www.fortinet.com
FortiMail
Version 3.0 MR4
FortiMail Install Guide Version 3.0 MR4 January 9, 2009
06-343-88550-20090109
© Copyright 2009 Fortinet, Inc. All rights reserved. No part of this publication including text, examples, diagrams or illustrations may be reproduced, transmitted, or translated in any form or by any means, electronic, mechanical, manual, optical or otherwise, for any purpose, without prior written permission of Fortinet, Inc.
Trademarks
Dynamic Threat Prevention System (DTPS), APSecure, FortiASIC, FortiBIOS, FortiBridge, FortiClient, FortiGate®, FortiGate Unified Threat Management System, FortiGuard®, FortiGuard-Antispam, FortiGuard-Antivirus, FortiGuard-Intrusion, FortiGuard-Web, FortiLog, FortiAnalyzer, FortiManager, Fortinet®, FortiOS, FortiPartner, FortiProtect, FortiReporter, FortiResponse, FortiShield, FortiVoIP, and FortiWiFi are trademarks of Fortinet, Inc. in the United States and/or other countries. The names of actual companies and products mentioned herein may be the trademarks of their respective owners.
Regulatory compliance FCC Class A Part 15 CSA/CUS
Contents
Contents
Introduction ... 7
Registering your FortiMail unit... 7
Customer service and technical support ... 7
About FortiMail units... 8
FortiMail-100 ... 8
FortiMail-400 ... 8
FortiMail-2000A ... 8
FortiMail-4000A ... 8
About this document... 9
Document conventions... 9
FortiMail documentation ... 10
Comments on FortiMail technical documentation ... 11
Key concepts... 13
Email protocols... 13 SMTP ... 13 POP3... 14 IMAP ... 14 HTTP and HTTPS ... 14 Client-server connections in SMTP ... 15 MTA... 15 MUA ... 15Incoming vs. outgoing directionality ... 15
The role of DNS in email delivery... 16
MX record... 17
A record... 18
Reverse DNS record ... 18
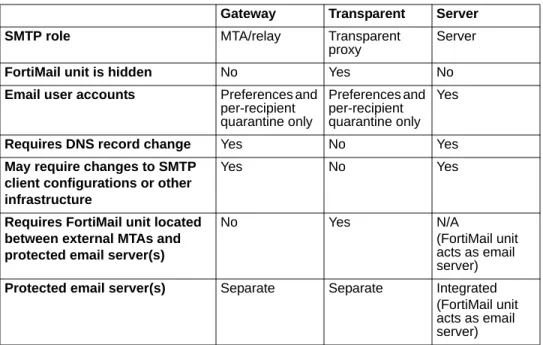
FortiMail web-based manager modes... 19
FortiMail operation modes... 19
FortiMail high availability modes ... 20
Physical installation... 21
Environmental specifications... 21
Cautions and warnings ... 21
Grounding ... 21
Rack mount instructions ... 22
Mounting the FortiMail unit... 22
FortiMail-100 ... 22
FortiMail-400 ... 22
Contents
Powering on the FortiMail unit ... 26
FortiMail-100 ... 26
FortiMail-400 ... 26
FortiMail-2000A and FortiMail-4000A ... 27
Connecting to the network ... 27
Turning off the FortiMail unit... 27
Connecting to the FortiMail unit ... 28
Web-based manager ... 28
Command line interface ... 29
LCD front control buttons ... 29
Updating the firmware ... 31
Testing new firmware before installing it... 31
Installing firmware... 33
Installing backup firmware ... 35
Restoring firmware... 37
Choosing the operation mode ... 39
Characteristics of gateway mode ... 40
Characteristics of transparent mode... 40
Characteristics of server mode... 41
Configuring the operation mode... 42
Quick Start Wizard ... 45
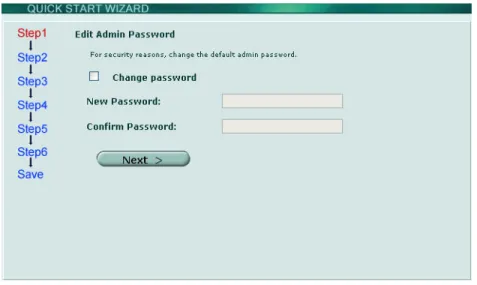
Step 1: Changing the “admin” password... 45
Step 2: Configuring the network settings and system time ... 46
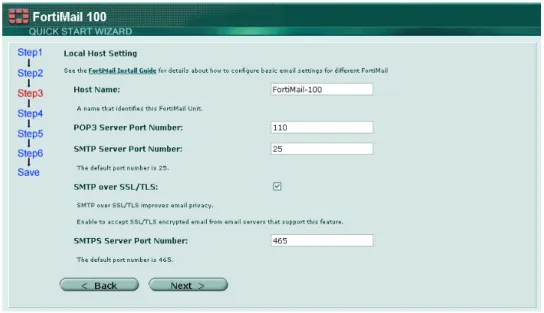
Step 3: Configuring local host settings... 48
Step 4: Adding protected domains ... 50
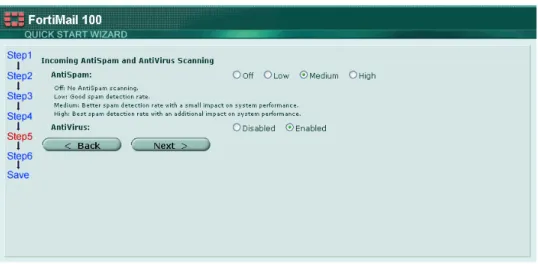
Step 5: Configuring incoming antispam and antivirus settings ... 53
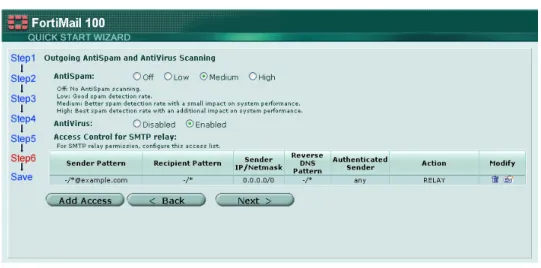
Step 6: Configuring access control rules and outgoing antispam and antivirus settings... 54
Step 7: Reviewing and saving the configuration... 57
Continuing the installation ... 58
Connecting to FortiGuard services... 59
Configuring scheduled updates... 62
Configuring push updates... 63
Contents
Gateway mode deployment... 67
Configuring DNS records... 67
Configuring DNS records for the protected domains ... 67
Configuring DNS records for the FortiMail unit itself ... 68
Configuring a private DNS server ... 70
Example 1: FortiMail unit behind a firewall ... 71
Configuring the firewall... 72
Configuring the MUAs ... 76
Testing the installation ... 77
Example 2: FortiMail unit in front of a firewall ... 77
Configuring the firewall... 78
Configuring the MUAs ... 83
Testing the installation ... 83
Example 3: FortiMail unit in DMZ ... 83
Configuring the firewall... 84
Configuring the MUAs ... 91
Testing the installation ... 91
Transparent mode deployment... 93
Configuring DNS records... 93
Configuring DNS records for the FortiMail unit itself ... 93
Configuring a private DNS server ... 95
Example 1: FortiMail unit in front of an email server ... 96
Configuring the protected domains ... 97
Configuring the proxies ... 98
Testing the installation ... 99
Example 2: FortiMail unit in front of an email hub ... 99
Configuring the protected domains ... 100
Configuring the proxies ... 102
Testing the installation ... 102
Server mode deployment ... 103
Configuring DNS records... 103
Configuring DNS records for protected domains ... 103
Configuring DNS records for the FortiMail unit itself ... 104
Configuring a private DNS server ... 106
Example 1: FortiMail unit behind a firewall ... 106
Configuring the firewall... 107
Configuring the email user accounts ... 111
Configuring the MUAs ... 111
Contents
Example 2: FortiMail unit in front of a firewall... 112
Configuring the firewall ... 113
Configuring the email user accounts... 115
Configuring the MUAs ... 115
Testing the installation ... 115
Example 3: FortiMail unit in DMZ ... 116
Configuring the firewall ... 117
Configuring the email user accounts... 121
Configuring the MUAs ... 122
Testing the installation ... 122
Testing the installation... 123
Troubleshooting tools... 125
Ping and traceroute... 125
Nslookup ... 126
Telnet connections to the SMTP port number ... 127
Log messages... 129
Greylist and sender reputation displays ... 130
Mail queues and quarantines ... 130
Packet capture ... 131
Introduction Registering your FortiMail unit
Introduction
Welcome, and thank you for selecting Fortinet products for your network protection.
The FortiMail Secure Messaging Platform is an integrated hardware and software solution that provides powerful and flexible antispam, antivirus, email archiving and logging capabilities to incoming and outgoing email traffic. The FortiMail unit has reliable and high performance features for detecting and blocking spam messages and malicious attachments.
Built on the Fortinet award winning FortiOS™ and FortiASIC™ technology, the FortiMail antivirus technology extends full content inspection capabilities to detect the most advanced email threats.
This document will assist you in physically connecting and performing required configuration to achieve a basic FortiMail installation.
Registering your FortiMail unit
Before you begin, take a moment to register your Fortinet product at the Fortinet Technical Support web site, https://support.fortinet.com.
Many Fortinet customer services, such as firmware updates, technical support, and FortiGuard Antivirus and other FortiGuard services, require product registration.
For more information, see the Fortinet Knowledge Center article Registration Frequently Asked Questions.
Customer service and technical support
Fortinet Technical Support provides services designed to make sure that your Fortinet products install quickly, configure easily, and operate reliably in your network.
To learn about the technical support services that Fortinet provides, visit the Fortinet Technical Support web site at https://support.fortinet.com.
You can dramatically improve the time that it takes to resolve your technical support ticket by providing your configuration file, a network diagram, and other specific information. For a list of required information, see the Fortinet Knowledge Center article What does Fortinet Technical Support require in order to best assist the customer?
About FortiMail units Introduction
About FortiMail units
The FortiMail family of appliances are designed for any business size and requirement, from a Small Business or Small Office Home Office (SOHO) to larger businesses, and deliver the same enterprise-class network-based antivirus and antispam features.
FortiMail is an email security system that provides multi-layered protection against blended threats comprised of spam, viruses, worms and spyware.
To ensure up-to-date email protection, FortiMail relies on FortiGuard™ Antivirus and FortiGuard Antispam security subscription services that are powered by a worldwide 24x7 Global Threat Research Team. FortiMail provides bidirectional email routing, virtualization and archiving capabilities with a lower total cost of ownership.
FortiMail-100
The FortiMail-100 is an easy-to-deploy and easy-to-administer solution that delivers exceptional value and performance for small office, home office and branch office applications. The FortiMail-100 delivers reliable and high performance features to detect, tag, and block spam messages and their malicious attachments.
FortiMail-400
The FortiMail-400 is optimized for medium sized enterprise customers, delivering a wealth of reliable and high performance features to detect, tag, and block spam messages and their malicious attachments. The FortiMail-400 features a
high-performance hardened operating system with RAID storage system for redundancy and supports a rich set of multi-layered spam detection and filtering technologies with global and per-user spam policies for maximum configuration flexibility.
FortiMail-2000A
For larger installations where higher performance and better reliability is required, the 2000A system provides the same software features as the FortiMail-400, but with a modular chassis with hot swappable components. Ideal for the most demanding email infrastructures, the FortiMail-2000A system delivers high performance for large enterprises and service providers, which includes the performance capability to scan 6.8 million emails per day, with six hot swappable disk drives with RAID for disk redundancy, and redundant power supplies and fans. Four 10/100/1000 Base-T interfaces, provides the flexibility to connect into many corporate or service provider environments.
FortiMail-4000A
For larger installations where higher performance and better reliability is required, the 4000A system provides the same software features as the FortiMail-2000A. Ideal for the most demanding email infrastructures, the FortiMail-4000A system delivers high performance for large enterprises and service providers, which includes the performance capability to scan 6.8 million emails per day, with 12 hot swappable disk drives with RAID for disk redundancy, and redundant power supplies. Two 10/100/1000 Base-T interfaces, provides the flexibility to connect into many corporate or service provider environments.
Introduction About this document
About this document
This document explains how to install and configure your FortiMail unit onto your network.
This document contains the following chapters:
• Key concepts – Describes the three modes you can select from to operate the FortiMail unit and briefly describes some email terminology for administrators and users new to email administration and setup.
• Physical installation – Describes setting up and powering on a FortiMail unit, as well as connecting to the web-based manager or CLI for the first time. • Updating the firmware – Describes how to test, install, and restore FortiMail
firmware.
• Choosing the operation mode – Describes how to choose and set the operation mode of the FortiMail unit.
• Quick Start Wizard – Describes how to use the Quick Start Wizard to complete basic first-time configuration.
• Connecting to FortiGuard services – Describes how to connect the FortiMail unit to the Fortinet Distribution Network (FDN) to obtain up-to-date spam and virus definitions, ensuring that your protection is current.
• Gateway mode deployment – Describes configuration required in addition to the Quick Start Wizard for example topologies when the FortiMail unit is operating in gateway mode.
• Transparent mode deployment – Describes configuration required in addition to the Quick Start Wizard for example topologies when the FortiMail unit is operating in transparent mode.
• Server mode deployment – Describes configuration required in addition to the Quick Start Wizard for example topologies when the FortiMail unit is operating in server mode.
• Testing the installation – Describes how to test the deployment of your FortiMail unit for configuration errors.
Document conventions
The following document conventions are used in this guide:
• In the examples, private IP addresses are used for both private and public IP addresses.
• Notes and Cautions are used to provide important information:
Note: Highlights useful additional information.
FortiMail documentation Introduction
Typographic conventions
FortiMail documentation uses the following typographical conventions:
FortiMail documentation
You can find FortiMail documentation from the following resources:
Online Help
• FortiMail online help
Provides a searchable version of the FortiMail Administration Guide in HTML format. You can access online help from the web-based manager as you work. • FortiMail webmail online help
Describes how to use the FortiMail web-based email client, including: how to send and receive email; how to add, import, and export addresses; how to configure message display preferences; and how to manage quarantined email. You can access online help when using FortiMail webmail.
Fortinet Documentation CD
All Fortinet documentation is available on the Fortinet Tools and Documentation CD shipped with your Fortinet product. The documents on this CD are current at shipping time. The CD contains the following documents:
• FortiMailQuickStart Guide
Provides basic information about connecting and installing a FortiMail unit. A separate guide is available for each FortiMail model.
• FortiMail Install Guide
Describes how to set up the FortiMail unit in transparent, gateway, or server mode.
• FortiMail Administration Guide
This document. Introduces the product and describes how to configure and manage a FortiMail unit, including how to create profiles and policies, configure antispam and antivirus filters, create user accounts, configure email archiving, and set up logging and reporting.
• FortiMail CLI Reference
Describes how to use the FortiMail CLI and contains a reference of all FortiMail CLI commands.
Convention Example
Keyboard input In the Host Name field, type a name for the remote server (for example, Central_Office_1).
CLI command syntax execute restore image <name_str> <tftp_ipv4> Document names FortiMail Administration Guide
Menu commands Go to Mail Settings > Domains and select Create New. Program output Welcome!
Introduction FortiMail documentation
Fortinet Documentation Web Site
Go to http://docs.fortinet.com to get up-to-date FortiMail documentation.
Fortinet Knowledge Center
Go to http://kc.fortinet.com to find more FortiMail related documents: • FortiMail Log Message Reference
Describes the structure of FortiMail log messages and provides information about the log messages that are generated by FortiMail units.
• Other troubleshooting and how-to articles, FAQs, technical notes, and more.
Comments on FortiMail technical documentation
Please send information about any errors or omissions in this or any FortiMail technical documentation to [email protected].
Key concepts Email protocols
Key concepts
This chapter defines basic email and FortiMail concepts and terms.
If you are new to FortiMail units, or new to email systems, this chapter can help you to quickly understand this document and your FortiMail unit.
This chapter contains the following sections: • Email protocols
• Client-server connections in SMTP • The role of DNS in email delivery • FortiMail web-based manager modes • FortiMail operation modes
• FortiMail high availability modes
Email protocols
There are multiple prevalent standard email protocols.
SMTP
Simple Mail Transfer Protocol (SMTP) is the standard protocol for sending email between:
• two mail transfer agents (MTA) • a mail user agent (MUA) and an MTA
SMTP communications typically occur on TCP port number 25.
When an email user sends an email, their MUA uses SMTP to send the email to an MTA, which is often their email server. The MTA then uses SMTP to directly or indirectly deliver the email to the destination email server that hosts email for the recipient email user.
When an MTA connects to the destination email server, it determines whether the recipient exists on the destination email server. If the recipient email address is legitimate, then the MTA delivers the email to the email server, from which email users can then use a protocol such as POP3 or IMAP to retrieve the email. If the recipient email address does not exist, the MTA typically sends a separate email message to the sender, notifying them of delivery failure.
While the basic protocol of SMTP is simple, many SMTP servers support a number of protocol extensions for features such as authentication, encryption, multipart messages and attachments, and may be referred to as extended SMTP (ESMTP) servers.
FortiMail units can scan SMTP traffic for spam and viruses, and support several SMTP extensions. For details, see the Fortinet Knowledge Center article Supported SMTP-related RFCs.
Note: For definitions of MTA and MUA, see “Client-server connections in SMTP” on page 15.
Email protocols Key concepts
POP3
Post Office Protocol version 3 (POP3) is a standard protocol used by email clients to retrieve email that has been delivered to and stored on an email server.
POP3 communications typically occur on TCP port number 110.
Unlike IMAP, after a POP3 client downloads an email to the email user’s
computer, a copy of the email usually does not remain on the email server’s hard disk. The advantage of this is that it frees hard disk space on the server. The disadvantage of this is that downloaded email usually resides on only one personal computer. Unless all of their POP3 clients are always configured to leave copies of email on the server, email users who use multiple computers to view email, such as both a desktop and laptop, will not be able to view from one computer any of the email previously downloaded to another computer.
FortiMail units do not scan POP3 traffic for spam and viruses, but may use POP3 when operating in server mode, when an email user retrieves their email. For more information on server mode, see “FortiMail operation modes” on page 19.
IMAP
Internet Message Access Protocol (IMAP) is a standard protocol used by email clients to retrieve email that has been delivered to and stored on an email server. IMAP communications typically occur on TCP port number 143.
Unless configured for offline availability, IMAP clients typically initially download only the message header. They download the message body and attachments only when the email user selects to read the email.
Unlike POP3, when an IMAP client downloads an email to the email user’s computer, a copy of the email remains on the email server’s hard disk. The advantage of this is that it enables email users to view email from more than one computer. This is especially useful in situations where more than one person may need to view an inbox, such where all members of a department monitor a collective inbox. The disadvantage of this is that, unless email users delete email, IMAP may more rapidly consume the server’s hard disk space.
FortiMail units do not scan IMAP traffic for spam and viruses, but may use IMAP when operating in server mode, when an email user retrieves their email. For more information on server mode, see “FortiMail operation modes” on page 19.
HTTP and HTTPS
Secured and non-secured HyperText Transfer Protocols (HTTP/HTTPS), while not strictly for the transport of email, are often used by webmail applications to view email that is stored remotely.
HTTP communications typically occur on TCP port number 80; HTTPS communications typically occur on TCP port number 443.
FortiMail units do not scan HTTP or HTTPS traffic for spam or viruses, but use them to display quarantines and, if the FortiMail unit is operating in server mode, FortiMail webmail. For more information on server mode, see “FortiMail operation modes” on page 19.
Key concepts Client-server connections in SMTP
Client-server connections in SMTP
Client-server connections and connection directionality in SMTP differ from how you may be familiar with them in other protocols.
For example, in the SMTP protocol, an SMTP client connects to an SMTP server. This seems consistent with the traditional client-server model of communications. However, due to the notion of relay in SMTP, the SMTP client may be either: • an email application on a user’s personal computer
• another SMTP server that acts as a delivery agent for the email user, relaying the email to its destination email server
The placement of clients and servers within your network topology may affect the operation mode you choose when installing a FortiMail unit. If your FortiMail unit will be operating in gateway mode or server mode, SMTP clients — including SMTP servers connecting as clients — must be configured to connect to the FortiMail unit.
Terms such as MTA and MUA describe server and client relationships specific to email protocols.
MTA
A Mail Transfer Agent (MTA) is an SMTP server that relays email messages to another SMTP server.
FortiMail units operating in gateway mode function as an MTA. FortiMail units operating in server mode function as an MTA and full (SMTP, IMAP, POP3, webmail) email server.
In order to deliver email, unless the email is incoming and the email server has no domain name and is accessed by IP address only, MTAs must query a DNS server for the MX record and the corresponding A record. For more information, see “The role of DNS in email delivery” on page 16.
MUA
A Mail User Agent (MUA), or email client, is software such as Microsoft Outlook that enables users to send and receive email.
FortiMail units support SMTP connections for sending of email by a MUA.
FortiMail units operating in server mode support POP3 and IMAP connections for retrieval of email by a MUA. For email users that prefer to use their web browsers to send and retrieve email instead of a traditional MUA, FortiMail units operating in server mode also provide FortiMail webmail.
Incoming vs. outgoing directionality
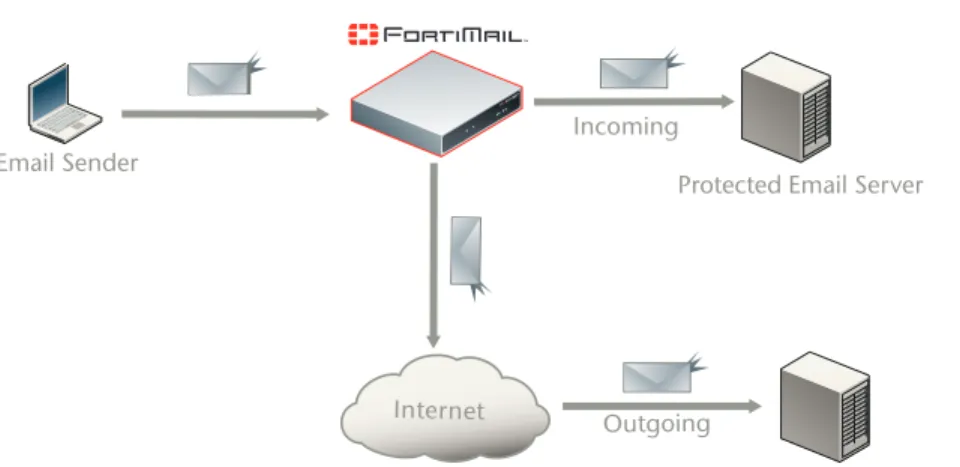
Many FortiMail features such as proxies and policies act upon the directionality of an SMTP connection or email message. Rather than being based upon origin, incoming or outgoing directionality is determined by whether the destination is a protected domain.
Note: For more information on gateway mode and server mode, see “FortiMail operation modes” on page 19.
The role of DNS in email delivery Key concepts
Incoming connections consist of those destined for the SMTP servers that are protected domains of the FortiMail unit. For example, if the FortiMail unit is configured to protect the SMTP server whose IP address is 10.1.1.1, the FortiMail unit treats all SMTP connections destined for 10.1.1.1 as incoming.
Outgoing connections consist of those destined for SMTP servers that the FortiMail unit has not been configured to protect. For example, if the FortiMail unit is not configured to protect the SMTP server whose IP address is 192.168.1.1, all SMTP connections destined for 192.168.1.1 will be treated as outgoing,
regardless of their origin.
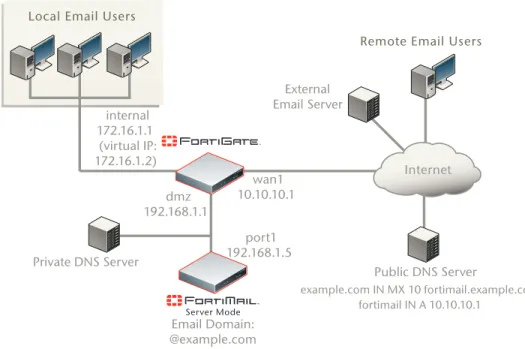
For example, in the following sample diagram, an email user configures their mail user agent (MUA) such as Microsoft Outlook to send email using 10.1.1.1, an SMTP server that has been configured as a protected domain on the FortiMail unit. Because 10.1.1.1 is the SMTP server for a protected domain, all SMTP connections from the MUA to 10.1.1.1 will be considered incoming. However, when 10.1.1.1 relays the email message to SMTP servers that have not been configured as protected domains on the FortiMail unit, those SMTP connections are outgoing.
If the email user configures their MUA to send email using the unprotected SMTP server 192.168.1.1, the MUA never connects to the IP address associated with a protected domain, and therefore all the SMTP connections from this email user will be outgoing.
Figure 1: Incoming vs. outgoing SMTP connections
Similarly to when determining the directionality of an SMTP connection, when determining the directionality of an email message, FortiMail units examine the domain to which the recipient belongs: if the domain to which the recipient email address belongs is a protected domain, the email message is considered to be incoming; if the domain to which the recipient email address belongs is not a protected domain, the email message is considered to be outgoing.
The role of DNS in email delivery
SMTP can be configured to operate without DNS, using IP addresses instead of domain names for SMTP clients, SMTP servers, and recipient email addresses. However, this configuration is rare.
Email Sender
Internet
Unprotected Email Server Protected Email Server Incoming
Key concepts The role of DNS in email delivery
SMTP as it is typically used relies upon DNS to determine the mail gateway server for a domain name, and to resolve domain names into IP addresses. As such, you usually must configure email servers and FortiMail units to be able to query a DNS server.
In addition, you may also be required to configure the DNS server with an MX record, an A record, and a reverse DNS record for protected domain names and for the domain name of the FortiMail unit itself.
MX record
Mail Exchanger (MX) records are configured on a DNS server. MX records for a domain name indicate designated email servers or email gateways that deliver email to that domain, and their order of preference. In their most simple form, MX records use the following format:
example.com IN MX 10 mail.example.com
where:
• example.com is the name of the domain
• IN indicates the Internet protocol class
• MX indicates that the DNS resource record is of the MX type
• 10 indicates the order of preference (greater values indicate lower preference)
• mail.example.com is the host name of an email server or gateway
When an email client sends an email, the sender’s MTA queries a DNS server for the MX record of the domain name in the recipient’s email address. To resolve the host name of the MTA referenced by the MX record, it then queries for the A record of the destination MTA. That A record provides the IP address of the email server or gateway. The sender’s MTA then attempts to deliver the email to that IP address.
For example, if the recipient email address is [email protected], in order to deliver the email, the sender’s MTA would query the MX and A records to determine the IP address of the email gateway of example.com.
Often, the domain name and/or IP address of the email domain is different from that of its email server or gateway. The fully qualified domain name (FQDN) of an email server or gateway may be a subdomain or another domain name entirely, such as that of the MTA of an Internet service provider (ISP). For example, the email gateways for the email domain example.com could be mail1.example.com and mail2.example.com, or mail.isp.example.net.
If your FortiMail unit will operate in transparent mode, no MX record changes are required.
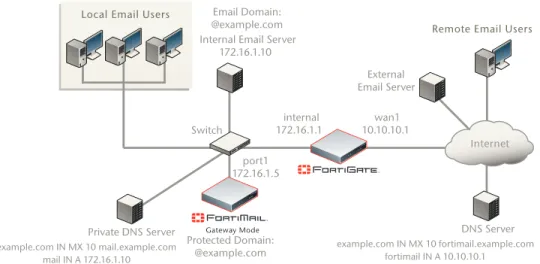
If your FortiMail unit will operate in gateway mode or server mode, you must configure the public DNS server for your domain name with an MX record that refers to the FortiMail unit which will operate as the email gateway, such as:
The role of DNS in email delivery Key concepts
Exceptions include if you are configuring a private DNS server for use with the “Use MX Record” option (see “Use MX Record” on page 52). In that case, rather than referencing the FortiMail unit as the mail gateway and being used by external SMTP servers to route mail, the MX record references the protected SMTP server and is used by the FortiMail unit to define the SMTP servers for the protected domain.
A record
A records are configured on a DNS server. A records indicate the IP address to which a host name resolves. In their most simple form, A records use the following format:
mail IN A 192.168.1.10
where:
• mail is the name of the host
• IN indicates the Internet protocol class
• A indicates that the DNS resource record is of the IPv4 address type
• 192.168.1.10 indicates the IP address that hosts the domain name
When an email client sends an email, the sender’s MTA queries a DNS server for the MX record of the domain name in the recipient’s email address. To resolve the host name of the MTA referenced by the MX record, it then queries for the A record of the destination MTA. That A record provides the IP address of the email server or gateway. The sender’s MTA then attempts to deliver the email to that IP address.
You must configure the public DNS server for your host names with an A record to resolve the host names referenced in MX records, and the host name of the FortiMail unit, if any. For example, if an MX record is:
example.com IN MX 10 fortimail.example.com
the required A record in the example.com zone file might be:
fortimail IN A 192.168.1.15
Reverse DNS record
Because the SMTP protocol does not strictly require SMTP clients to use their own domain name during the SMTP greeting, it is possible to spoof the origin domain. In an attempt to bypass antispam measures against domain names known to be associated with spam, spammers often exploit that aspect of SMTP by pretending to send email from legitimate domains.
!
Caution: MX record to refer to the FortiMail unit, and remove other MX records. If you do not If your FortiMail unit will operate in gateway mode or server mode, configure the configure the MX record to refer to the FortiMail unit, or if other MX records exist that do not refer to the FortiMail unit, external MTAs may not be able to deliver email to or through the FortiMail unit, or may be able to bypass the FortiMail unit. If you have configured secondary MX records for failover reasons, consider configuring FortiMail high availability (HA) instead. For details, see “FortiMail high availability modes” on page 20.Note: For more information on gateway mode and server mode, see “FortiMail operation modes” on page 19.
Key concepts FortiMail web-based manager modes
For example, the spammer spam.example.com might initiate an SMTP session with the command:
EHLO nonspam.example.edu
To prevent this form of attack, many SMTP servers query reverse DNS records to verify that the domain name provided in the SMTP greeting genuinely matches the IP address of the connecting SMTP client.
You should configure the public DNS server for your protected domain names with a reverse DNS record to resolve the IP addresses of your protected SMTP servers and/or FortiMail unit into domain names.
For example, if the outgoing MTA for example.com is the FortiMail unit,
fortimail.example.com, and the public network IP address of the FortiMail unit is 10.10.10.1, a public DNS server’s reverse DNS zone file for the 10.10.10.0/24 subnet might contain:
1 IN PTR fortimail.example.com.
where fortimail.example.com is the FQDN of the FortiMail unit.
FortiMail web-based manager modes
The web-based manager has two modes: basic mode and advanced mode. • Basic mode: Provides easy navigation using a simplified set of menu options
that allow for many typical FortiMail unit configurations, and includes the Quick Start Wizard.
• Advanced mode: Provides the full set of menu options which allows you to achieve more complex configurations, but does not include the Quick Start Wizard.
Unless otherwise specified, this document describes setup of the FortiMail unit using the basic mode of the web-based manager.
For more information on basic mode, advanced mode, the Quick Start Wizard, or configuring your FortiMail unit using either mode of the web-based manager, see the FortiMail Administration Guide.
FortiMail operation modes
FortiMail units can run in one of three operation modes: gateway mode, transparent mode, and server mode.
• Gateway mode: The FortiMail unit acts as a mail transfer agent (MTA), or email gateway, relaying email to and from the email servers that it protects. It does not locally store email unless queued or quarantined.
• Transparent mode: The FortiMail unit transparently proxies email traffic to and from the email servers that it protects. It does not locally store email unless queued or quarantined.
• Server mode: The FortiMail unit operates as a stand-alone email server and MTA. The FortiMail unit locally stores email for delivery to its email users. Email users can access their email using FortiMail webmail, POP3, or IMAP.
FortiMail high availability modes Key concepts
All operation modes can scan email traffic for viruses and spam, and can quarantine suspicious email and attachments.
For more information on the differences between operation modes and
configuring the operation mode, see “Choosing the operation mode” on page 39.
FortiMail high availability modes
FortiMail units can be configured to operate in high availability (HA) clusters. FortiMail HA has two modes: active-passive and config-only.
• Active-passive HA: Two FortiMail units operate as an HA cluster, synchronizing both configuration and data, providing failover protection. • Config-only HA: Up to 25 FortiMail units use an identical configuration, but do
not synchronize data, and therefore operate as independent FortiMail units. Fortinet recommends HA to achieve uninterrupted service.
Physical installation Environmental specifications
Physical installation
This chapter provides information on mounting and connecting the FortiMail unit to your network. This chapter includes the following topics:
• Environmental specifications • Cautions and warnings • Mounting the FortiMail unit • Powering on the FortiMail unit • Turning off the FortiMail unit • Connecting to the FortiMail unit
Environmental specifications
• Operating temperature: 32 to 104°F (0 to 40°C)
If you install the FortiMail unit in a closed or multi-unit rack assembly, the operating ambient temperature of the rack environment may be greater than room ambient temperature. Therefore, make sure to install the equipment in an environment compatible with the manufacturer's maximum rated ambient temperature.
• Storage temperature: -13 to 158°F (-25 to 70°C) • Humidity: 5 to 90% non-condensing
• Air flow: For rack installation, make sure that the amount of air flow required for safe operation of the equipment is not compromised.
For free-standing installation, make sure that the FortiMail unit has sufficient clearance on each side to allow for adequate air flow and cooling.
Cautions and warnings
Review the following cautions before installing your FortiMail unit.
Grounding
• Ensure the FortiMail unit is connected and properly grounded to a lightning and surge protector. WAN or LAN connections that enter the premises from outside the building should be connected to an Ethernet CAT5 (10/100 Mb/s) surge protector.
• Shielded Twisted Pair (STP) Ethernet cables should be used whenever possible rather than Unshielded Twisted Pair (UTP).
• Do not connect or disconnect cables during lightning activity to avoid damage to the FortiMail unit or personal injury.
Mounting the FortiMail unit Physical installation
Rack mount instructions
Elevated Operating Ambient - If installed in a closed or multi-unit rack assembly, the operating ambient temperature of the rack environment may be greater than room ambient temperature. Therefore, consideration should be given to installing the equipment in an environment compatible with the maximum ambient
temperature (Tma) specified by the manufacturer.
Reduced Air Flow - Installation of the equipment in a rack should be such that the amount of air flow required for safe operation of the equipment is not
compromised.
Mechanical Loading - Mounting of the equipment in the rack should be such that a hazardous condition is not achieved due to uneven mechanical loading.
Circuit Overloading - Consideration should be given to the connection of the equipment to the supply circuit and the effect that overloading of the circuits might have on overcurrent protection and supply wiring. Appropriate consideration of equipment nameplate ratings should be used when addressing this concern. Reliable Earthing - Reliable earthing of rack-mounted equipment should be maintained.
Particular attention should be given to supply connections other than direct connections to the branch circuit (e.g. use of power strips).
If required to fit into a rack unit, remove the rubber feet from the bottom of the FortiMail unit.
Mounting the FortiMail unit
FortiMail-100
Adhere the rubber feet included in the package to the underside of the FortiMail unit, near the corners of the unit if not already attached.
Place the FortiMail unit on any flat, stable surface. Ensure the FortiMail unit has sufficient clearance on each side to ensure adequate airflow for cooling.
If you remove the rubber feet, you can alternatively mount the FortiMail unit in a 2U-tall space in any standard 19-inch rack unit.
FortiMail-400
The FortiMail unit can be placed on any flat surface, or mounted in a standard 19-inch rack unit.
When placing the FortiMail unit on any flat, stable surface, ensure the FortiMail unit has sufficient clearance on each side to ensure adequate airflow for cooling. For rack mounting, use the mounting brackets and screws included with the FortiMail unit.
Physical installation Mounting the FortiMail unit
To install the FortiMail unit into a rack
1 Attach the mounting brackets to the side to the unit so that the brackets are on the front portion of the FortiMail unit.
The following photos illustrate how the brackets should be mounted. Note that the screw configuration may vary.
Figure 2: Installed mounting brackets
2 Position the FortiMail unit in the rack to allow for sufficient air flow.
3 Line up the mounting bracket holes to the holes on the rack, ensuring the FortiMail unit is level.
4 Finger tighten the screws to attach the FortiMail unit to the rack.
5 Once you verify the spacing of the FortiMail unit and that it is level, tighten the screws with a screwdriver.
Figure 3: Mounting in a rack
FortiMail-2000A and FortiMail-4000A
To mount the FortiMail unit on a 19-inch rack or cabinet, use the slide rails included with the product.
Mounting the FortiMail unit Physical installation
Mounting requires three steps:
• disassembling the slide rail from the slide housing • attaching the slide rail to the sides of the FortiMail unit • mounting the FortiMail unit to the rack or cabinet.
Disassembling the slide rail
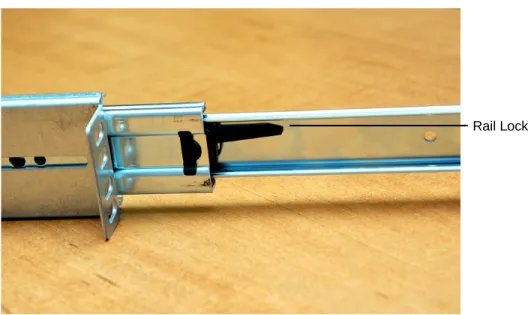
The slide rail assembly has two moving rails within the housing. You need to remove the innermost rail. This rail will attach to the sides of the FortiMail unit. Figure 4: FortiMail side rail
To remove the side rail
1 Open the slide rails package and remove the rails. 2 Extend the slide rail and locate the slide rail lock.
Rail housing Sliding Rail
Physical installation Mounting the FortiMail unit
3 Push down on the lock while pulling the rail completely out of the slide rail assembly.
4 Repeat these steps for the other slide rail assembly. You will attach this part to the side of the FortiMail unit.
Attaching the slide rail to the FortiMail unit
Attach the disconnected slide rails from the previous step to the sides of the FortiMail unit. Use the screws provided with the slide rail package, being sure to securely fasten the rail to the FortiMail chassis.
Mounting the FortiMail unit
Mounting the FortiMail-2000A or FortiMail-4000A is a two step process. First, you must attached the slide rail housing to the rack or cabinet, then insert the FortiMail unit.
Powering on the FortiMail unit Physical installation
To mount the FortiMail unit
1 Mount the slide rail housing to the rack or cabinet frame. Adjust the outside L-shaped brackets for a proper fit. Ensure that both housings are on the same level to ensure the FortiMail unit can easily glide into place and is level. 2 Use the screws and additional L-brackets if required to securely fasten the
housing.
3 Position the FortiMail unit so that the back of the unit is facing the rack, and the slide rails affixed in the previous step line up with the slide rail housing.
4 Gently push the FortiMail unit into the rack or cabinet. You will hear a click when the slide rail lock has been engaged.
5 Push the FortiMail unit until it is fully inserted into the rack.
Powering on the FortiMail unit
FortiMail-100
The FortiMail-100 does not have a power switch. To power on the FortiMail unit
1 Connect the AC adapter to the power connection at the back of the FortiMail unit. 2 Connect the AC adapter to the power cable.
3 Connect the power cable to a power outlet.
The FortiMail unit starts and the Power and Status LEDs light up. The Status LEDs flash while the FortiMail unit starts up, and remain lit when the system is running.
FortiMail-400
Use the following steps to connect the power supply to the FortiMail unit. To power on the FortiMail unit
1 Ensure the power switch, located at the back of the FortiMail unit is in the off position, indicated by the “O”.
2 Connect the power cord at the back of the FortiMail unit. 3 Connect the power cable to a power outlet.
4 Set the power switch on the back left of the FortiMail unit to the on position indicated by the “I”.
After a few seconds, SYSTEM STARTING appears on the LCD. The main menu setting appears on the LCD when the system is running.
Physical installation Turning off the FortiMail unit
FortiMail-2000A and FortiMail-4000A
The FortiMail unit does not have an on/off switch. To power on the FortiMail unit
1 Connect the two power cables to the power connections on the back of the FortiMail unit.
2 Connect the two power cables to power outlets.
Each power cable should be connected to a different power source. If one power source fails, the other may still be operative.
After a few seconds, SYSTEM STARTING appears on the LCD. The main menu setting appears on the LCD when the system is running.
The FortiMail unit starts and the Power and Status LEDs light up. The Status LEDs flash while the FortiMail unit starts up, and remain lit when the system is running.
Connecting to the network
Until the FortiMail unit is configured with an IP address and other settings in the Quick Start Wizard required to connect to your network, you may prefer to connect the FortiMail unit directly to your management computer, or through a switch, in a peer network that is isolated from your overall network. However, isolation is not required.
Using the supplied Ethernet cable, connect one end of the cable to port 1 on the FortiMail unit; connect the other end of the cable to the router, switch, or directly to your management computer.
Turning off the FortiMail unit
Always shut down the FortiMail unit properly before turning off the power switch to avoid potential hardware problems. This enables the hard drives to spin down and park correctly and avoid losing data.
To power off the FortiMail unit
1 From the web-based manager, go to Management > Status in the basic management mode, or System > Status in the advanced management mode. 2 In the System Command display, select Shutdown.
3 Turn off and/or Disconnect the power cables from the power supply.
Note: If only one power supply is connected, an audible alarm sounds to indicate a failed power supply. Press the red alarm cancel button on the rear panel next to the power supply to stop the alarm.
Note: If you will upgrade the FortiMail firmware and configure the FortiMail unit while it is isolated from your overall network, download the FortiMail firmware to your management computer before disconnecting it from your overall network. For details, see “Updating the firmware” on page 31.
Connecting to the FortiMail unit Physical installation
Connecting to the FortiMail unit
There are three methods of connecting and configuring fundamental settings such as IP addresses:
• the web-based manager
• the command line interface (CLI)
• the front control buttons and LCD (FortiMail-400 and FortiMail-2000A)
Web-based manager
You can configure and manage the FortiMail unit using HTTP or a secure HTTPS connection from any computer using a recent browser.
You can use the web-based manager to configure most FortiMail settings, and monitor the status of the FortiMail unit.
Use the following procedure to connect to the web-based manager for the first time. Configuration changes made with the web-based manager are effective immediately, without interrupting service.
To connect to the web-based manager, you require: • a computer with an Ethernet connection
• any recent version of most popular web browser
• a crossover Ethernet cable or an Ethernet hub with two Ethernet cables To connect to the web-based manager
1 Set the IP address of the computer with an Ethernet connection to the static IP address 192.168.1.2 with a netmask of 255.255.255.0.
2 Using the crossover cable or the Ethernet hub and cables, connect the internal interface of the FortiMail unit to the computer Ethernet connection.
3 Start the web browser and browse to the address https://192.168.1.99/admin. (remember to include the “s” in https://)
To support a secure HTTPS authentication method, the FortiMail unit ships with a self-signed security certificate, and is offered to remote clients whenever they initiate a HTTPS connection to the FortiMail unit. When you connect, the FortiMail unit displays two security warnings in the browser.
The first warning prompts you to accept and optionally install the FortiMail unit’s self-signed security certificate. If you do not accept the certificate, the FortiMail unit refuses the connection. If you accept the certificate, the FortiMail login page appears. The credentials entered are encrypted before they are sent to the FortiMail unit. If you choose to accept the certificate permanently, the warning is not displayed again.
Just before the FortiMail login page is displayed, a second warning informs you that the FortiMail certificate distinguished name differs from the original request. This warning occurs because the FortiMail unit redirects the connection. This is an informational message. Select OK to continue logging in.
Physical installation Connecting to the FortiMail unit
Command line interface
You can access the FortiMail command line interface (CLI) by connecting a management computer serial port to the FortiMail serial console connector. You can also use Telnet or an SSH connection to connect to the CLI from any network that is connected to the FortiMail unit, including the Internet.
As an alternative to the web-based manager, you can install and configure the FortiMail unit using the CLI. Configuration changes made with the CLI are effective immediately, without interrupting service.
To connect to the FortiMail CLI you require:
• a computer with an available communications port
• the DB-9 or RJ-45 to DB-9 cable included in your FortiMail package • terminal emulation software such as HyperTerminal for Microsoft Windows
To connect to the CLI
1 Connect the console cable to the communications port of your computer and to the FortiMail console port.
2 Start HyperTerminal, enter a name for the connection and select OK.
3 Configure HyperTerminal to connect directly to the communications (COM) port on your computer and select OK.
4 Select the following port settings and select OK:
5 Press Enter to connect to the FortiMail CLI. The login prompt appears.
6 Type admin and press Enter twice.
The following prompt is displayed:
Welcome!
Type ? to list available commands. For information about how to use the CLI, see theFortiMail CLI Reference.
LCD front control buttons
You can use the front control buttons and LCD on the FortiMail-400 and
FortiMail-2000 to configure IP addresses, default gateways and switch operating modes. The LCD shows you what mode you are in without having to go to the command line interface or the web-based manager.
This configuration method provides an easy and fast method to configure your FortiMail unit. You can configure:
Note: The following procedure uses Microsoft Windows HyperTerminal software. You can apply these steps to any terminal emulation program.
Bits per second 9600
Data bits 8
Parity None
Stop bits 1
Connecting to the FortiMail unit Physical installation
• default gateways • operating modes
• restore factory default settings
The front control buttons control how you enter and exit the different menus when configuring the different ports and interfaces. The front control buttons also enables you to increase or decrease each number for configuring IP addresses, default gateway addresses, or netmasks. The following table defines each button and what it does when configuring the basic settings of your FortiMail unit. Table 1: Front control button definitions
Enter Enables you to move forward through the configuration process. Esc Enables you to move backward, or exit out of the menu you are in.
Up Allows you to increase the number for an IP address, default gateway address or netmask.
Down Allows you to decrease the number for an IP address, default gateway address or netmask.
Updating the firmware Testing new firmware before installing it
Updating the firmware
Fortinet periodically releases FortiMail firmware updates to include enhancements and address issues. After you have registered your FortiMail unit, FortiMail firmware is available for download at http://support.fortinet.com.
Installing new firmware can introduce new features and overwrites antivirus and antispam packages using the versions of the packages that were current at the time that the firmware image was built. To avoid repeat configuration and updates, update the firmware before configuring the FortiMail unit and/or updating your FortiGuard Antivirus and FortiGuard Antispam packages.
For information specific to the firmware release version, see the Release Notes available with that release.
This chapter includes the following topics: • Testing new firmware before installing it • Installing firmware
• Installing backup firmware • Restoring firmware
Testing new firmware before installing it
You can test a new firmware image by temporarily running it from memory, without saving it to disk. By keeping your existing firmware on disk, if the evaluation fails, you do not have to re-install your previous firmware. Instead, you can quickly revert to your existing firmware by simply rebooting the FortiMail unit.
To test a new firmware image
1 Connect your management computer to the FortiMail console port using a RJ-45 to DB-9 serial cable or a null-modem cable.
2 Initiate a connection from your management computer to the CLI of the FortiMail unit.
For details, see “Command line interface” on page 29.
3 Connect port1 of the FortiMail unit directly or to the same subnet as a TFTP server.
4 Copy the new firmware image file to the root directory of the TFTP server. Note: In addition to major releases that contain new features, Fortinet releases patch releases that resolve specific issues without containing new features and/or changes to existing features. It is recommended to download and install patch releases as soon as they are available.
Testing new firmware before installing it Updating the firmware
5 Verify that the TFTP server is currently running, and that the FortiMail unit can reach the TFTP server.
To use the FortiMail CLI to verify connectivity, enter the following command:
execute ping 192.168.1.168
where 192.168.1.168 is the IP address of the TFTP server. 6 Enter the following command to restart the FortiMail unit:
execute reboot
7 As the FortiMail units starts, a series of system startup messages are displayed.
Press any key to display configuration menu...
8 Immediately press a key to interrupt the system startup.
If you successfully interrupt the startup process, the following messages appears:
[G]: Get firmware image from TFTP server. [F]: Format boot device.
[B]: Boot with backup firmware and set as default. [I]: Configuration and information.
[Q]: Quit menu and continue to boot with default firmware.
[H]: Display this list of options. Enter G,F,B,I,Q,or H:
9 Type G to get the firmware image from the TFTP server. The following message appears:
Enter TFTP server address [192.168.1.168]:
10 Type the IP address of the TFTP server and press Enter. The following message appears:
Enter Local Address [192.168.1.188]:
11 Type a temporary IP address that can be used by the FortiMail unit to connect to the TFTP server.
The following message appears:
Enter File Name [image.out]:
12 Type the firmware image file name and press Enter.
The FortiMail unit downloads the firmware image file from the TFTP server and displays a message similar to the following:
Save as Default firmware/Backup firmware/Run image without saving:[D/B/R]
13 Type R.
The FortiMail image is loaded into memory and uses the current configuration, without saving the new firmware image to disk.
14 To verify that the new firmware image has been loaded, log in to the CLI and type:
get system status
Note: You have only 3 seconds to press a key. If you do not press a key soon enough, the FortiMail unit reboots and you must log in and repeat the execute reboot command.
Updating the firmware Installing firmware
15 Test the new firmware image.
• If the new firmware image operates successfully, you can install it to disk, overwriting the existing firmware, using the procedure “Installing firmware” on page 33.
• If the new firmware image does not operate successfully, reboot the FortiMail unit to discard the temporary firmware and resume operation using the existing firmware.
Installing firmware
You can use either the web-based manager or the CLI to upgrade or downgrade the firmware of the FortiMail unit.
Administrators whose Domain is “system”, such as the “admin” administrator, can change the FortiMail firmware. Firmware changes are either:
• an upgrade to a newer version • a reversion to an earlier version
The firmware version number is used to determine if you are upgrading or reverting your firmware image. For example, if your current firmware version is
“FortiMail-400 3.00,build288,080327”, changing to “FortiMail-400
3.00,build266,071209”, an earlier build number and date, indicates you are
reverting.
To install firmware using the web-based manager
1 Log in to the Fortinet Technical Support web site, https://support.fortinet.com/. 2 Download the firmware image file to your management computer.
3 Log in to the web-based manager as the “admin” administrator, or an
administrator account that has system configuration read and write privileges. 4 In the advanced management mode, go to System > Status > Status.
If this menu option does not appear, first select Advanced >> to switch to the advanced mode of the web-based manager.
5 In the System Information area, in the Firmware Version row, select Update. 6 Select Browse to locate and select the firmware file that you want to install, then
select OK. 7 Select OK.
The FortiMail unit downloads the firmware image file from the TFTP server. The FortiMail unit installs the firmware and restarts. Time required varies by the size of the file and the speed of your network connection.
If you are downgrading the firmware to a previous version, the FortiMail unit reverts the configuration to default values for that version of the firmware. You must either reconfigure the FortiMail unit or restore the configuration file.
!
Caution: the IP addresses of network interfaces. For information on reconnecting to a FortiMail unit Reverting to an earlier firmware version could reset the configuration, including whose network interface configuration has been reset, see “Connecting to the FortiMail unit” on page 28.Installing firmware Updating the firmware
8 To verify that the firmware was successfully installed, log in to the web-based manager and go to System > Status > Status. Text appearing in the Firmware Version row indicates the currently installed firmware version.
To install firmware using the CLI
1 Log in to the Fortinet Technical Support web site, https://support.fortinet.com/. 2 Download the firmware image file to your management computer.
3 Connect your management computer to the FortiMail console port using a RJ-45 to DB-9 serial cable or a null-modem cable.
4 Initiate a connection from your management computer to the CLI of the FortiMail unit, and log in as the “admin” administrator, or an administrator account that has system configuration read and write privileges.
For details, see “Command line interface” on page 29.
5 Connect port1 of the FortiMail unit directly or to the same subnet as a TFTP server.
6 Copy the new firmware image file to the root directory of the TFTP server. 7 Verify that the TFTP server is currently running, and that the FortiMail unit can
reach the TFTP server.
To use the FortiMail CLI to verify connectivity, enter the following command:
execute ping 192.168.1.168
where 192.168.1.168 is the IP address of the TFTP server.
8 Enter the following command to download the firmware image from the TFTP server to the FortiMail unit:
execute restore image <name_str> <tftp_ipv4>
where <name_str> is the name of the firmware image file and <tftp_ipv4> is the IP address of the TFTP server. For example, if the firmware image file name is
image.out and the IP address of the TFTP server is 192.168.1.168, enter:
execute restore image.out 192.168.1.168
One of the following message appears:
This operation will replace the current firmware version! Do you want to continue? (y/n)
or:
Get image from tftp server OK. Check image OK.
This operation will downgrade the current firmware version! Do you want to continue? (y/n)
9 Type y.
The FortiMail unit downloads the firmware image file from the TFTP server. The FortiMail unit installs the firmware and restarts. Time required varies by the size of the file and the speed of your network connection.
If you are downgrading the firmware to a previous version, the FortiMail unit reverts the configuration to default values for that version of the firmware. You must either reconfigure the FortiMail unit or restore the configuration file.
Updating the firmware Installing backup firmware
10 To verify that the firmware was successfully installed, log in to the CLI and type:
get system status
11 Update the FortiGuard Antivirus definitions.
Installing backup firmware
You can install backup firmware which can be loaded if the primary firmware fails. To install backup firmware
1 Log in to the Fortinet Technical Support web site, https://support.fortinet.com/. 2 Download the firmware image file to your management computer.
3 Connect your management computer to the FortiMail console port using a RJ-45 to DB-9 serial cable or a null-modem cable.
4 Initiate a connection from your management computer to the CLI of the FortiMail unit, and log in as the “admin” administrator, or an administrator account that has system configuration read and write privileges.
For details, see “Command line interface” on page 29.
5 Connect port1 of the FortiMail unit directly or to the same subnet as a TFTP server.
6 Copy the new firmware image file to the root directory of the TFTP server. 7 Verify that the TFTP server is currently running, and that the FortiMail unit can
reach the TFTP server.
To use the FortiMail CLI to verify connectivity, enter the following command:
execute ping 192.168.1.168
where 192.168.1.168 is the IP address of the TFTP server. 8 Enter the following command to restart the FortiMail unit:
execute reboot
9 As the FortiMail units starts, a series of system startup messages are displayed.
Press any key to display configuration menu...
10 Immediately press a key to interrupt the system startup.
Note: Installing firmware replaces the current antivirus definitions with those included with the firmware release that you are installing. After you install the new firmware, make sure that your FortiGuard Antivirus definitions are up-to-date. For more information, see “Configuring scheduled updates” on page 62.
Note: You have only 3 seconds to press a key. If you do not press a key soon enough, the FortiMail unit reboots and you must log in and repeat the execute reboot command.
Installing backup firmware Updating the firmware
If you successfully interrupt the startup process, the following messages appears:
[G]: Get firmware image from TFTP server. [F]: Format boot device.
[B]: Boot with backup firmware and set as default. [I]: Configuration and information.
[Q]: Quit menu and continue to boot with default firmware.
[H]: Display this list of options. Enter G,F,B,I,Q,or H:
11 Type G to get the firmware image from the TFTP server. The following message appears:
Enter TFTP server address [192.168.1.168]:
12 Type the IP address of the TFTP server and press Enter. The following message appears:
Enter Local Address [192.168.1.188]:
13 Type a temporary IP address that can be used by the FortiMail unit to connect to the TFTP server.
The following message appears:
Enter File Name [image.out]:
14 Type the firmware image file name and press Enter.
The FortiMail unit downloads the firmware image file from the TFTP server and displays a message similar to the following:
Save as Default firmware/Backup firmware/Run image without saving:[D/B/R]
15 Type B.
The FortiMail unit saves the backup firmware image and restarts. When the FortiMail unit restarts, it is running the primary firmware.
To use backup firmware as the primary firmware
1 Connect your management computer to the FortiMail console port using a RJ-45 to DB-9 serial cable or a null-modem cable.
2 Initiate a connection from your management computer to the CLI of the FortiMail unit, and log in as the “admin” administrator, or an administrator account that has system configuration read and write privileges.
For details, see “Command line interface” on page 29. 3 Enter the following command to restart the FortiMail unit:
execute reboot
4 As the FortiMail units starts, a series of system startup messages are displayed.
Press any key to display configuration menu...
Immediately press a key to interrupt the system startup.
Note: You have only 3 seconds to press a key. If you do not press a key soon enough, the FortiMail unit reboots and you must log in and repeat the execute reboot command.
Updating the firmware Restoring firmware
If you successfully interrupt the startup process, the following messages appears:
[G]: Get firmware image from TFTP server. [F]: Format boot device.
[B]: Boot with backup firmware and set as default. [I]: Configuration and information.
[Q]: Quit menu and continue to boot with default firmware.
[H]: Display this list of options. Enter G,F,B,I,Q,or H:
5 Type B to reboot and use the backup firmware.
Restoring firmware
If you are unable to connect to the FortiMail unit using the web-based manager or the CLI, or if you want to install firmware without preserving any existing
configuration, you can restore the firmware.
To restore the firmware
1 Connect your management computer to the FortiMail console port using a RJ-45 to DB-9 serial cable or a null-modem cable.
2 Initiate a connection from your management computer to the CLI of the FortiMail unit, and log in as the “admin” administrator, or an administrator account that has system configuration read and write privileges.
For details, see “Command line interface” on page 29.
3 Connect port1 of the FortiMail unit directly or to the same subnet as a TFTP server.
4 Copy the new firmware image file to the root directory of the TFTP server. 5 Verify that the TFTP server is currently running, and that the FortiMail unit can
reach the TFTP server.
To use the FortiMail CLI to verify connectivity, enter the following command:
execute ping 192.168.1.168
where 192.168.1.168 is the IP address of the TFTP server. 6 Enter the following command to restart the FortiMail unit:
execute reboot