Release 6.0
The ownCloud developers
1 ownCloud 6.0 Admin Documentation 1 1.1 Introduction . . . 1 1.2 Installation . . . 1 1.3 Configuration. . . 2 1.4 Maintenance . . . 2 2 Installation 3 2.1 Appliances . . . 3 2.2 Linux Distributions. . . 3 2.3 Mac OS X . . . 4
2.4 Windows 7 and Windows Server 2008. . . 4
2.5 Univention Corporate Server. . . 10
2.6 Manual Installation. . . 17 2.7 PageKite Configuration . . . 26 2.8 Open Wrt . . . 26 3 Configuration 27 3.1 Apps Configuration . . . 27 3.2 User Management . . . 29
3.3 User Authentication with LDAP . . . 32
3.4 Background Jobs . . . 44
3.5 3rd-Party Configuration . . . 45
3.6 Automatic Configuration . . . 46
3.7 Custom Client Configuration. . . 48
3.8 Database Configuration . . . 48
3.9 Use Server-Side Encryption . . . 54
3.10 Knowledge Base Configuration . . . 54
3.11 Language Configuration . . . 55
3.12 Logging Configuration . . . 55
3.13 Mail Configuration . . . 56
3.14 Maintenance Mode Configuration . . . 61
3.15 Preview Configuration . . . 61
3.16 Reverse Proxy Configuration. . . 63
3.17 Uploading big files > 512MB (as set by default) . . . 64
3.18 Enabling uploading big files . . . 64
3.19 Custom Mount Configuration Web-GUI . . . 65
3.20 Custom Mount Configuration . . . 66
3.21 Custom User Backend Configuration . . . 72
4.2 Updating ownCloud . . . 78 4.3 Restoring ownCloud . . . 79 4.4 Migrating ownCloud Installations . . . 79
5 Issues 81
ONE
OWNCLOUD 6.0 ADMIN
DOCUMENTATION
1.1 Introduction
This is the administrators manual for ownCloud, a flexible, open source file sync and share solution. It comprises of the ownCloud server, as well as client applications for Microsoft Windows, Mac OS X and Linux (Desktop Client) and mobile clients for the Android and Apple iOS operating system.
1.1.1 Target audience
This guide is targeted towards people who want to install, administer and optimize ownCloud Server. If you want to learn how to use the Web UI, or how to install clients on the server, please refer to theUser Manualor theDesktop Client Manualrespectively.
1.1.2 Structure of this document
The next chapters describes how to set up ownCloud Server on different platforms and operating systems, as well as how to update existing installations.
Further chapters will then detail on integrating ownCloud into your existing environment, e.g. how to setup LDAP or how to mount your storage.
1.2 Installation
This chapter will introduce you to the installation of ownCloud in different scenarios.
If you want to just try ownCloud in a virtual machine without any configuration, check the sectionAppliances, where you will find ready-to-use images.
• Linux Distributions(recommended) • Windows 7 and Windows Server 2008 • Manual Installation
• PageKite Configuration • Univention Corporate Server
• Mac OS X(not supported) • Appliances
1.3 Configuration
This chapter covers ownCloud and web server configuration. • Apps Configuration
• User Management • Database Configuration • User Authentication with LDAP • Custom Mount Configuration Web-GUI • Custom Mount Configuration
• Background Jobs • Mail Configuration • Automatic Configuration • Use Server-Side Encryption
• Uploading big files > 512MB (as set by default) • Reverse Proxy Configuration
• Serving static files via web server • 3rd-Party Configuration
• Custom User Backend Configuration • Custom Client Configuration • Maintenance Mode Configuration • Knowledge Base Configuration • Logging Configuration • Language Configuration
1.4 Maintenance
This chapter covers maintenance tasks such as updating or migrating to a new version. • Migrating ownCloud Installations
TWO
INSTALLATION
2.1 Appliances
If you are looking for virtual machine images, check the Software Appliances section. The Hardware Appliances section is of interest for people seeking to run ownCloud on appliance hardware (i.e. NAS filers, routers, etc.).
2.1.1 Software Appliances
There are number of pre-made virtual machine-based appliances:
• SUSE Studio, ownCloud on openSuSE, runnable directly from an USB stick.
• Ubuntu charm, ownCloud
2.1.2 ownCloud on Hardware Appliances
These are tutorials provided by the user communities of the respective appliances:
• QNAP Guidefor QNAP NAS appliances
• OpenWrt Guidefor the popular embedded distribution for routers and NAS devices.
• Synology Packagefor Synology NAS products
Todo
Tutorials for running ownCloud on Dreamplug.
2.2 Linux Distributions
2.2.1 Supported Distribution Packages
Ready-to-use packages are available atopenSUSE Build Servicefor a variety of Linux distributions. If your distribution is not listed please followManual Installation.
Additional installation guides and notes
Fedora:Make sureSELinux is disabledor else the installation process might fail.
Archlinux:There are two AUR packages for ownCloud:stable versionanddevelopment version.
PCLinuxOS:Follow the TutorialownCloud, installation and setupon the PCLinuxOS web site.
2.3 Mac OS X
Note: Due to anissuewith Mac OS Unicode support, installing ownCloud Server 6.0 on Mac OS is currently not supported.
2.4 Windows 7 and Windows Server 2008
Note: You must move the data directory outside of your public root (See advanced install settings) This section describes how to install ownCloud on Windows with IIS (Internet Information Services).
It assumes that you have a vanilla, non-IIS enabled Windows machine – Windows 7 or Server 2008. After enabling IIS, the steps are essentially identical for Windows 7 and Windows Server 2008.
For installing ownCloud physical access or a remote desktop connection is required. You should leverage MySQL as the backend database for ownCloud. If you do not want to use MySQL, it is possible to use Postgres or SQLite instead. Microsoft SQL Server is not yet support.
Enabling SSL is not yet covered by this section.
Note: If you make your desktop machine or server available outside of your LAN, you must maintain it. Monitor the logs, manage the access, apply patches to avoid compromising the system at large.
There are 4 primary steps to the installation, and then a 5th step required for configuring everything to allow files larger than the default 2MB.
1. Install IIS with CGI support – enable IIS on your Windows machine. 2. Install PHP – Grab, download and install PHP.
3. Install MySQL – Setup the MySQL server manager and enable ownCloud to create an instance. 4. Install ownCloud – The whole reason we are here!
5. Configure upload sizes and timeouts to enable large file uploads – So that you can upload larger files.
2.4.1 Activate IIS with CGI Support
Windows 71. Go toStart –> Control Panel –> Programs.
3. There is a box labeled Internet Information Services, expand it. 4. Expand World Wide Web Services and all the folders underneath.
5. Select the folders as illustrated in the picture below to get your IIS server up and running.
You do not need an FTP server running, so you should tune that feature off for your server. You definitely need the IIS Management Console, as that is the easiest way to start, stop, restart you server, as well as where you change certificate options and manage items like file upload size. You must check the CGI box under Application Development Features, because CGI is how you enable PHP on IIS.
You have to turn off WebDAV publishing or the Windows WebDAV conflicts with the ownCloud WebDAV interface. This might already be turned off for you, just make sure it stays that way. The common HTTP features are the features you would expect from a web server. With the selections on this page, IIS will now serve up a web page for you. Restart IIS by going to the IIS manager (Start –> IIS Manager).
Select your website, and on the far right side is a section titledManage Server. Make sure that the service is started, or clickStartto start the services selected. Once this is complete, you should be able to go to a web browser and navigate tohttp://localhost.
This should open the standard IIS 7 splash page, which is just a static image that says your web server is running. Assuming you were able to get the splash page, it is safe to say your web server is now up and running.
Windows Server 2008
1. Go toStart –> Control Panel –> Programs.
2. Under Programs and Features, there is link titledTurn Windows Features on and Off. Click on it. 3. This will bring up the Server Manager.
4. In the server manager, Click on Roles, and then click Add Roles. 5. Use theAdd Roles Wizardto add the web server role.
6. Make sure that, at a minimum, the same boxes are checked in this wizard that are checked in the Windows 7 Section. For example, make sure that the CGI box is checked under Application Development Features, and that WebDAV Publishing is turned off. With Remote Desktop Sharing turned on, the detailed role service list looks like the figure “Role Services”.
7. Restart IIS by going to the IIS manager (Start –> IIS Manager).
8. Select your website, and on the far right side is a section titled Manage server. Make sure that the service is started, or click “Start” to start the services selected.
9. Once this is complete, you should be able to go to a web browser and typelocalhost. This should open the standard IIS 7 splash page, which is just a static image that says your web server is running.Assuming you were able to get the splash page, it is safe to say your web server is now up and running. The next part of this “how to” installs PHP on the server.
2.4.2 Installing PHP
This part is also straightforward, but it is necessary to remind you that this is for IIS only.
1. Go to the following link and grab thePHP installerfor version “VC9 Non Thread Safe” 32 or 64 bit based on your system.
2. Once through that login, select the location that is closest to you geographically.
3. Run that install wizard once it is downloaded. Read the license agreement, agree, select an install directory. 4. Then select IIS FastCGI as the install server.
5. Take the default selections for the items to install, and click next. Then clickinstall. 6. After a few minutes, PHP will be installed. On to MySQL.
2.4.3 Installing MySQL
This part installs MySQL on your Windows machine.
1. Point your browser tohttp://dev.mysql.com/downloads/and download the latest community edition for your OS – the 32 or 64 bit version. Please download theMSI Installeras it will make life easier.
2. Once downloaded, install MySQL (5.5 at the time of writing). Select the Typical installation.
3. When that finishes, check the box to launch the MySQL Instance Configuration Wizard and click Finish. 4. Select a standard configuration, as this will be the only version of MySQL on this machine.
5. Select to install as a windows service, and Check the Launch the MySQL Server Automatically button. 6. Select the modify security settings box on the next page, and enter a password you will remember. You will
need this password when you configure ownCloud.
7. Uncheckenableroot access from remote machines” for security reasons. 8. Click execute, and wait while the instance is created and launched. 9. Click Finish when this is all complete.
Take particular note of your MySQL password, as the user namerootand the password you select will be necessary later on in the ownCloud installation. As an aside, this link is an excellent resource for questions on how to configure your MySQL instance, and also to configure PHP to work with MySQL. This, however, is not strictly necessary as much of this is handled when you download ownCloud.
More information in this topic can be found in atutorial on the IIS web site.
2.4.4 Installing ownCloud
1. Download the latest version of ownCloud fromhttp://owncloud.org/download.
2. It will arrive as a tar.bz2 file, and I recommend something like jZip for a free utility to unzip it.
3. Once you have the ownCloud directory unzipped and saved locally, copy it into your wwwroot directory (prob-ablyC:\inetpub\wwwroot).
Note: You cannot install directly into the directorywwwrootfrom jzip, as only the administrator can unzip into the
wwwrootdirectory. If you save it in a different folder, and then move the files intowwwrootin windows explorer, it works. This will install ownCloud locally in your root web directory. You can use a subdirectory called owncloud, or whatever you want – the www root, or something else.
4. It is now time to give write access to the ownCloud directory to the ownCloud server: Navigate your win-dows explorer over toinetpub/wwwroot/owncloud (or your installation directory if you selected something different).
5. Right click and select properties. Click on the security tab, and click the button “to change permissions, click edit”.
6. Select the “users” user from the list, and check the box “write”. 7. Apply these settings and close out.
8. Now open your browser and go to http://localhost/owncloud (or localhost if it is installed in the root www directory). This should bring up the ownCloud configuration page.
9. At this page, you enter your desired ownCloud user name and password for the administrator, and expand the little arrow.
10. Select MySQL as the database, and enter your MySQL database user name, password and desired instance name – use the user name and password you setup for MySQL earlier in step 3, and pick any name for the database instance.
Note: The ownCloud admin password and the MySQL password CANNOT be the same in any way.
11. Click next, and ownCloud should have you logged in as the admin user, and you can get started exploring ownCloud, creating other users and more!
2.4.5 Ensure Proper HTTP-Verb handling
IIS must pass all HTTP and WebDAV verbs to the PHP/CGI handler, and must not try to handle them by itself. If it does, syncing with the Desktop and Mobile Clients will fail. Here is how to ensure your configuration is correct:
1. Open IIS Manager7.
2. In theConnectionsbar, pick your site below Sites, or choose the top level entry if you want to modify the machine-wide settings.
3. Choose theHandler Mappingsfeature clickPHP_via_fastCGI. 4. ChooseRequest Restrictionsand find theVerbstab.
5. EnsureAll Verbsis checked. 6. ClickOK.
7. Next, chooseRequest Filteringfeature from IIS Manager.
8. Ensure that all verbs are permitted (or none are forbidden) in theVerbstab.
Also, ensure that you did not enable the WebDAV authoring module, since ownCloud needs to be able to handle WebDAV on the application level.
2.4.6 Configuring ownCloud, PHP and IIS for Large File Uploads
Before going too nuts on ownCloud, it is important to do a couple of configuration changes to make this a useful service for you. You will probably want to increase themax upload size, for example. The default upload is set to
2MB, which is too small for even most MP3 files.
To do that, simply go into yourPHP.inifile, which can be found in yourC:\Program Files (x86)\PHPfolder. In here, you will find aPHP.inifile. Open this in a text editor, and look for a few key attributes to change:
• upload_max_filesize– change this to something good, like 1G, and you will get to upload much larger files. • post_max_size– also change this size, and make it larger than the max upload size you chose, like 1G. There are other changes you can make, such as the timeout duration for uploads, but for now you should be all set in thePHP.inifile.
Now you have to go back to IIS manager and make one last change to enable file uploads on the web server larger than 30MB.
1. Go to the start menu, and typeiis manager.
2. Open IIS Manager Select the website you want enable to accept large file uploads. 3. In the main window in the middle double click on the iconRequest filtering.
4. Once the window is opened you will see a bunch of tabs across the top of the far right, SelectEdit Feature Settingsand modify theMaximum allowed content length (bytes) 5. In here, you can change this to up to 4.1 GB.
Note: This entry is in BYTES, not KB.
You should now have ownCloud configured and ready for use.
2.5 Univention Corporate Server
Subscribers to the ownCloud Enterprise edition can also integrate with UCS (Univention Corporate Server).
2.5.1 Pre configuration
ownCloud makes use of the UCR, the Univention Configuration Registry. The values are being read during installation, most of them can be changed later, too. Changes done directly via ownCloud are not taken over to UCR. We think we found sane defaults, nevertheless you might have your own requirements. The installation script will listen to the UCR keys listed below. In case you want to override any default setting, simply add the key in question to the UCR and assign your required value.
Key Default Description Introduced
owncloud/directory/data /var/lib/owncloud Specifies where the file storage will be placed
2012.0.1
owncloud/db/name owncloud Name of the MySQL database.
ownCloud will create an own user for it.
2012.0.1
owncloud/user/quota (empty) The default quota, when a user is being added. Assign values in hu-man readable strings, e.g. “2 GB”. Unlimited if empty.
2012.0.1
owncloud/user/enabled 0 Wether a new user is allowed to use
ownCloud by default.
2012.0.1 owncloud/group/enabled 0 Wether a new group is allowed to be
used in ownCloud by default.
2012.4.0.4 owncloud/ldap/base/users cn=users,$ldap_base The users-subtree in the LDAP
di-rectory. If left blank it will fall back to the LDAP base.
2012.4.0.4
owncloud/ldap/base/groups cn=groups,$ldap_base The groups-subtree in the LDAP di-rectory. If left blank it will fall back to the LDAP base.
2012.4.0.4
Table 2.1 – continued from previous page
Key Default Description Introduced
owncloud/ldap/groupMemberAssoc uniqueMember The LDAP attribute showing the group-member relationship. Possi-ble values: uniqueMember, mem-berUid and member
2012.4.0.4
owncloud/ldap/tls 1 Whether to talk to the LDAP server
via TLS.
2012.0.1 owncloud/ldap/disableMainServer 0 Deactivates the (first) LDAP
Con-figuration
5.0.9
owncloud/ldap/cacheTTL 600 Lifetime of the ownCloud LDAP
Cache in seconds
5.0.9 owncloud/ldap/UUIDAttribute (empty) Attribute that provides a unique
value for each user and group entry. Empty value for autodetection.
5.0.9 owncloud/ldap/loginFilter (&(|(&(objectClass=posixAccount) (objectClass=shadowAccount)) (objectClass=univentionMail) jectClass=sambaSamAccount) (ob-jectClass=simpleSecurityObject) (&(objectClass=person) (ob-jectClass=organizationalPerson) (objectClass=inetOrgPerson))) (!(uidNumber=0)) (!(uid=*$)) (&(uid=%uid) (ownCloudEn-abled=1)))
The LDAP filter that shall be used when a user tries to log in.
2012.0.1 owncloud/ldap/userlistFilter (&(|(&(objectClass=posixAccount) (objectClass=shadowAccount)) (objectClass=univentionMail) jectClass=sambaSamAccount) (ob-jectClass=simpleSecurityObject) (&(objectClass=person) (ob-jectClass=organizationalPerson) (objectClass=inetOrgPerson))) (!(uidNumber=0))(!(uid=*$)) (&(ownCloudEnabled=1)))
The LDAP filter that shall be used when the user list is being retrieved (e.g. for sharing)
2012.0.1
owncloud/ldap/groupFilter (&(objectClass=posixGroup) (ownCloudEnabled=1))
The LDAP filter that shall be used when the group list is being re-trieved (e.g. for sharing)
2012.4.0.4
owncloud/ldap/internalNameAttribute uid Attribute that should be used to create the user’s owncloud internal name
5.0.9
owncloud/ldap/displayName uid The LDAP attribute that should be displayed as name in ownCloud
2012.0.1 owncloud/ldap/user/searchAttributes uid,givenName,sn,description,employeeNumber,mailPrimaryAddressAttributes taken into consideration
when searching for users (comma separated)
5.0.9
owncloud/ldap/user/quotaAttribute ownCloudQuota Name of the quota attribute. The default attribute is provided by owncloud-schema.
5.0.9
Table 2.1 – continued from previous page
Key Default Description Introduced
owncloud/ldap/user/homeAttribute (empty) Attribute that should be used to create the user’s owncloud internal home folder
5.0.9
owncloud/ldap/group/displayName cn The LDAP attribute that should be used as groupname in ownCloud
2012.4.0.4 owncloud/ldap/group/searchAttributes cn,description,
mailPrimaryAd-dress
Attributes taken into consideration when searching for groups (comma separated)
5.0.9
owncloud/join/users/update yes Wether ownCloud LDAP schema
should be applied to existing users
2012.0.1 owncloud/group/enableDomainUsers 1 Wether the group “Domain Users”
shall be enabled for ownCloud on install 2012.4.0.4 owncloud/join/users/filter (&(|(&(objectClass=posixAccount) (objectClass=shadowAccount)) (objectClass=univentionMail) jectClass=sambaSamAccount) (ob-jectClass=simpleSecurityObject) (&(objectClass=person) (ob-jectClass=organizationalPerson) (objectClass=inetOrgPerson))) (!(uidNumber=0)) (!(|(uid=*$) (uid=owncloudsystemuser) (uid=join-backup) (uid=join-slave))) (!(object-Class=ownCloudUser)))
Filters, on which LDAP users the ownCloud schema should be ap-plied to. The default excludes system users and already own-CloudUsers.
2012.0.1
owncloud/join/groups/filter (empty) Filters which LDAP groups will be en/disabled for own-Cloud when running the script /usr/share/owncloud/update-groups.sh
2012.4.0.4
If you want to override the default settings, simply create the key in question in the UCR and assign your required value, for example:
ucr set owncloud/user/enabled=1 or via UMC:
2.5.2 Installation
Now, we are ready to install ownCloud. This can be either done through the UCS App Center (recommended) or by downloading the packages.
UCS App Center
Open the Univention Management Console and choose the App Center module. You will see a variety of available applications, including ownCloud.
In the UCS App Center, you can also upgrade from ownCloud 4.5 by installing ownCloud 5.0. They are provided as separate apps. It is only possible to have one version of ownCloud installed.
Manually by download
Download the integration packagesfrom our websiteand install them from within your download folder (note: the package owncloud-unsupported is optional) via command line:
dpkg -i owncloud*.deb
ownCloud will be configured to fully work with LDAP.
Reinstallation
When ownCloud was installed before and uninstalled via AppCenter or via command line using apt-get remove, ownCloud can be simply installed again. The old configuration will be used again.
When an older ownCloud was installed and has been purged (only possible via command line using apt-get purge) the old configuration is gone, but data is left. This blocks an installation. You can either install the old version and upgrade to ownCloud 5 or (re)move the old data. This is done by removing the MySQL database “ownCloud” using the command line:
mysql -u root -e "DROP DATABASE owncloud" -p‘tail /etc/mysql.secret
In this case you probably also want to remove the data directory/var/lib/owncloudalthough this is not mandatory.
2.5.3 Postconfiguration (optional)
There is only one local admin user “owncloudadmin”, you can find his password in/etc/owncloudadmin.secret. Use this account, if you want to change basic ownCloud settings.
In the installation process a virtual host is set up (Apache is required therefore). If you want to modify the settings, edit /etc/apache2/sites-available/owncloudand restart the web server. You might want to do it to enable HTTPS connections. Besides that, you can edit the.htaccess-File in /var/www/owncloud/. In the latter file there are also the PHP limits for file transfer specified.
2.5.4 Using ownCloud
If you decided to enable every user by default to use ownCloud, simply open uphttp://myserver.com/owncloud/and log in with your LDAP credentials and enjoy.
If you did not, go to the UMC and enable the users who shall have access (see picture below). Then, login at
http://myserver.com/owncloud/with your LDAP credentials.
Updating users can also be done by the script/usr/share/owncloud/update-users.sh. It takes the fol-lowing UCR variables as parameters:owncloud/user/enabledfor enabling or disabling,owncloud/user/quotaas the Quota value andowncloud/join/users/filteras LDAP filter to select the users to update.
Groups 2012.4.0.4
Since ownCloud Enterprise 2012.4.0.4 group support is enabled. Groups, that are activated for ownCloud usage, can be used to share files to instead of single users, for example. It is also important to note, that users can only share within groups where they belong to. Groups can be enabled and disabled via UCM as shown in the screen shot below.
Another way to enable or disable groups is to use the script/usr/share/owncloud/update-groups.sh. Currently, it takes an argument which can be 1=enable groups or 0=disable groups. The filter applied is being taken from the UCR variableowncloud/join/groups/filter. In case it is empty, a message will be displayed.
2.6 Manual Installation
If you do not want to use packages, here is how you setup ownCloud on from scratch using a classic LAMP (Linux, Apache, MySQL, PHP) setup:
This document provides a complete walk-through for installing ownCloud on Ubuntu 12.04 LTS Server with Apache and MySQL. It also provides guidelines for installing it on other distributions, webservers and database systems.
2.6.1 Prerequisites
Note: This tutorial assumes you have terminal access to the machine you want to install owncloud on. Although this is not an absolute requirement, installation without it is highly likely to require contacting your hoster (e.g. for installing required modules).
To run ownCloud, your web server must have the following installed: • PHP (>= 5.3.3 minimum, 5.4 or higher recommended) • PHP module ctype • PHP module dom • PHP module GD • PHP module iconv • PHP module JSON • PHP module libxml • PHP module mb multibyte • PHP module SimpleXML • PHP module zip • PHP module zlib
Database connectors (pick at least one):
• PHP module sqlite (>= 3, usually not recommendable for performance reasons) • PHP module mysql
• PHP module pgsql (requires PostgreSQL >= 9.0) Recommendedpackages:
• PHP module curl (highly recommended, some functionality, e.g. http user authentication, depends on this) • PHP module fileinfo (highly recommended, enhances file analysis performance)
• PHP module bz2 (recommended, required for extraction of apps) • PHP module intl (increases language translation performance) • PHP module mcrypt (increases file encryption performance)
• PHP module openssl (required for accessing HTTPS resources)
Required for specific apps (if you use the mentioned app, you must install that package): • PHP module ldap (for ldap integration)
• smbclient (for SMB storage) • PHP module ftp (for FTP storage) Recommended for specific apps (optional):
• PHP module exif (for image rotation in pictures app)
For enhanced performance (optional/ select only one of the following): • PHP module apc
• PHP module apcu • PHP module xcache For preview generation (optional):
• PHP module imagick • avconv or ffmpeg • OpenOffice or libreOffice
Remarks:
• Please check your distribution, operating system or hosting partner documentation on how to install/enable these modules.
• Make sure your distribution’s php version fulfils the version requirements specified above. If it doesn’t, there might be custom repositories you can use. If you are e.g. running Ubuntu 10.04 LTS, you can update your PHP using a customPHP PPA:
sudo add-apt-repository ppa:ondrej/php5 sudo apt-get update
sudo apt-get install php5
• You don’t need any WebDAV support module for your web server (i.e. Apache’s mod_webdav) to access your ownCloud data via WebDAV. ownCloud has a built-in WebDAV server of its own.
Example installation on Ubuntu 12.04.4 LTS Server
On a machine running a pristine Ubuntu 12.04.4 LTS server, you would install the required and recommended modules for a typical ownCloud installation, using Apache and MySQL by issuing the following commands in a terminal: sudo apt-get install apache2 mysql-server libapache2-mod-php5
sudo apt-get install php5-gd php5-json php5-mysql php5-curl sudo apt-get install php5-intl php5-mcrypt php5-imagick
Remarks:
• If you want to use any other combination of distribution, webserver or database, please consult the respective documentation.
• At the execution of each of the above commands you might be prompted whether you want to continue; press “Y” for Yes (that is if your system language is English. You might have to press a different key if you have a different system language).
• At the installation of the MySQL server, you will be prompted for a root password. Be sure to remember that password for later use.
• This installs the packages for the ownCloud core system. If you are planning on running additional apps, keep in mind that they might require additional packages. See the list above for details.
2.6.2 Download, extract and copy ownCloud to Your Web Server
First, download the archive of the latest ownCloud version:• Navigate tohttp://owncloud.org/install • Click “Tar or Zip file”
• In the opening dialog, chose the “Linux” link.
• This will start the download of a file named owncloud-x.y.z.tar.bz2 (where x.y.z is the version number of the current latest version).
• Save this file on the machine you want to install ownCloud on.
• If that’s a different machine than the one you are currently working on, use e.g. FTP to transfer the downloaded archive file there.
• Note down the directory where you put the file.
• Extract the archive contents. Open a terminal on the machine you plan to run ownCloud on, and run: cd path/to/downloaded/archive
tar -xjf owncloud-x.y.z.tar.bz2
where:code:‘path/to/downloaded/archive‘is to be replaced by the path where you put the downloaded archive, and x.y.z of course has to be replaced by the actual version number as in the file you have downloaded. • Copy the ownCloud files to their final destination in the document root of your webserver (you can skip this step
if you already downloaded and extracted the files there):
sudo cp -r owncloud /path/to/your/webserver/document-root
– If you don’t know where your webserver’s document root is located, consult its documentation. For Apache on Ubuntu 12.04 LTS for example, this would usually be:code:‘/var/www‘. So above command should look like this:
sudo cp -r owncloud /var/www
– The above assumes you want to install ownCloud into a subdirectory “owncloud” on your webserver. For installing it anywhere else, you’ll have to adapt the above command accordingly.
2.6.3 Set the Directory Permissions
The user running your web server must own at least the apps/, data/ and config/ directories in your ownCloud installa-tion folder. The following command will change the ownership of the whole folder to that user.
• For Debian-based distributions (like Ubuntu, Debian or Linux Mint) and Gentoo, run: sudo chown -R www-data:www-data /path/to/your/owncloud
• Continuing the example from above, for Ubuntu 12.04 LTS, where the install location was:code:‘/var/www‘, you would run:
sudo chown -R www-data:www-data /var/www/owncloud • For ArchLinux should run (as root):
chown -R http:http /path/to/your/owncloud
• Fedora users should run (as root):
chown -R apache:apache /path/to/your/owncloud
When using an NFS mount for the data directory, do not change ownership as above. The simple act of mounting the drive will set proper permissions for ownCloud to write to the directory. Changing ownership as above could result in some issues if the NFS mount is lost.
2.6.4 Web Server Configuration
Note: You can use ownCloud over plain http, but we strongly encourage you to use SSL/TLS. If you don’t use it, and you for example access your ownCloud over an unsecured WiFi, everyone in the same WiFi can grab your authentication data or the content of files synchronized while you are on the WiFi.
Apache is the recommended web server.
Apache Configuration
Enabling SSL
An Apache installed under Ubuntu comes already set-up with a simple self-signed certificate. All you have to do is to enable the ssl module and the according site. Open a terminal and run
sudo a2enmod ssl
sudo a2ensite default-ssl sudo service apache2 reload
If you are using a different distribution, check their documentation on how to enable SSL.
Note: Self-signed certificates have their drawbacks - especially when you plan to make your ownCloud server publicly accessible. You might want to consider getting a certificate signed by an official signing authority. If you’re looking for a free certificate, you can consult e.g. this article: https://www.sslshopper.com/article-free-ssl-certificates-from-a-free-certificate-authority.html
Configuring ownCloud
Since there was a change in the way versions 2.2 and 2.4 are configured, you’ll have to find out which Apache version you are using.
Usually you can do this by running one of the following commands: sudo apachectl -v
apache2 -v Example output:
Server version: Apache/2.2.22 (Ubuntu)
Server built: Jul 12 2013 13:37:10
This indicates an Apache of the 2.2 version branch (as e.g. you will find on Ubuntu 12.04 LTS). Example config for Apache 2.2:
<Directory /path/to/your/owncloud/install> Options Indexes FollowSymLinks MultiViews AllowOverride All
Order allow,deny allow from all </Directory>
Example config for Apache 2.4:
<Directory /path/to/your/owncloud/install> Options Indexes FollowSymLinks MultiViews AllowOverride All
Require all granted </Directory>
• This config entry needs to go into the configuration file of the “site” you want to use.
• On a Ubuntu system, this typically is the “default-ssl” site (to be found at :code:‘/etc/apache2/sites-available/default-ssl‘).
• Edit the site file with your favorite editor (note that you’ll need root permissions to modify that file). For Ubuntu 12.04 LTS, you could for example run the following command in a Terminal:
sudo nano /etc/apache2/sites-available/default-ssl • Add the entry shown above immediately before the line containing
</VirtualHost>
(this should be one of the last lines in the file).
• For ownCloud to work correctly, we need the module mod_rewrite. Enable it by running: sudo a2enmod rewrite
• In distributions that do not come with a2enmod the module needs to be enabled manually by editing the config Apache files, usually/etc/httpd/httpd.conf. consult the Apache documentation or your distributions documentation.
• Then restart Apache.
– For Ubuntu systems (or distributions using upstartd), run: sudo service apache2 restart
– For systemd systems (Fedora, ArchLinux, OpenSUSE), run: systemctl restart httpd.service
• In order for the maximum upload size to be configurable, the .htaccess file in the ownCloud folder needs to be made writable by the server (this should already be done, see sectionSet the Directory Permissions).
• You should make sure that any built-in WebDAV module of your web server is disabled (at least for the own-Cloud directory), as it will interfere with ownown-Cloud’s built-in WebDAV support.
If you need the WebDAV support in the rest of your configuration, you can turn it off specifically for the ownCloud entry by adding the following line in the configuration of your ownCloud. In above “<Directory ...” code, add the following line directly after the “allow from all” / “Require all granted” line):
Dav Off
• Furthermore, you need to disable any server-configured authentication for ownCloud, as it’s internally using Basic authentication for its *DAV services. If you have turned on authentication on a parent folder (via e.g. an “AuthType Basic” directive), you can turn off the authentication specifically for the ownCloud entry; to do so, in above “<Directory ...” code, add the following line directly after the “allow from all” / “Require all granted” line):
Satisfy Any
A minimal site configuration on Ubuntu 12.04 might look like this: <IfModule mod_ssl.c> <VirtualHost _default_:443> ServerName YourServerName ServerAdmin webmaster@localhost DocumentRoot /var/www <Directory /> Options FollowSymLinks AllowOverride None </Directory> <Directory /var/www/>
Options Indexes FollowSymLinks MultiViews AllowOverride None
Order allow,deny allow from all </Directory>
ErrorLog ${APACHE_LOG_DIR}/error.log LogLevel warn
CustomLog ${APACHE_LOG_DIR}/ssl_access.log combined SSLEngine on SSLCertificateFile /etc/ssl/certs/ssl-cert-snakeoil.pem SSLCertificateKeyFile /etc/ssl/private/ssl-cert-snakeoil.key <FilesMatch "\.(cgi|shtml|phtml|php)$"> SSLOptions +StdEnvVars </FilesMatch> <Directory /usr/lib/cgi-bin> SSLOptions +StdEnvVars </Directory> BrowserMatch "MSIE [2-6]" \ nokeepalive ssl-unclean-shutdown \ downgrade-1.0 force-response-1.0
BrowserMatch "MSIE [17-9]" ssl-unclean-shutdown <Directory /var/www/owncloud>
Options Indexes FollowSymLinks MultiViews AllowOverride All
Order allow,deny Allow from all
# add any possibly required additional directives here # e.g. the Satisfy directive:
Satisfy Any </Directory>
</VirtualHost> </IfModule>
When using ssl, take special note on the ServerName. You should specify one in the server configuration, as well as in the CommonName field of the certificate. If you want your ownCloud to be reachable via the internet, then set both these to the domain you want to reach your ownCloud under.
Note: By default, the certificates’ CommonName will get set to the host name at the time when the ssl-cert package was installed.
Nginx Configuration
• You need to insert the following code intoyour nginx config file.
• Adjustserver_name,root,ssl_certificateandssl_certificate_keyto suit your needs.
• Make sure your SSL certificates are readable by the server (seehttp://wiki.nginx.org/HttpSslModule). upstream php-handler { server 127.0.0.1:9000; #server unix:/var/run/php5-fpm.sock; } server { listen 80; server_name cloud.example.com;
return 301 https://$server_name$request_uri; # enforce https
} server { listen 443 ssl; server_name cloud.example.com; ssl_certificate /etc/ssl/nginx/cloud.example.com.crt; ssl_certificate_key /etc/ssl/nginx/cloud.example.com.key;
# Path to the root of your installation root /var/www/;
client_max_body_size 10G; # set max upload size fastcgi_buffers 64 4K;
rewrite ^/caldav(.*)$ /remote.php/caldav$1 redirect; rewrite ^/carddav(.*)$ /remote.php/carddav$1 redirect; rewrite ^/webdav(.*)$ /remote.php/webdav$1 redirect; index index.php; error_page 403 /core/templates/403.php; error_page 404 /core/templates/404.php; location = /robots.txt { allow all; log_not_found off; access_log off; } location ~ ^/(data|config|\.ht|db_structure\.xml|README) { deny all; }
location / {
# The following 2 rules are only needed with webfinger
rewrite ^/.well-known/host-meta /public.php?service=host-meta last;
rewrite ^/.well-known/host-meta.json /public.php?service=host-meta-json last; rewrite ^/.well-known/carddav /remote.php/carddav/ redirect;
rewrite ^/.well-known/caldav /remote.php/caldav/ redirect;
rewrite ^(/core/doc/[^\/]+/)$ $1/index.html;
try_files $uri $uri/ index.php; }
location ~ ^(.+?\.php)(/.*)?$ { try_files $1 = 404;
include fastcgi_params;
fastcgi_param SCRIPT_FILENAME $document_root$1; fastcgi_param PATH_INFO $2;
fastcgi_param HTTPS on; fastcgi_pass php-handler; }
# Optional: set long EXPIRES header on static assets location ~* ^.+\.(jpg|jpeg|gif|bmp|ico|png|css|js|swf)$ {
expires 30d;
# Optional: Don’t log access to assets access_log off;
} }
To enable SSL support: - Remove the server block containing the redirect - Changelisten 443 ssl tolisten 80; -Removessl_certificateandssl_certificate_key. - Removefastcgi_params HTTPS on;
Note: If you want to effectively increase maximum upload size you will also have to modify yourphp-fpm con-figuration(usually at /etc/php5/fpm/php.ini) and increaseupload_max_filesizeandpost_max_sizevalues. You’ll need to restart php5-fpm and nginx services in order these changes to be applied.
Lighttpd Configuration
This assumes that you are familiar with installing PHP application on lighttpd.
It is important to note that the.htaccessfiles used by ownCloud to protect thedatafolder are ignored by lighttpd, so you have to secure it by yourself, otherwise yourowncloud.dbdatabase and user data are publicly readable even if directory listing is off. You need to add two snippets to your lighttpd configuration file:
Disable access to data folder:
$HTTP["url"] =~ "^/owncloud/data/" { url.access-deny = ("")
}
$HTTP["url"] =~ "^/owncloud($|/)" { dir-listing.activate = "disable" }
Yaws Configuration
This should be in youryaws_server.conf. In the configuration file, thedir_listings = falseis important and also the redirect from/datato somewhere else, because files will be saved in this directory and it should not be accessible from the outside. A configuration file would look like this
<server owncloud.myserver.com/> port = 80
listen = 0.0.0.0
docroot = /var/www/owncloud/src allowed_scripts = php
php_handler = <cgi, /usr/local/bin/php-cgi> errormod_404 = yaws_404_to_index_php access_log = false dir_listings = false <redirect> /data == / </redirect> </server>
The Apache.htaccess file that comes with ownCloud is configured to redirect requests to nonexistent pages. To emulate that behaviour, you need a custom error handler for yaws. See thisgithub gist for further instructionson how to create and compile that error handler.
Hiawatha Configuration
AddWebDAVapp = yesto the ownCloud virtual host. Users accessing WebDAV from MacOS will also need to add
AllowDotFiles = yes. Disable access to data folder: UrlToolkit {
ToolkitID = denyData Match ^/data DenyAccess }
Microsoft Internet Information Server (IIS)
SeeWindows 7 and Windows Server 2008for further instructions.
2.6.5 Follow the Install Wizard
Open your web browser and navigate to your ownCloud instance. If you are installing ownCloud on the same machine as you will access the install wizard from, the url will be:http://localhost/(orhttp://localhost/owncloud).
For basic installs we recommend SQLite as it is easy to setup (ownCloud will do it for you). For larger installs you should use MySQL or PostgreSQL. Click on the Advanced options to show the configuration options. You may enter admin credentials and let ownCloud create its own database user, or enter a preconfigured user. If you are not using Apache as the web server, please set the data directory to a location outside of the document root. See the advanced install settings.
2.7 PageKite Configuration
You can use thisPageKite how toto make your local ownCloud accessible from the internet using PageKite.
2.8 Open Wrt
THREE
CONFIGURATION
3.1 Apps Configuration
After you have installed ownCloud, you might realize that it would be nice to provide an additional function on top of the core functionality in your ownCloud installation.
With ownCloud installation, you will find some apps enabled by default. To see which applications are enabled, click on Apps button on the web interface navigation to go into applications page:
Administrator application page
In this page, you can enable or disable applications simply by clicking on their names. Enabled applications will be shown inboldwhile disabled ones will be shown in normal font. If the app is not developed by ownCloud, it will have the3rd partynotice next to it. To see what an application does, clicking on its name will show a description on the right side of the same page.
To install new apps, you can useMore appsbutton or check out theownCloud apps store. There you will find a lot of ready-to-use apps provided by the ownCloud community.
If you would like to add your own app, please useAdd your App...button on the same page. This will redirect you to ourDeveloper Center.
3.1.1 Parameters
Parameters are set in theconfig/config.phpinside the$CONFIGarray.
Use custom app directories
Use theapps_pathsarray to set the apps folders which should be scanned for available apps and/or where user specific apps should be installed.The keypathdefines the absolute file system path to the app folder. The keyurldefines the http web path to that folder, starting at the ownCloud web root. The keywritableindicates if a user can install apps in that folder.
Note: If you want to make sure that the default/apps/folder only contains apps shipped with ownCloud, you should follow the example and set-up a/apps2/folder which will be used to store all apps downloaded by users
<?php
"apps_paths" => array ( 0 => array (
"path" => OC::$SERVERROOT."/apps", "url" => "/apps",
"writable" => false, ),
1 => array (
"path" => OC::$SERVERROOT."/apps2", "url" => "/apps2",
"writable" => true, ),
),
Use your own appstore
If you want to allow the installation of apps from the apps store you have to setappstoreenabledparameter, but this can only be done if at least one of the configured apps directories is writable.
Theappstoreurlis used to set the http path to the ownCloud apps store. The appstore server has to use OCS (Open Collaboration Services).
<?php
"appstoreenabled" => true,
"appstoreurl" => "http://api.apps.owncloud.com/v1",
Guard against malicious 3rdparty code
Finally you can enable checks for malicious code fragments of 3rd-party apps by setting theappcodechecker param-eter.
<?php
"appcodechecker" => false,
3.2 User Management
ownCloud administrators can easily manage users via the web interface. To go into user management page, click your username on the web interface and selectUsers. A page similar to the image below will be shown:
Users management page
A fictive use case will help you understand the concept of users, user groups and group admins.
Think of a small, 25-member staff company, named “Cloud Lovers”, that is lead by its founder Richard. In this company Bob acts as IT operator and recently set up ownCloud. Being the installing user, Bob is member of the so called “admin” user group of ownCloud. His colleague Tom, who provides support if Bob is on holiday, is member of the “admin” user group as well. All employees, including Bob and Tom, are members of the user group “Internal”, that is used to share data across the company. Mostly for operational data, that should not be accessible to all employees, Bob created the “Administration” user group having two members: Richard and his assistant Susan. Richard is group admin of this user group, so he can manage the members of the “Administration” user group on his own.
3.2.1 Users
A user represents an account of the ownCloud installation. In this section the core properties are listed.
Login name (Username) This is the unique ID of a ownCloud user (e.g. test, jon.doe).
Full Name This is the name that is used all over the user interface to identify the user i.e. when sharing data or sending mails. If no display name is set, it defaults to the login name.
Password This is the password the user uses to login to ownCloud.
Groups This is a list of security groups the user is assigned to. By default the user is not member of any user group.
Group Admin This is a list of security groups the user has administration privileges for. By default the user is not registered as group admin for any user group.
Storage This is the maximum disk space that may be used by the user. If the user reaches this limit he/she is not able to upload or sync further data. The storage quota is specified in the formatNumber Unit(e.g. 100 B (byte), 50 KB (kilobyte), 20 MB (megabyte), 5 GB (gigabyte)). If no unit is given, the number is interpreted as bytes. Each user is able to change its display name and password.
Create a user
Before users can sign in and share data, they need ownCloud user accounts. To create a user account:
1. Enter the new user’sLogin Nameand its initialPasswordin the appropriate fields. 2. (Optional) Select theGroupsto which you want to assign the new user.
3. ClickCreate.
4. (Optional) Edit additional user settings.
To set other user settings, such as setting a display name or limiting the user’s storage, see instructions as follows. Created users will have the storage specified onDefault Storagesetting on the same page.
Login names may contain letters (a-z, A-Z), numbers (0-9), dashes (-), underscores (_), periods (.) and at signs (@).
Reset a user’s password To reset a user’s password:
1. Hover the line of the user.
2. Click on thepencil iconnext to the password field.
3. Enter the user’s new password in the password field and then hit theEnterkey of your keyboard. Remember to provide the user with the new login information after you have reset the password.
Rename a user
Each ownCloud user has two names: an uniquelogin nameused for authentication, and adisplay name(e.g. the user’s first name and last name) used in the user interface. You can edit the display name of a user, but you cannot change the login name of any user.
To set a user’s display name: 1. Hover the line of the user.
2. Click on thepencil iconnext to the display name field.
3. Enter the user’s new display name in the corresponding field and then hit theEnterkey of your keyboard.
Grant administrator privileges to a user
If a user has administrator privileges, the user has the right to manage other users. Within ownCloud there are two types of administrators:Super AdministratorsandGroup Administrators.
Group administrators have the management rights to:
• Create new users and assign them to the group of the group administrator • Edit and delete users that are assigned to the group of the group administrator
Group administrators cannot access system settings or modify installation-wide configuration like the default storage. To assign thesuper administratorrole to a user:
2. Assign the user to the “admin” user group To assign thegroup administratorrole to a user:
Find the user and select the user groups from the Group Admindrop-down list you want the user become group administrator for.
Assign a user to a user group To assign a user to a user group:
Find the user and select the user groups from theGroupsdrop-down list you want to assign the user to. You can use add grouplink to create a new group to assign the user to. You can assign the user more than one group by checking multiple groups.
Note: If a file/folder is shared with a group, newly created users will immediately have access to the share.
Note: If you assign a user to theadmin user group, the user will become aSuper Administrator with unlimited privileges.
Limit a user’s storage To limit a user’s storage quota:
Find the user and select an item from theStoragedrop-down list.
• If you selectDefault, the default storage limit, specified in the action bar at the top, is applied. • If you selectUnlimited, the user is not limited until the total disk space is consumed.
• If you want to enter a custom limit, selectOther..., enter the storage quota of your choice and hit theEnterkey of your keyboard.
If you edit the value of theDefault Storagefield in the action bar, all users with storage Defaultare affected by this change, i.e. changing the default storage fromUnlimitedto1 GBwill cause all users withDefaultstorage being limited to 1 GB storage each.
Delete User
Important considerations before deleting a user:
• The user will no longer be able to sign in to your ownCloud installation. • You cannot revert the deletion or restore a deleted account.
Note: If this user had a share with a group or user, the share also will be deleted permanently. To delete a user account:
1. Hover the line of the user you want to delete. 2. Click thecross iconat the end of the line.
3.2.2 User Groups
Create GroupTo create a user group:
1. Open theGroupsdrop-down list in the action bar. 2. Clickadd group.
3. Enter the name of the new group and then hit theEnterkey of your keyboard.
You canassign usersto the newly created user groups anytime by using users’ group drop-down list.
Edit/Delete Group
Currently, groups cannot be edited (e.g. renamed) or removed. This feature will be available in a future version of ownCloud.
Note: If you have direct access to the database, you can manually delete the group from database tables oc_groups and oc_group_user.
3.3 User Authentication with LDAP
ownCloud ships an LDAP backend, which allows full use of ownCloud for user logging in with LDAP credentials including:
• LDAP group support
• File sharing with users and groups
• Access via WebDAV and of course ownCloud Desktop Client • Versioning, external Storages and all other ownCloud goodies
To connect to an LDAP server the configuration needs to be set up properly. Once the LDAP backend is activated (Apps Sidebar→Apps, chooseLDAP user and group backend, click onEnable) the configuration can be found on Settings→Admin. Read on for a detailed description of the configuration fields.
3.3.1 Configuration
The LDAP backend follows a wizard-like approach, splitted into four tabs. A correctly completed first tab (“Server”) is mandatory to access the other tabs. Also, the other tabs need to be reviewed by the admin, however the necessary settings are detected automatically. An indicator will show whether the configuration is incomplete, incorrect or OK. The settings are changed automatically, as soon as a input element looses the focus, i.e. the cursor is taken away by clicking somewhere else or pressing the tabulator key.
The other tabs can be navigated by clicking the tabs or by using theContinueandBackbuttons. They are located on the lower right, next to the status indicator.
Server
The server tab contains the basic information on the LDAP server. They make sure that ownCloud will be able to connect to LDAP and be able to read data from there. The admin at least needs to provide a hostname. If anonymous access is not possible he will need to provide an account DN and a password, too. ownCloud attempts to auto-detect the port and the base DN.
Server configuration: ownCloud can be configured to connect to multiple LDAP servers. Using this control you can pick a configuration you want to edit or add a new one. The buttonDelete Configurationdeletes the current configuration.
Host: The host name of the LDAP server. It can also be aldaps://URI, for instance.
It is also possible to pass a port number, which speeds up port detection. It is especially useful, if a custom port is used. ownCloud will move the value to the port field subsequently.
Examples:
• directory.my-company.com • ldaps://directory.my-company.com • directory.my-company.com:9876
Port: The port on which to connect to the LDAP server. The field is disabled in the beginning of a new configuration. The port will be detected automatically, if the LDAP server is running on a standard port. After ownCloud attempted to determine the port, the field will be enabled for user input. A successfully found port will be inserted by ownCloud, of course.
Example: • 389
User DN: The name as DN of a user who is able to do searches in the LDAP directory. Leave it empty for anonymous access. It is recommended to have a special system user for ownCloud.
• uid=owncloudsystemuser,cn=sysusers,dc=my-company,dc=com
Password: The password for the user given above. Empty for anonymous access.
Base DN: The base DN of LDAP, from where all users and groups can be reached. Separated Base DNs for users and groups can be set in the Advanced tab. Nevertheless, this field is mandatory. ownCloud attempts to determine the Base DN according to the provided User DN or the provided Host.
Example:
• dc=my-company,dc=com
User Filter
The settings in the user filter tab determine which LDAP users will appear and are allowed to log in into ownCloud. It is also possible to enter a raw LDAP filter.
only those object classes: ownCloud will determine the object classes that are typically availalble for (ideally only) user objects in your LDAP. ownCloud will automatically select the object class that returns the highest amount of users. You can select multiple object classes.
only from those groups: If your LDAP server supports the member-of-overlay in LDAP filters, you can define that only users from one or more certain groups are allowed to appear and log in into ownCloud. By default, no value will be selected. You can select multiple groups.
If your LDAP server does not support the member-of-overlay in LDAP filters, the input field is disabled. Please contact your LDAP administrator.
Edit raw filter instead: Clicking on this text will toggle the filter mode. Instead of the assisted approach, you can enter the raw LDAP filter directly in the appearing field.
Example:
x users found: This is an indicator that tells you approximately how many users will be allowed to access ownCloud. The number will update after any change you do.
Login Filter
The settings in the login filter tab determine which user detail will be compared to the login value entered by the user. It is possible to allow multiple user details. It is also possible to enter a raw LDAP filter.
The user limitation as set up in the previous tab is in effect, unless you manually configure the filter in raw mode.
LDAP Username: If this value is checked, the login value will be compared to the username in the LDAP directory. The corresponding attribute, usuallyuidorsamaccountnamewill be detected automatically by ownCloud.
LDAP Email Address: If this value is checked, the login value will be compared to an email address in the LDAP directory. The email address will be looked for in themailPrimaryAddressandmailattributes.
Other Attributes: This multiselect box allows you to select other attributes for the comparison. The list is generated automatically based on the attributes that a user object contains in your LDAP server.
Edit raw filter instead: Clicking on this text will toggle the filter mode. Instead of the assisted approach, you can enter the raw LDAP filter directly in the appearing field.
The%uidplaceholder will be replaced with the login name entered by the user upon login. When you enter the filter manually.
Examples:
• only username:uid=%uid
Group Filter
The settings in the group filter tab determine which groups will be availalble in ownCloud. It does not have any restrictions on logins, this has been dealed with in the prior tabs. It is also possible to enter a raw LDAP filter. By default, no groups will be availalble in ownCloud. You actively need to enable groups.
only those object classes: ownCloud will determine the object classes that are typically availalble for (ideally only) group objects in your LDAP. ownCloud will only list object classes that return at least one group object. You can select multiple object classes. A typical object class is “group”, or “posixGroup”.
only from those groups: This setting lets you pick certain groups that shall be availalble in ownCloud. This field follows a whitelist approach. ownCloud will generate a list of available groups found in your LDAP server. You can select multiple groups.
Edit raw filter instead: Clicking on this text will toggle the filter mode. Instead of the assisted approach, you can enter the raw LDAP filter directly in the appearing field.
Example:
• objectClass=group • objectClass=posixGroup
y groups found: This is an indicator that tells you approximately how many groups will be available in ownCloud. The number will update after any change you do.
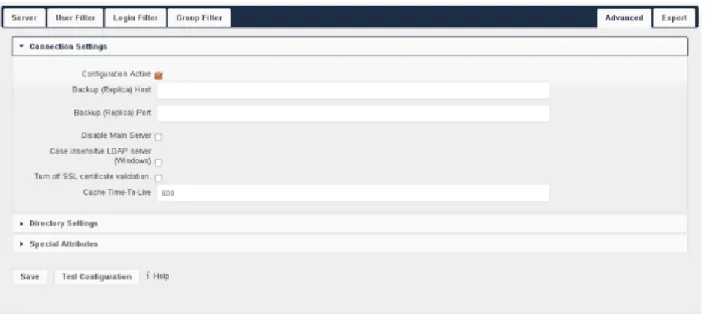
3.3.2 Advanced Settings
In the LDAP Advanced settings section you can define options, that are less common to set. They are not needed for a working connection. It can also have a positive effect on the performance to specify distinguished bases for user and group searches.
• Connection Settings • Directory Settings • Special Attributes
Connection Settings
Figure 3.1: LDAP Advanced Settings, section Connection Settings
Configuration Active: Enables or Disables the current configuration. Disabled configuration will not connect to the LDAP server.
By default, it is turned off. It will be automatically turned on, when using the wizard and the configuration is OK and a test connection successful.
Backup (Replica) Host: A backup server can be defined here. ownCloud tries to connect to the backup server au-tomatically, when the main host (as specified in basic settings) cannot be reached. It is import that the backup server is a replica of the main server, because the object UUIDs must match.
Example:
• directory2.my-company.com
Backup (Replica) Port: The port on which to connect to the backup LDAP server. If no port is given, but a host, then the main port (as specified above) will be used.
Example: • 389
Disable Main Server: You can manually override the main server and make ownCloud only connect to the backup server. It may be handy for planned downtimes.
Case insensitive LDAP server (Windows): Whether the LDAP server is running on a Windows Host. Usually, it is not necessary to check it, however.
Turn off SSL certificate validation: Turns of check of valid SSL certificates. Use it – if needed – for testing, only!
Cache Time-To-Live: A cache is introduced to avoid unnecessary LDAP traffic, for example lookups check whether the users exists on every page request or WebDAV interaction. It is also supposed to speed up the Admin→User
page or list of users to share with, once it is populated. Saving the configuration empties the cache (changes are not necessary). The time is given in seconds.
Note that almost every PHP request would require to build up a new connection to the LDAP server. If you require a most up-to-dateness it is recommended not to totally switch off the cache, but define a minimum life time of 15s.
Examples:
• ten minutes:600 • one hour:3600
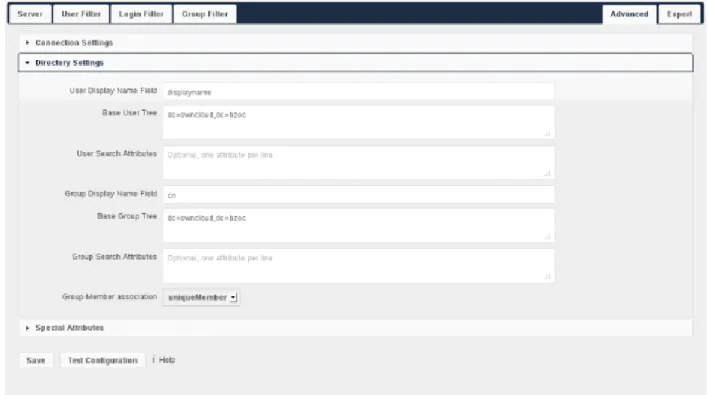
Directory Settings
Figure 3.2: LDAP Advanced Settings, section Directory Settings
User Display Name Field: The attribute that should be used as display name in ownCloud. • Example:displayName
Base User Tree: The base DN of LDAP, from where all users can be reached. It needs to be given completely despite to the Base DN from the Basic settings. You can specify multiple base trees, one in each line.
• Example:
cn=programmers,dc=my-company,dc=com cn=designers,dc=my-company,dc=com
User Search Attributes: These attributes are used when a search for users is done. This happens, for instance, in the share dialogue. By default the user display name attribute as specified above is being used. Multiple attributes
can be given, one in each line.
Beware that if an attribute is not available on a user object, the user will neither be listed (e.g. in the share dialogue) nor be able to login. This also affects the display name attribute as specified above. If you override the default, the display name attribute will not be taken into account, unless you specify it as well.
• Example:
displayName mail
Group Display Name Field: The attribute that should be used as ownCloud group name. ownCloud allows a limited set of characters (a-zA-Z0-9.-_@), every other character will be replaced in ownCloud. Once a group name is assigned, it will not be changed, i.e. changing this value will only have effect to new LDAP groups.
• Example:cn
Base Group Tree: The base DN of LDAP, from where all groups can be reached. It needs to be given completely despite to the Base DN from the Basic settings. You can specify multiple base trees, one in each line.
• Example:
cn=barcelona,dc=my-company,dc=com cn=madrid,dc=my-company,dc=com
Group Search Attributes: These attributes are used when a search for groups is done. This happens, for instance, in the share dialogue. By default the group display name attribute as specified above is being used. Multiple attributes can be given, one in each line.
If you override the default, the group display name attribute will not be taken into account, unless you specify it as well.
• Example:
cn
description
Group Member association: The attribute that is used to indicate group memberships, i.e. the attribute used by LDAP groups to refer to their users.
ownCloud detects the value automatically, you should only change it, if you have a very valid reason and know what you are doing.
• Example:uniquemember
Special Attributes
Quota Field: ownCloud can read an LDAP attribute and set the user quota according to its value. Specify the attribute here, otherwise keep it empty. The attribute shall return human readable values, e.g. “2 GB”.
Figure 3.3: LDAP Advanced Settings, section Special Attributes
Quota Default: Override ownCloud default quota for LDAP users who do not have a quota set in the attribute given above.
• Example:15 GB
Email Field: ownCloud can read an LDAP attribute and set the user email there from. Specify the attribute here, otherwise keep it empty.
Although the wizard offers you to check login by email, the correct email attribute is not detected and you need to specify it manually.
• Example:mail
User Home Folder Naming Rule: By default, the ownCloud creates the user directory, where all files and meta data are kept, according to the ownCloud user name. You may want to override this setting and name it after an attribute value. The attribute given can also return an absolute path, e.g. /mnt/storage43/alice. Leave it empty for default behavior.
• Example:cn
3.3.3 Expert Settings
In the Expert Settings fundamental behavior can be adjusted to your needs. The configuration should be done before starting production use or when testing the installation.
Internal Username: The internal username is the identifier in ownCloud for LDAP users. By default it will be created from the UUID attribute. By using the UUID attribute it is made sure that the username is unique and characters do not need to be converted. The internal username has the restriction that only these characters are allowed: [a-zA-Z0-9_.@-]. Other characters are replaced with their ASCII correspondence or are simply omitted. The LDAP backend ensures that there are no duplicate internal usernames in ownCloud, i.e. that it is checking all other activated user backends (including local ownCloud users). On collisions a random number (between 1000 and 9999) will be attached to the retrieved value. For example, if “alice” exists, the next username may be “alice_1337”.
The internal username is also the default name for the user home folder in ownCloud. It is also a part of remote URLs, for instance for all *DAV services. With this setting the default behaviour can be overridden.
• Example:uid
Override UUID detection By default, ownCloud auto-detects the UUID attribute. The UUID attribute is used to doubtlessly identify LDAP users and groups. Also, the internal username will be created based on the UUID, if not specified otherwise above.
You can override the setting and pass an attribute of your choice. You must make sure that the attribute of your choice can be fetched for both users and groups and it is unique. Leave it empty for default behaviour. Changes will have effect only on newly mapped (added) LDAP users and groups. It also will have effect when a user’s or group’s DN changes and an old UUID was cached: It will result in a new user. Because of this, the setting should be applied before putting ownCloud in production use and cleaning the bindings (see below).
• Example:cn
Username-LDAP User Mapping ownCloud uses the usernames as key to store and assign data. In order to precisely identify and recognize users, each LDAP user will have a internal username in ownCloud. This requires a mapping from ownCloud username to LDAP user. The created username is mapped to the UUID of the LDAP user. Additionally the DN is cached as well to reduce LDAP interaction, but it is not used for identification. If the DN changes, the change will be detected by ownCloud by checking the UUID value.
The same is valid for groups.
The internal ownCloud name is used all over in ownCloud. Clearing the Mappings will have leftovers ev-erywhere. Do never clear the mappings in a production environment. Only clear mappings in a testing or experimental stage.
Clearing the Mappings is not configuration sensitive, it affects all LDAP configurations!
3.3.4 Testing the configuration
In this version we introduced theTest Configuration button on the bottom of the LDAP settings section. It will always check the values as currently given in the input fields. You do not need to save before testing. By clicking on