From
Earthquake
Disaster?
A Homeowner’s Guide
From
Earthquake
Disaster?
Is Your
Home
Protected
Is Your
Home
Protected
A Homeowner’s Guide to Earthquake Retrofit Prepared by the Institute for Business & Home Safety. The Institute for Business & Home Safety (IBHS) is an initiative of the insurance industry to reduce deaths, injuries, property damage, economic losses and human suffering caused by natural disasters. IBHS is a nonprofit research and communications organization com-mitted to institutionalizing natural disaster protection as a public value.
acknowledgments
The staff of the Institute for Business & Home Safety (IBHS) wishes to acknowledge the valuable input of all those involved in preparing this brochure. In particular, we extend our thanks to:
The IBHS Earthquake Peril Committee Members The IBHS Public Relations Committee Members The IBHS Retrofit Committee Members
The National Geophysical Data Center (NGDC)
Earthquake Engineering Research Center, University of California, Berkeley (EERC, UCB) Earthquake Engineering Research Institute (EERI)
cover photo credits
EERI Northridge Earthquake Reconnaissance Team, J. Hall, CIT; F. Desler, APA; Godden Collection, EERC, UCB; and USGS, D. Perkins
architectural illustrations
W. Spaulding, AIAdisclaimer
The suggestions and recommendations you will read in this guide are based on professional judgment, expe-rience and research. The authors, contributors and publisher disclaim all warranties and guarantees with respect to the information in the document and assume no liability or responsibility with respect to the infor-mation.
(c) 1999 Institute for Business & Home Safety All rights reserved. ISBN 1-885312-22-9
introduction
. . . .1
earthquakes and your home
. . . .2
Earthquakes: What, When, Where and Why
. . . .2
Measuring an Earthquake’s Size . . . .
4
What You Feel and Why You Feel It
. . . .4
What Your Home Experiences . . . .
5
What You Can Do
. . . .6
nonstructural retrofits
. . . .7
Bookcases . . . .
7
Cabinets and Drawers . . . .
10
Picture Frames and Bulletin Boards
. . . .12
Ceiling Lights, Suspended Ceilings and Hanging Fixtures
. . . .13
Windows and Doors
. . . .15
Large Appliances
. . . .15
Water Heaters . . . .
16
structural retrofits
. . . .19
Foundation Systems
. . . .21
Slab-on-Grade Foundations . . . .
21
Crawl Space and Basement Foundations . . . .
23
Post-and-pier Foundations
. . . .25
Floor Systems
. . . .27
Wall Systems
. . . .28
Wood-Framed Walls
. . . .28
Unreinforced Masonry Walls . . . .
29
Roof Systems
. . . .30
Unreinforced Chimneys
. . . .31
Garages
. . . .33
Room Additions
. . . .33
home improvement project list
. . . .34
before, during and after: be completely prepared
. . . .35
references
. . . .37
additional sources of information
. . . .38
ibhs member companies
. . . .41
checklist
. . . .42
table of contents
A Homeowner’s Guide to Earthquake Retrofit Top: Earthquake
dam-age in Kobe, Japan. Right: San Francisco Marina fire caused by broken gas lines. Background: Shored building in the Marina District, San Francisco. USGS, D. Perkins
F. Desler, APA
arthquakes occur suddenly with little or no warning, during any season and at any time of day. Although the West Coast generally has the greatest earthquake activity, the po-tential for earthquakes exists in almost every corner of the United States. More than 3,360 Americans have died during earthquakes in the last century, and homes in all 50 states have suf-fered damage in the last 250 years.1 So, what can you do to protect your-self, your home and its contents from earthquakes? This brochure will help you by providing information about:
• the relationship between your home and an earthquake;
• key areas of your home that are especially susceptible to damage; • ways you can reduce damage to
your home and belongings; and, • what you can do to protect yourself
and your family.
The information and suggestions pre-sented in this brochure range from simple weekend tasks that require basic carpentry skills to involved pro-jects that may require professional assistance. Before starting on any activity, make sure you are comfort-able with the required skill level. If you are uncertain, contact a profes-sional engineer, architect or building contractor.
introduction
E
J. Preli Damage in San Francisco’s Marina District. 1Earthquakes: What,
When, Where and Why
Did you know that the ground beneath you is constantly moving? The Earth’s surface is broken into many dif-ferent plates, which float on top of the Earth’s quasi-liquid mantle. Typically, one plate interacts with another by either colliding with it, sliding past it or pushing itself underneath it. These areas along which plates interact are known as geological faults.As plates move over time, the edge of one plate often catches itself on anoth-er, forcing that portion of the fault to remain motionless while stress builds.
Eventually, the fault reaches a breaking point and slips suddenly, sometimes by yards or sometimes only by inches. This sudden vertical or lateral (side-ways) movement releases seismic waves, which we feel as an earthquake. The point where the fault first slips is located deep within the earth and is called the hypocenter. Directly above that, on the earth’s surface, is the epi-center. Figure 1highlights the key ele-ments of an earthquake.
In the United States, the most active faults are along the West Coast—the most famous being the San Andreas Fault system that runs through the state of California. This fault system
A Homeowner’s Guide to Earthquake Retrofit
2
earthquakes and
your home
Top: The San Andreas Fault in the Carrizo Plain area, Calif. Bottom: The fault scarp of the Landers earth-quake, Calif. Plate Fault-line Epicenter Hypocenter Plate Fault-plane
Figure 1: Key Elements of an Earthquake
NO
AA/NGDC
NO
separates the North American Plate from the Pacific Plate. Despite the large number of earthquakes associated with this and other plate boundaries, earthquakes are not restricted to just the plate edges. Approx-imately five percent of earthquakes occur within the central part of a plate. These earthquakes are known as intraplate earth-quakes, and have occurred in recent history in Charleston, South Carolina, and the Mississippi Valley near New Madrid, Missouri.
Remember, even if you don’t live in one of these areas, you are still at risk. The maps presented in Figure 2 show where earth-quakes have been recorded in the past hun-dred years. As you can see, no place is truly safe from earthquakes.
Number of Events: >14,000
Number of Events: 1,507
Data provided by the National Geophysical Data Center
Number of Events: 7,667
Data provided by the National Geophysical Data Center
Figure 2: Alaskan, Hawaiian and Mainland Earthquakes
Measuring an
Earthquake’s Size
Seismologists estimate the size, or magni-tude, of an earthquake in several different ways. The Richterscale measures the size of the earthquake’s waves (amplitude); whereas, the moment magnitude scale estimates the total energy released during the slip of a fault. Because the moment magnitude scale is more objective than the Richter scale, it is now more com-monly used. Figure 3 shows different levels of earthquakes and their
corre-sponding moment magnitudes (Mw).
What You Feel
and Why You Feel It
The amount of movement you experi-ence during an earthquake doesn’t depend just upon its magnitude. Where you’re located in relation to the earth-quake’s epicenter also has an effect. The farther away you are, the less shaking you feel, since the seismic waves lose energy as they travel through the earth. Imagine a drop of water hitting the surface of a pond. As the circular waves travel away from the impact, they lose energy and reduce in size and frequency. In time, they disappear altogether.
Also, the kind of soil underneath and around you plays a large role in how much of the earthquake you experience. Unlike water, soil is not uniform
through-A Homeowner’s Guide to Earthquake Retrofit
4
Short History of U.S. Earthquakes: (Moment Magnitude Scale—MW) 1755 Cape Anne, MA ~6.0 Mw 1812 New Madrid, MO ~7.8 Mw 1886 Charleston, SC ~7.0 Mw 1906 San Francisco, CA ~7.7 Mw 1944 Massena, NY ~5.5 Mw 1964 Alaska 9.2 Mw 1989 Loma Prieta, CA 7.0 Mw 1994 Northridge, CA 6.7 Mw Fissure in Santa Cruz Mountains, Calif.
Figure 3: Moment Magnitude Scale
U.S. G eological S u rv ey , C. S to ver Turnagain Heights Landslide; Anchorage, Alaska. NO AA/NGDC
out. The soil type can have a dramatic effect on the way seismic waves travel through the earth. For instance softer, less compact soil can actual-ly increase the forces. More stable soils, such as bedrock or compacted fill, dissipate an earth-quake’s energy more quickly.
Three major factors – an earthquake’s magni-tude, your proximity to the epicenter and the condition of the soil around you – determine the amount of shaking you feel. The Modified Mercalli Intensity scale measures this intensity by evaluating the earthquake’s effect on you and your home.
What Your Home
Experiences
Imagine that a strong earthquake strikes where you live. Loose items fall and break. Cabinets and bookcases tip over, blocking exits. Dust bil-lows everywhere. Gas and water lines break, and phone and electrical service are interrupted for days. Your home may collapse, slide off its foundation or simply come apart at the seams.
Figure 4illustrates how your home reacts in an earthquake. Because it is not able to move in sync with the surrounding ground, your home and its contents can experience substantial damage.
Building collapse in Marina District, San Francisco, Calif.
Home at Rest; Ground at Rest Leftward Movement Begins Rightward Movement Begins Ground Comes to Rest Ground at Rest; Home Continues to Move Due to Inertia
Figure 4: Your Home in an Earthquake
EERI, J. E
gan
A sand boil near El Centro, Calif. provides evidence of an earthquake.
USGS. R
What You Can Do
You can protect your home by modifying it, or retrofitting it, in two different ways:
Nonstructural retrofits protect your home’s contents against damage with little cost and effort. Examples of retrofits include:
• securing water heaters, large appliances, bookcases, pictures and bulletin boards; • latching cabinet doors; and
• using safety film on windows.
To complete these improvements simply follow the instructions in this brochure. In most cases, you won’t need a building per-mit. It’s a good idea, however, to contact your local building department to make sure.
Structural retrofits strengthen your home’s structure or skeleton so it can better with-stand the force of an earthquake. Your home’s structure is made up of many differ-ent parts, or components, which must work together in order to resist an earthquake. Modifications to your home’s structure tend to be quite involved and generally require the expertise of a registered design profes-sional (engineer, architect or building con-tractor) and your local building depart-ment’s approval. Use this brochure to iden-tify potential problem areas in your own home. If you have any questions or con-cerns about what you see, contact a profes-sional engineer or architect.
A Homeowner’s Guide to Earthquake Retrofit
6
Top: Structure shifted on its foundation in Watsonville, Calif. Bottom: Nonstruc-tural kitchen damage, Northridge, Calif. USGS, C. S to ver NO AA/NGDC
nonstructural retrofits
n this section, you will learn inex-pensive and easy ways to protect yourself against some of the damage earthquakes can cause inside your home. Start by looking for objects that could fall and break during an earth-quake. Consider items such as water heaters, bookcases and light fixtures, as well as items that are difficult to replace because they have monetary or sentimental value. As you conduct your inspection, think about ways in which you can protect them from damage. If you have any questions about the changes you should make, contact a professional engineer, archi-tect or contractor.
Bookcases
It’s true that bookcases are great for storing books, toys and supplies. They can, however, shake and tip over in an earthquake, causing considerable dam-age or injury. For this reason, make sure all bookcases are securely fastened to nearby walls.
➣ One way to do this is to attach either L-brackets or Z-brackets to the bookcase and the wall after pre-drilling holes in each. Be sure to use a bracket that can accommodate the fas-teners you are using. See Figure 5 on page 8 for details.
Fallen bookcases at the Lawrence Livermore Lab, Livermore, Calif.
I
USGSA Homeowner’s Guide to Earthquake Retrofit
8
Bolt back to back through frame with #8 (or larger) machine screws, oversized washers and nuts. No more than 12” apart.
Metal, plastic, or wood ledge barriers prevent objects from falling
Screw through back into wall. Use washers. Exterior Bracket
Interior Bracket
Attach object with museum gel, or large patches of hook & loop material (such as Velcro®). General Notes:
• Bracket to Bookcase (Interior or Exterior) #8 (or larger) wood screws; or
#8 (or larger) machine screws with washers and nuts • Bracket to Wall (Interior or Exterior)
Wood-stud wall: 3” long, #8 (or larger) wood screws Masonry wall: 3” long, #8 (or larger) screws with
plastic anchors, or 3/16” diameter (or larger) masonry screws
Interior L-Bracket
Wood Screw Drywall Bookcase Wood Stud Wood Screw or Machine Screw Exterior L-Bracket Wood Screw Drywall Bookcase Wood Stud Wood Screw or Machine Screw
Figure 5: Securing Bookcases
Exterior Z-Bracket Drywall Bookcase Wood Stud Wood Screw Wood Screw or Machine Screw
Attaching the bracket to the bookcase:
• For wood bookcases, attach the bracket with #8 (or larger) wood screws. The screw should be long enough to secure the bracket to the shelf without punching through and creating a sharp edge.
• For plastic and metal bookcases, use #8 (or larger) machine screws with washers and nuts to ensure that the bracket will stay in place. The screw should be long enough to accommo-date the bracket, shelf, washer and nut.
Attaching the bracket to the walls:
• For wood stud walls, use 3-inch long #8 (or larger) wood screws to attach each bracket to the wall. Place screws in the wood studs to assure that they are properly supported. Use a stud locator to find the best places. • For stone or masonry walls, place
plastic anchors in the holes before you screw in 3-inch long #8 (or larger) screws or consider using 3/16-inch diameter (or larger) masonry screws.
➣ For a bookcase with a solid back, you can pass screws directly through the back into the wall. Use washers to spread contact over a larger area between the screw and the bookcase’s back. If you are working with a wood stud wall, use a stud locator to find the best locations for the 3-inch long #8 (or larger) wood screws. For a stone or masonry wall, use plastic anchors with the #8 (or larger) screws or use 3/16-inch diameter (or larger) masonry screws.
➣ You can prevent items on shelves from falling by installing ledge barriers made from strips of wood, metal or plas-tic. Cut them to fit the shelf and attach them with glue or mechanical fasteners. You can finish the barriers to match the shelves. See Figure 5for details.
➣ Place heavy items on lower shelves.
➣ You can stabilize bookcases that are not against walls by attaching them back-to-back with #8 (or larger) machine screws, oversize washers and nuts. See Figure 5.
➣ Affix large, heavy items, such as plants and aquariums, and other break-ables directly to the shelf to keep them from falling. You can apply hook and loop material (such as Velcro®) or museum gel (or museum wax) to secure these items. For added protection, use metal, plastic or wood ledge barriers. See
Figure 5for details.
Necessary Tools and
Materials
• L- or Z-brackets • Fasteners
• Plastic anchors for masonry walls • Variable speed drill and bits • Screwdriver
• Stud locator
• Wood, plastic or metal strips • Paint or wood finish
• Hook and loop material (Velcro®) or museum gel/wax
A Homeowner’s Guide to Earthquake Retrofit
10
Figure 6: Cabinets and Drawers
Provide self-locking door latches or mechanical
cabinet catches.
Install self-locking or mechanical drawer closures (baby-proof latches, drawer lock,
or other speciality latches). Top connections tie units together for a
more stable configuration. Use steel straps with #8 (or larger) machine
screws with nuts and washers.
Brackets for fastening units to: Wood Stud Walls:
Use #8 (or larger) wood screws with 3” min. embedment in studs. Masonry Walls:
Use 3” long #8 (or larger) screws with plastic anchors or 3/16” diameter (or larger) masonry screws.
Cabinets:
Use#8 (or larger) machine screws with nuts and washers.
Cabinets and Drawers
Like bookcases, cabinets can tip over and their doors can open, spilling their con-tents. Furthermore, the drawers, which sometimes have sharp edges, can slide out and hurt you, or your family.➣ To secure them, do the following: • Attach cabinets to the wall and floors
using L-brackets or Z-brackets. Again, be sure to use brackets that can accom-modate the diameter of the fasteners. You should follow the specific direc-tions given in Figure 6 and in the “Bookcases” section for securing the bracket to the wall and cabinet.
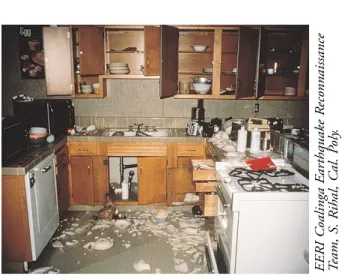
Interior damage to kitchen, Coalinga Junior High School, Coalinga, Calif.
EERI Coalinga E ar thquake R econnaissance T eam, S. Rihal, C al. P oly .
Secure items with L-Brackets (see Figure 5 for
attachment details). Use adhesive backed latches. Attach hook and loop material (such as Velcro®) between object and table surface.
Figure 7: Secure Heavy Objects
Necessary Tools
and Materials
• L- or Z-brackets • Fasteners
• Door or drawer latches
• Plastic anchors for masonry walls • Variable speed drill and bits • Screwdriver
• Stud locator
• You can fasten several units togeth-er to form a widtogeth-er footprint using #8 (or larger) machine screws.
➣ Attach simple mechanical or self-locking latches to cabinet drawers so they cannot slide open.
➣ Install mechanical or self-locking latches to prevent your cabinet doors from swinging open and spilling their contents. Your local hardware store has a large variety of latches, many of which are small, unobtrusive and easy to operate. See Figure 6for details.
➣ Most of us place heavy objects such as televisions, computers and stereos on top of cabinets, bookcases and tables. You should fasten these items down so they will not slide off during an earthquake. Several methods of attachment are shown in Figure 7.
A Homeowner’s Guide to Earthquake Retrofit
12
Picture Frames
and Bulletin Boards
The photographs, bulletin boards and art-work you display in your home add to its character. But these items can easily fall dur-ing an earthquake if you do not fasten them properly to a wall in the following way:
➣ Use closed screw-eyes, instead of tradi-tional picture hangers, for securing picture frames, bulletin boards and mirrors.
• Depending on the weight of the object and the screw-eye’s maximum weight limit, screw one or more closed screw eyes into wall studs. Use a stud finder to figure out where to put them.
• Attach picture wire to one side of the frame. Thread the wire through the closed screw-eye, fastening it securely to the other side of the frame. See Figure 8. • If you use an open screw-eye instead of a
closed screw-eye, be sure to close it with pliers once you have hung the picture.
➣ Always mount heavy or sharp wall hang-ings away from areas where they could fall on children.
Necessary Tools
and Materials
• Stud locator • Screwdriver
• Variable speed drill and bits • Screw-eyes
• Heavy picture wire • Pliers
Damage to framed pictures, Northridge, Calif. Drywall Wire Wood Stud Closed Screw-Eye Picture
Figure 8: Secure Picture Frame to Wall
J. P
Ceiling Lights,
Suspended Ceilings
and Hanging Fixtures
If they aren’t well attached and supported, ceiling lights, suspended ceilings and hang-ing fixtures, such as chandeliers and ceilhang-ing fans, can fall in an earthquake and serious-ly injure those below. Here are some ways to protect yourself:
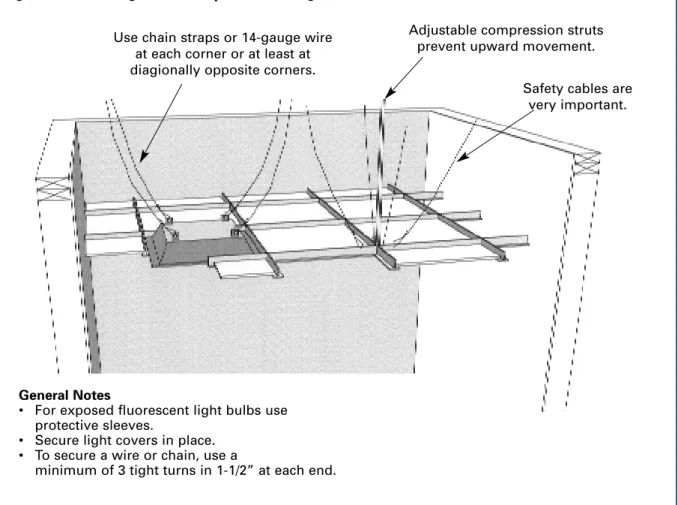
➣ Secure ceiling lights to supports using safety cables.
• Use a chain strap or a minimum 14-gauge wire to attach the light fixture to a nearby ceiling support. Locate the support visually or use a stud locator. Be sure to leave the safety cables slack; they should not support the weight of the lights under normal circumstances. See Figure 9for details.
• If your ceiling light has a cover, keep it from falling during an earthquake by fastening it to the fixture itself or to the home’s permanent structure.
• Pay special attention to your home’s fluorescent lights. Installing plastic sleeves over the fluorescent light tubes will keep the glass from scattering if they break. As an alternative, consider using Teflon® fluorescent lights, which are shatter-resistant.
➣ Use safety cables every few feet to attach suspended or false ceilings to the structure of your home.
• Use chain straps, plumber’s strapping (metal strapping with holes) or heavy wire (minimum 14-gauge) to secure sus-pended or false ceilings. See Figure 9.
• Use screws, bolts or other appropriate fasteners to attach the safety cables to both the suspended ceiling and the per-manent structure.
• You can prevent the ceiling panels from flying upward by installing adjustable compression struts. Contact your sus-pended ceiling manufacturer for details. See Figure 9.
Top: Failure of pendant light fix-tures in the Dawson Elementary School library, Coalinga, Calif. Bottom: Damage to suspended ceiling and recessed ceiling lights, Philippines. EERI Coalinga E ar thquake R econnaissance T eam S. Rihal, C al. P oly . EERI, S. S wan, EQE I nter .
A Homeowner’s Guide to Earthquake Retrofit
14
➣ Make sure chandeliers, ceiling fans, other suspended fixtures and hanging plants are safely secured to the permanent structure.
• Connect all suspended items to strong supports with safety cables capable of supporting each item’s entire weight. Each cable should remain slack and not support the item’s weight under normal circumstances.
• Keep in mind that hanging items tend to sway easily. Make sure these objects will not collide with anything if they swing in an earthquake.
Necessary Tools
and Materials
• Safety cables, chain straps, heavy wire or plumber’s strapping • Fasteners
• Adjustable compression struts • Screwdriver
• Variable speed drill and bits • Stud locator
• Plastic sleeves for fluorescent lights • Light covers
Figure 9: Secure Lights and Suspended Ceilings
Use chain straps or 14-gauge wire at each corner or at least at diagionally opposite corners.
Adjustable compression struts prevent upward movement.
Safety cables are very important.
General Notes
• For exposed fluorescent light bulbs use protective sleeves.
• Secure light covers in place. • To secure a wire or chain, use a
Windows and Doors
Your home’s windows and glass doors may seem harmless enough. But in an earth-quake, glass can break explosively, serious-ly injuring anyone nearby. One way to pro-tect yourself and your family from broken glass is to apply safety film to windows and glass doors:
➣ Use a protective film (minimum thick-ness of 4 mils) on all types of glass, includ-ing tempered glass and annealed glass. You can buy it in rolls at your local hardware and home improvment stores, or contact the International Window Film Associ-ation for the nearest distributor. Be sure to install the film according to the manufac-turer’s instructions.
➣ As an alternative, consider professional installation.
Large Appliances
An earthquake can cause refrigerators, washing machines and other large appli-ances to slide or fall over. Heavy objects on wheels may roll if brakes or stops are not provided and locked. To secure these items:
➣ Anchor large appliances to walls using safety cables or straps. The restraint should be located in the mid- to upper-portion of the appliance. Use the following method:
• Choose a screw-eye that is sized appro-priately for the appliance. For example, use a 3/8-inch diameter screw-eye (or larger) for a refrigerator.
• For wood stud walls, use a stud locator to find the best wall location to install the screw-eye. For stone or masonry
walls, place plastic anchors in the pre-drilled holes before you install the screw-eye.
• Connect coated wire cable to the screw-eye at one end and to a snap-hook fastener at the other end.
• Attach the cable to the appliance with the snap-hook fastener.
➣ Replace rigid water or gas connec-tions on large appliances with flexible connectors.
• Check to see if your local building codes allow you to use flexible connec-tors and whether a professional must install them.
➣ Always lock the rollers of any large appliances or pieces of furniture.
Necessary Tools
and Materials
• Coated wire cable or other strapping system
• Screwdriver
• Variable speed drill and bits • Stud locator • Screw-eyes • Hook fasteners • Flexible connectors • Plastic anchors USGS, M. H opper
A Homeowner’s Guide to Earthquake Retrofit
16
Water heater burned in residential fire caused by a gas leak.
Figure 10: Retrofitted Water Heater
Heavy-duty shelving bracket located within the top 1/3 of the water heater.
Heavy-duty shelving bracket located within the lower 1/3 of the water heater. It must be a minimum of 4” above controls.
Existing Walls
Existing Water Heater
2 x 4 Wood Blocking Water Heater Control 3/4” Plumber’s strapping snug around water heater
B
en R
otholtz
Note: See general notes on page 17 for additional information
Water Heaters
Water heaters can move or tip over in an earthquake and the broken water pipe can flood your home, destroying ceilings, floors, walls, furniture, artwork and family photos. If your heater runs on flammable gas and the gas line breaks, the situation becomes far more serious.
In many areas of the country where earth-quakes are common, local building codes may require that water heaters be laterally braced or strapped to resist seismic forces. Most hardware stores sell retrofit kits for dif-ferent-sized water heaters. In addition, sever-al generic restraint systems are available.
Before you decide on a retrofit method, check with your local building depart-ment and make sure that it is approved for use in your area or goes beyond what is required by your local building code.
➣ Secure water heaters (up to 50 gallons) to stud walls using the simple, generic method detailed in Figures 10 through 12. • You can anchor the water heater using
items that are readily available from the local hardware store.
• To begin: fasten two 2 x 4 wood block-ing strips to the nearby wall - one at a
height within the upper one-third (1/3) of the water heater and the other within the lower one-third (1/3) of the water heater. The lower 2 x 4 should be at least four (4) inches above the water heater control. If you are working with a wood or metal stud wall, attach the blocking directly to the studs. Use a stud locator to find the studs.
Existing Water Heater
Extend blocking at least two (2) studs beyond bracket attachment.
Existing Wall
Attach blocking to wall, see General Notes below. 2 x 4 Wood Blocking (two (2) places) Use one (1) heavy-duty
shelving bracket in four (4) places.
Attach bracket to blocking with two (2) #16 (or min. 1/4”Ø) by 1-1/2” lag screws.
Attach bracket to plumber’s strapping with a minumum 1/4” Ø x 3/4” hex bolt. Use a washer under the nut. Keep 1” between end of bracket and center of bolt.
Attach bent ends of strapping with a minu-mum 1/4” Ø x 1” hex bolt. Use washers under head and nut. Keep 1” between end of strapping and center of bolt.
Use minumum 3/4” plumber’s strapping. Wrap around water heater and provide snug fit.
General Notes: Blocking Attachment to Wall 1) Wood Stud Wall: Use two (2) #16 (or
minimum 1/4”Ø) x 3-1/2” lag screws with hex head and washer under head of screw. 2) Concrete or Masonry Wall: Use 3/8”Ø
masonry anchors with 1-5/8” embedment into existing wall at 12”-16” on center.
3) Steel Stud Wall: Use two (2) #10-16 self-drilling sheet metal screws with hex head and washer under head of screw.
4) Wood and Steel Stud Walls: Center screws on studs.
Figure 11: Straight Wall Configuration
• Method recommended by NIST. See NIST Report GCR 97-732 reference pg. 37. • Ø refers to the connection’s diameter.
A Homeowner’s Guide to Earthquake Retrofit
18
2 x 4 Wood Blocking four (4) places
Figure 12: Corner Wall Configuration
Necessary Tools
and Materials
• 2 x 4s • Stud locator • Screwdriver
• Hammer drill & bits (stone & masonry walls) • Variable speed drill & bits
(wood & metal stud walls) • Various fasteners
• Heavy-duty shelving brackets • Plumber’s strapping
• Flexible connector
• Fasten heavy-duty shelving brackets to the wood blocking. These brackets should fit snugly against the water heater.
• Wrap plumber’s strapping (metal strap-ping with holes) around the heater and secure it to the brackets.
➣ Remember: Use flexible, not rigid, water and gas connectors and check with local build-ing code officials to see if you must hire a licensed plumber to modify the connections.
➣ Make certain all adult and teenage family members know where to locate the gas shut-off valve and how to operate it.
Extend blocking at least two (2) studs beyond bracket attachment.
Existing Wall
Attach blocking to wall, see General Notes, below. Use one (1) heavy-duty shelv-ing bracket in four (4) places. Attach bracket to blocking with two (2) #16 (or min. 1/4”Ø) by 1-1/2” lag screws.
Attach bracket to plumber’s strapping with a minumum 1/4” Ø x 3/4” hex bolt. Use a washer under the nut. Keep 1” between end of bracket and center of bolt.
Attach bent ends of strapping with a minumum 1/4” Ø x 1” hex bolt. Use washers under head and nut. Keep 1” between end of strapping and center of bolt.
Use minumum 3/4” plumber’s strapping. Wrap around water heater and provide snug fit.
General Notes: Blocking Attachment to Wall
1) Wood Stud Wall: Use two #16 (or minimum 1/4”Ø) x 3-1/2” lag screws with hex head and washer under head of screw.
2) Concrete or Masonry Wall: Use 3/8”Ø masonry anchors with 1-5/8” embedment into existing wall at 12”-16” on center.
3) Steel Stud Wall: Use two (2) #10-16 self-drilling sheet metal screws with hex head and washer under head of screw.
4) Wood and Steel Stud Walls: Center screws on studs.
• Method recommended by NIST. See NIST Report GCR 97-732 reference pg. 37. • Ø refers to the connection’s diameter.
structural retrofits
hen an earthquake strikes, your home’s structure is put to the test. The skeleton must absorb the earthquake’s energy and provide a stable path to transfer the forces back into the ground. For this to happen, your home’s structure must be tied togeth-er; that is, your home’s roof should be tightly attached to the walls, and your walls should be fastened to each other, braced and anchored to a strong founda-tion. Figure 13 on page 20 shows how the components of a home can be secured to each other, so that they function as a single unit during an earthquake.
Keep in mind that the purpose of this section is to help you identify key areas of your home’s structure that are
susceptible to earthquake damage. If you are uncertain about what you see, or if you decide to have work done, enlist the help of a professional archi-tect, engineer, building contractor or your local building department.
Remember that an ideal time to inspect and retrofit your home’s structure is when you are making a significant change to your home such as adding on a room or remodeling. In either case, it is important that your work conforms to local building code requirements. Although the existing portion of your home may not need to be upgraded to current code requirements, now may be a good time to do so. Contact your local building code official to find out what is required for your project.
W
J. P reli Cripple wall foundation failure, Northridge, Calif.A Homeowner’s Guide to Earthquake Retrofit
20
Roof Rafters/Trusses
Figure 13: Typical Wood Frame House
Roof Covering
Blocking Framing Anchor
Top Plates Floor Joists Floor Sheathing Wall Studs Top Plates Floor Sheathing Floor Joists Top Plates
Mud Sill (Sill Plate) Cripple Wall Stud
Anchor Bolt Foundation Wall Foundation Reinforcement Brick Ledge Weep Holes Foundation Footing Metal Ties Brick Veneer Floor Ties Lap Siding Structural-Grade Plywood or OSB Sheathing Roof Sheathing Sill Plate Band Joist Band Joist
Foundation Systems
Earthquakes can create ground motion in any direction. During a quake, your home’s foundation moves with the earth, but the rest of your home reacts more slow-ly due to its inertia. See Figure 4on page 5. This creates a tremendous amount of stress on the connections between the foundation and the remaining structure. If these connections are not strong enough, your home may slide or fall off its founda-tion. In fact, this is one of the most com-mon and costly types of structural damage. Depending upon the foundation, however, this may be relatively easy to fix.
SLAB-ON-GRADEFOUNDATIONS
Slab-on-grade foundations are just that: concrete slabs that rest on the ground. In an earthquake-prone area, a home’s wood-frame structure should be connected to the slab with either anchor bolts or other
steel connectors (including steel plates).
Figure 14 on page 22 illustrates both types of connections.
If your home has anchor bolts, it can be difficult to conduct a thorough inspection, since you must get access to the top of the
sill plate. This almost always requires that you remove an inside or outside finished wall, so consider doing this when remodel-ing your house. Your inspection should reveal minimum 1/2-inch-diameter anchor bolts with washers and tightened nuts con-necting the sill plate to the foundation. These bolts should be spaced no more than six feet apart. Make sure that the bolts are in good condition and show no rust and that the nuts are tight. The concrete sur-rounding the bolt should be strong and free of any severe cracks (wider than the edge of a dime).
Top: Separation of porch from rest of house due to unan-chored foundation, Petrolia, Calif. Bottom: Home has shifted off its unan-chored slab-on-grade foundation, Coalinga, Calif. L. B rew er , USGS Steinbr ugge Collection EERC, UCB
A Homeowner’s Guide to Earthquake Retrofit
22
Figure 14: Concrete Slab-on-Grade Froundation
Concrete Slab-on-Grade Foundation
Sill Plate (Mud Sill)
(1) Mud Sill Anchor
(2) Steel Flat Plate Foundation Reinforcement (3) Anchor Bolt Stud Connectors (Framing Ties)
Note: Three different methods of hold-down are presented here. However, only one system is usually required. Steel plates connect the home’s sill plate to
the foundation. Carefully inspect the plates along the outside perimeter of the struc-ture. This may require removing the exteri-or cladding. Both the plates and fasteners should be in good condition. Keep an eye out for rust or signs of poor workmanship. The plates should be no more than six feet apart. Next, take a close look at the foun-dation. Are there severe cracks (wider than the edge of a dime) in the concrete? There shouldn’t be.
If the foundation is in poor condition or you must add additional anchorage, ask a professional engineer for help.
Cripple wall foundation failure and utility damage, Northridge, Calif.
J. P
CRAWLSPACE AND
BASEMENTFOUNDATIONS
A foundation with a crawl space or basement
typically has enough room underneath the first floor so that you can inspect the foundation and the underside of the floor-framing mem-bers, or joists, as long as the space is unfinished. The main difference between a crawl space and a full basement is the amount of headroom available.
The walls that rise from the foundation foot-ings to the first floor are called foundation walls. They are typically made with masonry blocks or concrete. In some cases, a short wood stud wall, or cripple wall, is positioned above ground between the top of the concrete or masonry foundation wall and the first floor. Cross sections of the three basic types of wall systems are highlighted in Figure 15.
Figure 15: Three Types of Foundation Walls
Exterior Sheathing Cripple Wall Top Plates Wood Stud Cripple Wall Anchor Bolt Sill Plate Foundation Footing Reinforcement Foundation Footing Sill Plate Solid Concrete Wall
Grout Inside Cavity Horizontal Reinforcement Foundation Footing Reinforcement Anchor Bolt
Wood Stud Cripple Wall Reinforced-Concrete Wall
Reinforced-Concrete Block/Masonry Wall Cripple wall foundation failure, Northridge, Calif. R. S hackelfor d, R. Chapman Foundation Wall Reinforcement Foundation Wall Reinforcement Foundation Wall
A Homeowner’s Guide to Earthquake Retrofit
24
Connections
➣ Steel plates or minimum 1/2-inch-diam-eter anchor bolts should connect the wood-framing sill plate to the concrete or mason-ry wall. These connections should be spaced no more than six feet apart. All components should be undamaged and rust-free. Also, examine the overall condition of the foun-dation wall. Make sure you don’t see any severe cracks (wider than the edge of a dime) in the masonry or concrete. If a wood cripple wall is present, it should show no evidence of termites or rot.
➣ If the foundation wall needs repair, or you need to add additional anchorage, check with a professional engineer for a suitable retrofit method.
Bracing
➣ For cripple walls, exterior lap siding alone cannot adequately resist the earth-quake’s lateral forces. You may need to add interior bracing, if it is not already there, to
prevent the cripple wall from collapsing in an earthquake:
• Nail 3/8-inch minimum structural-grade plywood or oriented strand board (OSB) sheathing to the inside of the wall. Ideally, the entire wall length should be covered. However, if you have limited access, place sheathing in each corner of your home. While the sheathing panels can be oriented in any direction, take care to ensure that each edge is supported by a stud or solid blocking.2 Figure 16 illustrates this method. If you have any questions about bracing weak cripple walls, con-tact a professional engineer.
➣ Adequately reinforced concrete founda-tion walls do not typically require addifounda-tion- addition-al bracing. Masonry foundation waddition-alls, how-ever, may benefit from an upgrade. Because of the difficulty in evaluating masonry walls, consult a professional engineer.
Figure 16: Strenghtening Cripple Walls with Plywood Panels
First Floor Band Joist Air Holes Structural-Grade Plywood or OSB Panels Bridging Band Joist Joist Ties Lap Siding Top Plates Wood Stud Cripple Wall Blocking (around anchor bolts or over plate anchor) Sill Plate
Anchor Bolt Foundation
Wall Sill Plate
Anchor Floor Joists
POST-AND-PIERFOUNDATIONS
A home can also be supported by a post-and-pier foundation (Figure 17). Large
beamsrun under the home’s floor joistsand are held up by posts. Each post rests on a separate concrete footing or pier. Some post-and-pier foundations are hidden from view by a cripple wall that runs around the home’s outside perimeter. This type of foundation is very susceptible to collapse during an earthquake. To better resist seis-mic forces, all of the foundation’s compo-nents, including the beams, posts and piers, must be securely tied together. When inspecting the foundation for possi-ble propossi-blems, carefully examine the way the components are anchored together. The connection between the beam and the post should be strong and without rust, rot or evidence of poor workmanship. One way to help your home better withstand an
Figure 17: Post-and-Pier Foundation
Joist Strap Ground Reinforced Connection Post Concrete Pier Anchored Post-Base Floor Joist Beam Joist Hangers
Post-and-pier with cripple wall foundation failure, Ferndale, Calif.
L. B rew er , USGS
B
A
Note: This drawing illustrates two different ways floor joists can frame into a beam.
A Homeowner’s Guide to Earthquake Retrofit
26
earthquake is to have the connection rein-forced with steel plates or with plywood or OSB connectors. Pre-manufactured metal straps or fixtures are available at most hard-ware stores (“A” in Figure 17). This rein-forcement is especially important if the joint in the beam falls on top of the post. The other critical joint in this foundation lies between the post and the pier. Examine this area carefully. The post should be securely fastened to the pier, and all com-ponents should be well constructed, free of rust, severe cracks (anything wider than the edge of a dime) and rot. Most new con-struction will have the post attached to the block with a built-in metal fixture (“B” in
Figure 17). In older construction, the post may simply rest on the top of the block. Reinforce the connection by nailing heavy-gauge straps onto at least two sides of the post and then bolting them into the con-crete block.
Keep in mind that strong connections between the various components may not be enough - the earthquake’s movement may still knock the home off its founda-tion. That is why extra connections and lateral bracing may be necessary. If your home has an exterior cripple wall, bracing and anchoring it further can provide the necessary protection. Refer to the previous discussion on cripple wall foundations for inspection and retrofit techniques. If your home does not have an exterior cripple wall, lateral bracing and strong con-nections between the posts are critical. Simple toe nailing is not sufficient. Since the seismic evaluation of post-and-pier foundations is complex, you should con-sult a professional engineer.
Failure of wood frame dwelling. A post-and-pier foundation with a cripple wall, Kern County, Calif.
Steinbr
ugge Collection, EERC, UCB
Post-and-Pier Foundation; undam-aged (top) and damundam-aged (bot-tom), Costa Rica.
EERI, S. S
wan EQE I
nter
Floor Systems
An earthquake exposes the floor to sub-stantial forces that can distort and damage the floor system, jeopardizing the strength of your home. The floor system typically consists of floor joists, floor sheathing and
band joists, which are located along the floor’s perimeter (Figure 18).
If you have access to the underside of your floor, make sure that your floor system is tied together and that the sub-floor is securely connected to the underlying floor joists. To reduce the possibility of rotation in an earthquake, each joist should be nailed to a band joist. Blocking
or bridging can also be placed between joists to keep them from falling over. The forces absorbed by the band joist or block-ing must, in turn, be transferred to the foundation. Secure this connection by using metal ties or framing anchors. Finally, make sure you do not find any evi-dence of poor workmanship, rust or rot. It may be difficult for you to access these areas. Often, the best time to evaluate your floor system is when you are planning to remodel. If your inspection reveals any problems, consult a professional engineer for the best way to retrofit your floor system.
Figure 18: The Floor System
Floor Sheathing Band Joist Framing Anchor Sill Plate Bridging Joist Hanger Foundation Wall Anchor Bolt
A Homeowner’s Guide to Earthquake Retrofit
28
Wall Systems
During an earthquake, the walls in your home, especially the exterior walls, play an important role in preventing your home from collapsing. The walls along with the floors and roof create a box. As the ground shakes, the floors and roof sway back and forth, while the walls in between try to stop your home from moving too far. To do their job, your walls must be strong and securely tied to the roof, floor and foundation.
WOOD-FRAMEDWALLS
Traditionally, the exterior walls of wood-frame houses are supported with wood studs attached to structural-grade plywood, orien-ted strand board (OSB) or diagonal wood
sheathing. To protect the exterior walls from the elements, they are covered with lap sid-ing, stucco, stone or brick veneer. In order for this system to resist damage from earthquake forces, it must be well designed with the appropriate hardware in place to ensure a strong connection between all of the ele-ments. See Figure 13on page 20 for details. Also, consider the number, size and location of the windows and doors, including garage doors, in your home. Too many can weaken your walls and lead to possible collapse in an earthquake. Imagine a closed box with sever-al openings: it will cave in much easier than one with no openings.
Unlike wood siding, brick and stone veneers require special attention because of their weight. During an earthquake, this heavy veneer can fall off, causing injury and signifi-cant damage. It is very important that these walls be tied to the wood-frames behind them with simple metal ties secured in the mortar. Sound building practices usually provide suffi-cient ties for the first story - even when not designed specifically for earthquakes. Special attention, however, may be required for the size and spacing of the ties in the upper stories. Because it is difficult to access these areas, the best time to inspect is while you are remodeling or adding on to your home. If you have any concerns about your home’s exterior walls, openings or veneer, contact a
Above: Failure of a wood stud wall to sill plate connection. Note anchor bolt and sill plate are still connected, San Fernando, Calif. Below, right: Failure of a unrein-forced brick-veneer wall, San Fernando, Calif.
Steinbr
ugge Collection, EERC, UCB
Steinbr
ugge Collection,
professional engineer. Ask him or her to determine how well your walls can with-stand an earthquake and to recommend necessary retrofit measures.
UNREINFORCEDMASONRYWALLS
If your home’s walls are made entirely of brick, stone, clay tile, concrete block or adobe, they could be susceptible to earth-quake damage. In newer masonry homes on the West Coast, these types of walls are often reinforced with steel bars grouted inside the walls. If the walls are reinforced and well anchored to the foundations, floors and roofs, they can usually withstand an earthquake. But masonry that is in poor condition, unreinforced or not securely tied to the rest of the structure, has the potential to collapse. Figure 19highlights the differ-ences between reinforced and unreinforced concrete block masonry walls.
A proper retrofit generally requires anchor-age designed specifically for earthquakes.
Since evaluating structural masonry walls for general soundness and specific seismic features is quite complex, it would be best to consult a professional engineer.
USGS, M. H
opper
Figure 19: Reinforced vs. Unreinforced Masonry Walls
Vertical Reinforcement Secured with Grout
Unreinforced Reinforced Horizontal Reinforcement Concrete Masonry Blocks
Second floor wall failure in an unreinforced masonry home. Note the apparently undamaged two-story wood frame building on right, Coalinga, Calif.
A Homeowner’s Guide to Earthquake Retrofit
30
Roof Systems
For your home to adequately resist the force of an earthquake, your roof structure must function like the top of a box, keep-ing the walls tied together and preventkeep-ing your home from coming apart at the seams. The typical roof system includes a
roof covering, roof sheathingand supporting
roof frame(Figure 20).
Start by inspecting your roof covering - it should be in good condition with no evi-dence of excessive wear and tear. Non-structural lightweight coverings, such as wood or asphalt shingles, usually behave well during an earthquake. Tile and slate coverings, which are heavy, tend to tax
your entire earthquake-resisting system and are also susceptible to sliding or falling off the roof during an earthquake. Next, consider what lies under the roof covering - the roof sheathing. Both ply-wood and OSB roof sheathing give strength to the roof regardless of the roof style. Roofs fully sheathed with structural-grade plywood or OSB tend to provide the greatest stability to the overall structure.
Figure 20: The Roof System
Roof Covering Roof Sheathing Blocking Wall Sheathing Framing Anchor Joist/Truss Tie Top Plates Ceiling Joists or Lower Chord of Truss Roof Rafters or Trusses
Top: Collapsed heavy tile roof supported on unreinforced brick masonry, San Fernando, Calif. Bottom: Roof to wall failure on an industrial building, San Fernando, Calif.
Steinbr
ugge Collection, EERC, UCB
G
Board sheathing is not as earthquake resistant as plywood and OSB sheathing, but may be adequate in smaller homes. Consult a professional engineer for more specific information. Also, keep in mind that large dormers, skylight openings and any other features that interrupt the sheathing can weaken your roof structure. Remember: sheathing can only do so much. You must also consider the roof sys-tem’s framing - the trusses or rafters that support the roof covering and sheathing. Similar to floor systems, roof-framing sys-tems can rotate or fall over when your home starts to move in an earthquake. To prevent this, blocking can be placed between the rafters or trusses where they rest on the wall. See Figure 20. Be sure to nail the blocking to the roof sheathing in order to transfer the lateral loads into the wall. Metal strap connectors or properly placed toe-nailing ensure that the blocking is adequately connected to the wall and rafters.
You may not be able to thoroughly exam-ine your roofing system due to limited access. The best time for a complete inspection is just before you re-roof your home. If you have any concerns about your roof ’s covering, sheathing, openings or framing members, talk to a professional engineer or qualified roofing contractor.
Unreinforced Chimneys
Unless specifically designed and reinforced for lateral forces, brick or stone chimneys often come apart or topple during an earth-quake, causing serious damage and injury. Usually, only the top portion of the chim-ney breaks apart during an earthquake; however, in some cases the entire chimney peels away from the side of the home.Check the top of your chimney to be sure it is free of severe cracks (anything wider than the edge of a dime). Take a close look at the mortar between the bricks. It should not scrape away easily with a metal tool. Even if your chimney is in good condition, it may still be at risk, especially if it is tall and slender. Some chimneys have metal straps that hold them to the side of the home. Carefully inspect these fastenings. They should be in good condition with no evidence of poor workmanship or rust. If you are uncertain about what you see, consult with a professional engineer. The engineer may recommend adding a brace between the top portion of the chimney and the roof. You may also need to use metal straps at several points to anchor the chimney to the home (Figure 21).
Chimney damage, San Fernando, Calif.
Steinbr
A Homeowner’s Guide to Earthquake Retrofit
32
Figure 21: How to Reinforce a Chimney
Flue Metal Strap Metal Straps House Frame Chimney Metal Straps
Note: (1) Wood blocking should be added to joists underneath metal straps. (2) See FEMA-232 for specific details, referenced on pg. 37.
Metal Straps are secured to underside
of roof joists. Chimney
Metal Straps are secured to top of ceiling joists.
Metal Straps are secured between floor sheathing and
floor joists.
Metal Straps are secured to underside
of floor joists.
Flue
Room Additions
If you’ve put on an addition or made other modifications in the past, you may have unknowingly weakened your home’s earth-quake resistance. Sometimes, homes that were originally very simple and structural-ly sound undergo changes that make them bigger or fancier, but also more prone to earthquake damage.
If you are planning to make major changes to the structure of your house, or if you suspect existing features lack good engineering details, consult a professional engineer.
Garages
Garages are particularly vulnerable to earthquake damage. The situation be-comes especially serious if the garage has a portion of the home over it. The large garage door opening removes almost an entire side of the box configuration and requires the remaining narrow walls on either side to support the roof and extra rooms. If these walls are not designed carefully to handle the situation, the entire structure may collapse when an earthquake strikes.
Strengthening the narrow garage walls generally requires engineering details, such as specially detailed plywood panels, steel bracing or a steel frame. A profes-sional engineer can help you decide what will work best for your home.
STRUCTURAL CHANGES THAT INCREASE THE RISK OF
EARTHQUAKE DAMAGE INCLUDE:
• replacing large portions of walls with windows or glass doors;
• adding large skylights or additional stories;
• opening large portions of existing floors; or
• additions that create an “L” configuration.
Top: Two stories now crushed to one story due to weak lower level (note crushed auto), San Fernando, Calif. Bottom: Damage due to inadequate lateral bracing on the ground level, San Francisco, Calif.
Steinbr
ugge Collection, EERC, UCB
U.S. G eological S u rv ey (D. P er kins)
A Homeowner’s Guide to Earthquake Retrofit
34
home improvement
project list
his list of home improvements divides the different retrofits into cost categories. The categories reflect the cost of each individual item. The cost will be slightly higher if you hire someone
to complete the work. You or your con-tractor can tackle these projects one at a time, but remember, the more you do the stronger your home becomes.
Category $ (<$300)
• Fasten bookcases and cabinets to nearby walls; • Install latches on cabinet doors and drawers; • Secure electronic equipment, artwork and other
breakable items to the tops of bookcases and cabinets; • Anchor large appliances to nearby walls;
• Secure pictures and bulletin boards to walls;
• Attach safety cables to light fixtures, suspended ceilings and other hanging items;
• Apply safety film to windows and doors; • Secure water heater to nearby wall.
Category $$ ($300-$1000)
• Reinforce cripple wall;• Strengthen narrow walls on either side of garage opening; • Anchor unreinforced chimneys.
Category $$$ (>$1000)
• Add anchor bolts or steel plates to foundation; • Secure post-and-pier foundation;
• Modify floor system;
• Strengthen wood-framed walls; • Reinforce masonry walls; • Retrofit roof system;
• Evaluate unique room additions.
ou will give yourself and your fami-ly a better chance of escaping harm during an earthquake by taking as many of the precautions outlined in this brochure as possible. But, these steps are only the beginning. To protect yourself as completely as possible, here are some added suggestions:
Before an
Earthquake Strikes:
• Teach everyone to “duck” or drop to the floor, take “cover” under a desk or table and “hold” on to it when an earthquake strikes. Remember the phrase: “Duck, Cover and Hold.”
• Learn first aid and CPR.
• Put together an emergency kit that includes at least a three-day supply of drinking water and food that needs no refrigeration and, generally, no cooking; emergency cooking equipment, if required; a portable NOAA weather radio; first aid supplies and medications; basic tools, such as a wrench, a flashlight and gloves; portable lanterns and batteries; credit cards and cash; and important doc-uments, including insurance policies. • Know where your gas, electric and
water main shut-off controls are and how to turn them off if there is a leak or electrical short. Make sure all adult and teenage members of your family know how to shut off each utility.
• Become familiar with your community’s disaster preparedness plans and create a family plan. Know where the closest police, fire and emergency medical facili-ties are located.
• Plan an escape route from your home and neighborhood and designate an emergency meeting place for the family to reunite. Establish a contact point to communicate with concerned relatives. • Periodically review your homeowner’s
insurance policy with your insurance agent or company to make sure that, if you are the victim of a disaster, you have enough coverage to rebuild your home and life. The typical homeowner’s insurance policy does not include earthquake coverage. If you are in an earthquake-prone area, you should con-sider purchasing earthquake insurance.
before, during and after:
be completely prepared
Y
EERI, J. E
A Homeowner’s Guide to Earthquake Retrofit
36
During an Earthquake:
• If you are indoors, “duck, cover and hold” until the shaking stops. Do not try and run out of a building – you may be hit by falling debris.
• If you are outdoors, move quickly and safely into the open, away from electri-cal lines, trees and buildings, and wait for the shaking to stop.
• If you are driving, carefully and slowly bring your vehicle to a stop at the side of the road away from traffic. Make sure that you do not stop on or under bridges. Do not stop under power lines or near roadway signs that might fall. Once the shaking has stopped, you can continue driving. Watch carefully for possible damage to the roadway.
After an Earthquake Strikes:
• Check for hazards, such as gas or water leaks and electrical shorts. Turn off damaged utilities. Have the fire depart-ment or gas and electric companies turn the utilities back on when the area is secured.• Check for injuries and administer first aid as needed.
• Check your food and water supplies. Do not eat anything from open containers near shattered glass.
• Listen to and follow the advice and recommendations of local aid organi-zations, including the emergency man-agement office, the fire department and the utility companies.
• Keep roads and phone lines clear for emergency use.
• Be prepared for aftershocks.
D. P er kins, USGS C. S to ver , USGS
references
APA: The Engineered Wood Association. Earthquake Safeguards. Tacoma, WA: APA, 1997.
Association for Bay Area Governments. Techniques for Mitigating Earthquake Hazards. 18 March 1999.
<http://www.abag.ca.gov/bayarea/eqmaps/fixit/fixit.html>
California Governor’s Office of Emergency Services and Federal Emergency Management Agency. An Ounce of Prevention: Strengthening Your Wood-frame House for Earthquake Safety. Sacramento, CA: California OES, 1993.
California Governor’s Office of Emergency Services and Federal Emergency Management Agency. Guide to Strengthening and Repairing Your Home Before the Next Earthquake. Sacramento, CA: California OES, 1995.
California Seismic Safety Commission. The Homeowner’s Guide to Earthquake Safety. Sacramento, CA: California SSC, 1998.
Federal Emergency Management Agency. Reducing the Risks of Nonstructural Earthquake Damage. FEMA 74. Washington, DC: FEMA, 1994.
Federal Emergency Management Agency. Homebuilder’s Guide to Seismic Resistant Construction. FEMA 232. Washington, DC: FEMA, 1998.
Federal Emergency Management Agency. Identification and Reduction of Nonstructural Earthquake Hazards in Schools. FEMA 241. Washington, DC: FEMA, 1993. Federal Emergency Management Agency. FEMA: Mitigation “How To” Series.
<http://www.fema.gov/MIT/how2.htm>
Gray, Ralph Gareth. “Riding Out the Big One”. Fine Homebuilding. Two Part Series: December 1990/January 1991.
Kimball, Virginia. Earthquake Ready: The Complete Preparedness Guide. Malibu, CA: Roundtable, 1992.
Mroz, M.P., and T.T. Soong. NIST GCR 97-732: Fire Hazards and Mitigation Measures Associated with Seismic Damage of Water Heaters. Gaithersburg, MD: National Institute of Standards and Technology, 1997.
Southern California Earthquake Center. Putting Down Roots in Earthquake Country. 1995. <http://www.scecdc.scec.org/eqcountry.html> F. D esler , AP A B ay A rea R egional E ar thquake P repar dness P roject
A Homeowner’s Guide to Earthquake Retrofit
38
APA - The Engineered Wood Association P.O. Box 11700 Tacoma, WA 98411-0700 Tel: 253-565-6600 Help Desk: 253-620-7400 Fax: 253-565-7265 http://www.apawood.org/
American Society of Civil Engineers (ASCE) 1801 Alexander Bell Drive
Reston, VA 20191-4400 Tel: 703-295-6000 Fax: 703-295-6222 http://www.asce.org American Red Cross
Check your local phone directory for the chapter nearest you.
http://www.redcross.org
Association of Bay Area Governments (ABAG) P.O. Box 2050
Oakland, CA 94604-2050 Tel: 510-464-7900 Fax: 510-464-7970 http://www.abag.ca.gov/
Applied Technology Council (ATC) 555 Twin Dolphin Drive, Suite 550 Redwood City, CA 94065
Tel: 650-595-1542 Fax: 650-593-2320
http://www.atcouncil.org/index.htm
Building Officials and Code Administrators International, Inc. (BOCAI)
4051 West Flossmoor Road
Country Club Hills, IL 60478-5795 Tel: 708-799-2300
Fax: 708-799-4981 http://www.bocai.org
California Division Of Mines and Geology 801 K Street, MS 14-33
Sacramento, CA 95814-3532 Tel: 916-445-5716
Fax: 916-445-1853
http://www.consrv.ca.gov/dmg
California Office of Emergency Services 1300 Clay Street, Suite 408
Oakland, CA 94612 Tel: 510-286-0895 Fax: 510-286-3581 http://www.oes.ca.gov/
California Seismic Safety Commission 1755 Creekside Oaks Drive, Suite 100 Sacramento, CA 95833
Tel: 916-263-5506 Fax: 916-263-0594 http://www.seismic.ca.gov
California Universities for Research in Earthquake Engineering (CUREe) 1301 S. 46th Street
Richmond, CA 94804-4698 Tel: 510-231-9557
Fax: 510-231-5664 http://www.curee.org
Center for Earthquake Research and Information (CERI) University of Memphis Memphis, TN 38152 Tel: 901-678-2007 Fax: 901-678-4734
http://www.ceri.memphis.edu/
Central U.S. Earthquake Consortium (CUSEC) 2630 E. Holmes Road Memphis, TN 38118 Tel: 901-544-3570 Fax: 901-544-0544 http://www.cusec.org
additional sources
of information
Earthquake Engineering Research Center (EERC) NISEE/EERC 1301 South 46th Street Richmond, CA 94804-4698 Tel: 510-231-9403 Fax: 510-231-9461 http://nisee.ce.berkeley.edu/ Earthquake Engineering Research Institute (EERI) 499 14th Street, Suite 320 Oakland, CA 94612-1934 Tel: 510-451-0905 Fax: 510-451-5411 http://www.eeri.org/ Federal Emergency
Management Agency (FEMA) P.O. Box 2012
Jessup, MD 20794-2012 Tel: 1-800-480-2520 http://www.fema.gov
Institute for Business & Home Safety (IBHS) 175 Federal Street, Suite 500
Boston, MA 02110-2222 Tel: 617-292-2003 Fax: 617-292-2022 http://www.ibhs.org
International Code Council (ICC) 5203 Leesburg Pike Falls Church, VA 22041 Tel: 703-931-4533 Fax: 703-379-1546 http://www.intlcode.org International Conference of Building Officials (ICBO) 5360 South Workman Mill Road Whittier, CA 90601-2298 Tel: 562-699-0541 Fax: 562-692-3853 http://www.icbo.org
International Window Film Association 318-A Brown Street
P.O. Box 3871
Martinsville, VA 24115-3871 Tel: 540-666-4932
Fax: 540-666-4933 http://www.iwfa.com
Mid-America Earthquake Center 1241 Newmark Lab MC-250 205 N. Mathews Urbana, IL 61801 Tel: 217-244-6302 Fax: 217-333-3821 http://mae.ce.uiuc.edu Multidisciplinary Center for
Earthquake Engineering Research (MCEER) MCEER/IS
State University of New York @ Buffalo 304 Capen Hall
Buffalo, NY 14260-2200 Tel: 716-645-3377 Fax: 716-645-3379 http://mceer.buffalo.edu
National Information Service for
Earthquake Engineering/California Institute for Technology (NISEE/CALTECH) 1301 South 46th Street
Richmond, CA 94804-4698 Tel: (510) 231-9403 Fax: (510) 231-9461 http://www.eerc.berkeley.edu National Institute for Urban Search and Rescue (NI/USR) P.O. Box 90909 Santa Barbara, CA 93190 Tel: 800-767-9983 Fax: 805-966-6178 http://www.niusr.org/
National Oceanic and Atmospheric Administration (NOAA),
National Geophysical Data Center (NGDC) 325 Broadway
Boulder, CO 80303 Tel: 303-497-6826 Fax: 303-497-6513
http://www.ngdc.noaa.gov/ngdc.html Nature of the Northwest
Information Center
800 NE Oregon Street, Suite 177 Portland, OR 97232
Tel: 503-872-2750 Fax: 503-731-4066 http://naturenw.org
Pacific Earthquake Engineering Research Center (PEER) Richmond Field Station
University of California, Berkeley 1301 S. 46th Street
Richmond, CA 94804-4698 Tel: 510-231-9554
Fax: 510-231-9471 http://peer.berkeley.edu Simpson Strong Tie 4637 Chabot Dr., Suite 200 Pleasanton, CA 94588 Tel: 925/460-9912 Fax: 925/847-0694
http://www.strongtie.com/index.htm Southern Building Code
Congress International, Inc. (SBCCI) 900 Montclair Road Birmingham, AL 35213-1206 Tel: 205-591-1853 Fax: 205-591-0775 http://www.sbcci.org Southern California Earthquake Center (SCEC) University of Southern California Los Angeles, CA 90089 Tel: 213-740-5843 Fax: 213-740-0011 http://www.scec.org/
University of California Berkeley Seismological Laboratory 202 McCone Hall Berkeley, CA 94720-4760 Tel: 510-642-3977 Fax: 510-643-5811 http://www.seismo.berkeley.edu/seismo/ USGS National Earthquake Information Center (NEIC)
P.O. Box 25046 , Denver Federal Center Denver, CO 80225
Tel: 303-273-8500 http://gldss7.cr.usgs.gov or http://wwwneic.cr.usgs.gov/
A Homeowner’s Guide to Earthquake Retrofit
40
Alfa Insurance Group Alliance Insurance Companies Allstate Insurance Group
American Agricultural Insurance Company American Family Insurance Group American Re-Insurance Company Amica Mutual Insurance Company Andover Group
Auto Club South Insurance Company Automobile Club Insurance Association Baldwin Mutual Insurance Company Bankers Insurance Group
Barnstable Group
Brethren Mutual Insurance Company
California State Auto Association Inter-Insurance Bureau CIGNA Group
Cincinnati Financial Corporation CNA Insurance Companies Colonial Penn Group
Concord Group Insurance Companies Country Companies
EMC Insurance Companies
Employers Insurance of Wausau - A Mutual Company Farm Bureau Group of Iowa
Farmers Insurance Group FCCI Insurance Group
First Delaware Insurance Company
First Floridian Auto and Home Insurance Company Florida Family Mutual Insurance Company Florida Farm Bureau Casualty Insurance Company FM Global
Foremost Corporation Group General Re Group
Gerling Global Reinsurance Corporation of America Germania Mutual Group
Grange Mutual Insurance Company (OR) Harleysville Insurance Companies Hartford Financial Services Group The Hartford Steam Boiler Group
Holyoke Mutual Insurance Company in Salem IPC Re Ltd.
Kemper Insurance Companies Keystone Insurance Companies LaSalle Re Ltd.
Liberty Mutual Group
Maine Mutual Fire Insurance Company Merastar Insurance Company
Metropolitan Group
Millers Mutual Insurance Company Montgomery Insurance Companies Motor Club of America Group Mutual Assurance Society of Virginia Mutual of Enumclaw Insurance Company Mutual of Omaha Group
NAC Reinsurance Corporation
National Grange Mutual Insurance