5-1
5
Configuring a DNS
Infrastructure
Exam Objectives in this Chapter:■ Configure a DNS server. ■ Configure DNS zone options. ■ Configure DNS forwarding. ■ Manage DNS zone settings. ■ Manage DNS server options.
Why This Chapter Matters
The Domain Name System (DNS) is too vital an element in a network infrastruc-ture to be merely deployed and forgotten on a single server. For medium-sized and large organizations, DNS must be distributed throughout the network and kept up to date. Network administrators are tasked with the responsibility of maintaining this infrastructure, a job which requires understanding the nuances of features such as zone transfers, delegations, stub zones, round robin, and net-mask ordering. Because of its importance, this chapter is one of the most heavily tested sections on the 70-291 exam.
This chapter introduces you to the main configuration options available for DNS servers and zones, many of which are available in the server properties and zone properties dialog boxes. In addition, this chapter teaches you how and why to implement delegations and stub zones in your Windows Server 2003 networks.
Lessons in this Chapter:
■ Lesson 1: Configuring DNS Server Properties . . . .5-3 ■ Lesson 2: Configuring Zone Properties and Transfers . . . 5-21 ■ Lesson 3: Configuring Advanced DNS Server Properties . . . 5-45 ■ Lesson 4: Creating Zone Delegations . . . 5-57 ■ Lesson 5: Deploying Stub Zones . . . 5-67
Before You Begin
To complete this chapter, you must have
■ Networked two computers, named Computer1 and Computer2, each running Windows Server 2003. Computer1 should be assigned a static address of 192.168.0.1/24, and Computer2 should be configured to obtain an address auto-matically. Computer2 should have an alternate configuration address of 192.168.0.2/24. Both Computer1 and Computer2 should have a configured pri-mary DNS suffix of domain1.local.
■ A phone line and dial-up Internet service provider (ISP) account. (If you choose to substitute a dedicated Internet connection for this requirement, you should rename this Internet connection “MyISP.” You might also need to make other minor adjustments to the lesson exercises.)
■ Installed the Network Monitor Tools subcomponent of the Management And Mon-itoring Tools Windows component on Computer1. A Network Monitor capture file named Name Resolution 1 should be saved to the My Captures folder in My Doc-uments on Computer1. This capture, created before DNS is deployed on the net-work, shows the traffic exchanged on the network after the Ping computer2 command is executed on Computer1.
■ Installed the Domain Name System (DNS) subcomponent of the Networking Ser-vices. Once installed, the DNS server should host a primary forward lookup zone named domain1.local and a primary reverse lookup zone corresponding to the 192.168.0.0/24 address space. Both zones are configured to accept secure and nonsecure updates. A host (A) resource record for both Computer1 and Computer2 should exist in the domain1.local zone.
■ Installed Windows Support Tools on Computer1.
■ Created a dial-up connection to the Internet named MyISP on Computer1 that you have shared through Internet Connection Sharing (ICS). Computer2 should receive a fresh Internet Protocol (IP) configuration from Computer1 after ICS is enabled. (If you are using a dedicated Internet connection instead of a dial-up account, you should apply this requirement to the dedicated connection.)
■ Selected the Use This Connection’s DNS Suffix In DNS Registration option on the DNS tab in the Advanced TCP/IP Settings dialog box for the Local Area Connec-tion on Computer2.
Lesson 1: Configuring DNS Server Properties
After you have installed a DNS server, you might need to modify its default settings to suit your network needs. In this lesson, you learn the various settings that you can con-figure through the server properties dialog box in the DNS console. The settings you configure in this properties dialog box do not apply to a particular zone but to the server in general.
After this lesson, you will be able to
■ Configure a DNS server to listen for queries on selected network adapters
■ Configure a DNS server to forward all or select DNS queries to an upstream DNS server
■ Determine when it is necessary to modify root hints
Estimated lesson time: 45 minutes
Exploring DNS Server Properties Tabs
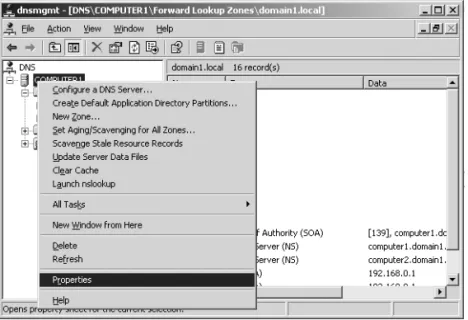
The DNS server properties dialog box allows you to configure settings that apply to the DNS server and all its hosted zones. You can access this dialog box in the DNS console tree by right-clicking the DNS server you want to configure and then selecting Proper-ties, as shown in Figure 5-1.
f05ni01
Figure 5-1 Accessing the DNS server properties dialog box
Interfaces Tab
The Interfaces tab allows you to specify which of the local computer’s IP addresses the DNS server should listen to for DNS requests. For example, if your server is multi-homed and has one IP address for the local network and another IP address connected to the Internet, you can prevent the DNS server from servicing DNS queries from out-side the local network. To perform this task, specify that the DNS server listen only on the computer’s internal IP address, as shown in Figure 5-2.
By default, the setting on this tab specifies that the DNS server listens on all IP addresses associated with the local computer.
f05ni02
Figure 5-2 Interfaces tab
Exam Tip For simulation questions, be sure to review the procedure for configuring DNS listening by adding or removing interfaces from the DNS server. To spot such questions, look for requirements stating that a DNS server should listen or respond to queries only from cer-tain networks (such as the private network).
Forwarders Tab
The Forwarders tab allows you to forward DNS queries received by the local DNS server to upstream DNS servers, called forwarders. Using this tab, you can specify the IP addresses of the upstream forwarders, and you can specify the domain names of queries that should be forwarded. For example, in Figure 5-3, all queries received for the domain lucernepublishing.com will be forwarded to the DNS server 207.46.132.23. When, after
receiving and forwarding a query from an internal client, the local forwarding server receives a query response back from 207.46.132.23, the local forwarding server then passes this query response back to the original querying client. The process of forward-ing selected queries in this way is known as conditional forwarding.
f05ni03
Figure 5-3 Forwarders tab
In all cases, a DNS server configured for forwarding uses forwarders only after it has determined that it cannot resolve a query using its authoritative data (primary or sec-ondary zone data) or cached data.
Tip To specify how long the forwarding server should wait for a response from a forwarder before timing out, on the Forwarders tab, enter a value in the Number Of Seconds Before For-ward Queries Time Out text box. The default setting is 5.
When to Use Forwarders In some cases, network administrators might not want DNS
servers to communicate directly with external servers. For example, if your organiza-tion is connected to the Internet by means of a slow wide area link, you can optimize name resolution performance by channeling all DNS queries through one forwarder, as shown in Figure 5-4. Through this method, the server cache of the DNS forwarder has the maximum potential to grow and reduce the need for external queries.
f05ni04
Figure 5-4 Using forwarding to consolidate caching
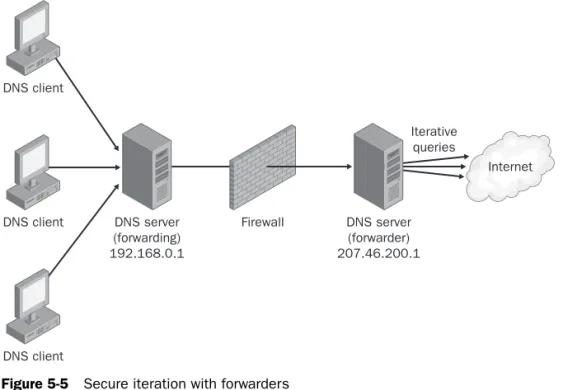
Another common use of forwarding is to allow DNS clients and servers inside a firewall to resolve external names securely. When an internal DNS server or client communi-cates with external DNS servers by making iterative queries, normally the ports used for DNS communication with all external servers must be left open to the outside world through the firewall. However, by configuring a DNS server inside a firewall to forward external queries to a single DNS forwarder outside your firewall, and by then opening ports only to this one forwarder, you can resolve names without exposing your net-work to outside servers. Figure 5-5 illustrates this arrangement.
To external DNS servers
DNS forwarder 192.168.0.1
Forwarding DNS server (forwards to 192.168.0.1) DNS client
Forwarding DNS server (forwards to 192.168.0.1) DNS client
Forwarding DNS server (forwards to 192.168.0.1) DNS client
f05ni05
Figure 5-5 Secure iteration with forwarders
Exam Tip If your forwarders go down, you should remove them and force your DNS servers to perform recursion against the root servers. Alternatively, if you configure forwarders and remove the root hints, you are essentially forcing your DNS servers to use the forwarders for all unresolved queries.
When to Use Conditional Forwarding The term conditional forwarding describes a
DNS server configuration in which queries for specific domains are forwarded to spe-cific DNS servers.
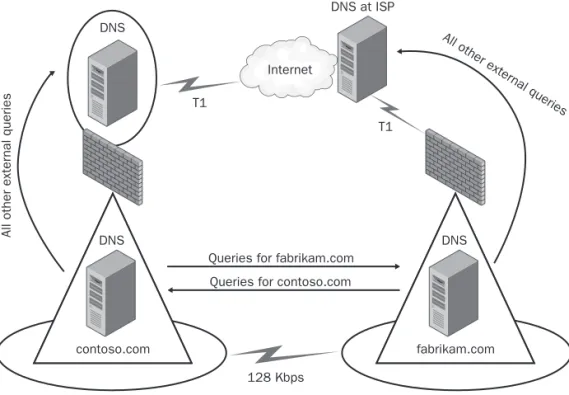
One of the many scenarios in which conditional forwarding is useful is when two sep-arate networks merge. For example, suppose the Contoso and Fabrikam companies have separate networks with Active Directory directory service domains. After the two companies merge, a 128-kilobits per second (Kbps) leased line is used to connect the private networks. For clients in each company to resolve queries for names in the opposite network, conditional forwarding is configured on the DNS servers in both domains. Queries to resolve names in the opposite domain will be forwarded to the DNS server in that domain. All Internet queries are forwarded to the next DNS server upstream beyond the firewall. This scenario is depicted in Figure 5-6.
Note that conditional forwarding is not the only way to provide name resolution in this type of merger scenario. Secondary zones and stub zones can also be configured for this reason and provide basically the same name resolution service. However, conditional
DNS client DNS client DNS client
Internet
DNS server (forwarding) 192.168.0.1
Firewall DNS server (forwarder) 207.46.200.1
Iterative queries
forwarding eliminates zone transfer traffic, provides zone data that is up to date, and allows for simple configuration and maintenance.
f05ni06
Figure 5-6 A conditional forwarding scenario
Exam Tip Conditional forwarding is a topic you should expect to encounter more than once on the 70-291 exam. Understand its purpose and the benefits it offers. For simulation ques-tions, be sure to review how to configure conditional forwarding by using the Forwarders tab of the DNS server properties sheet. Finally, to spot these simulation questions, look for require-ments stating that name resolution requests for a specific domain (such as contoso.com) must be resolved by a server in that domain or that no zone transfer traffic should occur over a wide area network (WAN) link.
Disabling Recursion The Forwarders tab allows you to disable recursion on any
que-ries, specified by domain, that have been configured to be forwarded to an upstream server. When recursion is not disabled (the default), the local DNS server attempts to resolve a fully qualified domain name (FQDN) after a forwarder has failed to do so. This condition is preferable if you want to optimize settings for fault tolerance: If the upstream forwarder is down, name resolution can fall back to the local DNS server. However, when under this default setting the forwarder receives the forwarded query and still fails to resolve it, the subsequent fallback recursion that occurs at the local DNS server is usually redundant and delays an inevitable query failure message
DNS
DNS
contoso.com
DNS
fabrikam.com Queries for fabrikam.com
Queries for contoso.com
128 Kbps T1
T1 Internet
DNS at ISP
All other exter
nal queries
All other exter
nal queries
response. Disabling recursion on queries for which forwarding has been configured thus optimizes the speed of negative query responses at the expense of fault tolerance. When forwarders are configured this way, in combination with disabling recursion, the local DNS server is known as a slave server because, in these cases, it is completely dependent on the forwarder for queries that it cannot resolve locally.
Note Do not confuse the use of the term slave server with the term slave zone, which is used in some implementations of DNS. In some non-Microsoft DNS servers, such as Berkeley Internet Name Domain (BIND), primary zones are called master zones and secondary zones are called slave zones.
Advanced Tab
The Advanced tab, shown in Figure 5-7, allows you to enable, disable, and configure certain DNS server options and features such as recursion, round robin, automatic scavenging, and netmask ordering. To learn more about the features configurable on this tab, see Lesson 3, “Configuring Advanced DNS Server Properties,” in this chapter.
Note Whereas the Forwarders tab allows you to disable recursion on selected queries for domains used with forwarders, the Advanced tab allows you to disable recursion for all que-ries received by the local DNS server.
Note If you disable recursion on a DNS server using the Advanced tab, you cannot use for-warders on the same server, and the Forfor-warders tab becomes inactive.
f05ni07
Root Hints Tab
The Root Hints tab contains a copy of the information found in the WINDOWS \System32\Dns\Cache.dns file. For DNS servers answering queries for Internet names, this information does not need to be modified. However, when you are configuring a root DNS server (named “.”) for a private network, you should delete the entire Cache.dns file. (When your DNS server is hosting a root server, the Root Hints tab is unavailable.)
In addition, if you are configuring a DNS server within a large private namespace, you can use this tab to delete the Internet root servers and specify the root servers in your network instead.
Exam Tip You need to understand root hints and root servers for the 70-291 exam, both for multiple choice and simulation questions. In addition to the information presented above, you also need to know that adding a zone named “.” to a DNS server will turn that DNS server into a root server. And, when that happens, the DNS server will never forward queries or per-form recursion for external names. In general, configuring a root server in this way prevents clients from accessing the Internet. However, users can still browse the Web if a Web proxy server such as an Internet Security and Acceleration (ISA) Server is deployed on the network and browsers have been configured to point to the proxy.
Figure 5-8 shows the Root Hints tab.
f05ni08
Figure 5-8 Root Hints tab
Note Every few years the list of root servers on the Internet is slightly modified. Because the Cache.dns file already contains so many possible root servers to contact, it is not neces-sary to modify the root hints file as soon as these changes occur. However, if you do learn of the availability of new root servers, you can choose to modify your root hints accordingly. As of this writing, the last update to the root servers list was made on January 29, 2004. You can download the latest version of the named cache file from InterNIC at ftp://rs.internic.net /domain/named.cache.
Debug Logging Tab
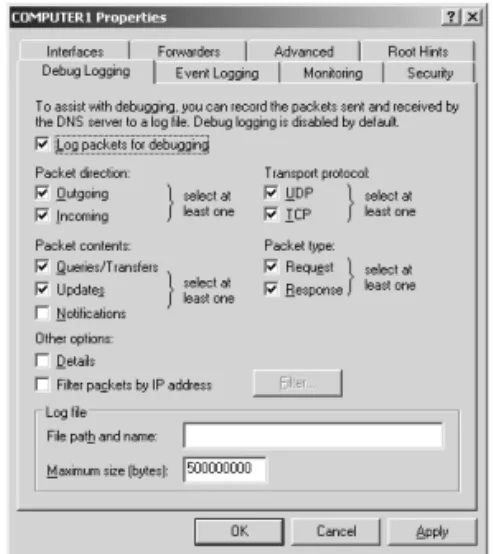
The Debug Logging tab allows you to troubleshoot the DNS server by logging the packets it sends and receives. Because logging all packets is resource-intensive, this tab allows you to restrict which packets to log, as specified by transport protocol, source IP address, packet direction, packet type, and packet contents. For more information on this feature, see Lesson 1 of Chapter 6, “Monitoring and Troubleshooting DNS.” Figure 5-9 shows the Debug Logging tab.
f05ni09
Figure 5-9 Debug Logging tab Event Logging Tab
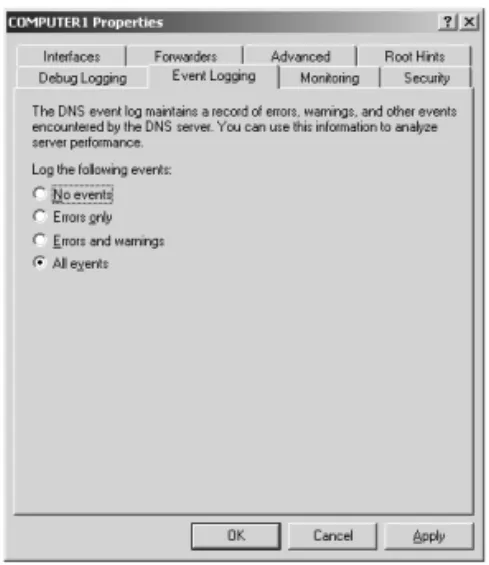
You can access the DNS Events log through the Event Viewer node in the DNS console. The Event Logging tab, shown in Figure 5-10, allows you to restrict the events written to the DNS Events log file to only errors or to only errors and warnings. It also allows you to disable DNS logging. For more powerful features related to the filtering of DNS events, use the Filtering tab of the DNS Events Properties dialog box. You can open this dialog box by selecting Event Viewer in the left pane of the DNS console, right-clicking DNS Events in the right pane, and selecting Properties.
f05ni10
Figure 5-10 Event Logging tab Monitoring Tab
The Monitoring tab allows you to test basic DNS functionality with two simple tests. The first test is a simple query against the local DNS server. To perform the first test success-fully, the server must be able to answer forward and reverse queries targeted at itself. The second test is a recursive query to the root DNS servers. To perform this second test successfully, the DNS server computer must be able to connect to the root servers specified on the Root Hints tab.
The Monitoring tab, shown in Figure 5-11, also allows you to schedule these tests to be conducted at regular intervals. The results of the tests, whether performed manually or automatically, are shown in the Test Results area of the tab.
f05ni11
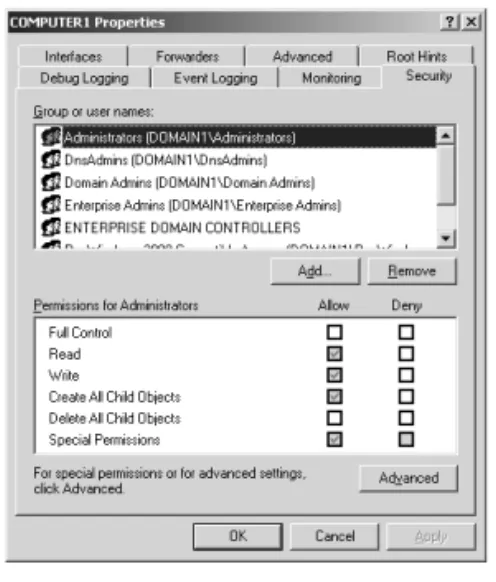
Security Tab
The Security tab is available only when the DNS server is also a domain controller. This tab allows you to control which users are granted permissions to view, configure, and modify the DNS server and its zones. By clicking the Advanced button, you can further refine settings related to DNS server permissions.
Figure 5-12 shows the Security tab.
f05ni12
Figure 5-12 Security tab
Practice 1: Comparing NetBIOS and DNS Name Resolution Traffic
In this practice, you perform a capture of name resolution traffic and compare the result to a similar capture that was performed in Lesson 1 of Chapter 4, “Configuring DNS Servers and Clients.”
Exercise 1: Capturing Name Resolution Traffic
In this exercise, you perform a Network Monitor capture of name resolution traffic from Computer2 and then compare this capture to one already saved on Computer1.
1. Log on to Computer2 as Administrator.
2. Install Network Monitor on Computer2, as explained in Lesson 1 of Chapter 3, “Monitoring and Troubleshooting TCP/IP Connections.”
3. On Computer2, open Network Monitor.
4. If a message box appears requesting that you specify a network on which to cap-ture data, click OK.
5. Select the adapter associated with your internal local area network (LAN), and then click OK.
6. Click the Start Capture button to begin a network trace. 7. Open a command prompt.
The next two steps force Computer2 to contact Computer1 during the name reso-lution process.
8. At the prompt, type nbtstat –R, and then press ENTER. This step clears the cache of any NetBIOS name mappings.
9. At the prompt, type ipconfig /flushdns, and then press ENTER. This step clears
the cache of host (DNS) name mappings.
10. At the command prompt, type ping computer1, and then press ENTER.
The ping is successful. Notice how in this output, domain1.local has been appended to “computer1” in the original query.
11. After the Ping output has completed, switch back to Network Monitor, and click Stop And View Capture. The Frame Viewer window opens in Network Monitor, displaying the frames just captured.
12. From the File menu, select Save As to open the Save As dialog box. 13. In the File Name text box, type Name Resolution 2.
14. On Computer2, save the file to the My Captures folder.
15. Compare the traffic in the Name Resolution 2 file to the traffic in the Name Reso-lution 1 file saved in the My Captures folder on Computer1. Then answer the fol-lowing questions in the spaces provided.
What is the essential difference between the two captures?
What accounts for the difference in name resolution methods?
16. Close all open windows on Computer1 and Computer2. If prompted to save any open files, click No.
Practice 2: Verifying SRV Resource Records for Active Directory in DNS
After you first install Active Directory, you must verify that the installation has created the proper service location (SRV) resource records in DNS. In this practice, you install an Active Directory domain by promoting Computer1 to the status of domain control-ler. You then examine the DNS console to verify that the SRV resource records required for the new domain1.local Active Directory domain have been created. Finally, you join Computer2 to the new domain.
Exercise 1: Installing Active Directory
In this exercise, you install Active Directory and promote Computer1 to the status of domain controller in a new domain.
1. Log on to Computer1 as Administrator.
2. Verify that Computer1 is disconnected from the Internet. 3. Click Start and then select Manage Your Server.
The Manage Your Server page appears.
4. On the Manage Your Server page, click the Add Or Remove A Role option. The Preliminary Steps page of the Configure Your Server Wizard appears. 5. Read the text on the page, and then click Next.
The Server Role page appears.
6. In the Server Role list, select Domain Controller (Active Directory), and then click Next.
The Summary Of Selections page appears. 7. Read the text on the page, and then click Next.
The Welcome page of the Active Directory Installation Wizard appears. 8. Click Next.
The Operating System Compatibility page appears.
9. Read all of the text on this page, and then answer the following question in the space provided.
What is the restriction that applies to clients running Microsoft Windows 95 and Microsoft Windows NT 4 SP3 or earlier?
10. Click Next.
11. Click Next to accept the default selection, Domain Controller For A New Domain. The Create New Domain page appears.
12. Click Next to accept the default selection, Domain In A New Forest. The New Domain Name page appears.
13. In the Full DNS Name For New Domain text box, type domain1.local, and click Next.
The NetBIOS Domain Name page appears.
14. Click Next to accept the default selection of DOMAIN1 in the Domain NetBIOS Name text box.
The Database And Log Folders page appears.
15. Click Next to accept the default selections in the Database Folder text box and the Log Folder text box.
The Shared System Volume page appears.
16. Click Next to accept the default selection in the Folder Location text box. The DNS Registration Diagnostics page appears.
17. Read the diagnostic results and then click Next. The Permissions page appears.
18. Click Next to accept the default selection, Permissions Compatible Only With Windows 2000 Or Windows Server 2003 Operating Systems.
The Directory Services Restore Mode Administrator Password page appears. 19. In the Restore Mode Password text box and the Confirm Password text box, type
a strong password.
This setting specifies that the password you have just entered must be used when-ever you log on as Administrator in Directory Services Restore mode.
20. Click Next.
The Summary page appears.
21. Read the text on the page, and then click Next.
The Active Directory Installation Wizard window appears while Active Directory is being installed. When installation is complete, the Completing The Active Direc-tory Installation Wizard page appears.
22. Click Finish.
The Active Directory Installation Wizard dialog box appears, indicating that Windows must be restarted before the changes will take effect.
Exercise 2: Verifying SRV Resource Records in DNS
In this exercise, you verify that new SRV resource records have been added to the domain1.local zone.
1. From Computer1, log on to Domain1 as Administrator. Use the same password that you originally assigned to the Computer1 Administrator account.
2. If you see the final page in the Configure Your Server Wizard, indicating that the server is now a domain controller, click Finish.
3. Open the DNS console. Expand the COMPUTER1, Forward Lookup Zones, and the Domain1.local nodes.
Six subdomains are now listed under Domain1.local. They have been created by the installation of Active Directory.
4. In the DNS console tree, browse to locate an SRV resource record named _ldap._tcp.dc._msdcs.domain1.local. To perform this task, read each label in the name of the resource record from right to left, starting with the Domain1.local node. For example, after you have opened the _msdcs.domain1.local node, open the dc node, and finally select the _tcp node. You see the _ldap Service Location (SRV) resource record in the details pane when the _tcp node is selected, as shown in Figure 5-13.
f05ni13
Figure 5-13 SRV resource records for a domain controller
This resource record is used to locate domain controllers for the domain1.local domain. It is the most important record to check after you have installed Active Directory.
5. In the DNS console tree, browse to locate an SRV resource record named _ldap._tcp.gc._msdcs.domain1.local.
This resource record is used to locate Active Directory global catalogs for the domain1.local domain. The records have been created successfully.
Exercise 3: Joining a Computer to the New Domain In this exercise, you join Computer2 to the new domain.
1. Log on to Computer2 as Administrator. 2. In Control Panel, double-click System.
The System Properties dialog box opens.
3. On the Computer Name tab, click the Change button. The Computer Name Changes dialog box opens. 4. In the Member Of area, select Domain.
5. In the Domain text box, type domain1.local, and then click OK.
The Computer Name Changes dialog box opens, prompting you for an account name and password with the permissions to add Computer2 to Domain1.
6. In the User Name text box, type administrator.
7. In the Password text box, type the password that you originally assigned to the Administrator account for Computer1. (This password is now the password for the Administrator account in Domain1.)
8. Click OK.
The Computer Name Changes message box appears, welcoming you to the domain1.local domain.
9. Click OK.
A message box indicates that you need to restart the computer for the changes to take effect.
10. Click OK, and then click OK again in the System Properties dialog box.
The System Settings Change message box appears, asking whether you want to restart the computer now.
11. Click Yes to restart the computer. Computer2 restarts.
Lesson Review
The following questions are intended to reinforce key information presented in this lesson. If you are unable to answer a question, review the lesson materials and try the question again. You can find answers to the questions in the “Questions and Answers” section at the end of this chapter.
2. Using the DNS server properties dialog box, how can you prevent a multihomed DNS server from answering DNS queries received through specific network cards?
3. You administer a network that consists of a single domain. On this network, you have configured a new DNS server named DNS1 to answer queries for Internet names from the local domain. However, although DNS1 is connected to the Inter-net, it continues to fail its recursive test on the Monitoring tab of the server prop-erties dialog box. Which of the following could be the potential cause for the failure?
a. You have configured DNS1 in front of a firewall. b. DNS1 hosts a zone named “.”
c. Your root hints have not been modified from the defaults.
d. You have not configured DNS1 to forward any queries to upstream servers. 4. Which of the following events could serve as a legitimate reason to modify (but
not delete) the default root hints on the Root Hints tab of a DNS server properties dialog box? (Choose all that apply.)
a. The Internet root servers have changed. b. The server will not be used as a root server.
c. You have disabled recursion on the server. d. Your server is not used to resolve Internet names.
Lesson Summary
■ The Interfaces tab of the DNS server properties dialog box allows you to specify which of the local computer’s IP addresses the DNS server should listen to for DNS requests.
■ The Forwarders tab of the DNS server properties dialog box allows you to forward DNS queries received by the local DNS server to upstream DNS servers, called for-warders. This tab also allows you to disable recursion for select queries (as spec-ified by domain).
■ By configuring a DNS server inside a firewall to forward external queries to a sin-gle DNS forwarder outside your firewall, and by then opening ports through the firewall only to this one forwarder, you can resolve DNS names without exposing your network to outside servers.
■ The Root Hints tab provides a simple way to modify the contents in the Cache.dns file. If you are using your DNS server to resolve Internet names, you
do not normally need to modify these entries. However, if you are using your DNS server only to answer queries for hosts in a separate and private DNS namespace, you should alter these root hints to point to the root servers in your network. Finally, if your DNS server computer is itself the root server (named “.”) of your private namespace, you should delete the Cache.dns file.
■ The Monitoring tab of the DNS server properties dialog box allows you to check basic DNS functionality with two simple tests: a simple query against the local DNS server, and a recursive query to the root DNS servers.
Lesson 2: Configuring Zone Properties and Transfers
You can perform many essential tasks related to administering and managing a DNS infrastructure through the properties dialog boxes of your network’s hosted zones. These tasks include configuring and managing zone transfers, enabling dynamic updates, and modifying zone types.
After this lesson, you will be able to
■ Configure a DNS zone for dynamic updates
■ Change the DNS zone type
■ Store zone data in the Active Directory database
■ Add name server (NS) resource records to a zone
■ Configure zone transfers from secondary zones
■ Describe the events that can trigger a zone transfer
■ Describe the process of a zone transfer
Estimated lesson time: 70 minutes
Exploring DNS Zone Properties
The primary means to configure zone settings is through the zone properties dialog box, which is accessible through the DNS console. Each properties dialog box for a standard zone has five tabs: General, Start Of Authority (SOA), Name Servers, Windows Internet Name Service (WINS), and Zone Transfers. Properties dialog boxes for Active Directory– integrated zones include a sixth tab, Security, that allows you to configure access per-missions for the zone.
To open a properties dialog box for a particular zone, right-click the node of the zone you want to configure in the DNS console, and then select Properties, as shown in Figure 5-14.
f05ni14
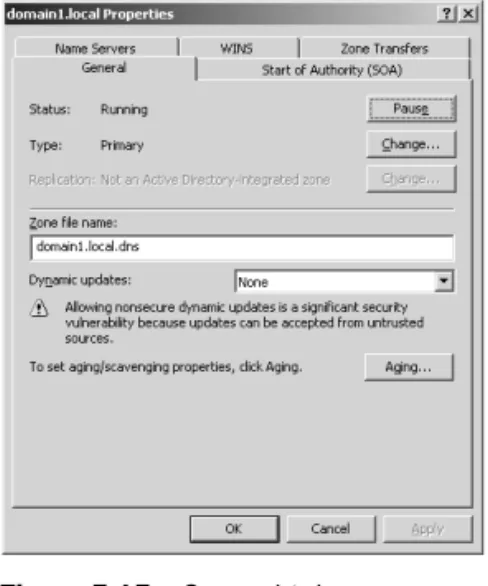
General Tab
The General tab, shown in Figure 5-15, allows you to temporarily suspend name reso-lution and to configure four basic features: zone type (including Active Directory inte-gration), zone file name, dynamic updates, and aging.
f05ni15
Figure 5-15 General tab
Zone Status The Pause button allows you to pause and resume name resolution for
the zone. Note that this feature does not allow you to pause or resume the DNS Server service.
Zone Type Clicking Change opens the Change Zone Type dialog box, as shown in
Figure 5-16.
f05ni16
Figure 5-16 Change Zone Type dialog box
The Change Zone Type dialog box allows you to reconfigure the zone as a primary, secondary, or stub zone. A primary zone stores the most current records and settings
for the zone. For each standard zone that is not Active Directory–integrated, only one primary DNS server is allowed, and this server contains the only read/write version of the zone database. A secondary zone is a read-only copy of the primary zone used to improve performance and fault tolerance. A stub zone is a copy of a zone that contains only those resource records necessary to identify the actual authoritative DNS servers for that zone. (Stub zones are discussed in more detail in Lesson 5 of this chapter.) By default, new zones are standard zones. This means that, by default, zone data is stored on the local DNS server only, in a text file. The alternative to a standard zone is an Active Directory–integrated zone.
Active Directory Integration Selecting the Store The Zone In Active Directory check
box in the Change Zone Type dialog box allows you to store the primary zone infor-mation in the Active Directory database instead of in the WINDOWS\System32\Dns folder. In Active Directory–integrated zones, zone data is automatically replicated through Active Directory. In most cases, this eliminates the need to configure zone transfers to secondary servers.
Exam Tip There are several things you need to remember about Active Directory–integrated zones for the 70-291 exam. First, remember how to configure them. Second, remember that you can implement Active Directory–integrated zones only on DNS servers that are also domain controllers. Third, they allow DNS data to replicate automatically throughout Active Directory and thus usually eliminate the need for secondary servers. Fourth, they minimize zone transfer traf-fic because only updated records (as opposed to whole zones) are replicated throughout Active Directory. Finally, Active Directory–integrated zones enable the option for secure dynamic updates (described next).
Tip To migrate a standard primary server, configure a secondary server, transfer the zone to the secondary server, and then promote the secondary server to a primary server. After the secondary server has been promoted, you can delete the original primary server.
There are several advantages to integrating your DNS zone with Active Directory. First, because Active Directory performs zone replication, you do not need to configure a separate mechanism for DNS zone transfers. Fault tolerance, along with improved per-formance from the availability of multiple read/write primary servers, is automatically supplied by the presence of multimaster replication on your network. Second, Active Directory allows for single properties of resource records to be updated and replicated among DNS servers. Avoiding the transfer of many and complete resource records decreases the load on network resources during zone transfers. Finally, Active Direc-tory integration allows you to configure access security for stored records, which pre-vents unauthorized updates.
Planning Because of the many benefits of Active Directory–integrated zones, you should plan to deploy your DNS servers on domain controllers whenever possible.
Zone Replication When you opt to store zone information in the Active Directory
database, the associated Change button becomes enabled, as shown in Figure 5-17. This button allows you to configure replication parameters for the Active Directory– integrated zone.
f05ni17
Figure 5-17 Change button for zone replication
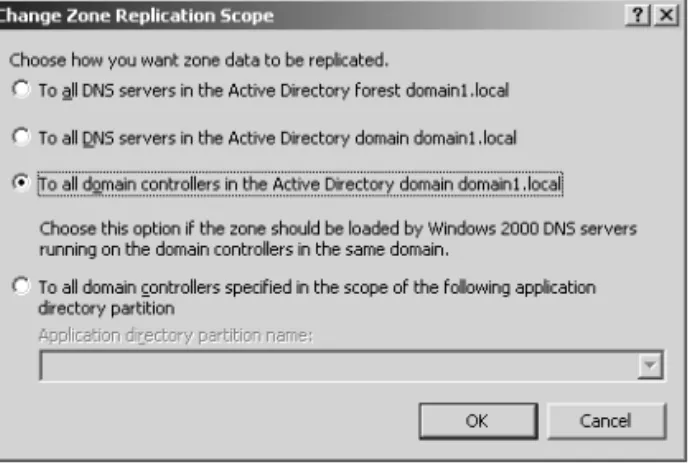
Clicking the Change button opens the Change Zone Replication Scope dialog box, shown in Figure 5-18. This dialog box allows you to determine among which servers in the Active Directory forest the zone data should be replicated.
f05ni18
Figure 5-18 Setting the zone replication scope
When deciding which replication option to choose, consider that the broader the rep-lication scope, the greater the network traffic caused by reprep-lication. For example, if you choose to have Active Directory–integrated DNS zone data replicated to all DNS servers in the forest, this setting produces greater network traffic than does replicating the DNS zone data to all DNS servers in a single Active Directory domain in that forest. On the other hand, replicating zone data to all DNS servers in a forest can improve forestwide name resolution performance and increase fault tolerance.
Application Directory Partitions and DNS Replication An application directory
parti-tion is a directory partition that is replicated among a specified subset of domain con-trollers running Windows Server 2003.
■ Built-in application directory partitions
For DNS, two built-in application directory partitions exist for each Active Direc-tory domain: DomainDnsZones and ForestDnsZones. The DomainDnsZones application directory partition is replicated among all DNS servers that are also domain controllers in an Active Directory domain. The ForestDnsZones applica-tion directory partiapplica-tion is replicated among all DNS servers that are also domain controllers in an Active Directory forest. Each of these application directory parti-tions is designated by a DNS subdomain and an FQDN. For example, in an Active Directory domain named bern.lucernepublishing.com whose root domain in the Active Directory forest is lucernepublishing.com, the built-in DNS application par-tition directories are specified by these FQDNs: DomainDnsZones.bern.lucerne-publishing.com and ForestDnsZones.lucerneDomainDnsZones.bern.lucerne-publishing.com.
Table 5-1 Zone Replication Options
Options Description
To All DNS Servers In The Active Directory Forest
Replicates zone data to all DNS servers running on domain con-trollers in the Active Directory forest. Usually, this option pro-vides the broadest scope of replication.
To All DNS Servers In The Active Directory Domain
Replicates zone data to all DNS servers running on domain con-trollers in the Active Directory domain.
To All Domain Controllers In The Active Directory Domain
Replicates zone data to all domain controllers in the Active Directory domain. If you want Microsoft Windows 2000 DNS servers to load an Active Directory zone, you must select this setting for that zone.
To All Domain Controllers Specified In The Scope Of The Following Application Directory Partition
Replicates zone data according to the replication scope of the specified application directory partition. For a zone to be stored in the specified application directory partition, the DNS server hosting the zone must be enlisted in the specified application directory partition.
When you select the To All DNS Servers In The Active Directory Forest option in the Change Zone Replication Scope dialog box, you are in fact choosing to store DNS zone data in the ForestDnsZones application directory partition. When you select the To All DNS Servers In The Active Directory Domain option, you are choosing to store DNS zone data in the DomainDnsZones application directory partition.
Note If either of these application directory partitions is deleted or damaged, you can re-create them in the DNS console by right-clicking the server node and selecting Create Default Application Directory Partitions.
■ Creating custom application directory partitions
You can also create your own custom application directory partitions for use with DNS and enlist chosen domain controllers in your network to host replicas of this partition.
To accomplish this task, first create the partition by typing the following command: dnscmd [servername]/createdirectorypartition FQDN
Then enlist other DNS servers in the partition by typing the following command: dnscmd servername/enlistdirectorypartition FQDN
For example, to create an application directory partition named SpecialDns on a computer named Server1 in the Active Directory domain contoso.com, type the following command:
dnscmd server1 /createdirectorypartition SpecialDns.contoso.com
To enlist a computer named Server2 in the application directory partition, type the following command:
dnscmd server2 /enlistdirectorypartition SpecialDns.contoso.com Note You must be a member of the Enterprise Admins group to create an application direc-tory partition.
To store DNS data in a custom application directory partition, select the fourth (bottom) option in the Change Zone Replication Scope dialog box, and specify the custom application directory partition in the drop-down list box. This option—To All Domain Controllers Specified In The Scope Of The Following Application Directory Partition—is available only if custom application directory partitions are available for DNS on your network.
■ Replication with Windows 2000 servers
Because application directory partitions are not available on Windows 2000 domain controllers, you must select the third option in the Change Zone Replication Scope
dialog box if you want the zone data to be read by Windows 2000 DNS servers. With this option—To All Domain Controllers In the Active Directory Domain—data is not replicated merely among all DNS server domain controllers, but among all domain controllers regardless of whether they are also DNS servers.
Exam Tip Expect to be tested on application directory partition concepts as well as the options in the Change Zone Replication Scope dialog box. To prepare for simulation ques-tions, also review the procedure of setting zone replication scope.
Zone File Name For standard zones not stored in Active Directory, the default zone
filename is created by adding a .dns extension to the zone name. The Zone File Name text box on the General tab allows you to change the default name of this file.
Dynamic Updates The General tab also allows you to configure a zone with dynamic
updates in resource records. As shown in Figure 5-19, three dynamic update settings are available for Active Directory–integrated DNS zones: None, Nonsecure And Secure, and Secure Only. For standard zones, only two settings are available: None and Non-secure And Secure.
f05ni19
Figure 5-19 Zone settings for dynamic updates
When you select the None setting in the properties for a zone, you must manually per-form registrations and updates to zone records. However, when you enable either the Nonsecure And Secure setting or the Secure Only setting, client computers can auto-matically create or update their own resource records. This functionality greatly reduces the need for manual administration of zone records, especially for DHCP cli-ents and roaming clicli-ents.
Figure 5-20 shows a typical dynamic update process.
f05ni20
Figure 5-20 Dynamic update process
Whenever a triggering event occurs on a DNS client computer, the DHCP Client ser-vice, not the DNS Client serser-vice, attempts to perform a dynamic update of the A resource record with the DNS server. This update process is designed so that if a change to the IP address information occurs because of DHCP, this update is imme-diately sent to the DNS server. The DHCP Client service attempts to perform this dynamic update function for all network connections used on the system, including those not configured to use DHCP. Whether this attempt at a dynamic update is suc-cessful depends first and foremost on whether the zone has been configured to allow dynamic updates.
Real World
Manually Adding Host Records
Even when dynamic updates are enabled for a particular zone, in some scenarios it might be necessary to add host records manually to that zone. For example, a company named Contoso, Inc. uses the domain name contoso.com for both its public namespace and its internal Active Directory domain. In this case, the pub-lic Web server named www.contoso.com is located outside the Active Directory domain and performs updates only on the public DNS server authoritative for contoso.com. Internal clients, however, point their DNS requests toward internal DNS servers. Because the A record for www.contoso.com is not updated dynam-ically on these internal DNS servers, the record must be added manually for inter-nal clients to resolve the name and connect to the public Web server.
Find authoritative server
Result (zone name and authoritative server's name and IP address)
Attempt dynamic update
Result (success or failure)
Local name server Client
Server that is authoritative for name
g05nw01
Another case in which you might need to add host records manually is when you have a UNIX server on your network. For example, a company named Fabrikam, Inc. uses a single Active Directory domain named fabrikam.com for its private network. The network also includes a UNIX server named App1.fabrikam.com that runs an application critical to the company’s daily operations. Since UNIX servers cannot perform dynamic updates, you need to add a host record for App1 on the DNS server hosting the fabrikam.com zone. Otherwise, users will not be able to connect to the application server when they specify it by FQDN.
contoso.com public servers
NS.contoso.com
contoso.com private network
www.contoso.com dns1.contoso.com
DC.contoso.com
web.contoso.com Internet
Dymanic update
Manual creation of A record needed
App1.fabrikam.com (UNIX) fabrikam.com
private network
dc.fabrikam.com
dns.fabrikam.com
g05nw02
Dynamic Update Triggers The following events trigger the DHCP Client service to
send a dynamic update to the DNS server:
■ An IP address is added, removed, or modified in the Transmission Control Proto-col/Internet Protocol (TCP/IP) properties configuration for any one of the local computer’s installed network connections.
■ An IP address lease changes or renews with the DHCP server for any one of the local computer’s installed network connections—for example, when the computer is started or if the Ipconfig /renew command is used.
■ The Ipconfig /registerdns command is used on a DNS client computer to manually force a refresh of the client name registration in DNS.
■ The DNS client computer is turned on.
■ A member server within the zone is promoted to a domain controller.
Secure Dynamic Updates Secure dynamic updates can be performed only in Active
Directory–integrated zones. For standard zones, the Secure Only option does not appear in the Dynamic Updates drop-down list box. These updates use the secure Ker-beros authentication protocol to create a secure context and ensure that the client updating the resource record is the owner of that record. Secure dynamic updates also ensure that the updating client computer has an account in the Active Directory domain corresponding to the DNS domain in the zone being updated. In addition, that computer account must successfully authenticate before it can update its record in the DNS domain.
Exam Tip To prepare for simulation questions, practice performing the procedure of requir-ing secure dynamic updates on a zone. For this task, look out for any requirement statrequir-ing that only authorized client computers can perform DNS updates or that one computer must not be able to overwrite another computer’s record.
Note Only clients running a version of Windows 2000, Microsoft Windows XP, or Windows Server 2003 can attempt to send dynamic updates to a DNS server. Dynamic updates are not available for any version of Windows NT, Windows 95, Microsoft Windows 98, or Microsoft Windows Millennium Edition (Me). However, a DHCP server can perform dynamic updates on behalf of other clients if the server is configured to do so.
Secure Dynamic Updates and the DnsUpdateProxy Group W h e n s e c u r e d y n a m i c
updates are required in a zone, only the owner of a record can update that record. (The owner of a record is the computer that originally registers the record.) This restric-tion can cause problems in situarestric-tions where a DHCP server is being used to register host (A) resource records on behalf of client computers that cannot perform dynamic
updates. In such cases, the DHCP server becomes the owner of the record, not the computers themselves. If the downlevel client computer is later upgraded to Windows 2000 or some other operating system that is capable of performing dynamic updates, the computer will not be recognized as the owner and will consequently be unable to update its own records. A similar problem might arise if a DHCP server fails that has registered records on behalf of downlevel clients: None of the clients will be able to have their records updated by a backup DHCP server.
To avoid such problems, add to the DnsUpdateProxy security group DHCP servers that register records on behalf of other computers. Members of this group are prevented from recording ownership on the resource records they update in DNS. This procedure consequently loosens security for these records until they can be registered by the real owner.
Exam Tip You should understand DnsUpdateProxy before you take the 70-291 exam.
Aging By clicking Aging on the General tab, you can open the Zone
Aging/Scaveng-ing Properties dialog box, shown in Figure 5-21. These properties provide a means of finding and clearing outdated records from the zone database.
Figure 5-21 Zone Aging/Scavenging Properties dialog box
Enabling Aging Aging in DNS refers to the process of placing a timestamp on a
dynamically registered resource record and then tracking the age of this record. Scav-enging refers to the process of deleting outdated resource records on which times-tamps have been placed. Scavenging can occur only when aging is enabled. Both aging and scavenging are disabled by default.
To enable aging for a particular zone, you have to enable this feature both at the zone level and at the server level. To enable aging at the zone level, in the Zone Aging/Scav-enging Properties dialog box, select the Scavenge Stale Resource Records check box. To enable aging at the server level, first open the Server Aging/Scavenging Properties dialog box by right-clicking the server icon in the DNS console and then clicking Set Aging/Scavenging For All Zones. Then, in the Server Aging/Scavenging Properties dia-log box, select the Scavenge Stale Resource Records check box.
After aging is enabled, a timestamp based on the current server time is placed on all dynamically registered records in the zone. When the DHCP Client service or DHCP server later performs a dynamic update of the records, a timestamp refresh is attempted. Manually created resource records are assigned a timestamp of 0; this value indicates that they will not be aged.
Note When you enable aging and scavenging for a zone, zone files cannot be read by pre– Windows 2000 DNS servers.
Modifying no-refresh intervals The no-refresh interval is the period after a timestamp
during which a zone or server rejects a timestamp refresh. The no-refresh feature pre-vents unnecessary refreshes from being processed by the server and reduces unneces-sary zone transfer traffic. The default no-refresh interval is seven days.
Modifying refresh intervals The refresh interval is the time after the no-refresh
inter-val during which timestamp refreshes are accepted and resource records are not scav-enged. After the no-refresh and refresh intervals expire, records can be scavenged from the zone. The default refresh interval is 7 days. Consequently, when aging is enabled, dynamically registered resource records can be scavenged after 14 days by default.
Tip If you modify the no-refresh or refresh interval, be sure to follow the guideline that the refresh interval should be equal to or greater than the no-refresh interval.
Exam Tip Prepare for simulation questions in which you have to configure aging and scav-enging on a zone. For example, you might be given a requirement that hosts should refresh their records only every 12 days. In this case, you have to know that this requirement relates to the no-refresh interval. Likewise, you might be given a requirement that records not updated after 20 days should be removed from the zone database. In this case, you need to know that this requirement refers to the refresh interval plus the refresh interval. If the no-refresh interval is 12, the no-refresh interval would thus need to be set to 8 to meet this require-ment. Last, don’t forget to enable aging and scavenging at both the zone and server level.
Performing Scavenging Scavenging in a zone is performed either automatically or manually. For scavenging to be performed automatically, you must enable automatic scavenging of stale resource records on the Advanced tab of DNS server properties. When this feature is not enabled, you can perform manual scavenging in a zone by right-clicking the server icon in the DNS console tree and then selecting Scavenge Stale Resource Records from the shortcut menu.
Start Of Authority (SOA) Tab
The Start Of Authority (SOA) tab, shown in Figure 5-22, allows you to configure the SOA resource record for the zone. When a DNS server loads a zone, it uses the SOA resource record to determine basic, authoritative information about the zone. These settings also determine how often zone transfers are performed between primary and secondary servers.
f05ni22
Figure 5-22 Start Of Authority (SOA) tab
Serial Number The Serial Number text box on the Start Of Authority (SOA) tab
con-tains the revision number of the zone file. This number increases each time a resource record changes in the zone or when the value is manually incremented on this tab by clicking Increment.
When zones are configured to perform zone transfers, the master server is intermit-tently queried for the serial number of the zone. This query is called the SOA query. If, through the SOA query, the serial number of the master zone is determined to be equivalent to the local serial number, no transfer is made. However, if the serial num-ber for the zone at the master server is greater than that at the requesting secondary server, the secondary server initiates a transfer.
Exam Tip When you click the Increment button, you force a zone transfer.
Primary Server The Primary Server text box on the Start Of Authority (SOA) tab con-tains the full computer name for the primary DNS server of the zone. This name must end with a period.
Responsible Person When this text box is configured, it contains a responsible
per-son (RP) resource record of the perper-son responsible for administering the zone. An RP resource record specifies a domain mailbox name for the responsible person. The name of the record entered into this field should always end with a period.
Refresh Interval The value you configure in the Refresh Interval field determines
how long a secondary DNS server waits before querying the master server for a zone renewal. When the refresh interval expires, the secondary DNS server requests a copy of the current SOA resource record for the zone from its master server source, which then answers this SOA query. The secondary DNS server then compares the serial number of the source server’s current SOA resource record (as indicated in the master’s response) with the serial number of its own local SOA resource record. If they are dif-ferent, the secondary DNS server requests a zone transfer from the primary DNS server. The default value for this setting is 15 minutes.
Tip Increasing the refresh interval decreases zone transfer traffic.
Retry Interval The value you configure in the Retry Interval box determines how long
a secondary server waits before retrying a failed zone transfer. Normally, this time is less than the refresh interval. The default value is 10 minutes.
Expires After The value you configure in the Expires After box determines the length
of time that a secondary server, without any contact with its master server, continues to answer queries from DNS clients. After this time elapses, the data is considered unreli-able. The default value is 1 day.
Minimum (Default) TTL The value you configure in the Minimum (Default) TTL box
determines the default Time to Live (TTL) that is applied to all resource records in the zone. The default value is 1 hour.
TTL values are not relevant for resource records within their authoritative zones. Instead, the TTL refers to the cache life of a resource record in nonauthoritative servers. A DNS server that has cached a resource record from a previous query discards the record when that record’s TTL has expired.
TTL For This Record The value you configure in this text box determines the TTL of
the present SOA resource record. This value overrides the default value setting in the preceding field.
Once configured in the DNS console, an SOA resource record is represented textually in the zone file, as shown in this example:
@ IN SOA computer1.domain1.local.hostmaster.domain1.local. ( 5099 ; serial number
3600 ; refresh (1 hour) 600 ; retry (10 mins) 86400 ; expire (1 day) 60 ) ; minimum TTL (1 min)
Exam Tip Make sure you understand all the settings and concepts related to the Start of Authority (SOA) tab.
Name Servers Tab
The Name Servers tab, shown in Figure 5-23, allows you to configure NS resource records for a zone. These records cannot be created elsewhere in the DNS console.
f05ni23
Figure 5-23 Name Servers tab
You use NS resource records to specify the authoritative name servers for a given zone. The NS resource record of the first primary server of a zone is configured automatically.
Note Every zone must contain at least one NS resource record at the zone root.
The following line is an example NS record taken from the database file for the lucernepublishing.com zone:
@ NS dns1.lucernepublishing.com.
In this record, the “@” symbol represents the zone defined by the SOA record in the same zone file. The complete entry, then, effectively maps the lucernepublishing.com domain to a DNS server hosted on a computer named dns1.lucernepublishing.com.
Note In primary zones, zone transfers by default are allowed only to servers specified on the Name Servers tab. This restriction is new to Windows Server 2003.
WINS Tab
You use the WINS tab, shown in Figure 5-24—or the WINS-R tab in reverse lookup zones—to configure WINS servers to aid in name resolution for a given zone after DNS servers have failed to resolve a queried name.
f05ni24
Figure 5-24 WINS tab
Exam Tip You need to know WINS lookup for the 70-291 exam. When you configure WINS lookup for a forward lookup zone, a WINS resource record pointing to the WINS server you specify on the WINS tab is added to the zone database. When you configure WINS-R lookup for a reverse lookup zone, a corresponding WINS-R resource record is added to the zone data-base. For redundancy, you can add two records to point to different WINS servers.
Zone Transfers Tab
The Zone Transfers tab, shown in Figure 5-25, allows you to restrict zone transfers from the local master server. For primary zones, zone transfers to secondary servers by default are either completely disabled or limited to name servers configured on the Name Servers tab. The former restriction applies when the DNS server has been added by using the Manage Your Server window; the latter, when it has been added by using the Windows Components Wizard. As an alternative to these default restrictions, you can customize zone transfer restrictions by selecting the Only To The Following Servers option and then specifying the IP addresses of allowed secondary servers in the list below this option.
Secondary zones, by default, do not allow zone transfers to other secondary zones, but you can enable this feature simply by selecting the Allow Zone Transfers check box.
Exam Tip For simulation questions, review the procedure of configuring zone transfers. Be sure to remember the differences among the three zone transfers options.
f05ni25
Figure 5-25 Zone Transfers tab
Off the Record In Windows 2000, the default setting on the Zone Transfers tab for primary zones was to allow transfers to any server, but this feature created an unnecessary security hole. Think about it: Why would you want to enable anyone who can access your DNS server to set up a secondary server and peruse your network’s resource records? Restricting zone trans-fers by default is a lot smarter—it allows you to prevent unauthorized copying of zone data.
Notification The Zone Transfers tab also allows you to configure notification to
sec-ondary servers. To perform this task, click Notify on the Zone Transfers tab when zone transfers are enabled. This action opens the Notify dialog box, as shown in Figure 5-26, in which you can specify secondary servers that should be notified whenever a zone update occurs at the local master server. By default, when zone transfers are enabled, all servers listed on the Name Servers tab are automatically notified of zone changes.
f05ni26.EPS
Figure 5-26 Notify dialog box
Exam Tip For simulation questions, review the procedure for enabling notification to other DNS servers in a zone. To spot these questions, look for a requirement stating that changes in a zone should immediately be updated to all secondary zones. Also, remember that you do not need to configure notification for Active Directory–integrated zones.
Notification and Zone Transfer Initiation Zone transfers in standard zones can be
trig-gered by any of three events:
■ They can be triggered when the refresh interval of the primary zone’s SOA resource record expires.
■ They can be triggered when a secondary server boots up.
In these first two cases, the secondary server initiates an SOA query to find out whether any updates in the zone have occurred. Transfers occur only if the zone database has been revised.
■ They are triggered when a change occurs in the configuration of the primary server and this server has specified particular secondary DNS servers to be notified of zone updates.
When a zone transfer initiates, the secondary server performs either an incremental zone transfer (IXFR) query or an all zone transfer (AXFR) query to the master server. Computers running Windows 2000 Server and Windows Server 2003 perform IXFR queries by default. Through IXFR queries, only the newly modified data is transferred across the network. Computers running Windows NT Server do not support IXFR que-ries and can perform only AXFR queque-ries. Through AXFR queque-ries, the entire zone data-base is transferred to the secondary server.
Primary DNS servers running Windows Server 2003 support both IXFR and AXFR zone transfers.
Figure 5-27 illustrates the transfer query process between secondary and master servers.
f05ni27
Figure 5-27 Zone transfer negotiations
Important You do not need to configure zone transfers or notification among domain con-trollers or DNS servers in Active Directory–integrated zones. For the servers within these zones, transfers are conducted automatically.
Practice: Deploying a Secondary DNS Server
In this practice, you create a secondary zone and then configure zone transfers between the two zones.
Exam Tip You should feel comfortable with the topic of secondary zones before you take the 70-291 exam, and you should prepare for a simulation in which you are asked to configure one. To spot questions on secondary zones, look for requirements stating that name resolution should occur locally or that name resolution traffic should be minimized across the WAN link. Also look for a requirement that a full copy of the zone should be stored on the DNS server.
Exercise 1: Configuring a Secondary Zone
In this exercise, you install a DNS server on Computer2 and then configure the new DNS server to host a secondary zone.
Source server
SOA query for zone
SOA query answer (zone status)
IXFR or AXFR query for zone
IXFR or AXFR query answer (zone transfer) Destination
server
Important The following exercise assumes that you have installed the DNS server on Computer1 by using the Windows Components Wizard (as described in Chapter 4, Lesson 3). In this case, zone transfers from the Domain1.local zone are enabled by default but restricted to authoritative name servers. If, instead, you have installed the DNS server on Computer1 by using the Manage Your Server window to add the DNS server role, zone transfers for all locally hosted zones are disabled by default. In this case, before beginning this exercise, be sure to enable zone transfers for the Domain1.local zone and restrict zone transfers to serv-ers listed on the Name Servserv-ers tab.
1. From Computer2, log on to Domain1 as Administrator. Remember to specify the password you originally assigned to the Administrator account on Computer1. 2. On Computer2, install the Windows Support Tools, as explained in Lesson 2 of
Chapter 3.
Windows Support Tools includes the Dnscmd command-line utility.
3. On Computer2, install the Domain Name System (DNS) Windows subcomponent of the Networking Services Windows component, as explained in Lesson 3 of Chapter 4. For the purposes of this exercise, you can safely dismiss any messages or errors you receive about Computer2 having a dynamically assigned IP address. Do not change the address configuration on Computer2.
4. Once the installation of the Domain Name System (DNS) subcomponent is com-plete, open a command prompt.
5. At the command prompt, enter the following command: dnscmd computer1 /recordadd domain1.local @ ns computer2.domain1.local.
This command adds an NS record in domain1.local for Computer2, which makes Computer2 an authoritative server in the zone. By default, when a DNS server has been installed by using the Windows Components Wizard, zone transfers are allowed only to authoritative servers.
6. On Computer2, open the DNS console.
7. In the DNS console tree, right-click Forward Lookup Zones and select New Zone. 8. In the New Zone Wizard, click Next.
9. On the Zone Type page, select the Secondary Zone option, and then click Next. 10. On the Zone Name page, in the Zone Name text box, type domain1.local and
then click Next.
11. In the Master DNS Server page, in the IP Address text box, type 192.168.0.1, click Add, and then click Next.
13. In the DNS console tree, expand Forward Lookup Zones and select the Domain1.local node.
14. Right-click the Domain1.local node, and then select Transfer From Master. 15. If the zone fails to load, wait 1 minute and then try again. Repeat this step until the
zone loads successfully.
16. When a copy of the domain1.local zone appears in the DNS console on Computer2, take a few moments to browse the zone properties dialog box and the items on the zone’s Action (shortcut) menu.
17. Right-click the DNS node in the DNS console, and then click Connect To DNS Server. The Connect To DNS Server dialog box opens.
18. Select the option The Following Computer, and then type COMPUTER1 in the associated text box.
19. Click OK. The COMPUTER1 node now appears above the COMPUTER2 node in the DNS console. Use both server nodes in the DNS console on Computer2 to answer the following questions in the spaces provided.
Which functions on the Action menu are available for the domain1.local zone through the COMPUTER2 node that are not available on the Action menu for the same zone through the COMPUTER1 node?
Can you create or configure resource records for domain1.local through the COMPUTER2 node in the DNS console?
Exercise 2: Reviewing Notification Settings
In this exercise, you review the default configuration for zone transfer notification. 1. From Computer2, while you are logged on to Domain1 as Administrator, expand
the COMPUTER1 icon in the DNS console, and then open the Domain1.local Properties dialog box associated with this primary zone.
2. Click the Name Servers tab.
Computer2 has been added as a result of adding an NS command in Exercise 1 of this chapter.
3. On the Zone Transfers tab, click Notify. The Notify dialog box opens.
By default, the primary zone automatically notifies the servers listed on the Name Servers tab of zone changes.
Because Computer2 is now configured on the Name Servers tab, the secondary server is notified of any zone changes. When Computer2 receives notification from the primary server, this secondary DNS server normally initiates an IXFR query for an incremental zone transfer.
4. Click Cancel.
5. In the Domain1.local Properties dialog box, click the Start Of Authority (SOA) tab. Using the settings configured on this tab, answer the following questions in the spaces provided.
According to the settings on the Start Of Authority (SOA) tab, if Computer2 loses contact with Computer1, how long will the DNS server on Computer2 continue to answer queries from DNS clients?
How often is Computer2 configured to query Computer1 to find out whether any changes have been made to the zone?
If Computer2 discovers it cannot contact Computer1 when it initiates an SOA query, how long does it wait before trying again?
If another primary DNS server named dns.domain2.local successfully queries Computer1 for the IP address of Computer2, how long does Computer2’s A resource record stay alive in the cache of dns.domain2.local?
6. Click OK to close the Domain1.local Properties dialog box.
7. In the DNS Console, right-click the Computer1 icon, and then click Delete. A DNS message box appears asking you to confirm the deletion.
8. In the DNS message box, click Yes.
Computer1 is removed from the DNS console on Computer2, but the server set-tings remain intact in the DNS console on Computer1.
Lesson Review
The following questions are intended to reinforce key information presented in this lesson. If you are unable to answer a question, review the lesson materials and try the question again. You can find answers to the questions in the “Questions and Answers” section at the end of this chapter.
1. Describe the process by which secondary servers determine whether a zone trans-fer should be initiated.
2. What is the difference between IXFR and AXFR queries?
3. You have multiple DHCP servers on your network, some of which are configured to register DNS records on behalf of pre–Windows 2000 clients. You have config-ured DNS to allow only secure updates. However, you find that some DNS records are not being updated properly. How can you solve this problem?
4. You oversee administration for a WAN belonging to the Proseware company, which has one central office in Rochester and two branch offices in Buffalo and Syracuse. The network, which consists of one domain, has one primary DNS zone running on a Windows Server 2003 computer at the central office, and one sec-ondary DNS zone at each branch. Network users are complaining that they often cannot connect to sites at remote branches. Administrators have determined that network bandwidth between the central office and branches has become satu-rated with zone transfers, and that zone transfers are being initiated before they can complete. Which of the following steps would help resolve the problem with the least effort?
a. Install Active Directory on the network, and promote the servers hosting the secondary DNS zones to domain controllers.
b. Increase the network bandwidth by establishing a fiber-optic connection between the two sites.
c. Increase the refresh interval on the primary DNS server. d. Increase the refresh interval on the secondary DNS servers.
5. You discover that an administrator has adjusted the default TTL value for your company’s primary DNS zone to 5 minutes. Which of the following is the most likely effect of this change?