SAP Web IDE Developer Guide
for Users with Local Installation (Trial Shipment)
SAP Web IDE Local Trial Version 1602
Content
1 SAP Web IDE. . . .5
2 What's New in SAP Web IDE (Local Installation). . . .6
3 Get Started. . . .19
3.1 Opening SAP Web IDE. . . 19
3.2 Entering Git Settings. . . 21
3.3 Optional - Connecting Remote Systems. . . .22
Requirements for Connecting to ABAP Systems. . . .25
4 Installation and Setup. . . .26
4.1 Installing SAP Web IDE. . . .27
4.2 Starting SAP Web IDE. . . 28
4.3 Migrating Projects from Older Versions of SAP Web IDE. . . .29
4.4 Optional Post-Installation Activities. . . .30
Configuring the Orion Application Server. . . .31
Connecting Remote Systems. . . .32
Importing the Git Server Certificate into the JVM. . . .35
5 Set User Preferences. . . . 36
5.1 Configuring Code Checking . . . .37
5.2 Configuring Code Completion. . . .38
5.3 Configuring the Code Editor. . . .38
5.4 Entering Git Settings. . . .39
5.5 Enabling Optional Plugins. . . .40
6 Overview. . . .42
6.1 Features and Benefits. . . 44
Assisted Development. . . 45
User-Centric Customizability and Session Persistence. . . .46
6.2 Menus. . . 47
6.3 Keyboard Shortcuts. . . .48
6.4 Searching and Replacing. . . .50
Searching for Files or Content in the Workspace. . . 51
Replacing Strings Across Multiple Files. . . .52
Finding and Replacing in an Open File. . . .54
6.5 Working with Files and Folders. . . 55
6.6 Resizing Window Panes. . . 57
7 Develop. . . .58
7.1 Creating Projects. . . .59
Creating Projects from a Template. . . .60
Creating Projects from a Sample Application. . . 62
7.2 Importing Projects. . . .62
Importing Projects from an Archive. . . 63
Importing Applications from the SAPUI5 ABAP Repository. . . .64
7.3 Customizing Your Project. . . .65
Customizing Code Checking Rules. . . .66
Customizing JavaScript Beautifier Properties. . . .66
Configuring Mock Data Usage. . . .67
Setting Project Types. . . .68
Defining Application Languages. . . .69
7.4 Modifying the Application Descriptor Configuration. . . 69
Settings Tab Options. . . 70
Data Sources Tab Options. . . .72
Routing Tab Options. . . .74
Navigation Tab Options. . . .75
7.5 Developing Applications. . . .78
Working in the Code Editor. . . 79
Using Code Completion. . . .83
Checking Code . . . 100
Adding a New Component. . . .107
Using the Outline Pane for JavaScript Files. . . .108
Enabling Dynamic API Reference Support. . . .109
Creating a Cloud Connectivity Configuration File. . . 110
7.6 Layout Editor. . . .110
Working with the Layout Editor. . . .115
Creating a Quick Start Application. . . 125
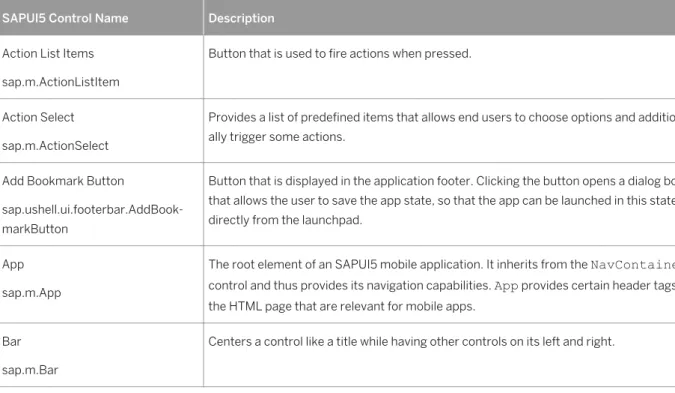
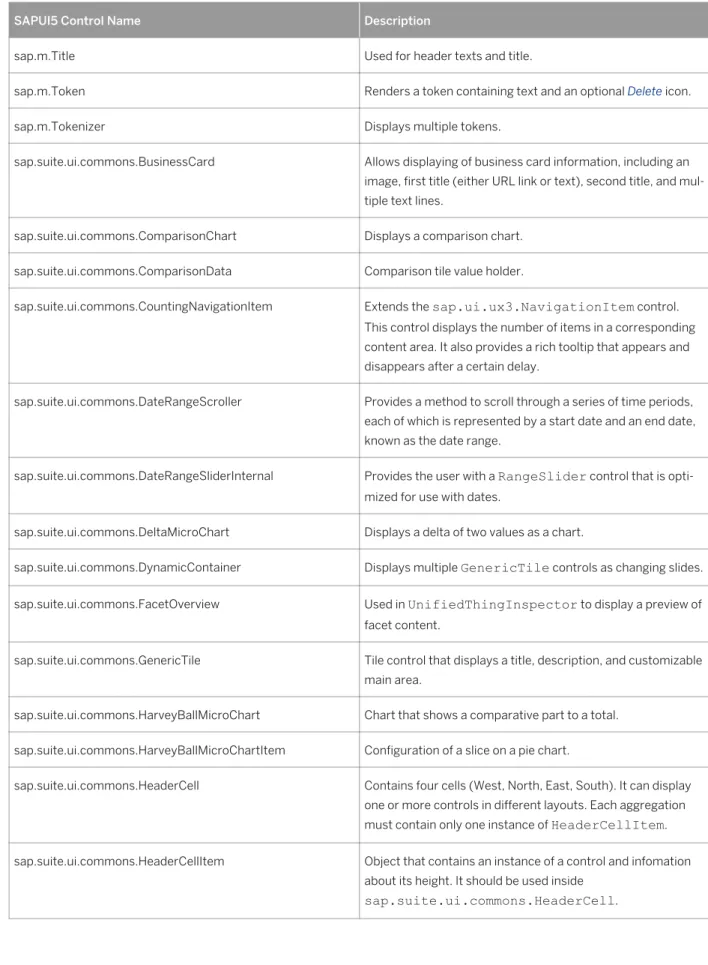
SAPUI5 Controls Supported in the Layout Editor. . . .126
Try It: Build an Application with the Layout Editor. . . .137
7.7 Annotation Modeler. . . .144
Annotation Modeler Architecture and User Interface. . . 145
Prerequisites for Working with the Annotation Modeler. . . .147
Working with the Annotation Modeler. . . .148
7.8 Using Source Control (Git). . . .151
Setting Up Git. . . .155
Cloning Repositories. . . .156
Fetching Changes. . . .158
Merging Changes. . . .160
Pulling Changes. . . .161
Staging Files. . . .162
Committing Changes. . . .165
Pushing Changes. . . 166
Using Multiple Branches. . . 167
Resetting a Branch. . . .169
About the Git History Pane. . . .170
7.9 Running Applications for In-Development Testing. . . .173
Configuring How to Run Projects. . . 174
Running Applications from the Workspace. . . .177
Running Applications in a Frame. . . .179
Running Applications in the SAP Fiori Launchpad Environment. . . .180
Running Unit Tests on Applications. . . .183
Running Applications with Mock Data. . . .184
7.10 Deploying Applications. . . .186
Deploying Applications to the SAPUI5 ABAP Repository. . . .187
Updating Existing Applications Residing in the SAPUI5 ABAP Repository. . . .189
Checking the Application Status. . . .190
Application Build. . . .191
7.11 Extending SAPUI5 Applications. . . .192
Creating New Extension Projects. . . 193
Extending Applications that Reside in the SAPUI5 ABAP Repository. . . 194
Creating New Extensions. . . .195
8 Optional Plugins and Add-Ons. . . .207
9 Secure. . . . 208
9.1 Architectural Overview. . . .208
9.2 Secure Programming Guide. . . .209
1
SAP Web IDE
What's New in SAP Web IDE (Local Installation) [page 6] Learn about SAP Web IDE new features.
Installation and Setup [page 26]
Learn how to set up and start SAP Web IDE. Overview [page 42]
Understand how to use SAP Web IDE and learn about its key features and benefits for de velopers.
Develop [page 58]
See how SAP Web IDE supports key stages of the development life cycle. Optional Plugins and Add-Ons [page 207]
Understand how to use additional SAP Web IDE plugins and add-ons.
Secure [page 208]
Understand the security landscape.
The local installation version of SAP Web IDE is a trial shipment provided on SAP Community Network. The described features cannot be used productively. In addition, the functionality is restricted compared to the SAP Web IDE version that is available on SAP HANA Cloud Platform. The following features are not available if you are using SAP Web IDE as local installation:
● SAP HANA Cloud features:
○ Deploying to SAP HANA Cloud
○ Running applications on SAP HANA Cloud
○ Extending applications on SAP HANA Cloud
○ Importing applications from SAP HANA Cloud
● Plug-in development
● Template development
● Consumption of optional plugins
Note
To use SAP Web IDE with its full functionality, go to SAP HANA Cloud Platform. For more information, see
2
What's New in SAP Web IDE (Local
Installation)
This section gives you an overview of the new features and functions of SAP Web IDE. It includes release notes that describe what is new, enhanced, changed, or deleted.
SAP Web IDE Versioning (New)
SAP Web IDE is moving to a new versioning concept. The versions will no longer be formatted as in previous versions (1.17, 1.18, 1.19). As of this release, we will use the date to identify the version. You can see the current version under Help About . The version appears in yymmdd format (for example, 160128).
Improved UI (New)
Annotation Modeler (New)
The Annotation Modeler provides an intuitive user interface for annotating OData entities. Depending on the selection, the Annotation Modeler displays different panes that allow you to add annotation terms to the local annotation file, edit them, or override annotation terms coming from other sources into the local annotation file. The usability for adding annotations have been improved and new user interface features for concatenating values and internationalized labels have been added.
For more information, see Annotation Modeler [page 144].
API Management Integration (New)
You can now use the API Management system as the data source for your applications. For more information, see Creating Projects from a Template [page 60].
Application Build (New)
A build of the application is now performed when you deploy your application. The build includes minification of the application's JavaScript file and the collection of files into a distributable runtime package.
For more information, see Application Build [page 191].
Application Status (New)
You can now see whether your application is deployed to SAPUI5 ABAP Repository. If the application is already deployed to SAPUI5 ABAP Repository, its system, name, package, and URL are displayed. If it is not deployed, you can choose to deploy it.
For more information, see Checking the Application Status [page 190] .
Cross-file Navigation for Function Definitions and Code Completion (New)
● You can now use the context menu Goto Definition option to navigate to a function definition in another file in the same project.
● When using code completion, (Ctrl + Space), suggestions from other files within the same project are now displayed.
Note
These features are available only when using SAPUI5 module patterns; target files contain the
For more information, see Working in the Code Editor [page 79] and Using Code Completion [page 83].
Embedded Type Code Completion (New)
You can attach a type to your variable definition to enable presentation of appropriate code completion
suggestions for the variable. Define the variable type in a JSdoc comment before the variable definition, and then press Ctrl + Space for code assistance.
The following example is for adding a button to the UI.
Sample Code
/* @type sap.m.Button */ var x;
x.
For more information, see Using Code Completion [page 83].
Extending Applications Containing Multiple Component.js Files (New)
You can now create an extension project for project that contains multiple Component.js files. You can then create extensions to enhance the project.
For more information, see Creating New Extension Projects [page 193] and Creating New Extensions [page 195].
JSDoc Comment Generation (New)
You can now generate a JSDoc comment snippet for a function in your code. The JSDoc comment snippet provides a template for documenting the function, which allows you to enter information about function arguments and parameters in the corresponding placeholders.
For more information, see Generating JSDoc Comment Snippets [page 81].
Logout Page (New)
After logging out, a new page is displayed indicating that you are logged out and including a link that allows you to log back in.
SAP Translation HUB Service (New, Experimental)
The SAP Translation HUB service is now integrated into SAP Web IDE. You can enter a string in the code editor and use auto-complete (CTRL + SPACE ) to automatically externalize the term to the predefined properties file
(i18n).
Note
The SAP Translation HUB service and all features that come with it are experimental and are not supported for productive use.
Tips and Tricks (New)
A dialog opens when you start up SAP Web IDE providing a description and a visual reference of how to use selected features.
Validation of Application Descriptor Files (New)
When you make changes to your projects's neo-app.json file in SAP Web IDE, schema validation is performed automatically and any errors are displayed as annotations.
For more information, see Checking Code [page 100].
Application Descriptor Editor (New, Changed)
You can now modify your project application descriptor file (manifest.json) in a multi-tab editor that contains two subtabs: Code Editor and Descriptor Editor.
Schema validation is automatically performed on manifest.json files that are open in the Code Editor tab. The Descriptor Editor subtab includes two AppDescriptor configuration subtabs: Settings and Navigation. The configuration fields in the Descriptor editor assist you by providing available choices, placeholder suggestions, and input validation.
To use the Application Descriptor editor, open your project manifest.json file in your workspace, and choose the Descriptor Editor subtab at the bottom of the pane. The changes that you make in the Descriptor Editor subtab are automatically udpated in the Code Editor subtab and vice versa.
Two new tabs have been added to the application descriptor editor:
● Routing tab for configuration of application routing.
● Data Sources tab for configuration of the OData services that are the data sources for the application. For more information, see Modifying the Application Descriptor Configuration [page 69].
Extensibility Pane (New, Changed)
From the extensibility pane, you can now choose to show all extension points available in the application (identifiable by the icon).
For more information, see Extending UI Elements Using the Extensibility Pane [page 197].
Layout Editor (New, Changed)
Create a Function on Events Pane (New)
You can now create a new function for a controller from the Events pane. For more information, see Creating a New Function [page 118].
Improved Usability (Changed)
Usability has been improved for the following:
● On the Outline tab, when you are adding a control using the Add Control dialog box, the following are now provided for each control in the list:
○ Icon
○ Technical name
○ Tooltip
For more information, see Adding Controls from the Outline Tab [page 117].
● On the Controls tab, when you are dragging and dropping a control onto the canvas, there are now tooltips displaying the names of the exact drop targets.
For more information, see Drag and Drop [page 119].
● In the Data Binding dialog box, you can now add data fields to the string in the Expression box by double-clicking them in the Data Fields list.
For more information, see Binding Data to a Simple Control [page 122].
Toolbar
A new toolbar has been added to the layout editor, as shown below:
You can use the buttons on the toolbar to change the device format view, expand or collapse the left or right pane, and undo or redo actions.
Supported SAPUI5 Semantic Pages
The following SAPUI5 semantic pages are now supported for specific operations (see below for a list of the supported operations):
● Fullscreen Page
● Master Page
● Semantic Page
● Share Menu Page
The following operations are supported for the abovementioned semantic pages:
● Modify content.
● Add controls to the content aggregations from the Controls and the Outline tabs.
● Select controls to content aggregations from the canvas as well as from the Outline tab.
● Edit properties of semantic pages and their content.
Cut, Copy, and Paste (New)
You can now use cut, copy, and paste functionality when adding controls from the Outline tab to the canvas. Either right-click and use the options in the context menu or use the Edit menu.
In addition to the Cut, Copy, and Paste options, you can now choose Paste Before or Paste After from the context menu.
Events Area in Properties Pane (New)
In the properties pane to the right of the canvas, a new Events area allows you to select an existing event handler from the controller for an event of the selected control.
Layout (Changed)
The Controls tab now replaces the palette, and the Outline tab now replaces the Outline pane. These new tabs are located to the left of the canvas.
On the Welcome page, there is a new tile, Quick Start with Layout Editor,to quickly create a new application, enabling you to start coding immediately. With just one click, you can create an application that you can run using the provided mock data. A data set for data binding and a metadata file are included.
For more information, see Creating a Quick Start Application [page 125].
Cut, Copy, and Paste Controls and Containers
In the layout editor, on the canvas, you can now cut, copy, and paste controls and containers, including all their properties. In addition, you can now paste these items into a different view.
SAPUI5 Versions
The layout editor now supports different SAPUI5 versions.
Undo/Redo Supported in Canvas (New)
While working on the canvas, you can undo (Ctrl + Z) and redo (Ctrl + Y) any changes you have made.
Additional Supported Controls (New)
More SAPUI5 controls are now supported in the layout editor, either from the Outline or the Controls tab. For the list of all controls supported in the layout editor, see SAPUI5 Controls Supported in the Layout Editor [page 126].
For more information regarding adding controls from the Outline tab, see Adding Controls from the Outline Tab [page 117] and Deleting Controls from the Outline Tab [page 117].
In the layout editor, from the context menu of any control in the canvas, you can go directly to a tab that displays the XML code for the control.
Open Fragment File from Canvas (Changed)
In the layout editor, from the context menu of any fragment in the canvas, you can go directly to the related fragment file.
For more information, see Extending UI Elements Using the Extensibility Pane [page 197].
Open Applications with No Index.html File (Changed)
In the layout editor, you can open applications that have no index.html file.
Layout Editor Tutorial (Changed)
The tutorial about building a new application with the layout editor has been completely updated. For more information, see Try It: Build an Application with the Layout Editor [page 137].
For more information, see Layout Editor [page 110].
Menu Bar (New, Changed)
Deploy Menu (New)
A Deploy menu was added to the menu bar with the following options:
● Deploy to the SAPUI5 ABAP Repository
● Register to SAP Fiori Launchpad
● Application Status
Hide/Show Hidden Files (New)
From the View menu, you can hide or show hidden files that are generated by SAP Web IDE, for example, the .user.project.json file.
The .user.project.json file contains the project settings for a specific user.
Run Menu Options (Changed)
The options in the Run menu in the main toolbar and context menu have been reorganized and enhanced:
● The first section in the Run menu options displays up to five run configurations that you can use for the selected project. The run configurations are listed according to recent usage; the last run configuration used is first in the list.
● The Run Configurations option is now named New Configuration. Choose this option to define a new run configuration for your project.
● The Run As submenu and the other options remain unchanged.
Templates (New, Changed)
Favorites Template Category (New)
In the New Project from Template wizard, a Favorites category has been added to the list of categories. You can click on the heart on the relevant tile to add it to this category.
Featured Templates Category (New)
When creating a new project using the wizard, there is a new Featured template category that displays the most commonly-used templates. These templates all follow the recommended SAP guidelines.
CRUD Template (New)
The template library now includes the CRUD Master-Detail Application template that displays data from an OData service using the master-detail pattern and includes Create, Read, Update, and Delete capabilities. This template belongs to the SAP Fiori Application category.
SAP Fiori Smart Template Application Template (New)
The SAP Fiori Smart Template Application template creates SAP Fiori applications that are based on OData services and annotations that require no JavaScript UI coding.
An app that is based on smart templates uses predefined template views and controllers that are provided centrally, so no application-specific view instances are required.
The SAPUI5 runtime interprets metadata and annotations of the underlying OData service and uses the corresponding views for the SAP Fiori app at start-up.
Build Creates Resources File (Changed)
When you build an application, a resources.json file is created listing all the resources in the project. For more information, see Application Build [page 191].
Compare Editor (Changed)
The panes in the Compare editor that you access from the Git pane, now have titles. The title of each pane indicates whether it contains the latest editable version or the previous read-only version.
For more information, see Comparing Code [page 163].
Cross-File Code Completion (Changed)
SAP Web IDE can now display code completion suggestions from other files within the same project when you use dependency declarations with Asynchronous Module Definition (AMD).
For more information, see Using Code Completion [page 83].
Mock Data Editor (Changed)
The mock data editor now supports the new SAPUI5 project template structure. In these projects, metadata is stored under the webapp/localService folder, and mock data json files are stored in the mockdata subfolder under webapp/localService.
For more information, see Editing Mock Data [page 185].
Run Configurations (Changed)
The user interface to manage run configurations has been updated. The run configuration settings are now organized in tabs, which are displayed according to the type of run configuration. The Run Configurations window is accessible from the Run menu, as previously, but is no longer accessible from Project Settings.
Tip
Mouse over the image for more information about the new Run Configurations user interface.
Hybrid App Toolkit Add-on Enhancements (Changed)
The Hybrid App Toolkit add-on has new and improved features.● Configuring How to Run Projects [page 174] ● Configuring How to Run Projects [page 174] ● Configuring How to Run Projects [page 174] ● Configuring How to Run Projects [page 174] ● Configuring How to Run Projects [page 174] ● Configuring How to Run Projects [page 174]
The only change in functionality is that all defined URL parameters are enabled and added to the URL at runtime. When you create a new run configuration, the default name is Run <run_application_filename>. If the run application file is not known, the default name is Configuration.
The name of the field for the path of the file that runs the application is now Run Application File.
● If you choose Run Configurations from the context menu of the file that runs the application, this file name appears in the Run Application File field.
● If you choose Run Configurations for a project with only one file that can run the application, this file name appears in the Run Application File field.
● In all other cases, you select the file from the list of possible options.
In the following example, Run Configurations was chosen from the context menu for the file testFLP.html in the project Fiori3test.
● Configuring How to Run Projects [page 174] ● Configuring How to Run Projects [page 174] ● Configuring How to Run Projects [page 174]
You can now add URL parameters that are added to the application's URL when running the extensibility pane. You can now define a URL fragment identifier (also known as a hash fragment) in run configurations for web applications and SAP Fiori components. When you run the application, the fragment identifier is appended to the application URL after other URL parameters and is preceded by a hash (#) delimiter.
The Run Configurations pane contains a new section, URL Components, in which you define the fragment identifier, and other URL application parameters as required. This section replaces the Application URL Parameters section.
When you run an application, it now opens with no frame, by default. You can change this setting in the Frame field in the Run Configuration settings.
For more information, see Configuring How to Run Projects [page 174].
Working in the Code Editor (Changed)
● You can now navigate to variable definitions in other files within the same project when you use dependency declarations with Asynchronous Module Definition (AMD).
● You can move between code editor tabs:
○ Alt + U - Move one tab to the right. ○ Alt + Q - Move one tab to the left.
● Code editor tabs load much more quickly after SAP Web IDE is refreshed.
● You can use the following keyboard shortcuts for German language keyboards to perform Toggle comment
actions.
Microsoft Windows Mac OS
Toggle line comment Alt + 7 Alt + 7
Toggle block com ment
Ctrl + Shift + 7 Command + Shift + 7
For more information, see Keyboard Shortcuts [page 48].
Working with Git (Changed)
Project Shows Current Checked-Out Branch (Changed)
In the workspace, each project that is under source control indicates the branch that is currently checkout out.
Create Multiple Local Branches from Remote Branch (Changed)
You can now create more than one local branch from a remote branch. For more information, see Using Multiple Branches [page 167].
3
Get Started
Set up SAP Web IDE by subscribing to it in the cloud, creating destinations, configuring Git, and connecting remote systems.
Prerequisites
● You must first sign up for an SAP HANA Cloud Platform developer account. For more information, see Getting an Account.
● In the SAP HANA Cloud Platform cockpit, you can add users who develop and maintain HTML5 applications as account members.
Opening SAP Web IDE [page 19]
You open SAP Web IDE in a web browser.
Entering Git Settings [page 21]
If you want to use source control in your SAP Web IDE project, your user name and email address must be set for your Git account.
Optional - Connecting Remote Systems [page 22]
Establish a connection to an ABAP back-end system by creating one destination for multi-usage.
3.1
Opening SAP Web IDE
You open SAP Web IDE in a web browser.
Prerequisites
To restrict access to SAP Web IDE, make sure that you have assigned your roles to the WebIDEPermission
permission.
Note
If no role is assigned, only account members with developer or administrator permissions have access to the protected resource.
Procedure
1. Log on with a user (who is an account member) to the SAP HANA Cloud Platform cockpit, using the developer account at one of the following URLs:
Productive Use Trial Use
○ https://account.hana.ondemand.com/ cockpit (Europe) ○ https://account.us1.hana.ondemand.com (United States) ○ https://account.ap1.hana.ondemand.com (Asia-Pacific) https://account.hanatrial.ondemand.com/ cockpit
2. In the navigation pane, choose Subscriptions.
3. In the Subscribed HTML5 Applications section, choose the existing webide subscription. An application URL is displayed.
4. Click the URL or copy it into your browser. The following browsers are supported:
Browser Version and Operating System
Microsoft Internet Explorer Versions 10 and 11 for Microsoft Windows 7 and 8
Mozilla Firefox Latest version for Microsoft Windows
Google Chrome Latest version for Microsoft Windows and Mac OS
Safari Latest version for Mac OS
Note
Opening multiple instances of SAP Web IDE in parallel may cause issues. For more information, see Known Issues [page 211].
Task overview: Get Started [page 19]
Related Information
Entering Git Settings [page 21]
3.2 Entering Git Settings
If you want to use source control in your SAP Web IDE project, your user name and email address must be set for your Git account.
Context
By carrying out the following steps, you can either set your Git user settings or check whether they are already set correctly.
Procedure
1. Open SAP Web IDE in one of the supported browsers using the subscription URL. 2. Choose (Preferences) and select Git Settings.
3. Enter your email address and name.
Note
The email address field is case-sensitive.
Note
If you have not set your Git user name and email address, SAP Web IDE extracts this information from the identity provider defined in your account and pre-populates these fields in the Git Settings page.
4. Choose Update.
Task overview: Get Started [page 19]
Task overview: Set User Preferences [page 36]
Related Information
Opening SAP Web IDE [page 19]
Optional - Connecting Remote Systems [page 22] Configuring Code Checking [page 37]
Configuring Code Completion [page 38] Configuring the Code Editor [page 38]
Enabling Optional Plugins [page 40]
3.3 Optional - Connecting Remote Systems
Establish a connection to an ABAP back-end system by creating one destination for multi-usage.
Prerequisites
If your remote system resides behind a firewall (proxy type OnPremise), the following prerequisites must be met:
● You have set up SAP HANA Cloud Connector and defined a virtual host mapping for the system. See SAP HANA Cloud Connector.
● In the Access Control tab page of SAP HANA Cloud Connector, you have granted access to the URL paths (Resources) for the required usages (for Access Policy, select option Path and all sub-paths):
○ /sap/opu/odata
for the OData functionality of Gateway
○ /sap/bc/ui5_ui5
for executing SAPUI5 applications from the SAPUI5 ABAP Repository
○ /sap/bc/adt
for extensibility scenarios and developing or deploying to SAPUI5 ABAP Repository
○ /sap/bc/bsp
for working with fact sheets
○ /sap/hba
for SAP HANA XS OData services See Configuring Access Control (HTTP).
Context
For every system that you want to connect to, you create one multi-usage destination. You enter the required usages as a value for the property WebIDEUsage.
Procedure
Note
You can access the SAP HANA Cloud Platform cockpit from SAP Web IDE by selecting Tools SAP HANA Cloud Platform Cockpit .
Option Description
productive use https://account.hana.ondemand.com/cockpit (Europe)
https://account.us1.hana.ondemand.com (United States)
https://account.ap1.hana.ondemand.com (Asia-Pacific) trial use https://account.hanatrial.ondemand.com/cockpit 2. Open the Destinations editor.
3. Choose New Destination.
4. Configure the destination as follows: Property Value
Name Provide a name for the destination that includes the desired service.
Type HTTP
Description Optional - Provide a description for the destination URL <protocol>://<host>:<port>
<protocol>://<virtual host>:<virtual port> (if you are using SAP HANA Cloud Connector)
Note
Do not add the URL path for the usage (for example, /sap/opu/odata).
Proxy Type Select Internet or OnPremise, depending on the connection you need to provide for your appli cation.
○ If your remote system is publicly accessible on the internet, select Internet.
○ If your remote system resides behind a firewall, select OnPremise. Cloud Connector
Version 2
Authentication Select the authentication you need for the connection. For more information, see Creating HTTP Destinations.
5. In the Additional Properties section, choose New Property for each of the properties described below.
Key Value
WebIDEUsage Enter one or more of the following values:
○ odata_abap:
for the OData functionality of Gateway (corresponds to URL path /sap/opu/odata)
○ odata_gen:
for generic OData functionality (service URL must be provided manually in the New Project wiz ard)
Key Value
○ ui5_execute_abap:
for executing SAPUI5 applications from the SAPUI5 ABAP Repository (corresponds to URL path /sap/bc/ui5_ui5)
○ dev_abap:
for extensibility scenarios and developing or deploying to SAPUI5 ABAP Repository (corre sponds to URL path /sap/bc/adt)
○ bsp_execute_abap:
for working with fact sheets (corresponds to URL path /sap/bc/bsp)
○ plugin_repository:
for exposing optional plugin repositories (corresponds to URL path /plugins/ pluginrepository)
○ odata_xs
for SAP HANA XS OData services (corresponds to URL path/sap/hba)
○ api_mgmt_catalog for the API management system
○ api_mgmt_proxy for the API's endpoint
Note
When you enter multiple usages for a destination, separate them by commas without spaces (for example, odata_abap,ui5_execute_abap).
WebIDEEnabled true
WebIDESystem <SAP system_ID>
sap-client <SAP client from the ABAP system> WebIDEAdditio
nalData
This property is optional.
You can add one or more of the following values:
○ api_mgmt
for specifying an API key to retrieve metadata
○ full_url
for specifying the full URL of a service so that metadata is shown without having to choose the service
Note
When specifying this value, the URL field of your destination should contain the full URL of your service. Otherwise, there will be no communication between SAP Web IDE and your system.
6. Repeat steps 4 and 5 for any additional destinations. 7. Choose Save.
Related Information
Opening SAP Web IDE [page 19] Entering Git Settings [page 21] SAP HANA Cloud Connector Creating HTTP Destinations
3.3.1 Requirements for Connecting to ABAP Systems
The following is prerequisite information for connecting to ABAP systems.
● You have installed SAP_BASIS 7.31 SP 14 or 7.40 SP 8 or later.
● If you are using SAP_BASIS 7.31, make sure that the software components of the UI add-on for SAP NetWeaver (UI_INFRA and UI5_731) are installed.
4 Installation and Setup
The following is an overview of the process for installing and starting SAP Web IDE.
Context
Note
The local installation of SAP Web IDE is meant for use by an individual user only and should not be used as a server.
Procedure
1. Install SAP Web IDE by downloading the installation ZIP file and extracting it.
2. Start SAP Web IDE by first starting the Orion Application Server and then opening the provided URL in the Chrome browser.
Installing SAP Web IDE [page 27]
Instructions for locally installing SAP Web IDE.
Starting SAP Web IDE [page 28]
Start SAP Web IDE and access remote systems if you defined them.
Migrating Projects from Older Versions of SAP Web IDE [page 29]
You can migrate your projects from older versions of SAP Web IDE.
Optional Post-Installation Activities [page 30]
4.1 Installing SAP Web IDE
Instructions for locally installing SAP Web IDE.
Prerequisites
You have installed Java™ Platform, Standard Edition Runtime Environment (JRE) Version 7 (at least version 1.7) or higher in the 64-bit version. If required, download an installer from Java SE Download and follow the
instructions.
Note
You can check the version by entering java -version in the command shell (Microsoft Windows®) or
Terminal window (Mac OS®).
Output example:
java version "1.7.0_55"
Java(TM) SE Runtime Environment (build 1.7.0_55-b13)
Java HotSpot(TM) 64-Bit Server VM (build 24.55-b03, mixed mode)
Procedure
1. Go to the SAP Web IDE - Local Trial Version page on SCN (SAP Community Network), scroll down to Install the Local Trial Version and click software zip file.
Note
The downloaded ZIP file includes SAP Web IDE and Orion 8. 2. On the SAP Store page, click Trial Version.
An email with a download link is sent to you.
3. In the email, click the download link, which is enabled for 48 hours only.
Microsoft Windows® Mac OS® 1. To download the installation ZIP file, click SAP Web IDE
local installation for Windows.
2. Extract the zipped files to C:\SAPWebIDE.
1. To download the installation ZIP file, click SAP Web IDE local installation for Mac OS.
2. Extract the zipped files to /Applications/ SAPWebIDE.
3. Using the Terminal window, execute the following in or der to grand executable permissions to the folder: chmod -R 777 /Applications/SAPWebIDE
Task overview: Installation and Setup [page 26]
Related Information
Starting SAP Web IDE [page 28]
Migrating Projects from Older Versions of SAP Web IDE [page 29] Optional Post-Installation Activities [page 30]
4.2 Starting SAP Web IDE
Start SAP Web IDE and access remote systems if you defined them.
Procedure
1. Start the Orion Application Server as follows:
Note
Optionally, you can also download the installation ZIP file for the SAP Hybrid App Toolkit local addon using theSAP Hybrid App Toolkit local addon download link.
For more information, seeInstalling and Setting Up.
Note
8080 is the default port. You can change to a different port if required. For more information, see Configuring the Orion Application Server [page 31].
Microsoft Windows® Mac OS®
Double-click the orion.exe file. A command shell opens. Execute orion by searching for it via the Finder. An OSGi terminal window appears displaying the OSGi shell.
Note
Make sure that you have allowed apps to be downloaded from Anywhere in the Security & Privacy settings.
Note
When you start the Orion Application server for the first time, you have to create a new account for it: 1. Choose Create a new account.
2. Enter a user name and password.
2. Access SAP Web IDE via the URL http://localhost:8080/webide/index.html. The default port is 8080. If you have changed the port, use the port that you defined. 3. On the Orion Server Application login page, enter the user and password that you defined.
If you configured remote systems, you can access them, for example, in the project creation wizard.
Task overview: Installation and Setup [page 26]
Related Information
Installing SAP Web IDE [page 27]
Migrating Projects from Older Versions of SAP Web IDE [page 29] Optional Post-Installation Activities [page 30]
4.3 Migrating Projects from Older Versions of SAP Web IDE
You can migrate your projects from older versions of SAP Web IDE.
Context
Procedure
1. In the older version of SAP Web IDE, export your projects.
2. Remove the SAP Web IDE folders and files in C:\SAPWebIDE in Windows systems or in /Applications/ SAPWebIDE in Mac systems.
3. Install the latest version of the local installation of SAP Web IDE according to the instructions in the topic
Installation and Setup [page 26].
4. Import your projects from the older version of SAP Web IDE.
Next Steps
If not previously defined, you can perform the optional settings that are described in the following sections:
● Configuring the Orion Application Server [page 31] ● Connecting Remote Systems [page 32]
● Importing the Git Server Certificate into the JVM [page 35] Task overview: Installation and Setup [page 26]
Related Information
Installing SAP Web IDE [page 27] Starting SAP Web IDE [page 28]
Optional Post-Installation Activities [page 30]
4.4 Optional Post-Installation Activities
You can perform any of the post-installation activities below according to your requirements.
Parent topic: Installation and Setup [page 26]
Related Information
Installing SAP Web IDE [page 27] Starting SAP Web IDE [page 28]
4.4.1 Configuring the Orion Application Server
You may wish to configure the Orion Application Server for your system landscape.
Changing the Orion Application Server Port
By default, the Orion Application Server runs on port 8080. You can change the port, for example, if there are conflicts with other servers running on the same machine.
Procedure
1. Open the orion.ini file:
Microsoft Windows® Mac OS® Open the orion.ini file with a text editor, such as Word
Pad.
Open the orion.ini file with a text editor, such as vi, by entering the following commands in the Terminal window:
1. cd /Applications/SAPWebIDE/eclipse/ orion.app/Contents/MacOS
2. vi orion.ini 2. Change the port in the following line:
-Dorg.eclipse.equinox.http.jetty.http.port=8080
Note
In vi editor, press I to edit. 3. Save the orion.ini file and close it.
Note
Setting the Proxy Server
In your landscape, you may need to access remote systems via a proxy server.
Procedure
1. Open the orion.ini file:
Microsoft Windows® Mac OS® Open the orion.ini file with a text editor, such as Word
Pad.
Open the orion.ini file with a text editor, such as vi, by entering the following commands in the Terminal window:
1. cd /Applications/SAPWebIDE/eclipse/ orion.app/Contents/MacOS
2. vi orion.ini
2. Add the following lines at the end of the file, replacing the placeholders with values specific to your landscape:
-Dhttp.proxyHost=<Proxy address> -Dhttp.proxyPort=<Proxy port> -Dhttps.proxyHost=<Proxy adddress> -Dhttps.proxyPort=<Proxy port> -Dhttps.nonProxyHosts=localhost|<host1>|<host2>
Note
In vi editor, press I to edit. 3. Save the orion.ini file and close it.
Note
In vi editor, press ESC when you finish editing. To save and quit, enter :wq .
4.4.2 Connecting Remote Systems
You can define service destinations to access remote systems as required.
Prerequisites
Context
The service destinations are described in the following property files:
Key Value
WebIDEUsage Enter one or more of the following possible values:
● odata_abap:
For the OData functionality of Gateway (corresponds to URL path /sap/opu/odata)
● odata_gen:
For generic OData functionality (service URL must be provided manually in the New Project wizard)
● ui5_execute_abap:
For executing SAPUI5 applications from the SAPUI5 ABAP repository (corresponds to URL path /sap/bc/ui5_ui5)
● dev_abap:
For extensibility scenarios and developing or deploying to the SAPUI5 ABAP repository (cor responds to URL path /sap/bc/adt)
● bsp_execute_abap:
For working with fact sheets (corresponds to URL path /sap/bc/bsp)
● odata_xs:
For SAP HANA XS OData services (corresponds to URL path/sap/hba)
Note
When you enter multiple usages for a destination, separate them by commas without spaces (for example, odata_abap,ui5_execute_abap).
WebIDEEnabled true
WebIDESystem <SAP system_ID>
sap-client <SAP client from the ABAP system>
Procedure
1. To connect your remote system <mysystem>, open a file with the same name as your remote system:
Note
Microsoft Windows® Mac OS® In the command shell, enter the following commands:
1. cd /d C:\SAPWebIDE\eclipse
2. mkdir config_master
\service.destinations\destinations
3. cd config_master\service.destinations \destinations
4. echo #ServiceDestination > <mysystem>
5. notepad <mysystem>
In the Terminal window, enter the following commands: 1. cd /Applications/SAPWebIDE/eclipse/
2. vi orion.app/Contents/MacOS/
config_master/service.destinations/ destinations/<mysystem>
2. Paste the content of the following example to the file.
Example for eclipse/config_master/service.destinations/destinations/<mysystem>:
Description=<mysystem> description Type=HTTP TrustAll=true Authentication=NoAuthentication Name=<mysystem> ProxyType=Internet URL=https\://<host>\:<port> WebIDEUsage=odata_abap,ui5_execute_abap,dev_abap WebIDESystem=<mysystem> WebIDEEnabled=true
3. Save and close the file.
Results
If your landscape requires the use of a proxy server to reach your systems, you can configure the Orion Application Server to use a proxy server.
Related Information
4.4.3 Importing the Git Server Certificate into the JVM
If the server certificate is based on a company internal root certificate, you have to import the root certificate into the JVM.
Context
If you are connecting to a Git server in your company via HTTPS, the Java Virtual Machine (JVM) on which the Orion installation is running has to trust the server certificate. If the server certificate is not issued by a public agency, but is based on a company internal root certificate, you have to import the root certificate into the JVM. Otherwise the verification of the Git server's certificate fails and prevents you from performing Git operations. To import your certificate into the JVM, fetch the certificate *.cer file from your company's IT department and store it on your machine, by performing the steps.
Microsoft Windows® Mac OS®
1. In the command shell, enter the following command:
cd C:\Program Files\Java\jre<VERSION>
\lib\security
Example:
C:\Program Files\Java\jre7\lib \security
2. Next, enter the following command:
keytool -import -file <PATH OF THE .cer FILE>
-keystore cacerts -alias <ANY ALIAS>
1. In the Terminal window, enter the following command:
cd /Library/Java/JavaVirtualMachines/ jdk<VERSION>.jdk/Contents/Home/jre/lib/ security Example: /Library/Java/JavaVirtualMachines/ jdk1.7.0_65.jdk/Contents/Home/jre/lib/ security
2. Next, enter the following command:
sudo keytool -import -file <PATH OF THE .cer FILE> -keystore cacerts -alias <ANY ALIAS>
Note
5
Set User Preferences
You can set your preferences for working in SAP Web IDE. You can set the following preferences:
● Code check settings to enable and disable inline code validation. The project-level appearance settings are used to validate code and flag messages.
● Code completion settings to enable inline code completion and comment completion.
● Code editor settings to select the theme to be used by the code editor and the font size. You can also choose to have the changes in all open documents saved automatically at preset intervals.
● Enable optional plugins to create and develop applications.
Note
If you start SAP Web IDE after you have been logged out, the system restores the latest status of the workspace with its preference settings and all the editors that have been opened.
If you want to reload SAP Web IDE while skipping this persistence feature, for example, because an editor cannot be loaded or is frozen, add the parameter settings=ignore to the URL and refresh your browser. The persistence information is not deleted (meaning that when you remove the parameter from the URL and refresh your browser, SAP Web IDE restores the latest status of the workspace and the editors).
To delete the persistence information, add the parameter settings=delete to the URL.
Configuring Code Checking [page 37]
Configure when to trigger code checking, also known as code validation, and the level of messages to display.
Configuring Code Completion [page 38]
You can enable code completion as you type (auto hint) for JavaScript and XML files.
Configuring the Code Editor [page 38]
Define the appearance of the code editor, and whether to autosave changes.
Entering Git Settings [page 21]
If you want to use source control in your SAP Web IDE project, your user name and email address must be set for your Git account.
Enabling Optional Plugins [page 40]
5.1
Configuring Code Checking
Configure when to trigger code checking, also known as code validation, and the level of messages to display.
Context
By default, code checking is enabled when you make changes to your code, and all messages are displayed. You can change these defaults.
Note
You can customize code checking rules for each project. For more information about customizing and using code checking, see Checking Code [page 100].
Procedure
1. To open the Preferences pane, in the left sidebar, choose (Preferences). 2. Select Code Check.
3. In the Run Code Check section, select when to display code checking annotations:
○ Choose On Save to display annotations only when you save your file.
○ Choose On Change to display annotations every time you make a change to your code. 4. In the Code Check Level section, select which messages to display:
○ All displays all errors, warnings, and information messages
○ Error displays error messages only
○ Error and Warning displays error and warning messages
○ Disable suppresses message display 5. Choose Save.
Task overview: Set User Preferences [page 36]
Related Information
Configuring Code Completion [page 38] Configuring the Code Editor [page 38] Entering Git Settings [page 21] Enabling Optional Plugins [page 40]
Customizing Code Checking Rules [page 66]
5.2 Configuring Code Completion
You can enable code completion as you type (auto hint) for JavaScript and XML files.
Procedure
1. To open the Preferences pane, in the left sidebar, choose (Preferences). 2. Click Code Completion and select the Enable checkbox.
3. Click Save.
Task overview: Set User Preferences [page 36]
Related Information
Configuring Code Checking [page 37] Configuring the Code Editor [page 38] Entering Git Settings [page 21] Enabling Optional Plugins [page 40]
5.3 Configuring the Code Editor
Define the appearance of the code editor, and whether to autosave changes.
Procedure
1. To open the Preferences pane, in the left sidebar, choose (Preferences). 2. Click Code Editor and choose one of the available SAP editor themes.
Check the preview to view the selected theme. 3. Choose the font size for text in the code editor.
4. Check Enable Auto Save to save the changes in all open documents automatically at preset intervals. 5. Click Save.
Task overview: Set User Preferences [page 36]
Related Information
Configuring Code Checking [page 37] Configuring Code Completion [page 38] Entering Git Settings [page 21]
Enabling Optional Plugins [page 40]
5.4 Entering Git Settings
If you want to use source control in your SAP Web IDE project, your user name and email address must be set for your Git account.
Context
By carrying out the following steps, you can either set your Git user settings or check whether they are already set correctly.
Procedure
1. Open SAP Web IDE in one of the supported browsers using the subscription URL. 2. Choose (Preferences) and select Git Settings.
3. Enter your email address and name.
Note
The email address field is case-sensitive.
Note
If you have not set your Git user name and email address, SAP Web IDE extracts this information from the identity provider defined in your account and pre-populates these fields in the Git Settings page.
4. Choose Update.
Task overview: Get Started [page 19]
Task overview: Set User Preferences [page 36]
Related Information
Opening SAP Web IDE [page 19]
Optional - Connecting Remote Systems [page 22] Configuring Code Checking [page 37]
Configuring Code Completion [page 38] Configuring the Code Editor [page 38] Enabling Optional Plugins [page 40]
5.5 Enabling Optional Plugins
You can use optional plugins in SAP Web IDE to create and develop applications.
Context
SAP Web IDE includes additional plugins that are not enabled by default. If you want to work on a project that was created using an optional plugin or create a new project with an optional plugin, the plugin must be enabled.
Procedure
1. To open the Preferences pane, in the left sidebar, choose (Preferences). 2. Choose Plugins Optional Plugins .
3. From the Plugin Repository dropdown list, select SAP Plugins. 4. Select the checkboxes of the plugins that you want to enable. 5. Choose Save.
Results
You can use the selected plugin to create and develop your project.
Task overview: Set User Preferences [page 36]
Related Information
Configuring Code Checking [page 37] Configuring Code Completion [page 38] Configuring the Code Editor [page 38] Entering Git Settings [page 21]
6
Overview
SAP Web IDE is a web-based tool that enables you to create and extend end user applications for browser and mobile devices. It simplifies the end-to-end application lifecycle: prototyping, development, packaging, deployment, and customer extensions for SAPUI5 and SAP Fiori applications, and allows developers to collaborate with business experts and designers to fulfill end user requirements and expectations more effectively.
Architecture
The following diagram provides an architectural overview of the SAP Web IDE environment:
Component Description
SAP Web IDE application Integrated development environment used to create or ex
Component Description
Orion Server that provides a number of back-end services that SAP
Web IDE relies on. For example:
● Provides private workspaces per user or per account
● Enables working with projects that are stored in a work space
● Enables working with files and folders that are stored in a workspace
● Enables working with local Git repositories and exchang ing Git commits with a central Git server
Git Revision control and source code management system.
SAPUI5 User interface technology that is used to build and adapt cli
ent applications.
For more information, see UI development toolkit for HTML5 - Demo Kit
SAP Gateway Provides a simple way to connect SAP Web IDE to an external
SAP system with access to OData functionality. Who is it for?
SAP Web IDE is a flexible tool for developers who want to dive right into the code editor without having to spend time configuring and administering the development environmentt.
The main personas are:
● Developers who need a modern and secure environment to create new or extend existing SAP Fiori, SAPUI5, or hybrid applications. Developers are provided with a comprehensive set of tools, including strong code editors with templates, wizards, beautifier capabilities, code completion, code snippets, code validation, code checking, WYSIWYG, and many more other features.
● Business users who need to be able to create fully functional, custom software applications that previously required the assistance of professional programmers.
The local installation version of SAP Web IDE is a trial shipment provided on SAP Community Network. The described features cannot be used productively. In addition, the functionality is restricted compared to the SAP Web IDE version that is available on SAP HANA Cloud Platform. The following features are not available if you are using SAP Web IDE as a local installation:
● SAP HANA Cloud features:
○ Deploying to SAP HANA Cloud
○ Running applications on SAP HANA Cloud
○ Extending applications on SAP HANA Cloud
○ Importing applications from SAP HANA Cloud
● Plug-in development
● Template development
Note
To use SAP Web IDE with its full functionality, go to SAP HANA Cloud Platform. For more information, see SAP HANA Cloud Platform Overview .
Features and Benefits [page 44]
SAP Web IDE is a flexible tool for developers to accelerate asynchronous development, especially in a geographically distributed team environment.
Menus [page 47]
In SAP Web IDE, you can choose from different types of menus to perform your actions.
Keyboard Shortcuts [page 48]
You can use keyboard shortcuts to perform actions in SAP Web IDE.
Searching and Replacing [page 50]
Choose how you want to perform searches in SAP Web IDE. SAP Web IDE allows you to perform an advanced search and replace across multiple files in a project. You can also perform a simple string search within an open file in the code editor.
Working with Files and Folders [page 55]
Use keyboard shortcuts and context menus to work with files and folders.
Resizing Window Panes [page 57]
You can show and hide various windows, as well as change their sizes, to fit your way of working.
6.1 Features and Benefits
SAP Web IDE is a flexible tool for developers to accelerate asynchronous development, especially in a geographically distributed team environment.
Review the following SAP Web IDE features to fully understand how your application development can benefit from them.
● Build SAPUI5 applications applying SAP Fiori UX guidelines using wizards, templates, and WYSIWYG editors.
● Expedite coding and testing by using a collection of dynamic interactive features, such as code completion and API reference support.
● Instantly preview your applications for any screen size - desktop, tablet, or smartphone.
● Use mock data to build and preview your entire application UI without connecting to any system.
● Deploy on SAP ABAP using Business Server Pages (BSP).
● Use SAP Web IDE's extensible framework to easily extend SAP delivered applications through plugins and templates.
● Use source control in your SAP Web IDE project to manage your code and improve your workflow.
Assisted Development [page 45]
A collection of dynamic interactive features, code completion, and API reference support, which facilitate development by expediting coding and testing.
SAP Web IDE shares a common workspace for code; however, all individual user settings, including any configuration changes or window resizing, are automatically saved when you exit. Your personal preferences persist, despite the workspace being shared.
Parent topic: Overview [page 42]
Related Information
Menus [page 47]
Keyboard Shortcuts [page 48] Searching and Replacing [page 50] Working with Files and Folders [page 55] Resizing Window Panes [page 57]
6.1.1 Assisted Development
A collection of dynamic interactive features, code completion, and API reference support, which facilitate development by expediting coding and testing.
You can also start your development based on predefined templates.
Parent topic: Features and Benefits [page 44]
Related Information
User-Centric Customizability and Session Persistence [page 46]
6.1.1.1
Code Completion
Use code completion to assist in writing JavaScript (for SAPUI5 namespaces) or XML code. Inline code completion popups provide contextually-aware API reference support, and make hints available to the editor directly where they are needed.
The editor completes words, code fragments, or entire SAPUI5 objects (including methods, properties, and events) based on the current context, and the context of other similar words within the same component. The selected code fragment is then entered into the cursor location in syntactically correct format.
To generate an appropriate list of suggestions, SAP Web IDE parses and analyzes the context by reviewing:
● The current node
● Any prefixes
SAP Web IDE then determines which suggestion is most appropriate: whether to suggest a namespace, a control, an attribute, event, value, or in the case of XML, only syntax. You can also select entire code snippets or custom objects. All suggestions appear as a filtered and sorted list, with an icon that indicates the type of code to be injected, allowing you to quickly find and select the correct option.
6.1.1.2
Integrated and Dynamic API Reference Support
API reference information is embedded in SAP Web IDE, providing contextually-aware reference information on demand when you are writing code.
API reference information is available in a standalone pane. You can show this pane any time by clicking View API Reference Pane . The pane appears docked to the right side of the editor. Use this information together with code completion to get API-specific help for code elements that are in focus.
Use of the API Reference pane is optional. It remains docked and available until you close it.
Related Information
Enabling Dynamic API Reference Support [page 109]
6.1.2 User-Centric Customizability and Session Persistence
SAP Web IDE shares a common workspace for code; however, all individual user settings, including any configuration changes or window resizing, are automatically saved when you exit. Your personal preferences persist, despite the workspace being shared.
Key customizations include:
Workspace View If you have changed the size of the workspace, the console, or various panes by dragging the splitter, the splitter's new position is saved automatically and your views are restored when you reopen SAP Web IDE.
Reset View You can reset to the default settings by choosing View Reset to Default . Custom Code
Readability
Code beautification support allows you to apply readability standards to the files that you work in. Define custom beautification settings and apply them to files as needed. Inline Error Validation You can configure custom code validation checks as required so issues can be
displayed and corrected inline.
Parent topic: Features and Benefits [page 44]
Related Information
Assisted Development [page 45]
6.2 Menus
In SAP Web IDE, you can choose from different types of menus to perform your actions.
Menu bar - Provides access to all operations available in SAP Web IDE.
Global toolbar - Depending on the item that is activated in the workspace, you can choose from the icons in the global toolbar (icons of actions that are not applicable are grayed out).
Left sidebar - Use the buttons to switch between the Welcome page, development workspace, and user preferences.
Right sidebar - Use the buttons to switch between the different panes available in SAP Web IDE (for example, Git pane, Outline pane, and so on).
Logout
To end your session and log out, choose Logout in the top right corner of the SAP Web IDE menu bar.
Related Information
Features and Benefits [page 44] Keyboard Shortcuts [page 48] Searching and Replacing [page 50] Working with Files and Folders [page 55] Resizing Window Panes [page 57]
6.3 Keyboard Shortcuts
You can use keyboard shortcuts to perform actions in SAP Web IDE. The following shortcuts are available in SAP Web IDE:
Note
The majority of these shortcuts are available only for English language keyboards. You cannot customize keyboard shortcuts.
Action Microsoft Windows Keyboard Shortcut Mac OS Keyboard Shortcut
New file Ctrl + Alt + N Command + Option + N
New folder Ctrl + Alt + Shift + N Command + Option + Shift + N
New project Ctrl + Alt + Shift + O Command + Option + Shift + O
New extension project Ctrl + Alt + Shift + E Command + Option + Shift + E
Close file Alt + W Option + W
Close all files Alt + Shift + W Option + Shift + W
Save file Ctrl + S Command + S
Save all files Ctrl + Shift + S Command + Shift + S
Undo Ctrl + Z Command + Z Redo Ctrl + Y Command + Y Cut Ctrl + X Command + X Copy Ctrl + C Command + C Paste Ctrl + V Command + V Rename F2 F2
Delete Del Del
Move one tab to the right
Alt + U Alt + U
Action Microsoft Windows Keyboard Shortcut Mac OS Keyboard Shortcut
Navigate back Ctrl + Alt + R Command + Option + R
Navigate forward Ctrl + Alt + Y Command + Option + Y
Navigate to last edit Ctrl + Shift + 9 Command + Shift + 9
Toggle show invisibles Ctrl + I Command + I
Toggle line comment Ctrl + / Command + /
Toggle line comment (German language key board)
Alt + 7 Alt + 7
Toggle block comment Ctrl + Shift + / Command + Shift + /
Toggle block comment (German language key board)
Ctrl + Shift + 7 Command + Shift + 7
Add todo comment Ctrl + Alt + T Command + Option + T
Indent line Tab Tab
Outdent line Shift + Tab Shift + Tab
Move lines up Alt + Up Arrow Shift + Tab
Move lines down Alt + Down Arrow Option + Down Arrow
Copy lines up Alt + Shift + Up Arrow Option + Shift + Up Arrow
Copy lines down Alt + Shift + Down Arrow Option + Shift + Up Arrow
Beautify file format Ctrl + Alt + B Command + Option + B
Generate JSDoc Com ment
Ctrl + Alt + J Command + Alt + J
Goto JavaScript defini tion
Ctrl + Alt + G Command + Option + G
Run Alt + Shift + R Alt + Shift + R
Run without frame Ctrl + Alt + Shift + R Command + Option + Shift + R
Find Ctrl + F Command + F
Find and replace Ctrl + H Command + H
Advanced repository search
Ctrl + Shift + F Command + Shift + F
Maximize Active View Ctrl + M Command + M
Reset Active View Alt + R Option + R
View console Ctrl + Shift + M Command + Shift + M
View API reference pane
Ctrl + Shift + A Command + Shift + A
View Git pane Ctrl + Shift + V Command + Shift + V
Action Microsoft Windows Keyboard Shortcut Mac OS Keyboard Shortcut
User preferences Ctrl + . Command + .
Extensibility pane Ctrl + Shift + E Command + Shift + E
Open resource Ctrl + Shift + R Command + Shift + R
Parent topic: Overview [page 42]
Related Information
Features and Benefits [page 44] Menus [page 47]
Searching and Replacing [page 50] Working with Files and Folders [page 55] Resizing Window Panes [page 57]
6.4 Searching and Replacing
Choose how you want to perform searches in SAP Web IDE. SAP Web IDE allows you to perform an advanced search and replace across multiple files in a project. You can also perform a simple string search within an open file in the code editor.
Searching for Files or Content in the Workspace [page 51]
Perform a file or string search within a folder or across all projects in your workspace. To determine the success of your search, use the preview to quickly validate results, and refine your search further as needed.
Replacing Strings Across Multiple Files [page 52]
Perform an advanced find and replace across multiple files with the Search pane.
Finding and Replacing in an Open File [page 54]
Perform a simple find and replace within a single open file from the code editor.
Task overview: Overview [page 42]
Related Information
Features and Benefits [page 44] Menus [page 47]