# 21 - CYMS Training Guide – Taking Payments
(10.1 – Updated May 08)Daily Processing Device Assumption: Global Sales Default = Clerk’s Payment Screen (For guidance on Daily Processing Device Assumption, See CQG #01c – Daily Processing Device)
The recommended method for taking payments is through Global Sales. This allows you to see and pay any balance in any module — Activity, Facility, Pass, etc. Go to Daily Global Global Sales (or click the Global Sales button on your Main Menu screen).
This guide contains:
Background Information On
Basic Concepts Manual Apply Screen
Payment Screen Manual Reversal Screen
Pay Codes
Types of Payments
Full Payments Over Payments
Partial Payments Payment Reversals
Split Payments Hourly Pre-Payments
Vacation Credits Outstanding Hourly Visits
Agency Payments Outstanding Registration Fees
Pre-Payments
Questions and Answers On
Payments Hourly Care
Payment Reversals
Background – Basic Concepts:
1 When you look up a household, the current balance at the bottom of the Household Listing screen is the total household balance. This total includes money owed by the household in any module (activity, pass, etc.) for any family member at any Center.
2 Upon selecting the household or family member, you will be brought to the Global Payment Update for <household> screen where you will see each module’s balance in the Net Amount Due or Dep/Visit Due column. Each module (activity, pass, etc) carries its own balance/credit. You must be extremely careful here —
You cannot pay for hourly care in the Actv Reg row or for full/part day care in the Dep/Visit Paid field of the Pass Mgt row.
Failure to make payments in the proper row will cause balances to go unpaid in one module and credits to appear in another.
You can have a credit balance in one module and a debit (an amount due) in another. You cannot have a credit and debit within the same module.
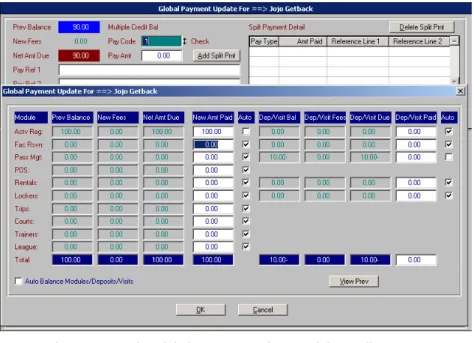
3 Payment amounts are always entered in the white New Amt Paid or Dep/Visit Paid field, where the field coming down meets the module row going across. The Total row at the bottom will do the addition automatically. You cannot update this field directly. Click OK when done to proceed to the final Payment Update Screen where you enter Pay Code and Pay Reference
information.
Figure 1: The Global Payment Update, Module Details Screen
Note: If a customer wants to pay $20 for child care and gives you a $50 bill, $20 would go in the New Amount Paid field on the first screen mentioned (the Module Details screen) and $50 would go in the Pay Amt field on the main Payment screen. When you click Print or No Print to finish, the Change Due screen will show $30 due to the customer.
4 You can always click Cancel to exit a Payment screen. This allows you to start over and does not save your changes.
You CANNOT cancel out of the Manual Apply screen. You will visit a Manual Apply Screen when a customer pays less then what is due. Once there, it is too late to cancel. Do not panic!! Finish the transaction and refer to the Payment Reversal Q&A section of this document.
5 Pre-Payments/Overpayments: If a customer pays more than is due, the over-payment appears as a credit in the advance payment general ledger account and cost center. In CYMS this is known as the Control Account.
A clerk cannot flag advance payment money for the CDC or SA. It is the household that has the credit, not the center.
Once the household is charged for a program, the money is debited from (taken out of) the Control Account and credited to the proper program revenue account.
Clerks can only direct monies to specific programs if the household owes a balance. This is done on the Manual Apply Screen.
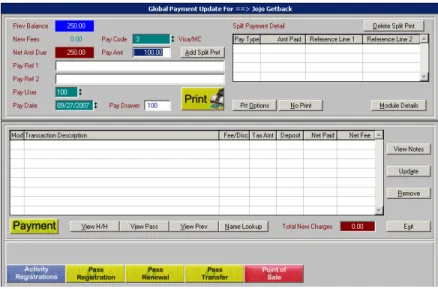
Figure 2: The Global Payment Main Screen
Background -- Payment Module Screen
Column Headings:o Module – The two key modules used in CYMS are Activity and Pass. At some locations, there may be an occasional charge in POS or Rental.
o Columns on the Left of the Screen:
Columns in the Activity Row, contain charges for activity fees, late payment fees, and deposits.
Columns in the Pass Row, contain hourly no-show fees and pass registration fees
Columns on this side of the screen include:
Prev Balance – outstanding unpaid household charges for the items described above (these charges do not include hourly or late pickup fees)
New Fees – fees for these services generated from the transaction you are currently doing
Net Amt Due – the total now due for these services (previous balance + new fees for the left side columns)
New Amt Paid – where you put what the patron is paying today for these services.
o It is CRITICAL to place payments in the boxes next to the correct module – either where the charges appear or where you want to make an advance payment if there are no charges due!
Auto - Do not enable these toggles unless directed by VSI.
o Columns on the Right Side of the Screen:
Columns in the Pass Row, on this side of the screen contain charges for hourly fees and late pickup charges.
Dep/Visit Due (in the Pass row) – outstanding charges for hourly care or late pickup fees
Dep/Visit Paid (in the Pass row) -- where you put what the patron is paying today for these pass-related services
o It is CRITICAL to place payments in the boxes next to the correct module!
Auto - Do not select this toggle unless directed by VSI.
Box at the bottom of the screen:
o Auto Balance Between Modules/Deposits/Visits – Allows you take a credit from one module and use it as a payment against another module.
A customer has a $100 pass credit balance and a $100 debit balance in the activity module. When toggled, the pass credit will pay off the activity balance.
Auto Balance should only be used if there is a credit in one module that the customer wishes to move to pay a balance in another module.
Buttons at the bottom of the screen:
o OK – Allows you to accept the amounts entered and proceed to the Global Sales Payment Update, main screen
o Cancel – Takes you to the main Payment screen. From there, you can:
Make a payment by entering a number in the Pay Amount field
Return to the Payment Modules screen by clicking Module Details
Cancel the payment by clicking Exit
Process an Activity Registration, Pass Membership, Pass Renewal or Pass Transfer for the selected household by clicking the appropriate Hot Button.
Background – Payment Main Screen
Important Fields/Buttons:o Pay Code – See Detailed Information below.
o Pay Amt – By default, this will be the total amount entered on the Payment Module screen as described above.
You can override this amount by overwriting the data as its displayed.
o Add Split Pmt – Used when a customer’s bill is being paid using two or more pay types (check, cash, credit card, agency co-payments, employee discounts, vacation credits, etc.).
o Delete Split Pmt – Removes the a split payment from the Split Payment Browser
o Pay Refs 1 & 2 – Provide space to make notes about the transaction (the check number, what the payment is for, etc). Information entered here will be displayed on the Cash Journal, GL Distribution report and Transaction History. Put notes that will help you audit, research or explain transactions or problems at a later date.
o Pay User/ Pay Drwr – Defaults to whoever is logged in. Do not change these fields unless directed by VSI.
o Date – Displays the current processing date. Do not change this field unless directed by VSI. Installations using End Of Shift processing should NEVER back date payment.
o Print/No Print – Allows you to print a receipt or process the payment without printing.
o Print Options – Use to attach a pre-established Comment Code at the bottom of the receipt.
o Module Details – Returns you to the Payment Modules Screen described above.
o Exit – Exits you from Global Sales and back to the CYMS desktop. Exiting will not save your current transactions.
o Hot Buttons – Activity Registration, Pass Membership, Pass Renewal or Pass Transfer for the selected household.
o Payment – Takes you to the Payment Modules Screen if you have items in the Transaction Listing Browser.
Background - Pay Codes
Pay Codes are your methods of payment (tender types). Correct setup and use of Pay Codes is critical to having your financial paperwork balance at the end of the day. CYMS has 4 basic Pay Code groupings:
Patron-Related Codes: These are the common payment methods you must account for on your bank deposit. They include: Cash, check, credit card, money order, etc.
Agency Codes: If an agency (Wives Club, State Social Services, Exceptional Family Member or any other outside source) is going to pay for all or part of a patron’s fees, these payments get posted to the qualifying households automatically at the time of billing.
o Using the Auto Pay process, (refer to CTG-28 FIN Setting Up Auto Pay) the household balance is reduced by the amount of the Agency payment during billing – the remaining balance is the household’s portion.
o When the Agency payment is made to the household, the money hits your revenue account and (because at this point the Agency hasn’t reimbursed the center) a receivable is set up for the amount of the payment.
o When the Agency reimburses your center (typically 4-12 weeks later), you would make a CYS Misc Income Posting to reduce the amount of the receivable.
o This is a new Posting Program – found under Period End CYS. You should no longer use the old Misc Income posting program found under Period End Global.
o See the CYMS Quick Guide on Agency Payments (CQG-25) for more information how to bill the agency, and how to process the reimbursement checks.
o CYMS will not let you overpay using an Agency Pay Code. This is by design and necessary.
Discount Codes: CYMS always bills 100% of what is due. If you give discounts for Parent Participation, Coach’s Discount, Vacation Credits, Employee Discount, GWOT, Hardship Discount, etc, CYMS can automatically apply the discount at the time billing is run. The household is left with only it’s portion of the balance (if any) to pay.
o Discounts reduce revenue at your Centers, but by using Discount Codes to make payments, you can track the amount of ‘income you lost’ or ‘savings to patrons’ due to the discounts.
o Tracking in this manner can be done by single Discount Code, multiple Codes (such as all GWOT codes) or all Discount Codes.
o CYMS will not let you overpay with a Discount Pay Code. This is by design and necessary.
System Codes: These codes (Journal, Refund, System, etc) are used for administrative actions within CYMS.
Taking Payments – Full Payment
Example: The customer has a $250 Activity balance and is paying $250 with a check.
1 From the Main Menu, click Global Sales. Lookup the household or child and select it. You will be taken to the Global Payment Update for <Household> screen.
2 Enter the amount being paid in the appropriate New Amt Paid field (in this instance you would enter ‘250.00’ in the Activity row), and click OK at the bottom of the screen. You will proceed to the Global Sales Update Main screen.
Figure 3: The Global Payment Update, Module Details Screen showing a $250.00 payment in ‘Activity.’
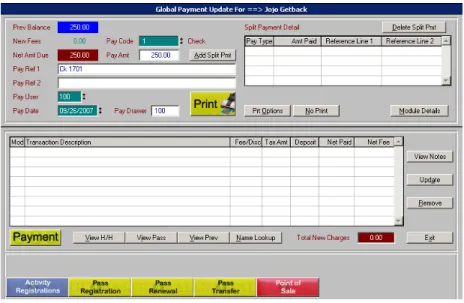
3 Right-click in the Pay Code field and select the correct payment method. For this example, use Pay Code 1 (check).
For customers using multiple pay types, such as cash and check, or if the customer is eligible for a co-payment from an agency or wishes to use a Vacation Credit or Employee Discount, refer to the Split Payments section below.
4 The Pay Ref 1 & 2 fields can be used to reference the check # or, if the customer is paying cash, the month/billing the customer is paying for. Anything entered in these fields (e.g., ck # 1701) will display on the Cash Journal, General Ledger, and Transaction History reports.
Figure 4: The Global Payment Update, Main screen showing a $250.00 payment and Pay Code ‘1’ for check.’
5 If you made a mistake, click the Module Details button to return to the Payment Modules screen.
6 Click Print if you want a receipt. You will be taken to a Print Option Selection screen. Click Print to print the receipt, or Preview to show the receipt on the screen.
7 If you do NOT want to print a receipt, click No Print.
NOTES
When paying in full, the system doesn’t allow you to choose where to put the money. So, it is possible that part of the payment went against a different center’s balance.
For this reason, you cannot keep paper balances outside the system. Balances must be maintained and quoted from CYMS!
Failure to keep CYMS current and have it serve as your master “accounting record” for patron payments will cause many financial issues down the road.
Taking Payments – Partial Payments
Example: The customer has an activity balance of $376 and is paying $275 with cash.
1 From the Main Menu, click Global Sales. Lookup the household or child and select it. You will be taken to the Global Payment Update for <Household> screen.
2 Enter the amount being paid in the appropriate New Amt Paid field (In this instance: you would enter ‘275.00’ in the Activity row), and click OK at the bottom of the screen. You will proceed to the Global Sales Update Main screen.
3 Right-click in the Pay Code field and select the correct payment method (2 for cash). 4 Use the Pay Ref 1 field for the check # (e.g., ck # 123) or, if the customer is paying cash, the
month/billing for which the customer is paying.
Figure 5: The Global Payment Update, Main screen showing a $275.00 payment and Pay Code ‘2’ for cash.’
5 To print a receipt, click Print. You will be taken to a Print Option Selection screen. If you think you made a mistake, click Cancel. Click Print to print the receipt, or Preview to show the receipt on the screen. If you do NOT want to print a receipt, click No Print.
A message will pop indicating you will be taken to the Manual Apply screen and that once there you will not be able to cancel out of the transaction. Click Yes to continue.
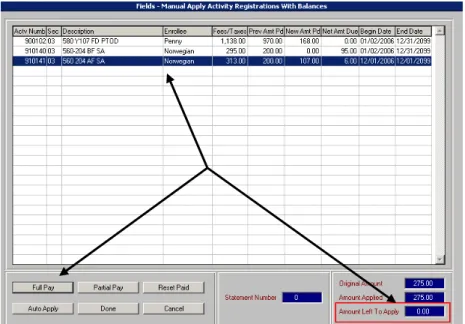
6 On the Manual Apply Screen the clerk must apply the money against one or more enrollments with an outstanding balance. See below for Manual Apply screen help.
Background - Manual Apply Screen
Original Amount – What the customer is paying. This field does not change once you are on this screen.
Amount Applied – As you apply money to the household’s enrollments, this field increases accordingly.
Amount Left To Apply – As you apply money to the household’s enrollments, this field decreases accordingly.
The ONLY way you can leave the Manual Apply screen is to apply ALL the money. To leave this screen, the Amount Left To Apply MUST = 0.00.
Full Pay – You are telling the system to take whatever dollar amount is in the Amount Left To Apply field and apply as much of it as possible toward the activity that is highlighted at the top of the screen.
CYMS will only allow you to pay up to what is owed for the selected class.
For example:
The customer has paid $200.00.
The amount due on the first activity is $125.00.
You will highlight that activity and click Full Pay.
CYMS will apply $125.00 of the $200.00 toward that activity, leaving you with $75.00 in the Amount Left To Apply field.
Partial Pay – You are telling the system you wish to apply a portion of what is left in the Amount Left to Apply field to the activity that is highlighted at the top of the screen.
For example:
The customer paid $200.00.
The amount due on the first activity is $125.00 but the customer only wants to pay $75.00 toward that balance.
You will highlight that activity and click “Partial Pay.”
On the next screen, you will enter $75.00 in the New Amt Paid field. Then Done.
Reset Paid – If you misapply a payment (or think you misapplied the payment), click Reset Paid to reset the Amount Applied field to 0.00; the Amount Left To Apply will be reset to match the Original Amount, and you can start the process from the beginning.
Auto Apply – Clerks should never use this option. You want to maintain control of where the money is distributed!
Done – Once all the money has been applied (the Amount Left To Apply field = 0.00) the clerk must click Done to finish the payment process.
Cancel – You cannot cancel from the manual apply screen. The purpose of this button is to launch the cautionary pop-up message.
NOTES:
Once a clerk gets to this Manual Apply screen there is no way to exit without finishing the payment process.
Do NOT panic. Do NOT turn off the PC, etc. — this will cause the system to become out of balance.
In our example, this household owes money on more than one class.
The clerk must work with the customer to decide which enrollment(s) to pay for and how much money will be applied to each.
The customer cannot over pay at one center if there is a balance at another.
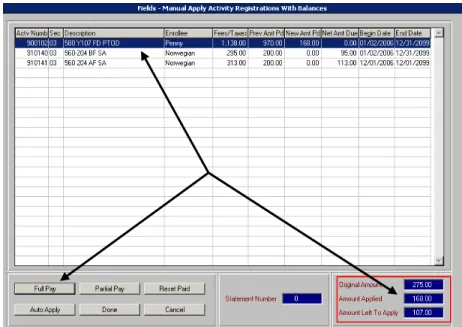
The household owes $168 for a Full Day Pre-Tod class (580 Y107 FD PTOD) at the CDC and $208 for B/A classes at School Age (560 204 BF/AF SA) and is paying $275.
Regardless of where the payment is made, the balance at the other Center will be decreased.
7 Our sponsor wants to pay the full balance owed on the CDC class ($168) and apply the rest toward the balances at School Age.
Highlight the FD PTOD class and click Full Pay. This will apply $168.00 of the $275 toward that class and pay off the balance.
The Amount Applied field now reads $168.00 and the Amount Left To Apply becomes 107.00.
Figure 6: The Manual Apply screen showing $168.00 being applied to a CDC balance, leaving $107.00 left to apply toward another activity
8 There is still money left to apply and there are two B/A classes with balances. The parent could apply equal amounts to each, or simply have the clerk apply as much as she can toward one or the other. Highlight the class with the $113.00 balance and click Full Pay again.
You click Full Pay because you are applying 100% (the full amount) of the Amount Left To Apply ($107.00) toward the balance.
The Amount Left to Apply will change to 0.00. 9 Click Done to finish.
Figure 7: The Manual Apply screen now showing the remaining $107.00 being applied to a SA Activity and $0.00 Left to Apply.
NOTES
If you made a mistake, you can always click Reset Paid to start over.
NEVER use Auto Apply!! You want to control where the money is distributed, you do not want the system to do it for you.
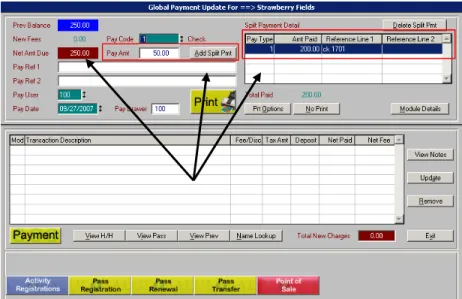
Taking Payments - Split Payments (Check, Cash, Credit Card)
Example: The customer has a Net Amt Due of $250 and is paying $200 with a check and $50 in cash.
1 From the Main Menu, click Global Sales. Lookup the household or child and select it. You will be taken to the Global Payment Update for <Household> screen.
2 Enter the amount being paid in the appropriate New Amt Paid field (in this instance you would enter ‘250.00’ in the Activity row), and click OK at the bottom of the screen. You will proceed to the Global Sales Update Main screen.
3 Right-click in the Pay Code field and select the first payment method.
4 In the Pay Amt field, enter the amount being paid with the Pay Code you selected in Step 3. 5 Include a Pay Ref if necessary
6 Click Add Split Pmt. A line item will appear in the Split Payment Detail browser and the Pay Amt field will display the amount remaining.
In our example, the patron is paying $200 with a check and $50 in cash. We’ll put “1” in the Pay Code field for ‘checks,’ reduce the amount in Pay Amt from $250.00 to $200.00 and click Add Split Pmt. A line item showing $200 check payment appears in the Split Payment Detail browser and our Pay Amt field displays the remaining $50.
Figure 8: The Global Sales main screen showing a $200.00 check in the Split Payment browser and an additional $50.00 still being owed.
7 Repeat Steps 3-6 for each additional tender type being used. Repeat, as well, until the Pay Amt field displays $0.00 and the Total Paid field shows the full amount the patron paid.
Figure 9: The Global Sales main screen showing a two split payments, $0.00 in the Pay Amt field and a Total Paid of $250.00
8 If you don’t like the way things look, or if you made a mistake with the tender types or amounts, highlight the line item you need to edit and click Delete Split Pmt. Then repeat Steps 3-6.
9 To print a receipt, click Print. When asked if you are happy with the payment distributions, click Yes. You will proceed to the Print Option Selection screen, where you can print or preview the receipt. If you think you made a mistake, click Cancel.
10 If you choose not to print a receipt, click No Print.
Taking Payments - Vacation Credits / Agency Co-Pays
Example: The household wishes to use 1 week of vacation credit on their next billing or receives an ongoing Agency co-payment.
VSI recommends all Agency and discount payments be made using the new Auto Pay Logic. See CTG-28 (Setting Up Auto Pay) for more details.
o If you choose to make an Agency or Discount payment manually, be aware CYMS will not let you over-pay.
o Because of this it is recommended that you use the Auto Pay logic.
o If you are unable to do so, you should attempt to make these payments right after the billing has occurred as there is a better chance that the household will have a balance.
o Regardless of how a discount payment is made, the DAR will show a credit to revenue – the offset will be to a customer discount account.
o Regardless of how an agency co-pay is made, the DAR will show a credit to revenue and the offset will be to a receivable account. This is important for Finance.
Taking Payments – Agency Accounts
IMPORTANT NOTE
Most Agency Payments, such as on-going Agency Co-Pays, Deployed Service Member Discounts, etc can be managed through Installment Billing Auto-Pay.
See CTG-28 FIN Setting Up Auto Pay for set up and operation details. Continue with this section for guidance on taking one-time Agency Payments
See the CYMS Quick Guide on Agency Payments (CQG-25) for more information on: o Taking agency payments
o How to bill the agency
Taking Payments - Pre-Payments / Over-Payments
A pre-payment or over-payment is occurs when a Household pays more than is currently due. o The clerk must enter an amount in the New Amount Paid field that is greater than the Net
Amount Due.
o The result of a pre-payment or over-payment is a Credit Balance on the Household.
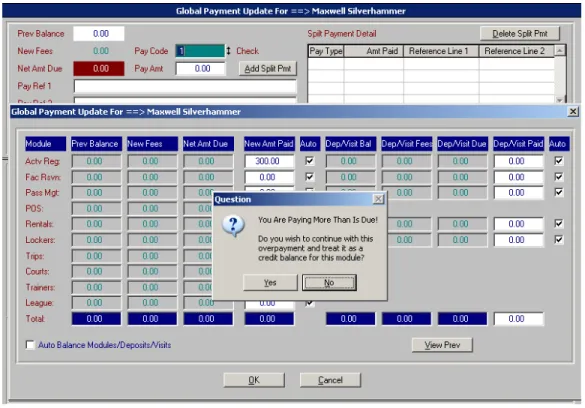
Example: On 28 Sep, a customer with a zero balance wants to make a $300 activity payment in advance of the billing that will occur on 01 Oct.
1 From the Main Menu, click Global Sales. Lookup the household or child and select it. You will be taken to the Global Payment Update for <Household> screen.
2 Enter the amount being paid in the appropriate New Amt Paid field (In this instance: you would enter ‘300.00’ in the Activity row).
Be especially careful here. Since NOTHING is due, you must make sure you place the advance payment next to the correct module:
o Activity New Amt Paid (left side of screen, Activity Row) = Advance Pmt for Activities/Classes
o Pass Dep/Visit Paid (right side of screen, Pass Row) = Advance Pmt for Hourly Care
Figure 10: The Payment Modules screen showing the pre-pay/over-pay message
3 You will receive a message saying You are paying more than is due. Click YES to the message, and click OK at the bottom of the screen. You will proceed to the Global Sales Update Main screen.
5 Use the Pay Ref 1 field for the check # (e.g., ck # 123), etc. 6 Click Print or No Print.
Taking Payments - Payment Reversals
Payment reversals are generally used to correct payment mistakes, the most common of which are:
A payment was applied to the wrong household, such as John Smith instead of Joe Smith.
The wrong Pay Code was used, such as Check (1) instead of Cash (2).
Example: The Clerk received $50 cash from a customer, but entered it into the system as a check.
Step 1 - Do Some Research
1 Go to: Reports Global Global Financial Reports Global HH Transaction History Listing
2 Run a Transaction History Report. This will help determine your course of action and show you if there have been other attempts to fix the problem.
Step 2 - Reverse the Incorrect Payment
1 Go to Daily Global Global Payment Reversals. Lookup the household or child and select.
2 On the Payment Reversal Select Modules To Scan screen, click OK. You will proceed to the Payment Reversal screen.
Figure 11: The Payment Reversal screen showing amounts paid in Activities, Pass Management (Registrations), and Pass Visits (Hourly Care)
If the payment you need to reverse was an Activity payment, enter the amount in this field.
If you need to reverse a payment that was made in a different module (Pass, Facility, Rentals, etc) press Tab to proceed to the appropriate row. To reverse an hourly payment you must be in the Pass Mgt row on the right side in the D/V Rev Amt field.
4 For this example, enter 50.00 in the Activity row/Reversal Amount column.
5 Right-click in the Rev Code field. Select how you are reversing the money from the system.
For this example, you entered a cash payment into the system as a check, so you need to reverse the payment out as a check. Select 1 (Check).
Remember: You have to reverse out the bad payment the SAME way you put it in.
6 In the Rev Ref field(s), always enter a note to describe why you are doing the reversal. This is very important. These notes will display on the Cash Journal, General Ledger Distribution, and Transaction History reports.
Figure 12: The Payment Reversal screen showing a $50.00 payment being reversed from Checks because it was taken under the wrong Pay Code
7 To print a receipt, click Print. You will be taken to a Print Option Selection screen. If you think you made a mistake, you can click Cancel. Click Print to print a receipt, or Preview to display the receipt on the screen.
8 If you choose not to print a receipt, click No Print.
9 Depending on the situation (if the household has more than one enrollment, pass and/or pass visit), you may be taken to the Manual Reversal screen. See below for screen help and screen shots.
Notes:
The Manual Reversal screen is almost identical to the Manual Apply screen.
The ONLY way you can leave the Manual Reversal screen is to make the Amount Left To Rev equal 0.00.
Once you get to this screen, there is no way to cancel the reversal process. Do NOT panic. Do NOT turn off the PC—this will cause the system to become out of balance.
Step 3 - Go Back and Make the Correct Payment 1 Go to Global Sales.
2 Process the payment again using the CORRECT pay type, correct household, etc.
Background - Manual Reversal Screen
Original Amount – The amount you are reversing. This field does not change once you are on this screen.
Amount Reversed – As you start reversing money on the household’s enrollments using the Full Rev or Partial Rev option, this field will change appropriately.
Amount Left To Rev – As you start reversing money on the household’s enrollments using the Full Rev or Partial Rev option, this field will change appropriately.
Full Rev – Tells the system to take whatever dollar amount is in the Amount Left To Rev field and reverse it from the activity that is highlighted at the top of the screen. It will only allow you to reverse up to what has been paid on the class.
Partial Rev – Tells the system you wish to reverse a portion of what is left in the Amount Left to Rev field from the activity that is highlighted at the top of the screen.
Reset Rev – If you think you have reversed the wrong amount on the wrong enrollment, you can always click Reset Rev.
This will reset the Amount Reversed field to zero and the Amount Left To Rev will be reset to match the Original Amount, allowing you to start the process from the
beginning.
Auto Apply – Clerks should never use this option.
Done – Once all the money has been applied (the Amount Left To Rev field is 0.00) the clerk must click Done to finish the reversal process.
On the Manual Reverse screen, if only one enrollment has been previously paid, the smartest/quickest option to use is Full Rev.
Highlight the program to reverse the payment on and click Full Rev.
This will take whatever dollar amount is in the Amount Left To Rev field (in our example $50) and reverse it from the activity that is highlighted at the top of the screen.
The Amount Left To Rev will change to 0.00.
Click Done to finish.
If more than one enrollment has been previously paid, you must decide which enrollment(s) to reverse the money from.
If you highlight the program that has $32 in the Prev Paid column and click Full Rev, this will only reverse $32 since that is all that was paid.
The Amount Left To Rev will still be 18.00.
You can then highlight the class with $42 in the Prev Paid column and click Full Rev again. This will take the rest of the money ($18) and reverse it from that class.
The Amount Left To Rev will change to 0.00.
Click Done to finish.
Note: If you make a mistake, you can always click Reset Rev to start over.
Taking Payments - Hourly Care Pre-Payment
Example: A customer wants to pre-pay $50 for hourly care
Global Sales can be used to pre-pay for hourly care. 1 Go to Daily Global Global Sales. 2 Lookup the household or child and select.
3 On the Global Payment Update For/Module Details screen, the cursor will default in the New Amount Paid field in the Activity Reg Row.
CAUTION!!! You CANNOT pre-pay for hourly care in this field!
4 Click in the Dep/Visit Paid field in the Pass Mgt row.
5 Double check to make sure the cursor is in the correct row — Pass Mgt.
Enter 50.00.
6 You will receive a message indicating that you are paying more than is due. 7 Click Yes to continue and click OK at the bottom of the screen.
8 Right-click in the Pay Code field to select the method of payment. 9 If appropriate, enter a pay reference in the Pay Ref 1 field.
10 Click Print to print a receipt or No Print to process the transaction without printing a receipt. 11 All future hourly visit fees or late pickup fees incurred by this household will be automatically
deducted from this credit at the time the child is swiped out of the system until such time as the credit balance is used up.
Taking Payments – Outstanding Hourly Care Visit
Example: A customer has an unpaid hourly visit balance of $50 and wishes to pay it off.
o Global Sales can be used to pay outstanding visit balances, including late pickup fees.
o Follow the instructions above for making an hourly pre-payment.
Taking Payments – Outstanding Registration Fees
Example A customer forgot their checkbook and didn’t pay their $18.00 registration fee during
re-registration. The customer now wants to pay off the outstanding $18.00 charge.
o Procedures are ALMOST the same as above
o The DIFFERENCE is where you find and pay the outstanding fee.
Registration fees are recorded in the Pass Row on the LEFT side of the screen
Put the $18.00 payment in the Pass Row under the New Amt Paid column
You should see the $18.00 charge in the column next to where you record the payment!!
If you get the “You are paying more than is due” message you are in the WRONG field!
If you put this payment in the wrong place, the customer will still owe $18.00 for their registration fee, but will have an $18.00 credit showing in their activity or hourly care accounts!
Q&A – Taking Payments
Question 1: When I make a payment against a household that has a zero balance, why can’t I flag the money as belonging to the CDC or SA?
Answer 1: In a network environment it doesn’t make sense that a customer could have an activity balance at CDC and an activity credit at SA.
o When a payment is made against a zero balance, the money will be stored as a credit on the household and as a credit in the advance payment general ledger account and cost center (Control Account).
o At that time, the advance payment account(s) will be debited and the proper revenue account will be credited.
Question 2: What do I do if my computer freezes during a payment?
Answer 2: This can cause several problems with the system. If your Cash and General Ledger reports are out of balance, call VSI for assistance.
Question 3: I needed to make a split payment, but I paid the entire amount as a check. What do I do? The customer wanted to pay $20 in cash and $50 in check. I processed all $70 as a check.
Answer 3: Do a Payment Reversal for $20 with a reversal code of Check. Then make a $20 Cash payment.
Question 4: What does the Auto Apply option do? Answer 4: Do NOT use the Auto Apply option.
o Auto Apply pays money against the ‘oldest’ fees first.
o Since you have no idea what the oldest fee is, it is best to apply the money to the enrollments yourself using Full Pay or Partial Pay.
Question: When I got to the Manual Apply screen, my program didn’t show as owing money. I only see money that is owed to SA. What do I do?
Answer: The first thing you need to do is apply the money to SA.
o Do NOT panic. Do NOT reboot the PC. This will only complicate your problem.
o Run a Transaction History Listing for the household (Reports Global Global Financial Reports Global HH Transaction History Listing).
o This will help show what has taken place on this household.
o The transactions you find here will determine the next course of action. o Call VSI for assistance.
Q&A - Payment Reversals
Question 1: How do I undo a payment reversal? The customer paid with cash; I entered the payment into the system as a check. Then I made a mistake and processed a payment reversal using Cash as the reversal code. Result: I am now even more out of balance!
Answer 1: It’s a good idea to run a Transaction History Listing prior to doing a payment reversal. o This will show you what has already been done to attempt to fix the problem and will help to
determine your course of action.
o If nothing else has been done to fix the problem, to reverse the reversal you would need to make a cash payment.
o Then, do a payment reversal and use Check as the reversal code. o Finally, make the correct cash payment.
Q&A - Hourly Care Payments
Question 1: Do I have to use Global Sales to pay for hourly? Why can’t I just pay/pre-pay for hourly care when the patron swipes out?
Answer 1: When a patron swipes out and incurs a fee (whether it is hourly or a late pickup fee) it is recommended that the customer pay at that time.
o A customer who swipes out and incurs a fee can pay or pre-pay by overpaying on the swipe-out Payment screen in the Visit Paid field (on the right side of the screen).
o If, however, the customer does not pay/pre-pay during the swipe out, Global Sales allows you to pay against those outstanding hourly balances or pre-pay for hourly care.
Question 2: I charged someone too much/not enough for their hourly care or for their late pickup fee. What do I do?
Answer 2: During a swipe out, you are in control of the visit fees and late fees. You can change them if you need to. If, however, you swiped the child out and didn’t change them, do the following:
o Go to Daily Pass Pass Visit Update. o Lookup the household and select it.
o Highlight the Pass Visit you wish to change click Update Visit. o On the Update Visit screen:
The Visit Balance equals the hourly balance (make sure the count is 1 – this should never be more than 1).
The Late/Guest Balance equals the late pickup balance (make sure the count is 1 if there is a fee present – this should never be more than 1).
Increase or decrease the appropriate balance and click OK. o You will return to the Pass Visit Update screen.
o To finish, click Payment (or Refund if there is a balance due) and respond to any screen messages.
Remember, if you are making a payment against the visit/late pickup fees, you need to make it in the Visit Paid field on the right side of the screen.
The cursor doesn’t default there.
If you are unsure of what changes you’ve made, you can always click Cancel from the Payment screen to start over, or call VSI.
Question 3: A household has an existing visit credit of $100. Mom uses hourly care and volunteers at Red Cross. When she picks up her child Red Cross is paying for her visit.
Answer 3: Steps to handle:
(1) During the swipe out the clerk will be taken to a refund screen and not allowed to make a Red Cross payment. The clerk will need to cancel out of the visit.
(2) Go to Daily Pass Pass Visit Update (don’t use Global Credit Balance Refund because you could possibly refund credits in other modules if you are not careful – pass visit update will only allow you to refund visit credits). Select the household, click Refund. Print this receipt becauae you will need to know the amount of the refund in step 5.
(3) At the top of the screen it will say Apply to household – change that to Refund Now and change the Pay Code to Cash.
(4) Go back to Visit Processing, swipe out the child, you should be taken to a payment screen where you can apply the Red Cross payment against the hourly fee.
(5) Go to Global Sales and make a cash payment to the Dep/Visit Paid field in the Pass Mgt row for the amount of the refund that was done in step 3.