Business Continuity Solutions
BUSINESS CONTINUITY
SonicWALL CDP Series
533 2915 339 200 158 659 320 123 cool gray 5 & silver met
SonicWALL CDP 6.1
SonicWALL CDP
Agent User’s Guide
Version 6.1
SonicWALL, Inc.
2001 Logic Drive San Jose, CA 95124-3452 Phone: +1.408.745.9600 Fax: +1.408.745.9300 E-mail: [email protected]Copyright Notice
© 2011 SonicWALL, Inc. All rights reserved.
Under the copyright laws, this manual or the software described within, can not be copied, in whole or part, without the written consent of the manufacturer, except in the normal use of the software to make a backup copy. The same proprietary and copyright notices must be affixed to any permitted copies as were affixed to the original. This exception does not allow copies to be made for others, whether or not sold, but all of the material purchased (with all backup copies) can be sold, given, or loaned to another person. Under the law, copying includes translating into another language or format.
Specifications and descriptions subject to change without notice.
Trademarks
SonicWALL is a registered trademark of SonicWALL, Inc.
Microsoft Windows 7, Windows Vista, Windows XP, Windows 2000, Windows Server 2008, Windows Server 2003, Microsoft Exchange Server, SharePoint, SQL Server 2008, SQL Server 2005, Outlook, Outlook Express, Internet Explorer, and Active Directory are trademarks or registered trademarks of Microsoft Corporation.
Adobe, Acrobat, and Acrobat Reader are either registered trademarks or trademarks of Adobe Systems Incorporated in the U.S. and/or other countries.
Other product and company names mentioned herein may be trademarks and/or registered trademarks of their respective companies and are the sole property of their respective manufacturers.
SonicWALL GPL Source Code
GNU General Public License (GPL)
SonicWALL will provide a machine-readable copy of the GPL open source on a CD. To obtain a complete machine-readable copy, please send your written request, along with a certified check or money order in the amount of US $25.00 payable to "SonicWALL, Inc." to:
General Public License Source Code Request SonicWALL, Inc. Attn: Jennifer Anderson 2001 Logic Drive
San Jose, CA 95124-3452
Limited Warranty
SonicWALL, Inc. warrants that commencing from the delivery date to Customer (but in any case commencing not more than ninety (90) days after the original shipment by SonicWALL), and continuing for a period of twelve (12) months, that the product will be free from defects in materials and workmanship under normal use. This Limited Warranty is not transferable and applies only to the original end user of the product. SonicWALL and its suppliers' entire liability and Customer's sole and exclusive remedy under this limited warranty will be shipment of a replacement product. At SonicWALL's discretion the replacement product may be of equal or greater functionality and may be of either new or like-new quality. SonicWALL's obligations under this warranty are contingent upon the return of the defective product according to the terms of SonicWALL's then-current Support Services policies.
This warranty does not apply if the product has been subjected to abnormal electrical stress, damaged by accident, abuse, misuse or misapplication, or has been modified without the written permission of SonicWALL.
DISCLAIMER OF LIABILITY. SONICWALL'S SOLE LIABILITY IS THE SHIPMENT OF A REPLACEMENT PRODUCT AS DESCRIBED IN THE ABOVE LIMITED WARRANTY. IN NO EVENT SHALL SONICWALL OR ITS SUPPLIERS BE LIABLE FOR ANY DAMAGES WHATSOEVER, INCLUDING, WITHOUT LIMITATION, DAMAGES FOR LOSS OF PROFITS, BUSINESS INTERRUPTION, LOSS OF INFORMATION, OR OTHER PECUNIARY LOSS ARISING OUT OF THE USE OR INABILITY TO USE THE PRODUCT, OR FOR SPECIAL, INDIRECT, CONSEQUENTIAL,
INCIDENTAL, OR PUNITIVE DAMAGES HOWEVER CAUSED AND REGARDLESS OF THE THEORY OF LIABILITY ARISING OUT OF THE USE OF OR INABILITY TO USE HARDWARE OR SOFTWARE EVEN IF SONICWALL OR ITS SUPPLIERS HAVE BEEN ADVISED OF THE POSSIBILITY OF SUCH DAMAGES. In no event shall SonicWALL or its suppliers' liability to Customer, whether in contract, tort (including negligence), or otherwise, exceed the price paid by Customer. The foregoing limitations shall apply even if the above-stated warranty fails of its essential purpose. BECAUSE SOME STATES OR JURISDICTIONS DO NOT ALLOW LIMITATION OR EXCLUSION OF
Table of Contents
Overview of the SonicWALL CDP Agent . . . 2
About Data De-Duplication . . . 2
About FileSets. . . 3
About Backup Policies . . . 3
About Rules . . . 4
About Offsite Backup . . . 5
About Scheduling . . . 6
About Application Backup and Restore . . . 9
Example: Creating a Backup Policy . . . 9
Installing the SonicWALL CDP Agent Software. . . 14
Configuration Information . . . 14
Downloading the Latest SonicWALL CDP Agent Software . . . 15
SonicWALL CDP Agent Installation on Windows . . . 17
SonicWALL CDP Agent Installation on Mac OS . . . 20
SonicWALL CDP Agent Installation on Linux . . . 22
Initializing the SonicWALL CDP Agent . . . 23
Launching the SonicWALL CDP Agent . . . 23
Troubleshooting the SonicWALL CDP Agent Operation . . . 24
Agent User Interface Overview . . . 25
Tab Selection . . . 25
View Panel . . . 26
Using the Status Interface . . . 27
Current Agent Information . . . 28
Changing Appliances . . . 29
Using the Administrator File Browser . . . 30
ii
SonicWALL CDP 6.1 Agent User’s Guide
Adding a Client Application Object . . . .43
Editing the Default CDP Files and Folders Object . . . .44
Configuring Schedule Objects. . . .48
Configuring a Backup Task for Client Data . . . .54
Using Backup Now . . . .56
Removing Backup Tasks . . . .56
Restoring Backed Up Client Data . . . .57
Restoring Files and Folders . . . .58
Restoring a Client Application . . . .60
Backing Up Server Applications . . . .61
Creating Schedules for Application Backups . . . .61
Microsoft Exchange Prerequisites . . . .63
Backing Up Exchange 2010 User Mailboxes . . . .66
Backing Up Exchange 2010 InfoStore . . . .76
Backing Up Exchange 2007/2003 User Mailboxes . . . .82
Backing Up Exchange 2007/2003 Storage Groups . . . .87
Backing Up SharePoint . . . .92
Backing up System State and Active Directory . . . .96
Backing up Microsoft SQL Server . . . .101
Restoring Server Applications. . . .107
Restoring Data from Exchange 2010. . . .107
Restoring Data from Exchange 2007/2003 . . . .113
Restoring SharePoint . . . .120
Restoring System State and Active Directory . . . .122
Restoring Data from Microsoft SQL Server . . . .127
Restoring Local Archives . . . .132
Restoring Data Using the Local Archive File Browser . . . .132
Restoring Data Using the Administrator File Browser . . . .135
Using Online Help . . . .137
Viewing the Online Agent User Guide . . . .138
Accessing Technical Support Information . . . .139
SonicWALL CDP Agent User Guide
This User’s Guide provides installation procedures and configuration guidelines for deploying the SonicWALL Continuous Data Protection (CDP) Agent. The SonicWALL CDP Agent provides a software interface for backing up files, folders, and application data to a SonicWALL CDP appliance.
The SonicWALL CDP appliance backs up data from the agent computer, saving it first locally and then, if configured, to a secure offsite location*. By combining the advantages of local disk-based backup (fast recovery) with offsite backup, the SonicWALL CDP appliance helps protect your network from threats of data loss.
*Offsite backup is offered as a subscription-based service. This guide contains the following sections:
• “Overview of the SonicWALL CDP Agent” section on page 2
• “Installing the SonicWALL CDP Agent Software” section on page 14 • “Initializing the SonicWALL CDP Agent” section on page 23
• “Agent User Interface Overview” section on page 25 • “Using the Status Interface” section on page 27 • “Managing Backups” section on page 34
• “Configuring Client Backup Policies” section on page 38 • “Restoring Backed Up Client Data” section on page 57 • “Backing Up Server Applications” section on page 61 • “Restoring Server Applications” section on page 107 • “Using Online Help” section on page 137
Overview of the SonicWALL CDP Agent
2
SonicWALL CDP 6.1 Agent User’s Guide
Overview of the SonicWALL CDP Agent
The SonicWALL CDP 6.1 Agent provides a user interface that is closely aligned with the Web-based management interface for the SonicWALL CDP appliance. The Agent User Interface looks and operates the same on supported Windows, Mac, and Linux clients. The Agent service is also faster, smarter, and more efficient than in versions previous to 6.0. Initial backup of one million files (of size 1 KB each) takes just a little over 6 hours, and subsequent revisions copy only the modified data blocks, keeping track of all changes internally. This method uses less bandwidth, takes less time, and uses less disk space than earlier versions of SonicWALL CDP.
See the following sections for an overview of various functionality in SonicWALL CDP: • “About Data De-Duplication” on page 2
• “About FileSets” on page 3
• “About Backup Policies” on page 3 • “About Rules” on page 4
• “About Offsite Backup” on page 5 • “About Scheduling” on page 6
• “About Application Backup and Restore” on page 9 • “Example: Creating a Backup Policy” on page 9
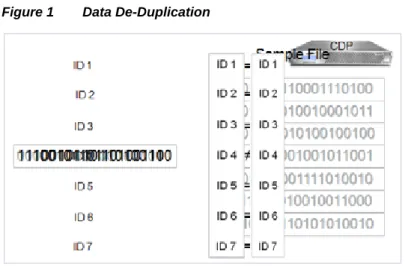
About Data De-Duplication
Data de-duplication technology is used on the agent during backups of revisions for both applications and files/folders. This allows all new data to be backed up, while existing data is not rewritten to the appliance. Metadata keeps track of where the changes occur, and is always included with revisions.
Figure 1 shows a graphical representation of the data de-duplication process.
Overview of the SonicWALL CDP Agent
About FileSets
When backing up data, SonicWALL CDP is aware of interdependencies among multiple, related files, called FileSets. Both application backup and backup of files and folders use the concept of FileSets to include all relevant data in backups, so that recovery can provide everything needed for full and seamless operation.
On Windows agents, Microsoft Volume Shadow Copy Service (VSS) is used during backups to take a snapshot of all relevant data, providing a cohesive set of files at a certain point in time. Using the VSS method also eliminates the need to stop services in order to keep files in sync while performing a backup.
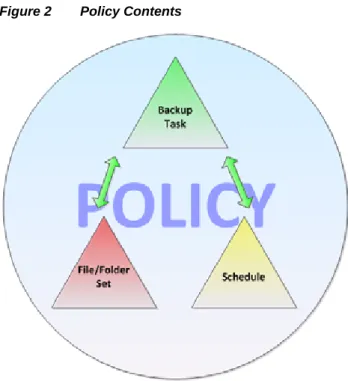
About Backup Policies
Data backup in SonicWALL CDP is accomplished via policies. Policies control the backup activities performed by SonicWALL CDP.
Figure 2 illustrates a policy for a files and folders backup.
Figure 2 Policy Contents
Each backup policy contains one or more backup tasks. Each backup task consists of two components:
Overview of the SonicWALL CDP Agent
4
SonicWALL CDP 6.1 Agent User’s Guide
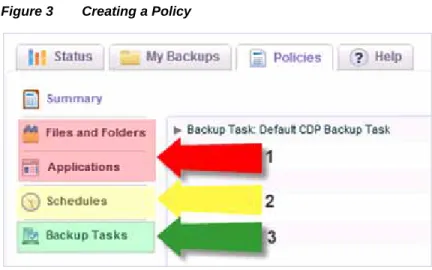
Figure 3 illustrates the steps for creating a policy.
Figure 3 Creating a Policy
Backup policies are defined both at the administrative level in the Web Management Interface and at the local agent level using the Agent User Interface. Policies can be very granular, even allowing you to create multiple backup tasks in one Files and Folders object, if desired. Such an object can contain more than one folder. You can also define the number of revisions to keep when configuring the backup policy, on both local and offsite CDP appliances.
A legacy style CDP policy is defined by default at the administrative level and is inherited by agents connected to the SonicWALL CDP appliance. At the agent level, you can edit this default policy to add files and folders for backup to the CDP object, but you cannot create a new CDP object. A CDP object differs from a Files and Folders or Application object in that the defined files and folders are backed up as separate entities, not as FileSets. CDP policies use Interval scheduling, which back up changed data continuously or at a set interval, rather than Event scheduling in which you can set dates for backups to occur. The default CDP policy
accommodates policies from previous (5.x) versions of SonicWALL CDP after upgrading.
About Rules
The rules within Files and Folders objects are flexible, providing the ability to include or exclude files or folders at any level. Rules are defined at both the administrative level and the agent level, with administrative rules taking precedence over local rules. CDP type objects also provide similar rule functionality. Application objects do not use rules in the same format, but allow you to select the application components to back up, such as individual user mailboxes or system state files.
Overview of the SonicWALL CDP Agent
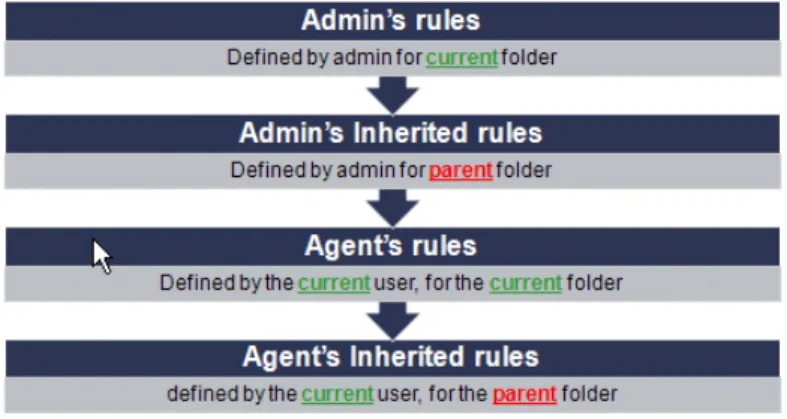
Figure 4 illustrates the order in which rules are applied when determining what to back up.
Figure 4 Admin vs Agent Rule Precedence
Within the constraints of administrative rule precedence, rules operate as follows: • Rules from current folder override inherited rules from parent folder
• Rules in higher position take precedence; rule order can be adjusted in the Agent User Interface
• Rules can include or exclude sub-folders
Figure 5 illustrates rule operation and precedence.
Overview of the SonicWALL CDP Agent
6
SonicWALL CDP 6.1 Agent User’s Guide
The Offsite subscription-based service is configured by the administrator on the System > Settings page of the Web Management Interface. Offsite backup can be selected during policy configuration. This allows you to copy your backups to either the SonicWALL Offsite Portal, or to another, offsite, SonicWALL CDP appliance for safekeeping in the event that your local appliance becomes unusable. The SonicWALL Offsite Portal provides load balancing,
redundancy, and an efficient file system structure for optimal access to and protection of your data.
The SonicWALL CDP Offsite Data Backup provides different services, ranging from 5 to 100 GB of quota. You need to make sure that the total size of all of your backups does not exceed the quota limit. If the offsite quota is exceeded, the consequent backup will fail and the administrator will receive an email alert. If the agent exceeds its quota, the Quota Exceeded Error message will be displayed, and the status for the last backup will change to Quota Exceeded. You will receive an email notification informing you of the failed backup attempt. You can free up your storage space by removing some of the old backups or you can purchase additional quota.
For more information, see the SonicWALL CDP Offsite Data Backup Service data sheet at: <http://www.sonicwall.com/downloads/DS_CDP_Offsite_US_060507.pdf>
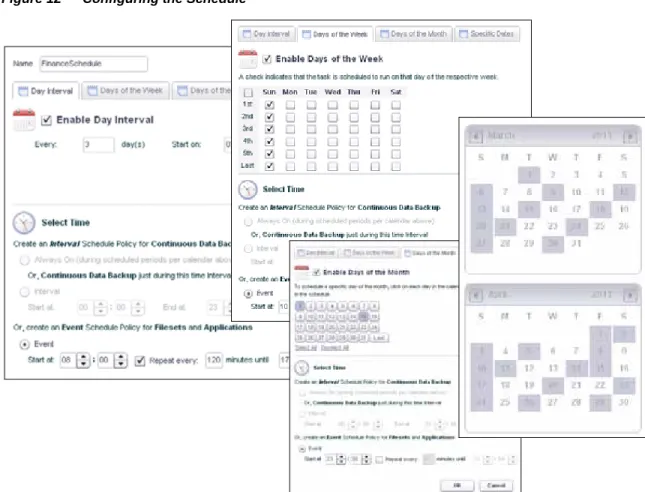
About Scheduling
Backups are scheduled using a very flexible interface for schedule configuration. You can schedule backups to occur at any interval down to the minute or up to months apart. Custom, specific dates can be configured.
There are two types of scheduling:
• Event – Uses fixed time points, such as Mondays at 5 PM or midnight every evening. Used for Fileset or Application backup tasks.
• Interval – Uses Always On or always on during a specific start and end time, such as Sundays from 4 PM to 8 PM. Used for CDP type backup tasks.
Interval scheduling is used for the default CDP type policy on an agent. Because the Agent User Interface does not provide a way to create a new CDP type backup task, you would not have another opportunity to use interval scheduling.
When creating a backup task in the Web Management Interface, the type of Schedule object available for selection depends on whether you have selected CDP, Fileset, or Client Application in the Select Data Type field of the Add Backup Task configuration window. The scheduling interface provides four tabs for different scheduling options:
• Day Interval • Days of the Week • Days of the Month • Specific Dates
Each tab provides configuration fields and a calendar that displays the selected dates with a darker background, so that you can easily verify your configuration.
Overview of the SonicWALL CDP Agent
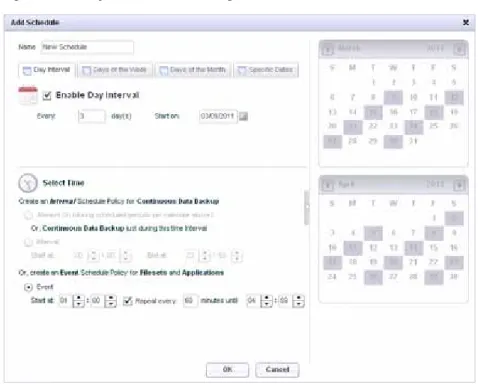
Figure 6 illustrates the Day Interval tab.
Figure 6 Day Interval Scheduling
Figure 7 illustrates the Days of the Week tab.
Overview of the SonicWALL CDP Agent
8
SonicWALL CDP 6.1 Agent User’s Guide
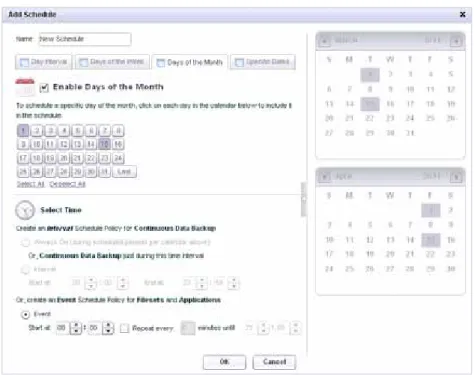
Figure 8 illustrates the Days of the Month tab.
Figure 8 Days of the Month Scheduling
Figure 9 illustrates the Specific Dates tab.
Overview of the SonicWALL CDP Agent
The same data can be scheduled for backup with multiple policies using different schedules, allowing you to maintain near-continuous revisions along with daily, weekly, monthly, or custom scheduled versions. The number of revisions to keep is controlled by the settings in each policy.
About Application Backup and Restore
Client applications such as Outlook and Outlook Express are supported for backup and restore, as well as a number of server applications. Supported server applications include Microsoft Exchange, SQL Server, Sharepoint, and Active Directory. Active Directory is backed up and restored as an element of System State, to ensure that all relevant system files are included for a consistent environment.
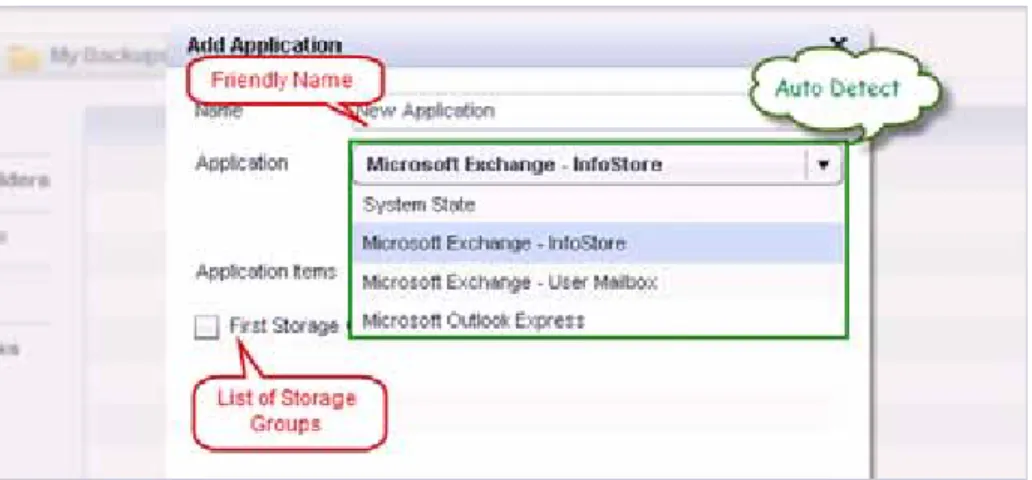
When configuring an Application object as part of a backup policy, available applications on the agent are automatically discovered by SonicWALL CDP, and their friendly names are presented for selection in a drop-down list. Figure 10 illustrates these application features.
Figure 10 Adding an Application
When restoring an application, SonicWALL CDP automatically uses the proper restore method for the application type. For example, restore on reboot for Active Directory, or
stop/restore/start for SQL Server. Restoring is interactive and walks you through the process.
Example: Creating a Backup Policy
Let’s say that the Finance Department at SonicWALL needs to backup its data on three different schedules.
Overview of the SonicWALL CDP Agent
10
SonicWALL CDP 6.1 Agent User’s Guide
What is the best solution?
First, edit the inherited administrator policy to add files for backup. The Files and Folders object includes the folder required by the administrator, and users can add more files and folders for backup and create rules to include or exclude certain files or file types.
Figure 11 illustrates the modifications to the Files and Folders object.
Figure 11 Selecting Folders for Backup
Overview of the SonicWALL CDP Agent
Figure 12 illustrates the schedule configuration.
Figure 12 Configuring the Schedule
Next, create a backup task which includes the Files and Folders object and the Schedule object.
Overview of the SonicWALL CDP Agent
12
SonicWALL CDP 6.1 Agent User’s Guide
Figure 13 illustrates the backup task.
Figure 13 Creating the Backup Task
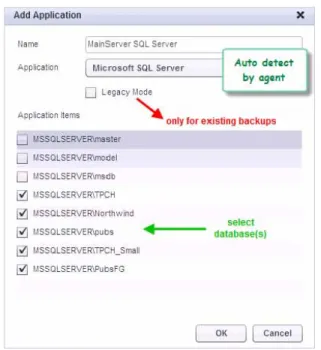
For the SQL backups, create an Application object to select the SQL databases to back up.
Figure 14 illustrates the SQL Server Application object creation.
Figure 14 Creating an SQL Server Application Object
Finally, create a backup task for the SQL Server backup, using the SQL Server Application object and an appropriate Schedule object.
Overview of the SonicWALL CDP Agent
Figure 15 illustrates the creation of the SQL Server backup task.
Figure 15 Creating an SQL Server Backup Task
This completes the configuration needed to accomplish the required backups for the Finance Department.
Installing the SonicWALL CDP Agent Software
14
SonicWALL CDP 6.1 Agent User’s Guide
Installing the SonicWALL CDP Agent Software
This section describes installation of the SonicWALL CDP Agent Software for Windows, Mac OS, and Linux systems. See the following subsections:
– “Configuration Information” section on page 14
– “Downloading the Latest SonicWALL CDP Agent Software” section on page 15 – “SonicWALL CDP Agent Installation on Windows” section on page 17
– “SonicWALL CDP Agent Installation on Mac OS” section on page 20 – “SonicWALL CDP Agent Installation on Linux” section on page 22
Configuration Information
Have your network administrator supply you with the following information needed for SonicWALL CDP Agent setup:
Server Name: The name of the SonicWALL CDP appliance you are connecting to.
Password: The password for your SonicWALL CDP appliance (if applicable).
CDP IP Address: The static IP address for your SonicWALL CDP appliance.
Installing the SonicWALL CDP Agent Software
Downloading the Latest SonicWALL CDP Agent Software
Perform the following steps to download the SonicWALL CDP Agent software on your computer:
Step 1 Open a Web browser on the computer you are using as the agent and navigate to
http://www.mysonicwall.com.
Step 2 Enter the Username/Email and Password in the appropriate fields. Select Download Center
in the drop-down menu located below the password field.
Installing the SonicWALL CDP Agent Software
16
SonicWALL CDP 6.1 Agent User’s Guide
Step 4 In the Software Type drop-down menu, located in the Download Center, select the CDP Software that corresponds to your SonicWALL CDP appliance. A list of available software appears.
Step 5 Select the CDP Agent Software you want to download.
For Windows, download one of the following installers (where the x’s represent version numbers):
• CDPSetup.x64-6.1.x.xx.exe – For 64 bit Windows operating systems • CDPSetup.x86-6.1.x.xx.exe – For 32 bit Windows operating systems
For Mac OS, download the following installer (where the x’s represent version numbers): • CDPAgentTool_6.1.0.xx.dmg
For Linux, download the following installer (where the x’s represent version numbers): • CDPAgentTool_6.1.0.xx.tar.gz
Installing the SonicWALL CDP Agent Software
SonicWALL CDP Agent Installation on Windows
This section describes the requirements and installation steps for Windows computers.
Installation Prerequisites for Windows
In order to install the SonicWALL CDP Agent, you must have:
• A computer (32-bit or 64-bit) which meets or exceeds the following requirements: • Pentium III 450 MHZ Processor
• 256 MB of RAM
• 40 MB of free disk space
• Windows 7, Vista, XP, or Windows Server 2003, or 2008 • Administrator privileges on the computer you are installing to • All applications closed before installing
Installing the SonicWALL CDP Windows Agent
Perform the following steps to install the SonicWALL CDP Agent on your Windows computer: Step 1 Navigate to the folder where your software was downloaded and double-click the setup file to
begin the installation process.
Note If you are running Windows XP SP2 or use a third-party firewall, you may receive a warning during installation of the SonicWALL CDP software. Select the option to install SonicWALL CDP.
Step 2 Select your preferred language and click Next.
Note If you wish to change your language in the future, you will need to uninstall and re-install the software.
Installing the SonicWALL CDP Agent Software
18
SonicWALL CDP 6.1 Agent User’s Guide
Step 3 Select the I accept the terms of the license agreement option and click the Next button.
Step 4 Select one of the Setup options available:
• Typical: Installs the most common program features. Recommended for most users. • Custom: Allows users to select which program features are installed and where they are
installed. Typically recommended for advanced users.
• Complete: All program features are installed. This setup choice requires more disk space.
Installing the SonicWALL CDP Agent Software
Step 6 Click Install to install the software.
Step 7 Once the software installation is complete, click the Finish button.
You have successfully installed the SonicWALL CDP Agent.
Uninstalling the SonicWALL CDP Windows Agent
To uninstall the SonicWALL CDP Agent from your Windows computer, perform the following steps:
Installing the SonicWALL CDP Agent Software
20
SonicWALL CDP 6.1 Agent User’s Guide
SonicWALL CDP Agent Installation on Mac OS
This section describes the requirements and installation steps for Mac OS computers.
Supported Platforms
The CDP Mac OS X Agent User Interface is supported on the following operating systems: • Apple Mac OS X 10.6.x Snow Leopard
• Apple Mac OS X Server Snow Leopard • Apple Mac OS X 10.5.x Leopard • Apple Mac OS X Server 10.5
System Requirements
The Mac running the CDP Mac OS X Agent User Interface has the following minimum system requirements:
• 1 GHz Pentium 4 processor or faster • 512 MB RAM
• Minimum 20 MB hard disk space
• 1024 x 768 video display, High Color 16-bit
Installing the SonicWALL CDP Mac OS Agent
Perform the following steps to install the SonicWALL CDP Agent on your Mac OS computer: Step 1 Login as as a user with admin privileges.
Step 2 Copy the SonicWALL CDPAgentTool_6.1.0.xx.dmg installer to a location on the Mac OS computer.
Step 3 InvokeCDPAgentTool_6.1.0.xx.dmg from “Finder” to create CDPMac/Agent_x.x.x.x.pkg, where x.x.x.x represents the installer version.
Step 4 Double click the CDPMac/Agent_x.x.x.x.pkg icon to start the SonicWALL CDP Agent User Interface Installer.
Installing the SonicWALL CDP Agent Software
Step 5 Click the Install button to begin installation of the SonicWALL CDP Agent User Interface.
Step 6 When prompted, enter the Admin password to continue the installation. The Agent User Interface will notify you when the software has successfully been installed.
Adjusting the Hostname Setting
On some Mac systems, the SonicWALL CDP displays the hostname as “localhost”. This typically does not match the hostname returned if you type hostname on the computer itself. On some Mac OS X versions, such as earlier Snow Leopard, you need to force a change to the hostname by editing the /etc/hostconfig file and changing the HOSTNAME variable definition to reflect the correct value.
The default setting is:
HOSTNAME=–AUTOMATIC–
Change the “–AUTOMATIC–” to the correct hostname. You may need to reboot the computer.
Installing the SonicWALL CDP Agent Software
22
SonicWALL CDP 6.1 Agent User’s Guide
SonicWALL CDP Agent Installation on Linux
This section describes the requirements and installation steps for Linux computers.
Supported Linux Distributions
The SonicWALL CDP Linux Agent is supported on the following 32-bit Linux distributions: • Red Hat Enterprise Linux 5.2
• CentOS 5.3 • Fedora 8, 10, 13 • OpenSUSE 11.1 • Debian 5.0 • Ubuntu 10.04
Installing the SonicWALL CDP Linux Agent
The Linux Agent can be installed or uninstalled only by the root user. The compressed tar file,
CDPAgentTool_6.1.0.xx.tar.gz, is used for installation.
Perform the following steps to install the Linux Agent on your Linux computer:
Step 1 Login as root, or log in using your own credentials and then use sudo in front of commands requiring root privileges.
Step 2 Copy the compressed tar file to a location on the Linux computer. Step 3 Unzip the file with the command:
tar –zxvf CDPAgentTool_6.1.0.xx.tar.gz
This command creates the CDPAgentTool folder containing the files: cdpinstall.sh and
cdpagent.tar.gz.
Step 4 Change directory to the CDPAgentTool folder. Step 5 Run the install script with the command:
./cdpinstall.sh –i –access=all
This command installs both the Linux Agent service and Linux Agent User Interface.
The installation process creates a Desktop shortcut that can be double-clicked to launch the Agent. You can also start the Agent by typing cdpagentool on the Linux command line. The following messages are displayed:
Installing CDP Agent BackupService... Starting CDP Agent Daemon process. CDP Agent BackupService is installed. Installing CDP Agent Console... CDP Agent Console is installed.
Initializing the SonicWALL CDP Agent
Step 6 Verify that the Linux Agent service is running with the command:
ps auxwww | grep cdpagentservice
The output should be similar to the following:
root 7044 0.1 0.4 17404 1744 ? Ssl 11:05 0:00 /usr/bin/cdp/cdpagentservice –d /usr/bin/cdp/watchdog/cdpagentservice.pid -r /etc/cdp/cdpagent.conf
root 7195 0.0 0.1 3884 668 pts/1 R+ 11:05 0:00 grep cdpagentservice
Initializing the SonicWALL CDP Agent
The following section provides instructions for launching the SonicWALL CDP Agent and connecting to a SonicWALL CDP appliance. This section contains the following subsections:
– “Launching the SonicWALL CDP Agent” section on page 23
– “Troubleshooting the SonicWALL CDP Agent Operation” section on page 24
Launching the SonicWALL CDP Agent
Perform the following steps to login to your SonicWALL CDP Agent for the first time.
Step 1 Launch the SonicWALL CDP Agent Software by double-clicking the shortcut placed on your computer desktop during the installation process. Windows, Mac, and Linux systems all have a shortcut for launching the Agent.
On Windows, you can also launch the Agent from the Windows Start Menu: Programs > SonicWALL > SonicWALL Continuous Data Protection > SonicWALL Agent User Interface.
On Linux, you can also start the Agent by typing cdpagentool on the Linux command line.
Note If you are running Windows XP SP2 or use a third-party firewall, you may receive a warning during initial launch of the SonicWALL CDP software. For more information on configuring your firewall to work with SonicWALL CDP, contact your network administrator.
Initializing the SonicWALL CDP Agent
24
SonicWALL CDP 6.1 Agent User’s Guide
Step 2 Double-click the desired SonicWALL CDP Appliance in the Available Appliances list. If you are unsure which CDP appliance to connect to, contact your network administrator before continuing.
Troubleshooting the SonicWALL CDP Agent Operation
If your SonicWALL CDP Agent User Interface does not start, verify the following: 1. Verify that the software was installed by a user with administrative rights.
2. Verify that the operating system has been upgraded to the latest released service pack. 3. On a Windows Server agent, use the Task Manager to verify that another administrator has
not already launched the Agent software.
4. Add exceptions for the following .exe files for your personal firewall: • CDPAgentservice.exe
• CDPAutoUpdate.exe
Agent User Interface Overview
6. Verify the Data Execution Prevention (DEP) configuration on Windows Server 2003: a. Under Windows Services, stop the CDPAgentService.exe service.
b. Right click My Computer and select Properties, then select the Advanced tab, c. Under Performance, click Settings.
d. Select the DEP tab.
e. Add CDPAgentService.exe and CDPAutoUpdate.exe to the list. f. Click Apply.
g. Start the Agent Service again.
Agent User Interface Overview
The Agent User Interface provides users with selection tabs and a view panel.
Tab Selection
Agent User Interface Overview
26
SonicWALL CDP 6.1 Agent User’s Guide
View Panel
The View Panel is located directly below the Tab Selection. The panel refreshes when a tab is selected.
Tab Description
Status Displays the connected SonicWALL CDP appliance IP address, the agent name and state, quota information including file count, size, size on disk, quota remaining, and the name of the current backup policy that is defined for agents on the connected SonicWALL CDP appliance. Recent tasks are displayed in right pane with task name, start time, duration, and status.
MyBackups Displays all backed up data, including backups created using the CDP, FileSets, and Applications backup methods. It also provides the ability to enable or disable backups, refresh the display, search by all or part of the file name, restore data, remove items, and remove old file versions.
Policies Allows the user to configure Files and Folder objects, Application objects, Schedule objects, and Backup Task objects. Also allows the user to view a summary of backup tasks.
Help Provides links to online help, the SonicWALL knowledge base, the Agent log file, and Agent version information.
Using the Status Interface
Using the Status Interface
The Status tab allows you to view current agent information, change appliances, log into the Administrator File Browser, and view details about recent backups.
This section contains the following subsections: • “Current Agent Information” section on page 28 • “Changing Appliances” section on page 29
• “Using the Administrator File Browser” section on page 30 • “Viewing the Status Events Panel” section on page 33
To view the Status window, click the Status tab at the top of the Agent User Interface.
Figure 16 provides an image of the Status window, which displays recent Backup Events and FileSet and Application Events.
Using the Status Interface
28
SonicWALL CDP 6.1 Agent User’s Guide
Current Agent Information
The Agent Information panel displays details about the current agent and about its backups. It also displays the name of the SonicWALL CDP appliance to which the agent is currently connected.
Descriptions of the items in the Agent Information panel are provided below:
Field Description
Appliance Displays the IP address of the SonicWALL CDP appliance that the agent is currently accessing.
Agent Displays the name of the current agent machine.
AgentState Displays the current state of the agent.
FileCount Displays the number of files backed up on this agent.
Size Displays the total file size the agent has backed up.
SizeonDisk Displays the total file size on disk that is dedicated to the agent’s files.
Quota Displays the allotted quota that the agent can use for backups.
PolicyName Displays the name of the administrative policy the agent is using. A single administrative policy can apply to an agent at a time. This policy is defined by the administrator while logged into the SonicWALL CDP appliance, using the Web Management Interface.
Using the Status Interface
Two buttons are located at the bottom of the Agent Information panel:
• Change Appliance: Allows the user to connect to a different SonicWALL CDP appliance. For information about using this feature, see “Changing Appliances” on page 29. • Login to Administrator File Browser: Allows the administrator to log into the
SonicWALL CDP appliance using the Agent User Interface, to manage or restore backed up files for all associated agents. See “Using the Administrator File Browser” on page 30.
Changing Appliances
You can connect to different SonicWALL CDP appliances while using the Agent User Interface. To connect the SonicWALL CDP Agent User Interface to a different CDP appliance:
Step 1 Click the Change Appliance button located below the Agent Information in the Status screen.
The Available Appliances window opens, displaying the IP addresses and descriptions of available appliances on the network.
Using the Status Interface
30
SonicWALL CDP 6.1 Agent User’s Guide
Step 3 To manually enter the IP address of an appliance that is not displayed, click the Manual Connect button and then type in the IP address or name of the desired appliance and click OK
in the dialog box.
Step 4 To connect to a displayed appliance, either double-click the appliance IP address or select it and click the Connect button.
The Agent Information panel displays the new appliance information.
Using the Administrator File Browser
The Agent software allows Administrators to log into the Agent User Interface to manage and configure agent backups. You can access any appliance, and then view, manage, or restore any files backed up by any agent that is associated with that appliance, when logged in as an administrator in the Agent User Interface.
To use the Administrator File Browser in the Agent User Interface:
Step 1 Click on the Login to Administrator File Browser button located at the bottom of the agent informaton panel.
Using the Status Interface
Step 3 Type in the password for the admin account, and click Login. The Agent User Interface displays the starting screen for the appliance.
Step 4 Click the arrow for either Appliance or Offsite to expand the display to include all associated agents, then click any agent to expand the display further. You can view details about agents that are associated with the appliance.
Using the Status Interface
32
SonicWALL CDP 6.1 Agent User’s Guide
You can also view specific backups.
The bottom of the window provides controls for your use.
Step 5 On the left, the meanings of the icons are defined. At the right, the following controls are available, from left to right:
• Refresh – refreshes the window contents • Restore – restores the selected item
• Remove Items – removes the selected items
• Remove Deleted Items – removes items that are no longer on the agent machine • Logoff from Administrator File Browser – logs off
Using the Status Interface
Viewing the Status Events Panel
The main Status panel displays information about the recent backup tasks for the agent. There are two sections: Backup Events and FileSet and Application Events.
Descriptions of the fields on the Status page are provided below:
Field Description
Task Displays the name of the Backup Task.
Name Displays the names of files that are backed up as part of the task.
Start Time Displays the start time of each file backup.
Duration Displays the amount of time required to back up each file.
Finish Time In the FileSet and Application Events section, displays the time that each backup task finished, for each revision that was executed.
Status In the Backup Events section, displays the status of each file backup. In the FileSet and Application Events section, displays the status of each backup task, for each revision.
Managing Backups
34
SonicWALL CDP 6.1 Agent User’s Guide
Managing Backups
The My Backups tab displays information about recent backups that have been executed by the SonicWALL CDP Agent. You can view the backups at various levels of detail, search for files, remove backed up files, and restore files from this page. Figure 17 shows the initial view of the My Backups tab.
Figure 17 My Backups View
This section contains the following subsections: • “Viewing Backup Details” on page 35 • “Searching for Files” on page 35
• “Removing Backed Up Files” on page 37
For information about restoring client data, see the “Restoring Backed Up Client Data” section on page 57.
For information about restoring server applications, see the “Restoring Server Applications” section on page 107.
Managing Backups
Viewing Backup Details
You can click the arrow next to any of the three backup types to expand the level of detail shown on the My Backups page. For example, Figure 18 shows the page after expanding the CDP selection several times until the actual file names are displayed.
Figure 18 My Backups Expanded
A key or legend for the icons next to each file or folder is provided in the lower left area of the window. There are Common Folder, File, Deleted Folder, and Deleted File icons.
To return to a view with fewer details, click the tab for the level you want to display or click the Back arrow to the left of the tabs.
Searching for Files
You can use the Search function on the My Backups page to search for backed up files stored on the SonicWALL CDP appliance.
The enhanced search feature provides the ability to restore, delete, or trim directly from the search interface.
Managing Backups
36
SonicWALL CDP 6.1 Agent User’s Guide
Searching in User Mode
To use the Search function while in normal user mode in the Agent user interface: Step 1 On the My Backups page, click the Search button in the upper right corner.
Step 2 A Search dialog is displayed at the top of the window. In the All or part of the file name field, type in the file name or partial file name for which to search.
Step 3 To specify a folder to search in, enter the folder name in the In Folder field. Step 4 Select the Case Sensitive checkbox if the search should be case sensitive.
Step 5 To search by file size range, type numbers for the minimum size and maximum size in bytes in the File Size (in bytes) fields.
Step 6 To search within a range of modification dates, specify the earliest and the latest dates in the
Modification Date fields.
Step 7 To search within a range of revisions, specify the number of the minimum revision and the maximum revision in the Revision Count fields.
Step 8 Click the Search button to start the search. Only your agent machine is searched when in normal user mode. The results are displayed below the search options.
Step 9 Optionally use the buttons at the bottom of the window to to restore, delete, or trim the files or folders you have located.
Searching in the Administrative File Browser
To use the Search function from the Agent user interface while in the Administrative File Browser:
Managing Backups
Step 1 Log into the Agent user interface on your CDP client machine.
Step 2 Click the Switch to Administrative File Browser button to change to Administrative Mode. Step 3 Click the Search button to display the enhanced search fields.
Step 4 Enter the text to search for in the file or folder names, or enter the minimum and maximum file size, date range, or minimum and maximum revision count. You can fill in a value for one or more of these fields.
Step 5 To search for files from a specific Agent, select the Agent in the Search Agent drop-down list. To search for files from any Agent, select All Agents.
Step 6 Click Search. The results are displayed below the search options.
Step 7 Optionally use the buttons at the bottom of the window to to restore, delete, or trim the files or folders you have located.
Removing Backed Up Files
The My Backups page provides three ways to remove files stored on the SonicWALL CDP appliance:
Configuring Client Backup Policies
38
SonicWALL CDP 6.1 Agent User’s Guide
To remove files or data from the appliance:
Step 1 On the My Backups page, to remove a specific file, expand the backup to view the file that you want to remove.
Step 2 Select the file to be removed and click the Remove icon.
Step 3 To remove files from the appliance which no longer exist on the agent, select the backup or the revision that contains such files. The Remove Deleted Items icon becomes active when files exist on the appliance which no longer exist on the agent. Click the icon to remove the deleted items from the appliance.
Step 4 To remove older revisions of a file or a set of files, expand the view to display the files, select the file, and then click the Remove Old Versions icon to remove all revisions of the file except the most current one. The icon is greyed out if there is only one revision of the file currently backed up.
Configuring Client Backup Policies
For file and folder backups, client backup policies include a Files and Folders object, schedule, and task. For client applications such as Outlook or Outlook Express, client backup policies include an Application object, schedule, and task. You can configure objects, schedules, and tasks on the Policies tab in the Agent User Interface.
Objects can be defined using one of the following methods:
• FileSet – The FileSet method backs up related files as a set. Dependencies between files is considered. This method uses Event scheduling.
• Application – The Application method is used for both client and server applications, and also considers dependencies and backs up files as a set. This method also uses Event scheduling.
When using the FileSet or Application methods, Microsoft Volume Shadow Copy Service is used to create a cohesive snapshot for backup on Windows agents. Data de-duplication prevents multiple copies of unchanged data from being backed up.
The Policies window might also display a policy for a CDP method backup. The CDP method is folder-based and uses Interval scheduling.
To back up files or application data, you must configure a backup object, a schedule, and a backup task that includes both the backup object and the schedule.
Note Without a backup task, no backups will occur. This section contains the following subsections:
• “Adding a Files and Folders Object” section on page 39 • “Adding a Client Application Object” section on page 43
• “Editing the Default CDP Files and Folders Object” section on page 44 • “Configuring Schedule Objects” section on page 48
• “Configuring a Backup Task for Client Data” section on page 54 • “Using Backup Now” section on page 56
Configuring Client Backup Policies
• “Removing Backup Tasks” section on page 56
For information about restoring client data, see the “Restoring Backed Up Client Data” section on page 57.
Adding a Files and Folders Object
To create a Files and Folders object, perform the following steps:
Step 1 Navigate to the Policies tab located in the Agent User Interface and click on the Files and Folders link located in the left-side menu.
Step 2 Click the + button located in the bottom-right below the Files and Folders table. The Files and Folders window appears.
Configuring Client Backup Policies
40
SonicWALL CDP 6.1 Agent User’s Guide
Step 4 Select the desired folder you wish to back up in the Computer field.
SonicWALL CDP supports backing up and restoring on non-directly attached drives, including USB drives and mounted network drives. You must have the appropriate read/write permissions for the drives.
The image below shows the CDP Agent user interface window next to a view of the Windows computer, while two USB drives are mounted as drives G and H. You can select the G or H drives, as well as any of the network-mounted drives on the system, to drill down to files or folders that you want to back up.
To drill down and select a particular folder, click the arrow at the left of the folder icon to expand the list of subfolders, then repeat to expand the next folder in the path until you see the folder you want, then click that folder icon. Not every folder has an arrow, such as the “shortcut” My Document folder.
Configuring Client Backup Policies
As an example, to select a folder under My Documents, click the arrow next to the C:\ folder to expand it and then continue to expand the desired folders (including My Documents when you reach it) until you see the folder you want. After you select the folder for backup, each parent folder is marked by a blue dot. In this example, both the My Documents folder within the expanded list and the “shortcut” My Document folder display the blue dot.
The file path of the backup folders is displayed in the Full Path field located at the top of the Files and Folders window.
Configuring Client Backup Policies
42
SonicWALL CDP 6.1 Agent User’s Guide
Step 8 Click the + button, located next to the check box, to add the rule to the Files and Folders object. After clicking the + button, the rule is added to the Rules table and the selected folder appears in the Backup Folders list.
Step 9 If desired, repeat Step 5 through Step 8 to create more rules.
Step 10 Click OK after Files and Folders object creation is complete. The new Files and Folders object is visible in the table on the Policies tab.
Configuring Client Backup Policies
Adding a Client Application Object
To backup a client application such as Outlook or Outlook Express, you must configure an application object, a schedule, and a backup task that includes both the application object and the schedule. This section describes how to create the application object.
To create a client application object, perform the following steps: Step 1 In the SonicWALL CDP Agent User Interface, click the Policies tab. Step 2 In the left pane, click Applications.
Step 3 In the right pane, click the Plus button at the lower right corner. The Add Application window opens.
Step 4 Type a descriptive name for the application object into the Name field.
Step 5 Select the desired application from the Application drop-down list. The list of available applications is automatically populated through a discovery process. On most Windows computers, for example, the list will include Outlook, Outlook Express, and System State.
Note Only applications that are installed on your local computer will display in the Add Application window.
Configuring Client Backup Policies
44
SonicWALL CDP 6.1 Agent User’s Guide
Step 6 Under Application items, select the checkboxes for one or more items to back up.
Step 7 Click OK to add the application object.
The new application object appears in the Policies screen of the Agent User Interface. The In Use column indicates No to show that this application object is not part of an enabled Backup Task.
Note Before the backup will occur, you must configure a schedule for this application object (unless one already exists) and a backup task that includes both the application object and the schedule.
Editing the Default CDP Files and Folders Object
A legacy style CDP policy, including a default CDP Files and Folders object, a default CDP schedule (set to Always On), and a default CDP backup task, is defined by default at the administrative level and is inherited by agents connected to the SonicWALL CDP appliance. At the agent level, you can edit the default CDP Files and Folders object to add files and folders for backup to the CDP object, but you cannot create a new CDP object.
Configuring Client Backup Policies
A CDP object differs from a Files and Folders or Application object in that the defined files and folders are backed up as separate entities, not as FileSets. CDP schedules use Interval scheduling, which back up changed data continuously when set to Always On, rather than Event scheduling in which you can set dates for backups to occur.
To edit the default CDP Files and Folders object, perform the following steps:
Step 1 Navigate to the Policies tab located in the Agent User Interface and click on the Files and Folders link located in the left-side menu.
Step 2 Click the Edit button to the right of the CDP object name. The Files and Folders window appears.
Configuring Client Backup Policies
46
SonicWALL CDP 6.1 Agent User’s Guide
Step 3 Select the desired folder you wish to back up in the Computer field.
To drill down and select a particular folder, click the arrow at the left of the folder icon to expand the list of subfolders, then repeat to expand the next folder in the path until you see the folder you want, then click that folder icon. Not every folder has an arrow, such as the “shortcut” My Document folder.
To select a folder under My Documents, click the arrow next to the C:\ folder to expand it and then continue to expand the desired folders (including My Documents when you reach it) until you see the folder you want.
The file path of the backup folders is displayed in the Full Path field located at the top of the Files and Folders window.
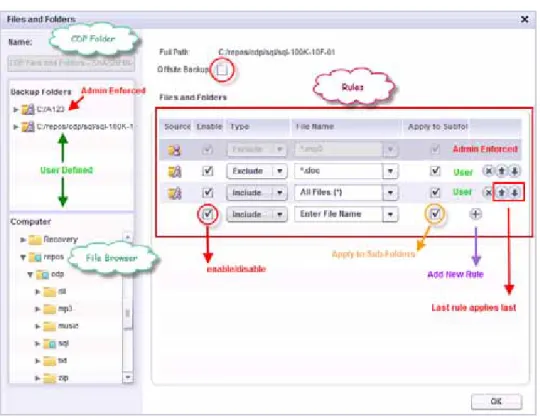
Step 4 Define the rules for your Files and Folders object by first determining how to apply the rule by choosing Include or Exclude under the Type drop-down menu.
• Include: Includes the specified files or extensions. • Exclude: Excludes the specified files or extensions.
Step 5 Define the File Name by entering a file name, extension, or select from a predefined list under
File Name and Patterns.
Step 6 If desired, check the Apply to Subfolders check box to apply the rules to subfolders.
Configuring Client Backup Policies
After clicking the + button, the rule is added to the Rules table and the selected folder appears in the Backup Folders list.
Configuring Client Backup Policies
48
SonicWALL CDP 6.1 Agent User’s Guide
Step 8 To send the backed up files to the configured SonicWALL Offsite Portal or offsite CDP appliance, first click on the selected folder in the Backup Folders list, and then select the
Offsite Backup checkbox.
Step 9 If desired, repeat Step 5 through Step 8 to create more rules. Step 10 Click OK when finished editing the CDP Files and Folders object.
Configuring Schedule Objects
To backup client data, you must configure a Files and Folders or Application object, a schedule object, and a backup task that includes both the backup object and the schedule. This section describes how to create the schedule object.
Note You can use the same schedule object in more than one backup task.
You can create or edit schedule objects for FileSet or Application backup tasks, but not for CDP method tasks. If you see a CDP schedule object, it is inherited from the connected appliance. You can view the settings on the CDP schedule object; see the “Viewing a CDP Schedule Object” section on page 53.
To create a schedule object, perform the following steps:
Step 1 In the SonicWALL CDP Agent User Interface, click the Policies tab. Step 2 In the left pane, click Schedules.
Configuring Client Backup Policies
Step 3 In the right pane, click the Plus button at the lower right corner. The Add Schedule window opens.
Step 4 Type a descriptive name for the schedule into the Name field.
Step 5 Specify the type of schedule and time desired. Four options are available and can be combined to form a schedule policy:
Configuring Client Backup Policies
50
SonicWALL CDP 6.1 Agent User’s Guide
– Select the Enable Day Interval checkbox.
– Select the number of days for the interval between backups.
– Select a start date. By default, the interval is calculated from the current date. – Under Select Time, to back up the files beginning at a specific time, select the Event
radio button, then fill in the Start at fields by selecting an hour and a minute for the start time. To repeat the backup, type a value into the Repeat every ... minutes field, and select an hour and minute for the end time after until.
• Days of the Week – The backup runs on certain days of the week.
– Select the Enable Days of the Week checkbox.
– Select the days of the week, Sunday through Saturday, on which to run the backup. – Select the time at which to start the backup.
– Under Select Time, to back up the files beginning at a specific time, select the Event
radio button, then fill in the Start at fields by selecting an hour and a minute for the start time. To repeat the backup, type a value into the Repeat every ... minutes field, and select an hour and minute for the end time after until.
Configuring Client Backup Policies
• Days of the Month – The backup occurs on certain days of the month.
– Select the Enable Days of the Month checkbox.
– Select the days of the month on which to run the backup. Select Last for the last day of the month.
– Select the time at which to start the backup.
– Under Select Time, to back up the files beginning at a specific time, select the Event
radio button, then fill in the Start at fields by selecting an hour and a minute for the start time. To repeat the backup, type a value into the Repeat every ... minutes field, and select an hour and minute for the end time after until.
Configuring Client Backup Policies
52
SonicWALL CDP 6.1 Agent User’s Guide
• Specific Dates – The backup occurs on the selected dates.
– Select the Enable Specific Dates checkbox. – Click the small calendar and then select the date(s). – Select the time at which to start the backup.
– Under Select Time, to back up the files beginning at a specific time, select the Event
radio button, then fill in the Start at fields by selecting an hour and a minute for the start time. To repeat the backup, type a value into the Repeat every ... minutes field, and select an hour and minute for the end time after until.
Step 6 Click OK after defining the desired schedule. New schedules are visible in the table on the main Schedules page.
Configuring Client Backup Policies
Viewing a CDP Schedule Object
A default CDP schedule object is inherited from the SonicWALL CDP appliance. It uses Interval scheduling rather than Event scheduling. Only the Day Interval tab of the Edit Schedule Object interface is used. You can view the default CDP schedule object, but cannot change it.
To view the default CDP schedule object:
Step 1 In the SonicWALL CDP Agent User Interface, click the Policies tab. Step 2 In the left pane, click Schedules.
Step 3 In the right pane, double-click the Edit button to the right of the CDP schedule object name. The Edit Schedule window opens.
Step 4 On the Day Interval tab under Enable Day Interval, the number of days for the interval between backups is defined. For example, if you see 1, the backups will occur daily; if you see
2, the backups will occur every other day.
Step 5 In the Start on field, the start date is defined. By default, the interval is calculated from the current date.
Configuring Client Backup Policies
54
SonicWALL CDP 6.1 Agent User’s Guide
Configuring a Backup Task for Client Data
A backup task includes either a Files and Folders or Application object and a schedule for the backup. Without a backup task, no backups will occur.
For offsite backup, you can choose the Send All Files Offsite option when adding or editing a backup task. In the Offsite Versions field, you can specify the number of revisions that should be kept on the Offsite device.
Note Before creating a backup task, create the backup object and schedule to be included in the task.
To create a backup task for client data backup, perform the following steps: Step 1 In the SonicWALL CDP Agent User Interface, click the Policies tab. Step 2 In the left pane, select Backup Tasks.
Step 3 In the right pane, click the Plus button at the lower right corner. The Add Backup Task window opens.
Step 4 Type a descriptive name for the backup task into the Name field. Step 5 Select one of the following in the Select File Type drop-down list:
• For a client application backup task, select Application. • For a FileSet or CDP backup task, select FileSet.
Step 6 For a client application backup task, select the desired application object from the Application Data drop-down list.
Step 7 For a FileSet or CDP backup task, select the desired Files and Folders object from the Files and Folders drop-down list.
Configuring Client Backup Policies
Step 8 Type the desired number of backup revisions to keep into the Number of Versions field. For client applications, the default is 2. For files and folders, the default is 10.
Step 9 Type the desired number of backup revisions to keep on the Offsite CDP or Portal into the
Offsite Versions field. The default is 1.
Step 10 The Trimming Algorithm field is not configurable. The field displays the type of trimming algorithm in use.
Step 11 In the Offsite drop-down list, select one of the following options:
• Send all Files Offsite – Files will be backed up on the configured Offsite appliance. • Do Not Send Files Offsite – Files will be backed up on the SonicWALL CDP appliance that
is connected to the agent.
Step 12 Select the desired schedule from the Schedule drop-down list.
Step 13 To activate this backup task, select the Enable this task in Policy checkbox. To disable this backup task without deleting it, you can clear this checkbox.
Step 14 Click OK when finished configuring the backup task.
A backup task for the Outlook Express client application is shown below:
Configuring Client Backup Policies
56
SonicWALL CDP 6.1 Agent User’s Guide
After clicking OK, the new tasks appear in the Policies tab window:
Using Backup Now
For any existing backup task that is currently enabled in a policy, the administrator can click the
Backup Now button on the Policies tab to execute an immediate backup. This is useful for immediate backup of files, in general, and especially in the following cases:
• A new Application is added to the backup plan • To backup data immediately from a new Agent To perform an immediate backup using Backup Now: Step 1 Click the Policies tab.
Step 2 Select Backup Tasks in the left pane.
Step 3 Click the Backup Now button located to the right of the backup task you want to back up. Step 4 The page displays the in-progress indicator while the backup is performed.
Removing Backup Tasks
You can temporarily disable a backup task, or completely remove it along with the associated backup rules or application object. See the following sections:
• “Disabling a Backup Task” section on page 57 • “Removing a Backup Task” section on page 57
Restoring Backed Up Client Data
Disabling a Backup Task
You can temporarily disable any backup task with removing its configuration by performing the following steps:
Step 1 In the SonicWALL CDP Agent User Interface, click the Policies tab. Step 2 In the left pane, click Backup Tasks.
Step 3 Click the Editbutton located to the right of the backup task you want to disable. Step 4 In the Edit Backup Task window, clear the Enable this task in Policy checkbox. Step 5 Click OK.
Removing a Backup Task
To completely remove a backup task and the associated Files and Folders or Application object rules, perform the following steps:
Step 1 In the SonicWALL CDP Agent User Interface, click the Policies tab. Step 2 In the left pane, click Backup Tasks.
Step 3 Click the X button located to the right of the backup task you want to remove. Step 4 Click Yes in the confirmation dialog.
Step 5 In the left pane, click either Files and Folders or Applications. Step 6 Click the X button located to the right of the object name. Step 7 Click Yes in the confirmation dialog.
Restoring Backed Up Client Data
Using the SonicWALL CDP Agent on a machine for which you have administrative rights, you can restore data from connected CDP appliances to the agent machine, even if it is a different machine than the one from which the data was backed up.
See the following sections for instructions about restoring backed up files, folders, and client applications:
• “Restoring Files and Folders” section on page 58 • “Restoring a Client Application” section on page 60