DNS and Network Configuration
Version 8.0
1 Legal Notices
Copyrights Symantec IM Manager and related modules.
Copyright © 2002 - 2006 by Symantec, Incorporated. All rights reserved.
This manual and the application program associated with it is provided under a software licensing agreement from Symantec, Incorporated (“Symantec”) and may only be used, copied and distributed under the terms of that agreement.
The information contained herein is for informational use only; it is subject to change without notice and does not represent a commitment by Symantec for any specific application or use of the software (express or implied).
Unless specified in the software licensing agreement, this manual (in whole or in part) may not be reproduced or transmitted in any form or by any means, electronic, mechanical, recording or otherwise without the express written permission of Symantec, Incorporated. This software and documentation are commercial products developed exclusively at private expense. The rights of the Government, including Department of Defense Agencies, to use, duplicate and disclose are limited to those set forth in the License Agreement.
This product includes software developed by the Apache Software Foundation (http://www.apache.org)
This project includes software licensed under the OpenLDAP license version 2.8. Portions Copyright sysFire LLC
Portions Copyright 1999,2000 Boris Fomitchev
Cookies.js - Copyright JavaScript & DHTML Cookbook by Dan Goodman, Published by O’Reilly & Associates ISBN: 0596004672
Warranty Symantec warrants the software according to the terms in the software license agreement. Symantec assumes no responsibility or liability for any errors or omissions that may exist in this manual.
Trademarks AOL® and AOL® Instant Messenger™ are trademarks or registered trademarks of America Online, Incorporated.
IBM® ,Lotus® , and Sametime® are registered trademarks of the IBM Corporation. McAfee®, McAfee Security™ , Sniffer® Technologies, and Magic Solutions® are trademarks
or registered trademarks of Network Associates, Inc. Symantec™ is a trademark of Symantec Corporation.
Microsoft® Windows® and Active Directory™ are trademarks or registered trademarks of
Microsoft Corporation.
MSN® and MSN® Messenger are registered trademarks of Microsoft Corporation.
Netscape® and Netscape Navigator® are registered trademarks of America Online, Incorporated.
Reuters®is a registered trademark of the Reuters Group of companies worldwide.
Yahoo!® , Yahoo! ® Messenger, and Yahoo! ® Messenger Enterprise Edition are registered trademarks of Yahoo!, Incorporated.
Jabber XCP, Jabber Messenger are registered trademarks of Jabber Incorporated. OpenLDAP is a registered trademark of the OpenLDAP Foundation.
Other brand and product names are trademarks or registered trademarks of their respective owners.
Legal Disclaimers The use of software under the OpenLDAP Public License is provided under the following conditions:
The OpenLDAP Public License Version 2.8, 17 August 2003
Redistribution and use of this software and associated documentation ("Software"), with or without modification, are permitted provided that the following conditions are met:
1. Redistributions in source form must retain copyright statements and notices,
2. Redistributions in binary form must reproduce applicable copyright statements and notices, this list of conditions, and the following disclaimer in the documentation and/or other materials provided with the distribution, and
3. Redistributions must contain a verbatim copy of this document. The OpenLDAP Foundation may revise this license from time to time. Each revision is distinguished by a version number. You may use this Software under terms of this license revision or under the terms of any subsequent revision of the license.
THIS SOFTWARE IS PROVIDED BY THE OPENLDAP FOUNDATION AND ITS CONTRIBUTORS ``AS IS'' AND ANY EXPRESSED OR IMPLIED WARRANTIES,
INCLUDING, BUT NOT LIMITED TO, THE IMPLIED WARRANTIES OF MERCHANTABILITY AND FITNESS FOR A PARTICULAR PURPOSE ARE DISCLAIMED. IN NO EVENT
SHALL THE OPENLDAP FOUNDATION, ITS CONTRIBUTORS, OR THE AUTHOR(S) OR OWNER(S) OF THE SOFTWARE BE LIABLE FOR ANY DIRECT, INDIRECT, INCIDENTAL, SPECIAL, EXEMPLARY, OR CONSEQUENTIAL DAMAGES (INCLUDING, BUT NOT LIMITED TO, PROCUREMENT OF SUBSTITUTE GOODS OR SERVICES; LOSS OF USE, DATA, OR PROFITS; OR BUSINESS INTERRUPTION) HOWEVER CAUSED AND ON ANY THEORY OF LIABILITY, WHETHER IN CONTRACT, STRICT LIABILITY, OR TORT (INCLUDING NEGLIGENCE OR OTHERWISE) ARISING IN ANY WAY OUT OF THE USE OF THIS SOFTWARE, EVEN IF ADVISED OF THE POSSIBILITY OF SUCH DAMAGE.
The names of the authors and copyright holders must not be used in advertising or otherwise to promote the sale, use or other dealing in this Software without specific, written prior permission. Title to copyright in this Software shall at all times remain with copyright holders.
OpenLDAP is a registered trademark of the OpenLDAP Foundation. Copyright 1999-2003 The OpenLDAP Foundation, Redwood City, California, USA. All Rights Reserved. Permission to copy and distribute verbatim copies of this document is granted.
Document Version 8.1041
Table of Contents
1
Legal Notices ...2
2
Introduction ...5
3
IM Control Configuration Strategies Overview ...6
4
DNS Rerouting Configuration...7
4.1 Overview... 7
4.2 Rerouting DNS Addresses ... 7
4.3 DNS for IM over HTTP ... 8
5
Firewall Configuration ...11
5.1 Connecting to Public IM ... 11
5.2 IM Manager in a DMZ... 11
6
Blocking HTTP IM Access ...13
7
Blocking ICQ Chat Room Access ...15
Appendix A: Configuring DNS on the IM Manager Server ...16
Appendix B: Configuring DNS Redirection in Windows 2003...19
7.1 Creating a Zone in Windows 2003 ... 19
7.2 Assign Hosts to Zone in Windows 2003 ... 23
Appendix C: Configuring DNS Redirection in Windows 2000...25
7.3 Creating a Zone in Windows 2000 ... 25
7.4 Assign Hosts to Zone in Windows 2000 ... 28
7.5 Balance IM Manager Relay Loading in Windows 2000 ...Error! Bookmark not defined.
Appendix D: Configuring DNS Redirection in Windows NT4 ...30
7.6 Configuring DNS Redirection in Windows NT4 ... 30
7.7 Creating a Zone in Windows NT4 ... 30
7.8 Creating a New Record Host in Windows NT4 ... 32
Appendix E: Configuring DNS Redirection in UNIX BIND...34
2 Introduction
Welcome again to the Symantec IM Manager (IM Manager). IM Manager is a comprehensive Instant Messaging (IM) archiving, review, and audit solution.
This guide provides information on how to configure your enterprise’s network and Distributed Name Server (DNS) to complement IM Manager features and provide better control over user access to public IM networks.
Enterprise IM typically does not require any DNS or networking changes; IM Manager takes advantage of existing IM infrastructure.
If you have questions after reading this guide, please visit the Symantec Support Website at
http://support.symantec.com.
Intended Audience
This document is intended for use by IT Administrators who are using IM Manager. At a minimum, IM Manager Administrators must have advanced knowledge of Internet and IM protocols and technology, as well as local area networks.
Related Documents
Symantec provides electronic versions of this and related documents in PDF format located in the Documents folder of the Symantec installation directory (located by default at \Program Files\Symantec\Documents).
3 IM Control Configuration Strategies
Overview
Your IM control strategy consists of two elements:
• Clients must connect to IM Manager, and not directly to the internet. This can be done through DNS
redirection or by modification of individual IM clients and workstations. DNS redirection is covered in detail in the DNS Rerouting Configuration section of this document.
• The corporate network should block any IM connections that don’t go through IM Manager. The
section titled Firewall Configuration goes into detail about the ports that are important for Public IM and IM Manager. Section 5 covers the specific steps necessary to block IM over HTTP (port 80).
The specific configuration strategy that you choose depends on your goals. For IM Manager to capture IM traffic, IM clients must connect to the IM Manager server. Clients that connect directly to the Internet without passing through the IM Manager server are not controlled. For this reason, it is important that your environment limit the ability of clients to connect to the Internet directly.
The most secure environment is one where the user’s desktop is blocked by the corporate firewall from making any direct external connections. End users are permitted to connect to the Internet only through IM Manager and a web proxy.
4 DNS Rerouting Configuration
4.1 Overview
Each of the Public IM clients depends on a DNS query to make a connection to the IM network. You can configure your company’s DNS to reply with the IP address of the IM Manager server, rather than an address on the Internet. By controlling your DNS, you cause the IM clients to connect to IM Manager rather than to the Internet.
Important: IM Manager needs to be able to find the true Internet IP addresses of the Public IM networks. That means that IM Manager can not use the same DNS server as the end users. Additionally, some IM Manager features require successful DNS lookups of your internal corporate servers; that means that IM Manager should not use your ISP’s external DNS servers. The common solution is to install a separate DNS service on the IM Manager server for the IM Manager’s use. The steps to do this are detailed in Appendix A: Configuring DNS on the IM Manager Server.
4.2 Rerouting DNS Addresses
The first stage in configuring DNS redirection is to implement the DNS zones on an internal dedicated DNS server. All the zones point IM Client connections to the IM Manager Relay server.
In order to reroute public IM network addresses from your DNS server to the IM Manager Relay server, each zone file should include the domain names for each IM network service provider your enterprise supports.
NOTE: ICQ support requires that a separate IP address be configured on the relay. Please read the Installation Guide’s section titled “Configuring ICQ Support” for more information.
NOTE: Each individual IM network service provider maintains and controls its own DNS Hostnames. Therefore,
they are subject to change with minimal notice.
Symantec makes every attempt to maintain current IM network addressing information in its documentation and Support Web Portal and strives to inform customers proactively of changes, usually before the change goes live. The appendices provide DNS configuration procedures for the following four operating systems:
• Windows (2003) DNS
• Windows (2000) DNS
• Windows NT4 (WINS)
• UNIX (BIND)
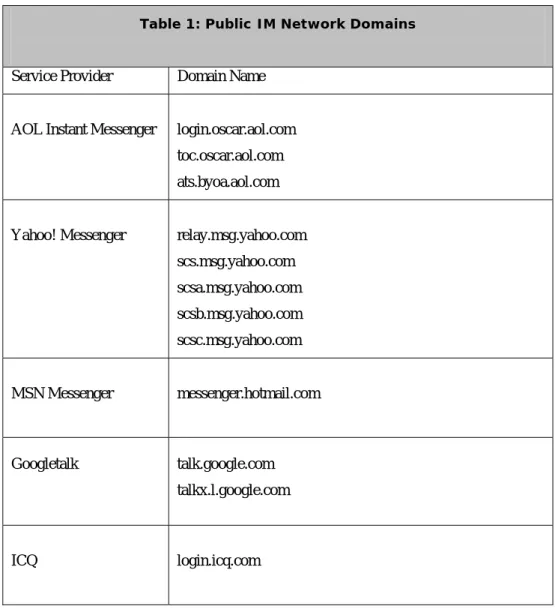
Table 1 lists the domain names for the most popular Public IM Services (as they existed on the date this document was published):
Table 1: Public IM Network Domains
Service Provider Domain Name
AOL Instant Messenger login.oscar.aol.com toc.oscar.aol.com ats.byoa.aol.com
Yahoo! Messenger relay.msg.yahoo.com scs.msg.yahoo.com scsa.msg.yahoo.com scsb.msg.yahoo.com scsc.msg.yahoo.com
MSN Messenger messenger.hotmail.com
Googletalk talk.google.com talkx.l.google.com
ICQ login.icq.com
NOTE: login.icq.com should point to the IP address dedicated to ICQ. Please read the Installation Guide’s section titled “Configuring ICQ Support” for more information.
4.3 DNS for IM over HTTP
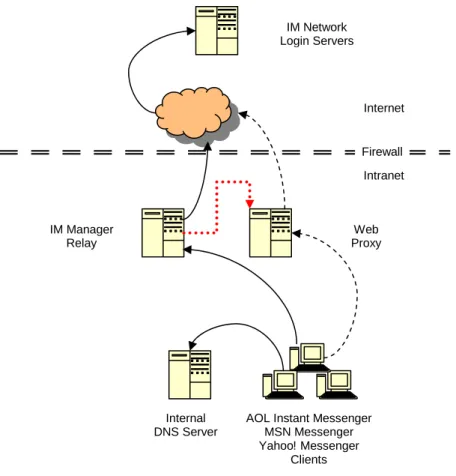
IM Manager can be deployed to control IM communication in two modes:
Native Protocol Mode: When you deploy IM Manager in native protocol mode,
the IM client application typically uses its native protocol mode and one of the following approaches to log into the IM service provider’s network
(shown with solid lines in Figure 1: Client IM Logon Controls (Native and HTTP Mode)).
This option allows for zero-client configuration, that is, desktop IM clients need not be changed in any way.
HTTP Protocol Mode: When you deploy IM Manager in HTTP protocol mode,
all IM traffic must go through the IM Manager Replay server (in HTTP mode), then to the Web Proxy, and finally to the Internet and the IM service provider’s network
(shown with dotted lines in Figure 1: Client IM Logon Controls (Native and HTTP Mode)). This option requires both client configuration and Web Proxy Hostname filtering.
The decision on which IM Manager configuration strategy to choose depends on your enterprise’s network configuration and security requirements. This decision to deprecate functionality should be made only if your policies require you to.
In response to each approach, IM Manager Administrators must do the corresponding task described in Table 2: Public IM Network Hostnames to ensure that all IM traffic passes through the IM Manager
Relay server:
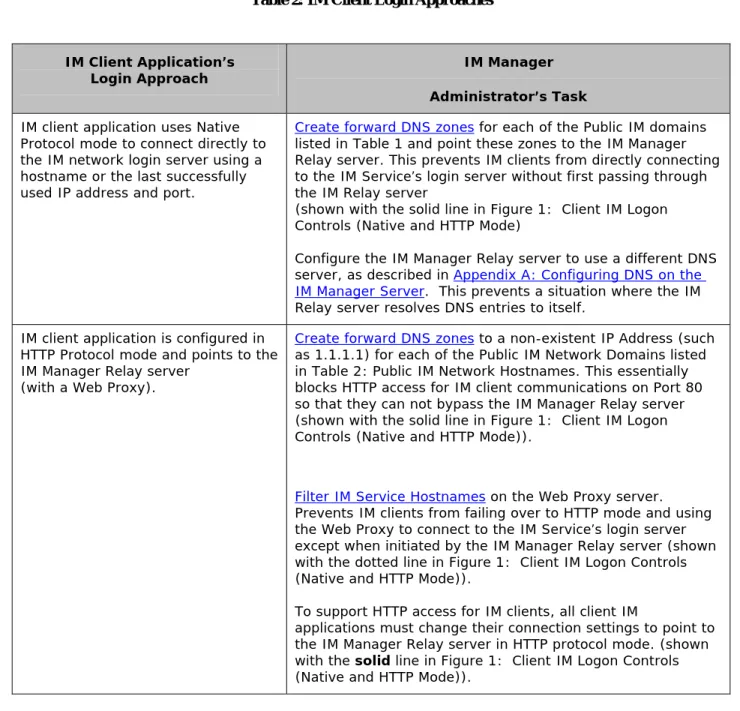
Table 2: IM Client Login Approaches
IM Client Application’s
Login Approach IM Manager
Administrator’s Task
IM client application uses Native Protocol mode to connect directly to the IM network login server using a hostname or the last successfully used IP address and port.
Create forward DNS zones for each of the Public IM domains listed in Table 1 and point these zones to the IM Manager Relay server. This prevents IM clients from directly connecting to the IM Service’s login server without first passing through the IM Relay server
(shown with the solid line in Figure 1: Client IM Logon Controls (Native and HTTP Mode)
Configure the IM Manager Relay server to use a different DNS server, as described in Appendix A: Configuring DNS on the IM Manager Server. This prevents a situation where the IM Relay server resolves DNS entries to itself.
IM client application is configured in HTTP Protocol mode and points to the IM Manager Relay server
(with a Web Proxy).
Create forward DNS zones to a non-existent IP Address (such as 1.1.1.1) for each of the Public IM Network Domains listed in Table 2: Public IM Network Hostnames. This essentially blocks HTTP access for IM client communications on Port 80 so that they can not bypass the IM Manager Relay server (shown with the solid line in Figure 1: Client IM Logon Controls (Native and HTTP Mode)).
Filter IM Service Hostnames on the Web Proxy server. Prevents IM clients from failing over to HTTP mode and using the Web Proxy to connect to the IM Service’s login server except when initiated by the IM Manager Relay server (shown with the dotted line in Figure 1: Client IM Logon Controls (Native and HTTP Mode)).
To support HTTP access for IM clients, all client IM
applications must change their connection settings to point to the IM Manager Relay server in HTTP protocol mode. (shown with the solid line in Figure 1: Client IM Logon Controls (Native and HTTP Mode)).
Figure 1: Client IM Logon Controls (Native and HTTP Mode) shows the typical network configurations for the various DNS Reconfigurations described in Table 2: Public IM Network Hostnames
Internet
Web Proxy IM Manager
Relay
AOL Instant Messenger MSN Messenger Yahoo! Messenger
Clients Internal
DNS Server
IM Network Login Servers
Intranet Firewall
Figure 1: Client IM Logon Controls (Native and HTTP Mode)
5 Firewall Configuration
To ensure that native protocol IM traffic only goes through the IM Manager Relay server, it is necessary, at a minimum, to block the ports that the Public IM Service Provider networks use. Blocking the specified ports is usually sufficient to force all standard clients through the IM Manager relay. If additional security is required, the firewall should be configured to prevent any communication (inbound or outbound) with the IM clients on other ports as well.
5.1 Connecting to Public IM
Table 4 provides a list of ports used by the Public IM Service networks. These ports must be blocked for all communication except from the IM Manager Relay server. The IM Manager server must be able to initiate outbound connections on these ports.
Table 1 Public IM Network Ports
Service Provider Port (TCP)
AOL Instant Messenger 5190
Yahoo! Messenger 5050
MSN Messenger 1863
Googletalk 5222 ICQ 5190
NOTE: The MSN client’s authentication requires an SSL connection over port 443 directly from the end user to MSN (loginnet.passport.com or login.passport.com).
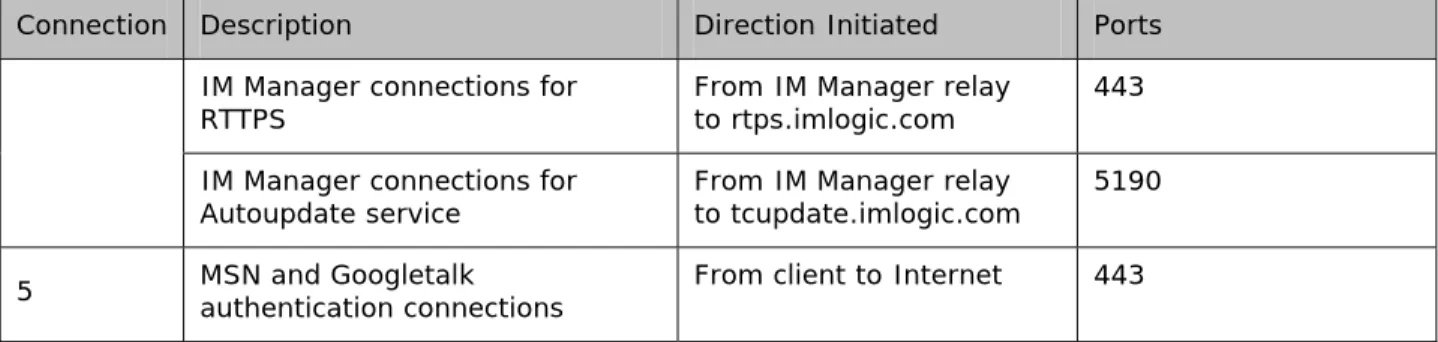
5.2 IM Manager in a DMZ
You may choose to put the IM Manager Relay service in your DMZ. This diagram describes the ports required for the various clients connecting to IM Manger. It also illustrates required ports for the components of IM Manager.
Connection Description Direction Initiated Ports
1 ODBC connection for Administrator Web Interface From web server to database Standard SQL ports Client messaging connections
with IM Manager From client to IM Manager relay AIM: 5190, 5191, 5192, 5290, 5291, 5292
MSN: 1863, 1864 Yahoo: 5050 ICQ: 5190 Googletalk: 5222 SOCKS: 1080 Client file transfer connections
with IM Manager
From client
to IM Manager relay
AIM: 5193, 5194 MSN: 1863 Yahoo: 80 2
Client file transfer connections
with IM Manager (AIM only) From IM Manager relay to client AIM: 5193
3 ODBC connection for IM Manager relay service From IM Manager relay to database Standard SQL ports IM Manager messaging
connections with Internet From IM Manager relay to Internet AIM: 5190 MSN: 1863 Yahoo: 5050 ICQ: 5190 Googletalk: 5222 4
IM Manager file transfer connections with Internet
From IM Manager relay to Internet
AIM: 5190 MSN: 1863 Yahoo: 80
Connection Description Direction Initiated Ports IM Manager connections for
RTTPS From IM Manager relay to rtps.imlogic.com 443 IM Manager connections for
Autoupdate service From IM Manager relay to tcupdate.imlogic.com 5190 5 MSN and Googletalk authentication connections From client to Internet 443
6 Blocking HTTP IM Access
Almost all of the Public IM clients have the ability to connect to their networks via HTTP. To ensure that all IM traffic is captured by IM Manager, these HTTP connections should be blocked.
Ensure that the Hostnames in Table 2 for the IM Service Provider networks are blocked at the Web Proxy for HTTP Access so that IM clients cannot bypass the IM Manager Relay server and go directly to the Internet in HTTP mode:
Table 2: Public IM Network Hostnames
Service Provider Hostname
AOL Instant Messenger aimexpress.aol.com
aimexpress.oscar.aol.com (Java client) aimhttp.oscar.aol.com
beta.aimexpress.aol.com aimexpress.aim.com toc.oscar.aol.com
Yahoo! Messenger http.msg.yahoo.com shttp.msg.yahoo.com
ypager.yahoo.com (Java client) http.chat.yahoo.com (Chat) jcs.chat.yahoo.com (Chat) messenger.yahoo.com
Service Provider Hostname
MSN Messenger gateway.messenger.hotmail.com messenger.hotmail.com
webmessenger.msn.com
Googletalk mail.google.com gmail.google.com
ICQ
http.proxy.icq.com icq.com
(to permit ICQ client download and ICQ registration, permit access to www.icq.com and download.icq.com)
7 Blocking ICQ Chat Room Access
The IM Manager Relay blocks invites to ICQ chat rooms. An additional step is required to block internal users from entering a chat through the web URL. DNS redirection and/or firewall settings should be used to block this address:
IRC.ICQ.COM
To test that the block is working, try accessing address http://www.icq.com/icqchat and entering a room. If the block is working, you should see repeated reconnection attempts which fail.
This can also be implemented by adding the following entry to the hosts file: 127.0.0.1 IRC.ICQ.COM
8 Blocking Yahoo Webcam Access
Yahoo has features called “View webcam” and “Invite to View My Webcam”, which allow you to view another contact’s webcam and vice versa. This feature does not pass through the IM Manager relay, but instead, establishes a direct connection with the host webcam.yahoo.com on port 5100. DNS redirection and/or firewall settings should be used to block this address:
WEBCAM.YAHOO.COM
To test that the block is working, select the View Webcam option in Yahoo! Messenger. If the block is working, you will see repeated connection attempts fail.
This can also be implemented by redirecting the server name to a fictitious IP address in the hosts file. For example: 0.0.0.1 WEBCAM.YAHOO.COM
Appendix A: Configuring DNS on the
IM Manager Server
As described in Section 3.1, IM Manager needs to be able to find the true Internet IP addresses of the Public IM networks. That means that IM Manager can not use the same DNS server as the end users. Additionally, some IM Manager features require successful DNS lookups of your internal corporate servers; that means that IM Manager should not use your ISP’s external DNS servers. The common solution is to install a separate DNS service on the IM Manager server for the IM Manager’s use. The steps to do this are detailed here.
The DNS service is installed by going to the Add/Remove Programs panel and choosing to install a Windows Component. Choose the DNS Service and start the install. If you need details on this installation, please refer to your Microsoft Windows documentation. To configure the DNS:
1. Open the Computer Management screen and right click on the Services and
Applications|DNS| <servername> node. Select Properties. Select the Forwarders tab. 2. Enter the IP address of the external DNS server (or an internal DNS server that resolves
internet addresses externall) in the Selected domains forwarder IP address list textbox. Click Add. Click OK.
3. Right click on Forward Lookup Zones. Select New Zone… to display the New Zone Wizard dialog box.
4. Click Next to display the Zone Type dialog box.
5. Click the Secondary Zone radio option. Click Next to display the Zone Name dialog box. 6. Enter your internal zone name (e.g. symantec.com) in the Zone name textbox. Click Next
to display the Master DNS Servers dialog box.
7. Enter the IP addresses of the internal DNS servers and click Add. Click Next to display the finish screen. Click Finish.
Appendix B: Configuring DNS
Redirection in Windows 2003
This section provides an example of setting up a primary zone for login.oscar.aol.com in Windows 2003 so that IM client queries to the internal DNS machine for that domain name will receive the IP address of the IM
Manager Relay server.
There are two stages in this procedure:
• Creating a Zone
• Assigning one or more hosts (IM Manager Relay servers) to the new Zone. Optionally, properties of the host may be modified.
8.1 Creating a Zone in Windows 2003
To create a zone, perform the following steps:
Open the DNS manager window. To do so, in Windows click Start | Programs | Administrative Tools | DNS. The DNS window is shown in Figure 2: DNS Manager Window (Windows 2003):
Figure 2: DNS Manager Window (Windows 2003)
Right-click Forward Lookup Zones, and on the shortcut menu, select New Zone to open the New Zone wizard window. The first screen, Zone Type, is shown in Figure 3: Zone Type Screen
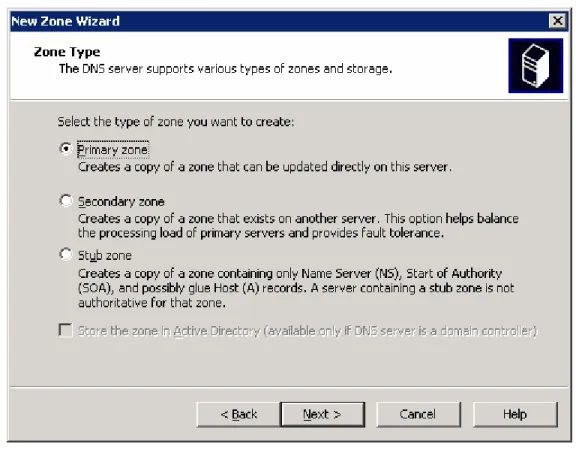
Figure 3: Zone Type Screen
Click the Primary button to set the zone type, then click the Next button to commit the type setting, and open the Zone Name screen, shown in Figure 4: Zone Name Screen:
Figure 4: Zone Name Screen
In the Name text box, type the name of the zone; for this example: login.oscar.aol.com. Then click the Next button to open the Zone File screen, shown in Figure 5: Zone File Screen.
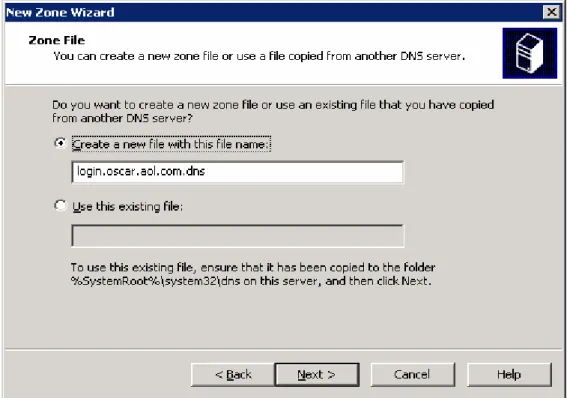
Figure 5: Zone File Screen
Select the Create a new file with this file name button. The default file name is already filled in (the zone name plus the .DNS file name extension).
Figure 6: DNS Manager Screen with New Zone Selected
Select next. Choose to not allow dynamic updates.
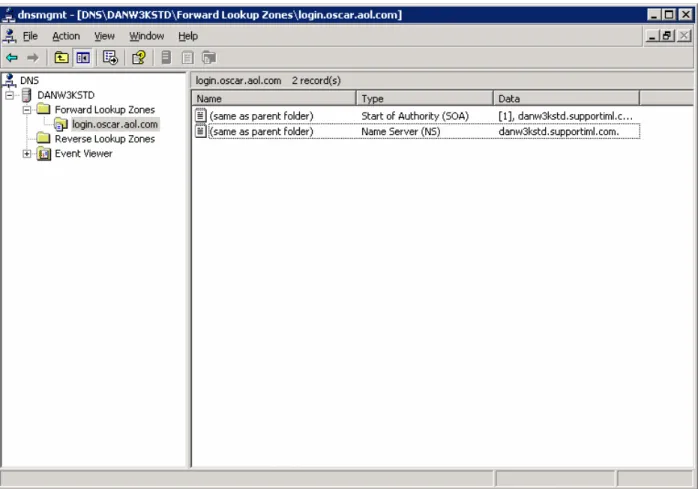
Click the Next button to create the new zone file and close the wizard. The DNS window receives the focus again. The new zone appears on a branch under the Forward Lookup Zones item, as shown in Figure 7: DNS Manager Screen with New Zone Selected:
Figure 7: DNS Manager Screen with New Zone Selected
NOTE: Do not close the DNS window; continue using it for the next stage described below.
8.2 Assign Hosts to Zone in Windows 2003
To assign a host to the new zone, perform the following steps:
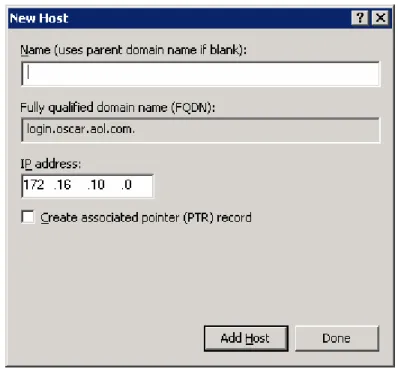
In the DNS manager window, right-click the new zone item (in this example: login.oscar.aol.com), and in the shortcut menu, choose the New Host option to open the New Host dialog box, shown in Figure 8: New Host Dialog Box:
Figure 8: New Host Dialog Box Leave the Name text box empty.
In the IP address text box, type IP address of the IM Manager Relay server.
Click the Add Host button to create the host record, and close the dialog box. The DNS Manager window receives focus again.
Appendix C: Configuring DNS
Redirection in Windows 2000
This section provides an example of setting up a primary zone for login.oscar.aol.com in Windows 2000 so that IM client queries to the internal DNS machine for that domain name will receive the IP address of the IM
Manager Relay server.
There are two to three stages in this procedure:
• Creating a Zone
• Assigning one or more hosts (IM Manager Relay servers) to the new Zone.
• Balancing Relay server Loading
Optionally, properties of the host may be modified.
8.3 Creating a Zone in Windows 2000
To create a zone, perform the following steps:
Open the DNS manager window. To do so, in Windows click Start | Programs | Administrative Tools | DNS. The DNS window is shown in Figure 9: DNS Manager Window (Windows 2000):
Figure 9: DNS Manager Window (Windows 2000)
Right-click Forward Lookup Zones, and on the shortcut menu, select New Zone to open the New Zone wizard window. The first screen, Zone Type, is shown in Figure 10: Zone Type Screen:
Figure 10: Zone Type Screen
Click the Standard Primary button to set the zone type, then click the Next button to commit the type setting, and open the Zone Name screen, shown in Figure 11: Zone Name Screen:
Figure 11: Zone Name Screen
In the Name text box, type the name of the zone; for this example: login.oscar.aol.com. Then click the Next button to open the Zone File screen, shown in Figure 12: Zone File Screen:
Figure 12: Zone File Screen
Select the Create a new file with this file name button. The default file name is already filled in (the zone name plus the .DNS file name extension).
Click the Next button to create the new zone file and close the wizard. The DNS window receives the focus again. The new zone appears on a branch under the Forward Lookup Zones item, as shown in Figure 13: DNS Manager Screen with New Zone Selected:
Figure 13: DNS Manager Screen with New Zone Selected
NOTE: Do not close the DNS window; continue using it for the next stage described below.
8.4 Assign Hosts to Zone in Windows 2000
To assign a host to the new zone, perform the following steps:
In the DNS manager window, right-click the new zone item (in this example: login.oscar.aol.com), and in the shortcut menu, choose the New Host option to open the New Host dialog box, shown in Figure 14: New Host Dialog Box:
Figure 14: New Host Dialog Box Leave the Name text box empty.
In the IP address text box, type IP address of the IM Manager Relay server.
Click the Add Host button to create the host record, and close the dialog box. The DNS Manager window receives focus again.
Appendix D: Configuring DNS
Redirection in Windows NT
8.5 Configuring DNS Redirection in Windows NT4
The following is an example of setting up a primary zone for login.oscar.aol.com in Windows NT4 Service Pack 6a. Client machines that query the DNS machine for that domain name will receive the IP of the IM Manager Relay server which is entered using this procedure.
There are two stages in this procedure:
• Creating a Zone
• Creating a New Record Host (for the IM Manager Relay server) in the new Zone. Optionally, properties of the host may be modified.
8.6 Creating a Zone in Windows NT4
To create a zone, perform the following steps:
Open the Domain Name Service Manager. To do so, in Windows click Start | Programs | Administrative Tools | DNS. The Domain Name Service Manager window is shown in Figure 15: DNS Manager (Windows NT4):
Figure 15: DNS Manager (Windows NT4)
In the left-hand pane, expand the Server List item, and locate the DNS server item.
NOTE: In Figure 15: DNS Manager (Windows NT4)’s example, the server appears as the 100.0.0.100 item.
Right-click the DNS server item, and on the shortcut menu, choose the New Zone option to open the Creating New Zone wizard. The first screen appears in Figure 16: Zone Type Selection:
Figure 16: Zone Type Selection
Click the Primary option button, then click the Next button to continue to the screen shown in Figure 17: Setting Zone Name:
Figure 17: Setting Zone Name
In the Zone Name text box, enter the domain name; for this example: login.oscar.aol.com, then press the Tab key to automatically complete the Zone File text box (the default zone file name is called by the domain name plus the .DNS file name extension).
Click the Next button to create the zone file. The dialog box closes and the focus returns to the Do not close the Domain Name Service Manager window. Do not the window. Instead, continue with the next stage.
8.7 Creating a New Record Host in Windows NT4
To create a New Record host (for the IM Manager Relay server) for the new zone, perform the following steps: In the Domain Name Service Manager window, locate the item corresponding to the new zone (in this example, login.oscar.aol.com).
Right-click the item, and on the shortcut menu, choose the New Record option, to open the New Resource Record dialog box, shown in Figure 18: New Resource Record Dialog Box. In the Record Type list box, click the A Record item. Leave the Host Name text box empty.
Figure 18: New Resource Record Dialog Box
In the Host IP Address text box, type the IP address of the IM Manager Relay server.
Click the OK button to create the new record. The dialog box closes and the Domain Name Service Manager window displays the new record, as shown in Figure 19: Domain Name Service Manager:
Displaying Zone Information:
Figure 19: Domain Name Service Manager: Displaying Zone Information
Appendix E: Configuring DNS
Redirection in UNIX BIND
This section provides the following code examples:
A sample named.conf file that contains all the customizations needed to set up DNS redirection with BIND 9.2.1 for MSN Messenger, AOL Instant Messenger, ICQ, and Yahoo! Messenger. Figure 20: Sample Named.Conf File A sample standard Zone file for messenger.hotmail.com that returns a record for messenger.hotmail.com. This is a standard zone file that can be used for all other IM services since are exactly the same as this
messenger.hotmail.com example, with the exception of msg.yahoo.com.zone. Figure 21: Sample Zone File (Standard)
A sample specific Zone file for msg.yahoo.com.zone that is more complicated because there are sub domains in it. Figure 22: Sample Zone File
(Specific for Yahoo IM)
// generated by named-bootconf.pl options {
directory "/var/named"; /*
* If there is a firewall between you and name servers you want
* to talk to, you might need to uncomment the query-source
* directive below. Previous versions of BIND always asked
* questions using port 53, but BIND 8.1 uses an unprivileged
* port by default. */
// query-source address * port 53; };
//
// a caching only name server config //
controls {
inet 127.0.0.1 allow { localhost; } keys { rndckey; };
};
zone "." IN { type hint; file "named.ca"; };
zone "localhost" IN { type master;
file "localhost.zone"; allow-update { none; }; };
zone "0.0.127.in-addr.arpa" IN { type master;
file "named.local";
allow-update { none; }; };
//
// These zones are for MSN IM traffic //
zone "messenger.hotmail.com" IN { type master;
file "messenger.hotmail.com.zone"; allow-update { none; };
}; //
// These zones are for AOL IM traffic //
zone "login.oscar.aol.com" IN { type master;
file "login.oscar.aol.com.zone"; allow-update { none; };
};
zone "toc.oscar.aol.com" IN { type master;
file "toc.oscar.aol.com.zone"; allow-update { none; };
};
zone "aimexpress.aol.com" IN { type master;
file "aimexpress.aol.com.zone"; allow-update { none; };
}; //
// This zone is for ICQ IM traffic //
zone "login.icq.com" IN { type master;
file "login.icq.com.zone"; allow-update { none; }; };
//
// These zones are for Yahoo IM traffic //
zone "scs.msg.yahoo.com" IN { type master;
file "scs.yahoo.com.zone"; allow-update { none; }; };
zone "scsa.msg.yahoo.com" IN { type master;
file "scsa.yahoo.com.zone"; allow-update { none; }; };
zone "scsb.msg.yahoo.com" IN { type master;
file "scsb.yahoo.com.zone";
allow-update { none; }; };
zone "scsc.msg.yahoo.com" IN { type master;
file "scsc.yahoo.com.zone"; allow-update { none; }; };
include "/etc/rndc.key";
Figure 20: Sample Named.Conf File
$TTL 86400
@ 1D IN SOA @ root (
2 ; serial (d. adams)
3H ; refresh
15M ; retry
1W ; expiry
1D ) ; minimum
@ IN NS 192.168.1.2 @ 1d IN A 192.168.1.100
Figure 21: Sample Zone File (Standard)
$TTL 86400
@ 1D IN SOA @ root (
2 ; serial (d. adams)
3H ; refresh
15M ; retry
1W ; expiry
1D ) ; minimum
@ IN NS 192.168.1.2 @ 1d IN A 192.168.1.100 scs 1d IN A 192.168.1.100 scsa 1d IN A 192.168.1.100 scsb 1d IN A 192.168.1.100 scsc 1d IN A 192.168.1.100
Figure 22: Sample Zone File (Specific for Yahoo IM)