ExCEL Management System (EMS)
User Guide v1.0
Table of Contents
Setting Up Activities
Add Activity
3
Naming Activities
4-5
General Info Page
6
Edit Schedule
7
Setting the Service Term
8
Participants and Staff
Staff Information
9
Assign Student (Summer Only)
10
Enrollment
Enrollment
11-12
Enrollment: by Single Student
13-14
Edit Enrollment: by Activity
15
Edit Enrollment: by Student
16-17
Edit Enrollment: Re-enroll by Activity
18
Enrollment: Query Tool: General
19
Enrollment: Query Tool: Activity
20
Linking Activities: Groups
21-23
Attendance Collection Tools
Attendance Collection Tools
24
SFUSD ExCEL Daily Sign In Sheet
25
Optional—Multi-Day Attendance Sheet
26
Inputting Attendance
Group Activities
27
By Group
28
Group Activities:
Add Activity
From the Group Activi-ties Section Select the Add Activity tab
Insert the name of the activity us-ing the ExCEL standardized format. For more information on how to input in the proper format refer to page 4.
Fig 3.1
Mark one category that best describes the activity. Most activities will fit within the first three options.
Only fill this out if the indi-vidual activity intentionally targets a given student population. Mark all that apply.
Mark all subject areas that apply.
This option is for High School Programs ONLY and is not visible to K-8 pro-grams.
Group Activities:
Naming Activities
Naming Activities:
1. Group— A group can be defined by a student created Name (Happy Chickens), a staff person (Bill), grade level (1st, 2nd/3rd)
2. Activity Time— Identify the start and end time of the activity. (This will have them populate chronologically. See Fig 4.1) 3. Activity Name— Define the activity by type (Academics, Enrichment, Recreation) or activity (Skateboarding, Cooking) 4. Days of Week– Indicate which days of the week the activity meets so that “at a glance” it is obvious that the full schedule
is entered into EMS.
5. Year (“12-13” for school year; “Summer 2013” for summer)
Fig 4.1
The SFUSD demosite is available for all sites to practice any function of the EMS. To access the demosite go to:
https://www.youthservices.net/sfusd/index.asp
Username: sfusd Password: demosite
When Do I Create a New and Separate Activity?
A new group activity must be created if any of the following circumstances are met:
1. A group of youth meets with a new Program Leader.
2. A group of youth begins a different activity component.
Why Do I Need To Create Separate Activities?
Activity level data is reported to the California Department of Education (CDE). The goal is
to report to the CDE that each student on average has attended three components: one
Academic activity, one Enrichment activity and one Recreation activity each day.
The way ExCEL captures this data and the way EMS has been created is to capture this via
activities.
Group Activities:
Naming Activities
Group Activities
:
General Info Page
Ensure that you input under all editable fields.
1. Activity Type: Only High Schools may count an activity as Drop In.
2. 21C Category: Mark one category that best de-scribes the activity.
3. 21C Student Population(s) Targeted: Only fill this out if the individual activity intentionally targets a given student population. Mark all that apply.
4. 21C Subject Area(s): Mark all subject areas that ap-ply.
5. Schedule: Every activity must have a schedule. For guidance on how to edit the schedule please refer to page 6.
6. Staff: Assign at least one Lead Staff person. Assign a minimum of one staff for every 20 youth.
Fig 6.1
It is expected that ALL STAFF people are entered into the EMS including teachers and volunteers.
1. Staff must be added prior to assigning them to an activity. To do so under the Participants & Staff section click on the “Add Person” tab in the top right corner.
2. Assign a staff type. Most CBO Program Leaders are “Youth Development Staff”.
3. Employment Type. Identify if the staff person is paid or a volunteer.
Fig 6.2
Adding Staff:
Once you have added staff refer to page 9 for inputting staff information like TB test and Criminal Background Check dates.
Group Activities:
Edit Schedule
For “Multiple Dates” Refer to figure 7.3.
1. Set the begin date (Step 1) and an end date (Step 2) of the activity. Activities can be year long, se-mester based, tied to the grading period or just a few weeks.
2. Select the Begin and End times for each day that the activity meets (Step 3). Activity times can be set on the quarter hour. Activities should be set to maximize the actual instruction time and leave no gaps. In the example above program begins at 1:50pm, so all activities should start at 1:45pm. 3. When you have finished click the yellow “Add
Mul-tiple Dates” tab (Step 4).
Fig 71
Fig 7.2
Fig 7.3
For “Single Date” Refer to figure 7.2. 1. Set the date (Step 1).
2. Enter the Begin time (Step 2) and End time (Step 3) the activity. Activity times can be set on the quarter hour. Activities should be set to maximize the actual instruction time and leave no gaps. 3. When you have finished click the yellow “Add
Sin-gle Date” tab (Step 4).
Select to add either Multiple dates or a Single Date. (Fig 7.1)
If you have a 21st Century Supplemental or AS-SETS grant do not assign activities to the week-end (Saturday/Sunday) or intersession (Spring Break) without first getting approval from your ExCEL District Coordinator. Activities that are not approved will be deleted.
Utilities:
Setting the Service
Setting the service term will define the activities you see under Group Activities in both the “View Activities” (Fig 8.2) and “View By Date” (Fig 8.4) tabs. All other activities are archived.
1. To set the Service Term click on the Utilities Tab on the left hand side.
2. Click on “Set Service Term”. 3. Enter the Begin Date (Step 1) 4. Enter the End Date (Step 2)
5. Click the yellow tab “Set Term” (Step 3).
To see activities that are not in the current ser-vice term use the drop down box in the upper right hand corner in “View Activities” and “View By Date”.
Click on “ALL” This will allow you to see all previ-ous activities (Fig 8.3) under “View Activities” or see all past dates of service (Fig 8.5) under “View By Date”.
Fig 8.1
Fig 8.2
Fig 8.3
Participants & Staff:
Staff Information
All staff must be entered in to the EMS system. There are several required fields that must be input into their file.
The first fields are covered on page 6 under “Adding Staff” (see fig 6.2). For the other required fields see figure 9.1
1. All staff must be finger printed and receive a negative result on a tuberculosis test. (Sites are not responsible for inputting this information for Youth volunteers and District staff)
2. When your staff have cleared fill in the check box for “Yes” next to “Finger Print Clearance” and “TB Clearance”.
3. Then input the date of the clearance for both Finger Printing and TB Testing.
4. All staff must have a Start and End date. Staff should not start prior to TB and FP clearance. The End Date should be the end of the current service term.
5. To enter dates, either type in the date OR click on the calendar graphic next to the field and click on the ap-propriate date.
6. When you are finished click on the yellow “Save” button
Fig 9.1
Expiration Dates:
TB test results are valid for 4 years.
Criminal Background Checks have no expiration.
Fig 9.2
Participants & Staff:
Assign Student (Summer Program ONLY)
To accommodate SB 429, the law which allows Summer Supplemental programs to operate 6 hours AND allow K-8 youth from the entire district to participate in any K-8 ASES or 21st Cen-tury program, Cityspan has created the “Assign Student” tab.
Info needed to Assign Student:
In order to find an SFUSD student that does not attend the host school site the following information is necessary:
1. The youth’s Date of Birth OR H0#
2. The youth’s legal First Name (nicknames will not work) 3. The youth’s Last Name
Click on the yellow “Find Person” tab. All youth that fit the description should appear below with a Home School, Grade and list an Action.
To Assign the youth click on the BLUE underlined ASSIGN button.
This youth will now be available to enroll into youth ExCEL Summer Program.
Fig 10.1
Partial names CAN work. For exam-ple, if you are looking for Peter Parker you can put “pe” in the first name section and “pa” in the last name sec-tion and you should be able to get a match.
Group Activities
:
Enrollment
When enrolling youth,
1. Start by clicking on an activity.
2. From there click on the Enrollment yellow tab. If you have not enrolled any youth into this activity the screen will look like figure 11.1. 3. Click on the blue line “click here to enroll new
participants”. You will be directed to step 1 (figure 11.2).
From figure 11.2 there are several options for searching for youth:
1. You can type in the first or last name of a youth
2. OR you can click on the letter of their last name.
3. OR you can input a single letter or part of their first or last name (for instance, you can input “r” in last name and if an “r” appears anywhere within a youth’s last name, they will appear on your list) 4. If you would like to see a list of ALL
youth who attend your school, click on ALL and you will see an alphabetical list of all youth with a check box next to their name.
5. When viewing multiple youth at once, check all youth that you would like to enroll and click on the yellow tab “Next Step”.
Fig 11.1
Fig 11.2
In Step 3 (Figure 12.1)
1. You will be asked to identify the start date within this activity for each youth. It will automatically assign the first day of the activity (in this example, Tuesday, June 19th).
2. If you need to adjust the start date, enter it into the box next to the youth’s name in OR click on the calendar icon.
3. Once you have completed entering start dates (if different from the first day of program) click on the yellow “Next Step” tab.
Fig 12.1
Fig 12.2
In Step 4 (Figure 12.2)
1. You will be asked to rectify any schedule conflicts.
2. If you would like to disregard the conflict check the box next to a youth’s name.
3. Otherwise, the system will NOT allow youth to be enrolled in two or more activities at the same time.
4. When you are finished, click on the yellow “Next Step” tab and your ac-tivity will have enrollment.
Group Activities
:
Enrollment By Single Student
EMS allows you to enroll an individual youth into one or more programs at once. This can be very useful when you have a new student enroll in your program or when you need to change a individual youth’s schedule.
1. From the “Participant & Staff” tab click on “Youth Participants”. This will bring you to the view in figure 13.1.
2. Enter the name of the new youth OR
3. Select the youth you wish to en-roll into one or more programs. (Fig 13.2)
4. You will be directed to the Stu-dent’s file. (Fig 13.3)
5. Click on the yellow “Enrollment” tab.
6. You will be directed to Figure 13.4. If the youth is already en-rolled in activities a list will ap-pear below the Activities bar. 7. To enroll the youth in new
activi-ties click on the yellow “Add Ac-tivity” button.
Continue to the next page...
Fig 13.1
Fig 13.2
Fig 13.4 Fig 13.3
Group Activities
:
Enrollment By Single Student
Continuing from page 13… 8. Select the name of the activity or activities that you wish to enroll the youth into by checking the box next to the ac-tivity name. (Fig 14.1) 9. Click the yellow “Enroll”
button. (Fig 14.1) 10. You will be prompted to
set the start date. (Fig 14.2)
11. Once you have deter-mined the start date click on the yellow “Enroll” button. (Fig 14.2)
12. You will be brought back to the Participant Enrollment Screen where the activity or activities you added should be visible. 13. To repeat this process
for another youth please refer back to page 13 and repeat steps 1-13.
Fig 14.1
Fig 14.2
Group Activities
:
Edit Enrollment By Activity
To edit a student’s enrollment in an individual activity
1. Start by going to that activity under the Group Activities tab.
2. Click on Enrollment and select the edit but-ton near the youth who needs a change. 3. You will be brought to Enrollment History
(figure 15.2) for the youth. Read the direc-tions to understand how best to proceed. A. If you click on “edit” you will be brought
to figure 15.3. Detailed directions on this page will guide you on how to proceed. Editing allows you to DROP A YOUTH FROM ONE OR MORE ACTIVITIES WITH-OUT LOSING DATA.
B. To see how to reenter a student into an activity go to page 18.
C. If you click on “Un-enroll” you will be brought to figure 15.4, Delete Enroll-ment History. This will inform you of any potential data loss prior to the deletion of enrollment. Un-enrolling will DELETE A YOUTH’S RECORDS.
Edit
Un-enroll
Fig 15.1
Fig 15.2
Group Activities
:
Edit Enrollment By Student
When a student is dropped from an activity, data may or may not be lost depending on the scenario.
For example, Erica Claremont is enrolled in “Foggy Bottoms 3:00-4:00 Gymnastics Th 12-13”, but she never attended the activity. Dropping her from “Foggy Bottoms 3:00-4:00 Gymnastics Th 12-13” will take her out of that activity and no data will be lost. In another example, if Erica is enrolled in “Jumping Jacks 1:45-6:00 Freestyle Friday F 12-13” and participated until October, she can be dropped after her last day attended and no data will be lost.
Data WILL be LOST if Erica Claremont is en-rolled in “Miracle Workers 1:45-3:00 Snack/ Recreation M-Th 12-13” and she attended from 8/20/12 through 5/24/12, attendance was entered for her on those days AND she is dropped on from 1/8/13. All data from 1/8/13 on will be LOST.
If you need to adjust the enrollment of a single youth follow the steps below. 1. Under “Participants and Youth” go to
“Youth Participants”.
2. Find the youth whose enrollment you wish to adjust. (Fig 16.1)
3. From the individual youth’s click on the yellow “Enrollment” tab. (Fig 16.2) 4. You will see a list of all the activities
that youth is enrolled in. (Fig 16.3) 5. Click on the yellow “Bulk Drop” button
(Fig 16.3)
Dropping and Data Loss
Fig 16.1Fig 16.2
Group Activities
:
Edit Enrollment By Student
6. From the Bulk Drop menu (Fig 17.1) indicate the first day in which the youth will no longer be counted, and therefore dropped, from one or more activities.
7. Click the yellow “Next Step” button (Fig 17.1)
8. A list of all the activities will be listed. Only Current Term activities will be available to drop. This is to prevent you from dropping a youth from a pre-vious semester or summer activity. (Fig 17.2)
9. Check off all activities that you wish to drop the youth from. (Fig 17.2)
10. Click the yellow “Drop Selected” button (Fig 17.2)
11. You will then be prompted to confirm the drop in figure 17.3. A highlighted section will show you of any potential data loss.
12. Click the yellow “Confirm Drop” button. (Fig 17.3)
Activities from different terms will be faded and no changes may be made to them.
Activities are listed in yellow highlight with any potential data records listed. In this case “0”. If you attempt to delete locked data they will appear in gray and you will not be allowed to make changes.
If you need to change, edit or delete locked data contact your District Co-ordinator to unlock the necessary month’s data.
Fig 17.1
Fig 17.2
Group Activities
:
Edit Enrollment Re-Enroll BY Activity
If you find that you need to Re-enroll a youth into a particular activity (For exam-ple, you dropped them during track sea-son and now they are ready to come back) then follow these steps to add them back to an activity.
This can only be done by activity.
1. From the Group Activities tab, click on an activity and then click on the yel-low “Enrollment” activity (Fig 18.1) 2. A list of all youth will be visible.
Dropped youth will appear at the bot-tom in gray. Click the blue “edit” but-ton next to the name of the youth you wish to re-enroll. (Fig 18.1)
3. You will be brought to the Enrollment History of that activity for the se-lected student. In the “Re-enroll Date” box enter the date you wish the youth to restart the activity. (Fig 18.2)
4. Click the blue “Re-enroll” button. (Fig 18.2)
5. The “Enrollment History” will be up-dated to reflect the new “start date” (Fig 18.3).
Fig 18.1
Fig 18.2
Group Activities
:
Enrollment: Query Tool: General Search
If you wish to narrow your search, you can specify which fields you wish to use in your search by grade level, gender, age, or any number of fields.1. Click on the yellow “Use Query” button.
2. Select your criteria and click on the yellow “Find Person” tab. A list of youth will show up with a total number in the top right corner (figure 19.3).
3. Hit the yellow “Return” tab.
You will be brought back to the main page of the query tool, but the blue in the top right corner will now say “Selected Persons:” and the number from your original search.
3. If you are happy with the selection click “Return” again. If not, revise your search repeating steps 1 and 2.
Once the query tool is set to a group of youth, it will not change until you reset it or until you log out.
The query search can be used both in enrollment and in
Fig 19.1
Fig 19.2
Fig 19.3
20
You can also use the Query Tool to copy the enrollment of one or more activities. To do this:
1. Click on the “Click to edit field” (Fig 20.1) button next to Activity Name.
2. Check off the box next to the activity whose enrollment data you wish to dupli-cate (Fig 20.2).
3. Click the yellow “Return” tab (Fig 20.2).
Group Activities
:
Enrollment: Query Tool: Activity Name
Fig 20.1
Fig 20.2
Fig 20.3
This will take you back to the main query screen (Fig 19.2 on page 19). 4. Click the yellow “Find Person” tab. 5. A list of youth will appear on your
screen with the number of youth selected (Fig 20.3).
6. Click the yellow “Return” tab (Fig 20.3).
7. You will return to the main Query Tool page (magnified in Fig 20.4). 8. If you are happy with your
selec-tion, click the yellow “Return Tab”(Fig 20.4)
9. If you are unhappy with your selec-tion revise your search by repeating steps 1 through 7.
Group Activities
:
Linking Activities:
Groups
To create a new Group in order to link multiple activities:
1. In the group activities section click on the yellow “View Groups” tab.
2. Click on the yellow “Add Group” tab.
You will be brought to the “Create Group” window.
3. Name the group.
4. Provide a description of the group. 5. Click the yellow “Create” button
From here, you can add youth OR activities to the group. Once youth are enrolled in the group they will be enrolled in any activity that is added to the group.
6. Click on “Click Here to Link Partici-pants.”
7. To link activities first go to page 23. Many programs organize the programs so that all 1st graders stick together all day while they meet the 3 ExCEL required areas of Academics, Enrichment and Recreation. EMS allows you to create the individual activities and then link them so that you can:
1. Enroll youth ONCE into a group. All linked activities will automatically be enrolled with these youth. 2. Take attendance ONCE daily by group.
To utilize this feature follow the steps below.
You will be brought to the “Link Participants” screen. You may enroll youth in several ways: 8. Input one youth at a time by using the First
Name or Last Name search.
9. Click on the letter of the last name of the youth.
10. Click on “ALL” to view all youth in your school
Fig 21.1
Fig 21.2
Fig 21.3
In this example a search was made by an individual’s last name (Barker). All youth with the name “Barker” will ap-pear below. Select the individual(s) by checking the box next to their name and click “Link Selected Participants”.
In this example a search was made by searching by the Last Name Initial “R”. Clicking on the “R” will show all youth with an R last name below. Select individual(s) us-ing the check box next to their name and click “Link Se-lected Participants”.
You will be brought to the Confirm Link screen below.
Group Activities
:
Linking Activities: Groups
You can link participants first OR activities first. It is up you. To see how to link activities, skip to page 23.
Note
Fig 22.1
Fig 22.2
From within your new group, click on the “Activities” tab and click the yel-low “Add” button.
1. You will see a list of all the activities that you have already created. 2. At this point if you have not yet
cre-ated activities, go back to the main “Group Activities” tab on the left of the screen. Follow the directions on pages 3 through 7 of this User Guide.
3. If you have already created all of your activities, check off the names of the activities that you wish to link to your group and click “Link Se-lected Activities”.
The final step to link activities in your new group is to confirm the start date for each activity.
You will have three choices: 1. Choose “today’s date”
2. Set the dates to the first date of each activity (beginning of each activity)
3. Manually enter a date in the box to the right of the activity.
Group Activities
:
Linking Activities: Groups
Fig 23.1
Fig 23.2
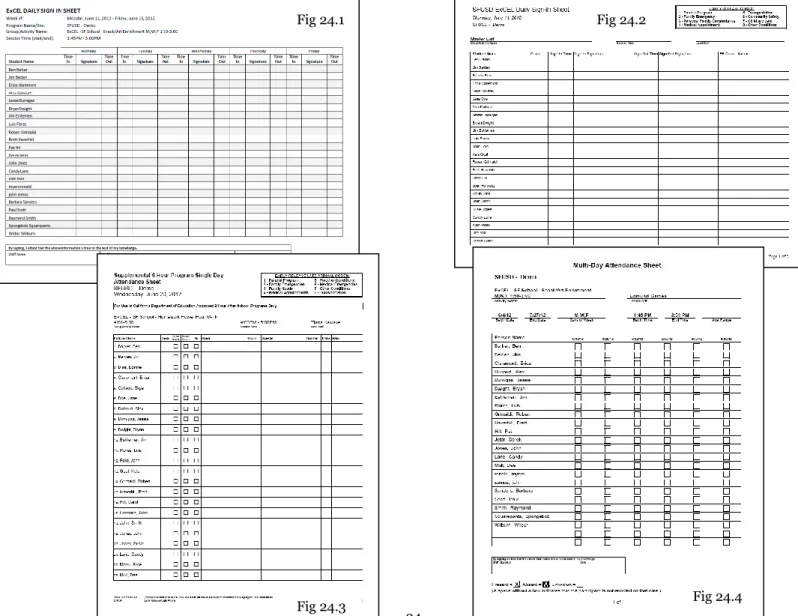
Reports:
Attendance Collection Tools
Elementary, Middle School and K-8 Sites:
For School Term Daily Sign In/Out use: SFUSD ExCEL Daily Sign-In Sheet (Fig 24.2) For 6 Hour Supplemental Program use: Supplemental 6 Hour Program Single Day
Atten-dance Sheet (Fig 24.3)
For 3 Hour Supplemental Program and ExCEL Approved Intercession use: SFUSD ExCEL Daily Sign-In Sheet (Fig 24.2)
OPTIONAL For tracking youth from activity to activity use: Multi-Day Attendance Sheet (Fig 24.4)
High School:
Daily Sign In/Out use: SFUSD ExCEL High School Sign-In Sheet (Fig 24.1) Summer and Intercession: SFUSD ExCEL High School Sign-In Sheet (Fig 24.1)
Fig 24.1 Fig 24.2
Reports:
Attendance Collection Tools
In the example above, clicking on SFUSD ExCEL Daily Sign-In Sheet (Fig 25.1) will bring you to Figure 25.2 where you can customize the sign in sheet.
1. Input the day and then choose how to sort the pages.
2. In this example by choosing “Alphabetical” the one day Sign-In sheet will display all youth enrolled that day in alphabetical order. 3. In “Add Blank” it says “5”, so at the last page of the Master list (Fig 25.4) there are 5 blank slots for new students to write in their
name.
To have youth sign in by an individual activity Sign In sheet: 1. Be sure to choose Activity under Sort Pages By in figure 25.2.
2. This will list all daily activities arranged alphabetically AND by the time of the activity sessions. Sites can also choose to have youth sign in/out by grade level.
1. To do this, check the Grade box in the Sort Pages By section in figure 25.2. Fig 25.1
Fig 25.2
Fig 25.3 Fig 25.4
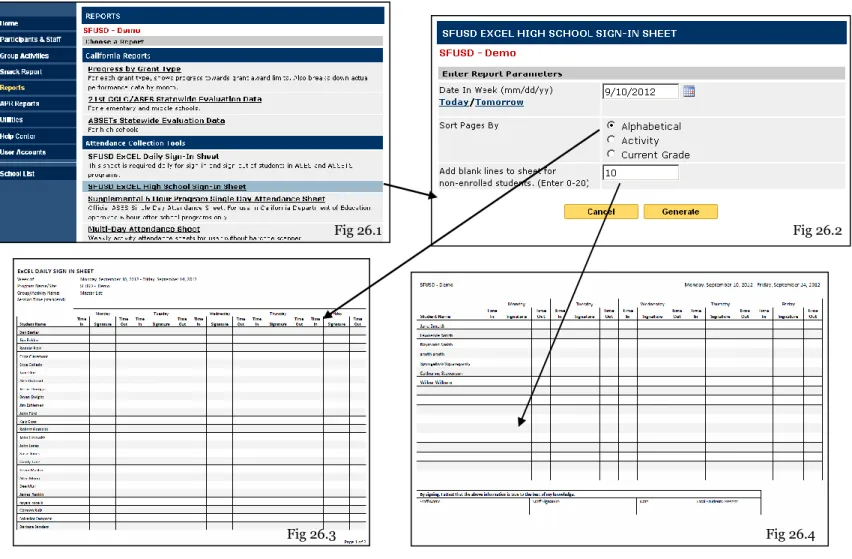
Reports:
Attendance Collection Tools
SFUSD ExCEL High School Sign In
This process is almost identical to that on page 25.
In the example above, clicking on SFUSD ExCEL High School Sign-In Sheet (Fig 26.1) will bring you to Figure 26.2 where you can customize the sign in sheet.
1. Input the day and then choose how to sort the pages.
2. In this example by choosing “Alphabetical” the weekly Sign-In sheet will display all youth enrolled in any activity that week in alphabeti-cal order.
3. In “Add Blank” it says “10”, so at the last page of the Master list (Fig 26.4) there are 10 blank slots for new students to write in their name.
To have youth sign in by an individual activity Sign In sheet: 1. Be sure to choose Activity under Sort Pages By in figure 26.2.
2. This will list all daily activities arranged alphabetically AND by the time of the activity sessions. Sites can also choose to have youth sign in/out by grade level.
1. To do this, check the Grade box in the Sort Pages By section in figure 26.2.
Fig 26.1 Fig 26.2
Reports:
Attendance Collection Tools
OPTIONAL—Multi-Day Attendance Sheet
This sheet CANNOT be used as a daily sign in sheet, but rather the Multi-Day Attendance Sheet allows sites to track youth across different activities in one or more days.
In Figure 26.1 the begin date is a Monday, with 8 days covered for the Homework Power Hour activity, which meets Monday though Thursday. Generating this sheet will provide a two week tracking sheet for this activity as seen in figure 26.2
Tracking Sheet:
Fig 26.1
Fig 26.2
1. Staff can use this sheet to check off students who are transferring from another ac-tivity.
2. Site Coordinators can collect this data to input individual activity attendance and to ensure that youth are not leaving program.
3. This report can also be used after attendance has been taken. It will print an “X” for the days when students were present and an “A” for absent.
There are two ways to take attendance for the entire program so that you only input once for each child. Both require you to be in the Group Activities tab. 1. Click on “View Groups” 2. Click on “View by Date”
For “View Groups”
1. Click on the name of the group for which you wish to take attendance (fig 27.2).
2. Click on the day for which you wish to take attendance (fig 27.3).
3. Continue on page 28
For “View By Date”
1. Click on the date for which you wish to take attendance (fig 27.4).
2. Continue on page 29 Attendance is due AND the system will
lock on the 5th of every month, unless otherwise noted by the ExCEL office.
It is recommended that sites input at-tendance within EMS daily. This will help catch possible errors and ensure that the site is maintaining the proper Average Daily Attendance. Inputting Daily will also help prevent spending hours in-putting attendance at the last minute.
Best Practice:
Inputting Attendance: Group Activities
Fig 27.1
Fig 27.2
Fig 27.3
When taking attendance under Group ac-tivities you will have four options for mark-ing students present:
1. The yellow “All Present Tab”.
2. The downward facing, green “Mark all present for the service” arrow. 3. The right facing, green “Mark all
pre-sent for the participant” arrow. 4. Check the box in the left column for
the activity that a youth is present.
You will have three options for marking youth absent:
1. The downward facing, red “Mark all absent for service” arrow.
2. The right facing, red “Mark all absent for the participant” arrow.
3. Check the box in the right column for the activity that a youth is absent.
When you have completed taking atten-dance for an individuial group click on the yellow “SAVE” button.
Inputting Attendance: By GROUP
Fig 28.1
When a youth is marked present or absent from this View By Date screen, they will be present or absent for the whole day.
To aide in attendance taking, staff can use the yellow “All Present” button and then only mark those youth that were absent OR conversely staff can use the yellow “All Absent” buttons and then only mark those youth that were present.
You can choose to sort by Participant Name, Activity Name or Grade Level.
In all three sort options students will be listed al-phabetically by last name. For Activity Name and Grade level sorting, there will be no visible sepa-ration in the list. Rather, breaks will be denoted by changes in alpha-betization (ie, sud-denly Watson is followed by Abad.) This is not always obvious as some-times the first youth in an activ-ity or grade has a last name with a B or C.
Inputting Attendance: View By Date
Be sure to SAVE when you are done.