Installing and Configuring VMware
Identity Manager
VMware Identity Manager 2.6
This document supports the version of each product listed and
supports all subsequent versions until the document is
replaced by a new edition. To check for more recent editions
of this document, see
http://www.vmware.com/support/pubs
.
You can find the most up-to-date technical documentation on the VMware Web site at: http://www.vmware.com/support/
The VMware Web site also provides the latest product updates.
If you have comments about this documentation, submit your feedback to: [email protected]
Copyright © 2013 – 2016 VMware, Inc. All rights reserved. Copyright and trademark information.
VMware, Inc. 3401 Hillview Ave. Palo Alto, CA 94304 www.vmware.com
About Installing and Configuring VMware Identity Manager 5
1
Preparing to Install VMware Identity Manager 7
System and Network Configuration Requirements 9 Preparing to Deploy VMware Identity Manager 12
Create DNS Records and IP Addresses 12
Database Options with VMware Identity Manager 13 Connecting to Active Directory 13
Deployment Checklists 13
Customer Experience Improvement Program 15
2
Deploying VMware Identity Manager 17
Install the VMware Identity Manager OVA File 17 (Optional) Add IP Pools 19
Configure VMware Identity Manager Settings 19
Setting Proxy Server Settings for VMware Identity Manager 25 Enter the License Key 25
3
Managing Appliance System Configuration Settings 27
Change Appliance Configuration Settings 28 Connecting to the Database 28
Configure a Microsoft SQL Database 28 Configure an Oracle Database 29 Configure a PostgreSQL Database 31
Add an External Database to the VMware Identity Manager Appliance 32 Using SSL Certificates 33
Apply Public Certificate Authority 34 Adding SSL Certificates 35
Modifying the VMware Identity Manager Service URL 35 Modifying the Connector URL 36
Enable the Syslog Server 36 Log File Information 37
Collect Log Information 37 Manage Your Appliance Passwords 38
Editing the domain_krb.properties file 44 Troubleshooting domain_krb.properties 45
Managing User Attributes that Sync from Active Directory 45 Select Attributes to Sync with Directory 46
Joining a Domain 47
Configure Active Directory Connection to the Service 47
5
Advanced Configuration for the VMware Identity Manager Appliance 53
Using a Load Balancer to Enable External Access to the VMware Identity Manager 53 Apply VMware Identity Manager Root Certificate to the Load Balancer 55 Apply Load Balancer Root Certificate to VMware Identity Manager 56 Deploying Access Point for Reverse Proxy 56
Setting Proxy Server Settings for VMware Identity Manager 57 Configuring Redundancy 57
Configuring Failover and Redundancy 57
Enabling Directory Sync on Another Instance in the Event of a Failure 61 Adding a Directory After Configuring Failover and Redundancy 62
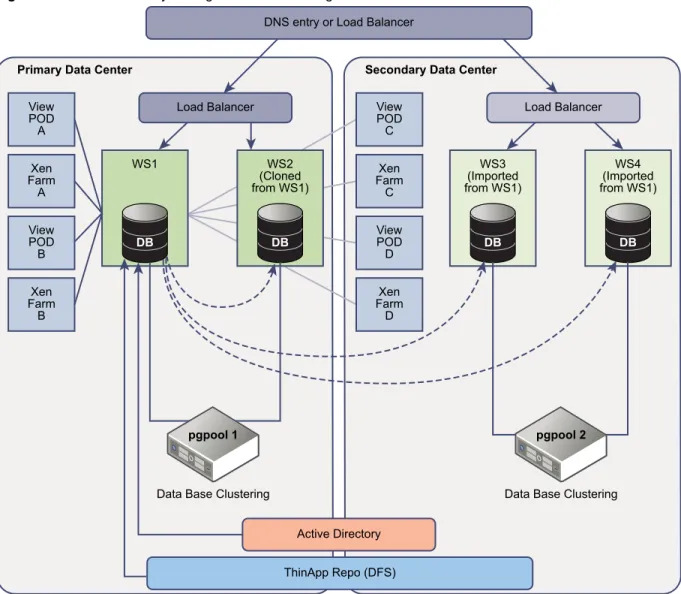
Deploying VMware Identity Manager in Secondary Data Center with Active-Active Read-Only Capability 63
Setting Up a Secondary Data Center 64
6
Installing Additional Connector Appliances 69
Generate Activation Code for Connector 70 Deploy the Connector OVA File 70 Configure Connector Settings 71
7
Preparing to Use Kerberos Authentication on iOS Devices 73
Pre- KDC Configuration Decisions 73
Initialize the Key Distribution Center in the Appliance 74 Creating Public DNS Entries for KDC with Built-in Kerberos 75
VMware Identity Manager
Installing and Configuring VMware Identity Manager provides information about the installation and
configuration process for the VMware Identity Manager appliance. When the installation is finished, you can use the administration console to entitle users to managed multi-device access to your organization's applications, including Windows applications, software as a service (SaaS) applications, and View desktops. The guide also explains how to configure your deployment for high availability.
Intended Audience
This information is intended for administrators of VMware Identity Manager. The information is written for experienced Windows and Linux system administrators who are familiar with VMware technologies, particularly vCenter™, ESX™, vSphere®, and View™, networking concepts, Active Directory servers, databases, backup and restore procedures, Simple Mail Transfer Protocol (SMTP), and NTP servers. SUSE Linux 11 is the underlying operating system for the virtual appliance. Knowledge of other technologies, such as VMware ThinApp® and RSA SecurID is helpful if you plan to implement those features.
Preparing to Install
VMware Identity Manager
1
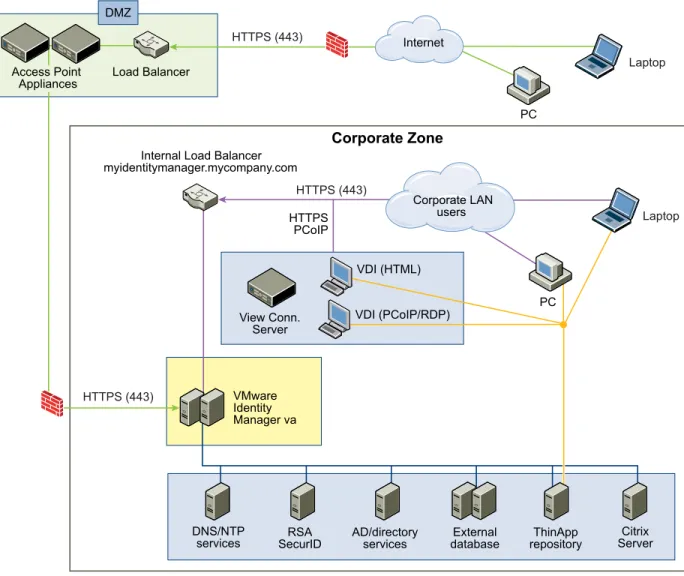
The tasks to deploy and set up VMware Identity Manager require that you complete the prerequisites, deploy the VMware Identity Manager OVA file and complete the setup from the VMware Identity Manager Setup wizard.
Figure 1‑1. VMware Identity Manager Architecture Diagram for Typical Deployments Laptop PC Laptop PC HTTPS (443) HTTPS (443) DMZ HTTPS (443) Corporate Zone VDI (HTML) VDI (PCoIP/RDP) VMware Identity Manager va Internet VMware Identity Manager FQDN: myidentitymanager.mycompany.com
Internal Load Balancer myidentitymanager.mycompany.com HTTPS PCoIP View Conn. Server DNS/NTP
services SecurIDRSA AD/directoryservices databaseExternal repositoryThinApp ServerCitrix Load Balancer
Corporate LAN users Access Point
Appliances
NOTE If you plan to enable certificate or smart card-based authentication, use the SSL pass-through setting
at the load balancer, instead of the terminate SSL setting. This configuration ensures that the SSL handshake is between the connector, a component of VMware Identity Manager, and the client.
This chapter includes the following topics:
n “System and Network Configuration Requirements,” on page 9 n “Preparing to Deploy VMware Identity Manager,” on page 12 n “Customer Experience Improvement Program,” on page 15
System and Network Configuration Requirements
Consider your entire deployment, including how you integrate resources, when you make decisions about hardware, resources, and network requirements.
Supported vSphere and ESX Versions
The following versions of vSphere and ESX server are supported:
n 5.0 U2 and later n 5.1 and later n 5.5 and later n 6.0 and later
VMware Identity Manager Virtual Appliance Requirements
Ensure that the resources allocated to the virtual appliance meet the minimum requirements.
Component Minimum Requirement
CPU 2
Random-access memory 6GB
Disk space 36GB
Database n A PostgreSQL database is included in the VMware Identity Manager
virtual appliance, and you can use an external database server. For information about specific database versions and service pack
configurations supported with VMware Identity Manager, see the VMware Product Interoperability Matrix at
http://www.vmware.com/resources/compatibility/sim/interop_matrix.php.
n External database sizing information: 64GB for first 100,000 users. Add
20GB for each additional 10,000 users.
n Storage: 32GB
Network Configuration Requirements
Component Minimum Requirement
DNS record and IP address IP address and DNS record
Firewall port Ensure that the inbound firewall port 443 is open for users outside the network to the VMware Identity Manager instance or the load balancer.
Reverse Proxy Access Point 2.6 supports reverse proxy functionality to allow users to securely access VMware Identity Manager unified catalog remotely. Access Point can be deployed in the DMZ behind the load balancers front-ending the VMware Identity Manager appliance.
Port Source Target Description
443 Load Balancer VMware Identity Manager
virtual appliance HTTPS 88 Load Balancer VMware Identity Manager
virtual appliance TCPPort used for Kerberos traffic from iOS devices to the Built-in KDC. 443 VMware Identity Manager
virtual appliance VMware Identity Managervirtual appliance HTTPS
443 Browsers VMware Identity Manager
virtual appliance HTTPS 443 VMware Identity Manager
virtual appliance vapp-updates.vmware.com Access to the upgradeserver. 8443 Browsers VMware Identity Manager
virtual appliance Administrator PortHTTPS 25 VMware Identity Manager
virtual appliance SMTP TCP port to relay outboundmail 389, 636, 3268, 3269 VMware Identity Manager
virtual appliance Active Directory Default values are shown.These ports are configurable. 445 VMware Identity Manager
virtual appliance VMware ThinApprepository Access to ThinApprepository 5500 VMware Identity Manager
virtual appliance RSA SecurID system Default value is shown. Thisport is configurable 53 VMware Identity Manager
virtual appliance DNS server TCP/UDPEvery virtual appliance must have access to the DNS server on port 53 and allow incoming SSH traffic on port 22
88, 464, 135 VMware Identity Manager
virtual appliance Domain controller TCP/UDP TCP: 9300-9400
UDP: 54328
VMware Identity Manager
virtual appliance VMware Identity Managervirtual appliance Audit needs 5432 VMware Identity Manager
virtual appliance Database The PostgreSQL default portis 5432. The Oracle default port is 1521
389, 443 VMware Identity Manager
virtual appliance View server Access to View server
Hardware Requirements for ESX Server
Ensure that the environment for the host and the vSphere instance that runs the VMware Identity Manager virtual appliance meets the minimum hardware requirements. Storage requirements vary per deployment based on the number of users.
NOTE You must turn on time sync at the ESX host level using an NTP server. Otherwise, a time drift will
occur between the virtual appliances.
If you deploy multiple virtual appliances on different hosts, consider disabling the Sync to Host option for time synchronization and configuring the NTP server in each virtual appliance directly to ensure that there is no time drift between the virtual appliances.
Component Minimum Requirement
Processor 2 Intel Quad Cores, 3.0GHz, 4MB Cache RAM 16GB DDR2 1066 MHz, ECC and registered On-board LAN One 10/100/1000Base-TX port
Storage 500GB
Active Directory
Active Directory on Windows 2008, 2008 R2, 2012, and 2012 R2 is supported.
Supported Web Browsers to Access the Administration Console
The VMware Identity Manager administration console is a Web-based application you use to manage your tenant. You can access the administration console from the following browsers.
n Internet Explorer 11 for Windows systems
n Google Chrome 42.0 or later for Windows and Mac systems n Mozilla Firefox 40 or later for Windows and Mac systems n Safari 6.2.8 and later for Mac systems
NOTE In Internet Explorer 11, JavaScript must be enabled and cookies allowed to authenticate through
VMware Identity Manager.
Supported Browsers to Access the User's My Apps Portal
End users can access the user apps portal from the following browsers.
n Mozilla Firefox (latest) n Google Chrome (latest) n Safari (latest)
n Internet Explorer 11 n Microsoft Edge browser
n Native browser and Google Chrome on Android devices n Safari on iOS devices
NOTE In Internet Explorer 11, JavaScript must be enabled and cookies allowed to authenticate through
Preparing to Deploy VMware Identity Manager
Before you deploy VMware Identity Manager, you must prepare your environment. This preparation includes downloading the VMware Identity Manager OVA file, creating DNS records and IP addresses.
Prerequisites
Before you begin to install VMware Identity Manager complete the prerequisite tasks.
n You need one or more ESX servers to deploy the VMware Identity Manager virtual appliance. NOTE For information about supported vSphere and ESX server versions, see the VMware Product
Interoperability Matrixes at http://www.vmware.com/resources/compatibility/sim/interop_matrix.php.
n VMware vSphere Client or vSphere Web Client is required to deploy the OVA file and access the
deployed virtual appliance remotely to configure networking.
n Download the VMware Identity Manager OVA file from the VMware Web site.
Create DNS Records and IP Addresses
A DNS entry and a static IP address must be available for the VMware Identity Manager appliance. Because each company administers their IP addresses and DNS records differently, before you begin your
installation, request the DNS record and IP addresses to use.
Configuring reverse lookup is optional. When you implement reverse lookup, you must define a PTR record on the DNS server so the virtual appliance uses the correct network configuration.
You can use the following sample list of DNS records when you talk to your network administrator. Replace the sample information with information from your environment. This example shows forward DNS records and IP addresses.
Table 1‑1. Examples of Forward DNS Records and IP Addresses
Domain Name Resource Type IP Address
myidentitymanager.company.com A 10.28.128.3 This example shows reverse DNS records and IP addresses.
Table 1‑2. Examples of Reverse DNS Records and IP Addresses
IP Address Resource Type Domain Name
128.28.10.in-addr.arpa. IN PTR myidentitymanager.company.com After you complete the DNS configuration, verify that the reverse DNS lookup is properly configured. For example, the virtual appliance command host IPaddress must resolve to the DNS name lookup.
Using a Unix/Linux-based DNS Server
If you are using a Unix or Linux-based DNS server and plan to join VMware Identity Manager to the Active Directory domain, make sure that the appropriate service (SRV) resource records are created for each Active Directory domain controller.
Database Options with VMware Identity Manager
Set up VMware Identity Manager with an external database to store and organize server data. If you cannot use an external database, you can use the internal vPostgres database that is embedded in the appliance. To use an external database, your database administrator must prepare an empty external database and schema before connecting to the external database in the Setup wizard. Licensed users can use an external Microsoft SQL database server, Oracle database server, or an external vPostgres database server to set up a high availability external database environment. See “Connecting to the Database,” on page 28.
The embedded vPostgres database configuration can be used for small deployments. The internal database does not require any additional configuration outside VMware Identity Manager, but it is recommended that you configure your internal database for high availability. See KB 2094258.
Connecting to Active Directory
VMware Identity Manager uses your Active Directory infrastructure for user authentication and management. You can integrate VMware Identity Manager with an Active Directory environment that consists of a single Active Directory domain, multiple domains in a single Active Directory forest, or multiple domains across multiple Active Directory forests. To sync users and groups, the
VMware Identity Manager virtual appliance must connect to Active Directory.
Your Active Directory must be accessible in the same LAN network as the VMware Identity Manager virtual appliance. See Chapter 4, “Integrating with Active Directory,” on page 39.
Deployment Checklists
You can use the deployment checklist to gather the necessary information to install the VMware Identity Manager virtual appliance.
Depending on your deployment, you might only need a portion of the network information for your virtual appliances when you create the static IP addresses in the DNS before the installation and during the installation.
Information for Fully Qualified Domain Name
See “Using a Load Balancer to Enable External Access to the VMware Identity Manager,” on page 53 for information.
Table 1‑3. Fully Qualified Domain Name (FQDN) Information Checklist
Information to Gather List the Information
VMware Identity Manager FQDN
Network Information for VMware Identity Manager Virtual Appliance
Table 1‑4. Network Information Checklist
Active Directory Domain Controller
Table 1‑5. Active Directory Domain Controller Information Checklist
Information to Gather List the Information
Active Directory server name Active Directory domain name Base DN
For Active Directory over LDAP the Bind DN username and password
For Active Directory with Integrated Windows Authentication, the user name and password of the account that has privileges to join computers to the domain.
SSL Certificates
Table 1‑6. SSL Certificate Information Checklist
Information to Gather List the Information
SSL certificate Private key
NOTE You can add an SSL certificate after you deploy the VMware Identity Manager virtual appliance.
License Key
Table 1‑7. VMware Identity Manager License Key Information Checklist
Information to Gather List the Information
License key
NOTE The License key information is entered in the administration console in the Appliance Settings > License page after the installation is complete.
External Database
Table 1‑8. External Database Information Checklist
Information to Gather List the Information
Database host name Port
Username Password
Appliance Administrator Passwords
Create strong passwords for the admin user, root user, and sshuser. Strong passwords should be at least eight characters long and include uppercase and lowercase characters and at least one digit or special character.
IMPORTANT The admin user password must be at least 6 characters in length.
Table 1‑9. Administrator Passwords
Information to Gather List the Information
Appliance administrator account password Appliance root account password
sshuser account password for remote log in
Customer Experience Improvement Program
When you install the VMware Identity Manager virtual appliance, you can choose to participate in VMware's customer experience improvement program.
If you participate in the program, VMware collects anonymous data about your deployment in order to improve VMware's response to user requirements. No data that identifies your organization is collected. Before collecting the data, VMware makes anonymous all fields that contain information that is specific to your organization.
NOTE If your network is configured to access the Internet through HTTP proxy, to send this information,
you must adjust the proxy settings in the VMware Identity Manager virtual appliance. See “Setting Proxy Server Settings for VMware Identity Manager,” on page 25.
Deploying VMware Identity Manager
2
To deploy VMware Identity Manager, you deploy the OVF template using the vSphere Client or the vSphere Web Client, power on the VMware Identity Manager virtual appliance, and configure settings. After the VMware Identity Manager virtual appliance is deployed, you use the Setup wizard to set up the VMware Identity Manager environment.
Use the information in the deployment checklist to complete the installation. See “Deployment Checklists,”
on page 13.
This chapter includes the following topics:
n “Install the VMware Identity Manager OVA File,” on page 17 n “(Optional) Add IP Pools,” on page 19
n “Configure VMware Identity Manager Settings,” on page 19
n “Setting Proxy Server Settings for VMware Identity Manager,” on page 25 n “Enter the License Key,” on page 25
Install the VMware Identity Manager OVA File
You deploy the VMware Identity Manager OVA file using the vSphere Client or the vSphere Web Client. You can download and deploy the OVA file from a local location that is accessible to the vSphere Client, or deploy it from a Web URL.
NOTE If you are using the vSphere Web Client, use either Firefox or Chrome browsers to deploy the OVA
file. Do not use Internet Explorer.
Prerequisites
Review and Chapter 1, “Preparing to Install VMware Identity Manager,” on page 7.
Procedure
4 In the Deploy OVF Template wizard, specify the following information.
Page Description
Source Browse to the OVA package location, or enter a specific URL.
OVF Template Details Review the product details, including version and size requirements. End User License Agreement Read the End User License Agreement and click Accept.
Name and Location Enter a name for the VMware Identity Manager virtual appliance. The
name must be unique within the inventory folder and can contain up to 80 characters. Names are case sensitive.
Select a location for the virtual appliance.
Host / Cluster Select the host or cluster in which to run the virtual appliance. Resource Pool Select the resource pool.
Storage Select the storage for the virtual appliance files. You can also select a VM
Storage Profile.
Disk Format Select the disk format for the files. For production environments, select one of the Thick Provision formats. Use the Thin Provision format for
evaluation and testing.
In the Thick Provision format, all the space required for the virtual disk is allocated during deployment. In the Thin Provision format, the disk uses only the amount of storage space that it needs for its initial operations.
Network Mapping Map the networks used in VMware Identity Manager to networks in your inventory.
Properties a In the Timezone setting field, select the correct time zone.
b The Customer Experience Improvement Program checkbox is selected by default. VMware collects anonymous data about your deployment in order to improve VMware's response to user requirements. Deselect the checkbox if you do not want the data collected.
c In the Host Name (FQDN) text box, enter the host name to use. If this is blank, reverse DNS is used to look up the host name.
d Configure the networking properties.
n To configure a static IP address for VMware Identity Manager,
enter the address for the Default Gateway, DNS, IP Address, and
Netmask fields.
IMPORTANT If any of the four address fields, including Host Name,
are left blank, DHCP is used.
n To configure DHCP, leave the address fields blank.
NOTE The Domain Name and Domain Search Path fields are not used.
You can leave these blank.
(Optional) After VMware Identity Manager is installed, you can configure IP Pools. See “(Optional) Add IP Pools,” on page 19.
Ready to Complete Review your selections and click Finish.
Depending on your network speed, the deployment can take several minutes. You can view the progress in the progress dialog box that appears.
5 When the deployment is complete, click Close in the progress dialog box.
6 Select the VMware Identity Manager virtual appliance you deployed, right-click, and select Power >
Power on.
The VMware Identity Manager virtual appliance is initialized. You can go to the Console tab to see the details. When the virtual appliance initialization is complete, the console screen displays the
VMware Identity Manager version, IP address, and the URLs to log in to the VMware Identity Manager Web interface and to complete the set up.
What to do next
n Configure VMware Identity Manager settings, including connecting to Active Directory and selecting
users and groups to sync to VMware Identity Manager.
(Optional) Add IP Pools
Network configuration with IP Pools is optional in VMware Identity Manager. You can manually add IP pools to the VMware Identity Manager virtual appliance after it is installed.
IP Pools act like DHCP servers to assign IP addresses from the pool to the VMware Identity Manager virtual appliance. To use IP Pools, you edit the virtual appliance networking properties to change the properties to dynamic properties and configure the netmask, gateway, and DNS settings.
Prerequisites
The virtual appliance must be powered off.
Procedure
1 In the vSphere Client or the vSphere Web Client, right-click the VMware Identity Manager virtual appliance and select Edit Settings.
2 Select the Options tab.
3 Under vApp Options, click Advanced.
4 In the Properties section on the right, click the Properties button.
5 In the Advanced Property Configuration dialog box, configure the following keys:
n vami.DNS.WorkspacePortal n vami.netmask0.WorkspacePortal n vami.gateway.WorkspacePortal
a Select one of the keys and click Edit.
b In the Edit Property Settings dialog box, next to the Type field, click Edit.
c In the Edit Property Type dialog box, select Dynamic Property and select the appropriate value from the drop down menu for Netmask, Gateway Address, and DNS Servers respectively. d Click OK, and click OK again.
e Repeat these steps to configure each key. 6 Power on the virtual appliance.
The properties are configured to use IP Pools.
What to do next
Configure VMware Identity Manager settings.
Configure VMware Identity Manager Settings
n Review Chapter 4, “Integrating with Active Directory,” on page 39 for information about the Active
Directory configuration.
n You have your Active Directory information.
n When multi-forest Active Directory is configured and the Domain Local group contains members from
domains in different forests, the Bind DN user used on the VMware Identity Manager Directory page must be added to the Administrators group of the domain in which Domain Local group resides. If this is not done, these members will be missing from the Domain Local group.
n You have a list of the Active Directory user attributes you want to use as filters, and a list of the groups
you want to add to VMware Identity Manager.
Procedure
1 Go to the VMware Identity Manager URL that is shown on the blue screen in the Console tab. For example, https://hostname.example.com.
2 Accept the certificate, if prompted. 3 In the Get Started page, click Continue.
4 In the Set Passwords page, set passwords for the following administrator accounts, which are used to manage the appliance, then click Continue.
Account
Appliance Administrator Set the password for the admin user. This user name cannot be changed. The admin user account is used to manage the appliance settings.
IMPORTANT The admin user password must be at least 6 characters in
length.
Appliance Root Set the root user password. The root user has full rights to the appliance.
Remote User Set the sshuser password, which is used to log in remotely to the appliance with an SSH connection.
5 In the Select Database page, select the database to use.
See “Connecting to the Database,” on page 28 for more information.
n If you are using an external database, select External Database and enter the external database
connection information, user name, and password. To verify that VMware Identity Manager can connect to the database, click Test Connection.
After you verify the connection, click Continue.
n If you are using the internal database, click Continue.
The connection to the database is configured and the database is initialized. When the process is complete, the Setup is complete page appears.
6 Click the Log in to the administration console link on the Setup is complete page to log in to the administration console to set up the Active Directory connection.
7 Log in to the administration console as the admin user, using the password you set.
You are logged in as a Local Admin. The Directories page appears. Before you add a directory, ensure that you review the Chapter 4, “Integrating with Active Directory,” on page 39 for information about Active Directory environments and requirements.
9 Click Setup > User Attributes to select the user attributes to sync to the directory.
Default attributes are listed and you can select the ones that are required. You can also add other attributes.
IMPORTANT After a directory is created, you cannot change an attribute to be a required attribute. You
must make that selection now.
IMPORTANT If you plan to sync XenApp resources to VMware Identity Manager, you must make distinguishedName a required attribute.
10 Click Save.
11 Click the Identity & Access Management tab, and, in the Directories page, click Add Directory. 12 Enter a name for the directory you are creating in VMware Identity Manager and select the type of
directory, either Active Directory over LDAP or Active Directory (Integrated Windows
13 Configure the connection information.
Option Description
Active Directory over LDAP a In the Sync Connector field, select the connector you want to use to sync users and groups from Active Directory to the
VMware Identity Manager directory.
A connector component is always available with the
VMware Identity Manager service by default. This connector appears in the drop-down list. If you install multiple
VMware Identity Manager appliances for high availability, the connector component of each appears in the list.
b In the Authentication field, if you want to use this Active Directory to authenticate users, click Yes.
If you want to use a third-party identity provider to authenticate users, click No. After you configure the Active Directory connection to sync users and groups, go to the Identity & Access Management > Manage
> Identity Providers page to add the third-party identity provider for
authentication.
c In the Directory Search Attribute field, select the account attribute that contains username.
d If the Active Directory uses DNS Service Location lookup, make the following selections.
n In the Server Location section, select the This Directory supports DNS Service Location checkbox.
A domain_krb.properties file, auto-populated with a list of domain controllers, will be created when the directory is created. See “About Domain Controller Selection (domain_krb.properties file),” on page 42 .
n If the Active Directory requires STARTTLS encryption, select the This Directory requires all connections to use SSL check box in
the Certificates section and copy and paste the Active Directory Root CA certificate into the SSL Certificate field.
Ensure the certificate is in PEM format and include the "BEGIN CERTIFICATE" and "END CERTIFICATE" lines.
NOTE If the Active Directory requires STARTTLS and you do not
provide the certificate, you cannot create the directory. e If the Active Directory does not use DNS Service Location lookup,
make the following selections.
n In the Server Location section, verify that the This Directory supports DNS Service Location checkbox is not selected and enter
the Active Directory server host name and port number. To configure the directory as a global catalog, see the Multi-Domain, Single Forest Active Directory Environment section in
“Active Directory Environments,” on page 40.
n If the Active Directory requires access over SSL, select the This Directory requires all connections to use SSL check box in the Certificates section and copy and paste the Active Directory Root
Option Description
Ensure the certificate is in PEM format and include the "BEGIN CERTIFICATE" and "END CERTIFICATE" lines.
NOTE If the Active Directory requires SSL and you do not provide
the certificate, you cannot create the directory.
f In the Base DN field, enter the DN from which to start account searches. For example, OU=myUnit,DC=myCorp,DC=com.
g In the Bind DN field, enter the account that can search for users. For example, CN=binduser,OU=myUnit,DC=myCorp,DC=com. h After you enter the Bind password, click Test Connection to verify
that the directory can connect to your Active Directory.
Active Directory (Integrated Windows Authentication)
a In the Sync Connector field, select the connector you want to use to sync users and groups from Active Directory to the
VMware Identity Manager directory.
A connector component is always available with the
VMware Identity Manager service by default. This connector appears in the drop-down list. If you install multiple
VMware Identity Manager appliances for high availability, the connector component of each appears in the list.
b In the Authentication field, if you want to use this Active Directory to authenticate users, click Yes.
If you want to use a third-party identity provider to authenticate users, click No. After you configure the Active Directory connection to sync users and groups, go to the Identity & Access Management > Manage
> Identity Providers page to add the third-party identity provider for
authentication.
c In the Directory Search Attribute field, select the account attribute that contains username.
d If the Active Directory requires STARTTLS encryption, select the This
Directory requires all connections to use STARTTLS checkbox in the Certificates section and copy and paste the Active Directory Root CA
certificate into the SSL Certificate field.
Ensure the certificate is in PEM format and include the "BEGIN CERTIFICATE" and "END CERTIFICATE" lines.
If the directory has multiple domains, add the Root CA certificates for all domains, one at a time.
NOTE If the Active Directory requires STARTTLS and you do not
provide the certificate, you cannot create the directory.
e Enter the name of the Active Directory domain to join. Enter a user name and password that has the rights to join the domain. See “Joining a Domain,” on page 47 for more information.
f In the Bind User UPN field, enter the User Principal Name of the user who can authenticate with the domain. For example,
g Enter the Bind DN User password. 14 Click Save & Next.
15 For Active Directory over LDAP, the domains are listed with a check mark.
For Active Directory (Integrated Windows Authentication), select the domains that should be associated with this Active Directory connection.
NOTE If you add a trusting domain after the directory is created, the service does not automatically
detect the newly trusting domain. To enable the service to detect the domain, the connector must leave and then rejoin the domain. When the connector rejoins the domain, the trusting domain appears in the list.
Click Next.
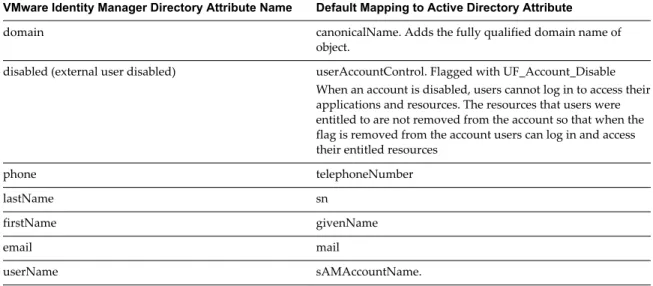
16 Verify that the VMware Identity Manager directory attribute names are mapped to the correct Active Directory attributes. If not, select the correct Active Directory attribute from the drop-down list. Click
Next.
17 Click + to select the groups you want to sync from Active Directory to the VMware Identity Manager directory.
The Sync nested group users option is enabled by default. When this option is enabled, all the users that belong directly to the group you select as well as all the users that belong to nested groups under it are synced. Note that the nested groups are not synced; only the users that belong to the nested groups are synced. In the VMware Identity Manager directory, these users will appear as members of the top-level group that you selected for sync.
If this option is disabled, when you specify a group to sync, all the users that belong directly to that group are synced. Users that belong to nested groups under it are not synced. Disabling this option is useful for large Active Directory configurations where traversing a group tree is resource and time intensive. If you disable this option, ensure that you select all the groups whose users you want to sync.
NOTE When you sync a group, any users that do not have Domain Users as their primary group in
Active Directory are not synced. 18 Click Next.
19 Click + to add additional users. For example, enter CN=username,CN=Users,OU=myUnit,DC=myCorp,DC=com.
To exclude users, create a filter to exclude some types of users. You select the user attribute to filter by, the query rule, and the value.
Click Next.
20 Review the page to see how many users and groups will sync to the directory and to view the sync schedule.
To make changes to users and groups, or to the sync frequency, click the Edit links. 21 Click Sync Directory to start the directory sync.
NOTE If a networking error occurs and the host name cannot be uniquely resolved using reverse DNS, the
configuration process stops. You must fix the networking problems and restart the virtual appliance. Then, you can continue the deployment process. The new network settings are not available until after you restart the virtual appliance.
What to do next
For information about setting up a load balancer or a high-availability configuration, see Chapter 5, “Advanced Configuration for the VMware Identity Manager Appliance,” on page 53.
You can customize the catalog of resources for your organization's applications and enable user access to these resources. You can also set up other resources, including View, ThinApp, and Citrix-based
Setting Proxy Server Settings for VMware Identity Manager
The VMware Identity Manager virtual appliance accesses the cloud application catalog and other Web services on the Internet. If your network configuration provides Internet access through an HTTP proxy, you must adjust your proxy settings on the VMware Identity Manager appliance.
Enable your proxy to handle only Internet traffic. To ensure that the proxy is set up correctly, set the parameter for internal traffic to no-proxy within the domain.
NOTE Proxy servers that require authentication are not supported.
Procedure
1 From the vSphere Client, log in as the root user to the VMware Identity Manager virtual appliance. 2 Enter YaST on the command line to run the YaST utility.
3 Select Network Services in the left pane, then select Proxy.
4 Enter the proxy server URLs in the HTTP Proxy URL and HTTPS Proxy URL fields. 5 Select Finish and exit the YaST utility.
6 Restart the Tomcat server on the VMware Identity Manager virtual appliance to use the new proxy settings.
service horizon-workspace restart
The cloud application catalog and other Web services are now available in VMware Identity Manager.
Enter the License Key
After you deploy the VMware Identity Manager appliance, enter your license key.
Procedure
1 Log in to the VMware Identity Manager administration console. 2 Select the Appliance Settings tab, then click License.
Managing Appliance System
Configuration Settings
3
After the initial appliance configuration is complete, you can go to the appliance admin pages to install certificates, manage passwords, and monitor system information for the virtual appliance.
You can also update the database, FQDN, and syslog, and download log files.
Page Name Setting Description
Database Connection The database connection setting, either Internal or External, is enabled. You can change the database type. When you select External Database, you enter the external database URL, user name, and password. To set up an external database, see “Connecting to the Database,” on page 28. Install Certificate On this page, you install a custom or self-signed certificate
for VMware Identity Manager and, if
VMware Identity Manager is configured with a load balancer, you can install the load balancer's root certificate. The location of the VMware Identity Manager root CA certificate is displayed on this page as well, on the
Terminate SSL on a Load Balancer tab. See “Using SSL Certificates,” on page 33.
Identity Manager FQDN The VMware Identity Manager FQDN is displayed on this page. You can change it. VMware Identity Manager FQDN is the URL that users use to access the service.
Configure Syslog On this page, you can enable an external syslog server. VMware Identity Manager logs are sent to this external server. See “Enable the Syslog Server,” on page 36. Change Password On this page, you can change the
VMware Identity Manager admin user password. System Security On this page, you can change the root password for the
VMware Identity Manager appliance and the ssh user password used to log in remotely.
Log File Locations A list of log files and their directory locations is displayed on this page. You can bundle the log files into a tar zip file and download it. See “Log File Information,” on page 37.
n “Modifying the VMware Identity Manager Service URL,” on page 35 n “Modifying the Connector URL,” on page 36
n “Enable the Syslog Server,” on page 36 n “Log File Information,” on page 37
n “Manage Your Appliance Passwords,” on page 38 n “Configure SMTP Settings,” on page 38
Change Appliance Configuration Settings
After you configure VMware Identity Manager, you can go to the Appliance Settings pages to update the current configuration and monitor system information for the virtual appliance.
Procedure
1 Log in to the administration console.
2 Select the Appliance Settings tab and click Manage Configuration. 3 Log in with the service administrator password.
4 In the left pane, select the page to view or edit.
What to do next
Verify that the settings or updates you make are in effect.
Connecting to the Database
An internal PostgreSQL database is embedded in the VMware Identity Manager appliance. To use an external database with VMware Identity Manager, your database administrator must prepare an empty database and schema before connecting to the database in VMware Identity Manager.
You can connect to the external database connection when you run the VMware Identity Manager Setup wizard. You can also go to the Appliance Settings > VA Configuration > Database Connection Setup page to configure the connection to the external database.
Licensed users can use an Oracle database or Microsoft SQL database to set up a high availability environment.
Existing users who are using an external vPostgres database can continue to use that database when they upgrade to this release
NOTE To configure your internal database for high availability, see KB 2094258.
Configure a Microsoft SQL Database
To use a Microsoft SQL database for the VMware Identity Manager, you must create a new database in the Microsoft SQL server.
You create for a database named saas on the Microsoft SQL server and create a login user named horizon.
NOTE The default collation should be case-sensitive.
Prerequisites
n Supported version of the Microsoft SQL server installed as an external database server. See the VMware
Product Interoperability Matrixes at
n Administrator rights to access and create the database components using Microsoft SQL Server
Management Studio or from another Microsoft SQL Server CLI client.
Procedure
1 Log in to the Microsoft SQL Server Management Studio session as the sysadmin or a user account with sysadmin privileges.
The editor window appears. 2 In the toolbar click New Query.
3 Cut and paste the following commands in to the editor window.
Microsoft SQL Commands CREATE DATABASE saas
COLLATE Latin1_General_CS_AS;
ALTER DATABASE saas SET READ_COMMITTED_SNAPSHOT ON; GO
BEGIN
CREATE LOGIN horizon WITH PASSWORD = N'H0rizon!'; END
GO USE saas;
IF EXISTS (SELECT * FROM sys.database_principals WHERE name = N'horizon') DROP USER [horizon]
GO
CREATE USER horizon FOR LOGIN horizon with default_schema = saas;
GO
CREATE SCHEMA saas AUTHORIZATION horizon GRANT ALL ON DATABASE::saas TO horizon; GO
Note that the CREATE LOGIN command creates the user named horizon with the password H0rizon!. 4 On the toolbar, click !Execute.
The Microsoft SQL database server is now ready to be connected to the VMware Identity Manager database
What to do next
Configure the external database on the VMware Identity Manager server. Go to the VMware Identity Manager administration console Appliance Settings > VA Configuration > Database Connection Setup page. Enter the JDBC URL as jdbc:sqlserver://<DB_VM_IP_ADDR>;DatabaseName=saas. Enter the user name and password created for the database. See “Add an External Database to the VMware Identity Manager Appliance,” on page 32
Procedure
1 Specify the following settings when creating an Oracle database.
a Select the General Purpose/Transaction Processing Database configuration option. b Click Use Unicode > UTF8.
c Use National Character Set.
2 Connect to the Oracle database after the installation is finished. 3 Log in to the Oracle database as the sys user.
4 Increase the process connections. Each additional service virtual machine requires a minimum of 300 process connections to function with VMware Identity Manager. For example, if your environment has two service virtual machines, run the alter command as sys or system user.
a Increase the process connections using the alter command. alter system set processes=600 scope=spfile
b Restart the database.
5 Create a database trigger that all users can use.
Sample SQL to Create a Database Trigger
CREATE OR REPLACE
TRIGGER CASE_INSENSITIVE_ONLOGON AFTER LOGON ON DATABASE
DECLARE
username VARCHAR2(30); BEGIN
username:=SYS_CONTEXT('USERENV','SESSION_USER'); IF username = 'saas' THEN
execute immediate 'alter session set NLS_SORT=BINARY_CI'; execute immediate 'alter session set NLS_COMP=LINGUISTIC'; END IF;
EXCEPTION
WHEN OTHERS THEN NULL;
END;
6 Run the Oracle commands to create a new user schema.
Sample SQL to Create a New User
CREATE USER "saas" IDENTIFIED BY <password> DEFAULT TABLESPACE USERS TEMPORARY TABLESPACE TEMP PROFILE DEFAULT
ACCOUNT UNLOCK; GRANT RESOURCE TO "saas" ; GRANT CONNECT TO "saas" ;
ALTER USER "saas" DEFAULT ROLE ALL; GRANT UNLIMITED TABLESPACE TO "saas";
Configure a PostgreSQL Database
During the PostgreSQL installation, you must specify certain PostgreSQL configurations for optimum performance with VMware Identity Manager.
NOTE VMware Identity Manager does not currently support generic PostgreSQL.
Prerequisites
n Install and configure a supported version of VMware vFabric PostgreSQL as the external database
server from one of the installation packages, such as OVA, OVF, or RPM, with the citext module installed. The citext module supports the CITEXT data type, a case insensitive text type. Verify that the VMware vFabric PostgreSQL version that you use is compatible with your version of
VMware Identity Manager. For information about supported VMware vFabric PostgreSQL versions, see the VMware Product Interoperability Matrixes at
http://www.vmware.com/resources/compatibility/sim/interop_matrix.php.
n Install and configure the load balancing implementation. n Verify that your environment meets these requirements:
n The database server you use is PostgreSQL.
n The database administrator username and password are available.
n You must enter a username and password to create a user with authorization to the saas schema.
This user is required when you connect a VMware Identity Manager virtual machine instance to the database.
NOTE The VMware Identity Manager virtual machine uses the database name saas. During the
initialization process, it drops and recreates any existing database named saas.
Procedure
1 Log in as the root user. 2 Edit the postgresql.conf file.
For example, the VMware vFabric PostgreSQL database location is /var/vmware/vpostgres/current/pgdata/.
3 Increase the max_connections parameter. Each additional VMware Identity Manager virtual machine
requires at least 300 connections to function properly with VMware Identity Manager.
4 Set the max_connections parameter value to 600 for the two VMware Identity Manager virtual
machines.
5 Restart the database.
7 Run the PostgresSQL commands to create a new PostgreSQL database schema.
Table 3‑1. Create a New Database Schema SQL Sample SQL to Create a New Database Schema
CREATE ROLE horizon LOGIN PASSWORD yourpassword
NOSUPERUSER INHERIT NOCREATEDB NOCREATEROLE NOREPLICATION; ALTER ROLE horizon
SET search_path = saas; CREATE DATABASE saas WITH OWNER = postgres ENCODING = 'UTF8' TABLESPACE = pg_default CONNECTION LIMIT = -1;
GRANT CONNECT, TEMPORARY ON DATABASE saas TO public; GRANT ALL ON DATABASE saas TO postgres;
GRANT ALL ON DATABASE saas TO horizon; \connect saas;
CREATE SCHEMA saas AUTHORIZATION horizon; CREATE EXTENSION citext SCHEMA saas;
Transfer Data from the Internal Database
If your deployment uses an internal database and you plan to switch to an external database, you can extract the existing data from the database and add it to a new external database.
Prerequisites
Prepare the external database server. See “Configure a PostgreSQL Database,” on page 31.
Procedure
1 Log in as the root user.
2 Go to the /opt/vmware/vpostgres/current/bin directory.
3 Run the ./pg_dump -U postgres -w --clean -f /tmp/db_dump.data saas command.
4 Copy the db_dump.data file to the newly prepared external database server. scp /tmp/db_dump.data
5 Log in as the root user on the external database server. 6 Go to the /opt/vmware/vpostgres/current/bin directory.
7 Run the db_dump.data command.
./psql -U postgres -w -d saas -f /tmp/db_dump.data
You might see DROP and ALTER commands while the db_dump.data command runs.
Add an External Database to the VMware Identity Manager Appliance
After you set up the database in the VMware Identity Manager Setup wizard, you can configure VMware Identity Manager to use a different database.
You must point VMware Identity Manager to an initialized, populated database. For example, you can use a database configured as the result of a successful run of the VMware Identity Manager Setup wizard, a database from a backup, or an existing database from a recovered snapshot.
Prerequisites
n Install and configure the supported Microsoft SQL, Oracle edition, or VMware vFabric PostgreSQL as
the external database server. For information about specific versions that are supported by VMware Identity Manager, see the VMware Product Interoperability Matrixes at
http://www.vmware.com/resources/compatibility/sim/interop_matrix.php.
n Transfer data from the internal database, if you had been using one.
Procedure
1 In the administration console click Appliance Settings and select VA Configuration. 2 Click Manage Configuration.
3 Log in with the VMware Identity Manager administrator password.
4 On the Database Connection Setup page, select External Database as the database type. 5 Enter information about the database connection.
a Type the JDBC URL of the database server.
PostgreSQL jdbc:postgresql://IP_address/saas?stringtype=unspecified Microsoft SQL jdbc:sqlserver://IP_address;DatabaseName=saas
Oracle jdbc:oracle:thin:@//IP_address:port/sid
b Type the name of the user with read and write privileges to the database.
PostgreSQL horizon
Microsoft SQL horizon
Oracle “saas”
c Type the password for the user you created when you configured the database. 6 Click Test Connection to verify and save the information.
Using SSL Certificates
When the VMware Identity Manager appliance is installed, a default SSL server certificate is automatically generated. You can use this self-signed certificate for general testing of your implementation. VMware strongly recommends that you generate and install commercial SSL certificates in your production environment.
A certificate of authority (CA) is a trusted entity that guarantees the identity of the certificate and its creator. When a certificate is signed by a trusted CA, users no longer receive messages asking them to verify the certificate.
If you deploy VMware Identity Manager with the self-signed SSL certificate, the root CA certificate must be available as a trusted CA for any client who accesses the VMware Identity Manager. The clients can include end user machines, load balancers, proxies, and so on. You can download the root CA from
Apply Public Certificate Authority
When the VMware Identity Manager service is installed, a default SSL server certificate is generated. You can use the default certificate for testing purposes. You should generate and install commercial SSL certificates for your environment.
NOTE If the VMware Identity Manager points to a load balancer, the SSL certificate is applied to the load
balancer.
Prerequisites
Generate a Certificate Signing Request (CSR) and obtain a valid, signed certificate from a CA. If your organization provides SSL certificates that are signed by a CA, you can use these certificates. The certificate must be in the PEM format.
Procedure
1 In the administration console, click Appliance Settings. VA configuration is selected by default.
2 Click Manage Configuration.
3 In the dialog box that appears, enter the VMware Identity Manager server admin user password. 4 Select Install Certificate.
5 In the Terminate SSL on Identity Manager Appliance tab, select Custom Certificate.
6 In the SSL Certificate Chain text box, paste the host, intermediate, and root certificates, in that order. The SSL certificate works only if you include the entire certificate chain in the correct order. For each certificate, copy everything between and including the lines ---BEGIN CERTIFICATE--- and ---END
CERTIFICATE----Ensure that the certificate includes the FQDN hostname.
7 Paste the private key in the Private Key text box. Copy everything between ----BEGIN RSA PRIVATE KEY and ---END RSA PRIVATE KEY.
8 Click Save.
Example: Certificate Examples
Certificate Chain Example
---BEGIN CERTIFICATE---jlQvt9WdR9Vpg3WQT5+C3HU17bUOwvhp/r0+ ... ... ... W53+O05j5xsxzDJfWr1lqBlFF/OkIYCPcyK1 ---END ---BEGIN CERTIFICATE---WdR9Vpg3WQT5+C3HU17bUOwvhp/rjlQvt90+ ... ... ... O05j5xsxzDJfWr1lqBlFF/OkIYCPW53+cyK1 ---END
CERTIFICATE---Certificate Chain Example ---BEGIN CERTIFICATE---dR9Vpg3WQTjlQvt9W5+C3HU17bUOwvhp/r0+ ... ... ... 5j5xsxzDJfWr1lqW53+O0BlFF/OkIYCPcyK1 ---END
CERTIFICATE---Private Key Example
---BEGIN RSA PRIVATE
KEY---jlQvtg3WQT5+C3HU17bU9WdR9VpOwvhp/r0+ ...
... ...
1lqBlFFW53+O05j5xsxzDJfWr/OkIYCPcyK1 ---END RSA PRIVATE
KEY---Adding SSL Certificates
When you apply the certificate make sure that you include the entire certificate chain. The certificate to be installed must be in the PEM format.
The SSL certificate works only if you include the entire certificate chain. For each certificate, copy everything between and including the lines that include ---BEGIN CERTIFICATE--- and ---END CERTIFICATE----.
IMPORTANT You must add the certificate chain in the order of SSL Certificate, Intermediate CA Certificates,
Root CA Certificate.
Certificate Chain Example
---BEGIN
CERTIFICATE---SSL Cert - Appliance CERTIFICATE---SSL Cert
---END ---BEGIN CERTIFICATE---Intermediate/Issuing CA Cert ---END ---BEGIN CERTIFICATE---Root CA Cert ---END
3 Click Manage Configuration and log in with the admin user password.
4 Click Identity Manager FQDN and enter the new URL in the Identity Manager FQDN field. Use the format https://FQDN:port. Specifying a port is optional. The default port is 443.
For example, https://myservice.example.com.
5 Click Save.
What to do next
Enable the new portal user interface.
1 Go to https://VMwareIdentityManagerURL/admin to access the administration console. 2 In the administration console, click the arrow on the Catalog tab and select Settings. 3 Select New End User Portal UI in the left pane and click Enable New Portal UI.
Modifying the Connector URL
You can change the connector URL by updating the identity provider hostname in the administration console. If you are using the connector as the identity provider, the connector URL is the URL of the login page and is visible to end users.
Procedure
1 Log in to the VMware Identity Manager administration console.
2 Click the Identity & Access Management tab, then click the Identity Providers tab. 3 In the Identity Providers page, select the identity provider to update.
4 In the IdP Hostname field, enter the new hostname.
Use the format hostname:port. Specifying a port is optional. The default port is 443.
For example, vidm.example.com.
5 Click Save.
Enable the Syslog Server
Application-level events from the service can be exported to an external syslog server. Operating system events are not exported.
Since most companies do not have unlimited disk space, the virtual appliance does not save the complete logging history. If you want to save more history or create a centralized location for your logging history, you can set up an external syslog server.
If you do not configure a syslog server during the initial configuration, you can configure it later from the application configuration Application Settings > Manage Configuration > Syslog Configuration page.
Prerequisites
Set up an external syslog server. You can use any of the standard syslog servers available. Several syslog servers include advanced search capabilities.
Procedure
1 Log in to the administration console.
2 Select the Appliance Settings tab and click Manage Configuration. 3 Click Configure Syslog.
4 Click Enable.
5 Enter the IP address or the FQDN of the server where you want to store the logs. 6 Click Save.
A copy of your logs is sent to the syslog server.
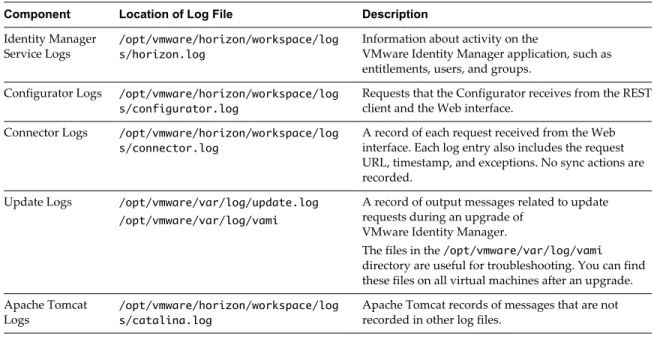
Log File Information
The VMware Identity Manager log files can help you debug and troubleshoot. The log files listed below are a common starting point. Additional logs can be found in the /opt/vmware/horizon/workspace/logs
directory.
Table 3‑2. Log Files
Component Location of Log File Description
Identity Manager
Service Logs /opt/vmware/horizon/workspace/logs/horizon.log
Information about activity on the
VMware Identity Manager application, such as entitlements, users, and groups.
Configurator Logs /opt/vmware/horizon/workspace/log s/configurator.log
Requests that the Configurator receives from the REST client and the Web interface.
Connector Logs /opt/vmware/horizon/workspace/log s/connector.log
A record of each request received from the Web interface. Each log entry also includes the request URL, timestamp, and exceptions. No sync actions are recorded.
Update Logs /opt/vmware/var/log/update.log /opt/vmware/var/log/vami
A record of output messages related to update requests during an upgrade of
VMware Identity Manager.
The files in the /opt/vmware/var/log/vami
directory are useful for troubleshooting. You can find these files on all virtual machines after an upgrade. Apache Tomcat
Logs /opt/vmware/horizon/workspace/logs/catalina.log
Apache Tomcat records of messages that are not recorded in other log files.
Collect Log Information
During testing or troubleshooting, the logs can give feedback about the activity and performance of the virtual appliance, as well as information about any problems that occur.
You collect the logs from each appliance that is in your environment.
Procedure
1 Log in to the administration console.
2 Select the Appliance Settings tab and click Manage Configuration. 3 Click Log File Locations and click Prepare log bundle.
Manage Your Appliance Passwords
When you configured the virtual appliance, you created passwords for the admin user, root user, and sshuser. You can change these passwords from the Appliance Settings pages.
Make sure that you create strong passwords. Strong passwords should be at least eight characters long and include uppercase and lowercase characters and at least one digit or special character.
Procedure
1 In the administration console, click the Appliance Settings tab. 2 Click VA Configuration > Manage Configuration.
3 To change the admin password, select Change Password. To change the root or sshuser passwords, select System Security.
IMPORTANT The admin user password must be at least 6 characters in length.
4 Enter the new password. 5 Click Save.
Configure SMTP Settings
You can configure SMTP server settings in VMware Identity Manager.
Procedure
1 Log in to the administration console.
2 Select the Appliance Settings tab and click SMTP. 3 Enter the SMTP server host name.
For example: smtp.example.com
4 Enter the SMTP server port number. For example: 25
5 (Optional) Enter a user name and password, if the SMTP server requires authentication. 6 Click Save.
Integrating with Active Directory
4
During configuration, you establish a connection between VMware Identity Manager and your Active Directory deployment.
You can update your Active Directory configuration information in the administration console, by clicking the Identity & Access Management tab.
This chapter includes the following topics:
n “Important Concepts Related to Active Directory,” on page 39 n “Active Directory Environments,” on page 40
n “About Domain Controller Selection (domain_krb.properties file),” on page 42 n “Managing User Attributes that Sync from Active Directory,” on page 45 n “Joining a Domain,” on page 47
n “Configure Active Directory Connection to the Service,” on page 47
Important Concepts Related to Active Directory
Several concepts related to Active Directory are integral to understanding how the VMware Identity Manager service integrates with your Active Directory environment.
Connector
The connector, a component of the service, performs the following functions.
n Syncs user and group data between Active Directory and the service. n When being used as an identity provider, authenticates users to the service.
The connector is the default identity provider. You can also use third-party identity providers that support the SAML 2.0 protocol. Use a third-party identity provider for an authentication type the connector does not support or for an authentication type the connector does support, if the third-party identity provider is preferable based on your enterprise security policy.
Directory
The VMware Identity Manager service has its own concept of the directory that syncs to Active Directory. This directory uses Active Directory attributes and parameters to define users and groups. You create one or more directories and then sync those directories with your Active Directory deployment. You can create the following directory types in the service.
n Active Directory over LDAP. Create this directory type if you plan to connect to a single Active
Directory domain environment. For the Active Directory over LDAP directory type, the connector binds to Active Directory using simple bind authentication.
n Active Directory, Integrated Windows Authentication. Create this directory type if you plan to connect
to a multi-domain or multi-forest Active Directory environment. The connector binds to Active Directory using Integrated Windows Authentication.
The type and number of directories that you create varies depending on your Active Directory environment, such as single domain or multi-domain, and on the type of trust used between domains. In most
environments, you create one directory.
The service does not have direct access to Active Directory. Only the connector has direct access to Active Directory. Therefore, you associate each directory created in the service with a connector instance.
Worker
When you associate a directory with a connector instance, the connector creates a partition for the associated directory called a worker. A connector instance can have multiple workers associated with it. Each worker acts as an identity provider. You define and configure authentication methods per worker.
The connector syncs user and group data between Active Directory and the service through one or more workers.
You cannot have two workers of the Integrated Windows Authentication type on the same connector instance.
Active Directory Environments
You can integrate the service with an Active Directory environment that consists of a single Active Directory domain, multiple domains in a single Active Directory forest, or multiple domains across multiple Active Directory forests.
Single Active Directory Domain Environment
A single Active Directory deployment allows you to sync users and groups from a single Active Directory domain.
For this environment, when you add a directory to the service, select the Active Directory over LDAP option.
For more information, see:
n “About Domain Controller Selection (domain_krb.properties file),” on page 42 n “Managing User Attributes that Sync from Active Directory,” on page 45 n “Joining a Domain,” on page 47
Multi-Domain, Single Forest Active Directory Environment
A multi-domain, single forest Active Directory deployment allows you to sync users and groups from multiple Active Directory domains within a single forest.
You can configure the service for this Active Directory environment as a single Active Directory, Integrated Windows Authentication directory type or, alternatively, as an Active Directory over LDAP directory type configured with the global catalog option.
n The recommended option is to create a single Active Directory, Integrated Windows Authentication
directory type.
When you add a directory for this environment, select the Active Directory (Integrated Windows Authentication) option.
For more information, see:
n “About Domain Controller Selection (domain_krb.properties file),” on page 42 n “Managing User Attributes that Sync from Active Directory,” on page 45 n “Joining a Domain,” on page 47
n “Configure Active Directory Connection to the Service,” on page 47
n If Integrated Windows Authentication does not work in your Active Directory environment, create an
Active Directory over LDAP directory type and select the global catalog option. Some of the limitations with selecting the global catalog option include:
n The Active Directory object attributes that are replicated to the global catalog are identified in the
Active Directory schema as the partial attribute set (PAS). Only these attributes are available for attribute mapping by the service. If necessary, edit the schema to add or remove attributes that are stored in the global catalog.
n The global catalog stores the group membership (the member attribute) of only universal groups.
Only universal groups are synced to the service. If necessary, change the scope of a group from a local domain or global to universal.
n The bind DN account that you define when configuring a directory in the service must have
permissions to read the Token-Groups-Global-And-Universal (TGGAU) attribute.
Active Directory uses ports 389 and 636 for standard LDAP queries. For global catalog queries, ports 3268 and 3269 are used.
When you add a directory for the global catalog environment, specify the following during the configuration.
n Select the Active Directory over LDAP option.
n Deselect the check box for the option This Directory supports DNS Service Location.
n Select the option This Directory has a Global Catalog. When you select this option, the server port
number is automatically changed to 3268. Also, because the Base DN is not needed when configuring the global catalog option, the Base DN text box does not display.