Project Builder for Java
Contents
Introduction to Project Builder for Java
8 Organization of This Document 8See Also 9
Application Development
10 The Tool Template 12The Swing Application Template 13 The JNI Application Template 14
Build System
18 Build Settings 18 Targets 20Target Information Panes 21 Target Summary 21 Build Settings 22
Information Property List Entries 27 Build Styles 32
Build Phases 33
Developing a Tool
35Creating the “Hello, World” Tool 35 Creating the Clock Tool 38
Installing the Clock Tool 40
Developing a Swing Application
43 Creating the “Hello, Swing” Application 43 Creating the File Chooser Demo 46 Changing an Application’s Icon 50Developing a JNI Application
54 Creating the “Hello, JNI” Application 54 JNI-Based Examples 57Adding Breakpoints 58
Stepping Through Lines of Code 60 Viewing the Debug Information 62 Accessing the Contents of Objects 62
Build Settings Reference
65 Project Settings Reference 65 Deployment Settings Reference 65 Target Settings Reference 66 Java Compiler Settings 67 Java Application Settings 68Document Revision History
70Glossary
71Figures, Tables, and Listings
Application Development
10Figure 1-1 Project Builder templates for Java development 10 Figure 1-2 The files of a Java tool project 12
Figure 1-3 Target editor for the Hammer project. 13 Figure 1-4 The files of a Java Swing application project 14 Figure 1-5 A JNI-based application project 15
Figure 1-6 Targets of JNI-based application project 16
Table 1-1 Applications types and their corresponding project templates 11
Build System
18Figure 2-1 Target Summary pane of the target editor in Project Builder 21 Figure 2-2 General Settings pane of the target editor in Project Builder 22 Figure 2-3 Installation Settings pane of the target editor in Project Builder 23 Figure 2-4 Search Paths pane of the target editor in Project Builder 24
Figure 2-5 Java Compiler Settings pane of the target editor in Project Builder 25 Figure 2-6 Java Archive Settings pane of the target editor in Project Builder 26 Figure 2-7 Basic Information pane of the target editor in Project Builder 27 Figure 2-8 Display Information pane of the target editor in Project Builder 28 Figure 2-9 Application Icon pane of the target editor in Project Builder 29 Figure 2-10 Cocoa Java–Specific pane of the target editor in Project Builder 30 Figure 2-11 Pure Java–Specific pane of the target editor in Project Builder 31 Figure 2-12 Build style definition 33
Figure 2-13 Build-setting display script 34
Figure 2-14 Output of a build-setting display script 34 Table 2-1 Project build settings 18
Table 2-2 Deployment build settings 19 Table 2-3 Target build settings 19 Table 2-4 Java compiler build settings 20 Table 2-5 Java application build setting 20
Table 2-6 Elements of the Target Summary pane 22 Table 2-7 Elements of the General Settings pane 23 Table 2-8 Elements of the Installation Settings pane 23 Table 2-9 Elements of the Search Paths pane 24
Table 2-11 Elements of the Java Archive Settings pane 26 Table 2-12 Elements of the Basic Information pane 27 Table 2-13 Elements of the Display Information pane 28 Table 2-14 Elements of the Application Icon pane 29 Table 2-15 Elements of the Cocoa Java–Specific pane 30 Table 2-16 Elements of the Pure Java–Specific pane 31
Developing a Tool
35Figure 3-1 The Hello project in Project Builder 37
Figure 3-2 Project Builder’s Run pane showing Hello’s console output 38 Figure 3-3 Arguments pane of the executable editor in Project Builder 39 Figure 3-4 Output of Clock tool displayed in Project Builder 40
Figure 3-5 Expert View pane of the target editor in Project Builder 41 Figure 3-6 Clock distribution directory in/tmp 41
Figure 3-7 Clock target directory 42
Figure 3-8 Output of Clock viewed through Console 42
Developing a Swing Application
43Figure 4-1 The Hello_Swing project in Project Builder’s window 45 Figure 4-2 Hello_Swing application in action 45
Figure 4-3 Delete References dialog of Project Builder 46 Figure 4-4 Adding source files to a project in Project Builder 47 Figure 4-5 FileChooser in action 49
Figure 4-6 Open dialog displayed by FileChooserDemo 50
Developing a JNI Application
54Figure 5-1 The Leverage project in the Project Builder window 55
Figure 5-2 The build folder of the Leverage project after building the application 57 Listing 5-1 Leveragejnilib.csource file in the Leverage project 56
Listing 5-2 JNIWrapper.javasource file in the Leverage project 56
Debugging Applications
58Figure 6-1 Breakpoint inDebug.javafile of Debug project 59 Figure 6-2 Debugging an application—stopping 60
Figure 6-3 Debugging an application—stepping over 60
Figure 6-4 Debugging an application—stepping into a method 61 Figure 6-5 Debugging an application—viewing variable information 62 Figure 6-6 Debugging an application—viewing an object’s contents 64
Listing 6-3 Console output after executing Print Description to Console command on a Person object 64
Build Settings Reference
65 Table A-1 Project build settings 65 Table A-2 Deployment build settings 66 Table A-3 Target build settings 66 Table A-4 Java compiler build settings 67 Table A-5 Java application build settings 68Important: This document may not represent best practices for current development. Links to downloads and other resources may no longer be valid.
This document addresses Java development in Mac OS X using Project Builder. Project Builder is part of Apple’s integrated development environment.
Important: To run the examples described in this document, you must have installed Java 1.4.1 and the December 2002 (or later) Developer Tools package.
You should read this document if you are a Java developer who is interested in developing applications for Mac OS X or want to port an existing application into Mac OS X.
Organization of This Document
This document has the following chapters and appendixes:
● Application Development (page 10) introduces Java development using Project Builder. The chapter
explains each of the Java-based templates, which give you a head start when developing a project.
● Build System (page 18) addresses the Project Builder build system. It describes build settings, build targets,
and build styles.
● Developing a Tool (page 35) explains how to use the Java Tool template to develop a text-based Java
application. This a good place to start if you’re new to Java development in Mac OS X.
● Developing a Swing Application (page 43) explains how to use the Java Swing Application template to
develop a graphical user interface–based application.
● Developing a JNI Application (page 54) provides an overview of the Java JNI Application template, which
you can use to develop Java applications that need to interact with native code.
● Debugging Applications (page 58) focuses on Project Builder’s debugging facilities.
● Build Settings Reference (page 65) describes the build settings that you may need to configure in Java
applications.
Following the appendixes are a document revision history, and a glossary.
See Also
There are source files and Project Builder projects in the companion files of this document. They are located in/Developer/ADC Reference
Library/documentation/Java/Conceptual/Project_Builder_for_Java/Project_Builder_for_Java_companion.zip; that directory is calledcompanionin the remainder of this document. You can also download the companion files fromhttp://developer.apple.com/documentation/Java/index.html.
For general information about Project Builder, see Project Builder Help. For information on specialized Project Builder customization, seeCustomizing Project Builder, at http://developer.apple.com/documentation/Devel-operTools/index.html.
This chapter introduces the development of Java applications using Project Builder. Project Builder provides a development environment in which you can develop, build, and deploy Java applications. In addition, Project Builder has a project template that facilitates the development of applications that use the native Mac OS X environment, that is, applications that have both Java code as well as C or Objective-C code.
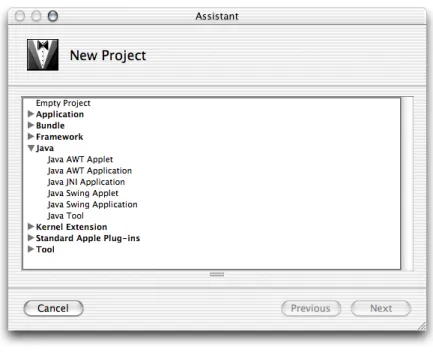
Project Builder templates are prebuilt projects that give you a head start in the development of an application. Figure 1-1 shows the New Project pane of the Project Builder Assistant, listing the Java project templates you can use to develop applications. When you want to develop a Swing-based application, for example, you can start with the Swing application template, which provides a fully configured application that follows Apple’s guidelines for GUI (graphical user interface) applications. That template is also useful if you’re new to Java and Swing and want to see the inner workings of a working application.
Figure 1-1 Project Builder templates for Java development
Table 1-1 shows the type of Java applications you can develop with Project Builder and their corresponding project templates.
Table 1-1 Applications types and their corresponding project templates
Template name Application type
Java Tool Text-based application
Java Swing Applet Swing applet
Java Swing Application Swing application
Java JNI Application JNI (Java Native Interface) application
Java AWT Applet AWT (Abstract Window Toolkit) applet
Java AWT Application AWT application
Project Builder has a powerful and flexible build system that facilitates the potentially complex tasks involved in building and deploying products, which include applications, libraries, frameworks, JAR files, and so on. The main elements involved in building products are targets. A project can contain more than one product, each produced by a target. In the case of text-based application projects, such as Java tool projects, the target is a JAR file created by the project’s only target.
In general, a target encompasses instructions on how to build a product, which can be an application or a component of one. Build settings are properties that tell Project Builder how to build a product. Build phases are concrete steps Project Builder takes to build a target; for example, compiling source files into object files and linking object files to create an executable file. For more information, seeTargets (page 20),Build Settings (page 18), andBuild Phases (page 33).
The Tool Template
The Java Tool template provides the files needed to create a simple, text-based application. It includes source files for the class with themainmethod, the JAR manifest, and the man page. Figure 1-2 shows the files that make up a Java tool project.
Figure 1-2 The files of a Java tool project
1 2 3 4
The following list describes the files of a Java tool project named Hammer:
1. Hammer.java: Java source file that contains themainmethod. Project Builder names this file after the project.
2. Manifest: File that contains information that Project Builder adds to theMANIFEST.MFfile of the generated JAR file.
3. Hammer.1: Source for the man page that documents the tool.
4. Hammer.jar: JAR file in which Java class files, the manifest file, and other resources are stored for distribution. This is the product of the project. It’s red because it hasn’t been produced yet, so the file doesn’t exist in the file system.
Application Development
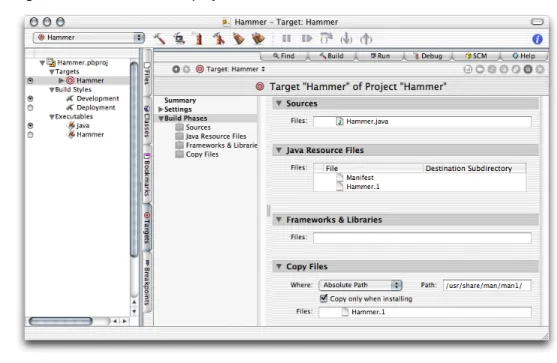
Figure 1-3 shows the target editor for the Hammer project.
Figure 1-3 Target editor for the Hammer project.
The items under Build Phases in the target editor list the build phases of the Hammer target. The phases are executed from top to bottom when the product is built. That is, the build phases are executed in the following order:
1. SourcesDetermines which Java source files are to be compiled (run through thejavaccompiler).
2. Java Resource FilesIndicates which files to copy to the root level of the product (the top level of the JAR file).
3. Frameworks & LibrariesLists frameworks or libraries to which the Java class files generated in step 1 must link against.
4. Copy FilesCopies files to specific parts of a product (for example, its resources directory or its plug-ins directory).
The Swing Application Template
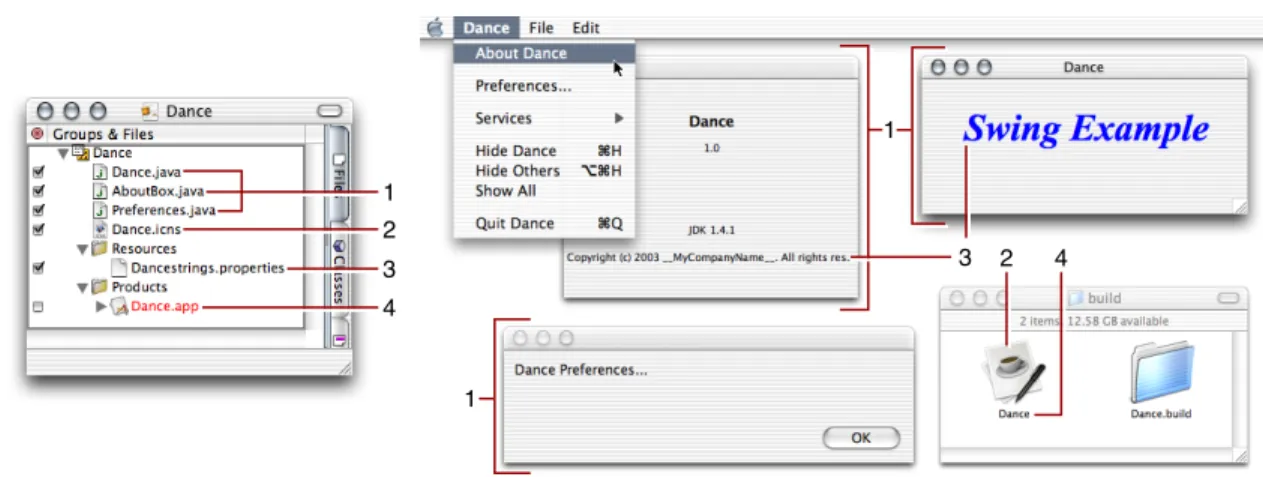
The Java Swing Application template provides the files needed to create a desktop application. It includes source files for a controller class (which includes themainmethod) and two JFrames that the user can make visible through menu commands, an icon file, and a properties file. Figure 1-4 shows the files that make up a
Figure 1-4 shows the project’s files in the Project Builder window, the contents of the project’s build folder, and the running application.
Figure 1-4 The files of a Java Swing application project
2 1 3 4 1 1 2 3 4
The following list describes the files in a Java Swing application project named Dance and their relationship to the actual application:
1. Dance.java,AboutBox.javaandPreferences.java: Java source files that implement an About box and a preferences dialog.
2. Dance.icns: Icon file that contains the icon that the Finder displays for the application package.
3. Dancestrings.properties: File that contains the names and values of application properties accessible at runtime. Project Builder places this file inside the JAR file for the application.
4. Dance.app: Application package that contains Mac OS X–specific information for the application, as well as the application’s JAR file.
The JNI Application Template
The Java Native Interface (JNI) provides a standard interface for communication with native libraries. You may want to use the JNI if you need to interface with native, legacy code from Java applications or when you want to improve the performance of an application by porting certain tasks to native code.
Application Development
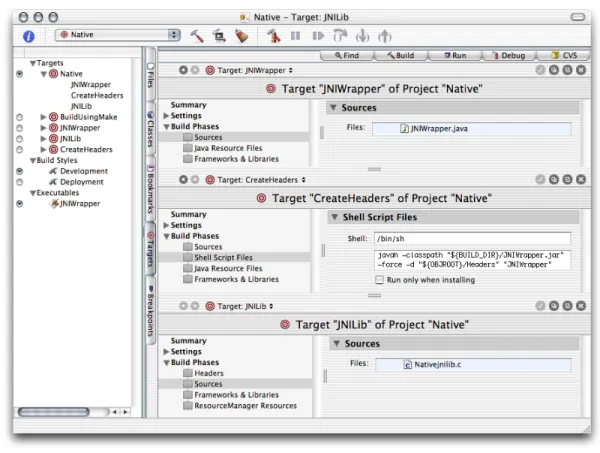
Project Builder provides a template with which you can develop projects that include both native code and Java code. Figure 1-5 shows a project called Pronto created with the JNI Application template.
Figure 1-5 A JNI-based application project
The most interesting part of the Pronto project are its targets. While the previous project types, tool and Swing application, required only one target, a JNI project requires several targets. This is because a JNI project contains three products, a JNI library (which contains the compiled C code), a header to the library, and a JAR file for the Java side of the application. See Figure 1-6.
Figure 1-6 Targets of JNI-based application project
The project has three main targets:
● JNIWrapperCompiles the Java source files of the application and archives them in a JAR file. This is the
Java application.
● CreateHeadersCreates C function prototypes from Java class files in the JAR file generated by the
JNIWrapper target.
● JNILibBuilds the native library by compilingProntojnilib.cand linking it with the Java VM framework
(/System/Library/Frameworks/JavaVM.framework).
The Native target is an aggregate target. Its purpose is to enclose the JNIWrapper, CreateHeaders, and JNILib targets into one build unit, so that any action performed on it is performed on all the targets it contains. The BuildUsingMake target bypasses the Project Builder build system. It usesgnumake(/usr/bin/gnumake) to build the application.
Application Development
You can find detailed information on the JNI athttp://java.sun.com/j2se/1.4/docs/guide/jni/.
Objective-CSwift
This chapter discusses the Project Builder build system, which determines how applications are built. Project Builder uses the Jam software build tool as its build engine. Jam allows Project Builder to easily manage dependencies between a project’s elements. It can also take advantage of computers with two or more central processing units (CPUs).
Build Settings
Build settings are similar to Java properties: They store values that Project Builder uses to build products. Project Builder facilitates configuring some build settings through specialized panes (seeTarget Information Panes (page 21)). However, you can set the value of any build setting directly through expert panes. Expert panes show the configuration build settings as a list of key-value pairs. Through these panes you can set the values of build settings for which the more user-friendly specialized panes do not provide a user interface.
The following tables list some of the build settings you may have to use in your projects.Build Settings Reference (page 65) has a complete list of Java-related settings. See the Project Builder release notes for a complete list of all settings.
Table 2-1 lists build settings that identify a project and tell Project Builder where to put temporary files generated during product building.
Table 2-1 Project build settings
Description Build setting
Name of the project. For example,MyProject. You should not modify this setting directly.
PROJECT_NAME
Base location for built products. For example,MyProject/build.
SYMROOT
Base location for the temporary files generated by a project’s targets. For example,MyProject/build. You should not modify this setting directly.
BUILD_DIR
Description Build setting
Base location for built products. It’s set to$BUILD_DIRin development builds (for example,MyProject/build),$INSTALL_DIR(for example, /tmp/My-Project.dst/usr/bin) in deployment builds when the product is installed, and$BUILD_DIR/UninstalledProductswhen the product is not installed.
TARGET_BUILD_DIR
Table 2-2 lists build settings that determine where files are placed when you usepbxbuildto install a product.
Table 2-2 Deployment build settings
Description Build setting
Base location for the installed product. For example,/tmp/MyProject.dst/.
DSTROOT
Location of the installed product. For exampleusr/bin.
INSTALL_PATH
Fully qualified path for the installed product. By default, it concatenatesDSTROOT
andINSTALL_PATH. So, with the example values, it evaluates to /tmp/My-Project.dst/usr/bin. You should not modify this setting directly.
INSTALL_DIR
Table 2-3 lists build settings that identify a target and tell Project Builder where to put the files it generates.
Table 2-3 Target build settings
Description Build setting
Name of the target. For example,MyProject. You should not modify this setting directly.
TARGET_NAME
The action being performed on a target. Its possible values arebuild,clean, or
install(throughpbxbuild). You should not modify this setting directly.
ACTION
Location for a target’s temporary files. For example, MyProject/build/My-Project.build/MyTarget.build.
TEMP_DIR
Table 2-4 lists build settings used to calljavacorjikesto compile Java source files.
Table 2-4 Java compiler build settings
Description Build setting
Base location for Java class files. For example,
MyProject/build/MyProject.build/MyTarget.build/Java-Classes.
CLASS_FILE_DIR
Defines the Java virtual machine version thatjavaccompiles Java source files to—for example,1.4. By default, this setting is
undefined.
JAVA_COMPILER_-TARGET_VM_VERSION
Table 2-5 lists the build setting that defines the archive of Java class files and the creation of the application package.
Table 2-5 Java application build setting
Description Build setting
Path (relative to the project’s root directory) to a manifest file to use when archiving Java class files into a JAR file. For example,Manifest.
JAVA_MANIFEST_FILE
Targets
Project Builder targets represent a product, such as an application or a framework. A project can produce more than one product. For example, a project can contain Java source files, which are compiled into Java class files byjavac, and Objective-C source files, which are compiled into object files bygcc. Such a project must contain at least two targets, one that compiles the Java sources files and another that compiles the Objective-C source files. The build settings introduced inBuild Settings (page 18) are what Project Builder uses to determine how to build a product.
Each target has its own set of build setting values; they are autonomous entities within a project. However, you can tell Project Builder that a target depends on one or more additional targets. That way you can guarantee, for example, that when target A needs files produced by target B, target B is executed before target A. In addition, if there’s a problem with target B, target A doesn’t get executed.
In addition, Project Builder provides the ability to addaggregate targets to a project. An aggregate target contains no product-building instructions; instead, it groups other targets. The operations you perform on aggregate targets are carried out on all the targets they enclose.
Each target can contain some or all of the following types of elements: Build System
● Build settingsThe group of build settings that control the build system.
● Information property list entriesApplication package–specific information, such as type, version, icon,
and so on.
● Build phasesTypes of tasks to perform on a set of a project’s files, such as compile, link, archive, copy,
and so on. SeeBuild Phases (page 33) for more information.
For more information on targets, see Project Builder Help .
Target Information Panes
Target information panes group information about how a product is built. They contain a user-friendly view of the values of certain build settings. These information panes are grouped in three major groups: Summary, Settings and Info.plist Entries.
Target Summary
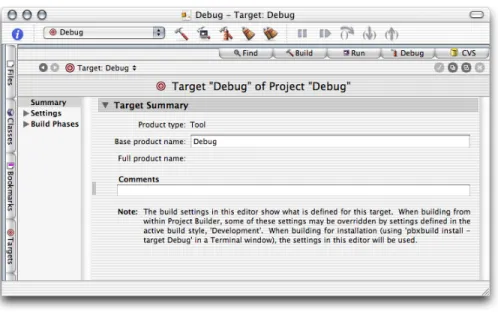
The Summary pane shows summary information for a project, including its name, type, and developer comments; it’s shown in Figure 2-1.
Figure 2-1 Target Summary pane of the target editor in Project Builder
Table 2-6 describes the elements of the Target Summary pane.
Table 2-6 Elements of the Target Summary pane Corresponding build setting Description Element label None. Indicates the type of project. Can be Application,
Tool, Framework, and so on. Product type
PRODUCT_NAME
Name of the generated product file without an extension.
Base product name
None. Developer comments about the target.
Comments
Build Settings
The Build Settings pane groups views of the build settings of a project. It includes two views: Simple View and Expert View. The Simple View provides a easy-to-use user interface to various build settings. The Expert View lists all the build settings. You can use this view when the other views don’t provide a way of configuring a particular build setting.
General Settings
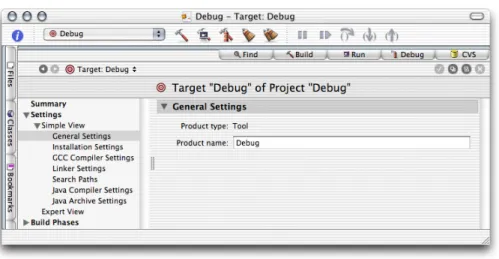
The General Settings pane, depicted in Figure 2-2, shows information that pertains to the entire project. Table 2-7 describes its elements.
Figure 2-2 General Settings pane of the target editor in Project Builder Build System
Table 2-7 Elements of the General Settings pane Corresponding build setting Description Element label None. Indicates the type of project. Can be Application,
Tool, Framework, and so on. Product type
PRODUCT_NAME
Name of the generated product file without an extension.
Product name
Installation Settings
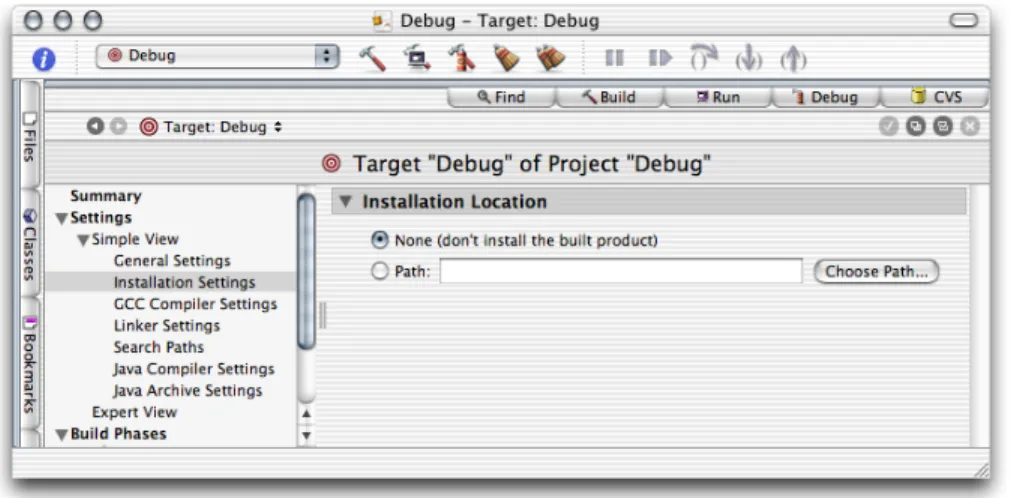
The Installation Settings pane, depicted in Figure 2-3, shows installation information for the selected target. Table 2-8 describes its elements.
Figure 2-3 Installation Settings pane of the target editor in Project Builder
Table 2-8 Elements of the Installation Settings pane
Correspondingbuildsetting Description
Element label
None. When selected, the product doesn’t get installed.
None
INSTALL_PATH
When selected, the product gets installed in the directory entered in the text input field.
Path
Search Paths
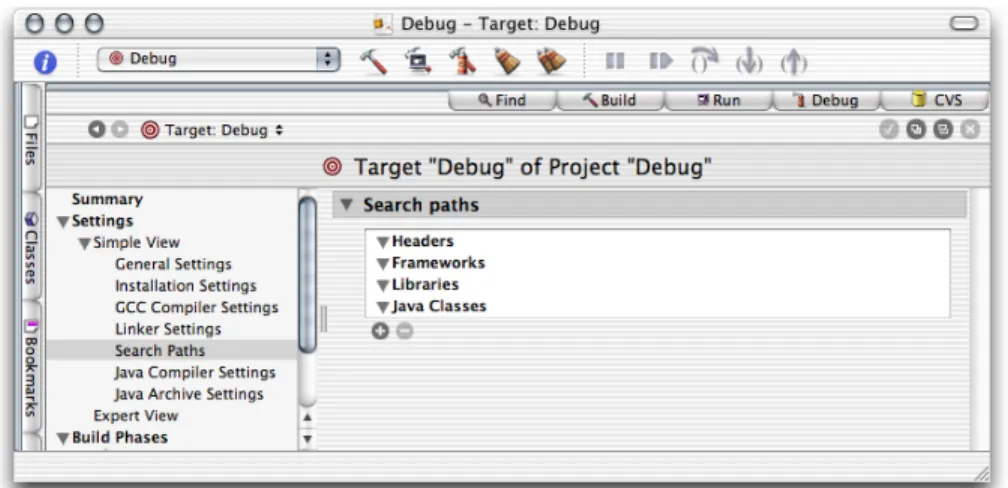
The Search Paths pane, depicted in Figure 2-4, determines the places Project Builder searches for frameworks, libraries, Java classes, and headers (in the case of a JNI application) to build the selected target. Table 2-9 describes its elements.
Figure 2-4 Search Paths pane of the target editor in Project Builder
Table 2-9 Elements of the Search Paths pane
Corresponding build setting Description
Element label
HEADER_SEARCH_PATHS
Search paths for Objective-C header files. Headers
FRAMEWORK_SEARCH_PATHS
Search paths for frameworks. Frameworks
LIBRARY_SEARCH_PATH
Search paths for libraries. Libraries
JAVA_CLASS_SEARCH_PATHS
Search paths for Java class files or JAR files. Java Classes
Build System
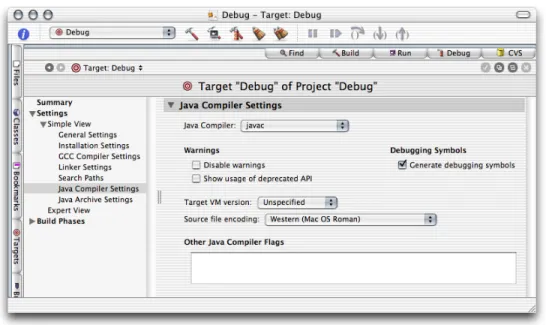
Java Compiler Settings
The Java Compiler Settings pane, depicted in Figure 2-5, determines some compiler settings for the selected target. Table 2-10 describes its elements.
Figure 2-5 Java Compiler Settings pane of the target editor in Project Builder
Table 2-10 Elements of the Java Compiler Settings pane
Corresponding build setting Description
Element label
JAVA_COMPILER
Determines the compiler to use to compile Java source files. The options are
javacandjikes. Java Compiler
JAVA_COMPILER_-DISABLE_WARNINGS
When selected, the compiler doesn’t produce warnings.
Disable warnings
JAVA_COMPILER_-DEPRECATED_WARNINGS
When selected, the compiler warns about deprecated API use.
Show usage of deprecated API
JAVA_COMPILER_-DEBUGGING_SYMBOLS
When selected, the compiler generates debugging symbols.
Generate debugging symbols
JAVA_COMPILER_-TARGET_VM_VERSION
The virtual machine version the compiler is to produce Java class files for.
Target VM version
JAVAC_SOURCE_FILE_-Specifies the character encoding used in Source file encoding
Corresponding build setting Description
Element label
JAVA_COMPILER_FLAGS
Additional compiler options. Other Java Compiler
Flags
Java Archive Settings
The Java Archive Settings pane, depicted in Figure 2-6, determines how Java class files in the selected target are archived. Table 2-11 describes its elements.
Figure 2-6 Java Archive Settings pane of the target editor in Project Builder
Table 2-11 Elements of the Java Archive Settings pane
Corresponding build setting Description
Element label
JAVA_ARCHIVE_CLASSES
Determines whether Java class files are archived in a JAR file.
Product type
JAVA_ARCHIVE_-COMPRESSION
When unselected, the Java class files are stored in the JAR file, but are not compressed.
Compress
CLASS_ARCHIVE_SUFFIX
The extension to use for the JAR file. The options are.jar,.war, and.ear. Archive file
extension
JAVA_MANIFEST_FILE
Name of the supplemental manifest file. Manifest file
Build System
Information Property List Entries
Information property lists (Info.plistfiles) contain information an application can access at runtime. This is similar to Java’s system properties. Information property lists, however, specify Mac OS X–specific application details, such as the application type and its icon. In addition, some Java-specific settings are also stored there; for example, the Java VM version that Mac OS X uses to run the application.
The following sections describe the simple views of information property list entries. SeeMac OS X Developer Release Notes: Information Property List athttp://developer.apple.com/releasenotes/index.html for more information about information property lists.
Basic Information
The Basic Information pane, depicted in Figure 2-7, encapsulates identification information about the application package. Table 2-12 describes its elements.
Figure 2-7 Basic Information pane of the target editor in Project Builder
Table 2-12 Elements of the Basic Information pane
Corresponding Info.plist entry
Description Element label
CFBundleExecutable
Name of the file containing the application’s executable code.
Executable
CFBundleIdentifier
Package-style name (for example,
com.apple.ProjectBuilder) used to uniquely identify the application or bundle.
Identifier
Corresponding Info.plist entry
Description Element label
CFBundlePackageType
Four-letter type indicator for the bundle. For example,APPLfor applications,FMWKfor frameworks, and so on.
Type
CFBundleSignature
Four-letter creator code for the bundle. Signature
CFBundleVersion
Version number for the bundle. For example,
10.2.3. Version
Display Information
The Display Information pane, depicted in Figure 2-8, encapsulates display information about the application package file. Table 2-13 describes its elements.
Figure 2-8 Display Information pane of the target editor in Project Builder
Table 2-13 Elements of the Display Information pane
Corresponding Info.plist entry
Description Element label
CFBundleName
In application packages, localized name that is displayed in the menu bar.
Display name
CFBundleGet-InfoString
Localized string that appears in Info windows or the Inspector in the Finder.
Get-Info string Build System
Corresponding Info.plist entry Description Element label CFBundleShortVersion-String
Localized string with bundle-version information. This is the string displayed in Info windows or the Inspector in the Finder when CFBundleGet-InfoStringis undefined.
Short version
Application Icon
The Application Icon pane, depicted in Figure 2-9, identifies the icon file to be used for the application package’s icon, which is the icon the Finder displays to the user. Table 2-14 describes its elements.
Figure 2-9 Application Icon pane of the target editor in Project Builder
Table 2-14 Elements of the Application Icon pane
Corresponding Info.plist entry Description
Element label
CFBundleIconFile
Name of the icon file for the bundle. Icon file
Cocoa Java–Specific
The Cocoa Java–Specific pane, depicted in Figure 2-10, contains information specific for Cocoa applications written in Java. Table 2-15 describes its elements.
Figure 2-10 Cocoa Java–Specific pane of the target editor in Project Builder
Table 2-15 Elements of the Cocoa Java–Specific pane
Corresponding Info.plist entry
Description Elements label
NSJavaNeeded
When selected, indicates that a Cocoa application needs to instantiate a Java virtual machine. Needs Java
NSJavaRoot
The directory where the application’s JAR files are stored in the application bundle. For example,
Contents/Resources/Java. Root Directory
NSJavaPath
List of JAR files contained in the root directory. Path
Build System
Pure Java–Specific
The Pure Java Specific pane, depicted in Figure 2-11, contains settings that are specific to Pure Java. Table 2-16 describes its elements.
Figure 2-11 Pure Java–Specific pane of the target editor in Project Builder
Table 2-16 Elements of the Pure Java–Specific pane
Corresponding Info.plist entry Description
Element label
Java/MainClass
Fully qualified name of an application’s main class. Main Class
Java/ClassPath/
List of paths to Java class files of JAR files the application uses. Class Path
Java/Properties/com.apple.macos.useScreenMenuBar
When selected, the
application’s menu bar follows Mac OS X style: It’s placed at the top of the screen instead of within each application window.
Place JFrame menu bars at top of screen
Java/Properties/com.apple.mrj.application.growbox.intrudes
When selected, the resize control is part of the window pane. When unselected, a white band is added to the bottom of Growbox intrudes
Corresponding Info.plist entry Description
Element label
Java/WorkingDirectory
When selected, the
application’s working directory is set to the bundle’s
Contents/Resources/Java directory. Set cwd to Contents/Resources/Java subdirectory Java/Properties/com.apple.macosx.AntiAliasedTextOn
Toggles text anti-aliasing. Anti-alias text
Java/Properties/com.apple.mrj.application.live-resize
Toggles live resizing of windows.
Live resizing
Java/JVMVersion
Version of the Java runtime the application requires. For example,1.4+.
Target VM Version
Java/VMOptions
Command-line options to add to the java invocation. For example,-Xfuture -Xprof. Additional VM Options
Java/Properties/
Additional Java system properties, which you can access through
System.getProperty. Additional Properties
Build Styles
During development, you may want to include debugging information in Java class files, but would rather not include it in the final version of those files. For example, theJAVA_COMPILER_DEBUGGING_SYMBOLSbuild setting determines whether debugging symbols are added to class files. So, a project could have a target called
MyAppDebugthat sets that build setting toYESand a target calledMyAppthat sets it toNO. However, when you need to set another build setting that affects the building of the application, you would have to make the change in two targets instead of one. To solve this situation, Project Builder includesbuild styles.
Build styles contain build setting configurations that override target build settings. So, instead of having two targets to produce an application, one for debugging and another for your customers, a project would contain one target that builds both types of products and a couple of build styles, one called Development and another named Deployment. The Development build style would contain theJAVA_COMPILER_DEBUGGING_SYMBOLS = YESbuild configuration, while the Deployment build style would have
JAVA_COMPILER_DEBUGGING_SYMBOLS = NO. Build System
To add a build style to a project, choose Project > New Build Style and name it. Then add the build settings that the build style is to override. For example, the build style shown in Figure 2-12 tellsjavacto optimize code for execution time.
Figure 2-12 Build style definition
Build Phases
Build phases define concrete tasks that Project Builder performs to build a product. These are the build phases you use in Java application projects:
● SourcesCompiles the selected Java source files usingjavacand puts the generated class files in
$TEMP_DIR/JavaClasses. It uses theJavaFileListfile in the target’s build directory (theTEMP_DIR
build setting).
● Java Resource FilesCopies the selected Java resource files, theDancestrings.stringfile for example,
to$TEMP_DIR/JavaClasses.
● Bundle ResourcesCopies the selected bundle resource files, such as the icon file, to the resulting bundle’s
Resourcesdirectory.
● Frameworks & LibrariesLinks the class files generated in the Sources build phase with the selected
frameworks and libraries, and archives the result in a JAR file (when theJAVA_ARCHIVE_CLASSESbuild setting is set toYES).
● Shell Script FilesExecutes a custom shell script. The value of every build setting is accessible in the script
using the format$BUILD_SETTING,$(BUILD_SETTING), or${BUILD_SETTING}. Therefore, you can
● Copy FilesCopies the files indicated in the build phase to a specified location. To select the files to copy,
drag them from the Files list into the Files list.
Figure 2-13 is an example of inserting a shell script phase to confirm the value of a build setting. It shows a script that displays the value of theJAVA_COMPILER_FLAGSbuild setting. Figure 2-14 shows the script’s output.
Figure 2-13 Build-setting display script
Figure 2-14 Output of a build-setting display script Build System
This chapter shows how to develop text-based Java applications or tools in Project Builder using the tool project template. It guides you through the creation of two projects, Hello and Clock. The former one is a “Hello, World” application, while the latter is a simple tool to display the current time, which is included in this document’s companion files. SeeIntroduction to Project Builder for Java (page 8) for details.
Creating the “Hello, World” Tool
The Java Tool project template provides the prototypical “Hello, World” application. Follow these steps to create your first Java application using Project Builder.
1. Launch Project Builder. It’s located in/Developer/Applications.
2. Create a Java tool project.
Choose File > New Project, and select Java Tool under Java in the project-template list of the New Project pane.
3. Name the project and choose a location for it.
In the New Java Tool pane of the Assistant, enterHelloin the Project Name text input field, click Choose, and choose a location for it.
Developing a Tool
When done, you should see the Project Builder window. Figure 3-1 shows the window with three editor panes, one for each file in the project, the Java source file, the manifest file, and the man page documentation file. The product,Hello.jar, is shown in red because it hasn’t been built.
Figure 3-1 The Hello project in Project Builder
Build and run the application by choosing Build > Build and Run. Figure 3-2 shows the Run pane of the Project Builder window. The Run pane displays the console output of the application.
Figure 3-2 Project Builder’s Run pane showing Hello’s console output
Creating the Clock Tool
This section shows how to create the Clock tool. Clock is a text-based application that tells time. It takes an optional command-line argument, the name of the user. You can find the finished product among this document’s companion files incompanion/projects/Clock(seeIntroduction to Project Builder for Java (page 8) for details on companion files).
Follow these instructions to create the Clock tool.
1. Create a Java tool project and name itClock.
2. Edit themainmethod of the Clock class so that it looks like this:
public static void main (String args[]) { Date date = new Date();
if (args.length > 0) {
String user_name = args[0];
System.out.println("Hello, " + user_name + ". It's " + date); }
Developing a Tool
else {
System.out.println("It's " + date); }
}
3. Add an argument to the application’s launch arguments to test it within Project Builder.
a. Click the Targets tab to display the Targets list.
b. Click java under Executables in the Targets list.
c. Click the plus sign (+) in the Arguments pane of the target editor.
d. Enter-jar "Clock.jar" Sheillain the newly added row of the Launch Arguments list.
e. Deselect the Use option in the first row by clicking the checkmark in the Use column. The Arguments pane should now look like Figure 3-3.
Figure 3-3 Arguments pane of the executable editor in Project Builder
Build and run the application. You should see its output in Project Builder’s Run pane, as shown in Figure 3-4.
Figure 3-4 Output of Clock tool displayed in Project Builder
Installing the Clock Tool
This section shows how to install the Clock tool on a computer. Follow these steps to install Clock on your computer:
1. Determine the location of the installed product by adding theINSTALL_DIRbuild setting to the project and configuring the setting appropriately.
a. Click the Targets tab to display the Targets list.
b. Click the Clock target.
c. Click Expert View under Settings in the target editor.
d. Click the plus sign (+) in the Build Settings pane. Developing a Tool
e. In the newly added row, enterINSTALL_PATHin the Name column andToolsin the Value column. The Expert View pane should look like Figure 3-5.
Figure 3-5 Expert View pane of the target editor in Project Builder
2. Runpbxbuildto install the application:
a. Launch Terminal. It’s located in/Applications/Utilities.
b. Execute the following commands:
% cd <path_to_Clock_project>
% pbxbuild install -buildstyle Deployment
Now, your/tmpdirectory contains the Clock distribution directory (Clock.dst), as shown in Figure 3-6.
Figure 3-6 Clock distribution directory in/tmp
If you wantpbxbuildto install in the final destination of a product instead of in/tmp, use the following commands:
sudo pbxbuild clean
sudo pbxbuild install -buildstyle Deployment DSTROOT=/
This creates/Toolsin your root volume if it doesn’t already exist and places the application’s JAR file there, as shown in Figure 3-7.
Figure 3-7 Clock target directory
To run the application, double-click the JAR file. To view the application’s output when you launch it from the Finder, launch Console, located in/Applications/Utilities. Figure 3-8 shows Console displaying the output of a Clock session.
Figure 3-8 Output of Clock viewed through Console Developing a Tool
This chapter covers the steps needed to develop Swing applications. First, this chapter guides you through the creation of a simple application, completely based on Project Builder’s Swing project template. Second, to show how to port an existing Swing application to Mac OS X, it shows how to create a Swing project based on Sun’s File Chooser Demo application and deploy it as a Mac OS X application; the finished project is in
companion/projects/FileChooser. (SeeIntroduction to Project Builder for Java (page 8) for details on this document’s companion files.) Finally, this chapter explains how to change the icon the Finder displays for the application from the generic Java application icon. .
Creating the “Hello, Swing” Application
The Swing application template provides another version of the “Hello, World” application. Follow these steps to create a project that demonstrates how a Swing application looks in Mac OS X.
1. Launch Project Builder. It’s located in/Developer/Applications.
2. Create a Java Swing application project.
Choose File > New Project, and select Java Swing Application under Java in the project-template list of the New Project pane.
In the New Java Swing Application pane of the Assistant enterHello_Swingin the Project Name text input field, click Choose, and choose a location for the project folder.
Developing a Swing Application
When done, you should see the Project Builder window, shown in Figure 4-1. The product,Hello_Swing.app, appears in red because it hasn’t been built.
Figure 4-1 The Hello_Swing project in Project Builder’s window
Build and run the application by choosing Build > Build and Run. Figure 4-2 shows the running Hello_Swing application.
Figure 4-2 Hello_Swing application in action
Creating the File Chooser Demo
This section explains how to use existing Java source files to create a Swing-based Mac OS X application. You can download source code that demonstrates the use of the JFileChooser class (javax.swing) at http://java.sun.com/docs/books/tutorial/uiswing/components/filechooser.html. You can also use the files included with this document incompanion/source/FileChooser(seeIntroduction to Project Builder for Java (page 8) for details on companion files).
Perform these steps to create a file-chooser demonstration project.
1. Create a Java Swing application project namedFileChooser.
2. Remove the standard source files from the project:
a. Select theFileChooser.java,AboutBox.java, andPreferences.javafiles in the Files list.
b. Choose File > Delete or press the Delete key.
c. Click Delete References & Files in the Delete References dialog, shown in Figure 4-3. Figure 4-3 Delete References dialog of Project Builder
3. Add the source files and image files required for the project:
a. Choose Project > Add Files. Developing a Swing Application
b. Navigate to where the source files reside, select them, and click Add. Figure 4-4 exemplifies the addition of the file-chooser demonstration files incompanion/source/FileChooser.
Figure 4-4 Adding source files to a project in Project Builder
c. In the dialog that appears, select “Copy items into destination group’s folder” and make sure the FileChooser target is selected in the Add To Targets list.
d. Repeat the previous step for the image files.
4. Examine the FileChooser target to verify that the newly added files are assigned to the correct build phases:
a. Click the Targets tab and select the FileChooser target in the Targets list.
b. Select the Sources build phase and the Java Resource Files build phase in the target editor. Make sure the source files and image files you added to the project appear in the Sources pane and the Java Resource Files pane, respectively.
5. Change the name of the main class in the information property list:
a. Select Pure Java–Specific under Simple view under Info.plist Entries in the target editor.
b. EnterFileChooserDemoin the Main Class text field.
6. Clean the FileChooser target by choosing Build > Clean and click Clean Active Target in the dialog that appears.
Cleaning the target erases any temporary files stored in the target’sbuilddirectory, which may have been left there in previous builds. (If you didn’t build the application, you may skip this step.)
Developing a Swing Application
Build and run the application. You should see the window shown in Figure 4-5.
Figure 4-5 FileChooser in action
If instead of a running application you get an error message like the following in Project Builder’s Run pane, make sure that the name of the application’s main class matches the contents of the Main Class entry of the Pure Java–Specific pane of the Info.plist Entries pane in the target editor.
[LaunchRunner Error] The main class "FileChooser" could not be found. [JavaAppLauncher Error] CallStaticVoidMethod() threw an exception java.lang.NullPointerException
at apple.launcher.LaunchRunner.run(LaunchRunner.java:85) at apple.launcher.LaunchRunner.callMain(LaunchRunner.java:50)
at apple.launcher.JavaApplicationLauncher.launch(JavaApplicationLauncher.java:52) Exception in thread "main"
FileChooser has exited with status 0.
When you click the Show FileChooser button of the FileChooserDemo window, you should see a window like the one in Figure 4-6. Of course, the actual look of the window depends on the selections you make in the FileChooserDemo window.
Figure 4-6 Open dialog displayed by FileChooserDemo
Changing an Application’s Icon
The Resources folder of an application package holds several types of files, including icon files. The Finder consults theCFBundleIconFileinformation property list entry to determine which of these files to use as the application’s icon.
Follow these steps to change the icon of the FileChooser application developed inCreating the File Chooser Demo (page 46) from the default icon.
1. Identify the icon file for the new icon.
You can find an icon file in/Developer/Applications/Pixie.app/Contents/Resources/Big.icns. In Terminal, execute the following command:
cp /Developer/Applications/Pixie.app/Contents/Resources/Big.icns <FileChooser_project_directory>
2. Remove theFileChooser.icnsfile from the FileChooser project:
a. SelectFileChooser.icnsin the Files list in the Project Builder main window.
b. Choose Edit > Delete or press the Delete key.
c. Click Delete References & Files. Developing a Swing Application
3. Add the icon file for the desired icon to the project:
a. Choose Project > Add Files.
b. SelectBig.icnsin the file list and click Add.
c. In the dialog that appears, make sure “Copy items into destination group’s folder” is not selected and click Add.
4. Make sure that the new icon file is assigned to the Bundle Resources build phase and not the Java Resource Files build phase.
a. Select the Java Resource Files build phase and the Bundle Resources build phase in the target editor of the FileChooser target.
b. DragBig.icnsfrom the Files list of the Java Resource Files pane to the Files list of the Bundle Resources pane.
5. Set the name of the icon file of the application.
a. Select Application Icon under Simple View under Info.plist Entries in the target editor.
b. EnterBig.icnsin the “Icon file” text field of the Application Icon pane. Developing a Swing Application
Clean the project, and build and run the application. The icon forFileChooser.appin the build folder of the project should have the icon used by Pixie.
When you need to leverage existing C or Objective-C code in a Java application or need to improve the performance of an application by executing critical parts natively instead of on the Java virtual machine, you use the Java Native Interface (JNI). The JNI provides a way for Java code to communicate with C-based libraries. Project Builder provides a template that facilitates the development of JNI-based applications. For an explanation of the elements of that template, including its targets, seeThe JNI Application Template (page 14).
Creating the “Hello, JNI” Application
The JNI application template provides yet another version of a “Hello, World” application. This one, however, joins the flexibility of Java with the high performance of C code to print the famous greeting on the console. Follow these steps to create a JNI-based application.
1. Launch Project Builder. It’s located in/Developer/Applications.
2. Create a Java JNI application project.
Choose File > New Project, and select Java JNI Application under Java in the template list.
3. Name the project and choose a location for it.
In the New Java JNI Application pane of the Assistant, enterHello_JNIin the Project Name text input field, click Choose, and choose a location for the project folder.
When done, you should see the Project Builder window, shown in Figure 5-1. The files in red are the project’s products, which haven’t been built.
Figure 5-1 The Leverage project in the Project Builder window
Listing 5-1 Leveragejnilib.csource file in the Leverage project
#include "JNIWrapper.h"
int shared_function(const char *arg) {
printf("shared_function called with %s\n", arg); return 42;
}
JNIEXPORT jint JNICALL Java_JNIWrapper_native_1method(JNIEnv *env, jobject this, jstring arg) {
/* Convert to UTF8 */
const char *argutf = (*env)->GetStringUTFChars(env, arg, JNI_FALSE); /* Call into external dylib function */
jint rc = shared_function(argutf); /* Release created UTF8 string. */
(*env)->ReleaseStringUTFChars(env, arg, argutf); return rc;
}
Listing 5-2 JNIWrapper.javasource file in the Leverage project
import java.util.*; public class JNIWrapper {
static {
// Ensure native JNI library is loaded. System.loadLibrary("Leverage");
}
public JNIWrapper() {
System.out.println("JNIWrapper instance created");
Developing a JNI Application
}
native int native_method(String arg); public static void main (String args[]) {
System.out.println("Started JNIWrapper"); JNIWrapper newjni = new JNIWrapper();
int result = newjni.native_method("Hello World !");
System.out.println("Finished JNIWrapper. Answer is " + result); }
}
Now, make sure the Leverage target is selected, and build and run the application. Several files appear in the project’s build folder. Because this is a JNI application, in addition to the JAR file containing the Java application, you see a JNI library file, which contains the object file for the native function specified inLeveragejnilib.c
(Figure 5-2). The Header folder contains theJNIWrapper.hfile, which is generated byjavahfrom the
JNIWrapper.classfile.
Figure 5-2 The build folder of the Leverage project after building the application
JNI-Based Examples
The developer tools package includes several examples of JNI-based applications, including a Cocoa/Java application located in/Developer/Examples/Java/AppleDemos/CocoaComponent. Open those projects and examine them to get a glimpse of the power and flexibility that Java and JNI provide.
Project Builder provides facilities for debugging Java applications. They allow you to stop the execution of an application at a specific line of code, execute a line of code within a method, step into a method call, step out of a method, or view the contents of variables in any method in the call stack.
This chapter shows how to use Project Builder’s debugging facilities to analyze the execution of a small application. It’s based on the Debug project included in the companion folder (companion/projects/Debug); seeIntroduction to Project Builder for Java (page 8) for details on companion files.
Adding Breakpoints
To pause the execution of an application, place a breakpoint marker in the line of code you want execution to stop. Listing 6-1 shows the definition of the Debug class in the Debug project.
Listing 6-1 Debug.javafile of Debug project
import java.util.*; public class Debug {
public static void main (String args[]) {
System.out.println("<Debug.main> Hello, World!"); int a_number = 1;
// 1
int another_number = 10;
method(a_number, another_number);
System.out.println("<Debug.main> a_number = " + a_number);
System.out.println("<Debug.main> another_number = " + another_number); }
public static void method(int number1, int number2) {
Person person = new Person("Kathy", "Yates", "female", "brown"); String a_string = person.firstName() + " likes debugging code."; System.out.println("<Debug.method> person = " + person);
} }
To add a breakpoint to the line numbered 1, click the line’s left margin in the editor. You can also set the insertion point in the line and choose Debug > Add Breakpoint at Current Line. Figure 6-1 shows the result.
Figure 6-1 Breakpoint inDebug.javafile of Debug project
To remove a breakpoint, click the breakpoint marker, drag the marker out of the margin, or choose Debug > Remove Breakpoint at Current Line.
To disable a breakpoint, Command-click the breakpoint marker or choose Debug > Disable Breakpoint at Current Line.
Stepping Through Lines of Code
To build and debug the Debug project, choose Build > Build and then choose Debug > Debug Executable, or click the Build and Debug toolbar button. Figure 6-2 shows the result, in which the highlighted line is about to be executed.
Figure 6-2 Debugging an application—stopping
To step to the next line of code choose Debug > Step Over or click the Step Over toolbar button, as shown in Figure 6-3. Because the line executed is not a method call, clicking the Step Into toolbar button would give the same result.
Figure 6-3 Debugging an application—stepping over Debugging Applications
To step into a method choose Debug > Step Into or click the Step Into toolbar button, as shown in Figure 6-4.
Figure 6-4 Debugging an application—stepping into a method
To step out of a method, (that is, to execute the rest of the lines in the current method and return to calling method), choose Debug > Step Out or click the Step Out toolbar button.
Viewing the Debug Information
The pop-up menu to the right of the Files tab (with main chosen) lists threads of execution. The list below it shows the call stack for the chosen thread. The pane to the right of the call stack pane, the variable pane, shows the names of the parameters and variables declared for the currently executing method in the chosen thread. It may also show the arguments used in the method invocation and the values of the local variables. Figure 6-5 shows the call stack of the main thread and parameters and local variables of a method.
Figure 6-5 Debugging an application—viewing variable information
Accessing the Contents of Objects
While you debug code, you may need to see the values of an object’s instance variables. Most programmers sprinkleSystem.out.printlninvocations throughout their code to accomplish this essential task. In Project Builder you can execute an object’stoStringmethod to get the same effect.
Listing 6-2 shows a partial listing of the Person class. It contains an implementation of thetoStringmethod.
Listing 6-2 Person.javafile
public class Person {
private String firstName; private String lastName;
Debugging Applications
private String gender; private String hairColor;
public Person(String firstName, String lastName, String gender, String hairColor) { setFirstName(firstName); setLastName(lastName); setGender(gender); setHairColor(hairColor); } ...
public String toString() {
return "{FirstName: " + firstName() + "},{LastName: " + lastName() + "},{Gender: " + gender() + "},{HairColor: " + hairColor() + "}";
} }
Figure 6-6 depicts a debugging session in which the user chooses the Print Description to Console command through the contextual menu of person in the Variable list of the Debug pane.
Figure 6-6 Debugging an application—viewing an object’s contents
Listing 6-3 shows the output generated.
Listing 6-3 Console output after executing Print Description to Console command on a Person object
Picked up _JAVA_OPTIONS: -Xdebug -Xnoagent -Djava.compiler=NONE -Xrunjdwp:transport=dt_local,server=y,address=8000
<Debug.main> Hello, World! Printing description of person:
"{FirstName: Kathy},{LastName: Yates},{Gender: female},{HairColor: brown}" JavaBug>
Debugging Applications
Objective-CSwift
This appendix lists some of the build settings you are likely to use in Java-based projects. See the Project Builder release notes for a complete treatment of Project Builder’s build settings.
Project Settings Reference
Table A-1 describes build settings that apply to a project as a whole; that is, they apply to all targets in a project.
Table A-1 Project build settings
Description Build setting
Name of the project. This setting is read-only.
PROJECT_NAME
Base location for built products. Configured initially as <project_-directory>/build.
SYMROOT
Base location for the temporary files generated by a project’s targets. Default:<project_directory>/build. This setting is read-only.
BUILD_DIR
The location for products. Set initially to$BUILD_DIRin development builds and$INSTALL_DIRin deployment builds when the product is installed. When the product is not installed, the setting is configured to
$BUILD_DIR/UninstalledProductsin development and deployment builds.
TARET_BUILD_DIR
The base location for all products. Configured initially as$BUILD_DIR.
BUILT_PRODUCTS_DIR
Deployment Settings Reference
Table A-2 describes build setting that determine the location of an installed product and its permissions.
Table A-2 Deployment build settings
Description Build setting
Base location for the installed product. Default: /tmp/$PROJECT_-NAME.dst/.
DSTROOT
Location of the installed product. For example,/my_app_path. This setting is undefined by default.
INSTALL_PATH
Fully qualified path for the installed product. By default, it concatenates
DSTROOTandINSTALL_PATH. This setting is read-only.
INSTALL_DIR
Determines whether the target’s product gets installed. When undefined, which is the default, the target’s product gets installed.
SKIP_INSTALL
WhenYES, the product gets installed in its deployment location ($INSTALL_DIR). Otherwise, the product gets installed in
$BUILT_PRODUCTS_DIR. This setting is undefined by default.
DEPLOYMENT_LOCATION
User who owns the generated product. Aspbxbuildshould be run by root, the owner should be root. This is applied after the product is deployed.
INSTALL_OWNER
Group who owns the generated product. Usually, staff. This is applied after the product is deployed.
INSTALL_GROUP
The mode that is applied to the product after it’s deployed. Default:
ugo-w, o+rX.
INSTALL_MODE_FLAG
Target Settings Reference
Table A-3 describes build settings that identify a target and determine the location of source files and of a directory for temporary files created as a product gets built.
Table A-3 Target build settings
Description Build setting
Name of the target. This setting is read-only.
TARGET_NAME
Name of the product the target builds. This setting is read-only.
PRODUCT_NAME
Build Settings Reference
Description Build setting
The action being performed on the target. Values:buildorcleanfrom Project Builder,install,installhdrs, andinstallsrcfrompbxbuild. When its value isclean, the target’s build directory is deleted and no build phases are executed. This setting is read-only.
ACTION
The base location of project sources. It’s set to the contents of thePWDenvironment variable whenPWDis defined or to the current directory otherwise.
SRCROOT
The base location for intermediate build files. Configured initially as
$SRCROOT/build(MyProject/build).
OBJROOT
The location of a target’s intermediate files. Configured initially as
$OBJROOT/$PROJECT_NAME.build/$TARGET_NAME.build.
TEMP_DIR
Java Compiler Settings
Table A-4 describes build settings that determine the flags that are used in the invocation of the Java compiler as well as the location of generated Java class files.
Table A-4 Java compiler build settings
Description Build setting
The base location for Java class files. Configured as $TEMP_-DIR/JavaClasses. This setting is read-only.
CLASS_FILE_DIR
The compiler used in Sources (compilation) build phases. Initially configured as/usr/bin/javac.
JAVA_COMPILER
Determines whether Java classes are compiled with debugging symbols. WhenNO, debugging symbols are not generated. When undefined or
YES, debugging symbols are generated. Initially undefined.
JAVA_COMPILER_-DEBUGGING_SYMBOLS
Determines whether the compiler generates warnings. WhenYES, warnings are not produced. When undefined orNO, warnings are produced. Initially undefined.
JAVA_COMPILER_-DISABLE_WARNINGS
Determines whether the compiler shows a description of the use of deprecated API (whether the-deprecationcommand-line option ofjavacandjikesis used).
JAVA_COMPILER_-DEPRECATED_WARNINGS
Description Build setting
Determines the value for the-encodingcommand-line option of
javacandjikes. When undefined,MACINTOSHis used.
JAVAC_SOURCE_FILE_-ENCODING
Use to set compiler options not supported in build settings forjavac
andjikes. For example, you can set the-extdirscommand-line option ofjavacto include paths to additional JAR files.
JAVA_COMPILER_FLAGS
Basejavaccommand-line options to use forjavac. When undefined, the options are configured as-J-Xms64m -J-XX:NewSize=4M -J-Dfile.encoding=UTF8. For more information, seeInside Mac OS X: Java Development on Mac OS X.
JAVAC_DEFAULT_FLAGS
Basejikescommand-line options to use for javac. When undefined, the options are configured as+E +OLDCSO.
JIKES_DEFAULT_FLAGS
Space-separated list of paths of required JAR files. This list is added to the-classpathcommand-line option of the compiler invocation.
JAVA_CLASS_SEARCH_-PATHS
Colon-separated list of additional paths of required JAR files. This list is added to the-classpathcommand-line option of the compiler invocation.
OTHER_JAVA_CLASS_PATH
Space-separated list of required JAR files. Initially configured as the combination of$LINKED_CLASS_ARCHIVESand $OTHER_JAVA_-CLASS_PATH. This setting is read-only.
LINKED_CLASS_ARCHIVES
Java Application Settings
Table A-5 describes build settings that determine whether Java class files are archived, how they are archived, and the name of the archive file, among other items.
Table A-5 Java application build settings
Description Build setting
Determines the disposition of Java class files generated by the target. This setting can have two values,YESorNO. WhenYES(the default), Java classes are archived in a JAR file, which is then copied to the product’sContents/Resources/Javadirectory. WhenNO, the class files are copied to that directory. You should not change the value of this setting if you plan to distribute your application or tool.
JAVA_ARCHIVE_CLASSES
Build Settings Reference
Description Build setting
Determines whether the contents of the archive file are compressed. WhenYESthe contents of the archive are compressed; otherwise, the contents are not compressed. Initially unconfigured.
JAVA_ARCHIVE_-COMPRESSION
Determines the extension used for the JAR file. Values:.jar,.war, or
.ear.
CLASS_ARCHIVE_SUFFIX
Project-directory based path to the file used to supplement the default manifest file (MANIFEST.MF) of the JAR file.
JAVA_MANIFEST_FILE
Path to the Cocoa application stub that’s embedded in a bundle-based Java application to launch the Java application. Configured as
/System/Library/Frameworks/Java-VM.framework/Resources/MacOS/JavaApplicationStub. This setting is read-only.
JAVA_APP_STUB
Path to the development-settings property list file of the product. Initially configured as$SYMROOT/pbdevelopment.plist.
DEVELOPMENT_PLIST_-FILE
This table describes the changes toProject Builder for Java.
Notes Date
Corrected obsolete links. 2003-10-10
Second preliminary version ofProject Builder for Java. 2003-05-01
Preliminary version ofProject Builder for Java. 2003-03-01