i5k_doc Documentation
Release 1.0
Fish Lin
Table of Contents
1 Pre-requisites 3
1.1 Python modules . . . 3
1.2 Service-side pre-requisites . . . 3
2 Setup Guide 5 2.1 Setup Guide (CentOS) . . . 5
2.1.1 Project Applications . . . 5
2.1.2 Yum . . . 5
2.1.3 Python. . . 6
2.1.4 RabbitMQ. . . 6
2.1.5 Memcached . . . 7
2.1.6 Database . . . 7
2.1.7 Python Modules and Packages . . . 8
2.1.8 Chrome Driver . . . 9
2.1.9 Celery . . . 9
2.1.10 Migrate Schema to to PostgreSQL . . . 9
2.1.11 Install BLAST binary . . . 9
2.1.12 Start development server . . . 10
2.1.13 Apache (for production server) . . . 10
2.2 Setup Guide (MacOS) . . . 12
2.2.1 Project Applications . . . 12
2.2.2 Homebrew . . . 12
2.2.3 Python. . . 13
2.2.4 RabbitMQ. . . 13
2.2.5 Memcached . . . 13
2.2.6 Database . . . 13
2.2.7 Python Modules and Packages . . . 14
2.2.8 Chrome Driver . . . 14
2.2.9 Celery . . . 14
2.2.10 Migrate Schema to to PostgreSQL . . . 14
2.2.11 Install BLAST binary . . . 14
2.2.12 Start development server . . . 14
3 Workplace Apps 17 3.1 Blast . . . 17
3.1.1 BLAST DB Configuration . . . 17
3.2.3 HMMER Query Histroy . . . 19
3.3 Clustal . . . 19
3.3.1 Install & Configuration . . . 19
3.3.2 Clustal Query Histroy. . . 20
3.4 Dashboard . . . 20
3.5 Data. . . 20
3.6 Proxy . . . 20
3.7 Drupal_SSO . . . 20
3.8 WebApollo SSO . . . 20
4 WebApollo Single Sign On 21 4.1 What is WebApollo SSO? . . . 21
4.2 Framework Overview . . . 22
4.3 Configuration. . . 22
4.4 Register WebApollo . . . 23
4.5 Utilities . . . 23
4.5.1 Utilities only for Admin . . . 23
4.5.2 General Utilities. . . 24
5 About i5k Workplace at NAL 25
6 Indices and tables 27
i5k_doc Documentation, Release 1.0
CHAPTER
1
Pre-requisites
1.1 Python modules
Described inrequirements.txt:Django==1.11.11 Markdown==2.6.6 celery==4.1.0 cssmin==0.2.0
django-pipeline==1.6.8 django-simple-captcha==0.4.9 djangorestframework==3.7.7 django-rest-swagger==0.3.5 docutils==0.12
jsmin==2.0.11 pillow==2.2.2 psycopg2==2.7.1 pycrypto==2.6.1
python-memcached==1.57 wsgiref==0.1.2
django-suit==0.2.26 six>=1.10.0
django-axes==2.3.3 requests==2.18.4
1.2 Service-side pre-requisites
• RabbitMQ• mod_wsgi • PostgreSQL
CHAPTER
2
Setup Guide
This is our introduction to this project.
2.1 Setup Guide (CentOS)
This setup guide is for CentOS. It’s tested in CentOS 6.7 and CentOS 7.2 with django 1.8.12 Note: The following variables may be used in path names; substitute as appropriate:
<user> : the name of the user doing a set up.
<user-home> : the user's home directory, e.g., /home/<user>
<git-home> : the directory containing the genomics-workspace, and `.git/` folder ˓→for `git` will be there.
2.1.1 Project Applications
Clone or refresh the genomics-workspace:git clone https://github.com/NAL-i5K/genomics-workspace
# Or if the repository exists:
cd <git-home>
git fetch
2.1.2 Yum
Generate metadata cache:
2.1.3 Python
Install necessary packages:
sudo yum -y groupinstall "Development tools"
sudo yum -y install zlib-devel bzip2-devel openssl-devel ncurses-devel sqlite-devel sudo yum -y install readline-devel tk-devel gdbm-devel db4-devel libpcap-devel xz
-˓→devel python-devel
Install python 2.7.13 from source:
cd <user-home>
wget http://www.python.org/ftp/python/2.7.8/Python-2.7.13.tar.xz tar -xf Python-2.7.13.tar.xz
# Configure as a shared library:
cd Python-2.7.13
./configure --prefix=/usr/local --enable-unicode=ucs4 --enable-shared LDFLAGS=
"-Wl,-˓→rpath /usr/local/lib"
# Compile and install:
make
sudo make altinstall
# Update PATH:
export PATH="/usr/local/bin:$PATH"
# Checking Python version (output should be: Python 2.7.13):
python2.7 -V
# Cleanup if desired:
cd ..
rm -rf Python-2.7.13.tar.xz Python-2.7.13
Install pip and virtualenv:
wget https://bootstrap.pypa.io/ez_setup.py sudo /usr/local/bin/python2.7 ez_setup.py
wget https://bootstrap.pypa.io/get-pip.py sudo /usr/local/bin/python2.7 get-pip.py
sudo /usr/local/bin/pip2.7 install virtualenv
Build a separate virtualenv:
cd <git-home>
# Create a virtual environment called py2.7 and activate:
virtualenv -p python2.7 py2.7 source py2.7/bin/activate
2.1.4 RabbitMQ
Install RabbitMQ Server:i5k_doc Documentation, Release 1.0
cd <user-home>
# Install RHEL/CentOS 6.8 64-Bit Extra Packages for Enterprise Linux (Epel). # The 6.8 Epel caters for CentOS 6.*:
wget https://dl.fedoraproject.org/pub/epel/6/x86_64/epel-release-6-8.noarch.rpm sudo rpm -ivh epel-release-6-8.noarch.rpm
# For RHEL/CentOS 7.* :
# wegt http://dl.fedoraproject.org/pub/epel/7/x86_64/e/epel-release-7-10.noarch.rpm # and change other commands accordingly
# Install Erlang:
sudo yum -y install erlang
# Install RabbitMQ server:
sudo yum -y install rabbitmq-server
# To start the daemon by default when system boots run:
sudo chkconfig rabbitmq-server on
# Start the server:
sudo /sbin/service rabbitmq-server start
# Clean up:
rm epel-release-6-8.noarch.rpm
2.1.5 Memcached
Install and activate memcached:sudo yum -y install memcached
# Set to start at boot time:
sudo chkconfig memcached on
2.1.6 Database
Install PostgreSQL:# Add line to yum repository:
echo 'exclude=postgresql*' | sudo tee -a /etc/yum.repos.d/CentOS-Base.repo # Install the PostgreSQL Global Development Group (PGDG) RPM file:
sudo yum -y install http://yum.postgresql.org/9.5/redhat/rhel-6-x86_64/pgdg-centos95-˓→9.5-2.noarch.rpm
# Install PostgreSQL 9.5:
sudo yum -y install postgresql95-server postgresql95-contrib postgresql95-devel
# Initialize (uses default data directory: /var/lib/pgsql): sudo service postgresql-9.5 initdb
# Startup at boot:
sudo chkconfig postgresql-9.5 on
(continued from previous page)
# Control:
# sudo service postgresql-9.5 <command> #
# where <command> can be: #
# start : start the database.
# stop : stop the database.
# restart : stop/start the database; used to read changes to core configuration
˓→files.
# reload : reload pg_hba.conf file while keeping database running.
# Start:
sudo service postgresql-9.5 start
#
# (To remove everything: sudo yum erase postgresql95*)
#
# Create django database and user: sudo su - postgres
psql
# At the prompt 'postgres=#' enter: create database django;
create user django;
grant all on database django to django;
# Connect to django database: \c django
# Create extension hstore: create extension hstore;
# Exit psql and postgres user: \q
exit
# Config in pg_hba.conf: cd <git-home>
export PATH=/usr/pgsql-9.5/bin:$PATH
# Restart:
sudo service postgresql-9.5 restart
2.1.7 Python Modules and Packages
Install additional Python packages:cd <git-home>
pip install -r requirements.txt
i5k_doc Documentation, Release 1.0
2.1.8 Chrome Driver
• Install ChromeDriver fromhttps://sites.google.com/a/chromium.org/chromedriver/downloads
• Add to PATH
2.1.9 Celery
Configure the celery:# Copy files: #
# When using CentOS 7.* copy
# celeryd.sysconfig and celerybeat.sysconfig # to /etc/default instead.
#
sudo cp celeryd /etc/init.d sudo cp celerybeat /etc/init.d
sudo cp celeryd.sysconfig /etc/sysconfig/celeryd sudo cp celerybeat.sysconfig /etc/sysconfig/celerybeat
# Sudo edit '/etc/sysconfig/celeryd' as follows:
CELERYD_CHDIR="<git-home>"
CELERYD_MULTI="<git-home>/py2.7/bin/celery multi"
# Sudo edit '/etc/sysconfig/celerybeat' as follows:
CELERYBEAT_CHDIR="<git-home>"
CELERY_BIN="<git-home>/py2.7/bin/celery"
# Set as daemon:
sudo chkconfig celeryd on sudo chkconfig celerybeat on
2.1.10 Migrate Schema to to PostgreSQL
Run migrate:cd <git-home>
# create log files
sudo mkdir /var/log/django/
sudo touch /var/log/django/django.log sudo chmod 666 /var/log/django/django.log sudo mkdir /var/log/i5k
sudo touch /var/log/i5k/i5k.log sudo chmod 666 /var/log/i5k/i5k.log python manage.py migrate
2.1.11 Install BLAST binary
To instll blast binary:2.1.12 Start development server
To run developement server:cd <git-home>
python manage.py collectstatic python manage.py runserver
2.1.13 Apache (for production server)
Please note: It is essential that tcp port 80 be open in your system. Sometimes the firewall may deny access to it. Check if iptables will drop input packets in the output of this command:
sudo iptables -L
If you see “INPUT” and “DROP” on the same line and no specific ACCEPT rule for tcp port 80 chances are web traffic will be blocked. Ask your sysadmin to open tcp ports 80 and 443 for http and https. Alternatively, check this
iptables guide.
Install Apache and related modules:
sudo yum -y install httpd httpd-devel mod_ssl
Give the system a fully qualified domain name (FQDN) if needed:
# Find out the system IP addres with 'ifconfig'.
# Assuming it is a VM created by Vagrant, this could be 10.0.2.15. # Sudo edit '/etc/hosts' and add an address and domain name entry. # For example:
10.0.2.15 virtualCentOS.local virtualCentOS
# Sudo edit the file /etc/httpd/conf/httpd.conf, # and set the ServerName, for example:
ServerName virtualCentOS.local:80
# Set to start httpd at boot:
sudo chkconfig httpd on
# Check this setting if you wish, with:
sudo chkconfig --list httpd
# Control:
# sudo apachectl <command> # Where <command> can be:
# start : Start httpd daemon. # stop : Stop httpd daemon.
# restart : Restart httpd daemon, start it if not running. # status : Brief status report.
# graceful : Restart without aborting open connections. # graceful-stop : stop without aborting open connections. #
# Start httpd daemon:
sudo apachectl start
# Test Apache:
# If all is well. This command should produce copious
(continues on next page)
i5k_doc Documentation, Release 1.0
(continued from previous page)
# HTML output and in the first few lines you should see:
# '<title>Apache HTTP Server Test Page powered by CentOS</title>'
curl localhost
# You can also view the formatted Apache test page in your # browser, e.g., firefox http://<setup-machine-ip-address>
This section documents the procedure to load organisms into the BLAST database. PRE-REQUISITES:
Storage: At least 32 GB of disk space.
Memory: At least 10 GB of memory in the system or VM.
To add organism to BLAST you need to download the relevant database files to the application ‘media’ directory. If for example you want to copy the BLAST databases from gmod-dev, make sure you have at least 32 GB of free disk space.
Also, to run the tool that populates the sequence table you need to have at least 10 GB of system or VM memory. In your VM:
cd <genomics-workspace-dir>/media
rsync gmod-dev:/usr/local/i5k/media/blast/db/* .
Organisms must be added one at a time using the Django app admin interface.
You need access to a user id with admin privileges. To do that you must alter the Postgres database to add such privileges to a normal user.
sudo su postgres psql django
First clear any entries that prevent login.
delete from axes_accessattempt where username='<user_name';
Set your id as superuser
update auth_user set is_staff = 't', is_active = 't' where username = '<user_name>';
Now you should be able to login as admin and navigate to <your_system>/admin/blast
And then to:
Home » App » Organisms » Add organism
For each organism:
Enter the organism name in the field, 'Display Name'.
Click in the 'Short Name' and 'Description' fields to have them populated
˓→automatically.
(continued from previous page)
Enter the organism NCBI Taxonomy ID, and click 'SAVE'
Click on: BLAST databases 'Add'
Now you must add the databases that correspond to each organism, from those located in: <genomics-workspace-dir>/media/blast/db/*
Navigate to:
Home » BLAST » BLAST databases
On this screen for each organism:
1. From the top three dropdown lists, select the organism, the type of database type
˓→being
loaded, and 'yes' for 'is_shown.'
2. Select the database files being loaded in the tabular list of database files.
3. From the dropdown list next to the 'Go' button, select, 'Populate the sequence
˓→table...'
and click go.
4. After a while, the three tick marks on each selected row should turn green.
2.2 Setup Guide (MacOS)
This setup guide is tested in MacOS Sierra (10.12.6) with django 1.8.12.
Note: The following variables may be used in path names; substitute as appropriate:
<user> : the name of the user doing a set up.
<user-home> : the user's home directory, e.g., /home/<user>
<git-home> : the directory containing the genomics-workspace, and `.git/` folder ˓→for `git` will be there.
2.2.1 Project Applications
Clone or refresh the genomics-workspace:git clone https://github.com/NAL-i5K/genomics-workspace
# Or if the repository exists:
cd <git-home>
git fetch
2.2.2 Homebrew
We recommend to useHomebrewas package manager. Installation steps can be found athttps://brew.sh/.
i5k_doc Documentation, Release 1.0
2.2.3 Python
Install virtualenv:pip install virtualenv
Build a separate virtualenv:
# Make root dir for virtualenv and cd into it:
cd genomics-workspace
# Create a virtual environment called py2.7 and activate:
virtualenv -p python2.7 py2.7 source py2.7/bin/activate
2.2.4 RabbitMQ
Install and run RabbitMQ Server:
brew install rabbitmq
# Make sure /usr/local/sbin is in your $PATH
rabbitmq-server
2.2.5 Memcached
Install and activate memcached:brew install memcached memcached
2.2.6 Database
Install PostgreSQL:brew install postgres psql postgres
# At the prompt 'postgres=#' enter:
create database django; create user django;
grant all on database django to django;
ALTER USER django CREATEDB;
# Connect to django database:
\c django
# Create extension hstore:
create extension hstore;
# Exit psql and postgres user:
\q exit
2.2.7 Python Modules and Packages
Install additional Python packages:cd <git-home>
pip install -r requirements.txt
2.2.8 Chrome Driver
• Install ChromeDriver fromhttps://sites.google.com/a/chromium.org/chromedriver/downloads
• Add to PATH
2.2.9 Celery
Configure celery:# Run celery manually
celery -A i5k worker --loglevel=info --concurrency=3
# Run celery beat maually as well
celery -A i5k beat --loglevel=info
2.2.10 Migrate Schema to to PostgreSQL
Run migrate:cd <git-home>
# create log files
sudo mkdir /var/log/django/
sudo touch /var/log/django/django.log sudo chmod 666 /var/log/django/django.log sudo touch /var/log/django/i5k.log
sudo chmod 666 /var/log/django/i5k.log python manage.py migrate
2.2.11 Install BLAST binary
To instll blast binary:python setup.py
2.2.12 Start development server
To run developement server:cd <git-home>
python manage.py collectstatic python manage.py runserver
i5k_doc Documentation, Release 1.0
This section documents the procedure to load organisms into the BLAST database. PRE-REQUISITES.
Storage: At least 32 GB of disk space.
Memory: At least 10 GB of memory in the system or VM.
To add organism to BLAST you need to download the relevant database files to the application ‘media’ directory. If for example you want to copy the BLAST databases from gmod-dev, make sure you have at least 32 GB of free disk space.
Also, to run the tool that populates the sequence table you need to have at least 10 GB of system or VM memory. In your VM:
cd <genomics-workspace-dir>/media
rsync gmod-dev:/usr/local/i5k/media/blast/db/* .
Organisms must be added one at a time using the Django app admin interface.
You need access to a user id with admin privileges. To do that you must alter the Postgres database to add such privileges to a normal user.
sudo su postgres psql django
First clear any entries that prevent login.
delete from axes_accessattempt where username='<user_name';
Set your id as superuser
update auth_user set is_staff = 't', is_active = 't' where username = '<user_name>';
Now you should be able to login as admin and navigate to <your_system>/admin/blast
And then to:
Home » App » Organisms » Add organism
For each organism:
Enter the organism name in the field, 'Display Name'.
Click in the 'Short Name' and 'Description' fields to have them populated
˓→automatically.
Enter the organism NCBI Taxonomy ID, and click 'SAVE'
Click on: BLAST databases 'Add'
<genomics-workspace-dir>/media/blast/db/*
Navigate to:
Home » BLAST » BLAST databases
On this screen for each organism:
1. From the top three dropdown lists, select the organism, the type of database type
˓→being
loaded, and 'yes' for 'is_shown.'
2. Select the database files being loaded in the tabular list of database files.
3. From the dropdown list next to the 'Go' button, select, 'Populate the sequence
˓→table...'
and click go.
4. After a while, the three tick marks on each selected row should turn green.
CHAPTER
3
Workplace Apps
3.1 Blast
IntroductionI5K BLAST Tutorial is onhttps://i5k.nal.usda.gov/content/blast-tutorial
3.1.1 BLAST DB Configuration
There are five tables for creating BLAST DB and browsing in I5K-blast. • Add Organism:
– Display name should be scientific name.
– Short name are used by system as a abbreviation. – Descriptions and NCBI taxa ID are automatically filled.
• Add Sequence types:
– Used to classify BLAST DBs in distinct catagories.
– Provide two kinds of molecule type for choosing, Nucleotide/Peptide. • Add Sequence
• Add BLAST DB
– ChooseOrgansim
– ChooseType(Sequence type)
– Type location of fasta file inFASTA file path(It should be in<git-home>/media/blast/db/
)
– TypeTitlename. (showed in HMMER page) – TypeDescriptions.
– Checkis shown, if not check, this database would show in HMMER page. – Save
• Add JBrowse settings
3.2 Hmmer
HMMER is used for searching sequence databases for homologs of protein sequences, and for making protein se-quence alignments. It implements methods using probabilistic models called profile hidden Markov models (profile HMMs).
I5K HMMER Tutorial is onhttps://i5k.nal.usda.gov/webapp/hmmer/manual.
3.2.1 Install & Configuration
InstallHMMERand append HMMER_bin directory in evironment varialbePATH.
i5k_doc Documentation, Release 1.0
3.2.2 HMMER DB Configuration
Like Blast, HMMER databases must be configured then they could be searched.
Go django admin page and click Hmmer on left-menubar. You need to create HMMER db instance (Hmmer dbs) for each fasta file.
• ChooseOrgansim
• Type location of peptide fasta file inFASTA file path
• TypeTitlename. (showed in HMMER page) • TypeDescriptions.
• Checkis shown, if not check, this database would show in HMMER page. • Save
3.2.3 HMMER Query Histroy
HMMER query histories are stored in tableHMMER results. Users could review them on dashboard. All query results (files on disk) will be removed if it’s expired. (default: after seven days)
Query results locate in directory$MEDIA_ROOT/hmmer/task/.
3.3 Clustal
ClustalW is the oldest of the currently most widely used programs for multiple sequence alignment. Clustal Omega is the latest version of CLUSTAL series. ClustalO is faster and more accurate because of new HMM alignment engine. I5K CLUSTAL Tutorial is onhttps://i5k.nal.usda.gov/webapp/clustal/manual.
3.3.1 Install & Configuration
3.3.2 Clustal Query Histroy
Clustal query histories are stored in tableClustal results. Users could review them on dashboard. All query results (files on disk) will be removed if it’s expired. (default: after seven days)
Query results locate in directory$MEDIA_ROOT/clustal/task/.
3.4 Dashboard
Personal query history.3.5 Data
Rest framework. Not finished
3.6 Proxy
For providing indirect access to some resources without https. Currently it is used by Web Apollo instances for looking up GO Terms.
3.7 Drupal_SSO
Coonection to Drupal summit data function.
DRUPAL_URL = 'https://gmod-dev.nal.usda.gov'
# cookie can be seen in same domain
DRUPAL_COOKIE_DOMAIN=".nal.usda.gov"
3.8 WebApollo SSO
Complete introduction locate in Section 4.CHAPTER
4
WebApollo Single Sign On
4.1 What is WebApollo SSO?
The basic idea in SSO is to provide handy user interface and make WebApollo user more like a community. In order to accomplish those ideas, we try to transfer management jobs from WebApollo to SSO. SSO gives the coordinators more authority to manage their members who can annotating and grant the priviledges on their own.
In SSO, we seperate users into three different roles.
• First, theADMINwho actually owns ‘admin priviledge’ in WebApollo, can manage users/groups/eroll event. • Second, the COORDINATOR who belong to group GROUP_(Organism_short_name(OSN))_ADMIN,
can manage membership in specific (Organism).
• Last, the remaining users are inUSER. They can make request to join (or leave) different organism team. Once be recuited in, user will pertain to groupGROUP_(OSN)_USER.
SSO make a virtual roleCOORDINATORby exploiting a conventional group nameGROUP_(OSN)_ADMINand the user in the team would be in groupGROUP_(OSN)_USER.
Role\ WebApollo Single Sign On (SSO) ADMIN Global Admin Global Admin
COORDINATOR Admin permission in GROUP_()_ADMIN
USER RWE permission in GROUP_()_USER with RWE permission
Note: Mapping between full organism name and short organism name are stored in django-blast app. Full organism name is the real name in WebApollo and short name is a abbreviation used in django-blast app.
4.2 Framework Overview
SSO was implemented in Django and JQuery. Conceptually, SSO is a proxy service for delegating user request to appropriate WebApollo service. The main advantage here is that SSO could provides more social utilities for the I5K community.
Database Schema (UserMapping)
Apollo_user_id Apollo_user_name Apollo_user_pwd django_user last_date 1 Chris (AES encrpted pwd) Christopher
2 Monica (AES encrpted pwd) Monica
3 Mei (AES encrpted pwd) NULL
SSO records the mapping between Apollo_user and django_user in tableUserMapping. Apollo_user_idand
django_userare unique attribute and this makes mapping a one to one relationship. (apollo_user_name could be changed and is not unique)
In above table, record 1 and 2 tell a formal relationship but record 3 describes an Apollo user doesn’t belong to any django user. User can claim it by re-register process. (mentioned below)
4.3 Configuration
SSO uses a pre-assigned admin Apollo account to communiate with Apollo server. The account must be create on apollo server first. Two URLs address of i5k server and apollo server are used to identify each others’ locations. In order to secure user password, SSO encrpt it before saving password into database.
WebApollo SSO configuration in django setting.py:
# WebApollo SSO robot account
ROBOT_ID='R2D2'
ROBOT_PWD='demo'
#URL of i5k workspace and webapollo
I5K_URL='http://i5k.nal.gov'
APOLLO_URL='http://i5k.apollo.nal.gov/apollo'
# cookie can be seen in Apollo-prod and Gmod-prod
APOLLO_COOKIE_DOMAIN=".nal.usda.gov"
#Encypt webapollo user password in SSO database. #AES key must be either 16, 24, or 32 bytes long.
SSO_CIPHER='1234567890123456'
i5k_doc Documentation, Release 1.0
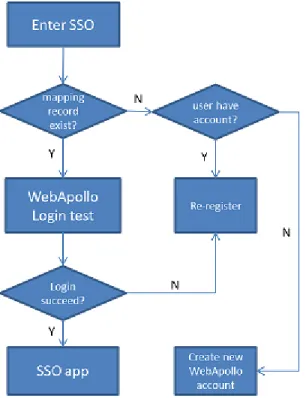
4.4 Register WebApollo
There are three ways to make connection between i5k account to apollo account.
• When registering an new i5k account, SSO also create an apollo account(same ID). • When entering SSO, if SSO doesn’t have mapping record of user,
– it asks user to create a new apollo account – or register his account info into SSO.
• When entering SSO, if SSO has mapping record of user but login failed, it asks user to re-enter his password into SSO.
4.5 Utilities
There are six individual tab pages, three of them are general and others are specific for Admin user.
4.5.1 Utilities only for Admin
Tab\ Function Descriptions
User(Admin) View/Create/Delete/Update/Disconnect Apollo User Group(Admin) View/Create/Delete Apollo Group
4.5.2 General Utilities
Tab\ Function Descriptions
My Organism Manage organism which you joined in / Go WebApollo My Request Make request to join/leave a organism community My Info User basic information
CHAPTER
5
About i5k Workplace at NAL
The i5k Workspace at NAL is a platform for communities around ‘orphaned’ arthropod genome projects to access, visualize, curate and disseminate their data. For more information, please seewebsite of i5k Workspace@NAL.
CHAPTER
6
Indices and tables
• genindex • modindex • search