© 2016 by Pulse Secure, LLC. All rights reserved 1
Pulse Secure Universal App for Windows
Quick Start Guide
Product Release 5.2.8
Document Revision 1.5
Pulse Secure, LLC
2700 Zanker Road, Suite 200 San Jose, CA 95134 http://www.pulsesecure.net
© 2016 by Pulse Secure, LLC. All rights reserved
Pulse Secure and the Pulse Secure logo are trademarks of Pulse Secure, LLC in the United States. All other trademarks, service marks, registered trademarks, or registered service marks are the property of their respective owners.
Pulse Secure, LLC assumes no responsibility for any inaccuracies in this document. Pulse Secure, LLC reserves the right to change, modify, transfer, or otherwise revise this publication without notice.
Pulse Secure Universal App for Windows Quick Start Guide
The information in this document is current as of the date on the title page. END USER LICENSE AGREEMENT
The Pulse Secure product that is the subject of this technical documentation consists of (or is intended for use with) Pulse Secure software. Use of such software is subject to the terms and conditions of the End User License Agreement (“EULA”) posted at http://www.pulsesecure.net/support/eula. By downloading, installing or using such software, you agree to the terms and conditions of that EULA.
Revision History
Revision Date Description
1.5 August 2016 5.2.8 – Added PowerShell appendix
1.4 July 2016 5.2.8 – Added support for Statement of Health (SoH)
1.3 April 2016 5.2.7 – Added support for Pulse Policy Secure – Source IP Enforcement 1.2 February 2016 5.2.6 – Added Server Configuration step for bypassing Host Checker restriction 1.1 October 2015 5.2.1
Table of Contents
List of Figures ... 4
Introduction ... 7
Overview ... 7
Supported Platforms ... 9
Supported Features ... 10
Limitations ... 11
Server Configuration ... 12
Pulse Connect Secure Configuration ... 12
Pulse Policy Secure Configuration ... 14
Client Configuration ... 14
Creating a VPN Connection ... 15
Modifying a VPN Connection ... 17
Removing a VPN Connection ... 17
Starting and Stopping a VPN Connection on Windows 10 ... 18
Status and Diagnostics ... 20
Connection Status ... 20
Event Viewer ... 22
Managing Certificates ... 23
Install User Certificate ... 23
Install SA Trusted Server Certificate ... 25
View Certificate Stores ... 28
Upgrading Pulse Secure Windows 8.1 Inbox Connections to Windows 10 ... 29
Windows PowerShell Script Examples ... 31
Add Pulse connection that uses split tunneling... 31
Add Pulse connection that saves the user credentials ... 32
Add Pulse connection that uses a specified role and realm ... 32
Delete Pulse Connection ... 32
Get Pulse connection information ... 32
Start Pulse connection on application launch ... 32
Schema Options ... 33
List of Figures
F
IGURE1:
U
NIVERSALA
PP FORW
INDOWS... 8
F
IGURE2:
P
ULSES
ECUREVPN
I
NSTALLS
CREEN... 8
F
IGURE3:
A
PPSL
IST... 15
F
IGURE4:
P
ULSES
ECUREVPN
M
AINP
AGE... 15
F
IGURE5:
M
ANUALLYA
DDING AP
ULSEC
ONNECTION... 16
F
IGURE6:
M
ODIFYING AVPN
C
ONNECTION... 17
F
IGURE7:
R
EMOVING AVPN
C
ONNECTION... 17
F
IGURE8:
S
YSTEMT
RAYN
ETWORKI
CON... 18
F
IGURE9:
VPN
P
AGE... 18
F
IGURE10:
VPN
D
ISCONNECTO
PTION... 19
F
IGURE11:
C
HANGEA
DAPTERO
PTIONS... 20
F
IGURE12:
N
ETWORKC
ONNECTIONS... 20
F
IGURE13:
VPN
S
TATUSW
INDOW... 21
F
IGURE14:
E
VENTV
IEWERW
INDOW... 22
F
IGURE15:
C
ERTIFICATEI
MPORTW
IZARD... 23
F
IGURE16:
P
RIVATEK
EYP
ROTECTIONP
AGE... 24
F
IGURE17:
C
ERTIFICATES
TOREP
AGE... 24
F
IGURE18:
C
ERTIFICATEI
NFORMATIONP
AGE... 25
F
IGURE19:
C
ERTIFICATEI
MPORTW
IZARD... 26
F
IGURE20:
C
ERTIFICATES
TOREP
AGE... 26
F
IGURE21:
C
ERTIFICATES
TORES
ELECTIONP
AGE... 27
F
IGURE22:
C
ERTIFICATEI
MPORTW
IZARD... 27
F
IGURE23:
V
IEWC
ERTIFICATES
TORES... 28
F
IGURE24:
N
ETWORK&
I
NTERNET
VPN
P
AGE–
VPN
C
ONNECTIONS... 29
F
IGURE25:
I
NSTALLA
PP–
F
REEB
UTTON... 30
CHAPTER 1
Introduction
Overview
The Pulse Secure Universal App for Windows can create a secure connection to your corporate Pulse Connect Secure SSL VPN gateway to provide instant access to business applications and data from anywhere at any time. The Universal App provides Layer 3 VPN (SSL) secure VPN connections between a Windows 10 and later device (whether PC, tablet, smartphone, Xbox, or Windows 10 IoT) and a Pulse Connect Secure (PCS) gateway (version 8.1 or later). Also, version 5.2.7 and later of the Universal App supports connections to Pulse Policy Secure gateways (version 5.2 or later) to enable Source IP Enforcement of Infranet Enforcers.
The Universal App provides a subset of the functionality offered by Pulse Secure’s full-featured desktop client for Windows. The Universal App is ideal for users who need a simple and lightweight way of establishing either SSL-based VPN connections to Pulse Connect Secure gateways or Source IP Enforcement brokered by Pulse Policy Secure gateways. The Pulse Secure Universal App for Windows is the successor to both the Pulse Secure “In-Box” VPN Plugin for Windows 8.1 and the Pulse Secure Windows Phone 8.1 app.
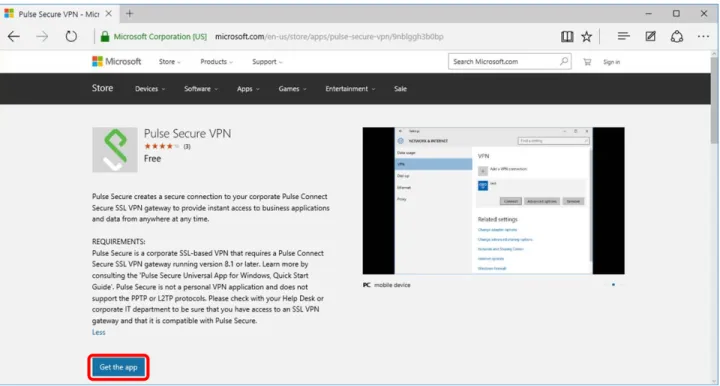
The Pulse Secure Universal App is localized into several foreign languages and is available for download at the Microsoft Store.
NOTE: The Pulse Secure Universal App is not a personal VPN application and does not support the PPTP or L2TP protocols. Please check with your Help Desk or corporate IT department to be sure that you have access to an SSL VPN gateway and that it is compatible with the Pulse Secure Universal App.
Figure 1: Universal App for Windows
The server-side configuration required to support the Universal App is similar to that for other Pulse Secure desktop and mobile clients. The system administrator can use sign-in policies, authentication realms, roles and VPN tunnel policies to define authentication and access permissions. A typical PCS gateway configuration to enable Universal App access involves the creation of a realm, a role and a remediation role intended for Universal App users.
The Get the App button launches the Install screen. Click Install to install Pulse Secure Universal App on your device.
Supported Platforms
The Pulse Secure Universal App for Windows can run on any Windows device that runs a
Windows 10 or later variant (example: Windows 10 Professional, Windows 10 Mobile/Phone, etc.). It cannot run on earlier versions of Windows.
The Universal app is qualified to operate with Pulse Connect Secure (PCS) gateways version 8.1 (and later) and Pulse Policy Secure version 5.2 (and later).
NOTE: A device must be running Windows 10 or later to be able to run the Pulse Secure Universal App for Windows.
Supported Features
The following is a list of features supported by the Universal App:
VPN (SSL) connections to Pulse Connect Secure gateways v8.1 and later
Manual end-user connection and disconnection
Authentication types:
o Username and password
o Username and RSA token code
(User PIN and system PIN are supported)
o Client certificate, smart card, and virtual smart card
o Radius challenge/response
o Secondary authentication
Authentication server prompts for retry, change password, create PIN, change PIN and next-token code
Realm/role and preferred realm/role selection
Pre- and post-authentication sign-in notification messages
HTTPS proxy
IPv4 and IPv6
Split tunneling enabled or disabled
NOTE: Universal App connections always have local subnet access enabled.
Split tunneling policies: IPv4 inclusion and exclusion routes, and IPv6 inclusion routes.
(In split-tunneled mode, the DNS search order options do not apply. Pulse forwards only those DNS requests contained by the configured DNS suffixes to the specified DNS servers. You can specify the VPN option Search device DNS only to forward all DNS requests to configured DNS servers.)
Host Checker (OS Check and Statement of Health (SoH) only)
Graceful handling of sleep/wakeup transitions
App download from the Microsoft Store
Limitations
The following features are not available with the Universal App:
Connections to gateways from third parties (Only connections to Pulse Connect Secure and Pulse Policy Secure gateways are supported.)
Full Host Checker support (only the Host Checker “OS-Check” and “Statement of Health” (SoH) are supported by the Universal App)
Save realm or role preference (The user cannot choose to save a connection preference.)
Machine authentication
Location awareness rules
Logon and logoff scripts
WINS server tunnel parameter
UDP-ESP tunnel (only SSL VPNs are supported)
Certificate trust override prompt
RSA soft-token integration
Session extension
Manual suspend/resume tunnel
SAML authentication
Server Configuration
Pulse Connect Secure Configuration
The Pulse Connect Secure (PCS) gateway can be customized to secure your company resources using authentication realms, user roles, and resource policies. For complete information on the PCS gateway, see the Pulse Connect Secure documentation.
A PCS gateway checks the authentication policy defined for the authentication realm. The user must meet the security requirements that are defined for a realm's
authentication policy. At the realm level, you can specify security requirements based on various elements, such as the user's source IP address or the possession of a client-side certificate. If the user meets the requirements specified by the realm's authentication policy, the gateway forwards the user's credentials to the appropriate authentication server. If this server successfully authenticates the user, then the gateway evaluates the role-mapping rules defined for the realm to determine which roles to assign to the user.
The following is a generalized example of configuring a Pulse Connect Secure gateway for the Universal App.
Click
Users > User Roles
and then either select an existing role (preferred) or create a new role.
If creating a new role, specify a name and optional description for the role, for example: Universal App Role, Windows Universal VPN Role.
To use certificate authentication at the role level, click
Restrictions > Certificate
on the role’s General tab, and add the required certificate information.
To sign in, enable certificate authentication by clicking “Only allow users with a client-side certificate
signed by Certification Authority”.
NOTE: One typical method of installing the client certificate on the Windows device is to send the certificate as an attachment to the Windows user. The certificate must be installed on the Windows device before the user can connect. The user is prompted to select the certificate during the initial Pulse VPN connection process. There are other mechanisms for transferring the certificate to the client,
including Pulse Connect Secure’s onboarding functionality and third-party MDM systems.
Define the client certificate, click Add, and then click Save Changes.
For complete information on certificate authentication, see the chapter
entitled “Understanding Digital Certificate Security” in the Pulse
Connect Secure Administrator’s Guide, which can be found at the Pulse
Secure techpubs site.
Set the options on the role’s Web and Files tables as required. Click
Users > User Realms
and then create a new realm or select an existing realm. Configure and save your options on the General and the Authentication Policy tabs.
One option for a role mapping rule is to create a custom expression that leverages the user-agent string to identify a Universal App. The Pulse Secure Universal App for Windows user-agent string has a form like this:
Pulse-Secure/8.1.0.0 (Windows UAP; ARM) PulseVpn/5.2.1.0
You can use all or part of the string in a custom expression that uses the userAgent variable. For example:
userAgent = '*Windows UAP*'
Select the role that you created earlier for the Universal App users, add it to the Selected Roles list, and
then click Save Changes.
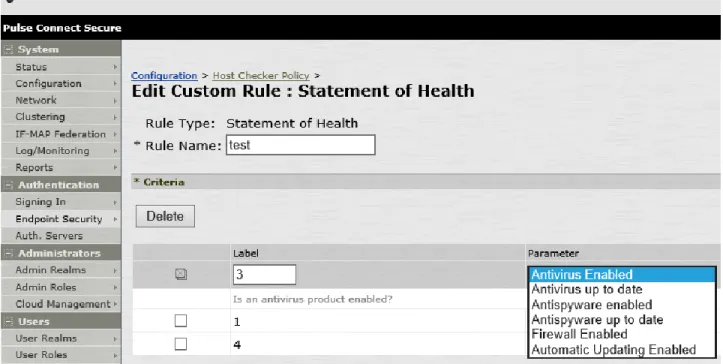
Note: End users will not be able to pass any Host Checker restriction (other than the Windows Universal OS Check and the Statement of Health (SoH)) in a realm or role. One workaround is to modify your Host Checker policy to add an “OR” that allows Windows Universal Apps to pass. See the screen shot below for an example of the “OR Universal-App” syntax required.
The Pulse Secure Universal App for Windows (version 5.2.8 and later) supports “Statement of Health” (SoH) Host Checker restrictions. The SoH setting can be used to enforce certain
connectivity restrictions based on the posture and health of an endpoint. System administrators can configure restrictions based on certain conditions, for example, whether antivirus, antispyware
and/or a software firewall is enabled. Currently, the Windows OS itself does not support checks for
whether antivirus/antispyware is up-to-date and whether OS auto-update is enabled. See the screen
shot of the administrative console, below, for details on how to configure the options that are supported.
Pulse Policy Secure Configuration
The Pulse Secure Universal App for Windows (version 5.2.7 and later) supports Source IP Enforcement via a Pulse Policy Secure (PPS) gateway. Source IP Enforcement allows a Pulse Policy Secure gateway to communicate with an “Infranet Enforcer” (i.e., a firewall) to permit the Windows device to communicate through the firewall. To use this feature, the Universal App simply must connect to a PPS gateway, authenticate and (optionally) pass the Host OS Check and Statement of Health (SoH). Once authenticated and once the Host Checker policy is passed, the PPS gateway can communicate with the Infranet Enforcer to open the appropriate firewall port for the endpoint Windows device. Periodic Host Checker enforcement can be configured to ensure that the port can later be closed if the endpoint device
changes in a manner that should cause a cessation of firewall transit for the endpoint device.
For information on configuring a PPS gateway to enable Source IP Enforcement, see the “Understanding Infranet Enforcer Source IP Security Policies” section of the Pulse Policy Secure Complete Software Guide.
Client Configuration
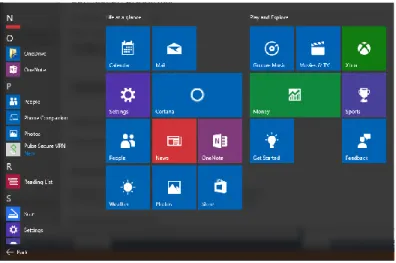
The Pulse Secure Universal App for Windows is available from the Microsoft Store. Figure 3shows the Universal App after it has been installed on a Windows device.
Figure 3: Apps List
You can create, manage, and delete Pulse Connect Secure connections by using the Windows 10 Settings screen (launched from the Windows Start menu).
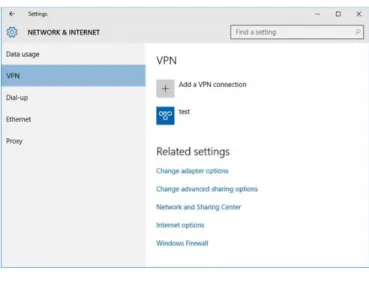
Figure 4: Pulse Secure VPN Main Page
PCS connections appear as VPN connections in the Networks list.
Creating a VPN Connection
To create a Pulse Secure client VPN connection on a Windows 10 (or later) device:
Tap Settings, then tap Network & Internet, and then tap VPN. The device displays a list of existing VPN connections.
Figure 5shows the Windows dialog where you configure the
Figure 5: Manually Adding a Pulse Connection
To create a new connection, tap the plus ( ). The Add Profile screen appears.
Tap the VPN Provider box to expand it, and then tap Pulse Secure client VPN to select it. In the Server name or IP address box, specify the target for this connection.
You can identify the server using the server IP address, the hostname, or a URL that optionally specifies the port the connection uses and the specific sign-in page. To specify a URL, use the following format: https://hostname[:port][/][sign-in page]
The brackets indicate options. Also, if you specify a specific sign-in page, make sure that the name you specify matches what is defined on the Pulse Connect Secure gateway. (Authentication > Signing in > Sign-in pages.)
Enter the Profile name. The Profile name appears in the VPN list that you can change as per your requirement.
Tap Advanced options to set the following:
Clear sign-in info – clears any automatically saved authentication credentials.
Auto proxy - you can specify auto proxy settings for connecting to the Pulse Connect Secure server through a proxy server.
Manual Proxy – you can specify manual proxy settings for connecting to the Pulse Connect Secure server through a proxy server.
After the user saves the new connection, it appears in the VPN list. The user can tap the connection to initiate a VPN connection. When a VPN connection is active, a small lock icon appears next to the WiFi status icon.
Modifying a VPN Connection
To modify a VPN connection:
Tap Settings, then tap Network & Internet, and then tap VPN. The device displays a list of existing VPN connections.
Figure 6: Modifying a VPN Connection
Select the connection that you want to modify. Click Advanced options and edit the connection
settings.
Removing a VPN Connection
To remove a VPN connection:
Tap Settings, then tap Network & Internet, and then tap VPN. The device displays a list of existing VPN connections.
Select the connection that you want to remove and click Remove.
Starting and Stopping a VPN Connection on Windows 10
To start a VPN connection:
Tap the system tray network icon (Wired: , Wireless: ).
Figure 8: System Tray Network Icon
Select the VPN connection to open the VPN settings page.
In the Settings Network & Internet VPN page, click Connect to start the connection process.
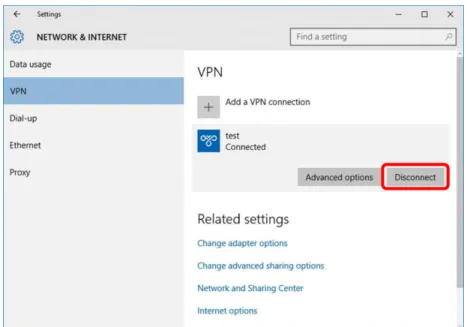
To stop a connection:
Select the connection from the list to see the expanded options.
Figure 10: VPN Disconnect Option
Status and Diagnostics
Connection Status
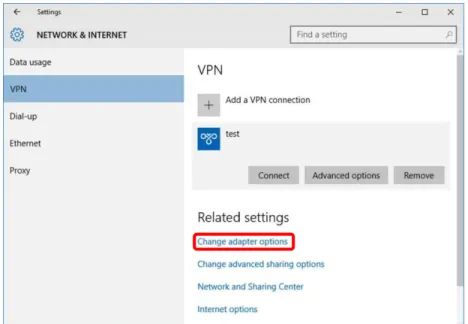
To view the VPN connection status:
Go to the VPN settings page.
Tap Change Adapters options under Related Settings.
Figure 11: Change Adapter Options
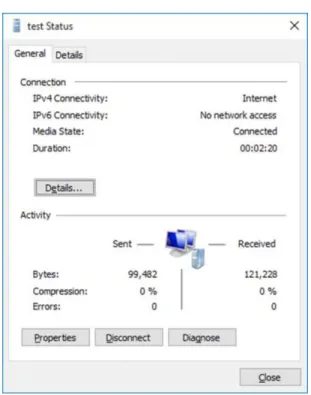
Double-click on the connected connection.
The status window shows the connection status. Figure 13: VPN Status Window
Event Viewer
To view the VPN event log:
Right-click the start icon and tap the Event viewer selection.
Browse to Applications and Service Logs Windows VPN Plugin Platform
operationalVerbose.
Under Actions, select Enable log as the operationalVerbose events are disabled by default.
Figure 14: Event Viewer Window
Appendix A
Managing Certificates
A certificate is a confirmation of your identity and is issued by a certification authority. It contains information used to protect data or to establish secure network connections. A Certificate Store is a system area where certificate are stored.
Install User Certificate
To manually install a user certificate:
Double-click on the certificate from within Windows Explorer to start the certificate import wizard.
Select Current User and click Next.
Enter your user certificate password.
Figure 16: Private Key Protection Page
Keep the default setting, and click Next.
Install SA Trusted Server Certificate
To manually install an SA trusted server certificate:
Launch Windows Explorer and double-click on the certificate file to trust. Tap Install Certificate.
Select the Local Machine option and click Next.
Figure 19: Certificate Import Wizard
Select the Place all certificates in the following store option and click Next.
Figure 20: Certificate Store Page
Figure 21: Certificate Store Selection Page
In the Certificate Import page, Click Finish.
View Certificate Stores
To view the user or local machine certificate stores:
Run mmc and add certificates snap-in
Select the Current User or Local Computer option.
Appendix B
Upgrading Pulse Secure Windows 8.1
Inbox Connections to Windows 10
After installing Windows 10 update, perform the following steps to upgrade Pulse Secure Windows 8.1 inbox connections to Windows 10.
Tap Settings, then tap Network & Internet, and then tap VPN. The device displays a list of existing VPN connections.
Select an existing VPN connection.
From the VPN settings page, click Connect to start the connection. This will fail with the error
‘Application not found’, but will automatically launch the Pulse Secure App Windows Store installation screen.
From the Store installation page, tap the Free button to start installation of the new Pulse Secure
Windows 10 app.
Figure 25: Install App – Free Button
Appendix C
Windows PowerShell Script Examples
You can create, manage, and remove Pulse connections on the Windows 10 endpoint by using Windows PowerShell scripts. PowerShell is a command-line shell and scripting language for system administration. To configure Pulse connections, you should have a working knowledge of PowerShell. For detailed information on PowerShell, see the
Microsoft Tech Net library.
Windows PowerShell commands are called cmdlets. To manage Pulse connections, you use the VPN Client cmdlets. For detailed information on the VPN Client cmdlets, see the VPN Client section of the Microsoft Tech Net library.
NOTE: PowerShell scripts must be signed to run on client computers that have a default PowerShell configuration. For more information, see the Microsoft Tech Net library.
NOTE: You use Windows PowerShell scripts to administer Pulse Secure Universal App for Windows connections. Pulse Secure desktop client connections do not respond to PowerShell scripts.
The following PowerShell script examples show how to use the most common PowerShell VPN cmdlets to create and manage Pulse connection configurations. Most PowerShell VPN cmdlets require that you specify the Application ID. For the Pulse Universal App, the application ID is 951D7986.PulseSecureVPN_qzpvqh70t9a4p. For a complete list of cmdlet options, see the VPN Client section of the Microsoft Tech Net library.
NOTE: All connections are HTTPS and use a server certificate, therefore you must install the server root CA to connect.
Add Pulse connection that uses split tunneling
This script creates a Pulse VPN connection named PulseCxn1 that connects to a Pulse server with an IP address of 10.17.1.216.
$xml = "<pulse-schema></pulse-schema>" $sourceXml=New-Object System.Xml.XmlDocument $sourceXml.LoadXml($xml)
AddVpnConnection Name “PulseCxn1” ServerAddress “10.17.1.216”
-SplitTunneling -PluginApplicationID “951D7986.PulseSecureVPN_qzpvqh70t9a4p” -CustomConfiguration $sourceXml
NOTE: Some VPN Client cmdlet options are not applicable to creating Pulse connections. The following Add-VpnConnection options cause an error if you use them when creating a Pulse connection:
-AuthenticationMethod -EncryptionLevel
-L2tpPsk
-MachineCertificateEKUFilter -MachineCertificateIssuerFilter -UseWinlogonCredential
Add Pulse connection that saves the user credentials
The -RememberCredentials option applies to smart cards and certificate PINs, and to usernames and passwords.
$xml = "<pulse-schema></pulse-schema>" $sourceXml=New-Object System.Xml.XmlDocument $sourceXml.LoadXml($xml)
AddVpnConnection Name “PulseCxn2” ServerAddress “10.17.1.217” -RememberCredential -PluginApplicationID
“951D7986.PulseSecureVPN_qzpvqh70t9a4p” -CustomConfiguration $sourceXml
Add Pulse connection that uses a specified role and realm
This script’s pulse-schema statement includes schema options that specify the realm and role that are used for this connection. If there are multiple realms or roles available to the user, and you do not specify the preferred values, then the user is prompted for selections.
$xml =
"<pulse-schema><preferredRealm>Users</preferredRealm><preferredRole>TestRole</prefe rredRole></pulse-schema>"
$sourceXml=New-Object System.Xml.XmlDocument $sourceXml.LoadXml($xml)
AddVpnConnection Name “PulseCxn3” ServerAddress “10.17.1.216” -SplitTunneling -RememberCredential -PluginApplicationID
“951D7986.PulseSecureVPN_qzpvqh70t9a4p” -CustomConfiguration $sourceXml
Delete Pulse Connection
To delete a Pulse connection, use the following command:
Remove-VpnConnection -Name <connection_name>
Get Pulse connection information
To see the properties of a Pulse connection, use the following command:
Get-VpnConnection -Name <connection_name>
You can associate a Pulse connection with an application. When the user starts that application, the specified Pulse VPN connection is initiated.
Add-VpnConnectionTriggerApplication -ConnectionName "PulseCxn1" [-ApplicationID] <String[]>
Schema Options
The following table lists options that you can use in your Pulse connection PowerShell scripts.
Option Description
"preferredRealm" Specify the preferred connection realm. The user must be a member of the specified
authentication realm.
"preferredRole" Specify the preferred role. The user must eligible for the role according to the role mapping
rules in effect for the realm.
“optimizeForLowCostNetwork” true/false
Specifies that the connection uses a wired connection if one is available.
“isSingleSignOnCredential” true/false
Specifies that the credentials be used to access resources that require authentication after the tunnel is established.
Index
C
certificate authentication ... 11
certificate stores ... 26
client configuration ... 13
connection status ... 18
D
DNS ... 9E
event log ... 20L
location awareness ... 10M
machine authentication ... 10managing certificates ... 21
R
RSA token code ... 9S
SA trusted server certificate ... 23server configuration ... 11
smart card ... 9
split tunneling... 9
supported features ... 9
supported platforms ... 8
U
upgrade to Windows 10 ... 27user agent string ... 11
user certificate ... 21
V
virtual smart card ... 9VPN connection create ... 13
modify ... 15