Chapter 2
The Virtual Environment
In the following chapters we examine a variety of problems related to information security, as they arise in modern computer and communication systems. To deepen your understanding of these problems, we do not merely consider them abstractly. Rather, we additionally provide you with a set of preconfigured virtual machines that allow you to work through the examples actively in a virtual environment.
As a virtualization environment we have chosen VirtualBox [23]. VirtualBox runs on Windows, Linux, Macintosh and OpenSolaris hosts, and supports a large number of guest operating systems. By following the instructions below, you should be able to install the virtual machines on your own computer, which you will need to complete the practical experiments in the following chapters. The virtual machines can be downloaded from the book’s web page,www.appliedinfsec.ch.
The structure of this chapter is as follows. We start with a general introduction to VirtualBox and explain its network options. Afterwards we provide information on the virtual machines as they are used for the practical exercises in this book. Besides information on the network setup you will find information on the types of operating systems, installed software, and user accounts in this section. Finally, we provide brief installation instructions for each of the virtual machines used in subsequent chapters.
Note to the reader: To simply install the virtual machines in order to com-plete the experiments in this book you may skip Sects.2.2and2.3and follow the installation instructions in Sect.2.4.
2.1 Objectives
After completion of this chapter you should:
• be able to install your own virtual machines in VirtualBox D. Basin et al., Applied Information Security,
DOI10.1007/978-3-642-24474-2 2, © Springer-Verlag Berlin Heidelberg 2011
• be able to install the delivered virtual machines on your computer, provided Vir-tualBox runs on your computer’s operating system
• be able to tackle all subsequent practical exercises
• know the layout of the virtual network connecting the virtual machines • know the characteristics of the virtual machines provided
2.2 VirtualBox
VirtualBox is a full, general-purpose virtualizer for x86 hardware. It is a professional-quality virtualization environment that is also open-source software. The software can be downloaded from the Internet [23]. For most Linux distributions there ex-ist packages that allow its automatic installation using the corresponding package management system.
2.2.1 Setting up a New Virtual Machine
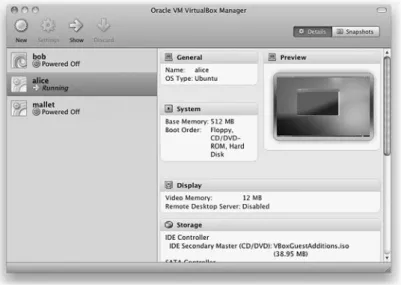
Once VirtualBox has been installed, setting up new virtual machines is straight-forward. Figure2.1shows the main window of VirtualBox displaying information about the virtual machinealicethat is currently running.
2.2 VirtualBox 19 • Pressing the New button in the upper left corner opens the New Virtual Machine Wizard that guides you through the steps necessary to create a new virtual ma-chine in VirtualBox.
• Providing the type of operating system to be installed allows VirtualBox to pre-pare OS-dependent proposals for parameters such as the necessary amount of base memory (RAM) or the size of the virtual hard drive.
• Having chosen the size of the base memory, the next step, Virtual Hard Disk, allows you to either create a new hard disk or to use an existing hard disk. • If you choose to create a new hard disk, a virtual hard disk will be created on your
system. After creating the hard disk you will be asked to select a boot-medium to install the operating system. If you have chosen to use an existing hard disk, the setup is already completed as it is assumed that the hard disk contains a bootable system.
Note that the virtual machines you need to work through the examples presented in this book are provided as hard disks (vdi files in the VirtualBox terminology). To install these machines you must save the corresponding vdi files somewhere on your system. Choose the option Use existing hard disk, leaving the check-box Boot Hard Disk (Primary Master) as it is, and select the location of the vdi file to be installed.
This completes the initial setup of a new virtual machine. However, there are set-tings, such as the network connecting the virtual machines, that must be configured manually on a per-system basis after the hard disks have been created. You can ac-cess these settings (only if the machine is shut down) by marking the corresponding virtual machine in VirtualBox’s main window and by pressing the Settings button.
2.2.2 The Network
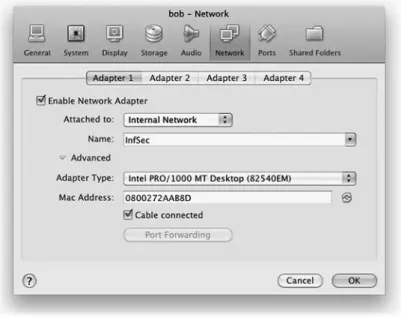
Having installed the hard disks, we must configure VirtualBox to allow the machines to communicate over an IP network (see Fig.2.2). The network is configured for every virtual machine separately (mark the shutdown virtual machine then follow Settings−→Network).
For every virtual machine, VirtualBox provides up to eight different virtual PCI network adapters. Using the advanced menu you can choose the type of network card to be virtualized by VirtualBox (some operating systems may not support cer-tain cards by default). Furthermore, you can choose a MAC address for the interface and may choose whether the corresponding network cable is plugged in at the start-up of the machine or not.
Each network adapter can be separately configured to operate in one of the fol-lowing modes:
Not attached: VirtualBox reports to the guest operating system that the corre-sponding network adapter is present, but that there is no connection (cable un-plugged).
Fig. 2.2 VirtualBox network settings
Network Address Translation (NAT): VirtualBox acts as a router providing DHCP-service to the guest operating system, using the physical network to connect to the Internet. If you want to connect the guest operating system to the Internet, this is the easiest way to do so.
Bridged networking: VirtualBox connects to one of your installed network cards and transports packets directly between the guest operating system and the net-work connected to your physical netnet-work card.
Internal networking: This creates a network containing a set of selected virtual machines without requiring a physical network interface card.
Host-only networking: This creates a network that contains the host and a set of virtual machines. No physical interface is needed; instead a virtual interface (such as a loopback interface) is created on the host. This is a kind of hybrid mode be-tween bridged and internal networking modes, i.e., the virtual machines can talk to each other (internal networking) and can talk to the host (bridged networking). However, there is no need for a physical interface as in bridged networking, and the virtual machines cannot talk to the outside world since they are not connected to the physical interface.
In the following, we will only use the Internal Networking mode, so that the virtual machines may talk to each other over a virtual network, but may not connect to the Internet. However, if you wish to connect to the Internet, for example, to
2.3 The Lab Environment 21 download software, then you can simply enable an additional network adapter in NAT mode.
2.3 The Lab Environment
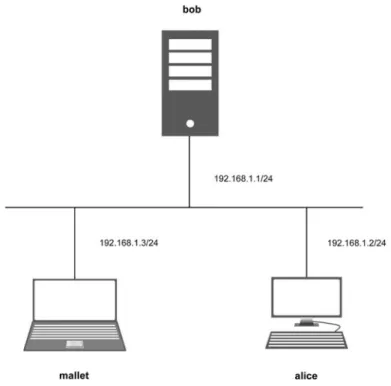
To carry out the experiments presented in this book, we provide three preconfigured virtual machines,alice,bob, andmallet. The machines are delivered as vdi files such that they can be installed in VirtualBox (use the vdi files as virtual disks). In order to be compliant with the network setup used in this book, you should enable a network adapter for each of the virtual machines and attach it to an Internal Network, for example, named InfSec. Finally, the network should look like the one shown in Fig.2.3.
Fig. 2.3 Network setup
Note that the exercises in subsequent chapters entail practices like port scans that might be considered malicious by system administrators if executed against a system under their control. In order to prevent unintended, suspicious network traffic originating from your machine, we recommend that you carry out the assignments
in this book using an isolated virtual network. We therefore urge you not to enable a network adapter that connects any of the virtual machines to the Internet. Also note that the virtual machines are preconfigured in such way that the described attacks work. For example, some of the attacks rely on older unpatched kernel versions. Updating the underlying operating system (e.g., over the Internet) might disable some vulnerabilities and thus make it impossible to successfully complete some assignments.
2.3.1 The Hosts
The virtual disksalice.vdi,bob.vdiandmallet.vdican be downloaded from the web pagewww.appliedinfsec.ch. Whereas hostaliceis configured as a typical desktop computer having a graphical user interface,bobis configured as a server, i.e., there is no graphical user interface installed and the machine’s operat-ing system can only be accessed usoperat-ing a simple command-line interface. Finally, malletplays the role of the adversary’s machine, having a similar desktop en-vironment to that ofalice, with the necessary software to complete the attacks preinstalled.
Note that the virtual machines delivered as vdi files contain the necessary con-figurations for automatic configuration of interfaces according to the network setup shown in Fig.2.3. Since interface configurations under Linux use the interface’s name, and the interface’s name is bound to the interface’s MAC address, you must configure the MAC address of the corresponding virtual machine in VirtualBox ac-cordingly. To do so you must manually enter the corresponding MAC address (given for every machine below) in the network section of each machine’s configuration menu in VirtualBox (see also Sect.2.2.2above).
Settings for VirtualBox: For optimal performance of the virtual guest sys-tems alice and mallet, VirtualBox offers system-specific tools called guest additions. These additions provide a closer integration between host and guest systems and allow features such as mouse pointer integration, bet-ter video support etc. You may install these guest additions for hostsalice andmalletas follows.
1. Choose Devices−→Install Guest Additions . . . in the tool bar of the corre-sponding virtual machine’s window after booting.
2. On the virtual machine’s filesystem you will now find a mounted CD that contains an installation script,autorun.sh, which can be executed by double-clicking on it.
2.3 The Lab Environment 23 Host alice
The hostaliceruns a typical Linux desktop operating system, namely Ubuntu 10.04.1 codename lucid. In addition to the standard distribution software,alice runs a set of services such as HTTP and SSH servers.
The passwords for the usersaliceandrootto access the operating system are:
User name Password
alice alice root alice
The user names and passwords for the applications running onaliceare: User name Password
alice alice123 bob bob123 mallet mallet123
Host bob
The hostbobruns a Debian server operating system and is configured as a typi-cal Linux server. The server runs a set of services including FTP, HTTP, and SSH servers. To create a web site including a web shop, the server’s administrator has installed the popular web content management system Joomla! in combination with the web shop extension VirtueMart.
The passwords for the usersbobandrootto access the operating system are:
User name Password
bob bob root bob
The user names and passwords for the applications running onbobare: User name Password
alice alice123 bob bob123 mallet mallet123
Host mallet
The hostmalletplays the role of the adversary’s computer. Likealiceit runs a Linux desktop operating system (Ubuntu 10.04.1 lucid). In addition to the soft-ware that comes with the standard distribution, there are many tools installed on malletthat will be used for attacks againstaliceandbobas described below.
The set of tools includes a port scanner (Nmap), a vulnerability scanner (OpenVAS), a password cracker (John the Ripper) and several others.
The passwords for the usersmalletandrootto access the operating system are:
User name Password
mallet mallet root mallet
2.4 Installing the Virtual Machines
To successfully complete the steps described below, we assume that you have successfully installed VirtualBox and that the virtual hard disks alice.vdi,
bob (Debian).vdiandmallet.vdiare locally accessible in a directory of your machine.
2.4.1 Installing host
alice
1. Open VirtualBox2. Choose the New button in the upper left corner to open the New Virtual Machine Wizard
3. Enteralicein the name field, choose Linux for the Operating System option and select Ubuntu using the Version drop-down list
4. Leave the proposed Base Memory Size unchanged (you can also change it ac-cording to your preferences and hardware setup)
5. In the Virtual Hard Disk wizard leave the check-box Boot Hard Disk as it is, choose the option Use existing hard disk and select the filealice.vdion your local file system
6. Finish the base installation by pressing the finish button on the Summary page 7. In the VirtualBox OSE Manager mark the newly created virtual machine alice
and press the Settings button in the tool bar 8. Select Network in the alice - Settings window
9. Leave the Enable Network Adapter check-box as it is, change the Attached to: drop-down list to Internal Network and give it the name InfSec
10. Press the Advanced button to display additional options, change there the MAC-Address to 080027ED5BF5 and press OK to confirm the changes
Summary ofalice’s settings for VirtualBox:
2.4 Installing the Virtual Machines 25
2.4.2 Installing host
bob
1. Open VirtualBox
2. Choose the New button in the upper left corner to open the New Virtual Machine Wizard
3. Enterbobin the name field, choose Linux for the Operating System option and select Debian using the Version drop-down list
4. Leave the proposed Base Memory Size unchanged (you can also change it ac-cording to your preferences and hardware setup)
5. In the Virtual Hard Disk wizard leave the check-box Boot Hard Disk as it is, choose the option Use existing hard disk and select the filebob (Debian).vdi
on your local file system
6. Finish the base installation by pressing the finish button on the Summary page 7. In the VirtualBox OSE Manager mark the newly created virtual machine bob and
press the Settings button on the tool bar
8. Select the System tab page in the bob - Settings window and mark the Enable IO APIC check-box under Extended Features
9. Select Storage in the bob - Settings window
10. Mark the IDE Controller, select Add Hard Disk (the right disks symbol in the IDE Controller line), and press Choose existing disk
11. Choose the filebob (Debian).vdion your file system 12. Remove the corresponding file under SATA Controller 13. In the bob - Settings window select Network
14. Leave the Enable Network Adapter check-box as it is, change the Attached to: drop-down list to Internal Network and give it the name InfSec
15. Press the Advanced button to display additional options, change there the MAC-Address to 0800272AAB8D
16. Press OK to confirm the changes
Keyboard layout: To adjust the keyboard layout onbobto your local setting, log in as user root and run the command:dpkg-reconfigure console-data
Summary ofbob’s settings for VirtualBox:
• MAC address for the Ethernet interface: 08:00:27:2A:AB:8D • bobonly starts if IO-APIC is set
2.4.3 Installing host
mallet
1. Open VirtualBox2. Choose the New button in the upper left corner to open the New Virtual Machine Wizard
3. Entermalletin the name field, choose Linux for the Operating System option and select Ubuntu using the Version drop-down list
4. Leave the proposed Base Memory Size unchanged (you can also change it ac-cording to your preferences and hardware setup)
5. In the Virtual Hard Disk wizard leave the check-box Boot Hard Disk as it is, choose the option Use existing hard disk and select the filemallet.vdion your local file system
6. Finish the base installation by pressing the finish button on the Summary page 7. In the VirtualBox OSE Manager mark the newly created virtual machine mallet
and press the Settings button on the tool bar 8. Select Network in the mallet - Settings window
9. Leave the Enable Network Adapter check-box as it is, change the Attached to: drop-down list to Internal Network and give it the name InfSec
10. Press the Advanced button to display additional options, change the Promis-cuous Mode: drop-down list to Allow VMs, then change the MAC-Address to 080027FB3C18 and press OK to confirm the changes
Summary ofmallet’s Settings for VirtualBox:
• MAC address for the Ethernet interface: 08:00:27:FB:3C:18 • the Ethernet interface must be set to promiscuous mode