SECOND EDITION
Version Control with Git
Jon Loeliger and Matthew McCullough
Version Control with Git, Second Edition by Jon Loeliger and Matthew McCullough
Copyright © 2012 Jon Loeliger. All rights reserved. Printed in the United States of America.
Published by O’Reilly Media, Inc., 1005 Gravenstein Highway North, Sebastopol, CA 95472. O’Reilly books may be purchased for educational, business, or sales promotional use. Online editions are also available for most titles (http://my.safaribooksonline.com). For more information, contact our corporate/institutional sales department: 800-998-9938 or [email protected].
Editor: Andy Oram
Production Editor: Iris Febres Copyeditor: Absolute Service, Inc. Proofreader: Absolute Service, Inc.
Indexer: Nancy Guenther on behalf of Potomac Indexing, LLC
Cover Designer: Karen Montgomery Interior Designer: David Futato
Illustrators: Robert Romano and Rebecca Demarest
May 2009: First Edition. August 2012: Second Edition. Revision History for the Second Edition:
2012-08-03 First release 2013-06-21 Second release
See http://oreilly.com/catalog/errata.csp?isbn=9781449316389 for release details.
Nutshell Handbook, the Nutshell Handbook logo, and the O’Reilly logo are registered trademarks of O’Reilly Media, Inc. Version Control with Git, the image of the image of a long-eared bat, and related trade dress are trademarks of O’Reilly Media, Inc.
Many of the designations used by manufacturers and sellers to distinguish their products are claimed as trademarks. Where those designations appear in this book, and O’Reilly Media, Inc., was aware of a trademark claim, the designations have been printed in caps or initial caps.
While every precaution has been taken in the preparation of this book, the publisher and authors assume no responsibility for errors or omissions, or for damages resulting from the use of the information con-tained herein.
ISBN: 978-1-449-31638-9 [LSI]
Table of Contents
Preface . . . xi
1. Introduction . . . 1
Background 1
The Birth of Git 2
Precedents 4
Timeline 6
What’s in a Name? 7
2. Installing Git . . . 9
Using Linux Binary Distributions 9
Debian/Ubuntu 9
Other Binary Distributions 10
Obtaining a Source Release 11
Building and Installing 11
Installing Git on Windows 13
Installing the Cygwin Git Package 14
Installing Standalone Git (msysGit) 14
3. Getting Started . . . 19
The Git Command Line 19
Quick Introduction to Using Git 21
Creating an Initial Repository 21
Adding a File to Your Repository 22
Configuring the Commit Author 24
Making Another Commit 24
Viewing Your Commits 25
Viewing Commit Differences 26
Removing and Renaming Files in Your Repository 26
Making a Copy of Your Repository 27
Configuration Files 28
Configuring an Alias 30
Inquiry 30
4. Basic Git Concepts . . . 31
Basic Concepts 31
Repositories 31
Git Object Types 32
Index 33
Content-Addressable Names 33
Git Tracks Content 34
Pathname Versus Content 35
Pack Files 36
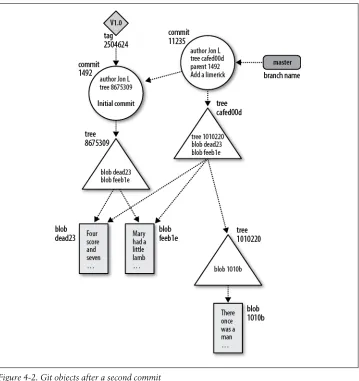
Object Store Pictures 36
Git Concepts at Work 39
Inside the .git Directory 39
Objects, Hashes, and Blobs 40
Files and Trees 41
A Note on Git’s Use of SHA1 42
Tree Hierarchies 43
Commits 44
Tags 46
5. File Management and the Index . . . 47
It’s All About the Index 48
File Classifications in Git 48
Using git add 50
Some Notes on Using git commit 52
Using git commit --all 52
Writing Commit Log Messages 54
Using git rm 54
Using git mv 56
A Note on Tracking Renames 57
The .gitignore File 58
A Detailed View of Git’s Object Model and Files 60
6. Commits . . . 65
Atomic Changesets 66
Identifying Commits 67
Absolute Commit Names 67
refs and symrefs 68
Relative Commit Names 69
Commit History 72
Commit Graphs 74
Commit Ranges 78
Finding Commits 83
Using git bisect 83
Using git blame 87
Using Pickaxe 88
7. Branches . . . 89
Reasons for Using Branches 89
Branch Names 90
Dos and Don’ts in Branch Names 91
Using Branches 91
Creating Branches 93
Listing Branch Names 94
Viewing Branches 94
Checking out Branches 97
A Basic Example of Checking out a Branch 97 Checking out When You Have Uncommitted Changes 98 Merging Changes into a Different Branch 99 Creating and Checking out a New Branch 101
Detached HEAD Branches 102
Deleting Branches 103
8. Diffs . . . 107
Forms of the git diff Command 108
Simple git diff Example 112
git diff and Commit Ranges 115
git diff with Path Limiting 117
Comparing How Subversion and Git Derive diffs 119
9. Merges . . . 121
Merge Examples 121
Preparing for a Merge 122
Merging Two Branches 122
A Merge with a Conflict 124
Working with Merge Conflicts 128
Locating Conflicted Files 129
Inspecting Conflicts 129
How Git Keeps Track of Conflicts 134
Finishing Up a Conflict Resolution 135
Aborting or Restarting a Merge 137
Merge Strategies 137
Degenerate Merges 140
Normal Merges 142
Specialty Merges 143
Applying Merge Strategies 144
Merge Drivers 145
How Git Thinks About Merges 146
Merges and Git’s Object Model 146
Squash Merges 147
Why Not Just Merge Each Change One by One? 148
10. Altering Commits . . . 151
Caution About Altering History 152
Using git reset 154
Using git cherry-pick 161
Using git revert 163
reset, revert, and checkout 164
Changing the Top Commit 165
Rebasing Commits 167
Using git rebase -i 170
rebase Versus merge 174
11. The Stash and the Reflog . . . 181
The Stash 181
The Reflog 189
12. Remote Repositories . . . 195
Repository Concepts 196
Bare and Development Repositories 196
Repository Clones 197
Remotes 198
Tracking Branches 199
Referencing Other Repositories 200
Referring to Remote Repositories 200
The refspec 202
Example Using Remote Repositories 204
Creating an Authoritative Repository 205
Make Your Own Origin Remote 206
Developing in Your Repository 208
Pushing Your Changes 209
Adding a New Developer 210
Getting Repository Updates 212
Remote Repository Development Cycle in Pictures 217
Cloning a Repository 217
Non–Fast-Forward Pushes 219
Fetching the Alternate History 221
Merging Histories 222
Merge Conflicts 223
Pushing a Merged History 223
Remote Configuration 223
Using git remote 224
Using git config 225
Using Manual Editing 226
Working with Tracking Branches 227
Creating Tracking Branches 227
Ahead and Behind 230
Adding and Deleting Remote Branches 231
Bare Repositories and git push 232
13. Repository Management . . . 235
A Word About Servers 235
Publishing Repositories 236
Repositories with Controlled Access 236
Repositories with Anonymous Read Access 238 Repositories with Anonymous Write Access 242 Publishing Your Repository to GitHub 242
Repository Publishing Advice 243
Repository Structure 244
The Shared Repository Structure 244
Distributed Repository Structure 244
Repository Structure Examples 246
Living with Distributed Development 248
Changing Public History 248
Separate Commit and Publish Steps 249
No One True History 249
Knowing Your Place 250
Upstream and Downstream Flows 251
The Maintainer and Developer Roles 251
Maintainer–Developer Interaction 252
Role Duality 253
Working with Multiple Repositories 254
Your Own Workspace 254
Where to Start Your Repository 255
Converting to a Different Upstream Repository 256 Using Multiple Upstream Repositories 257
Forking Projects 259
14. Patches . . . 263
Why Use Patches? 264
Generating Patches 265
Patches and Topological Sorts 272
Mailing Patches 273
Applying Patches 276
Bad Patches 283
Patching Versus Merging 283
15. Hooks . . . 285
Installing Hooks 287
Example Hooks 287
Creating Your First Hook 288
Available Hooks 290
Commit-Related Hooks 290
Patch-Related Hooks 291
Push-Related Hooks 292
Other Local Repository Hooks 294
16. Combining Projects . . . 295
The Old Solution: Partial Checkouts 296
The Obvious Solution: Import the Code into Your Project 297
Importing Subprojects by Copying 299
Importing Subprojects with git pull -s subtree 299
Submitting Your Changes Upstream 303
The Automated Solution: Checking out Subprojects Using Custom Scripts 304 The Native Solution: gitlinks and git submodule 305
Gitlinks 306
The git submodule Command 308
17. Submodule Best Practices . . . 313
Submodule Commands 314
Why Submodules? 315
Submodules Preparation 315
Why Read Only? 316
Why Not Read Only? 317
Examining the Hashes of Submodule Commits 317
Credential Reuse 318
Use Cases 318
Multilevel Nesting of Repos 319
18. Using Git with Subversion Repositories . . . 321
Example: A Shallow Clone of a Single Branch 321
Making Your Changes in Git 324
Fetching Before Committing 325
Committing Through git svn rebase 326
Pushing, Pulling, Branching, and Merging with git svn 327
Keeping Your Commit IDs Straight 328
Cloning All the Branches 329
Sharing Your Repository 331
Merging Back into Subversion 332
Miscellaneous Notes on Working with Subversion 334
svn:ignore Versus .gitignore 334
Reconstructing the git-svn Cache 334
19. Advanced Manipulations . . . 337
Using git filter-branch 337
Examples Using git filter-branch 339
filter-branch Pitfalls 344
How I Learned to Love git rev-list 345
Date-Based Checkout 345
Retrieve Old Version of a File 348
Interactive Hunk Staging 350
Recovering a Lost Commit 360
The git fsck Command 361
Reconnecting a Lost Commit 365
20. Tips, Tricks, and Techniques . . . 367
Interactive Rebase with a Dirty Working Directory 367
Remove Left-Over Editor Files 368
Garbage Collection 368
Split a Repository 370
Tips for Recovering Commits 371
Subversion Conversion Tips 372
General Advice 372
Remove a Trunk After an SVN Import 373
Removing SVN Commit IDs 373
Manipulating Branches from Two Repositories 374
Recovering from an Upstream Rebase 374
Make Your Own Git Command 376
Quick Overview of Changes 376
Cleaning Up 377
Using git-grep to Search a Repository 378
Updating and Deleting refs 380
Following Files that Moved 381
Keep, But Don’t Track, This File 382
Have You Been Here Before? 382
21. Git and GitHub . . . 385
Repo for Public Code 385
Creating a GitHub Repository 388
Social Coding on Open Source 390
Watchers 391
News Feed 392
Forks 392
Creating Pull Requests 394
Managing Pull Requests 396
Notifications 398
Finding Users, Projects, and Code 401
Wikis 402
GitHub Pages (Git for Websites) 403
In-Page Code Editor 405
Subversion Bridge 407
Tags Automatically Becoming Archives 408
Organizations 409
REST API 410
Social Coding on Closed Source 411
Eventual Open Sourcing 411
Coding Models 412
GitHub Enterprise 414
GitHub in Sum 416
Preface
Audience
Although some familiarity with revision control systems will be good background material, a reader who is not familiar with any other system will still be able to learn enough about basic Git operations to be productive in a short while. More advanced readers should be able to gain insight into some of Git’s internal design and thus master some of its more powerful techniques.
The main intended audience of this book should be familiar and comfortable with the Unix shell, basic shell commands, and general programming concepts.
Assumed Framework
Almost all examples and discussions in this book assume the reader has a Unix-like system with a command-line interface. The author developed these examples on Debian and Ubuntu Linux environments. The examples should work under other environments, such as Mac OS X or Solaris, but the reader can expect slight variations. A few examples require root access on machines where system operations are needed. Naturally, in such situations, you should have a clear understanding of the responsi-bilities of root access.
Book Layout and Omissions
This book is organized as a progressive series of topics, each designed to build upon concepts introduced earlier. The first 11 chapters focus on concepts and operations that pertain to one repository. They form the foundation for more complex operations on multiple repositories covered in the final 10 chapters.
If you already have Git installed or have even used it briefly, then you may not need the introductory and installation information in the first two chapters, nor even the quick tour presented in the third chapter.
The concepts covered in Chapter 4 are essential for a firm grasp on Git’s object model. They set the stage and prepare the reader for a clearer understanding of many of Git’s more complex operations.
Chapters 5 through 11 cover various topics in more detail. Chapter 5 describes the index and file management. Chapters 6 and 10 discuss the fundamentals of making commits and working with them to form a solid line of development. Chapter 7 intro-duces branches so that you may manipulate several different lines of development from your one local repository. Chapter 8 explains how Git derives and presents “diffs.” Git provides a rich and powerful ability to join different branches of development. The basics of branch merging and resolving merge conflicts are covered in Chapter 9. A key insight into Git’s model is to realize that all merging performed by Git happens in your local repository in the context of your current working directory. Chapters 10 and 11
expose some operations for altering, storing, tracking, and recovering daily develop-ment within your developdevelop-ment repository.
The fundamentals of naming and exchanging data with another, remote repository are covered in Chapter 12. Once the basics of merging have been mastered, interacting with multiple repositories is shown to be a simple combination of an exchange step plus a merge step. The exchange step is the new concept covered in this chapter and the merge step is covered in Chapter 9.
Chapter 13 provides a more philosophical and abstract coverage of repository management “in the large.” It also establishes a context for Chapter 14 to cover patch handling when direct exchange of repository information isn’t possible using Git’s native transfer protocols.
The next four chapters cover advanced topics of interest: the use of hooks ( Chap-ter 15), combining projects and multiple repositories into a superproject (Chapter 16
and Chapter 17), and interacting with Subversion repositories (Chapter 18).
Chapters 19 and 20 provide some advanced examples and clever tips, tricks, and tech-niques that may help transform you into a true Git guru.
Finally, Chapter 21 introduces GitHub and explains how Git has enabled a creative, social development process around version control.
Git is still evolving rapidly because there is an active developer base. It’s not that Git is so immature that you cannot use it for development; rather, ongoing refinements and user interface issues are being enhanced regularly. Even as this book was being written, Git evolved. Apologies if I was unable to keep up accurately.
Perhaps, though, enough pointers, tips, and direction can be found here to inspire readers to do some of their own research and exploration!
Conventions Used in This Book
The following typographical conventions are used in this book: Italic
Indicates new terms, URLs, email addresses, filenames, and file extensions.
Constant width
Used for program listings as well as within paragraphs to refer to program elements such as variable or function names, databases, data types, environment variables, statements, and keywords.
Constant width bold
Shows commands or other text that should be typed literally by the user.
Constant width italic
Shows text that should be replaced with user-supplied values or by values deter-mined by context.
This icon signifies a useful hint or a tip.
This icon indicates a warning or caution.
This icon indicates a general note.
Furthermore, you should be familiar with basic shell commands to manipulate files and directories. Many examples will contain commands such as these to add or remove directories, copy files, or create simple files:
$ cp file.txt copy-of-file.txt
$ mkdir newdirectory
$ rm file
$ rmdir somedir
$ echo "Test line" > file
$ echo "Another line" >> file
Commands that need to be executed with root permissions appear as a sudo operation:
# Install the Git core package
$ sudo apt-get install git-core
How you edit files or effect changes within your working directory is pretty much up to you. You should be familiar with a text editor. In this book, I’ll denote the process of editing a file by either a direct comment or a pseudocommand:
# edit file.c to have some new text
$ edit index.html
Using Code Examples
This book is here to help you get your job done. In general, you may use the code in this book in your programs and documentation. You do not need to contact us for permission unless you’re reproducing a significant portion of the code. For example, writing a program that uses several chunks of code from this book does not require permission. Selling or distributing a CD-ROM of examples from O’Reilly books does require permission. Answering a question by citing this book and quoting example code does not require permission. Incorporating a significant amount of example code from this book into your product’s documentation does require permission.
We appreciate, but do not require, attribution. An attribution usually includes the title, author, publisher, and ISBN. For example: “Version Control with Git by Jon Loeliger and Matthew McCullough. Copyright 2012 Jon Loeliger, 978-1-449-31638-9.” If you feel your use of code examples falls outside fair use or the permission given previously, feel free to contact us at [email protected].
Safari® Books Online
Safari Books Online (www.safaribooksonline.com) is an on-demand digital library that delivers expert content in both book and video form from the world’s leading authors in technology and business.
Technology professionals, software developers, web designers, and business and cre-ative professionals use Safari Books Online as their primary resource for research, problem solving, learning, and certification training.
Press, FT Press, Apress, Manning, New Riders, McGraw-Hill, Jones & Bartlett, Course Technology, and dozens more. For more information about Safari Books Online, please visit us online.
How to Contact Us
Please address comments and questions concerning this book to the publisher: O’Reilly Media, Inc.
1005 Gravenstein Highway North Sebastopol, CA 95472
800-998-9938 (in the United States or Canada) 707-829-0515 (international or local)
707-829-0104 (fax)
We have a web page for this book, where we list errata, examples, and any additional information. You can access this page at:
http://oreil.ly/VCWG2e
To comment or ask technical questions about this book, send email to:
For more information about our books, courses, conferences, and news, see our website at http://www.oreilly.com.
Find us on Facebook: http://facebook.com/oreilly
Follow us on Twitter: http://twitter.com/oreillymedia
Watch us on YouTube: http://www.youtube.com/oreillymedia
Acknowledgments
This work would not have been possible without the help of many other people. I’d like to thank Avery Pennarun for contributing substantial material to Chapters 15, 16, and 18. He also contributed some material to Chapters 4 and 9. His help was appre-ciated. I’d like to thank Matthew McCullough for the material in Chapters 17 and 21, assorted suggestions, and general advice. Martin Langhoff is paraphrased with permission for some repository publishing advice in Chapter 13, and Bart Massey’s tip on keeping a file without tracking is also used with permission. I’d like to publicly thank those who took time to review the book at various stages: Robert P. J. Day, Alan Hasty, Paul Jimenez, Barton Massey, Tom Rix, Jamey Sharp, Sarah Sharp, Larry Streepy, Andy Wilcox, and Andy Wingo. Robert P. J. Day, thankfully, took the time to review both editions of the book front to back.
Also, I’d like to thank my wife Rhonda, and daughters Brandi and Heather, who pro-vided moral support, gentle nudging, Pinot Noir, and the occasional grammar tip. And
thanks to Mylo, my long-haired dachshund who spent the entire writing process curled up lovingly in my lap. I’d like to add a special thanks to K. C. Dignan, who supplied enough moral support and double-stick butt-tape to keep my behind in my chair long enough to finish this book!
Finally, I would like to thank the staff at O’Reilly as well as my editors, Andy Oram and Martin Streicher.
Attributions
Linux® is the registered trademark of Linus Torvalds in the United States and other countries.
PowerPC® is a trademark of International Business Machines Corporation in the United States, other countries, or both.
CHAPTER 1
Introduction
Background
No cautious, creative person starts a project nowadays without a back-up strategy. Because data is ephemeral and can be lost easily—through an errant code change or a catastrophic disk crash, say—it is wise to maintain a living archive of all work. For text and code projects, the back-up strategy typically includes version control, or tracking and managing revisions. Each developer can make several revisions per day, and the ever increasing corpus serves simultaneously as repository, project narrative, communication medium, and team and product management tool. Given its pivotal role, version control is most effective when tailored to the working habits and goals of the project team.
A tool that manages and tracks different versions of software or other content is referred to generically as a version control system (VCS), a source code manager (SCM), a revision control system (RCS), and several other permutations of the words “revision,” “version,” “code,” “content,” “control,” “management,” and “system.” Although the authors and users of each tool might debate esoterics, each system addresses the same issue: develop and maintain a repository of content, provide access to historical editions of each datum, and record all changes in a log. In this book, the term version control system (VCS) is used to refer generically to any form of revision control system. This book covers Git, a particularly powerful, flexible, and low-overhead version con-trol tool that makes collaborative development a pleasure. Git was invented by Linus Torvalds to support the development of the Linux®1 kernel, but it has since proven
valuable to a wide range of projects.
1. Linux® is the registered trademark of Linus Torvalds in the United States and other countries.
The Birth of Git
Often, when there is discord between a tool and a project, the developers simply create a new tool. Indeed, in the world of software, the temptation to create new tools can be deceptively easy and inviting. In the face of many existing version control systems, the decision to create another shouldn’t be made casually. However, given a critical need, a bit of insight, and a healthy dose of motivation, forging a new tool can be exactly the right course.
Git, affectionately termed “the information manager from hell” by its creator (Linus is known for both his irascibility and his dry wit), is such a tool. Although the precise circumstances and timing of its genesis are shrouded in political wrangling within the Linux kernel community, there is no doubt that what came from that fire is a well-engineered version control system capable of supporting the worldwide development of software on a large scale.
Prior to Git, the Linux kernel was developed using the commercial BitKeeper VCS, which provided sophisticated operations not available in then-current, free software VCSs such as RCS and the Concurrent Versions System (CVS). However, when the company that owned BitKeeper placed additional restrictions on its “free as in beer” version in the spring of 2005, the Linux community realized that BitKeeper was no longer a viable solution.
Linus looked for alternatives. Eschewing commercial solutions, he studied the free software packages but found the same limitations and flaws that led him to reject them previously. What was wrong with the existing VCSs? What were the elusive missing features or characteristics that Linus wanted and couldn’t find?
Facilitate Distributed Development
There are many facets to “distributed development,” and Linus wanted a new VCS that would cover most of them. It had to allow parallel as well as independent and simultaneous development in private repositories without the need for constant synchronization with a central repository, which could form a development bottleneck. It had to allow multiple developers in multiple locations even if some of them were offline temporarily.
Scale to Handle Thousands of Developers
It isn’t enough just to have a distributed development model. Linus knew that thousands of developers contribute to each Linux release. So any new VCS had to handle a very large number of developers whether they were working on the same or different parts of a common project. And the new VCS had to be able to integrate all of their work reliably.
Perform Quickly and Efficiently
operations would have to be very fast. To save space and thus transfer time, com-pression and “delta” techniques would be needed. Using a distributed model instead of a centralized model also ensured that network latency would not hinder daily development.
Maintain Integrity and Trust
Because Git is a distributed revision control system, it is vital to obtain absolute assurance that data integrity is maintained and is not somehow being altered. How do you know the data hasn’t been altered in transition from one developer to the next? Or from one repository to the next? Or, for that matter, that the data in a Git repository is even what it purports to be?
Git uses a common cryptographic hash function, called Secure Hash Function (SHA1), to name and identify objects within its database. Though perhaps not absolute, in practice it has proven to be solid enough to ensure integrity and trust for all Git’s distributed repositories.
Enforce Accountability
One of the key aspects of a version control system is knowing who changed files and, if at all possible, why. Git enforces a change log on every commit that changes a file. The information stored in that change log is left up to the developer, project requirements, management, convention, and so on. Git ensures that changes will not happen mysteriously to files under version control because there is an accountability trail for all changes.
Immutability
Git’s repository database contains data objects that are immutable. That is, once they have been created and placed in the database, they cannot be modified. They can be recreated differently, of course, but the original data cannot be altered without consequences. The design of the Git database means that the entire history stored within the version control database is also immutable. Using immutable objects has several advantages, including quick comparison for equality.
Atomic Transactions
With atomic transactions, a number of different but related changes are performed either all together or not at all. This property ensures that the version control database is not left in a partially changed or corrupted state while an update or commit is happening. Git implements atomic transactions by recording complete, discrete repository states that cannot be broken down into individual or smaller state changes.
Support and Encourage Branched Development
Almost all VCSs can name different genealogies of development within a single project. For instance, one sequence of code changes could be called “development” while another is referred to as “test.” Each version control system can also split a single line of development into multiple lines and then unify, or merge, the dispa-rate threads. As with most VCSs, Git calls a line of development a branch and assigns each branch a name.
Along with branching comes merging. Just as Linus wanted easy branching to foster alternate lines of development, he also wanted to facilitate easy merging of those branches. Because branch merging has often been a painful and difficult operation in version control systems, it would be essential to support clean, fast, easy merging.
Complete Repositories
So that individual developers needn’t query a centralized repository server for historical revision information, it was essential that each repository have a com-plete copy of all historical revisions of every file.
A Clean Internal Design
Even though end users might not be concerned about a clean internal design, it was important to Linus and ultimately to other Git developers as well. Git’s object model has simple structures that capture fundamental concepts for raw data, directory structure, recording changes, and so forth. Coupling the object model with a globally unique identifier technique allowed a very clean data model that could be managed in a distributed development environment.
Be Free, as in Freedom ’Nuff said.
Given a clean slate to create a new VCS, many talented software engineers collaborated and Git was born. Necessity was the mother of invention again!
Precedents
The complete history of VCSs is beyond the scope of this book. However, there are several landmark, innovative systems that set the stage for or directly led to the development of Git. (This section is selective, hoping to record when new features were introduced or became popular within the free software community.)
The Source Code Control System (SCCS) was one of the original systems on Unix®2
and was developed by M. J. Rochkind in the very early 1970s. [“The Source Code Control System,” IEEE Transactions on Software Engineering 1(4) (1975): 364-370.] This is arguably the first VCS available on any Unix system.
The central store that SCCS provided was called a repository, and that fundamental concept remains pertinent to this day. SCCS also provided a simple locking model to serialize development. If a developer needed files to run and test a program, he or she would check them out unlocked. However, in order to edit a file, he or she had to check it out with a lock (a convention enforced through the Unix file system). When finished, he or she would check the file back into the repository and unlock it.
The Revision Control System (RCS) was introduced by Walter F. Tichy in the early 1980s. [“RCS: A System for Version Control,” Software Practice and Experience 15(7) (1985): 637-654.] RCS introduced both forward and reverse delta concepts for the efficient storage of different file revisions.
The Concurrent Version System (CVS), designed and originally implemented by Dick Grune in 1986 and then crafted anew some four years later by Berliner and colleagues extended and modified the RCS model with great success. CVS became very popular and was the de facto standard within the open source (http://www.opensource.org) community for many years. CVS provided several advances over RCS, including distributed development and repository-wide change sets for entire “modules.” Furthermore, CVS introduced a new paradigm for the lock. Whereas earlier systems required a developer to lock each file before changing it and thus forced one developer to wait for another in serial fashion, CVS gave each developer write permission in his or her private working copy. Thus, changes by different developers could be merged automatically by CVS unless two developers tried to change the same line. In that case, the conflict was flagged and the developers were left to work out the solution. The new rules for the lock allowed different developers to write code concurrently.
As often occurs, perceived shortcomings and faults in CVS eventually led to a new VCS. Subversion (SVN), introduced in 2001, quickly became popular within the free software community. Unlike CVS, SVN committed changes atomically and had significantly better support for branches.
BitKeeper and Mercurial were radical departures from all the aforementioned solutions. Each eliminated the central repository; instead, the store was distributed, providing each developer with his own shareable copy. Git is derived from this peer-to-peer model.
Finally, Mercurial and Monotone contrived a hash fingerprint to uniquely identify a file’s content. The name assigned to the file is a moniker and a convenient handle for the user and nothing more. Git features this notion as well. Internally, the Git identifier is based on the file’s contents, a concept known as a content-addressable file store. The concept is not new. [See “The Venti Filesystem,” (Plan 9), Bell Labs, http://www.usenix .org/events/fast02/quinlan/quinlan_html/index.html.] Git immediately borrowed the idea from Monotone, according to Linus.3 Mercurial was implementing the concept
simultaneously with Git.
3. Private email.
Timeline
With the stage set, a bit of external impetus, and a dire VCS crisis imminent, Git sprang to life in April 2005.
Git became self-hosted on April 7 with this commit:
commit e83c5163316f89bfbde7d9ab23ca2e25604af29 Author: Linus Torvalds <[email protected]> Date: Thu Apr 7 15:13:13 2005 -0700
Initial revision of "git", the information manager from hell
Shortly thereafter, the first Linux commit was made:
commit 1da177e4c3f41524e886b7f1b8a0c1fc7321cac2 Author: Linus Torvalds <[email protected]> Date: Sat Apr 16 15:20:36 2005 -0700
Linux-2.6.12-rc2
Initial git repository build. I'm not bothering with the full history, even though we have it. We can create a separate "historical" git archive of that later if we want to, and in the meantime it's about 3.2GB when imported into git - space that would just make the early git days unnecessarily complicated, when we don't have a lot of good infrastructure for it.
Let it rip!
That one commit introduced the bulk of the entire Linux Kernel into a Git repository.4 It consisted of
17291 files changed, 6718755 insertions(+), 0 deletions(-)
Yes, that’s an introduction of 6.7 million lines of code!
It was just three minutes later when the first patch using Git was applied to the kernel. Convinced that it was working, Linus announced it on April 20, 2005, to the Linux Kernel Mailing List.
Knowing full well that he wanted to return to the task of developing the kernel, Linus handed the maintenance of the Git source code to Junio Hamano on July 25, 2005, announcing that “Junio was the obvious choice.”
About two months later, Version 2.6.12 of the Linux Kernel was released using Git.
What’s in a Name?
Linus himself rationalizes the name “Git” by claiming “I’m an egotistical bastard, and I name all my projects after myself. First Linux, now git.”5 Granted, the name “Linux”
for the kernel was sort of a hybrid of Linus and Minix. The irony of using a British term for a silly or worthless person was not missed, either.
Since then, others had suggested some alternative and perhaps more palatable interpretations: the Global Information Tracker seems to be the most popular.
5. See http://www.infoworld.com/article/05/04/19/HNtorvaldswork_1.html.
CHAPTER 2
Installing Git
At the time of this writing, Git is (seemingly) not installed by default on any GNU/ Linux distribution or any other operating system. So, before you can use Git, you must install it. The steps to install Git depend greatly on the vendor and version of your operating system. This chapter describes how to install Git on Linux and Microsoft Windows and within Cygwin.
Using Linux Binary Distributions
Many Linux vendors provide precompiled, binary packages to make the installation of new applications, tools, and utilities easy. Each package specifies its dependencies, and the distribution’s package manager typically installs the prerequisites and the desired package in one (well-orchestrated and automated) fell swoop.
Debian/Ubuntu
On most Debian and Ubuntu systems, Git is offered as a collection of packages, where each package can be installed independently depending on your needs. Prior to the 12.04 release, the primary Git package was called git-core. As of the 12.04 release, it is simply called git, and the documentation is available in git-doc. There are other packages to consider, too.
git-arch git-cvs git-svn
If you need to transfer a project from Arch, CVS, or SVN to Git or vice versa, install one or more of these packages.
git-gui gitk gitweb
If you prefer to browse repositories in a graphical application or your web browser, install these as appropriate. git-gui is a Tcl/Tk-based graphical user interface for Git; gitk is another Git browser written in Tcl/Tk but focuses more on visualizing project history. gitweb is written in Perl and displays a Git repository in a browser window.
git-email
This is an essential component if you want to send Git patches through electronic mail, which is a common practice in some projects.
git-daemon-run
To share your repository, install this package. It creates a daemon service that allows you to share your repositories through anonymous download requests. Because distributions vary greatly, it’s best to search your distribution’s package depot for a complete list of Git-related packages. git-doc and git-email are strongly recommended.
This command installs the important Git packages by running apt-get as root.
$ sudo apt-get install git git-doc gitweb \ git-gui gitk git-email git-svn
Other Binary Distributions
To install Git on other Linux distributions, find the appropriate package or packages and use the distribution’s native package manager to install the software.
For example, on Gentoo systems, use emerge.
$ sudo emerge dev-util/git
On Fedora, use yum.
$ sudo yum install git
The Fedora git is roughly equivalent to Debian’s git. Other i386 Fedora packages include:
git.i386 :
The core Git tools git-all.i386 :
A meta-package for pulling in all Git tools git-arch.i386 :
Git tools for importing Arch repositories git-cvs.i386 :
git-daemon.i386 :
The Git protocol daemon git-debuginfo.i386 :
Debug information for package git git-email.i386 :
Git tools for sending email git-gui.i386 :
Git GUI tool git-svn.i386 :
Git tools for importing SVN repositories gitk.i386 :
Git revision tree visualizer
Again, be mindful that, like Debian, some distributions may split the Git release among many different packages. If your system lacks a particular Git command, you may need to install an additional package.
Be sure to verify that your distribution’s Git packages are sufficiently up-to-date. After Git is installed on your system, run git --version. If your collaborators use a more modern version of Git, you may have to replace your distribution’s precompiled Git packages with a build of your own. Consult your package manager documentation to learn how to remove previously installed packages; proceed to the next section to learn how to build Git from source.
Obtaining a Source Release
If you prefer to download the Git code from its canonical source or if you want the latest version of Git, visit Git’s master repository. As of this writing, the master repository for Git sources is http://git.kernel.org in the pub/scm/git directory.
The version of Git described in this book is roughly 1.7.9, but you might want to download the latest revision of the source. You can find a list of all the available versions at http://code.google.com/p/git-core/downloads/list.
To begin the build, download the source code for version 1.7.9 (or later) and unpack it.
$ wget http://git-core.googlecode.com/files/git-1.7.9.tar.gz
$ tar xzf git-1.7.9.tar.gz
$ cd git-1.7.9
Building and Installing
Git is similar to other pieces of open source software. Just configure it, type make, and install it. Small matter of software, right? Perhaps.
If your system has the proper libraries and a robust build environment and if you do not need to customize Git, then building the code can be a snap. On the other hand, if your machine lacks a compiler or a suite of server and software development libraries, or if you’ve never built a complex application from source, then you should consider building Git from scratch only as a last resort. Git is highly configurable, and building it shouldn’t be taken lightly.
To continue the build, consult the INSTALL file in the Git source bundle. The file lists several external dependencies, including the zlib, openssl, and libcurl libraries. Some of the requisite libraries and packages are a bit obscure or belong to larger packages. Here are three tips for a Debian stable distribution.
• curl-config, a small tool to extract information about the local curl install, can be found in the libcurl4-openssl-dev package.
• The header file expat.h comes from the libexpat1-dev package. • The msgfmt utility belongs to the gettext package.
Because compiling from sources is considered “development” work, the normal binary versions of installed libraries are not sufficient. Instead, you need the -dev versions, because the development variants also supply header files required during compilation. If you are unable to locate some of these packages or cannot find a necessary library on your system, the Makefile and configuration options offer alternatives. For example, if you lack the expat library, you can set the NO_EXPAT option in the Makefile. However, your build will lack some features, as noted in the Makefile. For example, you will not be able to push changes to a remote repository using the HTTP and HTTPS transports. Other Makefile configuration options support ports to various platforms and distribu-tions. For instance, several flags pertain to Mac OS X’s Darwin operating system. Either hand-modify and select the appropriate options or find what parameters are set auto-matically in the top-level INSTALL file.
Once your system and build options are ready, the rest is easy. By default, Git is installed in your home directory in subdirectories ~/bin/, ~/lib/, and ~/share/. In general, this default is useful only if you’re using Git personally and don’t need to share it with other users.
These commands build and install Git in your home directory.
$ cd git-1.7.9
$ ./configure
$ make all
$ make install
If you want to install Git into an alternate location, such as /usr/local/ to provide general access, add --prefix=/usr/local to the ./configure command. To continue, run make
$ cd git-1.7.9
$ ./configure --prefix=/usr/local
$ make all
$ sudo make install
To install the Git documentation, add the doc and install-doc targets to the make and
make install commands, respectively.
$ cd git-1.7.9
$ make all doc
$ sudo make install install-doc
Several more libraries are needed to do a complete build of the documentation. As an alternative, prebuilt manpages and HTML pages are available and can be installed separately as well; just be careful to avoid version mismatch problems if you choose to go this route.
A build from source includes all the Git subpackages and commands, such as git-email and gitk. There is no need to build or install those utilities independently.
Installing Git on Windows
There are two competing Git packages for Windows: a Cygwin-based Git and a “native” version called msysGit.
Both versions work well and support an almost identical set of features. The version you choose is a matter of personal preference. If you aren’t sure which one you want, here are some rules of thumb.
• If you use Cygwin already on Windows, use Cygwin’s Git because it interoperates better with your Cygwin setup. For example, all your Cygwin-style filenames will work in Git, and redirecting program input and output will always work exactly as expected.
• If you don’t use Cygwin, it’s easier to install msysGit because it has its own stand-alone installer.
• If you want Git integration with the Windows Explorer shell (for example, the ability to right-click on a folder and pick “Git GUI Here” or “Git Bash Here”), then install msysGit. If you want this feature but prefer to use Cygwin, you can install both packages without harm.
If you’re still in doubt about which package to use, install msysGit. Make sure you obtain the latest version (1.7.10 or higher) because the quality of Git’s Windows sup-port steadily improves in successive versions.
Installing the Cygwin Git Package
The Cygwin Git package, as the name implies, is a package inside the Cygwin system itself. To install it, run Cygwin’s setup.exe program, which you can download from
http://cygwin.com.
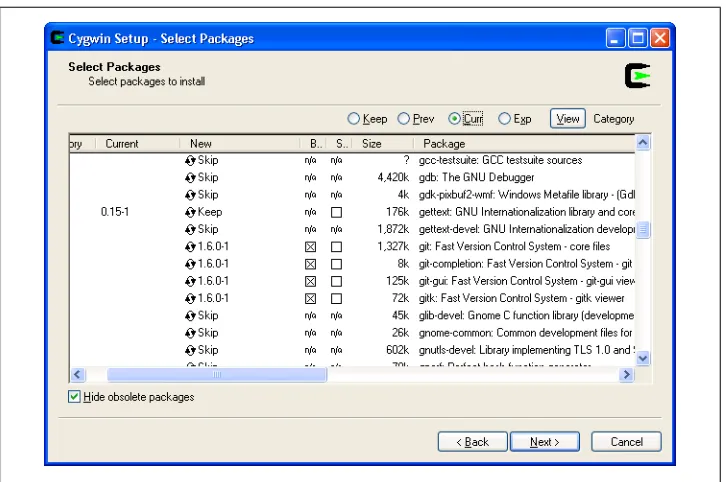
After setup.exe launches, use the default settings for most options until you get to the list of packages to install. The Git packages are in the devel category, as shown in
Figure 2-1.
Figure 2-1. Cygwin setup
After choosing the packages you want to install, click Next a few more times until the Cygwin installation finishes. You can then start the Cygwin Bash Shell from your Start menu, which should now include the git command (Figure 2-2).
As an alternative, if your Cygwin configuration includes the various compiler tools like
gcc and make, then you can build your own copy of Git from source code on Windows under Cygwin by following the same instructions as on Linux.
Installing Standalone Git (msysGit)
integrate well with Windows-style native applications (such as the Windows Explorer shell).
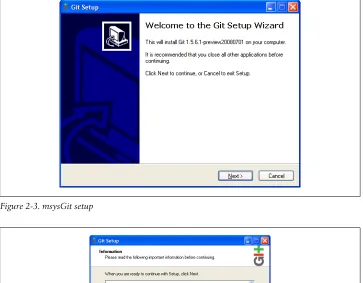
First, download the latest version of the installer from its home at http://msysgit.github .com. The file to collect is usually called something like Git-1.8.3-preview20130601.exe. After the download completes, run the installer. You should see a screen that looks something like Figure 2-3.
Depending on the actual version being installed, you may or may not need to click Next through a compatibility notice, as shown in Figure 2-4. This notice concerns incom-patibilities between Windows-style and Unix-style line endings, called CRLF and LF, respectively.
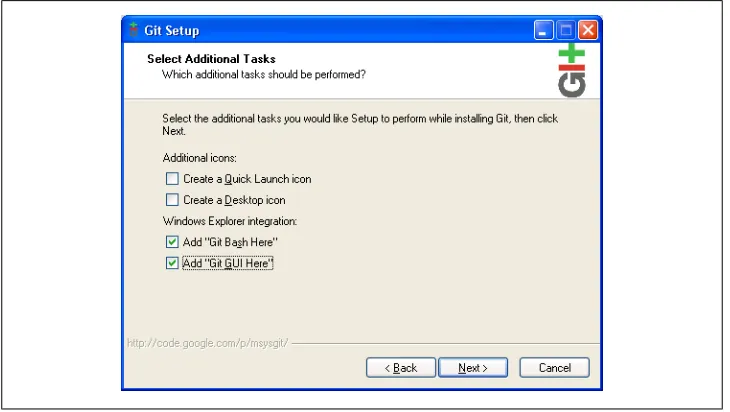
Click Next a few more times until you see the screen shown in Figure 2-5. The best way to run msysGit on a daily basis is via Windows Explorer, so check the two pertinent boxes as shown.
In addition, an icon to start Git Bash (a command prompt that makes the git commands available) is installed in the Start menu in the section called Git. Because most of the examples in this book use the command line, use Git Bash to get started.
All the examples in this book work equally well on Linux and Windows, with one caveat: msysGit for Windows uses the older Git command names mentioned in “The Git Command Line” on page 19 of Chapter 3. To follow the examples with msys-Git, enter git-add for git add.
Figure 2-2. Cygwin shell
Figure 2-3. msysGit setup
Figure 2-5. msysGit choices
CHAPTER 3
Getting Started
Git manages change. Given that intent, Git shares much with other version control systems. Many tenets—the notion of a commit, the change log, the repository—are the same, and workflow is conceptually similar among the corpus of tools. However, Git offers many novelties, too. The notions and practices of other version control systems may work differently in Git or may not apply at all. Yet no matter what your experience, this book explains how Git works and teaches mastery.
Let’s get started.
The Git Command Line
Git is simple to use. Just type git. Without any arguments, Git lists its options and the most common subcommands.
$ git
git [--version] [--exec-path[=GIT_EXEC_PATH]]
[-p|--paginate|--no-pager] [--bare] [--git-dir=GIT_DIR] [--work-tree=GIT_WORK_TREE] [--help] COMMAND [ARGS]
The most commonly used git commands are: add Add file contents to the index
bisect Find the change that introduced a bug by binary search branch List, create, or delete branches
checkout Checkout and switch to a branch clone Clone a repository into a new directory commit Record changes to the repository
diff Show changes between commits, the commit and working trees, etc fetch Download objects and refs from another repository
grep Print lines matching a pattern
init Create an empty git repository or reinitialize an existing one log Show commit logs
merge Join two or more development histories
mv Move or rename a file, a directory, or a symlink
pull Fetch from and merge with another repository or a local branch push Update remote refs along with associated objects
rebase Forward-port local commits to the updated upstream head reset Reset current HEAD to the specified state
rm Remove files from the working tree and from the index show Show various types of objects
status Show the working tree status
tag Create, list, delete, or verify a tag object signed with GPG
For a complete (and somewhat daunting) list of git subcommands, type
git help --all.
As you can see from the usage hint, a small handful of options apply to git. Most options, shown as [ARGS] in the hint, apply to specific subcommands.
For example, the option --version affects the git command and produces a version number.
$ git --version
git version 1.6.0
In contrast, --amend is an example of an option specific to the git subcommand
commit.
$ git commit --amend
Some invocations require both forms of options. (Here, the extra spaces in the com-mand line merely serve to visually separate the subcomcom-mand from the base comcom-mand and are not required.)
$ git --git-dir=project.git repack -d
For convenience, documentation for each git subcommand is available using
git help subcommand, git --help subcommand or git subcommand --help.
Historically, Git was provided as a suite of many simple, distinct, standalone com-mands developed according to the “Unix toolkit” philosophy: build small, interoper-able tools. Each command sported a hyphenated name, such as git-commit and
git-log. However, modern Git installations no longer support the hyphenated com-mand forms and instead use a single git executable with a subcommand.
You can visit http://www.kernel.org/pub/software/scm/git/docs/ to read the complete Git documentation online.
Git commands understand both “short” and “long” options. For example, the
git commit command treats the following examples as equivalents.
$ git commit -m "Fixed a typo."
$ git commit --message="Fixed a typo."
Finally, you can separate options from a list of arguments via the “bare double dash” convention. For instance, use the double dash to contrast the control portion of the command line from a list of operands, such as filenames.
$ git diff -w master origin -- tools/Makefile
You may need to use the double dash to separate and explicitly identify filenames if they might otherwise be mistaken for another part of the command. For example, if you happened to have both a file and a tag named main.c, then you will get different behavior:
# Checkout the tag named "main.c" $ git checkout main.c
# Checkout the file named "main.c" $ git checkout -- main.c
Quick Introduction to Using Git
To see git in action, let’s create a new repository, add some content, and manage a few revisions.
There are two fundamental techniques for establishing a Git repository. You can either create it from scratch, populating it with an existing body of work, or you can copy, or clone, an existing repository. It’s simpler to start with an empty repository, so let’s start there.
Creating an Initial Repository
To model a typical situation, let’s create a repository for your personal website from the directory ~/public_html and place it in a Git repository.
If you don’t have content for your personal website in ~/public_html, create the directory and place some simple content in a file called index.html:
$ mkdir ~/public_html
$ cd ~/public_html
$ echo 'My website is alive!' > index.html
To turn ~/public_html or any directory into a Git repository, run git init:
$ git init
Initialized empty Git repository in .git/
Git doesn’t care whether you start with a completely empty directory or if you start with a directory full of files. In either case, the process of converting the directory into a Git repository is the same.
To signify that your directory is a Git repository, the git init command creates a hidden directory, called .git, at the top level of your project. Whereas CVS and SVN
place revision information in CVS and .svn subdirectories within each of your project’s directories, Git places all its revision information in this one, top-level .git directory. The contents and purpose of the data files are discussed in more detail in “Inside the .git Directory” on page 39 of Chapter 4.
Everything in your ~/public_html directory remains untouched. Git considers it your project’s working directory, or the directory where you alter your files. In contrast, the repository hidden within .git is maintained by Git.
Adding a File to Your Repository
The command git init creates a new Git repository. Initially, each Git repository is empty. To manage content, you must explicitly deposit it in the repository. Such a conscious step separates scratch files from important files.
Use git add file to add file to the repository:
$ git add index.html
If you have a directory populated with several files, let Git add all the files in the directory and all subdirectories with git add .. (The argu-ment ., the single period or “dot” in Unix parlance, is shorthand for the current directory.)
After an add, Git knows that the file, index.html, is to remain in the repository. However, so far, Git has merely staged the file, an interim step before committal. Git separates the add and commit steps to avoid volatility. Imagine how disruptive, confusing, and time-consuming it would be to update the repository each time you add, remove, or change a file. Instead, multiple provisional and related steps, such as an add, can be “batched,” keeping the repository in a stable, consistent state.
Running git status reveals this in-between state of index.html:
$ git status
# On branch master #
# Initial commit #
# Changes to be committed:
# (use "git rm --cached <file>..." to unstage) #
# new file: index.html
In addition to actual changes to the directory and to file contents, Git records several other pieces of metadata with each commit, including a log message and the author of the change. A fully qualified git commit command supplies a log message and an author:
$ git commit -m "Initial contents of public_html" \ --author="Jon Loeliger <[email protected]>"
Created initial commit 9da581d: Initial contents of public_html 1 files changed, 1 insertions(+), 0 deletions(-)
create mode 100644 index.html
You can provide a log message on the command line, but it’s more typical to create the message during an interactive editor session. This gives you an opportunity to compose a complete and detailed log message in your favorite editor. To configure Git to open your favorite editor during a git commit, set your GIT_EDITOR environment variable.
# In tcsh
$ setenv GIT_EDITOR emacs
# In bash
$ export GIT_EDITOR=vim
After you commit the addition of the new file into the repository, git status indicates that there are no outstanding, staged changes to be committed.
$ git status
# On branch master
nothing to commit (working directory clean)
Git also takes the time to tell you that your working directory is clean, which means the working directory has no unknown or modified files that differ from what is in the repository.
Obscure Error Messages
Git tries hard to determine the author of each commit. If you haven’t set up your name and email address in a way that Git can find it, you may encounter some odd warnings. But there is no need to have an existential crisis if you see a cryptic error message like one of these:
You don't exist. Go away! Your parents must have hated you! Your sysadmin must hate you!
The error indicates that Git is unable to determine your real name, likely due to a problem (existence, readability, length) with your Unix “gecos” information. The problem can be fixed by setting your name and email configuration information as described in “Configuring the Commit Author” on page 24.
Configuring the Commit Author
Before making many commits to a repository, you should establish some basic environment and configuration options. At a bare minimum, Git must know your name and email address. You may specify your identity on every commit command line, as shown previously, but that is the hard way and quickly becomes tedious. Instead, save your identity in a configuration file using the git config command.
$ git config user.name "Jon Loeliger"
$ git config user.email "[email protected]"
You can also tell Git your name and email address using the GIT_AUTHOR_NAME and
GIT_AUTHOR_EMAIL environment variables. If set, these variables override all configura-tion settings.
Making Another Commit
To show a few more features of Git, let’s make some modifications and create a complex history of changes within the repository.
Let’s commit an alteration to the index.html file. Open the file, convert it to HTML, and save the file.
$ cd ~/public_html
# edit the index.html file
$ cat index.html
<html> <body>
My web site is alive! </body>
</html>
$ git commit index.html
If you are already somewhat familiar with Git, you may be tempted to think “Aha! You need to git add index.html before you can commit that file!” But that isn’t true. Because the file was already added to the repository (in “Adding a File to Your Reposi-tory” on page 22), there’s no need to tell the index about the file; it already knows. Furthermore, file changes are captured when directly committing a file named on the command line! Using a generic git commit without naming the file would not have worked in this case.
Viewing Your Commits
Once you have one or more commits in the repository, you can inspect them in a variety of ways. Some Git commands show the sequence of individual commits, others show the summary of an individual commit, and still others show the full details of any commit in the repository.
The command git log yields a sequential history of the individual commits within the repository:
$ git log
commit ec232cddfb94e0dfd5b5855af8ded7f5eb5c90d6 Author: Jon Loeliger <[email protected]>
Date: Wed Apr 2 16:47:42 2008 -0500
Convert to HTML
commit 9da581d910c9c4ac93557ca4859e767f5caf5169 Author: Jon Loeliger <[email protected]>
Date: Thu Mar 13 22:38:13 2008 -0500
Initial contents of public_html
The entries are listed, in order, from most recent to oldest1 (the original file); each entry
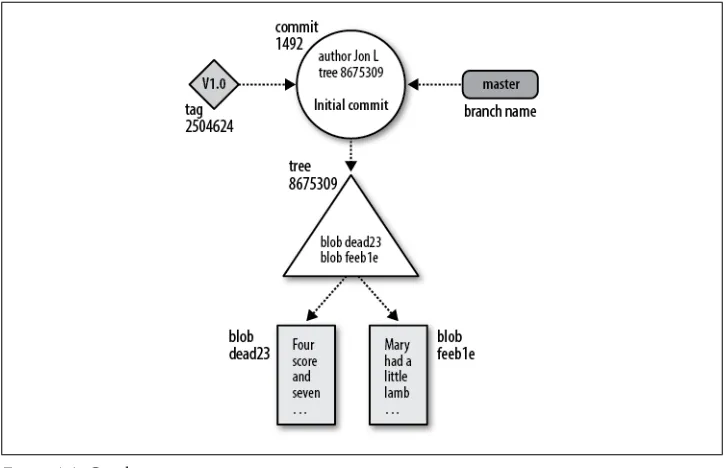
shows the commit author’s name and email address, the date of the commit, the log message for the change, and the internal identification number of the commit. The commit ID number is explained in “Content-Addressable Names” on page 33 of
Chapter 4, and commits are discussed in Chapter 6.
To see more detail about a particular commit, use git show with a commit number:
$ git show 9da581d910c9c4ac93557ca4859e767f5caf5169
commit 9da581d910c9c4ac93557ca4859e767f5caf5169 Author: Jon Loeliger <[email protected]>
Date: Thu Mar 13 22:38:13 2008 -0500
Initial contents of public_html
diff --git a/index.html b/index.html new file mode 100644
index 0000000..34217e9 --- /dev/null
+++ b/index.html @@ -0,0 +1 @@
+My web site is alive!
If you run git show without an explicit commit number, it simply shows the details of the most recent commit.
1. Strictly speaking, they are not in chronological order but rather are a topological sort of the commits.
Another view, show-branch, provides concise, one-line summaries for the current development branch:
$ git show-branch --more=10
[master] Convert to HTML
[master^] Initial contents of public_html
The phrase --more=10 reveals up to an additional 10 more versions, but only two exist so far and so both are shown. (The default in this case would list only the most recent commit.) The name master is the default branch name.
Branches are covered extensively in Chapter 7. “Viewing Branches” on page 94
describes the git show-branch command in more detail.
Viewing Commit Differences
To see the differences between the two revisions of index.html, recall both full commit ID names and run git diff:
$ git diff 9da581d910c9c4ac93557ca4859e767f5caf5169 \ ec232cddfb94e0dfd5b5855af8ded7f5eb5c90d6
diff --git a/index.html b/index.html index 34217e9..8638631 100644 --- a/index.html
+++ b/index.html @@ -1 +1,5 @@ +<html> +<body>
My web site is alive! +</body>
+</html>
This output should look familiar: It resembles what the diff program produces. As is the convention, the first revision named, 9da581d910c9c4ac93557ca4859e767f5caf5169, is the earlier version of the content and the second revision, named
ec232cddfb94e0dfd5b5855af8ded7f5eb5c90d6 is the newer one. Thus, a plus sign (+) pre-cedes each line of new content.
Scared yet? Don’t worry about those intimidating hex numbers. Thankfully, Git pro-vides many shorter, easier ways to do commands like this without having to produce large complicated numbers.
Removing and Renaming Files in Your Repository
Removing a file from a repository is analogous to adding a file but uses git rm. Suppose you have the file poem.html in your website content and it’s no longer needed.
$ cd ~/public_html
$ ls
$ git rm poem.html
rm 'poem.html'
$ git commit -m "Remove a poem"
Created commit 364a708: Remove a poem
0 files changed, 0 insertions(+), 0 deletions(-) delete mode 100644 poem.html
As with an addition, a deletion requires two steps: git rm expresses your intent to remove the file and stages the change, and then git commit realizes the change in the repository. Again, you can omit the -m option and type a log message such as “Remove a poem” interactively in your favorite text editor.
You can rename a file indirectly by using a combination of git rm and git add, or you can rename it more quickly and directly with git mv. Here’s an example of the former:
$ mv foo.html bar.html
$ git rm foo.html
rm 'foo.html' $ git add bar.html
In this sequence, you must execute mv foo.html bar.html at the onset lest git rm per-manently delete the foo.html file from the filesystem.
Here’s the same operation performed with git mv.
$ git mv foo.html bar.html
In either case, the staged changes must be committed subsequently:
$ git commit -m "Moved foo to bar"
Created commit 8805821: Moved foo to bar
1 files changed, 0 insertions(+), 0 deletions(-) rename foo.html => bar.html (100%)
Git handles file move operations differently than most akin systems, employing a mechanism based on the similarity of the content between two file versions. The specifics are described in Chapter 5.
Making a Copy of Your Repository
If you followed the previous steps and made an initial repository in your ~/pub-lic_html directory, then you can now create a complete copy, or clone, of that repository using the git clone command. This is how people around the world use Git to pursue pet projects on the same files and keep in sync with other repositories.
For the purposes of this tutorial, let’s just make a copy in your home directory and call it my_website:
$ cd ~
$ git clone public_html my_website
Although these two Git repositories now contain exactly the same objects, files, and directories, there are some subtle differences. You may want to explore those differ-ences with commands such as:
$ ls -lsa public_html my_website
$ diff -r public_html my_website
On a local filesystem like this, using git clone to make a copy of a repository is quite similar to cp -a or rsync. However, Git supports a richer set of repository sources, including network names, for naming the repository to be cloned. These forms and usage are explained in Chapter 12.
Once you clone a repository, you are able to modify the cloned version, make new commits, inspect its logs and history, and so on. It is a complete repository with full history.
Configuration Files
Git’s configuration files are all simple text files in the style of .ini files. They record various choices and settings used by many Git commands. Some settings represent purely personal preferences (should a color.pager be used?); others are vital to a repository functioning correctly (core.repositoryformatversion); and still others tweak command behavior a bit (gc.auto).
Like many tools, Git supports a hierarchy of configuration files. In decreasing precedence they are:
.git/config
Repository-specific configuration settings manipulated with the --file option or by default. These settings have the highest precedence.
~/.gitconfig
User-specific configuration settings manipulated with the --global option. /etc/gitconfig
System-wide configuration settings manipulated with the --system option if you have proper Unix file write permissions on it. These settings have the lowest prece-dence. Depending on your actual installation, the system settings file might be somewhere else (perhaps in /usr/local/etc/gitconfig), or may be entirely absent. For example, to establish an author name and email address that will be used on all the commits you make for all of your repositories, configure values for user.name and
user.email in your $HOME/.gitconfig file using git config --global:
$ git config --global user.name "Jon Loeliger"
Or, to set a repository-specific name and email address that would override a
--global setting, simply omit the --global flag:
$ git config user.name "Jon Loeliger"
$ git config user.email "[email protected]"
Use git config -l to list the settings of all the variables collectively found in the complete set of configuration files:
# Make a brand new empty repository $ mkdir /tmp/new
$ cd /tmp/new
$ git init
# Set some config values
$ git config --global user.name "Jon Loeliger"
$ git config --global user.email "[email protected]"
$ git config user.emai