Tools and Utilities
Guide
Borland may have patents andbr pending patent applications covering subject matter in this
document. The furnishing of this document does not give you any license to these patents.
COPYRIGHT ©
1987, 1994 by Borland International. All rights reserved. All Borland product
names are trademarks or registered trademarks of Borland International, Inc. Other brand
and product names are trademarks or registered trademarks of their respective holders.
Borland International, Inc.
100 Borland Way, Scotts Valley, CA 95066-3249
PRINTED IN THE UNITED STATES OF AMERICA
1 EOR0294
Contents
Introduction
1 Compatibility with Microsoft's NMAKE ... 22Chapter 1 TUNK: The Turbo linker
3 - Invoking TLINK ... 3Using TLINK with Borland C++ modules ... 4
Initialization modules ... 5
A TLINK example ... 5
Invoking TLINK with BCC ... 6
File-name extensions on the TLINK command line ... 6
Using response files ... 7
The TLINK configuration file ... 8
TLINK options ... 8
I a (application type) ... 9
I A (align pages) ... 9
IB
(base address) ... 9I
c (case sensitivity) ... 9IE
(maximum errors) ... 9IGm (Goodies) ... 9
IL (library search paths) ... 10
1m, Is,
andIx
(map options) ... 10IOc (chain fixups) ... 11
IS (stack size) ... 11
IT (output file type) ... 11
Iv (debugging information) ... 11
Iw
(warning control) ... 12Module definition reference ... 12
CODE statement ... 13
Using makefiles ... 23
Symbolic targets ... 23
Rules for symbolic targets ... 24
Explicit and implicit rules ... 24
Explicit rule syntax ... 24
Single targets with multiple rules ... 25
Implicit rule syntax ... 26
Explicit rules with implicit commands .... 26
Commands syntax ... 27
Command prefixes ... 27
Using@ ... 27
Using -num and - ... 27
Using & ... 28
Command operators ... 28
Debugging with temporary files ... 28
Using MAKE macros ... 29
Defining macros ... 29
Using a macro ... 30
String substitutions in macros ... 30
Default MAKE macros ... 31
Modifying default macros ... 31
Using MAKE directives ... 32
.autodepend ... 33
!error ... 33
Summing up error-checking controls ... 33
!if and other conditional directives ... 34
!include ... 35
DATA statement ... 13
DESCRIPTION statement ... 14
EXETYPE statement ... 14
EXPORTS statement ... 14
!message ... 35
.path.ext ... 36
. precious ... 36
.suffixes ... 36
IMPORTS statement ... 15 !undef ... 36
LIBRARY statement ... 16
NAME statement ... 16
SEGMENTS statement ... 16
Using macros in directives ... 37
Null macros ... 37
STACKSIZE statement ... 17
Chapter 3 TUB: The Turbo librarian
39 STUB statement ... 17 Why use object module libraries? ... 39Chapter 2 Make: The program manager
19 MAKE basics ... ~ ... 19 'The TLIB command line ... 40
The operation list ... 40
File and module names ... 41
BUILTINS.MAK ... 20
Using TOUCH.EXE ... 21
MAKE options ... 21
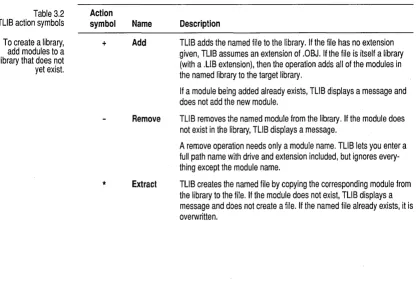
TLIB operations ... 41
Using response files ... 42
Advanced operation: The /C option ... 43 RC.EXE: The OS/2 resource compiler ... 51
Examples ... 43
Appendix A Error messages
53Chapter 4 Import library tools
45 Message classes ... 53IMPLIB: The import librarian ... 45 Fatal errors ... 53
IMPDEF: The module definitions file manager . 46 Errors ... 53
Classes in a DLL ... 47 Warnings ... 54
Functions in a DLL ... 47 Message listings ... 54
Chapter 5 Resource tools
49 Message explanations ... 55Tables
1.1 TLINK options ... 3 2.8 MAKE directives ... 32
2.1 MAKE options ... 21 2.9 Conditional operators ... 34
2.2 Command prefixes ... 27 3.1 TUB options ... 40
2.3 Command operators ... 28 3.2 TUB action symbols ... 41
2.4 Command line vs. makefile macros ... 30 4.1 IMPUB options ... 46
2.5 Default macros ... 31 5.1 BRCC (Borland resource compiler) ... 50
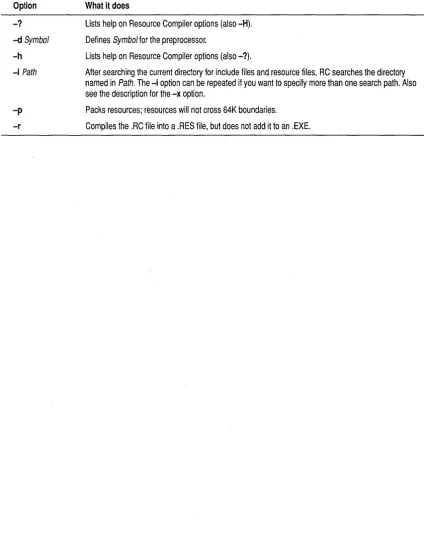
2.6 Other default macros ... 31 5.2 Resource Compiler options ... 52
Introduction
Borland C++ comes with a host of powerful standalone utilities that you
can use with your Borland C++ files or other modules to ease your DOS
and Windows programming.
This manual describes IMPDEF, IMPLIB, MAKE, TLIB, and TLINK and
uses code and command-line examples to show how to use them.
Italso
describes the Borland and OS/2 resource compilers. The rest of the Borland
C++ utilities are documented in a text file called UTIL.DOC, which the
INSTALL utility places in the DOC subdirectory. The Borland C++ error
messages are listed and described in Appendix A.
Name Description
Documented in this book
TUNK MAKE TUB IMPUB IMPDEF BRCC.EXE RC.EXE
Turbo Linker (see Chapter 1)
Standalone program manager (see Chapter 2) Turbo Librarian (see Chapter 3)
Generates an import library (see Chapter 4) Creates a module definition file (see Chapter 4) Borland Resource Compiler (see Chapter 5) OS/2 Resource Compiler (See Chapter 5)
Documented in the online document UTlL.DOC
cpp GREP OBJXREF TEMC TOUCH TRIGRAPH
Preprocessor File-search utility
Invoking TLINK
c
H
A
p
T
E
R
1
TLINK: The Turbo linker
This chapter explains the operation of Borland's command-line linker
TLINK. TLINK combines object modules and library modules to produce
.EXE files. When you invoke the command-line compiler BCC, TLINK is
invoked automatically unless you suppress the linking stage with the
-c
compiler option.
If
you suppress the linking stage, you must invoke TLINK
manually, as described in the next section.
TLiNK options are
The general syntax of a TLINK command line is
case-sensitive.
Table 1.1 TLiNK options
TLiNK options can also be preceded by a hyphen (-).
TLINK options objfiles, exefile, mapfile, libfiles, deffile
This syntax specifies that you supply file names in the given order, and that
you separate the file types with commas. You can invoke TLINK at the
command line by typing TLINK with or without parameters. TLINK
parameters are either options or file names.
Options let you control TLINK's output. For example, they let you specify
whether you want to produce an .EXE or a DLL file. TLINK options must
be immediately preceded by either a forward slash
(I)or a hyphen (-).
When invoked without parameters, TLINK displays an option summary.
Table 1.1 briefly describes the TLINK options.
Option
lax
IA:dd
IB:xxxxxx
Ie
IEnn
What it does
Specifies application type, where
laa targets PM applications
lai targets full-screen character mode applications lap targets PM-compatible character mode applications.
Specifies page alignment within .EXE file.
Specifies image base address (in hexadecimal).
Treats case as significant in symbols.
Using TLiNK with
Borland C++
modules
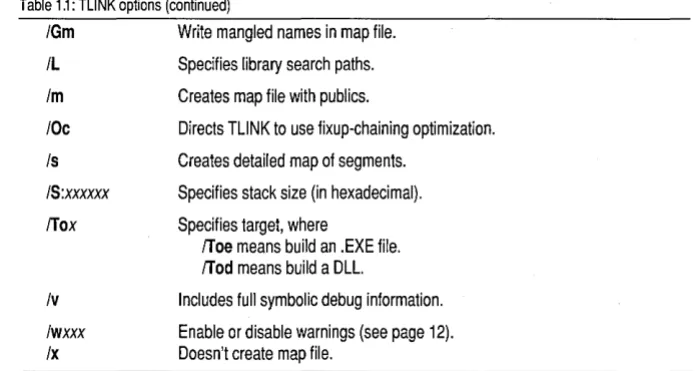
Table 1.1: TLiNK options (continued)
IGm Write mangled names in map file.
IL
1m
IOc
Is
15:xxxxxx
!Tox
Iv
Iwxxx Ix
Specifies library search paths.
Creates map file with publics.
Directs TLiNK to use fixup-chaining optimization.
Creates detailed map of segments.
Specifies stack size (in hexadecimal).
Specifies target, where
!Toe means build an .EXE file. !Tod means build a DLL.
Includes full symbolic debug information.
Enable or disable warnings (see page 12). Doesn't create map file.
File names can be grouped into different file types:
_ objfiles
specifies the .OBJ files you want linked into an .EXE or .DLL file.
_ exefile
specifies the name you want for the resulting .EXE or .DLL file.
_ mapfile
specifies the name you want for the link map file.
If
not given, the
map file name is the same as
exefile.
_ libfiles
specifies the library files you want to link with.
_ deffile
specifies the module definition file containing linker information.
When you create an executable Borland C++ file using TLINK, you must
include the initialization module and libraries.
The general format for linking Borland C++ programs with TLINK is
TLINK options C02[D] myobjs, exename, [mapfile], [mylibs] [C2IC2MT] [082], [deffile]
where
_ myobjs
are the :OBJ files you want linked. You must specify the path if the
files are not in the current directory.
_ exename
is the name you want given to the executable file.
(optional) _
mapfile
is the name you want given to the map file.
(optional) _
mylibs
are the library files you want included at link time. You must
specify the path if not in current directory, or use the
ILoption to specify
search paths.
Initialization modules
A TUNK example
Letting the command-line compiler, or the IDE project manager take care of linking is easier. They both provide correct options and libraries.
Be sure to include paths for the startup code and libraries (or use the
ILoption to specify a list of search paths for startup and library files).
The other file names on this general TLINK command line represent
Borland C++ files, as follows:
• C02 and C02D are the Borland initialization modules for programs or
DLLs. One of these must always be the first .OBJ file in the list.
• C2 is the Borland run-time library. C2MT is the multi-thread version .
.. 052 is the OS/2 import library. OS2.LIB provides access to the OS/2 API
functions.
C02.0BJ and C02D.OBJ are the application initialization modules for C
and C++ code. When your program is executed, this code is run first.
Failure to link in the correct initialization module usually results in a long
list of error messages telling you that certain identifiers are unresolved, or
that no stack has been created.
The initialization module must appear first in the object file list. The
initialization module arranges the order of the various segments of the
program.
If
it is not first, the program segments might not be placed in
memory properly, causing some frustrating program bugs.
Be sure you give an explicit name for the executable file name on the
TLINK command line. Otherwise, your program name will be something
like C02.EXE-probably not what you wanted.
See the
Library Reference,
Appendix A, for a summary of the libraries and
.OBJ files provided by Borland.
If
you want to create an OS/2 application or DLL, you must link OS2.LIB to
provide access to the OS / 2 API functions.
To create a PM application executable, you might use this command line:
TLINK IToe Ie \BCOS2\lib\e02 prnappl prnapp2, prnapp, prnapp, \BCOS2\lib\e2
\BCOS2\lib\os2, prnapp.def
where
.. The
/Toeoption tells TLINK to generate PM executables.
II
The
Ieoption tells TLINK to be case-sensitive during linking.
Invoking TUNK
with
Bee
See Chapter 6, "Command-line compiler," in the
Users Guide for more on BCC.
File-name
extensions on the
TUNK command
line
• PMAPP.EXE is the name of the target PM executable. The .EXE extension
is assumed.
• PMAPP.MAP is the name of the map file. The .MAP extension is
assumed.
• BCOS2\LIB\C2 is the OS/2 run-time library, and BCOS2\LIB\OS2 is the
import library that provides access to the OS/2
Applicat~onProgram
Interface (API) functions.
• PMAPP.DEF is the module definition file used to specify additional link
options.
You can also use BCC, the standalone Borland C++ compiler, as a "front
end" to TLINK that invokes TLINK with the correct startup file, libraries,
and executable program name.
To do this, you give file names on the BCC command line with explicit
.OBIand .LIB extensions. For example, given the following BCC command line,
BCC main.abj subl.abj mylib.lib
BCC invokes TLINK with the files C02.
OBI,C2.LIB, and OS2.LIB
(initialization module, run-time library, and OS/2 API import library).
TLINK will link these along with your own modules MAIN.OBI and
SUBl.OBJ, and your own library MYLIB.LIB, producing file MAIN.EXE.
If
you are producing multi-threaded executables, invoke BCC like this:
BCC -sm main.abj subl.abj func3.abj
The
-sm
switch tells BCC to invoke TLINK with the multi-thread library
C2MT.LIB.
To use BCC for linking a PM DLL, invoke BCC like this:
BCC -sd FUNC1.OBJ FUNC2.0BJ FUNC3.0BJ
The -sd switch tells BCC to invoke TLINK with the DLL initialization
module C02D.OBJ.
When BCC invokes TLINK, it uses the
Ie(case-sensitive link) option by
default.
If
you don't specify an executable file name, TLINK derives the name of the
executable by appending .EXE or .DLL to the first object file name listed.
Using response
files
TLINK assumes or appends these extensions to file names that have none:
• .OBJ for object files.
• .EXE for OS/2 executable files (when you use the
/Toeoption).
• .DLL for dynamic-link libraries (when you use the
/Tadoption).
• .MAP for map files.
• .LIB for library files.
• .DEF for module definition files.
All of the file names except object files are optional. So, for example,
TLINK myapp myapp2
links the files MYAPP.OBJ and MYAPP2.0BJ, creates an executable file
called MYAPP.EXE, creates a map file called MYAPP.MAP, links no
libraries, and uses no module definition file.
TLINK accepts its parameters not only from the command line, but also
from a response file (or any combination of the two).
A response file is a text file that contains the options and file names that
you would usually type after the name TLINK on your command line. This
saves you from having to type the full command line each time you link.
Unlike the command line, a response file can be continued onto several
lines of text. You can break a long list of object or library files into several
lines by ending one line with a plus character
(+)and continuing the list on
the next line. When a plus occurs at the end of a line, but it immediately
follows one of the TLINK options that uses
+
to enable the option (such as
Iv+),
the
+
is not treated as a line-continuation character.
You can also start each of the four components on separate lines: object
files, executable file, map file, libraries. When you do this, you must leave
out the comma used to separate components.
To illustrate these features, suppose that you rewrote the command line
TLINK Ie mainline wd In tx,fin,mfin,work\lib\eornrn work\lib\support
with the following response file, FINRESP:
Ie mainline wd+
In tx,fin mfin
work\lib\eornrn work\lib\support
You would then enter your TLINK command as
The TLiNK
configuration file
TLINK options
Note that you must precede the file name with the
@character to indicate
that the next name is a response file.
Alternatively, you could break your link command into multiple response
files. For example, you could break the previous command line into the
following two response files:
File name
LlSTOBJS
LlSTLIBS
Contents
mainlinet
wdt
In tx
lib\commt
lib\support
You would then enter the TLINK command as
tlink Ic @listobjs,fin,mfin,@listlibs
The command-line version of TLINK looks for a file called TLINK.CFG,
first in the current directory, then in the directory from which it was
loaded.
TLINK.CFG is a text file that contains a list of valid TLINK options. Unlike
a response file, TLINK.CFG can't list the groups of file names to be linked.
For example, the following TLINK.CFG file
ILc:\BCOS2\libic:\winapps\lib
Iv Is
IToe
tells TLINK to search the specified directories for libraries, include debug
information,
cr~atea detailed segment map, and produce an OS/2
program.
TLINK options can occur anywhere on the command line. The options
consist of a slash
(I),a hyphen (-), followed by the option. Options are
case-sensitive.
la
(application
type)
IA
(align pages)
18
(base address)
Ic (case
sensitivity)
IE
(maximum
errors)
/Gm (Goodies)
The
laoption lets you specify one of three types of EXE images:
./aa
targets windowing applications; that is, applications that run in and
use the Graphical User Interface (GUI) environment.
./ai targets full-screen, character-mode applications .
• lap
targets character-mode applications that can be run in a window.
The
I Aoption specifies page alignment for code and data within the
executable file. The syntax is
IA:dd
dd
must be a decimal power of 2. For example,
if
you specify an alignment
value of
IA:12,the pages of code and data are stored on 4096-byte
boundaries. OS/2 seeks' pages for loading based on this alignment value.
The default is
IA:9,which means pages are aligned on 512-byte boundaries
within the executable file. Larger alignment values result in larger
executable files, but can improve demand load performance.
The
18option specifies an image base address for an application.
If
this
option is used, internal fixups are removed from the image, and the
requested load address of the first object is set to the hexadecimal number
given with the option. All successive objects are aligned on 64K linear
address boundaries.
Using this option makes applications smaller on disk, and improves both
load-time and run-time performance, since the operating system no longer
has to apply internal fixups. Since OS/2 loads all.EXE images at 64K,
you're advised to link all.EXEs with
18:0x10000.DLLs are loaded at arbitrary addresses, and should not be linked with the
18
option.
The
Ieoption forces the case to be significant in public and external
symbols.
The
IEoption lets you specify the maximum number of errors the linker
reports before terminating. lEO means report an infinite number of errors
(that is, as many as occur), and is the default.
IL
(library search
paths)
1m, Is, and Ix (map
options)
The
ILoption lets you specify a list of directories that TLINK searches for
libraries
if
an explicit path is not specified. TLINK searches the current
directory before those specified with the
ILoption. For example,
TLINK /Lc:\BCOS2\libic:\mylibs splash logo" ,utils .\logolib
With this command line, TLINK first searches the current directory for
UTILS.LIB, then searches C:\BCOS2\LIB and C:\MYLIBS. Because.\
LOGOLIB explicitly names the current directory, TLINK does not search
the libraries specified with the
iL
option to find LOGOLIB.LIB.
TLINK also searches for the C or C++ initialization module (C02.0B}, or
C02D.OBJ) on the specified library search path.
By default, TLINK always creates a map of the executable file. This default
map includes only the list of the segments in the program, the program
start address, and any warning or error messages produced during the link.
If you don't want to create a map, turn it off with the
Ixoption.
If you want to create a more complete map, the
1moption adds a list of
public symbols to the map file, sorted alphabetically as well as in increasing
address order. Many debuggers can use the list of public symbols, which let
you refer to symbolic addresses when you are debugging.
The
Isoption creates a map file with segments, public symbols and the
program start address just like the
1moption does, but also adds a detailed
segment map. For each segment in each module, this map includes the
address, length in bytes, class, segment name, group, module, and ACBP
information.
If the same segment appears in more than one module, each module will
appear as a separate line (for example, SYMB.C). Except for the ACBP field,
the information in the detailed segment map is self-explanatory.
IOc
(chain fixups)
IS (stack size)
IT (output file
type)
Iv (debugging
information)
Field
The A field (alignment)
The C field (combination)
The B field (big)
The P field
Value
00
20
4060
80
AD
00
08
0002
00
01 DescriptionAn absolute segment. A byte-aligned segment. A word-aligned segment. A paragraph-aligned segment. A page-aligned segment.
An unnamed absolute portion of storage.
Cannot be combined. A public combining segment.
Segment less than 64K. Segment exactly 64K.
Segment is USE16. Segment is USE32.
When you request a detailed map with the
Isoption, the list of public
symbols
(ifit appears) has public symbols flagged with "idle"
ifthere are
no references to that symbol. For example, this fragment from the public
symbol section of a map file indicates that symbols
Symboll and Symbol3
are not referenced by the image being linked:
0002:00000874
Idle
Symbol1
0002:00000CE4
Symbol2
0002:000000E7
Idle
Symbol3
The
IOcoption directs TLINK to use the fixup-chaining optimization. This
optimization collapses multiple fix-up records for the same address into
one fix-up record. Though this optimization causes slower link time, it
shrinks executable size and speeds up loading.
The
ISoption lets you set the application stack size, in hexadecimal. The
form is
IS:xxxxxx,where
xxxxxxis a hexadecimal string. Specifying stack
size with
ISoverrides any stack size setting in a module definition file.
The /T option specifies whether you are producing a program or DLL. /Toe
tells the linker to produce a .EXE image, and /Tod tells the linker to produce
a DLLimage.
Iv-/w
(warning
control)
options to selectively enable or disable inclusion of debugging information
on a module-by-module basis (but not on the same command line as
Iv).For example, the command
TLINK modl /Vt mod2 mod3 /v- mod4
includes debugging information for modules
mod2and
mod3,but not for
modl
and
mod4.When
Iv-is seen, debug information is turned off until
Iv+is seen.
The
Iw
option lets you control specific warnings emitted by TLINK. With
this switch you can either enable or disable select warnings. This switch can
be used in the following ways:
./wxxx
or
Iw+xxx
enables warnings .
• /w-xxx
disables warnings .
• /w!
enables all warnings.
The value
xxx
can be one of the following:
• ent
controls the "No entry point" warning.
• dup
controls the "Duplicate symbol" warning for .OBJs.
• stk
controls the "No stack" warning.
• def
controls the "No .DEF file; using defaults" warning.
• imt
controls the "Import does not match previous definition" warning.
• msk
controls the "Multiple stack segments found" warning.
• bdl
controls the "Using based linking for DLLs may cause the DLL to
malfunction" warning.
• srf
controls the "Self-relative fixup overflowed" warning.
• dpl
controls the "Duplicate symbol" warning for libraries.
By default ent, dup, stk, srf, and bdl are enabled, and the rest are disabled.
Module definition reference
This section describes each statement in a module definition file. The
module definition file provides information to the linker about the contents
and system requirements of a PM application. More specifically, it
• Names the application or dynamic-link library (DLL).
• Identifies the type of application.
CODE statement
DATA
statement
• Describes the code and data segment attributes, and lets you specify
attributes for additional code and data segments .
• Specifies the size of the stack.
II
Provides for the inclusion of a stub program.
Note that the IMPDEF utility creates module definition files, and the
IMPLIB utility creates import libraries out of module definition files. See
Chapter 4, "Import library tools," for more information on these tools.
The CODE statement defines the default attributes of code segments. Code
segments can have any name, but must belong to segment classes whose
name ends in CODE. For example, valid segment class names are CODE or
MYCODE. The syntax is
CODE [PRELOAD I LOADONCALL) [EXECUTEONLY I EXECUTEREAD) [CONFORMING I NONCONFORMING)
PRELOAD means code is loaded when the calling program is loaded.
LOADONCALL (the default) means the code is loaded when called.
EXECUTEONL Y means a code segment can be executed only.
EXECUTEREAD (the default) means the code segment can be read and
executed.
CONFORMING means a code segment can be called from Ring 2 or Ring 3.
(This is also known as 80286 conforming.) NONCONFORMING (the
default) means the code segment is not 80286 conforming.
The DATA statement defines attributes of data segments.
The syntax of the DATA statement is
DATA [NONE I SINGLE I MULTIPLE) [READONLY I READWRITE) [PRELOAD I LOADONCALL) [SHARED I NONSHARED)
NONE means no data segment is created. (This option is available only for
libraries.) SINGLE means a single data segment is created and shared by all
processes, and is the default for DLLs. MULTIPLE means a data segment is
created for each process, and is the default for programs.
DESCRIPTION
statement
EXETYPE
statement
EXPORTS
statement
PRELOAD means the data segment is loaded when a module that uses it is
first loaded. LOADONCALL (the default) means the data segment is
loaded when it is first accessed.
SHARED (the default for DLLs) means one copy of the data segment is
shared among all processes. NONSHARED (the default for programs)
means a copy of the data segment is loaded for each process needing to use
the data segment.
The DESCRIPTION statement, which is optional, inserts text into the
application module. The DESCRIPTION statement is typically used to
embed author, date, or copyright information. The syntax is
DESCRIPTION 'Text'
Text
specifies an ASCII string delimited with single quotes.
The EXETYPE statement specifies the default executable file (.EXE) header
type. The syntax is
EXETYPE [WINDOWAPI] I [WINDOWCOMPAT] I [NOTWINDOWCOMPAT]
WINDOW API specifies a PM executable, and is equivalent to the TLINK
option
laa.WINDOWCOMPAT specifies a PM-compatible character-mode executable,
and is equivalent to the TLINK option
lap.NOTWINDOWCOMPAT specifies a character-mode application that won't
run under PM.
Itis equivalent to the TLINK option
laLThe EXPORTS statement defines the names and attributes of functions to be
exported. The EXPORTS keyword marks the beginning of the definitions.
Itcan be followed by any number of export definitions, each on a separate
line. The syntax is
EXPORTS
ExportName [Ordinal] [RESIDENTNAME] [Parameter]
ExportName
specifies an ASCII string that defines the symbol to be
exported.
Ithas the following form:
EntryName [=InternalNarne]
InternalName
is the name used within the application to refer to this entry.
EntryName
is the name listed in the executable file's entry table and is
externally visible.
IMPORTS
statement
@ordinal
where
ordinal
is an integer value that specifies the function's ordinal value.
When an application module or DLL module calls a function exported from
a DLL, the calling module can refer to the function by name or by ordinal
value. In terms of speed, referring to the function by ordinal is faster
because string comparisons are not required to locate the function. In terms
of memory allocation, exporting a function by ordinal (from the point of
view of that function's DLL) and importing/ calling a function by ordinal
(from the point of view of the calling module) is more efficient. When a
function is exported by ordinal, the name resides in the nonresident name
table. When a function is exported by name, the name resides in the
resident name table. The resident name table for a module is resident in
memory whenever the module is loaded; the nonresident name table isn't.
The RESIDENTNAME option lets you specify that the function's name
must be resident at all times. This is useful only when exporting by ordinal
(when the name wouldn't be resident by default).
Parameter
is an optional integer value that specifies the number of words
the function expects to be passed as parameters.
The IMPORTS statement defines the names and attributes of functions to be
imported from DLLs. Instead of listing imported DLL functions in the
IMPORTS statement, you can either specify an import library for the DLL
in the TLINK command line, or-in the IDE-include the import library for
the DLL in the project.
The IMPORTS keyword marks the beginning of the definitions.
Itcan be
followed by any number of import definitions, each on a separate line. The
syntax is
IMPORTS
[InternalName=jModuleName.Entry
InternalName
is an ASCII string that specifies the unique name that the
application will use to call the function.
ModuleName
specifies one or more uppercase ASCII characters that define
the name of the executable module that contains the function. The module
name must match the name of the executable file. For example, the file
SAMPLE.DLL has the module name SAMPLE.
LIBRARY
statement
NAME statement
The LIBRARY statement defines the name of a DLL module. A module
definition file can contain either a NAME statement to indicate a program
or a LIBRARY statement to indicate a DLL, but not both..
Like a program's module name, a library's module name must match the
name of the executable file. For example, the library MYLIB.DLL has the
module name MYLIB. The syntax is
LIBRARY [LibraryName] [INITGLOBAL I INITINSTANCE]
LibraryName
specifies an ASCII string that defines the name of the library
module.
LibraryName
is optional. If the parameter is not included, TLINK
uses the file-name part of the executable file (that is, the name with the
extension removed). If the module definition file includes neither a NAME
nor a LIBRARY statement, TLINK assumes a NAME statement without a
ModuleName
parameter.
INITGLOBAL means that the library-initialization routine is called only
when the library module is first loaded into memory. INITINSTANCE
means the library-initialization routine is called each time a new process
makes use of the library.
The NAME statement defines the name of the application's executable
module. The module name identifies the module when exporting functions.
The syntax is
NAME ModuleName
ModuleName
specifies one or more uppercase ASCII characters that define
the name of the executable module. The module name must match the
name of the executable file. For example, an application with the executable
file SAMPLE.EXE has the module name SAMPLE.
The
ModuleName
parameter is optional. If the parameter is not included,
TLINK assumes that the module name matches the file name of the
executable file. For example, if you do not specify a module name and the
executable file is named MYAPP.EXE, TLINK assumes that the module
name is MYAPP.
SEGMENTS
statement
STACKSIZE
statement
STUB statement
The SEGMENTS statement defines the segment attributes of additional
code and data segments. The syntax is
SEGMENTS
SegmentName [CLASS 'ClassName'j [MinAllocj
[PRELOAD I LOADONCALLj [SHARED I NONSHAREDj
SegmentName
specifies a character string that names the new segment.
Itcan be any name, including the standard segment names _TEXT and
_DATA, which represent the standard code and data segments.
ClassName
is an optional string that specifies the class name of the specified
segment.
If
no class name is specified, TLINK uses the class name CODE by
default.
MinAlloc
is an optional integer value that specifies the minimum allocation
size for the segment. Currently, TLINK ignores this value.
PRELOAD means the segment is loaded immediately; LOADONCALL
means the segment is loaded when it is accessed or called. The Resource
Compiler might override the LOAD ON CALL option and preload segments
instead.
SHARED (the default for DLLs) means one copy of the data segment is
shared among all processes. NONSHARED (the default for programs)
means a copy of the data segment is loaded for each process needing to use
the data segment.
Default attributes for additional segments are the same as described
previously for CODE and DATA segments (depending on the type of
additional segment).
The STACKSIZE statement defines the number of bytes needed by the
application for its local stack. An application uses the local stack whenever
it makes function calls. Do not use the STACKSIZE statement for
dynamic-link libraries. The syntax is
~TACKSIZE bytes
bytes
is an integer value that specifies the stack size in bytes.
Borland C++ adds a built-in stub to the beginning of a PM application
unless a different stub is specified with the STUB statement. Therefore, you
should not use the STUB statement merely to include OS2STUB.EXE
because the linker will do this for you automatically.
The syntax is
STUB "FileName"
FileName
specifies the name of the DOS executable file that will be
appended to the module. The name must have the DOS file name format.
MAKE basics
c
H
A
p
T
E
R
2
Make: The program manager
MAKE.EXE is a command-line project-manager utility that helps you
quickly compile only those files in a project that have changed since the last
compilation. (MAKER is a real-mode version of MAKE.)
This chapter covers the following topics:
.. MAKE basics
.. Using MAKE macros
.. Makefile contents
.. Using MAKE directives
.. Using explicit and implicit rules
MAKE uses rules from a text file (MAKE FILE or MAKEFILE.MAK by
default) to determine which files to build and how to build them. For
example, you can get MAKE to compile an .EXE file
ifthe date-time stamps
for the .CPP files that contain the code for the .EXE are more recent than the
.EXE itself. MAKE is very useful when you build a program from more
than one file because MAKE will recompile only the files that you modified
since the last compile.
Two types of rules (explicit and implicit) tell MAKE what files depend on
each other. MAKE then compares the date-time stamp of the files in a rule
and determines
ifit should execute a command (the commands usually tell
MAKE which files to recompile or link, but the commands can be nearly
any operating system command).
MAKE accepts * and
The general syntax for MAKE is
? as wildcards.
To get command-line help for MAKE, type MAKE -? orMAKE -h.
MAKE [options ... J [targets[sJJ
where
optionsare MAKE options that control how MAKE works, and
To place MAKE instructions in a file other than MAKEFILE, see the section titled "MAKE options."
BUlL TINS.MAK
If you type
MAKEat the command prompt, MAKE performs the following
default tasks:
1. MAKE looks in the current directory for a file called BUILTINS.MAK
(this file contains rules MAKE always follows unless you use
the-roption). If it can't find the file in the current directory,
itlooks in the
directory where MAKE.EXE is stored. After loading BUILTINS.MAK,
MAKE looks for a file called MAKE FILE or MAKEFILE.MAK. If MAKE
can't find any of these files, it gives you an error message.
2. When MAKE finds a makefile, it tries to build
only
the first target file in
the makefile (although the first target can force other targets to be built).
MAKE checks the time and date of the dependent files for the first
target. If the dependent files are more recent than the target file, MAKE
executes the target commands, which update the target. See the section
called "Using makefiles" for more information on instructions in
makefiles.
3.
If a dependent file for the first target appears as a target elsewhere in the
makefile, MAKE checks its dependencies and builds it before building
the first target. This chain reaction is called linked dependency.
4.
If the MAKE build process fails, MAKE deletes the target file it was
building. To get MAKE to keep a target when a build fails, see the
.precious
directive on page 36.
You can stop MAKE by using
CtrltBreak
or
Ctr/tC.
BUlL TINS.MAK contains standard rules and macros that MAKE uses
before it uses a makefile (you can use the
-roption to tell MAKE to ignore
BUILTINS.MAK). Use BUILTINS.MAK for instructions or macros you want
executed each time you use MAKE. Here's the default text of
BUlL TINS.MAK:
#
# Borland Ctt - (C) Copyright 1992 by Borland International #
CC
=
BCC AS=
TASM RC=
RC.asm.obj: $ (AS) .e.exe:
$(CC) .e.obj:
$(CC) .epp.obj:
$(CC)
$ (AFLAGS) $&.asm
$ (CFLAGS) $&.e
$ (CFLAGS) Ie $&.e
Using
TOUCH.EXE
You can use wildcards * and? with TOUCH.
Important!
MAKE options
Table 2.1: MAKE options
Option
-h or-?
-8
-Dmacro
[-D]macro=[string]
-I directory
-K
-N
-Umacro
-w
-ffilename
.re.res:
$(RC) $ (RFLAGS) /r $&
.SUFFIXES: .exe .obj .asm .e .res .re
Sometimes you'll want to force a target file to be recompiled or rebuilt even
though you haven't changed it. One way to do this is to use the TOUCH
utility. TOUCH changes the date and time of one or more files to the
current date and time, making it "newer" than the files that depend on it.
You can force MAKE to rebuild a target file by
touching
one of the files that
target depends on. To touch a file (or files), type the following at the
command prompt:
toueh filename [filename ... J
TOUCH updates the file's creation date and time.
Before you use TOUCH, make sure your system's internal clock is set
correctly.
If
it isn't, TOUCH and MAKE won't work properly.
Command-line options control MAKE behavior. Options are case-sensitive.
Type options with either a preceding - or /. For example, to use a file called
PRO}ECTA.MAK as the makefile, type
MAKE -fPROJECTA.MAK(a space after-f
is optional). Many of the command-line options have equivalent directives
that are used in the makefile (see page 32 for more information on
directives).
Description
Displays MAKE options and shows defaults with a trailing plus sign.
Builds all targets regardless of file dates.
Defines macro as a single character, causing an expression !ifdef macro written in the makefile to
return true.
Defines macro as string. If string contains any spaces or tabs, enclose string in quotation marks. The
-0 is optional.
Searches for include files in the current directory first, then in directory.
Keeps temporary files that MAKE creates (MAKE usually deletes them). See also KEEP on page 22.
Executes MAKE like Microsofts NMAKE (see the section following this table for more information).
Undefines previous definitions of macro.
Writes the current specified non-string options to MAKE.EXE making them defaults.
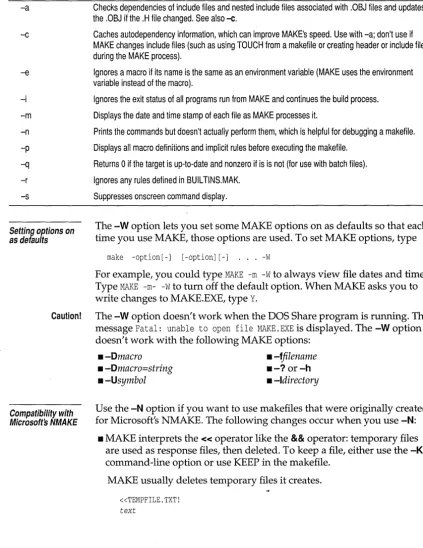
Table 2.1: MAKE options (continued) .
-a Checks dependencies of include files and nested include files associated with .OBJ files and updates the .OBJ if the .H file changed. See also -c.
-c
-e
-i
-m
-n
-p
-q
-r
-s
Setting options on as defaults
Caution!
Compatibility with Microsoft's NMAKE
Caches autodependency information, which can improve MAKE's speed. Use with -a; don't use if MAKE changes include files (such as using TOUCH from a makefile or creating header or include files during the MAKE process).
Ignores a macro if its name is the same as an environment variable (MAKE uses the environment variable instead of the macro).
Ignores the exit status of all programs run from MAKE and continues the build process.
Displays the date and time stamp of each file as MAKE processes it.
Prints the commands but doesn't actually perform them, which is helpful for debugging a makefile.
Displays all macro definitions and implicit rules before executing the makefile.
Returns 0 if the target is up-to-date and nonzero if is is not (for use with batch files).
Ignores any rules defined in BUILTINS.MAK.
Suppresses onscreen command display.
The
-Woption lets you set some MAKE options on as defaults so that each
time you use MAKE, those options are used. To set MAKE options, type
make -option[-] [-option] [-] . . .
-w
For example, you could type
MAKE -m -Wto always view file dates and times.
Type
MAKE -m- -Wto turn off the default option. When MAKE asks you to
write changes to MAKE.EXE,type
Y.The -Woption doesn't work when the DOS Share program is running. The
message
Fatal: unable to open file MAKE. EXEis displayed. The -Woption
doesn't work with the following MAKE options:
_ -Dmacro
_ -fjilename
_ -Dmacro=string
_
-?
or
-h_ -Usymbol
_ -Idirectory
Use the
-Noption
if
you want to use makefiles that were originally created
for Microsoft's NMAKE. The following changes occur when you use
-N:• MAKE interprets the
«
operator like the
&&operator: temporary files
are used as response files, then deleted. To keep a file, either use
the-K
command-line option or use KEEP in the makefile.
MAKE usually deletes temporary files
itcreates.
«TEMPFILE.TXT!
!KEEP
If
you don't want to keep a temporary file, type NOKEEP or type only
the temporary file name.
If
you use NOKEEP with a temporary file, then
use the
-Koption with MAKE, MAKE deletes the temporary file.
• The
$dmacro is treated differently. Use
!ifdef or !ifndefinstead.
• Macros that return paths won't return the last \. For example, if
$ «D)normally returns
C: \CPP\,the
-Noption makes it return
C: \CPP.• Unless there's a matching
.suffixesdirective, MAKE searches rules from
bottom to top of the makefile.
• The
$*macro always expands to the target name instead of the
dependent in an implicit rule.
Using makefiles
Symbolic targets
A makefile is an ASCII file of instructions for MAKE.EXE. MAKE assumes
your makefile is called MAKE FILE or MAKEFILE.MAK unless you use the
-f
option (see page 21).
MAKE either builds targets you specify at the MAKE command line or it
builds
only
the first target it finds in the makefile (to build more than one
target, see the section "Symbolic targets.") Makefiles can contain:
• Comments
• Macros
• Explicit rules
a Directives
• Implicit rules
A symbolic target forces MAKE to build multiple targets
ina makefile (you
don't need to rely on linked dependencies). The dependency line lists all
the targets you want to build. You don't type any commands for a symbolic
target.
In the following make file, the symbolic target
allFiles
builds both FILEl.EXE
and FILE2.EXE.
allFiles: filel.exe file2.exe filel.exe: filel.obj
bee filel. obj file2.exe: file2.obj
bee file2.obj
Rules for symbolic targets
Observe the following rules with symbolic targets:
• Symbolic targets don't need a command line.
• Give your symbolic target a unique name; it can't be the name of a file in
your current directory.
• Name symbolic targets according to the operating system rules for
naming files.
Explicit and implicit rules
Explicit rule
syntax
The explicit and implicit rules that instruct MAKE are generally defined as
follows:
• Explicit rules give MAKE instructions for specific files.
• Implicit rules give general instructions that MAKE follows when it can't
find an explicit rule.
Rules follow this general format:
Dependency line Corrunands
The dependency line is different for explicit and implicit rules, but the
commands are the same (for information on linked dependencies see
page 20).
MAKE supports multiple rules for one target. You can add dependent files
after the first explicit rule, but only one should contain a command line. For
example,
Targetl: dependentl dep2 dep3 dep4 dep5 Targetl: dep6 dep7 dep8
bcc -c $**
Explicit rules are instructions to MAKE that specify exact file names. The
explicit rule names one or more targets followed by one or two colons. One
colon means one rule is written for the target; two colons mean that two or
more rules are written for the target.
Braces must be included if you use the paths parameter.
Single targets with multiple rules
target [target ... 1: [: 1 [{path} 1 [dependent [s1 ... 1 [commands 1
• target
The name and extension of the file to be updated
(target
must be at the start of the line-no spaces or tabs are
allowed). One or more targets must be separated by spaces
or tabs. Don't use a target's name more than once in the
target position of an explicit rule in a makefile.
• path
A list of directories, separated by semicolons and enclosed
in braces, that points to the dependent files.
• dependent The file (or files) whose date and time MAKE checks to see
if
it is newer than
target(dependent
must
be preceded by a
space).
If
a dependent file also appears in the makefile as a
target, MAKE updates or creates the target file before using
it
as a dependent for another target.
• commands Any operating system command. Multiple commands are
allowed in a rule. Commands must be indented by at least
one space or tab (see the section on commands on page 27).
If
the dependency or command continues on to the next line, use the
backslash (\) at the end of the line after a target or a dependent file name.
For example:
MYSOURCE.EXE: FILE1.OBJ\ FILE2.0BJ\ FILE3.0BJ
bcc filel.obj file2.obj file3.obj
A single target can have more than one explicit rule. You must use the
double colon:: after the target name to tell MAKE to expect multiple
explicit rules. The following example shows how one target can have
multiple rules and commands .
. cpp.obj:
bcc -c -ncobj $<
.asm.obj:
tasm /rnx $<, asmobj\\
mylib.lib :: fl.obj f2.obj echo Adding C files
Implicit rule
syntax
Explicit rules with implicit commands
See page 31 for information on default macros.
mylib.lib :: f3.obj f4.obj echo Adding ASM files
tlib mylib -+asmobj\f3 -+asmobj\f4
An implicit rule starts with either a path or a period and
implies
a
target-dependent file relationship. Its main components are file extensions
separated by periods. The first extension belongs to the dependent, the
second to the target.
If
implicit dependents are out-of-date with respect to the target or
if
they
don't exist, MAKE executes the commands associated with the rule. MAKE
updates explicit dependents before it updates implicit dependents.
Implicit rules follow this basic syntax:
[{source_dirs}] . source_ext [{target_dirs}] . target_ext: [commands]
• {source_dirs} The directory of the dependent files. Separate multiple
directories with a semicolon.
• .source_ext
The dependent file-name extension.
• {target_dirs}
The directory of the target (executable) files. Separate
multiple directories with a semicolon.
• .target_ext
The target file-name extension. Macros are allowed here.
• :
Marks the end of the dependency line.
• commands
Any operating system command. Multiple commands are
allowed. Commands must be indented by one space or
tab (see the section on commands on page 27).
If
two implicit rules match a target extension but no dependent exists,
MAKE uses the implicit rule whose dependent's extension appears first in
the .sUFFIXES list. See the ".suffixes" section on page 36.
A target in an explicit rule can get its command line from an implicit rule.
The following example shows an implicit rule and an explicit rule without
a command line .
. c.obj:
bcc -c $< #This command uses a macro $< described later. myprog.obj: #This explicit rule uses the command: bec -c myprog.c
The implicit rule command tells MAKE to compile MYPROG.C (the macro
Commands
syntax
Command prefixes
Table 2.2 Command prefixes
Using@
Using num and
-Commands can be any operating system command, but they can also
include MAKE macros, directives, and special operators that operating
systems can't recognize (note that I can't be used in commands). Here are
some sample commands:
cd ..
bcc -c rnysource.c
COPY *.OBJ C:\PROJECTA
bcc -c $ (SOURCE) #Macros are explained later in the chapter.
Commands follow this general syntax:
[prefix ... ] commands
Commands in both implicit and explicit rules can have prefixes that modify
how MAKE treats the commands. Table 2.2 lists the prefixes you can use in
makefiles; each prefix is explained in more detail following the table.
Option Description
@ Don't display command while it's being executed.
-num Stop processing commands in the makefile when the exit code returned from
command exceeds num. Normally, MAKE aborts if the exit code is nonzero. No
white space is allowed between - and num.
&
Continue processing commands in the makefile, regardless of the exit code returned by them.
Expand either the macro $**, which represents all dependent files, or the macro
$?,
which represents all dependent files stamped later than the target. Execute the command once for each dependent file in the expanded macro.The following command uses the modifier
@,which prevents the
command from displaying onscreen when MAKE executes it.
diff.exe : diff.obj @bcc dif f. obj
The
-nurn
and - modifiers control MAKE processing under error
Using &
Command operators
Table 2.3 Command operators
Debugging with temporary files
In
the following example, MAKE continues processing if BCC isn't run
successfully:
target.exe : target.obj target.obj : target.cpp
bee -c target.cpp
The
&modifier issues a command once for each dependent file.
Itis
especially useful for commands that don't take a list of files as parameters.
For example,
copyall : filel.cpp file2.cpp © $** c:\ternp
results in COpy being invoked twice as follows:
copy filel.cpp c:\ternp copy file2.cpp c:\ternp
Without the
&modifier, COpy would be called only once.
You can use any operating system command in a MAKE commands
section. MAKE uses the normal operators (such as
+,-,
and so on), but it
also has other operators you can use.
Operator
<
>
»
«
&&
delimiter
Description
Take the input for use by command from file rather than from standard input.
Send the output from command to file.
Append the output from command to file.
Create a temporary, inline file and use its contents as standard input to command.
Create a temporary file and insert its name in the makefile.
Any character other than # and \ used with « and && as a starting and ending delimiter for a temporary file. Any characters on the same line and immediately following the starting delimiter are ignored. The closing delimiter must be written on
a line by itself.
Temporary files can help you debug a command set by placing the actual
commands MAKE executes into the temporary file. Temporary file names
start at MAKEOOOO.@@@, where the 0000 increments for each temporary file
you keep. You must place delimiters after
&&and at the end of what you
want sent to the temporary file
(!is a good delimiter).
prog.exe: A.obj B.obj
TLINK Ie &&-1 eOs.obj $** prog.exe prog.map maths.lib es.lib
The response file created by
&&contains these instructions:
eOs.obj a.obj b.obj prog.exe
prog.map
maths.lib es.lib
Using MAKE macros
Macros are case-sensitive: MACR01 is
different from Macro1.
Defining macros
A MAKE macro is a string that is expanded (used) wherever the macro is
called in a makefile. Macros let you create template make files that you can
change to suit different projects. For example, to define a macro called
LIBNAME that represents the string "mylib.lib," type
LIBNAME=
mylib.lib.When MAKE encounters the macro
$ (LIBNAME),it uses the string
mylib.lib. IfMAKE finds an undefined macro in a makefile, it looks for an
operating-system environment variable of that name (usually defined with SET) and
uses its definition as the expansion text. For example,
ifyou wrote
$ (path)in a makefile and never defined
path,
MAKE would use the text you
defined for PATH in your AUTOEXEC.BAT. (See the manuals for your
operating system for information on defining environment variables.)
The general syntax for defining a macro in a makefile is
MacroName=
expansion_text.
II
MacroName
is case-sensitive and is limited to 512 characters.
II
expansion_text
is limited to 4096 characters consisting of alphanumeric
characters, punctuation, and white space.
Each macro must be on a separate line in a makefile. Macros are usually put
at the top of the makefile.
IfMAKE finds more than one definition for a
macroName,
the new definition replaces the old one.
Table 2.4 Command line vs. makefile macros
Using a macro
String
substitutions in
macros
make -Dsourcedir=c:\projecta make command="bcc -c" make command=bcc option=-c
The following differences in syntax exist between macros entered on the
command line and macros written in a makefile.
Syntax Makefile Command line
Spaces allowed before and after
=
Yes NoSpace allowed before macroName No Yes
To use a macro in a makefile, type
$ (MacroName)where MacroName is the
name of a defined macro. You can use braces {} and parentheses
0
to
enclose the MacroName.
MAKE expands macros at various times depending on where they appear
in the makefile:
a Nested macros are expanded when the outer macro is invoked.
a Macros in rules and directives are expanded when MAKE first looks at
the makefile.
a Macros in commands are expanded when the command is executed.
MAKE lets you temporarily substitute characters in a previously defined
macro. For example,
if
you defined a macro called SOURCE as
SOURCE =fl. cpp f2. cpp f3. cpp,
you could substitute the characters .OBJ for the
characters .CPP by using
$ (SOURCE: . CPP=. OBJ).The substitution doesn't
redefine the macro.
Rules for macro substitution:
a Syntax:
$ (MacroName: original_text=new_text) .a No whitespace before or after the colon.
a Characters in
originaCtext
must exactly match the characters in the macro
definition; this text is case-sensitive.
MAKE now lets you use macros within substitution macros. For example,
MYEXT=.C
SOURCE=fl.cpp f2.cpp f3.cpp
Default MAKE
macros
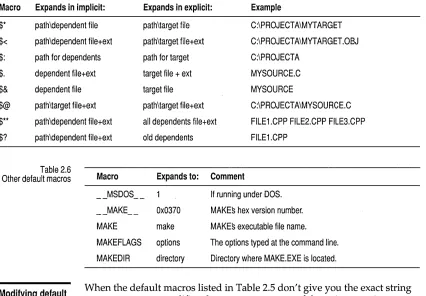
[image:38.504.32.458.130.426.2]MAKE contains several default macros you can use in your makefiles.
Table 2.5 lists the macro definition and what it expands to in explicit and
implicit rules.
Table 2.5: Default macros
Macro Expands in implicit: Expands in explicit: Example
$*
path\dependent file path\target file C:\PROJECTA\MYT ARGET$<
path\dependent file+ext path\target file+ext C:\PROJECTA\MYT ARGET.OBJ$:
path for dependents path for target C:\PROJECTA$.
dependent file+ext target file + ext MYSOURCE.C$&
dependent file target file MYSOURCE$@
path\target file+ext path\target file+ext C:\PROJECTA\MYSOURCE.C$**
path\dependent file+ext all dependents file+ext FILE1.CPP FILE2.CPP FILE3.CPP$?
path\dependent file+ext old dependents FILE1.CPPTable 2.6
Macro Expands to: Comment Other default macros
--MSDOS __ If running under DOS.
--MAKE __ Ox0370 MAKEs hex version number.
MAKE make MAKEs executable file name.
MAKEFLAGS options The options typed at the command line.
MAKEDIR directory Directory where MAKE.EXE is located.
Modifying default
macros
When the default macros listed in Table 2.5 don't give you the exact string
you want, macro modifiers let you extract parts of the string to suit your
purpose.
To modify a default macro, use this syntax:
[image:38.504.27.457.130.277.2]Table 2.7 File-name macro modifiers
Table 2.7 lists macro modifiers and provides examples of their use.
Modifier Part of file name expanded
D Drive and directory
F Base and extension
B Base only
R Drive, directory, and base
Example $«D) $«F) $«B) $«R) Result C:\PROJECTA\ MYSOURCE.C MYSOURCE C:\PROJECTA\MYSOURCE
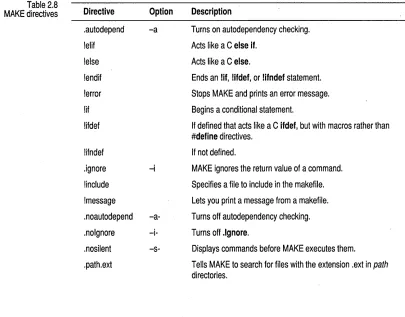
[image:39.504.64.469.294.611.2]Using MAKE directives
Table 2.8 MAKE directives
MAKE directives resemble directives in languages such as C and Pascal,
and perform various control functions, such as displaying commands
onscreen before executing them. MAKE directives begin either with an
exclamation point or a period. Table 2.8 lists MAKE directives and their
corresponding command-line options (directives override command-line
options). Each directive is described in more detail following the table.
Directive .autodepend !elif !else !endif !error !if !ifdef !ifndef Option
-a
. ignore -i
!include
!message
. noautodepend
-a-. nolgnore
-i-. nosilent
-s-.path.ext
Description
Turns on autodependency checking.
Acts like a C else if.
Acts like a C else.
Ends an !if, !ifdef, or !ifndef statement.
Stops MAKE and prints an error message.
Begins a conditional statement.
If defined that acts like a C ifdef, but with macros rather than #define directives.
If not defined.
MAKE ignores the return value of acommand .
Specifies a file to include in the makefile.
Lets you print a message from a makefile.
Turns off autodependency checking .
Turns off .Ignore .
Displays commands before MAKE executes them .
.autodepend
!error
[image:40.504.116.453.70.142.2]Summing up error-checking controls
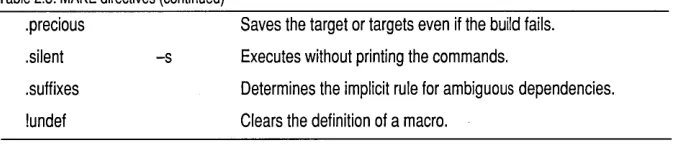
Table 2.8: MAKE directives (continued) . precious
. silent
. suffixes
!undef
-s
Saves the target or targets even if the build fails .
Executes without printing the commands .
Determines the implicit rule for ambiguous dependencies .
Clears the definition of a macro.
Autodependencies occur in .OBJ files that have corresponding .CPP, .C, or
.ASM files. With
.autodependon, MAKE compares the dates and times of
all the files used to build the .OBJ.
If
the dates and times of the files used to
build the .OBJ are different from the date-time stamp of the.OBJ file, the
.OBJ file is recompiled. You can use
.autodependor
-ain place of linked
dependencies (see page 20 for information on linked dependencies).
This is the syntax of the
!errordirective:
!error message
MAKE stops processing and prints the following string when it encounters
this directive:
Fatal makefile exit code: Error directive: message
Embed
!errorin conditional statements to abort processing and print an
error message, as shown in the following example:
! if ! $d(MYMACRO)
#if MYMACRO isn't defined !error MYMACRO isn't defined !endif
If
MYMACRO in the example isn't defined, MAKE prints the following
message:
Fatal makefile 4: Error directive: MYMACRO isn't defined
Four different controls turn off error checking:
• The
.ignoredirective turns off error checking for a selected portion of the
makefile.
• The
-icommand-line option turns off error checking for the entire
makefile.
!if and other
conditional
directives
Table 2.9 Conditional operators
• The - command operator turns off error checking for the related
command regardless of the exit code.
The
!ifdirective works like C
ifstatements (see the
Programmer's Guide
if
you don't understand
ifstatements). As shown here, the syntax of
!ifand
the other conditional directives resembles compiler conditionals:
!if condition
!if condition
!if condition
!endif
!else
!elif condition
!endif
!endif
The following expressions are equivalent:
! ifdef macro and! if $d (macro)
! ifndef macro and! if ! $d (macro)
These rules apply to conditional directives:
! ifdef macro
!endif
• One
!elsedirective is allowed between
!if, lifdef, or !ifndefand
!endifdirectives.
• Multiple
!elifdirectives are allowed between
!if, !ifdef, or !ifndefand
!else
directives and
!endif.• You can't split rules across conditional directives.
• You can nest conditional directives.
• Iif, !ifdef,
and
!ifndefmust have matching
!endifdirectives within the
same source file.
.
The following information can be included between
!ifand
!endifdirectives:
• Macro definition
• !includedirective
• Explicit rule
• !errordirective
• Implicit rule
• !undefdirective
Condition
in
ifstatements represents a conditional expression consisting of
decimal, octal, or hexadecimal constants and the operators shown in
Table 2.9.
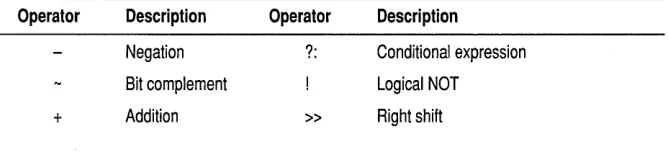
Operator Description Operator Description
Negation ?: Conditional expression Bit complement Logical NOT
!include
[image:42.504.133.455.70.212.2]!message
Table 2.9: Conditional operators (continued)
Subtraction « Left shift
Multiplication
&
Bitwise ANDDivision Bitwise OR
% Remainder II Bitwise XOR
&&
Logical AND >= Greater than or equal*Logical OR <= Less than or equal·
> Greater than Equality*
< Less than != Inequality*
·Operator also works with string expressions.
MAKE evaluates a conditional expression as either a simple 32-bit signed
integer or as a character string.
This directive is like the
#includepreprocessor directive for the C or
c++
language-it lets you include the text of another file in the makefile:
!include filename
You can enclose
filename
in quotation marks ("") or angle brackets
«»
and
nest directives to unlimited depth, but writing duplicate
!includedirectives
in a makefile isn't permitted-you'll get the error message
cycle in the
include file.
Rules, commands, or directives must be complete within a single source
file; you can't start a command in an
!includefile, then finish it in the
makefile.
MAKE searches for
!includefile