Getting Started with
NeD x
Terminals
NCDware Version 3.2
Part Number 9300276 Rev. A
April, 1994
Network Computing Devices, Inc. 350 North Bernardo Avenue Mountain View, California 94043 Telephone 415/694-0650
Copyright Copyright © 1994 by Network Computing Devices, Inc. The information contained in this doc-ument is subject to change without notice. Network Computing Devices, Inc. shall not be liable for errors contained herein or for incidental or consequential damages in connection with the furnishing, performance, or use of this material. This document contains information which is protected by copyright. All rights are reserved. No part of this document may be photocopied, reproduced, or translated to another language without the prior written consent of Network Computing Devices, Inc.
Trademarks ECX, MCX, NCD14c, NCD15b, NCD15r, NCD15s, NCD16, NCD16e, NCD17c, NCD17cr, NCD19, NCD19b, NCD19c, NCD19g, NCD19cp, NCD19r, NCDnet, and NCDware are
trade-marks of Network Computing Devices, Inc. XRemote is a registered trademark of Network Computing Devices, Inc.
PostScript, Display PostScript, and Adobe are trademarks of Adobe Systems Incorporated. Apple and LaserWriter are registered trademarks of Apple Computer, Inc. BrxTN3270 Server is a trademark of Brixton Systems, Inc. Cisco and cisco are trademarks of Cisco Systems, Inc. Cou-rier HST and CouCou-rier HST Dual Standard are trademarks of U.S. Robotics, Inc. US Robotics is a registered trademark of U.S. Robotics, Inc. DECnet, DECwindows, VMS, VT, VAX, UCX, and ULTRIX are trademarks of Digital Equipment Corporation. Ethernet is a trademark of Xerox Corporation. FrameMaker and FrameWriter are trademarks of Frame Technology Corporation. HP-UX is a trademark of Hewlett-Packard Corporation. Hewlett-Packard, LaserJet, and DeskJet are registered trademarks of Hewlett-Packard Corporation. IBM, IBM/PC, PC/AT, PS/2, AIX, and Token-Ring are registered trademarks of International Business Machines Corporation. Multiple Virtual Storage (MVS), and NetView are trademarks of International Business Machines Corporation. Lexmark is a trademark of Lexmark International, Inc. Microsoft is a registered trademark of Microsoft Corporation. Motif is a trademark of Open Software Founda-tion, Inc. Motorola is a registered trademark of Motorola, Inc. MultiNet is a trademark of SRI International and TGY, Inc. PCMCIA is a trademark of PC Memory Card International Associa-tion. PPP IP Control Protocol was developed by Carnegie-Mellon University.
seo
is aregistered trademark of The Santa Cruz Operation, Inc. SIMM is a trademark of Wang Labora-tories, Inc. SPARCstation is a trademark and SPARC is a registered trademark of SPARC International, Inc. Speedo is a trademark of Bitstream, Inc. Sun Workstation, SunOS, and NFS are registered trademarks of Sun Microsystems, Inc. Sun-3, Sun-4, and Open Windows are trademarks of Sun Microsystems, Inc. TCPware is a registered trademark of Process Software Corporation. Times and Helvetica are registered trademarks of Linotype AG and/or its subsid-iaries. TROPIC is a trademark of National Semi-Conductor, Inc. UNIX and OPEN LOOK are registered trademarks of UNIX System Laboratories, Inc. X Window System is a trademark of the Massachusetts Institute of Technology. WIN /TCP is a trademark of The Wollongong Group, Inc. Other trademarks and service marks are the trademarks and service marks of their respec-tive companies.
Revisions Revision history of this document:
Part Number Revision Date . Description
Guidelines for Productive and Healthy Use of Your X Terminal
You may have read or heard of articles which have linked prolonged viewing of computer video display terminals with eye fatigue, and prolonged use of computer keyboards and mouse devices with repetitive stress injuries such as carpal tunnel syndrome. One common example is the syndrome known as "tennis elbow." Although a conclusive direct causal relationship between computer use and these adverse health effects has yet to be scientifically proven, NCD recommends that you read and follow these guidelines in setting up and using your new NCD X terminal.
D Set up your X terminal in a well lit, glare and shadow-free environment.
D Avoid using your X terminal in a position you find awkward or unnatural.
D Select a chair that provides good lower back support. Adjust your chair so that your feet rest flat on the floor with your thighs in a horizontal position.
D Place your keyboard on a surface so that your wrists are not tilted, or only slightly tilted while using the keyboard. Many people find a comfortable keyboard height is at the same level as their elbows.
D If the height of your work surface cannot be adjusted, position the chair at a comfortable height and use a footrest to place your feet on a level surface.
D Place your mouse on a surface which is at the same height as your keyboard. Many people find using the mouse and keyboard within 16" inches of the body is comfortable.
D Avoid resting your arm on your work surface and merely bending your wrist when using your mouse. Consider using a wristrest to provide a padded surface for your wrists when working with your mouse.
D Place your display monitor at a comfortable viewing distance. Many people favor a dis-tance of 16" to 28" from their eyes. Position the screen so that you are not looking up or down at the screen.
D Take breaks to rest your eyes, stretch your muscles, and move around.
D Vary your work patterns so that you alternate working at your X terminal with other tasks that use different muscle groups and allow you to focus your eyes at different distances.
D See your physician if you experience persistent muscle ache, joint pain, eye fatigue or other discomfort when using your X terminal.
These are guidelines. What is comfortable for some may not be comfortable for you. You are the only one who can decide if these guidelines are appropriate for your needs.
iv
this subject is inconclusive. Moreover, the link, if any between VDT emissions and adverse health effects is unproven and the subject of much debate. Stress, postural strain and poor working conditions are frequently cited in addition to, and instead of, VDT emissions as posing potential health hazards to frequent users of VDTs.
The prevailing professional opinion to date is that VDTs are safe. NCD products comply with the applicable regulations and standards for electromagnetic radiation set forth by the U.S. Code of Federal Regulations, Underwriters Laboratories, Inc., the Canadian Standards Associa-tion, and the German VDE Standard. When and if new or additional standards are adopted, NCD will take appropriate steps to comply with them.
Before You Begin
Intended Audience
Assumptions
This document is written for NCO X terminal users who do not have much experience using X, workstations, or X terminals.
Getting Started provides an explanation of how X terminals
work and the purpose of the NCO software. Understanding how the X Window System (also called X) and NCD X terminals work will help you to take advantage of all the available options.
In addition, Getting Started suggests ways to get the best
performance out of your NCO X terminal when you run any of four common graphical user interfaces (GUls) provided by other vendors to simplify X usage.
Getting Started assumes that you are running the Standard X
server. However, notes are included to point out the
differences between the Standard, Minimal, mwm, and
XRemote-only X servers. DPS and PEX X servers are
documented in NCDware 3.2 Advanced User's Guide for UNIX
vi Before You Begin
Getting Started assumes that a system administrator (or an experienced user) has already:
o
Set up an account for you on your X terminal's primaryhost computer
o
Prepared the startup files you need for X to run on your X terminalo
Installed the terminal on the networko
Configured an X display manager (xdm)o
Configured a window managero
Configured the local terminal emulatorso
Configured the setup parameters and prepared thestartup files you need to run XRemote (if you plan to use XRemote).
Before you start reading Getting Started, ask your system administrator for the following items. We refer to these items in later sections of Getting Started.
o
Name of the primary host and operating system you areusing
o
Name of the graphical user interface and windowmanager you are using
o
Name of the X server you are using (Several X servers areavailable. Some X servers do not include all of the fea-tures described in this manual.)
o
Your login and passwordContents of this Manual
The contents of this document are organized as follows:
o
Chapter 1, A Quick Tour on an NCD X Terminal,illus-trates some X features and defines some concepts and terms.
o
Chapter 2, Introducing X Terminals and the X WindowSystem, specifies the X network architecture, the charac-teristics that make the X environment unique, and X
software components. '
o
Chapter 3, Introducing X with NCD, describes the NCOfamily of X terminals and NCO software.
o
Chapter 4, NCD X Terminal Interface Basics, explainshow to use the various software and hardware tools to enter and manipulate data and screens.
o
Chapter 5, Starting and Ending an X Session, explainshow to log in and out of your NCO X terminal.
o
Chapter 6, Using the NCD User Services, explains how totake advantage of the Console, the menu system used to control your X session and work environment.
o
Chapter 7, Using the NCD Local Window Manager,explains how to manipulate windows and icons using
ncdwm.
o
Chapter 8, Using the NCD XRemote Software, explainshow to use XRemote software to log in to (1) remote hosts over modems or (2) local hosts over RS-232 C cables.
o
Chapter 9, Common GUIs on NCD X Terminals,Software Version Numbers
viii Before You Begin
NCD documents refer to versions of software using one of the following formats:
o
maj.minThis format refers generically to all versions with the same major and minor version number; for example, 3.2.
o
maj.min.fixThis format specifies a distinct product version; for example, 3.1.1 or 3.2.0.
In this notation:
maj indicates the major version number. This field
changes for major functional enhancements.
min indicates the minor version number. This field'
changes for minor functional enhancements.
fix indicates the bug-fix version. This field
Text Conventions
This document uses the following conventions:
Ctrl-Z
<CR>
bold
bold italic
italic
courier
indicates that you should press two keys at the same time; in this case the Ctrl key and Z.
indicates that you should press the Return key.
indicates movement through menus. For example, the phrase "In the Console, select Statistics ~ Show Version" means that you display the Statistics menu and select the Show Version menu item.
indicates a directory, file, or remote configuration parameter, such as Itftpboot,
or boot-automatically.
indicates a variable or a utility, such as
Xncdxxx where xxx indicates the variable portion.
--indicates emphasis or the name of a publication, such as Getting Started with
NeD
x
Terminals.indicates information displayed on the screen or entries in a file.
Related Documents
x Before You Begin
The following documents describing NCO hardware and software products are published by NCO.
For documents describing the X Window System and
specialized features of the NCO X server, see the Bibliography in the back of this manual.
o
NCO terminal installation bookletsTerminal installation booklets explain how to unpack and set up NCO terminals and connect them to the network. Each document is designed for a specific NCO terminal or family of terminals.
o
NCO memory installation bookletsMemory installation booklets explain how to install memory in NCO terminals and run the recommended memory test.
o
A Roadmap to NCDware 3.2 PublicationsThis roadmap is a high-level index of major topics. The roadmap points the reader to the document or chapter in which a specific topic is addressed.
o
Getting Started with NCD X TerminalsThis introductory manual explains what users need to know to become productive and efficient with their NCO X terminals. This manual explains the X Window System, how X terminals work, and the purpose of NCO software; provides step-by-step instructions for using the terminal and the software; and suggests how to get the best performance from your terminals when you run four common user interfaces.
o
NCDware 3.2 Advanced User's Guide for UNIX SystemsThis guide tells how to manage NCO X terminals in a
UNIX environment. It includes information for advanced
booting, file service, security, login services, fonts, local clients, keyboards, and more.
D NCDware 3.2 Installation Guide for UNIX Systems
This guide describes how to use the NCDconfig utility to install NCDware software on your host computer,
configure terminals, and update system services and databases.
D NCDware 3.2 Advanced User's Guide for VMS Systems
This guide provides the information a system manager needs to manage NCO X terminals in a VMS environment. This guide details how NCO terminals work and explains how to use remote configuration, file service, fonts, login services, local clients, Display PostScript, and XRemote communications in a VMS environment. The NCDware distribution for VMS includes an online Bookreader version of this guide.
D NCDware 3.2 Installation Guide for VMS Systems
Written for system managers, this guide explains how to install NCO software on a VMS host and add terminals to an existing configuration. It identifies the disk space and memory requirements for systems and terminals and describes recommended post-installation activities. This guide also explains how to copy the NCO distribution to disk, contains an example upgrade installation script, and includes examples of files and UAF entries that are part of the NCDware distribution.
D NCDware 3.2 Reference Manual
This reference manual contains information about new features and reference material about the following subjects: boot monitor functions, features and commands; NVRAM (non-volatile random-access memory); remote configuration language and
xii Before You Begin
o
Using the 3270 Terminal EmulatorThis manual describes NeD's 3270 emulator local client and provides directions for using and customizing the client.
o
EXPORT CatalogContents
This table of contents contains only the major topics (the top-level headings). See the individual chapters for more detailed tables of contents.
Chapter 1 A Quick Tour on an NeD x Terminal
Power On, Booting, and Logging In 1-2
Connecting to Hosts and Applications 1-5
Using Windows 1-9
Locking the Screen and Logging Out 1-16
Chapter 2 Introducing X Terminals and the
X Window System
Network Computing 2-1
A Closer Look at X Software and Hardware 2-8
Chapter 3 Introducing X with NeD
The NCD Family of X Terminals 3-1
NCDware 3-2
Common X Clients 3-7
Network Connectivity 3-10
Contents
xiv
Chapter 4 NeD x Terminal Interface Basics
Using the Mouse 4-2
Using the Keyboard 4-5
Using Windows Management Tools 4-8
Using Motif-Style Graphical Tools 4-14
Chapter 5 Starting and Ending an X Session
Assumptions 5-2
Powering Up 5-2
Booting 5-3
Logging In 5-4
Logging Out 5-8
Chapter 6 Using the NCD User Services
The Console 6-2
Starting, Suspending, and Ending X Sessions 6-8
Starting the Local Window Manager 6-13
Connecting to Hosts 6-15
Using a Terminal Emulator Window 6-20
Changing User Preferences 6-27
Getting System Information 6-47
Chapter 7 Using the NCD Local Window Manager
Introducing ncdwm 7-2
Using the ncdwm Window 7-12
Chapter 8 Using the NCD XRemote Software
Assumptions 8-2
XRemote and Related Software and Hardware 8-3
Before Running XRemote 8-7
Deciding Which Protocol to Use 8-12
Using XRemote 8-13
Ending an XRemote Session 8-20
Checking XRemote Diagnostics 8-22
Chapter 9 Common eUIs on NCD X Terminals
Open Windows Environment on NCD X Terminals 9-2
DECwindows Environment on NCD X Terminals 9-10
OSF /Motif Environment on NCD X Terminals 9-27
Glossary
Bibliography
Index
Contents
Figures
Figure 1-1 X Terminal Display After Booting 1-2
Figure 1-2 The Login Chooser 1-3
Figure 1-3 A Login Banner 1-4
Figure 1-4 An X Display After Login 1-5
Figure 1-5 A Root Menu 1-6
Figure 1-6 An Applications Submenu 1-6
Figure 1-7 Starting an Application 1-7
Figure 1-8 An Active Window 1-10
Figure 1-9 Enlarging a Window 1-11
Figure 1-10 Adding Another Terminal Emulator 1-12
Figure 1-11 Moving a Window 1-13
Figure 1-12 Using the Window Menu Button 1-14
Figure 1-13 The Console's Utilities Menu 1-16
Figure 1-14 The Lock Screen Utility 1-16
Figure 2-1 Batch Processing Computing Model 2-2
Figure 2-2 Time-Share Computing Model 2-2
Figure 2-3 Standalone Computing 2-3
Figure 2-4 Work Group Computing 2-3
Figures
xviii
Figure 2-8 A Window Manager's Window Frame 2-7
Figure 2-9 X System Components 2-9
Figure 3-1 The Console 3-3
Figure 3-2 An Example of a Root Menu 3-4
Figure 3-3 Multi-Vendor Connectivity 3-10
Figure 4-1 Mouse 4-2
Figure 4-2 Trackball 4-2
Figure 4-3 Keyboard 4-5
Figure 4-4 Window Manager Indicating the Active Window 4-10
Figure 4-5 Window Menu 4-11
Figure 4-6 Iconified and Deiconified Windows 4-13
Figure 4-7 Menu Bar and Related Tools 4-14
Figure 4-8 Motif-Style Buttons in Popup Windows 4-16
Figure 4-9 Slider and Textual Tools 4-18
Figure 5-1 The X Display After Booting 5-4
Figure 5-2 An XDM Login Banner 5-6
Figure 5-3 Typical Display After Login 5-7
Figure 6-1 The Console 6-2
Figure 6-2 The Console with Messages 6-6
Figure 6-3 The Lock Screen Popup Window 6-9
Figure 6-4 Confirming Logging Out 6-11
Figure 6-5 An X Display Without a Window Manager 6-13
Figure 6-6 An X Display with ncdwm Running 6-14
Figure 6-7 The Terminal Host Chooser 6-15
Figure 6-8 A Telnet Terminal Emulator Window 6-18
Figure 6-9 A VT320 Terminal Emulator Window 6-20
Figures
Figure 6-11 Keyboard Preferences 6-31
Figure 6-12 Bell Preferences 6-33
Figure 6-13 Pointing Devices Preferences 6-34
Figure 6-14 Screen Background Preferences 6-36
Figure 6-15 Screen Saver Preferences 6-37
Figure 6-16 Power Management Preferences 6-38
Figure 6-17 Font Preferences 6-39
Figure 6-18 X, Graphics, and SIE Preferences 6-41
Figure 6-19 Compatibility Preferences 6-43
Figure 6-20 Console and Utilities Preferences 6-44
Figure 6-21 Audio Preferences 6-45
Figure 6-22 The Statistics Menu 6-47
Figure 6-23 The Show Version Popup Window for Ethernet 6-47
Figure 6-24 The Show Memory Popup Window 6-50
Figure 6-25 The Show X Connections Popup Window 6-51
Figure 6-26 The Show Statistics Popup Window 6-52
Figure 7-1 The Default Root Menu 7-5
Figure 7-2 A Window and Icon 7-6
Figure 7-3 Adding Windows 7-7
Figure 7-4 ncdwm Window 7-8
Figure 7-5 Resize Handles and Pointer Appearance 7-10
Figure 7-6 Window Menu 7-13
Figure 7-7 Icons in the Icon Box 7-18
Figure 8-1 A Local Area Network With XRemote 8-3
Figures
xx
Figure 8-5 Checking X Terminal Serial Parameters 8-11
Figure 8-6 NCD Terminal Host Chooser 8-15
Figure 8-7 Dialer Client Communications Menu 8-21
Figure 9-1 An OpenWindows Display After Login 9-3
Figure 9-2 An OpenWindows Window 9-5
Figure 9-3 The DECwindows Start Session Dialog Box 9-11
Figure 9-4 DECwindows Motif Display After Logging In 9-12
Figure 9-5 A DECwindows Motif Window 9-14
Figure 9-6 DECwindows Motif Session Manager 9-18
Figure 9-7 DECwindows Menus Dialog Box 9-19
Figure 9-8 Adding an Item to the Item Names Box 9-20
Figure 9-9 Adding an Item to the Applications Menu 9-21
Figure 9-10 DECwindows Motif Applications Menu 9-22
Figure 9-11 Removing a Client from Automatic Startup 9-23
Tables
Table 1-1 Powering On, Booting, and Logging In 1-4 Table 1-2 Connecting to Hosts and Applications 1-8
Table 1-3 Using X 1-15
Table 1-4 Pausing and Logging Out 1-17 Table 2-1 Characteristics of X 2-8
Table 2-2 Common Window Managers 2-13 Table 3-1 Protocols Used to Connect to Hosts 3-5 Table 4-1 Mouse Actions 4-4
Table 4-2 Setup Key Equivalent Combinations 4-8 Table 4-3 Use of Menu Bar Tools 4-15
Table 4-4 Use of Motif-Style Buttons 4-17 Table 4-5 Use of Sliders and Textual Tools 4-19
Table 6-1 Console Pulldown Menus 6-3 Table 6-2 Types of X Server Messages 6-7
Table 6-3 The Terminal Emulator File Menu 6-22
Table 6-4 The Terminal Emulator Options Menu 6-23 Table 6-5 The User Preferences File Menu 6-29 Table 6-6 Keyboard LED Functions 6-32
Tables
Table 7-3 Table 7-4 Table 7-5
Table 7-6
Table 7-7 Table 7-8
Table 7-9 Table 7-10 Table 7-11
Table 7-12 Table 8-1 Table 8-2
Table 8-3 Table 8-4
Table 9-1 Table 9-2
Table 9-3
xxii
Window Menu Items 7-14
Moving Windows: Use the Mouse and Title Bar 7-15
Raising or Lowering a Window: Use the Mouse 7-16 Lowering a Window: Use the Alt Key and Mouse 7-16
Changing Window Size: Use the Window Frame 7-17 Changing Window Size: Use the Maximize Button 7-17
Iconifying a Window: Use the Minimize Button 7-19 Iconifying a Window: Use the Alt Key and Mouse 7-19 Deiconifying a Window: Use the Mouse 7-20
Closing Windows: Use the Window Menu Button 7-20 Tasks for Your System Administrator 8-2
Modem Configuration Settings 8-9
Modem Messages When Attempting to Connect 8-10 Characteristics of Protocols Used With XRemote 8-12
Pointers in Open Windows 9-4
1
A Quick Tour on
an NCD X Terminal
Power On, Booting, and Logging In 1-2
For More Information 1-4
Connecting to Hosts and Applications 1-5
For More Information 1-8
Using Windows 1-9
For More Information 1-15
Locking the Screen and Logging Out 1-16
1
A Quick Tour on
an NCD X Terminal
This chapter is a short introduction to X on your NCD X terminal. Its purpose is to give you an idea of what it is like to use the X Window System on the terminal.
This chapter describes how a person might use an X terminal to write a memo. In the example, the X terminal is on a network that includes:
o
Minicomputers, used primarily for data storage and retrievalo
Workstations, used to run software such as a word processingprogram
Your X software may not be the same as in the example, so it may function somewhat differently. Nonetheless, the example gives you an idea of what it's like to use X on an NCD X terminal.
If you have questions about how your particular system differs from the examples included in this manual, refer to these sources for more information:
o
NCDware 3.2 Advanced User's Guide for UNIX Systemso
NCDware 3.2 Advanced User's Guide for VMS Systemso
Your system administratorPower On, Booting, and Logging In
Power On, Booting, and Logging In
The first thing the user-Sam, a sales manager for a nautical supplies manufacturer-does to start his X session is to turn on his X terminal. When he powers on the NeD X terminal, it
automatically boots.
Note Most users keep their terminals powered on. They simply log out when they leave their terminals for an extended period. Logging in when they return to the terminal bypasses the booting process.
Booting is the process of testing the X terminal's memory and loading the X software into the X terminal. Sam can tell that the terminal is booting by the appearance of test results and other information that scrolls by on the display. It takes 20 seconds or so for his terminal to boot.
When booting is finished, the Console, labeled NeD User Services: Console, appears on the display with the Login Chooser. (See Figure 1-1.)
anemone
mennald Tep
octopus Tep -xdm host
OTTER NCDnet - DECnet host
Figure 1-1 X Terminal Display After Booting
Power On, Booting, and Logging In
The Console provides a way of:
o
Connecting to host computers and applicationso
Customizing your working environmentWe'll see some uses of the Console later in this chapter.
Some system administrators configure the software so that the Login Chooser appears after booting. Others set up the software to display an entirely different way to log in. We examine the
different login methods in later chapters.
The Login Chooser lets Sam select a primary login host and start an X session on that host. Sam selects a login host by:
o
Moving the mouse pointer to the host's nameo
Clicking the left mouse button to highlight the host's name inthe chooser list
o
Clicking the OK button to confirm the selectionIn the example, Sam wants to select Octopus as the host computer. (See Figure 1-2.)
Figure 1-2 The Login Chooser
Power On, Booting, and Logging In
A login banner contains prompts that show Sam where to enter his login name and password. (See Figure 1-3.)
Welcome to Octopus
Login:
[image:29.540.142.486.339.569.2]Password:
Figure 1-3 A Login Banner
For More Information
For more information on powering on, booting, and logging in, see the sections in Getting Started that are listed in Table 1-1.
Table 1-1 Powering On, Booting, and Logging In
For Information On Look In
Booting "Booting" on page 5-3
Login chooser "Login Chooser" on page 5-5
Login banner "Login Banner" on page 5-6
Logging in "Logging In" on page 5-4
Logging into a "Log Into the Host For PPP or SLIP" on page remote host 8-15, "Log Into the Host For XRemote/Serial"
on page 8-19
X software and "A Closer Look at X Software and Hardware" hardware on page 2-8, "NCDware" on page 3-2
Console "NCD User Services" on page 3-2 "The Console" on page 6-2
Connecting to Hosts and Applications
Connecting to Hosts and Applications
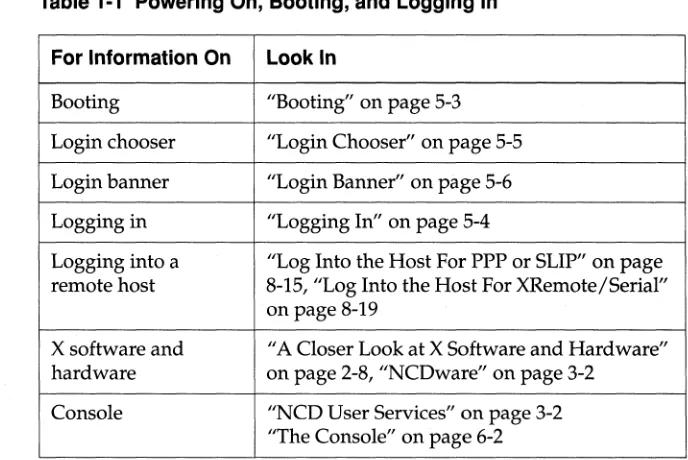
..
After entering his login name and password, the applications that the system administrator requested to start up automatically for Sam appear on the display. (See Figure 1-4.)
[image:30.540.116.485.138.452.2].term
Figure 1-4 An X Display After Login
Connecting to Hosts and Applications
terminal emulator called xterm runs from a host and mimics the behavior of an ordinary VTI02 terminal.
Another client, called a window manager, also started
automatically. It controls aspects of the appearance and function of the windows in which the other applications appear. For example, the window manager is what gives you the outside borders on a window. (We'll see how a window manager works in "Using Windows" on page 1-9.)
Sam needs to write a report using a program that runs on a different computer from the primary host to which he logged in. To start the program running on his X terminal, he clicks a mouse button to display a root menu. (See Figure 1-5.)
xterm
Applications ->
Utilities ->
Games ->
Log Off ->
Figure 1-5 A Root Menu
A root menu is a menu that appears when you place the mouse
pointer on the root window (the background upon which the other windows appear) and click a mouse button. Often root menus are set up by the system administrator to list the most frequently needed applications (clients). When a user selects an item from the list in a root menu, the selection invokes the commands needed to connect the X terminal to the host computer and start the client on the X terminal.
Sam clicks on the Applications item in his root menu. A submenu appears with a list of applications. (See Figure 1-6).
xterm
Applications -> -Apps-UtilitieS -> Calculator Games -> Clock Log Off -> Text Editor
FrameMaker
Figure 1-6 An Applications Submenu
Connecting to Hosts and Applications
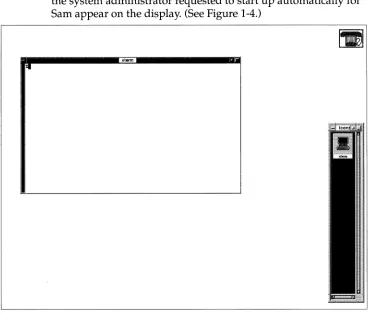
He selects a desktop publishing system, such as FrameMaker (owned by Frame Technology Corporation). The submenu
disappears, and in a moment the application appears as a window on the X terminal display. (See Figure 1-7.)
I I I I I Ig
I I I I I I~ Xlerm
[image:32.540.98.487.114.415.2]..
Connecting to Hosts and Applications
For More Information
For more information on connecting to hosts and applications, see the sections in Getting Started that are listed in Table 1-2.
Table 1-2 Connecting to Hosts and Applications
For Information On Look In
X applications "A Closer Look at X Software and Hardware" on page 2-8
"NCO User Services" on page 3-2 "Common X Clients" on page 3-7
Automatically "Startup File" on page 5-6 starting X
applications
Terminal emulators "Local Terminal Emulator" on page 3-5 "Terminal Emulators" on page 3-8
Connecting to hosts "Connecting to Hosts" on page 6-15 and applications "Starting Clients" on page 7-4
"Using XRemote" on page 8-13
Window managers ''Window Managers" on page 2-12 "Local Window Manager and Companion Software" on page 3-4
Chapter 7, Using the NCO Local Window Manager
Root window and "Local Window Manager and Companion root menu Software" on page 3-4
"Starting Clients" on page 7-4
[image:33.540.155.487.142.467.2]Using Windows
Using Windows
Sam wants to use some information from an old memo in a report he is writing. To read the old memo, he can use the terminal emulator that started automatically when he logged in. The report Sam is writing is in a file he created using the FrameMaker
application that he started with the root menu.
The NeD local window manager, called ncdwm, started
automatically when Sam logged in. (The NeD window manager is
called a local window manager when it runs on the NeD x terminal instead of on a host computer.) The window frames that appear
around the application windows are a function of ncdwm. They
give Sam control over the placement and size of the windows.
To read the old memo, Sam has to make the terminal emulator
window the active window. The active window is the window that
accepts keyboard and mouse input. The ncdwm software lets him
select the active window by placing the mouse pointer on the window and clicking the left mouse button. The method of selecting the active window is called the focus policy.
The frame of the active window is a different shade from the other windows. In the example, the frame on the active terminal
Using Windows
olerm
[image:35.540.99.483.82.371.2]Active window
Figure 1-8 An Active Window
Now that the terminal emulator window is the active window, Sam can read the memo. He uses the terminal emulator just as he would an ordiriary terminal connected to the host. In the example, the host is running the UNIX operating system, so Sam uses the UNIX vi editor to see the memo.
Sam finds the information he needs, so he opens the FrameMaker file that contains his report.
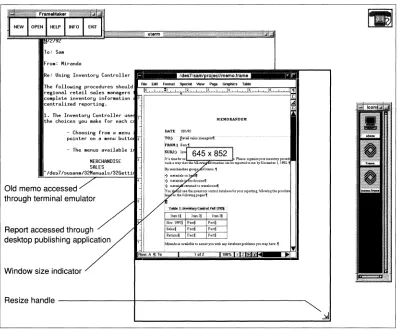
Using Windows
The part of the report displayed in the screen is too small for Sam's purpose, so he uses the ncdwm window frame to make the window larger. First he clicks with the left mouse button in the report's window to make it the active window. Then he places the pointer on a corner of the window frame called a resize handle. He drags the mouse while pressing with the left mouse button. As he does, an outline of the window appears and changes its size in
proportion to the mouse's movement. (See Figure 1-9.)
A small box also appears in the center of the display to indicate the size of the outlined window in units that are decided by the client, usually pixels or rows by columns.
xt«m'
To: Sail
Froll: Miranda
Re: Using Inventory Controller
1I •••
r!ld;.~.7~1'.~mI;lro~.~cv;m;.m;o~.fram;!.II • • • ~r--lRle Ellt Format Spacial View Page GraphIcs Tabla
The followins procedures ShOUldlj~~~~~~~~~~~~~~~~1
regional retail sales .snagers '
co.plele inventory infor.ation 0 C
centralized reporting. ~
1. The Inventory Controller use the choices you make for each c - Choosing froll a lIenu
pOinter on a lIenu but to 2 - The menus available 1
MERCHANDISE SALES
" Ides7/susanll/32Manuals/32Gettl
Old memo accessed through terminal emulator
Report accessed through desktop publishing application
Window size indicator
FJow:A '!I: To
MEMOIlANDUM
DATE: lot1192 TO:)"" ··]t$tUiwmiin~liQ-s" ..
.!====~Plu.seorgani2e~lDVmtnJypro""
lum11 It1l\\2§ IUm3§ Nov. 19\1t§ Faetl Fact§ Salu§ Facti Pe.ct:§
RUImls§ Fact' Fact§
M!randai&avmJ.ablBtoU:SlStyouwithanydatuaseproblemsyoumayhavt.'!I ,.fZ lf1O'r.. ;: Z
[image:36.540.90.488.221.551.2]Using Windows
When the window outline is the size he wants, Sam releases the mouse button. The window immediately changes to the size of the outline and more of the report shows in the window.
Sam then decides he wants to compare the old memo against another one. He needs another terminal emulator to look at the second memo, so he displays the root menu again and selects the item xterm, which invokes the command to start another terminal emulator just like the one that appeared automatically when Sam logged in. (See Figure 1-10.)
Sam uses the vi editor again to view the file containing the second memo. The second terminal emulator overlaps the window
.,erm
To: SI' ... " ... II~.,orm~lI .... II ... II ....
II.
118/92
To: So
Re: U:
FrOIl: Mirande
The f,
~::~i: Re: ReVised Procedures for Inventory Controller centro I've changed a few of the procedures for using the
1. Th, !~~e~~~~~c~:~!r:~!:r i ~~c~~:~~n~~o!o t~~e r:~~:~!ins
the cI managers who were using the system on an experillental bas1s. The following l1st contains the revised procedures:
"'des
1. The Inventory Controller uses lIenus to display the choices you lIake for each controlled itell.
- Choosing frOM a lIenu involves placing the pointer on a lIenu button and clicking a Mouse button - The .enus available include the following:
MERCHANDISE
"'des7/susanIll/32Manuals/32Getting/lle.o ,v12" 24 l1nes~ 615 characters
TUIe I: IavmDryc..u.l. .... lm itrm1 Itml2 item.<J
Nov. 1991 Pact Fact
Salas Pact Fact
Retunu: Fact Fact
Mirmdt.illt.nilabk to usitJtyou with lUIy detabt.u.probieml youmayhava.
[image:37.540.85.482.223.555.2]Fl(l'ol: A ~: To 10f2* 100% :z Z
Figure 1-10 Adding Another Terminal Emulator
To: S. Fro.:
Using Windows
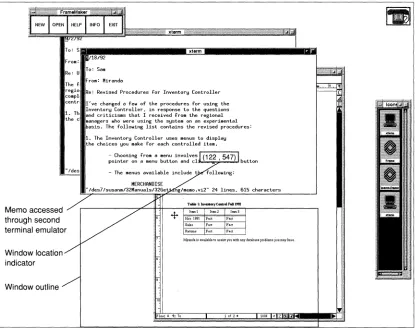
containing the first memo, so Sam needs to move the windows to be able to compare the two.
To move a window, Sam places the pointer on the title bar running across the top of the window frame, presses the left mouse button, and drags the mouse. An outline of the window appears, moving in proportion to the movement of the mouse. (See Figure 1-11.)
A small box also appears in the center of the display indicating the location of the upper left corner of the outline.
xlerm
xlerm
/18/92
To: Sail
Re: U·
The f,
regial cOllpI,
centr, 1. Th, the cI
"Ides
Memo accessed through second terminal emulator
Window location indicator
Window outline
From: Miranda
Re: ReVised Procedures for Inventory Controller rYe changed a few of the procedures for using the Inventory Controller. in response to the questions and criticislls that I received froll the regional lIanagers who were using the system on an experillental basis. The following 11st contains the revised procedures:
1. The Inventory Controller uses menus to display
the choices you make fOT each controlled itell. - Choosing froll a menu involves
pointer on a menu but ton and cl~..;;o;,;-;;...;.;.,U but ton
- The menus available include t
T.we l:lIMnaryCadrolNtm
+
1~1 I",,' Itrm3 Nov.l~l F •• F",Salts F", F ••
R _ F . .
Mirendais aveJ.\ableto usistYOll with any database problem. you mayhaV$
[image:38.540.70.485.196.524.2]lof2* 100: :z: Z
Using Windows
When the outline is where he wants the window to appear, Sam releases the mouse button. In this case, Sam moves the window so that it is partially off screen. The window immediately moves to the spot where the outline appeared.
After studying the windows, Sam decides he doesn't need the information in the first memo after all, so he exits from the vi editor and closes the terminal emulator by double clicking on the
Window menu button in the upper left corner of the window frame. (See Figure 1-12.)
Double click
~
to closeUsing Inventory Controller
following procedures should be used by all retail sales managers to ensure that we
Figure 1-12 Using the Window Menu Button
The window disappears.
Next Sam wants to copy a portion of the memo and paste it into the report. To do so, Sam:
o
Presses and drags the left mouse button to highlight some textin the memo
o
Clicks in the window containing the report to make it theactive window
o
Places the pointer where he wants the memo text to appearo
Clicks the middle mouse button to place the highlighted textinto the report at the position of the pointer
Now. that his report is complete, Sam saves the file.
Using Windows
For More Information
For more information on using X, see the sections in Getting Started
that are listed in Table 1-3.
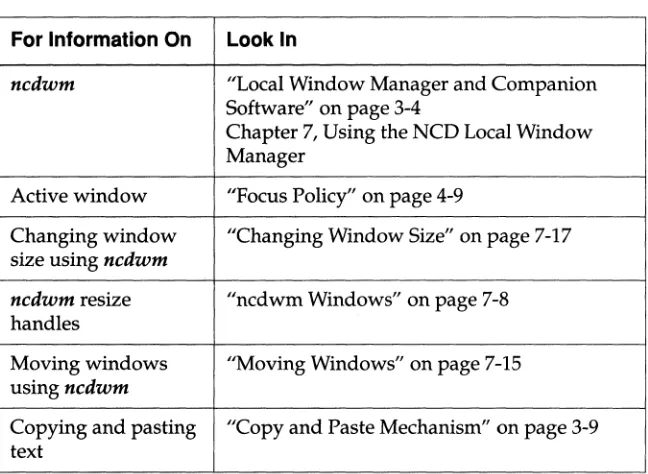
Table 1-3 Using X
For Information On Look In
ncdwm "Local Window Manager and Companion Software" on page 3-4
Chapter 7, Using the NCO Local Window Manager
Active window "Focus Policy" on page 4-9
Changing window "Changing Window Size" on page 7-17 size using ncdwm
ncdwm resize "ncdwm Windows" on page 7-8 handles
Moving windows "Moving Windows" on page 7-15 usingncdwm
[image:40.540.167.491.144.381.2]Locking the Screen and Logging Out
Locking the Screen and Logging Out
After saving and printing the report, Sam intends to leave his X terminal for a while. He doesn't want to leave his terminal available for other users, yet he doesn't want to have to log in all over again when he returns. He invokes a Lock Screen utility from the Console to secure the X terminal from use.
To display the Console, Sam presses the Setup key.
Note Some NCO keyboards do not have a Setup key. See Table 4-2 for equivalent key combinations.
From the Utilities menu in the menu bar, Sam selects the item Lock Screen. (See Figure 1-13.)
Blank Screen Loek Screen ...
[image:41.540.191.347.456.512.2]Resean Font Path Test Network ...
Figure 1-13 The Console's Utilities Menu
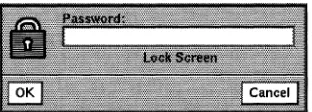
The Lock Screen utility causes the screen to become blank except for a popup window that prompts him to enter a password, then to retype it a second time. (See Figure 1-14.)
Figure 1-14 The Lock Screen Utility
Locking the Screen and Logging Out
As Sam types the password, asterisks appear instead of the characters he types. After he types the password the second time, the box reappears prompting for the password again. Until Sam retypes the same password that he typed twice before, the X terminal display is locked and accepts no other input.
When Sam decides he wants to log out, he quits any applications that are still running to prevent any loss of data or hung processes on the host.
Next, Sam selects the Login menu from the Console. He clicks on the Logout item. A popup window appears asking him to confirm that he wants to log out. He clicks on Yes. The popup window disappears, all the clients that are still running disappear, and in a moment the Console and the Login Chooser reappear so that another X session can begin when required.
For More Information
For more information on pausing and logging out, see the sections in Getting Started that are listed in Table 1-4.
Table 1-4 Pausing and Logging Out
For Information On Look In
Lock Screen "Starting, Suspending, and Ending X Sessions" on page 6-8
Setup key liThe Console" on page 6-2
Console liThe Console" on page 6-2
Logging out "Logging Out" on page 5-8 "Logging Out" on page 6-10 "Starting Clients" on page 7-4
Locking the Screen and Logging Out
2
Introducing
X Terminals
and the
X Window System
Network Computing 2-1
One Computer-Many Users 2-2
One Computer-One User 2-3
Network Computing-One Computer per Window 2-4
Network Computing in Practice 2-4
A Closer Look at X Software and Hardware 2-8
Characteristics of X 2-8
X Software Components 2-9
Servers 2-10
Clients 2-11
Window Managers 2-12
Communication Channels 2-14
2
Introducing
X Terminals
and the
X Window System
Your NCO X terminal and the X Window System offer you a simple way to use a variety of computers and application programs over a network. Depending on what is available on your network, your X terminal makes it easy for you to use different kinds of computers running on a variety of operating systems because the differences will not be apparent to you.
This chapter describes the history of the X Window System and defines the network structure that makes many computers accessible from your terminal.
Network Computing
Network Computing
One Computer-Many Users
During the 1960s, computer users usually shared resources, with each user accessing the processor serially in a computing model called batch processing. (See Figure 2-1.)
Processor
~
User 3Figure 2-1 Batch Processing Computing Model
During the next decade, time-sharing-many users accessing the same processor simultaneously-became increasingly common. (See Figure 2-2.)
User 3 Terminal
Processor
Figure 2-2 Time-Share Computing Model
2·2 Introducing X Terminals and the X Window System
User 4 Terminal
Network Computing
One Computer-One User
With the invention of the microprocessor in the 80s, standalone computing-the use of a single processor for each user in the form of personal computers and workstations-solved much of the overcrowding on time-sharing systems. (See Figure 2-3.)
User 1
Workstation Workstation User 2
Figure 2-3 Standalone Computing
User 3
Workstation Workstation User 4
Local area network (LAN) technology increased the usefulness of standalone computing. In a computing model sometimes called work group computing, LANs allow users to share files and resources such as printers and file storage devices. (See Figure 2-4.)
User 1
Workstation Workstation User 2
Figure 2-4 Work Group Computing
User 3
Workstation
User 4
Network Computing
Network Computing-One Computer per Window
The network computing architecture fostered by the X Window System takes the advantage of LAN computing and increases it by placing processing power, applications, and information wherever
it is needed on the network. Network computing gives each X
terminal user the power of any or all of the processors on the network. (See Figure 2-5.)
Workstation
X Terminal
Figure 2-5 Network Computing Model
The X window system, running on hosts on a network and on X terminals, gives the X terminal user access to many applications running on computers anywhere on the network. As a result, users have the power of one computer per window.
Network Computing in Practice
Let's look at what network computing is like in practice. We'll use the perspective of Jill, a nursing administrator in a small research hospitaL
The hospital's network links all the departments. Included on the network are X terminals, printers, minicomputers, workstations, personal computers (pes), and a supercomputer.
Network Computing
[image:50.540.188.486.297.508.2]On her X terminal,
Jill
often runs applications from several of the computers. She can reach and use as many of these resources (Figure 2-6) as she wants:o
Database applications running on the minicomputer to reviewpatients' records and to maintain personnel files
o
A word processing application running on a workstation towrite reports and letters
o
A financial reporting application to keep track of her depart-ment's spending and plan the budgeto
A database on the minicomputer to collect the data she's usingin her long-term research project
o
A program on the supercomputer that she wrote to evaluateher research data
o
Clock, calendar, and mail programs running on a workstationLAN
Clock Mail Calculator Workstation
Mini-computer
Database Application
Super-computer
Research Program
X Terminal
Print Server
Financial Application
PC
Network Computing
On the X terminal display, the output from each process (such as
FrameMaker, owned by Frame Technology Corporation) that
Jill
accesses appears in a window, a discrete area of the display. (See Figure 2-7.)
[image:51.540.64.487.65.467.2].term
Figure 2-7 An X Display
Windows can overlap each other. The border area (called a frame) around each window is provided by a client called a window manager. (As mentioned previously, client is the standard word for an application written especially for X.)
Network Computing
The frame has window management tools built into it, such as pulldown menus and toggle buttons. Jill, the nursing
administrator, uses the tools to change windows' size, shape, and position. These tools may also provide ways to start and stop applications. (See Figure 2-8.)
Window menu button
Toggle buttons
Figure 2-8 A Window Manager's Window Frame
A Closer Look at X Software and Hardware
A Closer Look at X Software and Hardware
In this section we'll look more closely at the X system software and hardware that are involved in an X computing environment.
Characteristics of X
X gives the user many benefits, which are summarized in Table 2-1.
Table 2·1 Characteristics of X
Benefit Description
Distributed The network's processing power is distributed processing throughout the network as it is needed. You can
access any computer on the network using the X terminal's display, keyboard, and mouse.
Network The network is transparent. Regardless of where transparency on the network your application resides, it
appears to be running on your desktop instead of in another room or building.
Operating system The operating system is independent of the X independence software. You can display applications from
computers with different operating systems at the same time on your X terminal.
Computer host The type of computer host you are connected to transparency is not apparent from your X terminal. Regardless
of the computer host, the X software provides a consistent way to connect to it, start and stop applications, and manipulate windows.
Windows Each application directs its output to a separate window on your display screen. The window manager software gives each of the windows a frame that you can manipulate with a mouse or keyboard to direct the application's actions and change the appearance or location of the window.
[image:53.540.150.488.200.558.2]A Closer Look at X Software and Hardware
X Software Components
The X computing environment achieves the characteristics listed in Table 2-1 via three components:
o
X server software that controls the physical display and inputdevices (typically the mouse and the keyboard)
o
X clients that request that the X server perform operations onwindows
o
Communication channels implemented in software andhard-ware that are used by the clients and X server to exchange data and instructions
Figure 2-9 illustrates the relationships among the three components of the X system.
X Server Software
Communication Channel 1
..
..
..
..
Communication Channel 2
Communication Channel 3
Figure 2-9 X System Components
A Closer Look at X Software and Hardware
Servers
An X Server is one kind of server. A server refers to a program that
provides services over the network. Some of the NCDware servers and the services they provide are:
o
X server-connects X terminals to hosts or additional servicesin a local area network and controls the physical display and input devices (e.g., keyboard) on the user's desktop
o
Font Server-provides convenient application access to fonts,including scalable fonts (described further in "Font Utilities" on page 3-6)
o
XRemote server-runs X over a serial connection and isavailable on PROMs, PCMCIA cards, and downloaded from the host (described further in Chapter 8, Using the NCD XRemote Software)
The X server was developed at the Massachusetts Institute of Technology (MIT) in 1984. The most recent version, XU, was released in 1987. XU is industry-standard windowing software.
X server software performs actions such as creating and removing windows and placing text and graphics in them for client
programs that request them. Basic X server functions include:
o
Allowing clients access to the displayo
Interpreting network messageso
Passing user input to the appropriate clientso
Performing two-dimensional and three-dimensional drawing(graphics and text)
o
Maintaining complex data structures such as windows,cursors, and fonts
Clients
A Closer Look at X Software and Hardware
Many of the services provided by the X server are organized in the Console that appears when you press the Setup key.
Note Some NCO keyboards do not have a Setup key. See Table 4-2 for equivalent key combinations.
For example, when you want to connect to a host through a terminal emulator window, you open the Terminals menu in the Console and select New Terminal. The terminal host chooser appears on your screen displaying a list of the available hosts to connect to. If you want a Telnet session and you select an
appropriate host, the X server requests a login connection to the selected Telnet host.
The X server provides other services without any explicit action on your part. For example, when an application needs to display a font, the X server requests the font from the Font Server.
Clients are X application programs that request the X server to perform actions on the X display. Clients can run on a remote machine across a network or they can run as local clients on the X terminal processors. A small part of the client program is
dedicated to communication with the X server.
In addition to the X server software, most implementations of the X computing environment include programs to provide various utilities to the X system. Some examples are:
o
Display managers, which manage login processingo
Terminal emulators, which allow you to run programs that doA Closer Look at X Software and Hardware
Window Managers
A window manager is a special client that controls the appearance and operation of the frame that surrounds the application
windows. (See Figure 2-8.) By using the mouse or keyboard to manipulate the control devices available on the frame (such as scroll bars and toggle and selection buttons), the user controls the interaction and layout of the windows on the display. Often window managers supply a menu for starting new client applications.
Although the window manager dictates the appearance and utility of the frame surrounding the window, the application controls
what appears inside the frame of the window through its requests to the X server.
Several different window managers may be available, but only one window manager can run on a display at a time.
NCD supplies a local window manager, ncdwm, that runs on the
NCD X terminal with the X server. The local window manager is beneficial because its response is quicker than a host-based
window manager. (The next chapters describe ncdwm and the
concept of local clients, such as a local window manager, in detail.)
Other common window managers are listed in Table 2-2.
A Closer Look at X Software and Hardware
Table 2-2 Common Window Managers
Window Manager Description
mwm Included with the Open Software
Foundation/Motif (OSF /Motif) X software. Similar to ncdwm.
olwm Manages windows for Open Windows using Sun Microsystem's OPEN LOOK graphical user interface.
DECwindows Motif Based on OSF /Motif, it manages windows Window Manager for DECwindows applications. Digital's
latest user interface for an X environment.
twm Distributed by MIT with the standard X distribution.
For more information about using window managers, see
[image:58.540.167.490.93.307.2]A Closer Look at X Software and Hardware
Communication Channels
When the X server and clients converse across the network, they rely upon communication channels, the third component of the X system software.
Channels for communicating across computer networks are composed of software and hardware. The software and hardware are designed according to protocols (standard rules) for passing messages between different sorts of machines. Many layers of software and hardware protocols are used for a communications job, each one handling specific tasks involved in the
communication process.
When using X terminals, the most commonly used protocols for governing the routing of requests around the network are Transmission Control Protocol/Internet Protocol (TCP lIP) and DECnet. The most commonly used protocol for the physical transport of the requests is the Ethernet 802.3 LAN, which can support a variety of physical cable types. TCP lIP can also be used over the Token-Ring 802.5 LAN.
X Hardware Devices
Implementations of the X Consortium's XU server typically run on workstations and on X terminals. Workstations run the X server software and clients on their own processor. X terminal processors are dedicated to running the X server software alone.
Display devices are available in various sizes and qualities.
NCD X terminals and NCD software are described in detail in the next chapter.
3
Introducing X
with NCD
The NCD Family of X Terminals 3-1
NCDware 3-2
The X Server 3-2
NCD User Services 3-2
Local Window Manager and Companion Software 3-4
Local Terminal Emulator 3-5
Font Utilities 3-6
System Administration Utilities 3-6
Common X Clients 3-7
Online Help 3-7
Screen Dump Utilities 3-7
Convenience Utilities 3-8
Terminal Emulators 3-8
VT102 (xterm) 3-8
VT320 (ncdterm) 3-8
3270 3-8
Network Connectivity 3-10
LAN Connection 3-10
Interface Board Requirements 3-10 Communication Methods 3-11
Serial Connection 3-11
Parallel Connection 3-11
3
Introducing X
with NCO
This chapter introduces NeD's family of X terminals and X server software. If you want to know more about the details of your particular system, refer to these sources:
a
NCDware 3.2 Advanced User's Guide for UNIX Systemsa
NCDware 3.2 Advanced User's Guide for VMS Systemsa
Your system administratorThe NCD Family of X Terminals
Your NeD X terminal is part of a family designed to offer a range of features. NeD X terminals usually include:
a
A display monitor-receives the output from mostapplica-tions and makes it visible to the user
a
An X terminal base--contains the processors that run the NeDX server software
o
A keyboard and mouse-the input devices for your X terminalNCDware
NCDware
The X Server
NCDware, the X server software provided with your NCD X terminal, is an implementation of the X Consortium's XllR5 server that has been optimized for NCD hardware.
This section describes the NCD X server, client software, and networking software. It also includes information on how to find out about X-compatible application software available from other software vendors.
NCD's X server is available in the following methods:
o
Downloaded from a host when you turn on your X terminalo
Downloaded from a PCMCIA card in your NCD X terminal basewhen you turn on your X terminal
o
Installed as programmable read-only memory chips (PROMs)in your NCD X terminal base
Each server is optimized specifically for the intended hardware model, so you must use the server intended for your NCD X terminal model. NCD server optimizations enhance X's performance on NCD hardware.
NCO User Services
X provides the basic components of a graphical window system. It
is easiest to use, however, with the graphical user interface (GUI) that is included. A GUI is a set of applications and utilities that aid in the interaction between the user and the computer hardware and software. For example, a GUI can help in tasks such as setting up your system to your liking, managing the windows on the display, and connecting to hosts and applications.
NCDware
NCD User Services is a major component of the NCDware GUI.
They are a set of configuration and management tools that can be accessed through the Console that appears when you press the Setup key. (See Figure 3-1.)
Note Some NCD keyboards do not have a Setup key. See Table 4-2 for equivalent key combinations.
Figure 3-1 The Console
NCD User Services utilities can also be accessed through a remote configuration command language, used primarily by system administrators.
NCD User Services (the Console) provides access to a variety of NCD utilities that allow you and your system administrator to manage your X session, network access, and terminal
environment, including:
o
Customizing your environmento
Logging in and logging outo
Connecting to hosts and running applicationso
Running NCD utility programs, including the local windowmanager
o
Examining statistics that describe the performance of yourterminal and the network
NCD User Services includes local clients that run on the NCD X terminal. They are introduced in the following sections and
NCDware
Local Window Manager and Companion Software
The NCD window manager ncdwm and the companion program
ncdrunwm work together as window management and host/ application startup utilities.
Note If your work environment includes NCD X termi-nals running NCDware released before version 3.2,
ncdrunwm may invoke an older version of the com-panion program, ncdlaunchd. The functionality of
ncdlaunchd is similar to that of ncdrunwm.
ncdwm provides the window frames used to change the size and location of windows. The local window manager looks and functions like the aSF /Motif window manager, but, unlike the Motif window manager, it can run directly on the NCD X
terminal's processor instead of on a host computer on the network.
(ncdwm can also run as a host-based client.)
A major benefit of a local window manager is that it responds more quickly than host-based window managers to window operation requests. In addition, it also allows you to use the NCD X terminal in n.on-X environments.
The companion program ncdrunwm runs on the host computer
from which the X server is downloaded. ncdrunwm provides an
easy way to connect to other hosts, applications, and clients through a root menu. The root menu is a menu that appears when you click a mouse button while the pointer is on the root window. (See Figure 3-2.)
Hosts ->
Applications ->
Utilities ->
Games ->
Log Off ->
Figure 3-2 An Example of a Root Menu
Your system administrator can set up the root menu to offer the items you need. "Starting Clients" on page 7-4 describes the default root menu and how to use it.
NCDware Local Terminal Emulator
The NCD local terminal emulator is a client that allows you to connect to a host and run non-X programs. The local terminal emulator runs on the local processor on your NCD X terminal, instead of running on a host computer. It is beneficial because it
allows you to connect directly to non-X applications through windows that mimic the function and usage of a VT320 terminal, including support for color. The local terminal emulator can also reduce host processing and memory load.
You can have as many as 16 local terminal emulator windows open at once on your terminal, depending on available memory.
NCDware's local terminal emulators connect to hosts using the protocols listed in Table 3-1.
Table 3-1 Protocols Used to Connect to Hosts
Protocol Description
TELNET A Telnet connection using TCP lIP. TELNET is a simple remote terminal protocol.
LAT A Local Area Transport (LAT) connection to a host providing LAT services. LAT is a Digital Equipment Corporation (DEC) communica-tions protocol.
CTERM A Command Terminal Protocol (CTerm) connection to a host using DECnet/NCDnet. (An NCD terminal requires a license and an NCDnet address to participate on a DECnet network.)
[image:66.540.166.491.286.538.2]NCDware
Font Utilities
X terminals are configured to download fonts from a host by default. NCDware includes utilities for converting fonts to formats that NCD X terminals can use.
"Font Options" on page 6-39 describes how to add fonts to and delete them from your X terminal's font path.
The NCD Font Server, an enhanced version of the XllR5 font server designed and developed at NCD for the X Consortium, centralizes font management for all display types. It runs on any appropriate host on the network and provides scalable fonts so that the bitmaps for every font size do not need to be stored on the Font Server.
Note The NCD Font Server is described in detail in the
NCDware 3.2 Advanced User's Guide for UNIX Systems and NCDware 3.2 Advanced User's Guide for VMS Systems.
System Administration Utilities
NCDware includes a variety of utilities that simplify network administration through centralized management:
o
Centralized configuration utilitieso
Implementation of Simple Network Management Protocol(SNMP)
o
Remote reset utilityo
X Display Manager (XDM)These NCD User Services' features are designed for system administrators and advanced users.
Common X Clients
Common X Clients
Online Help
Many common X utility programs are part of the MIT Xll
distribution and, consequently, are part of NCDware. This section introduces some of the common clients.
The clients described in this section are commonly available to users whose servers are downloaded from hosts running the UNIX operating system. If your servers are downloaded from a VMS host, check with your system administrator to find out which applications and utilities are available to you.
For additional information about standard X utilities, see the X guides listed in "Additional Documents" on page vii.
The host-based xman program is a simple facility for access to system documentation, often called man pages (abbreviation for manual reader) in a UNIX environment.
In VMS environments, information on system commands is available through the VMS help facility and Bookreader files. Most of the NCDware 3.2 Advanced User's Guide for VMS Systems and man pages on NCO clients are included in the Bookreader files.
Screen Dump Utilities
xwd is a host-based utility for copying the contents of the display screen "into a file.
xwud is a utility for displaying the contents of a window dump file on the display.
xpr is a utility to format and print a file that was created with xwd.
Common X Clients
Convenience Utilities
Some standard host-based X utilities that provide a convenient work environment include:
o
xclock-A clock utility that can appear as analog or digitalo
xcalc-A calculator utilityo
xbiff-A utility that displays a mailbox on which thehighlighting changes and a flag goes up to announce new mail
The DECwindows client provides many of these utilities.
Terminal Emulators
NCDware allows you to use three terminal emulators. <