Access 2013 Plain & Simple
Sebastopol, California 95472
Copyright © 2013 by Andrew Couch
All rights reserved. No part of the contents of this book may be reproduced or transmitted in any form or by any means without the written permission of the publisher.
ISBN: 978-0-7356-6944-4
1 2 3 4 5 6 7 8 9 TI 8 7 6 5 4 3
Printed and bound in the United States of America.
Microsoft Press books are available through booksellers and distributors worldwide. If you need support related to this book, email Microsoft Press Book Support at [email protected]. Please tell us what you think of this book at http://www. microsoft.com/learning/booksurvey.
Microsoft and the trademarks listed at http://www.microsoft.com/about/legal/en/us/IntellectualProperty/Trademarks/EN-US. aspx are trademarks of the Microsoft group of companies. All other marks are property of their respective owners.
The example companies, organizations, products, domain names, email addresses, logos, people, places, and events depicted herein are fictitious. No association with any real company, organization, product, domain name, email address, logo, person, place, or event is intended or should be inferred.
This book expresses the author’s views and opinions. The information contained in this book is provided without any express, statutory, or implied warranties. Neither the authors, O’Reilly Media, Inc., Microsoft Corporation, nor its resellers, or distributors will be held liable for any damages caused or alleged to be caused either directly or indirectly by this book.
Acquisitions and Developmental Editor: Kenyon Brown Production Editor: Melanie Yarbrough
Editorial Production: Holly Bauer Technical Reviewer: Andrew Vickers Copyeditor: Richard Carey
Indexer: Bob Pfahler
Contents v
Contents
1
About this book . . . . 1What’s new in Access 2013? . . . .2
2
Creating a custom Web App . . . . 9Starting Access . . . .10
Creating a custom Web App . . . .11
Adding a table template . . . .12
Showing the navigation pane . . . .13
Adding a blank table . . . .14
Launching a Web App . . . .15
Working with the List view . . . .16
Working with the Datasheet view . . . .17
Working with a summary view . . . .18
Finding your site and navigating to the team site . . . .19
vi Contents
3
Importing from an Access desktop database . . . .22Changing the design of a table . . . .24
Creating a lookup/relationship . . . .26
Designing with a List Details view . . . .28
Designing with a Datasheet view . . . .30
Designing with a summary view . . . .32
Designing with a blank view . . . .34
Open, rename, duplicate, or delete a view . . . .36
Creating a query . . . .38
Modifying the Table Selector . . . .40
Working with reports . . . .42
4
Creating a desktop database . . . . 43Creating a blank desktop database . . . 44
Creating a table in design view . . . .46
Creating a table in layout view . . . .48
Working with data parts in layout view . . . .50
Creating a table by using application parts . . . .52
Adding a primary key . . . .54
Improving performance by indexing data . . . .55
Validate that data in a field is of the correct type . . . .56
Comparing field values by using table validation . . . .60
Formatting a field . . . .61
Contents vii
Deleting relationships . . . .67
Adding relationships . . . .68
5
Working with data in datasheets . . . . 71Changing Access database options . . . .72
Altering the presentation by ordering, hiding, and freezing fields . . . .74
Moving between records and using Find And Replace . . . .76
Sorting datasheet rows . . . .77
Filtering datasheet rows . . . .78
Filtering combinations of choices with Filter By Form . . . .80
Filtering combinations of choices with Advanced Filter/Sort . . . .82
Inserting and updating records . . . .83
Deleting records . . . 84
Creating summary data for records . . . .86
Displaying related information with a subdatasheet . . . .87
Adjusting column/row height and formatting . . . .88
Selecting data to copy and paste. . . .90
Displaying more information with the Zoom box . . . .92
viii Contents
6
Selecting all columns from a table. . . .96Selecting individual columns from one or more tables . . . .98
Joining tables to see unmatched or missing records . . . 100
Filtering by single and multiple combinations of choices . . . .102
Adding calculations with the expression builder . . . 104
Returning the top matched records . . . 106
Eliminating duplicate values . . . .107
Creating a summary calculation . . . 108
Prompting to filter data with parameters . . . 109
Creating a crosstab query with the Query Wizard . . . .110
Simplifying a problem with a query by using other queries . . . 112
Adding two sets of query results together . . . 113
Resolving ambiguous outer joins . . . .114
Creating an additional query to resolve a problem with mixed joins . . . .115
7
Modifying data using queries . . . . 117Creating a table by using a Make Table query . . . .118
Changing data in a table with an Update query . . . 120
Adding data to an existing table with an Append query . . . 122
Deleting data in tables with a Delete query . . . 123
Updating a column based on an expression . . . .124
Adding only new data that is not already in a table . . . 126
Contents ix
8
Creating a continuous form with the multiple items template . . . 130Creating a datasheet form with conditional formatting . . . 132
Creating a single record form with the Form Wizard . . . 134
Creating a split form . . . .135
Working with form views . . . 136
Working with control layouts . . . .137
Creating a parent/child form with the Form Wizard . . . 138
Altering link master and link child fields . . . 140
Controlling editing and data entry in a form . . . .141
Changing the data source for a form . . . .142
Organizing your database with navigation forms . . . 144
Adding fields to a form in design view . . . 146
Adding fields to a form in layout view . . . 148
Adding a subform to an existing form . . . 150
9
Using controls effectively . . . . 151Creating labels and text boxes . . . .152
Creating lines and rectangles . . . .153
Creating check boxes, option buttons, and toggle buttons . . . 154
Creating option groups . . . 156
Creating list boxes . . . 158
Creating combo boxes . . . 160
Creating hyperlinks . . . .162
x Contents
Creating attachments . . . 168
Creating web browser controls . . . .169
Working with tab controls. . . .170
Creating command buttons . . . .172
Setting control defaults . . . .173
Applying Office themes . . . .174
10
Preparing data to print using reports . . . . 175Creating a tabular report with multiple tables . . . .176
Altering the presentation of controls on a page . . . 180
Working with controls and sections . . . 182
Using the Can Grow and Can Shrink Properties . . . 184
Adding a running sum . . . 185
Managing data and page breaks . . . 186
Adding sorting and grouping on reports . . . 188
Avoiding blank pages . . . 190
Adding conditional formatting. . . .191
Creating a single record report with the Report Wizard . . . .192
Creating a parent/child report . . . 194
Using labels and managing columns and rows . . . 196
Contents xi
11
Importing data and objects from Access . . . 202Linking to data in Access . . . 204
Importing data from Excel . . . 206
Linking to data in Excel . . . 208
Refreshing linked tables when files are changed . . . 209
Importing data from text files using specifications . . . .210
Exporting data to Excel . . . .214
Working with saved imports and exports . . . .216
Exporting data as PDF documents . . . .218
12
Introducing the power of macros . . . . 219Enabling macro commands and disabling Trusted Documents . . . 220
Linking together forms . . . 222
Linking a form to a query . . . .224
Validating data entered in controls . . . 226
Making controls change other controls . . . 228
Processing data with action queries . . . 230
xii Contents
13
Compacting and repairing your database . . . 234Analyzing your database . . . 236
Protecting your data . . . 238
Viewing object dependencies . . . 240
Index . . . .241
In this section:
■ What’s new in Access 2013? ■ A quick overview
■ A few assumptions
■ About the sample database ■ Adapting task procedures for
touchscreens
■ A final word
About this book
1
T
his book provides a quick reference to specific techniques for working with Microsoft Access 2013 and guides you with clear pictures that you can easily follow to replicate the procedures described. Although the book is designed to be used without sample databases, enabling you to dip into each method without having progressed through previous steps, it does provide links from which you can download samples with the same data-set I have used to help you more closely follow the examples.Access 2013 is a real treat for those wanting to access and work coopera-tively on their data from different geographical locations, while still main-taining all the standard desktop capabilities for developing a local solution to complex business problems.
What’s new in Access 2013?
Access 2013 is a revolutionary step forward, and the chal-lenge in this book has been to offer you a fresh look at the desktop database (because that part of Access has not changed in this version), while also introducing you to the new Web App.
In writing the book, I decided to offer you the new Web App experience in the first two chapters, because when you start Access, the default choice is to create a database using a Web App.
For many years, Access users have been looking for a way to get their databases onto the web, and although Access has gone through several supportive technologies, such as Data Access Pages and, in Access 2010, Web Databases, this has only now matured to a point where we can see a great path ahead. It is my pleasure to give you the first glimpse of what this new technology promises.
A Web App is hosted either in a Microsoft Office 365 Plan (which includes Office 2013 Professional) or in your orga-nization’s Microsoft SharePoint 2013 Server running Access
Services, so to work through those sections in the book, you will need this facility. If you are unable to get involved with moving your database to the web, I am sure that many of the other topics will provide a stimulating and fresh look at Access.
When getting started in developing a Web App, you can either take advantage of built-in table templates or import existing data from familiar data sources.
A Web App addresses several important problems when it comes to developing a browser-based interface. The first problem is getting started, and here Access will create for you at least two browser views of your data for each table. The first is a list view, which displays a searchable list of
records linked to areas that then display both the detailed contents of the records and any related records. A Web App has a wonderfully natural drill-down capability to take you to related data. The second view is the datasheet. Access will automatically create one for you, and you can then add more datasheets for a table to provide additional views of your data. You will notice that I use the term view. You can think of a view as being the same as a form in desktop database technology.
Another key feature of a Web App is that when you need a drop-down list of choices, Access traditionally uses combo or list boxes, but these are very inefficient to use in a browser. The new AutoComplete control allows you to type informa-tion and then uses pattern matching to show a reduced list of related choices.
When you edit data in a Web App Datasheet view, you will have the same desktop experience of interacting with a list of data records on the desktop. However, when you work with other views, you will use the new Action Bar to edit and save your changes.
Other great new features in a Web App are the ability to summarize data, and the Web App’s ability to automatically provide a vertical table selector and horizontal view selector for navigating your data.
When you save data in a Web App on Office 365, the data behind the scenes is saved inside a SQL Azure database in the cloud, so you can exploit all the scalable technologies of the very latest in Microsoft online storage.
The following older features in Access have been removed from the latest version:
■ Access Data Projects (ADP) ■ Pivot charts and pivot tables ■ Replication
■ Upsizing Wizard ■ Source code control
■ Support for Access 97 databases
A quick overview
Microsoft Access 2013 Plain & Simple is divided into sections,
and each section has a specific focus with related tasks. To help you understand how to move around and use the book, I’ll now provide a quick overview of the book’s structure.
Section 2, “Creating a custom Web App,” introduces the idea of creating a Web App and navigating around the key components in the interface. Here you will see how the productivity of the desktop is transferred into creating a browser-based interface for your application.
In Section 3, “Modifying a Web App,” we delve a bit deeper under the hood and see how you can add to a custom Web App to create your own views of data, create queries, and use other techniques.
In Section 4, “Creating a desktop database,” we look at how to create a desktop database, and we cover creating tables and relationships, which are key to understanding best prac-tices when building a database.
In Section 5, “Working with data in datasheets” (datasheets are an often overlooked feature in Access), I provide a wide range of techniques for getting the most out of your datasheets.
In Section 6, “Selecting data using queries,” you’ll discover how queries lie at the heart of relational databases. They allow you to bring data together from tables and exploit calculations, parameterization, and many other features.
Section 11, “Exchanging data,” shows how Access allows you to both import and export data. For many applications, the ability to link dynamically to data in other systems makes Access a number-one choice for bringing together data from different systems and reporting on it.
In Section 12, “Introducing the power of macros,” you will discover a unique approach to automating operations and providing more sophistication to your application. In this section, I get you started with several key examples. In Section 7, “Modifying data using queries,” I demonstrate
both simple and more complicated updates to your data. Action queries offer you features that allow you to perform bulk updates on data.
In Section 8, “Improving presentations with forms,” we will explore a landscape of many more advanced presentation features. Forms also allow you to integrate and extend basic datasheet presentation features.
In Section 9, “Using controls effectively,” you will enhance your forms and get an understanding of the wealth of con-trols available in Access.
In Section 10, “Preparing data to print using reports,” you will discover a fantastically rich reporting tool, which will allow you to create everything from a simple data list to a complex invoice and then print the results.
I assume you either use computers at work or at home or both, that you have access to an Internet connection, and you have gone online at some time or other using one browser or another. Other than that, I try to give you all the steps you need to get things done in an easy-to-understand way, regardless of your technical background.
About the sample database
The tasks and procedures in the book use a sample data-base, provided by Microsoft Corporation, called the Desktop Northwind 2007 sample database. You can download a copy of this database from
http://office.microsoft.com/en-us/tem-plates/TC012289971033.aspx?pid=CT101428651033 to get
a dataset that is very similar to the one used in the book, or you can visit my website at
www.ascassociates.biz/Access-2013PandSExamples.aspx, where you’ll find the database and
completed examples.
Adapting task procedures for
touchscreens
In this book, I provide instructions based on traditional keyboard and mouse input methods. If you’re using Access on a touch-enabled device, you might be giving commands by tapping with your finger or with a stylus. If so, substitute a tapping action whenever I instruct you to click a user inter-face element. Also note that when I ask you to enter informa-tion in Access, you can do so by typing on a keyboard, by tapping in the entry field under discussion to display and use the on-screen keyboard, or even by speaking aloud, depend-ing on your computer setup and your personal preferences. In Section 13, “Administrating a database,” we look at
main-taining your database in good health and securing your data, together with a quick look at tools for improving the design of your database.
A few assumptions
In writing any book, authors must make a few assumptions about their readers. I assume that you are basically computer literate, meaning that you have used a computer before and know how to turn it on and power it off, how to use a mouse, and how to select text and objects. I also assume that you have worked with some kind of software before and know what a menu, dialog box, and tool button are. I do not assume that you have used a touch screen before because these are a relatively recent addition to computers.
A final word
Access 2013 is preparing the road ahead for productivity in deploying data to be shared over the web. I hope you will share my enthusiasm both for the new technology features in the product and for the solid approach to developing solu-tions on the desktop.
In this section:
■ Starting Access
■ Creating a custom Web App ■ Adding a table template ■ Showing the navigation pane ■ Adding a blank table
■ Launching a Web App ■ Working with the List view ■ Working with the Datasheet view ■ Working with a summary view ■ Finding your site and navigating to
the team site
■ Creating a Web App using a template
Creating a custom
Web App
2
W
hen you start Access, the first option you see is to create a custom Web App. This new type of application is hosted within SharePoint. It could be installed on-premise with your own company’s software, or you could choose to use Office 365.With a Web App, you get the familiarity of working in the Access environ-ment although the Web App is hosted either in a Microsoft Office 365 Plan (which includes Office 2013 Professional) or in your organization’s Microsoft SharePoint 2013 Server running Access Services, so you are creating an app that can be viewed in a browser without Access being installed on the machine. This section contains a number of key activities that you will perform in creating a custom Web App. You will need Access to design and modify your site, but other users can interact with the app using only their web browser.
Starting Access
On the Windows desktop, scrolling to the right reveals the Office 2013 products that you have installed on the machine. When you start an application, the application opens on the desktop.
If you are using an older version of Windows, such as Windows 7, click the Start button on the taskbar, and then click All Programs | Microsoft Office | Access 2013.
Start Access
1 On the desktop, scroll to the right. 2 Click Access 2013.
TIP When working on the desktop, if you point to the lower-left of your screen on the taskbar and click the miniatur-ized desktop Tile, you will quickly return to the Windows desktop, where you can start other applications.
1
2
Creating a custom Web App
Access 2013 allows you to create both desktop-based and Web App –based applications. The default choice is to create a custom Web App. In this section, we guide you through the steps to get you started with your first web application.
If you have subscribed to Office 365, you have obtained a domain name as part of setting up your account—for example,
mydomain. You will use that domain name when typing a web
location to create an Access Web App—for example, https://
mydomain.sharepoint.com.
Create a custom Web App
1 After starting Access, choose the Custom Web App. 2 Type the application name in the App Name text box.
3 Type the URL for your Office 365 domain in the Web Location text
box, or select your Team Site from the Available Locations list.
4 Click Create.
5 Sign in to your account. You can also select the Keep Me Signed
In check box, which will keep you signed in; otherwise, you will be prompted again to sign in later when launching the Web App.
CAUTION If you cannot get to this point, remember that you need to create the appropriate Office 365 account before you can use this new feature. Otherwise, when you enter your details, you will not reach step 5.
1
2
3
4
5
TIP You might already see a list of available locations. If you see any locations referring to Team Site, you can use these as an alternative to typing the URL by selecting the location name.
Adding a table template
When choosing a table template, you can type a noun repre-senting the kind of data that you need to store. Access then attempts to match this with one of a large number of common designs.
After a noun is matched and selected, one or more tables are added to your application. This is an extremely powerful way to get started because in addition to simply adding the tables, Access creates a set of views for interacting with the data and creates a menu system for navigating between the views.
Add a table template
1 Type a name for your table, and click the search symbol to see the
matches displayed.
2 Select a table from the available list.
3 Click a table in the Table Selector to display a list of available views
for the table.
4 Click any item in the View Selector to display the associated view.
CAUTION The term view can be a bit confusing if you are familiar with SQL Server. In Access client terminology, view has the same meaning as form, and a query is equivalent to a SQL Server
view. When you create a table template, Access will automatically generate at least two, and sometimes three, views (depending on the table). You will also find that lookups to link together your views have been automatically added to the selected tables, depending on the tables that have been created.
TIP Typing All and clicking the search symbol displays a list of all available templates. Take care as you scroll through the list because it is easy to click a table by mistake and thus unintentionally create the table. You will also find that sometimes when you select one table—for example, Orders—several other related tables are automati-cally created to assist you in building the database.
1
2
3
4
Showing the navigation pane
Similar to a desktop database application, a Web App provides a navigation pane, which groups your Access objects. This is simi-lar to the desktop database interface and can be filtered easily to help you locate a specific design object. This means that you can use design features from both the table in the Table Selector and the table contained in the navigation pane.
In the navigation pane, the views are listed under the heading Forms. This is because the terminology used in the navigation pane comes from desktop databases.
Show the navigation pane
1 Click the Settings/Actions charm in the Table Selector to see the
available options.
2 Click Navigation Pane on the Home tab of the ribbon. 3 Use the Search box to filter the results.
4 Right-click a table to see options similar to those available from the
Table Selector.
5 Click each view that is displayed for a specific table. These are
the different views of the table that Access has automatically constructed.
TIP If you select the Open shortcut on the Table Selector menu or select View Data from the options on the Table Selector, you can type data directly into your tables without the need
to display the views in a web browser. TIP After Access has automatically created views of your data, if you add new fields to the table, the views automatically change to include your new fields—a very powerful feature. But if you edit the views, this capability is lost. This balances the needs of people who want Access to control the layouts with those users who want finer control of the layouts.
CAUTIon If you click Edit, you will not change the table design, but you will change the design of the selected view. We will look at the View Layout features in Section 3, “Modifying a Web App.”
3
4
2
1
5
Adding a blank table
As an alternative to using a predefined table template for your Web App, you can create individual tables and then relate these tables by using lookups. Access allows you to either start with a completely empty Web App or add to an existing Web App you have created by using a template.
The first field in any table is created automatically; it is called ID. This is an AutoNumber field and cannot be removed because a Web App table needs a unique numeric field as a primary key.
When you add a new table (for example, Countries), Access automatically creates two views (for example, Countries List and
Countries Datasheet).
Add a blank table
1 Click Table from the Home tab of the ribbon. Then select Add A
New Blank Table.
2 Select an appropriate data type for each new field name.
3 Change any appropriate field properties. When you click any field
name, the lower area of the screen displays the properties for the field.
4 Click Save to save the table. 5 Type a table name, and click OK.
TIP Although the ID field cannot be removed, you can rename this field. For example, in a Customer table, you could rename the field ID to CustomerID if you think that this would help when you are working with the database structure, such as when designing queries.
1
4
2
3
5
Launching a Web App
When you are creating your Web App, you can modify and adjust what is contained in the application, but it is not until you launch the app that you can enter data and explore how to interact with the app through your web browser.
When you view your data in a browser, you can see the action bar, which enables you to add, delete, and save changes to your data. An exception is in the Datasheet view, where changes are recorded when you click onto a new record. Otherwise, you need to use the action bar to save changes to the record you are editing.
Launch a Web App
1 Click Launch App from the Home tab of the ribbon. 2 Click a table in which you want to enter data. 3 Type data in some of the available fields. 4 On the action bar, click to save your changes.
TIP The action bar on a view can be customized to contain up to 10 icons. It is often a good idea to hide rather than delete icons that you do not want to show because, if deleted, these built-in icons cannot be easily added back to the action bar.
1
2
4 3
Working with the List view
The List view is the first of three presentations of data shown for the selected table. The List view is split into two areas. The first area, called the list control, shows a simple tabular list of the records on the left side of the page, from which you can select
a specific record. The full details of that record are displayed in the second detail area, on the right side of the List view. As new records are added or removed, the list control area automati-cally updates when the changes in the detail area are saved.
Work with the List view
1 Click List.
2 Click the Edit button on the action bar.
3 Look for a field that displays the text Find. This is the new
Autocomplete control. (In our example, both the Customer and Employee choices are Autocomplete controls.)
4 As you type into an Autocomplete control, any matches are
dis-played. The control also has an <Add A New Item> option. Click this option.
5 After choosing to add a new item, type new data values. 6 Click the Save button on the action bar.
7 Close the window; your newly created record is now displayed as
having been selected in the Autocomplete control.
TIP In our example for the Orders view, below the main order you can see an area for displaying and entering order details. This uses another new control, called the Related Items Control (RELIC).
4
2
1
3
5
6
7
Working with the Datasheet view
The Datasheet view is the second of three presentations for data; this presentation provides a tabulation of the data and can be scrolled left to right.
When working with the Datasheet view to enter new data, you can start by typing into a blank row or by clicking the plus sign (+) on the action bar. To edit an existing row, type into a cell in the row. Records and changes are saved when you click a cell in another row.
The columns can be reordered and adjusted in width, and the rows can be sorted and filtered.
Work with the Datasheet view
1 Click Datasheet.
2 Type new data in a record. After you move out of the first field, the
record selector on the left changes to a pencil shape.
3 Click a cell in any other row to save your changes.
4 Point to a column heading until the mouse shape changes to a
cross. Click, hold, and drag the column to a new column position to reorder the column.
5 Click the drop-down arrow to display options for filtering and
sort-ing data.
TIP Although it might appear that you cannot filter by multiple choices, this is not the case. After making a selection and filtering the data (the value Couch in our example), when you redisplay the filtering options, a check box will appear against the current filter value. Making a second choice (Peterson) adds another filter value, and the data will then filter by both choices.
5
2
3
4
1
Working with a summary view
A summary view is the third way of presenting data. Summary views created by templates typically use By Group as the label in the view selector. Summary views allow you to view a tabulation of data by grouping on a particular field. You can also filter the grouping field to limit the displayed groups.
A summary view combines a list of values with the related item control, which tabulates the matched records. The view is read-only.
Work with a summary view
1 Find a suitable table that has a By Group view. Click By Group. 2 Type any filtering data to reduce the visible groups.
3 Click the search symbol, and then click a desired group to display
the members of the group.
4 In views created by templates, you can click the tabulated record to
display a popup window for a detailed record.
SEE ALSO We describe how to create summary views that summarize numerical data, displaying totals for your records, in Section 3, “Modifying a web app.”
2
1
3
4
Finding your site and navigating to the team site
Your team site contains all your Web Apps. If you start by launching your Web App, you can use the Navigate Up menu choice to get to the site, or you can get to the site from your main Office 365 Account area. On the left menu, the Recent choices will display a list of Recent items. Use the Site Contents to display all items on the site.
If you are using a different computer, where your copy of Access does not have your site located as a Recent item, you can go to Team Site – Site Contents and open your Web App in Access.
Find a site
1 Click Back To Site. 2 Click Site Contents.
3 Click the ellipse button (...) to display other options for an
application.
4 Close the options for the application, and click a Web App to
dis-play the application in the browser window.
5 Click Customize In Access.
6 Click Open to launch your Web App in Access, and answer OK
to any further security prompts to open the Web App on your desktop.
1
2
5
3
4
6
Creating a Web App using a template
Access has a number of application templates that you can use to create complete applications. When these templates start with a name beginning with Desktop, they generate desktop databases, and the other templates will generate Web Apps.
After you start Access, the initial screen shows a choice of both desktop and Web App database templates.
Create a Web App using a template
1 Click the appropriate template in the Office Start Screen. 2 Type a name for your Web App in the App Name text box. 3 Type your Office 365 URL in the Web Location text box, or select
from the Available Locations list.
4 Click Create.
1
2
4
3
In this section:
■ Importing from an Access desktop
database
■ Changing the design of a table ■ Creating a lookup/relationship ■ Designing with the List Details view,
the Datasheet view, the summary view, and the blank view
■ Open, rename, duplicate, or delete a
view
■ Creating a query
■ Modifying the Table Selector ■ Working with reports
Modifying a Web
App
3
I
n this section, we look at some of the common activities you might want to perform in modifying and adding to the standard features that are provided when you create a Web App.While a desktop database draws a distinction between lookup fields and creating relationships, a Web App merges the concepts of lookups and relationships. Therefore, you will not find any part of the Web App that can display relationships because they have been built into the process of creating a lookup.
6
5
3
4
Importing from an Access desktop database
If you have an existing Access Desktop database, you can import the tables and, optionally, the data from that database into a new Web App. The data can be imported from a variety of sources, including an Access desktop database.
Where possible, the process of importing data will also import relationships between your tables and convert these to look-ups. If you don’t have an appropriate database available to
investigate the techniques described in this section, you can refer to Section 1, “About this book,” for information about how to download the sample data that we have used in preparing this section of the book.
We start with a new custom Web App into which we will import existing data.
Import an Access database
1 Click Table on the Home tab of the ribbon. 2 On the Add Tables screen, click Access. 3 Click Browse.
4 Locate the Access desktop database file. (If you do not already have
an accessible database file, you will not be able to complete any further steps until you have installed or created one.)
5 Click Open. 6 Click OK.
2
1
(continued on next page)
Import an Access database
7 Select the tables to import, or click Select All.
8 Click Options to display further options when importing data. 9 Choose to import or exclude the relationships.
10 Choose to import either definitions only or definitions and data. 11 Click OK. During the import process, your existing relationships will
be converted into Lookup data types.
12 Right-click the table that has relationships to other tables, and
select Edit Table.
The relationship is now shown as a Lookup data type.
13 Close the table.
CAUTIon Data types such as Attachments or OLE Objects are not supported in a Web App and will be excluded from the import process.
11
10
9
7
8
12
13
(continued)Changing the design of a table
In Section 2, “Creating a custom Web App,” we demonstrate how the desktop interface can allow you to display content both by using the Table Selector and by showing the navigation pane. You can use either of these interfaces to enter design view and change the design of your table. Here we show how to enter design view from the table in the Table Selector. (If you prefer the navigation pane, right-click an object to see similar options.)
In Access 2013, the available data types for fields have changed, and the most obvious change is that a Text field is now called a Short Text field and a Memo field is called a Long Text field. However, there are some other differences between the avail-able data types in a Web App compared to a desktop database.
Change the design of a table
1 Right-click a table, and select Edit Table.
2 Click the Data Type drop-down arrow to see the available choices of
data types.
1
2
(continued on next page)Change the design of a table
The following table describes the data types that are available. For each data type, we show in parentheses the SQL Server data type that is used to store the data.
Data type Description (SQL Server data type)
Short Text Unicode Text field allowing a maximum of 4,000 characters (nvarchar(4000)). The default is 220 characters. Long Text Large amounts of text (corresponds to a nvarchar(max), 2^30–1 bytes in SQL Server 2012).
Number Whole number with no decimal places (int), Floating-point number (float), and Fixed-point number (decimal(28,6), six decimal places).
Date/Time Date (date), Time (time(3)), and Date with Time (datetime2(3)). Currency Money (decimal(28,6)).
Yes/No (bit) True, False (default is False). Hyperlink Large amount of text (nvarchar(max)).
Image Binary Image data (varbinary(max) 2^31-1 bytes in SQL Server 2012). Calculated Calculated field using SQL Server functions. Storage depends on expression. Lookup Creates a foreign key lookup. (Lookup foreign key stored as integer (int)).
(continued)
TIP Behind the scenes in Office 365, your data is stored in Microsoft SQL Server for a corporate solution or using Micro-soft SQL Azure in conjunction with Office 365. SQL Server is similar to Access in being a relational database but it is more scalable (so it can handle more data that the normal Access Database), and SQL Azure is a version of SQL Server that it is the platform that Microsoft use to deliver data on the web. We only explain the underlying SQL Server data types here for reference; you don’t need to learn anything new to use this.
Creating a lookup/relationship
A Web App allows you to create a lookup, which ties or relates data between tables. (The relationship concept is described in Section 4, “Creating a desktop database,” for a desktop database.) The Web App does not have a separate area for viewing relation-ships. You can view them for individual tables by selecting Modify Lookups in the Table Tools group on the Design tab.
A Web App simplifies the design process by keeping you focused on creating lookups between tables. The terms
relation-ship and lookup mean the same thing in a Web App, and in the
popup window used to create the lookup, you will see options similar to those available for creating relationships in a desktop database.
Create a lookup
1 On a blank line in the Field Name column, type a name for the
lookup.
2 In the Data Type column, select the Lookup data type. 3 Select the option to look up data from a table or query. 4 Select the table from which you want to get a value. 5 Select the field to display.
6 Choose how the related records are managed. 7 Click OK.
TIP The lower part of the Lookup Wizard screen displays the optional rules for defining a relationship between the tables.
1
2
7
3
4
5
6
(continued on next page)Create a lookup
8 Click Save. 9 Click View.
10 When viewing the data, you can see the Autocomplete control
displaying the lookup data.
11 In the browser, you can type data into the new field that was
auto-matically added to the List Details view.
TIP If you have not changed the design of any views associ-ated with your table, the added field automatically displays in the updated List Details view and Datasheet view for the table.
(continued)
10
11
9
8
Designing with a List Details view
A view in a Web App is similar to a form in a desktop database. There are four types of views; List Details, Datasheet, Summary, and Blank. The List Details view is a powerful feature. In its simplest form, it has a vertical tabulation of the available records on the left side of the view, and when a record is selected, the record details are displayed on the right side of the view.
The layout capabilities of this view mean that as you delete, add, or move fields, the layout automatically moves other fields to accommodate the position of the new fields, simplifying the process of altering the view. The Record Source field (where the view gets the data) allows you to choose from the table or any queries that include the table.
Create a List Details view
1 Locate the object in the Table Selector. 2 Click the plus sign.
3 Type a name for the view, select List Details as the view type, and
select the record source.
4 Click Add New View.
5 When the new view is displayed, click Edit.
TIP In the lower part of a view, you may have a related item control (Orders in our example). To resize the control, click to select it (it will change color when selected); you can then grab the top edge of the control (the mouse shape will change when hovering over the edge) and resize the control.
1
2
3
4
5
Remove fields
1 Click a field.
2 Hold down the Ctrl key to select multiple fields and labels. Press the
Delete key to remove the fields.
3 Select any other fields to be repositioned, and drag the fields to
close up white space.
TIP By using the Ctrl key, you can select multiple controls and move them around the layout. After selecting the controls, move the mouse over the area until a crossing arrows symbol is displayed, and then click the left mouse button and drag the controls to a new position. As you move the controls around, other controls will change position, opening up a gap into which you can position the new controls.
1
2
3
CAUTIon Although you can select multiple fields in the Field List, when you use the dragging action to add the fields, only the first field will be added.
3
2
1
Add fields
1 Select a field from the Field List on the right side. 2 Drag the field to a new position on the display area.
3 As you move over other fields, they will make space to allow the
new control to be positioned.
Designing with a Datasheet view
A Datasheet view is the simplest view to create. This view tabu-lates the data and displays your fields as columns. Although it is extremely simple, when combined with the abilities to filter data, sort data, and reorder the columns, it is a very powerful method to quickly present a tabulation of your data.
In a List Details view, before you can edit data, you need to use the action bar to put the record into edit mode. However, in the Datasheet view, you can edit data without doing this and move
to the next record to continue editing another record, which automatically saves the changes from the previously edited row. This is a unique and very powerful feature of a Web App datasheet.
The Record Source property (where the view gets the data) allows you to choose from the table or any queries that include the table.
Create a Datasheet view
1 Locate the table in the Table Selector. 2 Click the plus sign.
3 Type a name for the view, select Datasheet as the view type, and
select the record source.
4 Click Add New View.
5 When the new view is displayed, click Edit.
1
2
3
4
5
Format a field
1 Click a field to format. 2 Click the formatting charm. 3 Change the formatting.
TIP You can delete fields by pressing the Delete key. You can select multiple fields and move them as a group by using the Ctrl key, and add new fields by using the Field List.
1
2
3
Create a summary view
1 Locate the object in the Table Selector. 2 Click the plus sign.
3 Type a name for the view, select Summary as the view type, and
select the record source.
4 Click Add New View.
5 When the new view is displayed, click Edit.
Designing with a summary view
A summary view allows you to summarize data by calculating a sum or average. You need to choose a table or query with numerical fields before you can work with many of the best features in this type of view.
The Record Source field (where the view gets the data) allows you to choose from the table or any queries that include the table.
If you have been creating tables by using templates, you might already have seen examples of a summary view, which would appear as a third available view on some of the tables. When you create your own tables, a Web App will automatically create a List view and a Datasheet view.
1
4
3
2
5
(continued on next page)Create a summary view
6 Click the control list shown on the left. 7 Click the Data charm next to the list control.
8 In the Data popup window, choose the field to group by, type a
header for the calculation, and choose the field and calculation type.
9 Close the Data popup window. 10 Click the details area on the right.
11 Click the Data charm next to the details area. 12 Define the fields to summarize.
13 When displaying a summary view in a browser, click each record in
the control list on the left to see the summary details on the right change to match the selected record.
CAUTIon After you have closed any Data popup windows, you will see the fields and summary options displayed on the control list, but in the detail section on the right, you will not see any information displayed. You might be unsure about whether you have defined any choices in this detail section, so to check this, you need to redisplay the Data popup window.
7
9
8
6
12
10
11
13
(continued)Create a blank view
1 Locate the object in the Table Selector. 2 Click the plus sign.
3 Type a name for the view, select Blank as the view type, and then
select the record source.
4 Click Add New View.
5 When the new view is displayed, click Edit. 6 Click the Data icon.
7 Change the record source. 8 Close the Data popup window.
Designing with a blank view
A blank view will create a presentation that does not display any fields from the table. This can give you a greater amount of control over what data is displayed, although it might involve more work in creating the view.
Normally, a view displays information from the table associated with the selected table and related tables, but you can add a view that displays information from an unrelated table. In this
example, we will add to the Products table View Selector a view that allows you to browse through the Category records but not display any associated record from the Products table.
1
2
3
4
5
7
8
6
(continued on next page)Create a blank view
9 In the Field List, select a field. 10 Drag the field onto the blank view.
11 After you have saved the changes, the View Selector for the table
has a view that displays information from another table without involving the table associated with the selected table name caption in the View Selector.
(continued)
10
9
11
Change a table design when editing a view
1 Click the Settings/Actions charm. 2 Select Edit.
3 If you are editing a view and displaying the Field List, you will see
a link to edit the design of the table. Click the Edit Table option to change the design of the table.
TIP If you switch to design view on the table, you will find that you need to close any open views before you can save any changes that you make to the table.
1
2
3
open, rename, duplicate, or delete a view
When you display a view in Access, you can use the Settings/ Actions charm next to the view name to perform basic opera-tions on the view. The opopera-tions are Open In Browser, Edit, Rename, Duplicate, and Delete.
When you choose Open In Browser, the view immediately dis-plays in the browser window, saving you from having to locate
the table and then select the view. The Rename option allows you to change the name of the view, the Duplicate option makes a copy of a view, and the Delete option removes the view.
This task will demonstrate how, when editing a view, you can switch to the table design and modify the structure of the table.
(continued on next page)
Change a table design when
editing a view
(continued)4 Add a new field name.
5 Click Save. (You will not be able to save changes until you close any
open views that refer to this table.)
6 Click the tab with the open view.
7 Close the view. If you now repeat step 5, you can save the changes
to the design of the table.
4
5
6
7
Create a query
1 Click Advanced on the Home tab of the ribbon. 2 Select Query.
3 From the Show Table Dialog box, select one or more queries or
tables from the Show Table dialog box by double-clicking each table.
4 Click Close when you have finished making selections.
Creating a query
A query provides a powerful mechanism for filtering and sort-ing data. It can also be used to brsort-ing together data from several tables or other queries in a single presentation.
Like a table, a query can be opened to display data in the design interface without showing the results in the browser. To display the results in the browser, you need to create a view that uses the query.
In Section 7, “Modifying data using queries,” we describe how you can create action queries that modify data in a desktop database—for example, updating a set of rows. These action queries are not available in a Web App.
1 2
4
3
(continued on next page)Create a query
5 Add the fields from the source data into the query grid by
double-clicking each field listed in the table.
6 Click Save.
7 Type a name for the query, and click OK to save it. 8 Click View.
9 Select Datasheet View to test the query.
SEE ALSo For a detailed explanation of how to construct select queries, see Section 6, “Selecting data using queries.”
7
5
6
8
9
(continued)Modify the Table Selector to hide or show a
table
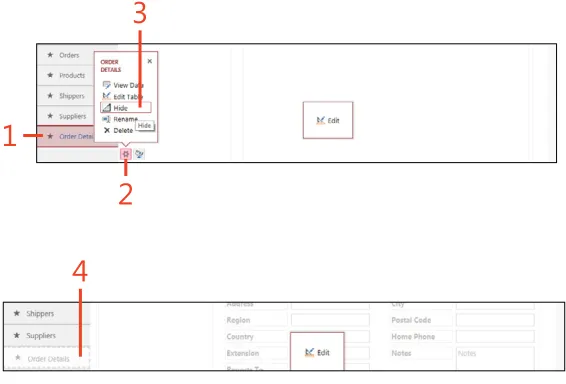
1 Click the table in the Table Selector. 2 Click the Settings/Actions charm. 3 Select Hide.
4 The table name caption in the Table Selector is now grayed out.
Modifying the Table Selector
In a Web App, you interact with the data by selecting a table from the Table Selector and then selecting an available view associated with the table from a list of available views, called the View Selector.
Each table in the Table Selector can be modified to rename captions or hide a table caption without affecting the underly-ing table. This means that the Table Selector works like a main menu for the application, and the View Selector works like a submenu.
[image:54.657.320.603.149.341.2]TIP After you hide a table, the table name caption will be grayed out and moved to the bottom of the Table Selector. The table name caption will be hidden when you are viewing results in a browser.
2
1
3
4
CAUTIon If an item is deleted, the underlying table will also be deleted.
Change a table icon
1 Click the formatting charm.
2 Choose an icon for the Table Selector item.
TIP When you change a table name caption, it does not change the name of the actual table but instead changes only the table name displayed on the Table Selector.
2
1
Create a report database
1 On the File menu, select the Info option and then click Create
Reports.
2 Choose a location, and provide a name for the reporting database. 3 Click Save.
4 The new reporting database opens, and on the left, you can see a
list of the tables that are linked to your Web App. Double-click a table in the navigation pane to display the data.
Working with reports
Although a Web App does not have a reporting feature that can be displayed in a browser window, you can create reports as described in Section 10, “Preparing data to print using reports,” in a desktop database that is linked to the data held in the Web App.
The first step is to use the Info option on the File menu to create a desktop database that is connected to your data.
4
1
2
3
In this section:
■ Creating a blank desktop database ■ Creating a table in design and layout
views
■ Working with data parts in layout
view
■ Creating a table by using application
parts
■ Adding a primary key
■ Improving performance by indexing
data
■ Validating data in a field ■ Formatting a field
■ Recording changes to text and rich
text formatting
■ Creating relationships by using the
Lookup Wizard
■ Viewing and adding relationships
Creating a desktop
database
4
A
desktop database uses tables to hold your data and is stored on your local computer or network. The data is displayed in rows (horizontal layout), with each row including a list of column or field names (vertical layout) like a worksheet. Using database tables differs from using several worksheets in a workbook. Generally, you will find it more natural and beneficial to create additional tables than to create more worksheets. Also, the rules for data consistency in any column are more strictly enforced in a database, which helps you to improve the quality of the data that you are recording.Each field in the table can be of a different data type, depending on the data to be held. Storing data in the correct field type is important because you can take advantage of special features in the database—for example, displaying a date picker when working with date data, or validating that sensible data is being entered for the chosen field type, or relating the data in one table to a list of values in another table.
Creating a blank desktop database
After starting Access as described at the beginning of Section 2, “Creating a custom Web App,” you can use one of the avail-able template databases, or you can create a blank database as described in this section.
Access offers you the flexibility to use templates of commonly encountered database structures or to start with an empty data-base into which you can either import existing data or create a solution tailored to your specific needs.
Create a blank desktop database
1 Click Blank Desktop Database. 2 Type a name for your database.
3 Select a file location in which to save the database. 4 Click Create.
5 When the new blank database opens in layout view (described later
in this section), you will see that Access has created a table called Table1. At this point, we can close this table without saving any changes to the new table. Click the Close button to close the table.
TIP The templates for a desktop application all begin with the word desktop, and you can scroll down the list of templates to see these. Other templates are for creating a Web App.
1
4
2
3
5
The following table lists the available data types when you are adding fields to a table in a desktop database.
Data type Description
Short Text Text up to 255 characters. In earlier versions of Access, this data type was called Text.
Long Text Large amounts of text, up to 65,536 characters. In ear-lier versions of Access, this data type was called Memo. Number Field Size property provides for Byte, Integer, Long
Integer (default), Single, Double, Replication ID, Decimal.
Date/Time Date and Time field. Currency Currency field.
AutoNumber Sequential Automatic Number, Long Integer (default). Yes/No True/False (default is False).
OLE Object Can hold images or other documents.
Hyperlink Hyperlink to the Internet and local documents. Attachment Allows multiple documents to be saved. Calculated Calculated field.
Lookup Creates a foreign key lookup. in reports
Create a table
1 Click the Create tab. 2 Click Table Design.
3 Type a name in the Field Name column for each field you want—for
example, Customername.
4 In the Data Type drop-down list, select a data type for each
field—for example, Short Text. (At the end of this exercise, a table describes the data types that are available.)
5 Click Save.
6 Provide a name for the table, and click OK.
(continued on next page)
2 1
3
4
6
5
TIP Designers sometimes begin table names with a prefix, such as tbl—for example, tblCustomers—to distinguish tables from queries (which are prefixed with qry) when both appear in one list. Having a naming convention is a good idea when you’re creating complex databases.
Creating a table in design view
Creating tables in design view gives you the greatest control over how the fields and properties are set, but it also involves more work than other techniques. Each field in the table design has a set of properties that you can safely leave at the default values. You can change these properties as you gain a deeper understanding of the product’s features.
A fantastic feature of Access is that the design view can always be used to modify an existing table structure, regardless of which technique you use to create the table.
7
(continued)TIP Because there are several different choices here for numbers, you might find it easiest to use a Long Integer for whole numbers and use a Double for numbers with decimal places.
TIP If you know which field(s) would make a good choice for a unique primary key, select the fields and click the primary key button. A primary key must be unique for each record in the table and cannot be null (blank). You can use more than one field to create a composite primary key, where each field doesn’t contain unique values, but the combination of fields will always be unique.
9
8
Create a table
7 If you have not created a primary key, you will be prompted to add
a key. Click Yes to add a primary key.
8 After saving your table, the new ID primary key is added to the
table.
9 The table now appears in the navigation pane.
Create a table
1 Click the Create tab. 2 Click Table.
3 Click the Click To Add drop-down list. 4 Select a data type.
5 Replace the default caption Field1 with a name for the field. 6 Click Save.
7 Provide a name for the table, and click OK.
TIP At this point, you will find it easier both to close the Field List pane on the right and to switch from the Table Tools tab to the Fields tab, which displays the full set of choices for setting properties on each field.
1
2
3 4
5
7
6
Creating a table in layout view
The layout view in Access can be used for tables, forms, and reports, and it enables you to make design changes without using the more complex design view. You can make changes and, at the same time, see how the design will finally look. In layout view, you have less control over detailed choices, but you have a faster and more intuitive interface through which to interact with the table.
In layout view, Access automatically adds a unique AutoNumber primary key, called ID, to your blank table design. After working in the layout view, you can always switch to the design view to refine your choices.
TIP One of the most common field data types to add is Short Text. The default field size is 255 characters (shown on the ribbon below Default Value). If you need only 20 characters, reducing the field size can help prevent you from accidentally storing more information than can be displayed—for example, when you have positioned a field on a form or report to be a specific size. Otherwise, do not worry about making it smaller just to save space.
5
4
3
1
2
Change field captions and descriptions
1 Click the Fields tab.
2 Click the ContactName field. 3 Click Name & Caption.
4 In the Enter Field Properties popup window, change the Caption
field to Contact Name, and for the Description type name of
com-pany contact.
5 Click OK. The title for the column is now displayed with a space via
the Caption property, and the description will be displayed on the lower left on the status bar.
Add a data part
1 With a table open in layout view (for the Customers table in our
example), click the Click To Add box at the right of the datasheet. The cursor will then be positioned to add the new fields at the end of the datasheet.
2 Click the Fields tab. 3 Click More Fields.
4 Scroll down the list of available fields, and click the Address field. 5 The new fields are automatically added to the design of the table.
5
4
2 1
3
Working with data parts in layout view
Data parts, which are shown in layout view in the More Fields drop-down list, allow you to quickly add one or more fields to a table from a list of prepared fields. For example, adding an Address will add the fields Address, City, StateProvince, ZipPost, and CountryRegion to your table.
You can also select any number of existing fields that you have added to a table, and add them to this list of data parts so that you can easily add those fields to another table.
4
3
2 1
5
6
7
8
9
10
Create a new data part
1 With the table in layout view, click the titles of one or more fields.
(If necessary, you can use the Shift key to select multiple fields that are next to each other.)
2 Click the Fields tab. 3 Click More Fields.
4 Scroll to the bottom of the list, and select Save Selection As New
Data Type.
5 Type a name for the data type. 6 Type a description for the data type.
7 Select a category in which to display the data type. 8 Click OK.
9 In the message that appears, noting where your new data type has
been saved in the file system, click OK.
10 If you click More Fields again, you can see that your new data type
has been added to the list of available data types. You can now add this new data type to a different table by following the steps described in the preceding exercise, “Add a data part,” on page 50.
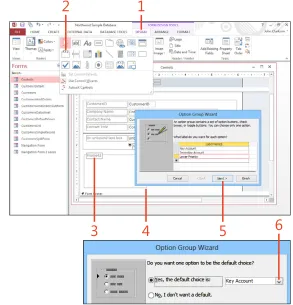
Add an application part
1 Click the Create tab. 2 Click Application Parts. 3 Select an application part.
4 In the Create Relationship popup window, select the table to relate
this part to, if one is available, and click Next.
(continued on next page)
CAUTION If you decide to use a primary key, such as an ID, rather than, for example, the contact name, you will need to later use the table design view to adjust your lookup field width because the drop-down lookup box has 0 width when it is a numeric key field.
4
3
2
1
Creating a table by using application parts
Application parts are predefined templates for creating popular layouts by using different Access objects. Depending on the part you select, you could have a series of steps that further integrate the chosen part with your application. These parts can enable you to add a great new feature to your database with minimum effort, although the choices for tables here are quite limited.
Choosing an application part can add several objects into your database, including supporting forms and reports.
7
5
6
8
9
TIP Access supports lookups that can store multiple values.