Selections by Dominique D. Guinard
and Vlad M. Trifa
Manning Author Picks
Copyright 2016 Manning Publications
www.manning.com. The publisher offers discounts on these books when ordered in quantity.
For more information, please contact
Special Sales Department Manning Publications Co. 20 Baldwin Road
PO Box 761
Shelter Island, NY 11964 Email: [email protected]
©2016 by Manning Publications Co. All rights reserved.
No part of this publication may be reproduced, stored in a retrieval system, or transmitted, in any form or by means electronic, mechanical, photocopying, or otherwise, without prior written permission of the publisher.
Many of the designations used by manufacturers and sellers to distinguish their products are claimed as trademarks. Where those designations appear in the book, and Manning
Publications was aware of a trademark claim, the designations have been printed in initial caps or all caps.
Recognizing the importance of preserving what has been written, it is Manning’s policy to have the books we publish printed on acid-free paper, and we exert our best efforts to that end. Recognizing also our responsibility to conserve the resources of our planet, Manning books are printed on paper that is at least 15 percent recycled and processed without the use of elemental chlorine.
Manning Publications Co. 20 Baldwin Road Technical PO Box 761
Shelter Island, NY 11964
Cover designer: Leslie Haimes
ISBN 9781617294006
iii
contents
introduction iv
THE ACCESS LAYER
1
Hello, World Wide Web of Things
Chapter 2 from Building the Web of Things
2
Getting data from clients: data ingestion
Chapter 2 from Streaming Data: Designing the real-time pipeline
34
THE FIND LAYER
59
Enhancing results from search engines
Chapter 6 from Linked Data: Structured Data on the Web
60
THE SHARE LAYER
93
Security
Chapter 10 from Express in Action: Node applications with Express
and its companion tools
94
THE COMPOSE LAYER
116
Example: NYC taxi data
Chapter 6 from Real-World Machine Learning
118
Big data visualization
Chapter 11 from D3.js in Action
134
iv
introduction
This collection of chapters examines one of most important new waves in computing: the Internet of Things (IoT)! Capturing the essence of the IoT in one sentence is nearly impossible. It has become such a hot topic that there are no clear boundaries between what the IoT is and what it isn’t. Broadly speaking, the IoT vision is of a world where the internet is much more than the bunch of multimedia content it is today— where it extends into the physical, real-time world using a myriad of tiny computers. The simplest definition we can offer is the following: The Internet of Things is a sys-tem of physical objects that can be discovered, monitored, controlled, or interacted with by electronic devices that communicate over various networking interfaces and eventually can be connected to the wider internet.
layer out there, why shouldn’t we reuse it for the IoT? This is what we call the Web of Things!
The concept of the Web of Things (WoT) is fairly straightforward: it explores how we can re-use the goodness of the web to make these tiny computers talk together and push their data to places where it can be leveraged to build truly ground-breaking applications! To better grasp the different technologies that can be involved in mak-ing the IoT an integral part of the web, in our book Building the Web of Things, we cre-ate four layers for the WoT architecture: Access, Find, Share & Secure, and Compose (see figure 1). Each layer solves a set of problems using web technologies for the layer above it. For example, the Access layer is all about creating web APIs for Things, while the Find layer assumes these APIs exist and deals with making them discoverable and findable on the web.
This architecture probably makes Building the Web of Things the first comprehensive toolbox for building the WoT. However, each layer could entail an entire book of its own! That's what this collection of chapters is all about. We've borrowed chapters from other great Manning books that are spot-on when it comes to illustrating our WoT architecture and building the application layer of the IoT!
Layer 4: Compose Layer 3: Share Layer 2: Find Layer 1: Access Networked things IFTTT Node-RED Physical mashups Systems integration Automated UI generation WoT-a-Mashup Web applications 6LoWPAN Beacons NFC Thread
QR Bluetooth ZigBee
JSON
WebSockets Gateway
Proxy
HTML REST API
Webhooks HTTP
URI/URL MQTT CoAP
Web Thing Model Search engines
Schema.org Link header
REST Crawler JSON-LD
mDNS Semantic Web RDFa HATEOAS Linked Data API tokens OAuth Social WoT Social networks PKI DTLS JWT TLS Delegated authentication Encryption
A chapter from Streaming Data: Designing the real-time pipeline by Andrew G. Psaltis builds on the Access layer by looking into data collection, patterns, and protecting from data loss.
Linked Data: Structured data on the Web by David Wood, Marsha Zaidman, Luke Ruth, and Michael Hausenblas takes you into the Find layer with an in-depth look at Resource Description Framework in Attributes.
In the Share layer, we delve into keeping code bug-free, dealing with attacks, and auditing code with a chapter from Express in Action: Node applications with Express and its companion tools by Evan M. Hahn.
T
he Access layer is the most fundamental because it looks into the way Things can be connected to the web by offering a web API. This layer is responsi-ble for turning any Thing into a programmaresponsi-ble web Thing that other devices and applications can easily talk to. The core idea of this level is simple: how can Things be smoothly integrated into the web by exposing their services through aRESTful API using HTTP, built on top of TCP/IP as well as the JSON data format. The Access layer also describes how to use WebSockets to accommodate the fact that a number of IoT use cases are real-time or event-driven. Because not all Things will be able to speak web protocols or even be connected to the internet, the Access layer also looks into the web integration of non-web and non-internet Things using several integration patterns such as gateways.
To better illustrate why bringing Things to the web is really powerful, we picked the chapter "Hello, World Wide Web of Things" from Building the Web of Things. In this chapter, you’ll see how you can program applications using embedded devices with simple and powerful JavaScript code instead of having to use complex embedded programming!
2
by Dominique D. Guinard and Vlad M. Trifa
Hello, World Wide Web
of Things
Before we dive head first into the Web of Things architecture and show how to build it from scratch, we want to give you a taste of what the Web of Things looks like. This chapter is structured as a set of exercises where you’ll build tiny web applications that use data generated by a real device. Each exercise will be a smooth introduction to the many problems and technical issues that you’ll face when building web-connected devices and the applications around them.
In this chapter, you’ll have the opportunity to get your hands dirty and code some simple (and less simple) Web of Things applications. Oh, you don’t have a device yet? No problem; just use ours! To make it possible for you to do those exercises
This chapter covers
A sneak peek at the different levels of the Web of Things architecture
Accessing devices with HTTP, URLs, and browsers
Working with REST APIs to expose JSON data
Learning about the idea of semantics on the web
without having a real device nearby, we connected our own device to the web so you can connect to it from your computer. Of course, if you already have a device, you can also download the source code used in this chapter and run it on your own device. How to run the code on the device will be detailed later, in chapter 7.
2.1
Meet a Web of Things device
This chapter is organized as a series of short and sweet exercises that illustrate the var-ious difficulties and problems you’ll learn how to solve in the next chapters. Each exer-cise allows you to interact with an actual Web of Things device in our office that’s live 24/7. This will allow you to do the exercises without having a real device next to you.
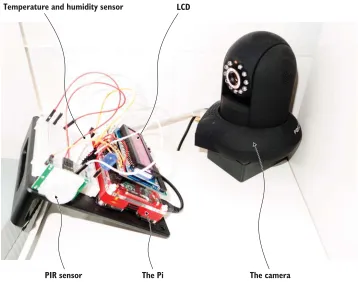
The device in our office is the Raspberry Pi 2 (or just Pi for friends and family) shown in figure 2.1, which we’ll describe in detail in chapter 4. If you’ve never seen one, you can simply think of a credit card–sized computer board with a few sensors attached to it and connected to our local network and the web via an Ethernet cable. In chapter 7, we’ll describe what gateways are in the Web of Things and help you build your own, but for now just imagine it’s a somewhat intelligent proxy or, in more detail, a server that abstracts the access to other servers, hiding some of the complexity to the clients, as shown in figure 2.2.
Temperature and humidity sensor
PIR sensor The Pi The camera
LCD
At the time of writing, we have a liquid crystal display (LCD), a camera, a temperature sensor, and a PIR sensor connected to our Raspberry Pi. We’ll keep adding various sensors and actuators to it over time, so you’re welcome to experiment and go well beyond the examples we provide here. You’ll soon realize that the various techniques and patterns described in this book will allow you to quickly extend and customize the examples we provide to any device, sensor, or object you can think of.
2.1.1 The suspect: Raspberry Pi
We’ll introduce the Raspberry Pi in greater detail in chapter 4, so all you need to understand for now is that a Pi is a small computer to which you can connect multiple sensors and accessories. It offers all the features you would expect from a desktop computer but with a lower power consumption and smaller form factor. Moreover, you can attach all sorts of digital and analog sensors or actuators to it using the input/output (I/O) pins. Actuator is an umbrella term for any element attached to a device that has an effect on the real world, for example, turning on/off some LEDs, displaying a text on an LCD panel, rotating an electric motor, unlocking a door, play-ing some music, and so on. In the Web of Thplay-ings, just as you send write requests to a web API using HTTP, you do the same to activate an actuator. Now back to our exer-cises. The first thing you need to do is to download the examples used in these pages from our repository here: http://book.webofthings.io.
You can check out the repository on your own computer, and you’ll find in it a few folders—one for each chapter. The exercises in this chapter are located in the folder chapter2-hello-wot/client. If you wonder about the code for the server, worry not! This is what you’ll learn how to build in the rest of the book.
Your HTTP client application
devices.webofthings.io/camera A Wi-Fi connected camera
Our office in London
devices.webofthings.io/pi/sensors/pir Passive infrared sensor
HTTP
Your house
devices.webofthings.io/pi
Raspberry Pi 2 with LCD and sensors
devices.webofthings.io/pi/sensors/temperature Temperature sensor
devices.webofthings.io Public URL of the Pi in our office
HTTP
2.2
Exercise 1—Browse a device on the Web of Things
We’ll start our exploration of the Web of Things with a simple exercise where you have almost nothing to do but click a few links. The first point we want to illustrate is that on the Web of Things, devices can easily offer simultaneously a visual user interface (web pages) to allow humans to control and interact with them and an application programming interface (API) to allow machines or applications to do the same.
2.2.1 Part 1—The web as user interface
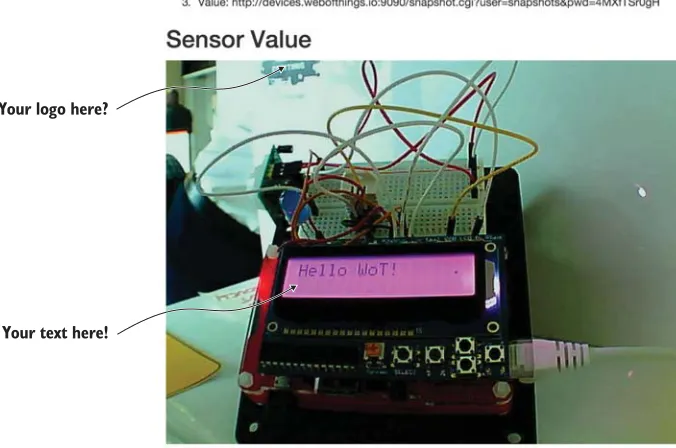
In this first exercise, you’ll simply use your browser to interact with some of the real Web of Things devices connected in our office. First, have a glimpse of what the setup in our office looks like through a webcam; see figure 2.3. Open the following link in your favorite browser to access the latest image taken by the web cam: http://devices .webofthings.io/camera/sensors/picture. This link will always return the latest screen-shot taken by our camera so you can see the devices you will play with (try it at night— at night it’s even more fun!). You won’t be seeing the camera itself though.
You probably noticed that the URL you typed had a certain path structure. Let’s play a bit with this structure and go back to the root of this URL, where you’ll see the homepage of the gateway that allows you to browse through the devices in our office (figure 2.4). Simply enter the following URL in your browser: http://devices.webofthings.io.
How to get the code examples in this chapter
We use the GitHuba service as a syncing server between our Pi and your computer.
As an alternative, the Bitbucketb service works and is configured in a similar manner.
Both services are based on the Git source version control system, and the source code for all the chapters is available from GitHub (here’s the link: http://book.webofthings.io). The examples for this chapter are located in the chapter2-hello-wot folder.
If you’re unfamiliar with Git and its commands, don’t worry: there are plenty of short descriptions on the web, but here are the most vital commands to work with it:
git clone—Fetches a version of a repository locally. For the book code you need to use the recursive option that will clone all the sub-projects as well: git clone https://github.com/webofthings/wot-book --recursive. git commit –a –m "your message"—Commits code changes locally. git push origin master—Pushes the last commits to the remote
reposi-tory (origin) on the master branch. can
a GitHub is a widely popular, web-based, source code management system. Many open source projects are hosted on GitHub, because, well, it’s pretty awesome. Here’s an excellent intro to GitHub: http://bit.ly/intro-git.
Your logo here?
Your text here!
Figure 2.3 The web page of the camera used in our setup. The image is a live screenshot taken by the camera.
The WoT Pi
This URL will always redirect you to the root page of the gateway running in our office, which shows the list of devices attached to it. Here, you can see that two devices are attached to the gateway:
A Raspberry Pi with various sensors and actuators
A webcam (the one you accessed earlier)
Note that this page is automatically generated based on which physical devices we have attached to it, so you might see a few more devices or sensors as we attach them. Yes, although it looks just like any other web page, it’s actually real data served in real time from real devices that are in a real office!
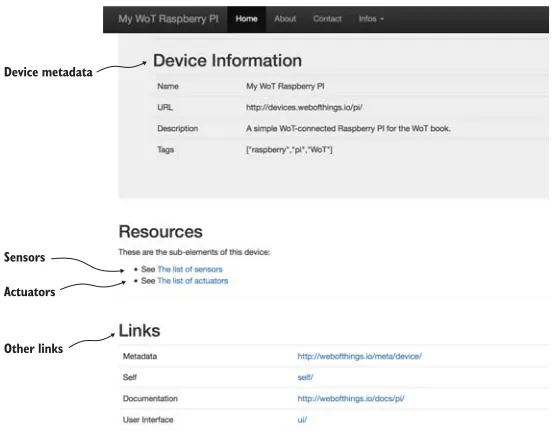
Now, click the My WoT Raspberry Pi link to access the root page of the device itself. Because you followed a link in your browser, you’ll see that the URL has changed to http://devices.webofthings.io/pi, as shown in figure 2.5.
This is another root page—the one of the device this time. In this case, we just appended /pi to the root URL of the gateway because this page is hosted on the gate-way. But it would have been equally simple to serve the root page directly from the Pi and allow you to access the Pi directly (say, using its public IP address). In this case, it would have been both impractical (because we want to make sure we scale and sup-port many concurrent users) and insecure (after all, the device is connected to the
LAN of our company office). Using a gateway (a simple software application) outside our private network solves both those problems without changing the experience from your point of view, because you’re still sending HTTP requests to a URL. Being
Other links Sensors
Actuators Device metadata
able to do this sort of thing is exactly the point of the Web of Things: leverage the tools and abstractions that work on the web and use them for physical objects!
Coming back to our device root page, hover with your mouse above the various links to see their structure, and then click The List of Sensors link. You’ll see the URL
change again to this (figure 2.6): http://devices.webofthings.io/pi/sensors.
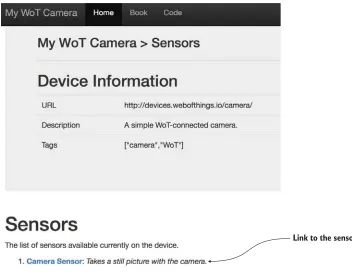
So far, it’s pretty straightforward: your browser is asking for an HTML page that shows the list of /sensors of the device /pi connected to the devices.webofthings.io gateway. Remember that there’s also a camera connected to this, so in your browser address bar replace pi with camera and you’ll be taken directly to the Sensors page of the cam-era: http://devices.webofthings.io/camera/sensors; see figure 2.7.
Now, go back to the list of sensors on your Pi and see the various sensors attached to the device. Currently, you can access three sensors: temperature, humidity, and pas-sive infrared. Open the Temperature Sensor link and you’ll see the temperature sen-sor page with the current value of the sensen-sor. Finally, just like you did for the sensen-sor, go to the actuators list of the Pi and open the Actuator Details page (screenshot in fig-ure 2.13), at the following URL: http://devices.webofthings.io/pi/actuators/display.
The display is a simple LCD screen attached to the Pi that can display some text, which you’ll use in exercise 2.4. You can see the information about this actuator, in particular the current value being displayed, the API description to send data to it, along with a form to display new data. You won’t use this form for now, but this is com-ing in section 2.4.
2.2.2 Part 2—The web as an API
In part 1, you started to interact with the Web of Things from your browser. You’ve seen how a human user can explore the various content offered by a device (sensors, actuators, and so on) and how to control it from a web page. All of that is done by browsing the resources of a physical device, just as you’d browse the various pages of a
Temperature sensor
website. But what if instead of a human user, you want a software application or another device to do the same thing, without having a human in the loop? How can you make it easy for any web client to find a device, understand what it does, see what its API looks like, determine what commands it can send, and so on?
Later in the book, we’ll show you in detail how to do this. For now, we’ll simply illustrate how the web makes it easy to support both humans and applications by show-ing you what a client application sees when it browses your device.
For this exercise, you’ll need to have Chrome installed and install one of our favor-ite browser extensions called Postman1 or use cURL2 if you’d rather use the command line. Postman is a handy little app that will help you a lot when working with a web
API, because it allows you to easily send HTTP requests and customize the various options of these requests, such as the headers, the payload, and much more. Postman will make your life easier throughout this book, so just go ahead and install it.
1 Get it here: http://www.getpostman.com/
2 cURL is a command-line tool that allows you to transfer data using various protocols, among which is HTTP.
If it’s not preinstalled on your machine, you can easily install it on Mac, Linux, or Windows. Website:
http://curl.haxx.se/
Link to the sensor
In part 1, your browser is simply a web client requesting content from the server. The browser automatically asks for the content to be in HTML format, which is returned by the server and then displayed by the browser.
In part 2, you’ll do almost the same exercise as in part 1 but this time by requesting the server to return JSON documents instead of an HTML page. JSON is pretty much the most successful data interchange format used on the internet. It has an easy-to-understand syntax and is lightweight, which makes it much more efficient to transmit when compared to its old parent, XML. In addition, JSON is easy for humans to read and write and also for machines to parse and generate, which makes it particularly suited to be the data exchange format of the Web of Things. The process of asking for a specific encoding is called content negotiation in the HTTP 1.1 specification and will be covered in detail in chapter 6.
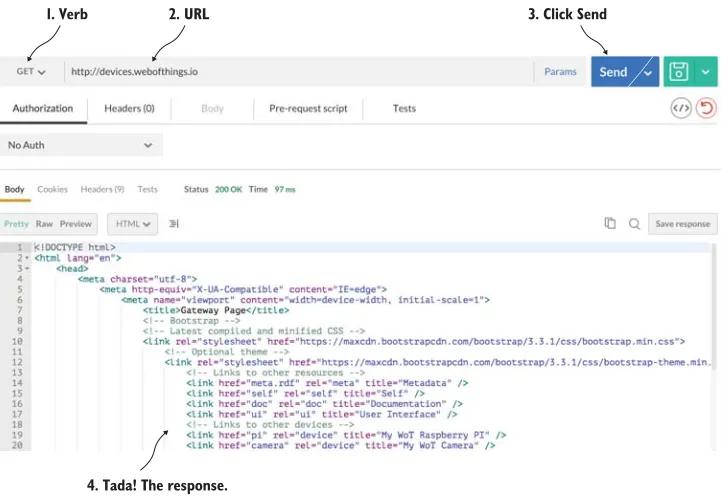
STEP 1—GETTINGTHELISTOFDEVICESFROMTHEGATEWAY
Just as you did before, you’ll send a GET request to the root page of the gateway to get the list of devices. For this just enter the URL of the gateway in Postman and click Send, as shown in figure 2.8.
Because most web servers return HTML by default, you’ll see in the body area the
HTML page content returned by the server (4). This is basically what happens behind the scenes each time you access a website from your browser. Now to get JSON instead
1. Verb 2. URL 3. Click Send
4. Tada! The response.
of HTML, click the Headers button and add a header named Accept with application /json in the value, and click Send again, as shown in figure 2.9. Adding this header to your request is simply telling the HTTP server, “Hey, if you can, please return me the results encoded in JSON.” Because this is supported by the gateway, you’ll now see the same content in JSON, which is the machine equivalent of that page with only the con-tent and no visual elements (that is, the HTML code).
The JSON body returned contains a machine-readable description of the devices attached to the gateway and looks like this:
{
"id": "1",
"name": "My WoT Raspberry Pi",
"description": "A simple WoT-connected Raspberry Pi for the WoT book.", "url": "http://devices.webofthings.io/pi/",
"currentStatus": "Live", "version": "v0.1", "tags": [
"raspberry", "pi", "WoT" ],
"resources": { "sensors": {
"url": "sensors/",
"name": "The list of sensors" },
"actuators": {
"url": "actuators/",
"name": "The list of actuators"
1. Toggle the headers 2. Ask for JSON
} },
"links": { "meta": {
"rel": "http://book.webofthings.io", "title": "Metadata"
}, "doc": { "rel":
"https://www.raspberrypi.org/products/raspberry-pi-2-model-b/", "title": "Documentation"
}, "ui": { "rel": ".",
"title": "User Interface" }
} }
In this JSON document, you can see there are two first-level elements (pi and camera) that represent the two devices attached to the gateway and a few details about them, such as their URL, name, ID, or description. Don’t worry for now if you don’t under-stand everything here; all of this will become crystal clear to you in a few chapters.
STEP 2—GETTINGASINGLEDEVICE
Now change the URL of the request in Postman to point to the Pi device (which is exactly the same as the one you typed in your browser in part 1), and click Send again, as shown in figure 2.10.
The body now contains the JSON object of the Pi except with the same information as shown previously, and you can see that the resources object has sensors, actuators, and so on:
"resources": { "sensors": {
"url": "sensors/",
"name": "The list of sensors" },
"actuators": {
"url": "actuators/",
"name": "The list of actuators" }
}
STEP 3—GETTINGTHELISTOFSENSORSONTHEDEVICE
To get to the list of sensors available on the device, just as you did before, simply append /sensors to the URL of the Pi in Postman and send the request again. An
HTTP GET there will return this JSON document in the response:
{
"temperature": {
"name": "Temperature Sensor",
"description": "A temperature sensor.", "type": "float",
"unit": "celsius", "value": 23.4,
"timestamp": "2015-10-04T14:39:17.240Z", "frequency": 5000
},
"humidity": {
"name": "Humidity Sensor",
"description": "A temperature sensor.", "type": "float",
"unit": "percent", "value": 38.9,
"timestamp": "2015-10-04T14:39:17.240Z", "frequency": 5000
}, "pir": {
"name": "Passive Infrared",
"description": "A passive infrared sensor. True when someone present.", "type": "boolean",
"value": true,
"timestamp": "2015-10-04T14:39:17.240Z", "gpio": 20
} }
You can see that the Pi has three sensors attached to it (respectively, temperature,
STEP 4—GETDETAILSOFASINGLESENSOR
Finally, you’ll get the details of a specific sensor, so simply append /temperature to the URL in Postman and click Send again. The URL should now be
http://devices.webofthings.io/pi/sensors/temperature, as shown in figure 2.11.
You’ll get more detailed information about that sensor, in particular the field value, which contains the latest value of the temperature sensor:
{
"value":22.4 }
You’ll now see additional details about this particular sensor, and among others you can see the latest value of the temperature sensor. If you only want this sensor value, you can append /value to the URL of the temperature sensor to retrieve it. This also works for the other sensors and actuators.
2.2.3 So what?
Now it’s time for you to play around with the different URLs you’ve seen so far in this exercise. Look at how they differ and are structured, browse around the device, and try to understand what data each sensor has, its format, and so on. As an extension look at the electronic devices around you—the appliances in your kitchen or the TV or sound system in your living room, the ordering system in the café, or the train notification sys-tem, depending on where you’re reading this book from. Now imagine how the ser-vices and data offered by all these deser-vices could all have a similar structure: URLs, content, paths, and so on. Try to map this system using the same JSON structure you’ve just seen, and write the URLs and JSON object that would be returned.
1. URL of the temperature sensor
2. Latest sensor value 3. Timestamp when the value was measured
What you have seen is that both humans and applications get data using exactly the same URL but using another encoding format (HTML for humans, JSON for appli-cations). Obviously, the data in both cases is identical, which makes it easy for applica-tion developers to go back and forth from one format to the other. A lot of what you’ve seen in this first part is linked to using HTTP and URLs as technologies to offer web services. You’ll explore and learn a lot more about how this can be used on devices in chapter 6 onward.
2.3
Exercise 2—Polling data from a WoT sensor
In the first exercise you learned about the structure of a WoT device and how it works. In particular, you saw that every element of the device is simply a resource with a unique URL that can be used by both people and applications to read and write data. Now you’re going to put a developer hat on and start coding your first web application that interacts with this Web of Things device.
2.3.1 Part 1—Polling the current sensor value
For this exercise, go to the folder you checked out from GitHub into the chapter2-hello-wot/client folder. Double-click the ex-2.1-polling-temp.html file to open it in a modern browser.1 This page simply displays the value of the temperature sensor on the Pi in our office and updates this value every five seconds by retrieving it in JSON, exactly as you saw in figure 2.11.
This file uses jQuery2 to poll data from the temperature sensor on our Pi. Now open this file in your favorite code editor and look at the source code. You’ll see two things there:
An <h2> tag showing where the current sensor value will be written.
A JavaScript function called doPoll() that reads the value from the Pi, displays it, and calls itself again five seconds later. This function is shown in the follow-ing listfollow-ing.
$(document).ready( function doPoll() {
$.getJSON('http://devices.webofthings.io/pi/sensors/temperature', function (data) {
console.log(data);
1 We fully tested our examples on Firefox (>41) and Chrome (>46) and suggest you install the latest version of
these. Safari (>9) should also work. If you really want to use Internet Explorer, please be aware that you’ll need version 10 onward; older versions won’t work.
2 jQuery is a handy JavaScript library that makes it easier to do lots of things, such as talk to REST APIs,
manip-ulate HTML elements, handle events, and so on. Learn more here: http://jquery.com/.
Listing 2.1 Polling for the temperature sensor
Wait until the page is loaded and then call doPoll()
Use the AJAX helper to get the JSON payload from the temperature sensor
$('#temp').html(data.value + ' ' + data.unit); setTimeout(doPoll, 5000);
}); });
When developing (and especially debugging!) web applications, it might be useful to display content from JavaScript outside the page; for this you have a JavaScript con-sole. To access it in Chrome, right-click somewhere on the page and select Inspect Ele-ment; then see the console view that displays below. The console.log(data)
statement displays the dataJSON object received from the server in this console.
2.3.2 Part 2—Polling and graphing sensor values
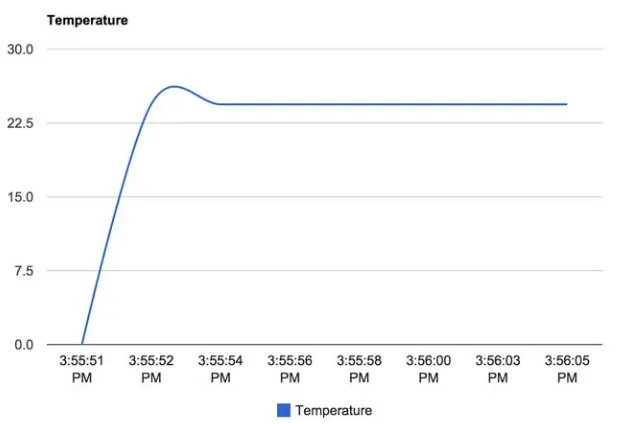
This is great, but in some cases you’d like to display more than just the current value of the sensor, for example, a graph of all readings in the last hour or week. So open the second HTML file in the exercises (ex-2.2-polling-temp-chart.html). This is a slightly more complex example that keeps track of the last 10 values of the temperature sensor and displays them in a graph. When you open this second file in your browser, you’ll see the graph being updated every two seconds, as shown in figure 2.12.
We built this graph using Google Charts,1 a nice and lightweight JavaScript library for displaying all sorts of charts and graphs. See our annotated code sample in the next listing.
1 https://developers.google.com/chart/
The doPoll() function sets a timer to call itself again in 5 seconds (5000 milliseconds)
Select the "temp" HTML element and update its content using the data.value (the value) and data.unit (the unit) returned in the JSON payload
$(document).ready(function () { var maxDataPoints = 10;
var chart = new google.visualization.LineChart($('#chart')[0]); var data = google.visualization.arrayToDataTable([
['Time', 'Temperature'], [getTime(), 0]
]);
var options = {
title: 'Temperature', curveType: 'function', animation: { duration: 1000, easing: 'in' },
legend: {position: 'bottom'} };
function addDataPoint(dataPoint) {
if (data.getNumberOfRows() > maxDataPoints) { data.removeRow(0);
}
data.addRow([getTime(), dataPoint.value]); chart.draw(data, options);
}
function getTime() { var d = new Date();
return d.toLocaleTimeString(); }
function doPoll() {
$.getJSON('http://devices.webofthings.io/pi/sensors/temperature/value', function (result) {
addDataPoint(result); setTimeout(doPoll, 2000); }); } doPoll(); });
2.3.3 Part 3—Real-time data updates
In the previous exercises, polling the temperature sensor of the Pi worked just fine. But this seems somewhat inefficient, doesn’t it? Instead of having to fetch the temper-ature from the device every two seconds or so, wouldn’t it be better if our script was
informed of any change of temperature when it happens, and only if the value changes? As we’ll explore to a greater extent in chapter 6, this has been one of the major impedance mismatches between the model of the web and the event-driven model of wireless sensor applications. For now, we’ll just look at one way of resolving the prob-lem using a relatively recent add-on to the web: WebSockets. In a nutshell, WebSockets
Listing 2.2 Polling and displaying a sensor reading
Initialize the
Google chart Create an array that will
contain the data points
Configure the parameters of the chart
Add a data point to the chart data and remove the oldest one if needed (if there are already 10 points available)
Redraw the chart with the new data
Poll the temperature sensor just like before
are simple yet powerful mechanisms for web servers to push notifications to web clients introduced as part of the efforts around the HTML5 standards.
The WebSockets standard comprises two distinct parts: one for the server and one for the client. Since the server is already implemented for us, the only specification we’ll use here is the client part. The client WebSockets API is based on JavaScript and is relatively simple and straightforward. The two lines of code in the following listing are all you need to connect to a WebSocket server and display in the console all mes-sages received.
var socket = new WebSocket('ws://ws.webofthings.io'); socket.onmessage = function (event) {console.log(event);};
Let’s get back to our examples. Go to the folder. Double-click the ex-2.3-websockets-temp-graph.html file to open it in your favorite browser. What you see on the page is exactly the same as in the previous exercise. But under the hood things are quite dif-ferent. Indeed, have a look at the new code shown here.
var socket = new
WebSocket('ws://devices.webofthings.io/pi/sensors/temperature');
socket.onmessage = function (event) { var result = JSON.parse(event.data); addDataPoint(result);
};
socket.onerror = function (error) { console.log('WebSocket error!'); console.log(error);
};
In this exercise, you don’t poll periodically for new data but only register your interest in these updates, by subscribing to the /sensors/temperature endpoint via Web-Sockets. When the server has new temperature data available, it will send it to your cli-ent (your web browser). This evcli-ent will be picked up by the anonymous function you registered and give it as a parameter the event object that contains the latest tempera-ture value.
2.3.4 So what?
Let’s take a step back and reflect about what you did with this exercise: you managed to communicate with an embedded device (the Raspberry Pi) that might be on the other side of the world (if you don’t happen to be living in rainy and beautiful Eng-land). From a web page you managed to fetch, on a regular basis, data from a sensor
Listing 2.3 Connecting to a WebSocket and listening for messages
Listing 2.4 Register to a WebSocket and get real-time temperature updates
Create a WebSocket subscription to the temperature sensor. Note that the URL uses the
WebSockets protocol (ws://...).
Register this anonymous function to be called when a message arrives on the WebSocket.
connected to the device and display it on a graph. Not bad for a simple web page of 60 lines of HTML, JavaScript, and CSS code. You didn’t stop there: with fewer than 10 lines of JavaScript you also subscribed to notifications from our Pi using WebSockets and then displayed the temperature in our office in real time. As an extension of this exercise, you could write a simple page that automatically fetches the image from the camera (ideally, you’d avoid doing this 25 times per second!).
If this was your first encounter with the Web of Things, what should strike you at this stage is the simplicity of these examples. Let’s imagine for a second our Pi wasn’t actually providing its data through HTTP, JSON, or WebSockets but via a “vintage”
XML-based machine-to-machine application stack such as DPWS (if you’ve never heard about it, don’t worry; that’s exactly our point!). Basically, you wouldn’t be able to talk directly to the device from your browser without a lot more effort. You would have been forced to write your application using a lower-level and more complex language such as C or Java. You wouldn’t have been able to use widespread concepts and lan-guages such as URLs, HTML, CSS, and JavaScript. This is also what the Web of Things is about: creating APIs for things that are universally accessible and bringing them closer to the masses of web development where a lot of today’s innovation and creative build-ing happens.
As mentioned before, in this book you’ll learn a lot more about the art of API craft-ing for physical thcraft-ings. In chapter 6 we’ll look at HTTP, REST, and JSON as well as at the real-time web, but in chapter 7 we’ll also look at how to build bridges to bring other protocols and systems closer to goodness of the web.
2.4
Exercise 3—Act on the real world
So far, you’ve seen various ways to read all sorts of sensor data from web devices. What about “writing” to a device? For example, you’d like to send a command to your device to change a configuration parameter. In other cases, you might want to control an actuator (for example, open the garage door or turn off all lights).
2.4.1 Part 1—Use a form to update text to display
To illustrate how you can send commands to an actuator, this exercise will show you how to build a simple page that allows you to push a piece of text to the LCD con-nected to the Pi in our office. To test this functionality first, open the actuator page of the LCD: http://devices.webofthings.io/pi/actuators/display.
On this page (shown in figure 2.13), you now see the various properties of the LED
actuator. First, you see brightness, which you could change (but can’t, because we made it read-only). Then, you have content, which is the value you want to send, and finally there is the duration, which is how long the piece of text will be displayed on our LCD. Use Postman to get the JSON format of the display actuator by entering the
URL just shown as you learned in the first exercise of this chapter:
{
"name": "LCD Display screen",
"properties": { "brightness": {
"name": "Brightness",
"timestamp": "2015-02-01T21:06:02.913Z", "value": 80,
"unit": "%", "type": "integer",
"description": "Percentage of brightness of the display. Min is 0 which is black, max is 100 which is white."
},
"content": {
"name": "Content",
"timestamp": "2015-02-01T21:06:32.933Z", "type": "string",
"description": "The text to display on the LCD screen." },
"duration": {
"name": "Display Duration",
"timestamp": "2015-02-01T21:06:02.913Z", "value": 5000,
"unit": "milliseconds", "type": "integer", "read-only": true,
"description": "The duration for how long text will be displayed on the LCD screen."
} },
"commands": [ "write", "clear", "blink", "color", "brightness" ]
}
Obviously, it wouldn’t be much fun to display something in our office if you couldn’t see what is being displayed. For this reason, we’ve set up a webcam where you can see the LCD on our Pi, so you can always see what is displayed on it. Here’s the URL:
http://devices.webofthings.io/camera/sensors/picture. So go ahead, open this page, and you’ll see the latest picture of the camera you saw earlier in figure 2.3 (to see the latest image, just refresh the page).
Now you’ll send a new message to the Pi for it to be displayed by the LCD. The
On this page you can see the various properties of the LCD actuator. Some are edit-able, and some aren’t. The content property is the one you want to edit, so enter the text you’d like to display and click Update. If all works fine, you’ll see a JSON payload like this:
{
"id":11,
"messageReceived":"Make WoT, not war!", "displayInSeconds":20
}
The returned payload contains the message that will be displayed, a unique ID for your message, and an estimated delay for when your text will appear on the LCD
screen (in seconds), so you know when to look at the camera image to see your text.
2.4.2 Part 2—Create your own form to control devices
Now let’s build a simple HTML page that allows you to send all sorts of commands to a web device using a simple form. From your browser, open the file ex-3.1-actuator-form.html in the exercises folder and you’ll see the screen shown in figure 2.14.
Enter some text here.
Figure 2.13 The details of the LCD actuator, with the various properties that you can set, for example, the text that should be displayed next on the device
This page has an input text field and a Send to Pi button, as shown in the following listing. Whatever text you enter will be displayed there. So yes, please keep it courte-ous, and because the API of our Pi is open to the public, we decline all responsibilities for what people write there.
<form action="http://devices.webofthings.io/pi/actuators/display/content/" method="post">
<label>Enter a message:</label>
<input type="text" name="value" placeholder="Hello world!"> <button type="submit">Send to Pi</button>
</form>
This is a simple HTML form that sends an HTTP POST (value of method) to the URL of the display (the value of action). The input text bar is called value (name="value") so that the Pi knows where to find the text to be displayed. This method works well. Unfortunately, what you don’t see behind the scenes is that web browsers do not sub-mit (nor do they make it possible to subsub-mit) the server using a JSON payload body (as you could easily do with Postman for the previous) but instead use a format called
application/x-www-form-urlencoded. The Pi needs to be able to understand this format in addition to application/json in order to handle data input from HTML
forms.
HTML forms can use only the verbs POST or GET but not DELETE or PUT. It’s rather unfortunate that even modern browsers don’t send the content of HTML forms as JSON objects because of some obscure legacy reasons, but hey, c’est la vie!
As you’ll see later in this book, the ability for all entities on the Web of Things to receive and transmit JSON content is essential to guarantee a truly open ecosystem. For this reason, we’ll show you how to send actual JSON from an HTML form page (by using AJAX and JavaScript), because doing so is an essential part of communicating with web devices.
Open the ex-3.2-actuator-ajax-json.html file to see a similar form but this time with a large piece of JavaScript, as follows.
(function($){ function processForm(e){
$.ajax({
url: 'http://devices.webofthings.io/pi/actuators/display/content/',
dataType: 'json',
method: 'POST',
contentType: 'application/json',
data: JSON.stringify({"value": $('#value').val()}),
processData: false,
Listing 2.5 Simple HTML form to send a command to an actuator
Listing 2.6 Send an HTTP POST with JSON payload from a form
The URL the request will be sent to The format of
the data you expect to get
The HTTP verb this request will send
The encoding of the data you are sending
success: function( data, textStatus, jQxhr ){
$('#response pre').html( JSON.stringify( data ) );
},
error: function( jqXhr, textStatus, errorThrown ){
console.log( errorThrown );
}
});
e.preventDefault();
}
$('#message-form').submit(processForm);
})(jQuery);
In this code, a function called processForm() is defined, which takes the data from the form, packs it into a JSON object, POSTs it to the Pi, and displays the result if suc-cessful (or displays an error in the console otherwise). The url parameter specifies the end-point URL (the Pi display), the method is the HTTP method to use, and the
contentType is the format of the content sent to the server (in this case application /json). The last line attaches the event generated by a click of the Submit button of the form #message-form to call the processForm() function.
There is a variation of this code, ex-3.2b-actuator-ajax-form.html, which encodes the data in the application/x-www-form-urlencoded format in place of JSON, just as it’s done with the simple form we showed in part 1 of exercise 3.
2.4.3 So what?
In this section you learned the basics of how to send write requests and commands to a device, both using a form on a web page and from an API. You had a crash course in the limitations, challenges, and problems of the modern web (don’t worry; there are many more ahead!), in particular how different web browsers can interpret and implement the same web standards differently. Finally, you learned how to use AJAX to bypass these limitations and send JSON commands to a Raspberry Pi and control it remotely.
We hope that after doing this exercise you realize that it’s straightforward to send actuator commands to all sorts of devices—as long as these are connected to the web and offer a simple HTTP/JSON interface. But the last problem is how to find a device nearby, understand its API, determine what functions are offered by the device, and know what parameters you need to include in your command, along with their type, unit, limitations, and the like. The next section will show you how to solve this prob-lem, so keep reading.
2.5
Exercise 4—Tell the world about your device
In the previous exercises you learned how devices can be easily exposed over the web and then explored and used by other client applications. But those examples assumed
The callback to invoke if the request was successful
The callback to invoke if the request failed
that you (as a human developer or as the application you wrote) know what the fields of the JSON objects (for example, sensor or actuator) mean and how to use them. But how is this possible? What if the only thing you know about a device is its URL and nothing else?
Imagine you’d like to build a web application that can control home automation devices present in your local network. How can you ensure this application will always work, even if you’re in someone else’s network and you don’t know anything about devices there?
First, you need to find the devices at a network level (the device discovery problem). In other words, how can your web application discover the root URL of all the devices around you?
Second, even if you happened to know (by some magic trick) the root URL of all Web of Things–compatible devices around you, how could your application “under-stand” what sensors or actuators these devices offer, what formats they use, and the meaning of those devices, properties, fields, and so on?
As you saw in exercise 2 (section 2.3.2), if you know the root URL of a device, then you can easily browse the device and find data about it and its sensors, services, and more. This is easy because you’re a human, but imagine if you just had a JSON docu-ment with unintelligible words or characters and no docudocu-mentation that explain what those words mean—how would you know what the device does? And how would you know it’s a device, for that matter?
Open ex-4-parse-device.html in your browser, and you’ll see a form prepopulated with the URL of the Pi (figure 2.15), so simply click Browse This Device.
This JavaScript code of ex-4-parse-device.html will read the root document of the Raspberry Pi (as JSON) and generate a simple report about the device and its sensors, along with link to the documentation for this device. First, let’s look at the HTML code to display the report.
<form id="message-form">
<input type="text" id="host" name="host" value="http://devices.webofthings.io/pi" placeholder="The URL of a WoT device" />
<button type="submit">Browse this device</button> </form>
<h4>Device Metadata</h4>
<p><b>Metadata.</b> A general model used by this device can be found here: <div id="meta"></div></p>
<p><b>Documentation.</b> A human-readable documentation specifically for this device can be found here: <div id="doc"></div></p>
<p><b>Sensors.</b> The sensors offered by this device: <div id="sensors"></div></p>
<ul id="sensors-list"> </ul>
The first thing you can see is a form where you can enter the root URL of a device with a Browse button. Then, there are some HTML text elements that will act as placehold-ers (meta, doc, and so on). Now let’s look at the AJAX calls.
(function ($) {
function processForm(e) {
var sensorsPath = '';
$.ajax({
url: $('#host').val(), method: 'GET',
dataType: 'json',
success: function (data) {
$('#meta').html(data.links.meta.title + " <a href=\"" + data.links.meta.rel + "\">" + data.links.meta.rel + "</a>"); $('#doc').html(data.links.doc.title + " <a href=\"" +
data.links.doc.rel + "\">" + data.links.doc.rel + "</a>");
sensorsPath = data.url + data.resources.sensors.url;
$.ajax({
url: sensorsPath, method: 'GET', dataType: 'json',
success: function (data) { var sensorList = "";
$('#sensors').html(Object.keys(data).length + " sensors found!");
Listing 2.7 A basic browser
Listing 2.8 Retrieve and parse device metadata using AJAX JSON calls
GET the ROOT JSON of the device and extract data from it
Update the "meta" and "doc" elements with the link found in the root JSON document
Store the URL of the sensors resource
GET the list of all sensors on the device
for (var key in data) {
sensorList = sensorList + "<li><a href=\"" + sensorsPath + key + "\">" + data[key].name + "</a></li>";
}
$('#sensors-list').html(sensorList); },
error: function (data, textStatus, jqXHR) { console.log(data);
} }); },
error: function (data, textStatus, jqXHR) { console.log(data);
} });
e.preventDefault(); }
$('#message-form').submit(processForm); })(jQuery);
Looking at this code, you can see that you first set the root JSON document of the device using the URL entered in the form ($('#host').val()). If the JSON file has been successfully retrieved, the success callback function will be triggered with the
data variable containing the root JSON document of the device (which was shown in step 2 of section 2.2.2). Then you parse this JSON to extract the elements you’re look-ing for; in this case the code is looklook-ing for a links element in the returned JSON
object (hence the data.links), which contains various links to get more information about this device, which looks like the following:
"links": { "meta": {
"rel": "http://book.webofthings.io", "title": "Metadata"
}, "doc": { "rel":
"https://www.raspberrypi.org/products/raspberry-pi-2-model-b/", "title": "Documentation"
}, "ui": { "rel": ".",
"title": "User Interface" }
}
In particular, the meta element contains a link (value of rel) to the general model used by this device (which describes the grammar used to describe the elements of this device) and then a doc that links to a human-readable documentation that Loop through
all sensors
describes the meaning (the semantics) and specific details of this particular device (that is, which sensors are present and what they measure).
The metadata document linked in the previous code is nothing more than a machine-readable JSON document model that allows users to describe WoT devices in a structured manner, along with a definition of the logic elements all WoT devices must have. If hundreds of device manufacturers would use this same data model to expose the services of their devices, it would mean that any application that can read and parse this file will be able to read the JSON file returned by the device and under-stand the components of the devices (how many sensors it has, their names or limita-tions, their type, and so on).
Now, what about the sensors or actuators themselves? The links element only defined metadata (documentation and such) about the device, not the device contents itself. To find the sensors contained in the device, you’ll have to parse the sensors field of the resources element, which is what happens in the second AJAX call where you do a GET on the sensors resource of the device. Once you get the sensors JSON document, you iterate over each sensor and create a link to it using this pattern:
<li><a href=\""+sensorsPath+key+"\">"+data[key].name+"</a></li>
Here sensorsPath is the URL of the sensors resource (in this case http://devices .webofthings.io/pi/sensors) to which you add the sensor ID of each sensor (key), along with the name of the respective sensor (data[key].name).
2.5.1 So what?
If you didn’t understand all the details of the previous exercises, it’s perfectly fine— there’s nothing wrong with you! What happened is that you got your first hands-on crash course on the Semantic Web or rather on the hard problems it tries to solve. The reason you’ve heard a lot about it yet never seen or used it (or understood it, for that matter) is that it’s a complex problem for computers and people who program them: how the hell do you explain the real world—and its existential questions—to a com-puter? Well, it turns out you can’t really teach philosophy to your machine yet. But, as we’ve shown here and will detail in chapter 8, there are quite a few small tricks that you can apply successfully that make the web—and computers—just a little smarter.
2.6
Exercise 5—Create your first physical mashup
In the previous exercises, you learned how to access a web device, understand the ser-vice and data it offers, and read and write data from deser-vices. In this exercise, we’ll show you how to build your first mashup. The concept of mashups originates from the hip-hop scene to describe a song composed by taking samples of other songs. Simi-larly, a web mashup is a web application that gets data from various sources, processes it, and combines it to create a new application.
Here, you’ll create not only a web mashup but a physical mashup—a web applica-tion that uses data from a real sensor connected to the web. Indeed, in this exercise you’re going to take local temperature data from the Yahoo! Weather service, com-pare it with the temperature sensor attached to the Pi in our office, and publish your results to the LCD screen attached to the Pi in London. Finally, to get a visual feedback of what your message looks like, you’ll use the web API of the webcam to take a picture and display it on our web page! See figure 2.16 for an illustration.
Go ahead and open the file ex-5-mashup.html in both your editor and your browser. This code is a little longer than what you’ve seen so far but not much more compli-cated, as shown in the following listing.
$(document).ready(function () {
var rootUrl = 'http://devices.webofthings.io';
function mashup(name, location) {
var yahooUrl = "https://query.yahooapis.com/v1/public/yql?q=select item from weather.forecast where woeid in (select woeid from geo.places(1)
Listing 2.9 Listing 2.9 Mashup function
Temperature sensor
+
Yahoo Weather
Message on LCD screen
Webcam
Figure 2.16 A physical mashup application. First (1), you retrieve the local temperature from Yahoo Weather and then the remote
where text='" + location + "') and u='c'&format=json";
$.getJSON(yahooUrl, function (yahooResult) {
var localTemp =
yahooResult.query.results.channel.item.condition.temp;
console.log('Local @ ' + location + ': ' + localTemp);
$.getJSON(rootUrl + '/pi/sensors/temperature', function (piResult) {
console.log('Pi @ London: ' + piResult.value);
publishMessage(prepareMessage(name, location, localTemp,
piResult.value));
});
});
}
function publishMessage(message) {
$.ajax(rootUrl + '/pi/actuators/display/content', {
data: JSON.stringify({"value": message}),
contentType: 'application/json',
type: 'POST',
success: function (data) {
$('#message').html('Published to LCD: ' + message);
$('#wait').html('The Webcam image with your message will appear
below in : ' + (data.displayInSeconds+2) + ' seconds.');
console.log('We will take a picture in ' +
(data.displayInSeconds+2) + ' seconds...');
setTimeout(takePicture, (data.displayInSeconds+2) * 1000);
}
});
}
function prepareMessage(name, location, localTemp, piTemp) {
return name + '@' + location + ((localTemp < piTemp) ? ' < ' : ' > ')
+ piTemp;
}
function takePicture() {
$.ajax({
type: 'GET',
url: rootUrl + '/camera/sensors/picture/',
dataType: 'json',
success: function (data) {
console.log(data);
$('#camImg').attr('src', data.value);
},
error: function (err) {
console.log(err);
}
});
}
mashup('Rachel', 'Zurich, CH');
});
Get the temperature in the user location from Yahoo
Get the temperature from the WoT Pi in London
Prepare the text to publish and use it to update the content of the LCD screen
POST the message to the LCD actuator
Set a timer that will call the takePicture() function in N seconds (after the LCD content has been updated)
Generate the text to display with the user name, location, and Pi temperature
Retrieve the current image from the webcam in our office
The mashup() function is responsible for running the different bits of the mashup. It takes two parameters: the first parameter is your name; the second one is the name of the city where you live formatted as city, countrycode (for example, Zurich, CH; London, UK; or New York, US). It’s then essentially composed of two HTTP GET calls over AJAX requesting a response as application/json representations. The first call is to the Yahoo Weather Service API, which given a location returns its current weather and temperature.
Once this call has returned (that is, the anonymous callback function has been invoked), the second function is called to fetch the latest value from the Pi tempera-ture sensor, just as you already did in section Part 1—Polling the current sensor value. Next, you call prepareMessage(), which formats your message and passes the result to publishMessage(). This last function runs an HTTP POST call over AJAX with a JSON payload containing the message to push to the LCD screen, as done in section Exercise 3—Act on the real world.
Because you need to wait in the queue for your message to be displayed, you set a timer that will trigger the takePicture() function. This last function runs a final
HTTP GET request to fetch a picture of what the LCD screen shows, via the web-enabled camera. You then dynamically add the returned picture to the image con-tainer of your HTML page.
To start this chain of real-world and virtual-world events, all you need to do is edit the source code so it invokes the mashup(x,y) function using your own name and city. For example, Rachel from Zurich in Switzerland needs to call this function as follows:
mashup('Rachel', 'Zurich, CH')
Then open the file in your browser, and voilà! Within a few seconds, you’ll see a live image from the webcam with your message appearing on the screen of the Pi in our office.
2.6.1 So what?
2.7
Summary
You experienced your first hands-on encounter with web-connected devices across the world and could browse their metadata, content, sensors, actuators, and so on.
Web-connected devices can be surfed just like any other website. Real-time data from sensors can be consumed via an HTTP API just like other content on the web.
It’s much easier and faster to understand the basics of HTTP APIs than the vari-ous and complex protocols commonly used in the IoT.
In only a few minutes you were able to read and write data to a device across the world by sending HTTP requests with Postman.
Connecting the physical world to the web enables rapid prototyping of interac-tive applications that require only a few lines of HTML/JavaScript code.
The Internet of Things (IoT) is a hot conversation topic. Analysts call it a disruptive technology. Compet-ing standards and technologies are appearCompet-ing daily, and there are no tangible signs of a single protocol that will enable all devices, services, and applications to talk to each other seamlessly. Fortunately, there’s a great universal IoT application platform available now: the World Wide Web. Web standards and tools provide the ideal substrate for connected devices and applica-tions to exchange data, and this vision is called the Web of Things.
Building the Web of Things is a hands-on guide that will teach how to design and implement scalable, flexible, and open IoT solutions using Web technologies. This book focuses on providing the right balance of theory, code samples and practical examples, to enable you how to successfully connect all sorts of devices to the Web and how to expose their services and data over RESTAPIs. After you build a simple proof of concept app, you’ll learn a systematic methodology and system architecture for connecting things to the Web, finding other things, shar-ing data, and combinshar-ing these components to rapidly build distributed applications and physical mashups. Gain the knowledge and skills you’ll need to fully take advan-tage of a new generation of real-time, web-connected devices and services and to be able to build scalable applications that merge the physical and digital worlds.
What’s inside
Sense and connect the real world
Build a Web interface to control your Smart Home using a Raspberry Pi Create a Web API for any device
Build real-time physical mashups with JavaScript and node.js
Integrate other protocols such as MQTT, CoAP or Bluetooth to the Web WoT and IoT platforms, tools, and protocols
33
W
ith the previous chapter about the Access layer, you learned how blending embedded devices into the web makes them so much more easily programmable. The request/response pattern of REST combined with the real-time power of Web-Sockets is ideal to offer simple web APIs for Things, but other patterns exist on the web. These patterns become especially valuable when considering use cases beyond your control. In the next chapter, “Getting data from clients: data ingestion” from34
by
Andrew G. Psaltis
Getting data from clients:
data ingestion
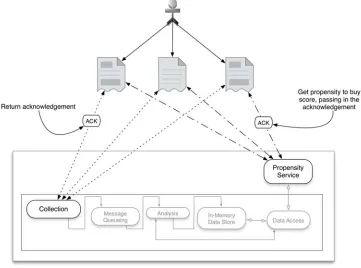
Now on to our first tier: the collection tier is our entry point for bringing data into our streaming system. Figure 2.1 shows a slightly modified version of our blueprint, with focus put on the collection tier.
This tier is where data comes into the system and starts its journey; from here it will progress through the rest of the system. In the coming chapters we’ll follow the flow of data through each of the tiers. Your goal for this chapter is to learn about the collection tier. When you finish this chapter you will have learned about the col-lection patterns, how to scale, and how to improve the dependability of the tier via the application of fault-tolerance techniques.
This chapter covers
Learning about the collection tier
Understanding the data collection patterns
Taking the collection tier to the next level
2.1
Common interaction patterns
Regardless of the protocol used by a client to send data to the collection tier—or in cer-tain cases the collection tier reaching out and pulling in the data—a limited number of interaction patterns are in use today. Even considering the protocols driving the emer-gence of the Internet of Everything, the interaction patterns fall into one of the following categories:
Request/response
Publish/subscribe
One-way
Request/acknowledge
Stream
At a high level we can group these interactions into two main categories:
Request/response optional (request/response, publish/subscribe, one-way, request/acknowledge)
Stream
Long Term Storage
In-Memory Data Store Analysis
Tier Message
Queueing Tier Collection
Tier
Data Access Tier
We will not be covering this in detail. But you may want to persist
analyzed data for future use.
Sometimes we need to reach back to get data that has just been analyzed. Browser,
Device, Vending Machine,
etc..
Browser, Device, Vending Machine, etc..
Let’s take a moment and explore each of these patterns and discuss how you might collect data using them.
2.1.1 Request/response
This is the simplest pattern and is used when the client must have an immediate response or wants the service to complete a task without delay. Every day you experi-ence this pattern while browsing the web, searching for information online, and using your mobile device. This pattern works as follows: First, a client makes a request to a service; this may be to take an action (such as send a text message, apply for a job, or buy an airline ticket) or to request data (such as perform a search on Google or find the current weather in their city). Second, the service sends a response to the client. Figure 2.2 illustrates this pattern.
When you look at figure 5.2 it’s apparent how simple this pattern is. One caveat of this pattern is that the request from the client and response from the service happen over the same connection in a synchronous fashion. This pattern is still widely used today and still relevant. The simplicity of a synchronous request and response comes at the cost of the client having to wait for the response and the service having to respond in a timely fashion. With modern-day services this cost often results in an unacceptable experience for users. Imagine browsing to your favorite news or social site and your browser trying to request all the resources in a synchronous fashion. Outside of basic services such as requesting the current weather, the potential delay is no longer toler-able. In many cases this can translate into lost revenue for merchants, because users don’t want to wait for the response. There are three common strategies used to over-come this limitation: one client side, one service side, and the last a combination of the two. Let’s consider the client side first. A common strategy often taken by the cli-ent is to make the requests asynchronously; this approach is illustrated in figure 2.3.
With this adaptation the client makes the request of the service and then contin-ues on with other processing while the service is processing the reqcontin-uest. This is the pattern used by all modern web browsers; the browser makes many asynchronous requests for resources and then renders the image and/or content as it arrives. This type of processing allows the client to maximize the time normally spent waiting on the response; the end result is an overall increase in the work performed by the client