GETTING STARTED
Drawings
I
I
Specifications Subject to Change.
Convergent Technologies and NGEN are registered trademarks of Convergent Technologies, Inc.
Convergent, CT-DBMS, CT-MAIL, CT-Net, CTIX, CTOS, DISTRIX, Document Designer, The Operator, AWS, CWS, IWS,
MegaFrame, MightyFrame, MiniFrame, MiniFrame Plus, and X-Bus are trademarks of Convergent Technologies, Inc.
CP/M-86 is a trademark of Digital Research. MS and GW are trademarks of Microsoft Corp.
UNIX is a trademark of Bell Laboratories.
First Edition (March 1986) 09-01135-01
Copyright c 1986 by Convergent Technologies, Inc., San Jose, CA. Printed in USA.
BEFORE YOU BEGIN
In order to use this booklet you will need the following:
• the Art Designer software installed on your system
• a Graphics Module
• a workstation configured for printing or plotting (see the Art Designer Release Notice for instructions)
• a Mouse
The Art Designer Picture Library files are located in the directory [Sys]<Pictures>. To access these files, your system must be pathed to this directory.
If your system is not currently in [Sys]<Pictures>, path to that directory before beginning this booklet. If you do not know how to path, ask your system administrator for help.
Left-handed people:
Right-handed people:
Plug the Mouse into the left port on the keyboard.
Getting Started with Drawings
Sample Drawing The Art Designer is a sophisticated drawing program that allows you to create business drawings easily and quickly.
OrgChart
The best way to learn the Art Designer is to use it. In this booklet you will learn to make a drawing like this one:
NoName
Plastics MFD
I
Fe, LTD
I
~ ~
@
fff
ittt
Entering the
Art Designer
Status
You can enter the Art Designer in one of two ways:
• through the Context Manager
• through the Executive
The Context Manager screen looks like this:
Contexts you can return to
I
Applications you can startArt Designer Document Designer Executive Extended Multiplan Logout Mail
Select application, optionally choose function key, then press GO.
~ ~
c=J
lLogoutI
c=J c=J
~E=:J
c=J
~Action-Go To see if you have the Context Manager, press the Action key and hold it down while you press Go.
1135-002
Pressing Action-Go makes the Context Manager screen appear.
Entering Through the Context Manager
If the Context Manager is on your system, follow these steps to enter the Art Designer:
~ If the highlight is not al-ready in the "Applications you can start" box, press the Right Arrow key to move the highlight to it.
~ Press the arrow keys to move the high-light to "Art Designer."
~ Press Go.
The Executive screen looks like this:
Executive 10.0 (aS tlClstrfsMp-9.6) Path: [dO]<Alison>
User name: alison Mon Feb 9, 19865:22 PM
Command~I ____ ~ __ ~ ____ ~ ______ ~ ______________________ ~
Entering
Through the
Executive
The Screen
Left Picture Tab
11NoNamei r<
If the Context Manager is not on your system, you have the Executive.
Follow these steps to enter the Art Designer:
~ Type Art Designer in the command line (or simply type a d).
~ Press Go.
The Art Designer screen appears.
Work Area Icon
CD
Right Picture Tab
1 NoName
Tools Menu
1 Color Palette
Fill Palette
Line Palette Work Area
Arrow
1\
CursorTools
Function Menu
rn
The Cursor
The Menus
The arrow in the middle of the work ~ is the arrow cursor. It is used to draw pictures, and to select items from the Tools menu and Function menu.
There are three Tools menus that can be displayed on the screen to· the right of the work area. The one that you see now is the Draw menu.
You -select a tool from the Draw menu to create or change a drawing.
Pick
Scale and Move
Connected Line
Rectangle
Connected Move
Connected Line Replace
Unpick
~
CopySketch
Circle
Sculpt
Sketch Replace
Making a Selection
The Mouse
You use the Function menu to select a new Tools menu, to clear the screen, and to perform other tasks in the Art Desig~er.
The Function menu is located at the bottom of the screen, below the work area.
Choosing a tool from the Tools menu, or picking a Function label from the Function menu, is called "making a selection." You select a tool or function before you use it.
A selection is made by placing the cursor on the desired tool or fUnction, and pressing a button on the Mouse.
The Mouse is an electronic device that plugs into the keyboard and sits on your desk. Moving the Mouse across the desk top moves the cursor on the screen.
Keyboard
01
- - " . . . _ _ _ ---lThe Mouse Buttons
The Mouse has three buttons. Two of these buttons, Mark and Bound, are used to carry out all the opera-tions you perform in the Art Designer.
The second (middle) Mouse button is not used.
Mark ---p.,:'<-"'II~."
Right hand configuration. Mark and Bound can be reversed for left-handed use.
~~:----Bound
What if I don't have a Mouse?
The Art Designer can be used without a Mouse. If you do not have a Mouse, refer to the Art Designer: Charts and Drawings manual for information on how to draw using a
What if I'm left-handed?
Mouse Hand • Right Handed
Ilo
Left Handed Grid DVlSible• Invisible Grid Snap
DOn
• Off
Grid Size
3
t
+
GOI
The Mouse is generally set up for right-handed people. However, it is easy to change it for left-handed use.
If, while doing this procedure, you feel you need more infor-mation about the Mouse, turn to the next page and read the sections IIUsing the Mouse" and "Using the Mouse Buttons:'
Then return and complete this procedure.
To set up the Mouse for your left hand:
~ Plug in the Mouse on the left side of the key-board (in the left port).
~ Plug in the keyboard cable on the right side (in the right port).
~ Move the cursor to the Set Up Function label.
~ Click (press down and immediately release) the button on the far left (the Mark button for a
right-handed person) .
~ A menu appears above the Set Up label. It
says Mouse Hand.
~ Place the cursor on the blank box next to Left Handed.
Mouse Hand D Right Handed
• Left Handed Grid
DVisible • Invisible
. GridSnap
DOn
• Off
Grid Size
-3-t
~GO
Notice that the box next to Left Handed is filled.
~ Move the cursor to the bottom of the menu, on the word Go.
~ Click the button on the far left' again. When the menu disappears, the Mouse buttons are set up for left-handed use.
In the left-hand configuration, Mark is the button farthest to the right,· Bound is the button farthest to the left. The
middle button is not used.
Second Finger _ _ _ -,
Using the Mouse
When using the Mouse, keep your hand relaxed. To move the Mouse freely, create enough room on your desk.
Then follow these steps:
~ Place your hand on the Mouse.
~ Put your first finger on the Mark button, and your second finger on the Bound button.
First Finger _ _ --,
on Mark
1135-008
,...--_ _ _ Second Finger
on Bound
~ Move the Mouse around on your desk and watch the cursor move on the screen.
~ Now pick up the Mouse and set it down in another place on your desk.
Using the Mouse Buttons
If you run out of room on your desk, pick up the Mouse and set it down in a different place. Then move the Mouse again. In this way you can move the cursor on the screen without using much space on your desk.
~ Practice moving the cursor by· making very short sweeps with the .Mouse across your desk. A t the end of each sweep, pick up the Mouse and set it down where you started. Sweep the Mouse across the desk top several times, and watch how the cursor moves on the screen.
Once you feel comfortable using the Mouse, you can perform any of the Art Designer functions easily and quickly.
To do anything in the Art Designer, you use the Mouse buttons in one of these two ways: click and press and hold.
Click means press down a button and release it
immediately.
*
When you see this symbol, it means click a button.To practice this:
Notice that a line appears on the screen when ·you move the cursor.
~ N ow click the Botmd button one time to remove the line.
The line disappears.
Press and hold means press a button and hold it down while you move the Mouse.
00
When you see this symbol, it means press and hold a button.-To practice this:
~ Press and hold the Mark button.
Once again you will see a line.
~ Still holding down the Mark button, move the Mouse in any direction.
When you are finished moving the Mouse, release the button.
~ To remove the line, click Bound.
Playing with the Mouse
Clearing the Screen
Go ahead and experiment with the Mouse and Mouse buttons now.
Select various features from the Draw menu, and use the Mouse buttons to test them out.
When you finish playing with the Mouse, clear the screen (as described below) and complete this booklet by following the step-by-step instructions.
~ Move the cursor to the Function label that says Clear.
~ Click the Mark button.
A menu appears above the Clear Function label. It presents two choices, Yes and No.
~ Place the cursor on Yes and click Mark.
Drawings are Made from Objects
An object is a line or shape considered by the Art Designer as a single unit. Objects are combined with other objects to make drawings.
To illustrate this point, imagine yourself drawing a face with a pencil. Every time you lift the pencil from the paper you complete a part of the face.
When you finish, you see the face as a whole. How-ever, the face is actually made up of many separate parts.
Drawings Start with a
Selection
h
h
\1/-g-/1\
6~g gZ g g
"
r'(;
~
D
0
~~~
~~
1\0
~
Selecting the Square Tool
Before you draw and create objects on the screen, you must select a tool to work with from the Draw menu.
You use tools to create and change objects in a drawing. You must select a tool in order to use it.
To make a selection, move the cursor to the tool or function you want and click Mark.
The active tool is the one you are using. When you enter the Art Designer, the highlighted tool (the active tool) is the Connected Line tool.
Now that you know how to use the Mouse and know what it means to select a tool, you are going to draw a square. The Square is not the active tool, so you need to select the Square before you can begin.
To select the Square tool:
~ Move the cursor to the Square tool on the Draw menu.
~ Click Mark.
CElO
11315-<11:1
Drawing a
Square
It:!
NoNameTo draw a square, follow these steps:
~ Move the cursor to the center of the work area.
~ Press and hold Mark.
This sets the anchor point for the square.
The anchor point is the point at which you press the Mark button on the screen. When you move the cur-sor, the anchor point remains fixed.
o=J
I
NoNamelit
Anchor point for square~ (indicates spot at which you press and hold: symbol does not appear on screen).
J
II
NoNameI,' .
.. ,~ While still holding down Mark, move the cursor diagonally toward any corner of the screen.
'I
CD
I
NoName.. ,
~
---, Cursor moves diagonally
1 to create square. 1
1
---, 1 1 1 1 I
1 1
- -
--,
1 1 1 1 1 1 1 1r.n
1 1 1~~
1
Anchor Point
1I35-ll14
~ When you have crea ted a square release
Mark.
Congratulations! You have drawn a square. Don't worry if it doesn't exactly match the square in the example.
Drawing
Several Squares
-Draw another square. Vary its size and dimension by moving the cursor in another direction from the anchor point.
Now experiment by filling the screen with squares.
CD
NoNameo
I
I
I
I
I
D
IH
l'----t-
u
I
D
Clearing the Squares
Circles are
Drawn Like
Squares
h
h
\ I I
-g-11\
~~I
gZg8"
ru
~
D 0
6~~
.~.~
1'0
~
Now that you've filled the screen, suppose you don't like the squares you've drawn and you want to start over. You can clear the screen and begin again.
In a moment you will learn how to delete individual squares.
For now, clear the screen in the same way as you did before:
~ Move the cursor to the Clear Function label and click Mark.
~ Place the cursor on Yes and click Mark.
Everything on the screen disappears, and you are ready to draw something new.
This time draw a circle. A circle is drawn exactly like a square.
~ Move the cursor to the Circle tool.
~ Click Mark.
NoName
~ Move the cursor into the work area.
~ Press and hold Mark.
~ Move the cursor diagonally in any direction.
A square appears on the screen. Imagine a circle in-side the square.
NoName
1135-017
~ Release Mark.
A Screen Full
of Circles
Now draw a screen full of circles. Don't worry about their size and shape.
Notice that you can draw circles, ovals, and oblong shapes. The size and shape of the circles are de-termined by the size and shape of the boxes that appear on the screen when you draw.
NoName
Peeling Comfortable
Deleting Objects
~
..
-\l~' - \ /·1\
~~I
glxl ".
ro.·ro
00
~~b
By now you should feel comfortable with the movement of the Mouse and the touch of the Mouse buttons.
Notice that you use the same motion to draw circles and squares. You press and release the Mark button in the same way.
The motion of the Mouse, and the use of the Mark button, is a common move used to perform most tasks in the Art Designer.
Clear the screen and practice with the Mouse as long as you want. Try drawing squares and circles, and fill the screen again. When you feel comfortable, move on to the next step.
Earlier you learned how to clear the screen by using the Clear function. Another way to clear the screen is to use the Delete tool to delete objects on the screen.
To delete the circles and squares on the screen (and clear the screen in a new way):
~ Place the cursor on the Delete tool •
~ Click Mark.
~ Move the delete cursor to the lower-left corner of the work area.
~ Press and hold Mark.
~ Move the cursor diagonally to the top right corner of the work area, and release
Mark.
NoName
All the objects inside (or touched by) the box disappear.
Notice that this is the same motion you used when you drew the squares and circles.
Deletes Can Be Now all the objects in the work area are gone. But Undone what if you want to put them back? Undo returns
the last thing you deleted to the screen.
~ Place the cursor on the Undo Function label.
~ Click Mark.
The squares and circles reappear.
r---~----NOTE---~
Deleting a Single Object
You have learned how to delete and return the objects to your screen. You can also delete one object at a time. Follow these steps:
~ Move the delete cursor close to the edge of an object.
~ Press and hold Mark.
~ Move the cursor across the edge of the object, and release Mark.
11l5-G2O
The object disappears.
If you miss the edge of an object, the following error message appears at the top of the work area:
No edge found. button down.)
(Move across edge with
o
Crossing the edge of another object with the delete cursor deletes that object, too. If you delete an ob-ject by mistake, use Undo to return it to the screen.
~ Experiment by deleting all the squares and circles, one at a time, until the screen is empty.
NoNa me
o
1136-021».
If you need more practice deleting objects from the screen, draw and delete more circles and squares until you feel comfortable using the Delete tool.
Creating
a
DrawingDrawing a
Circle
h
h
6-)
X X'XxX10
~
D
0
~-)~
~~
"'0
~
\1/
-x-11\
,
You are now going to create an organization chart like the one shown at the front of this booklet. The first step is to draw a circle.
Follow these steps:
~ Select the Circle tool from the Draw menu.
~ Place the cursor as shown below.
IINoName
I '
...: .. " >·1
IT1 1
NoNameI
~ Press and hold Mark.
~ Move the cursor diagonally to the upper right of the work area, away from the anchor point, and release Mark.
NoNa me NoNa me
11J6-022
When the circle is drawn, the screen should look like this:
NoName
Adding a
Square
NoName
The next step in creating the organization chart is to add a square to your drawing. To add a square:
~ Select the Square tool.
~ Place the cursor as shown.
NoName
1135-024
The square is now on the screen, below and to the left of the circle.
NoNa me
o
Picking an Object
Picking the Square
h
~~t~
6~g gXgX ,
~.~
DO
6~b
Picking an object is an important part of working with the Art Designer. This is because" the Art Designer considers the objects that you see on the screen as separate entities: each can be moved, modified, and copied independently of the others.
When you select a tool (for example, the Copy tool) to modify an object, you must designate which object you want to copy.
You must, therefore, pick the object you want before you can work on it.
To pick the square:
~ Select the Pick tool.
Notice that the cursor changes to a symbol shaped like a hand. This is the hand cursor, which you use to pick objects.
~ Move the cursor into the work area.
~ Press and hold Mark, move the hand cur-sor across the edge of the square, and release Mark.
1135-028
Copying the Square
\ II
g
-/1\
Notice that this is the same movement used to draw and delete. the square and the circle.
When you pick a square, a dotted box appears on top of it. This makes it look as though the lines of the square have turned to small dots.
If the object you pick is not a square or a rectangle, the dotted box appears around the object when it is picked.
,---.
1 1
1 1
1 1
1 1
1 1
1 1
I I
1 1
1 1
1 1
1 1
1_-_--_---__ -__ -1
Picked Square Picked Circle
1135-C27
Now that you have picked the square, you are going to copy it.
To copy the square:
~ Select the Copy tool.
~ A box appears on top of the square.
~ Place the copy box as shown below.
NoName NoName
D
113!!-02.1
~ Click Mark.
Unpicking the Square
h
h
\11-g-11\
6~g Kg g
g
"
I(;
ru
0
0
6~b
~~
1\0
~
An object stays picked until you unpick it, or until you pick another object.
So now you need to unpick the square so you can work with another object.
To unpick the square:
~ Select the Unpick tool.
The dotted box on top of the square disappears, and the lines of the square no longer look like small dots.
If a picked object is not a square or rectangle, the dotted box around it disappears when you unpick it.
Connecting the The basic elements of the organization chart are now
Squares on the screen.
Drawing a
Connected Line
6~g
gZgg "1(;'1.;
0 0
6~b
To complete the chart, you need to connect the squares and the circle together to form the crossbar for the chart.
To connect the squares and the circle:
~ Select the Connected Line tool.
~ Place the cursor as shown below.
NoName
D
D
113!!-Q2I
~ Click Mark and move the cursor in any direction.
~ Move the cursor straight up, as shown.
The line does not have to be perfectly straight.
NoName
D
11311-DlCI
NoName
~ Move the cursor so that the line segment stretches over the right box.
NoNa me
-"
D
11315-031
~ Click Mark.
~ Draw a third line segment down to the top of the right square, as shown.
NoName
,
,
\\35-D:U
~ Click Mark.
Ending a
Connected Line
To end the connected line:
~ Move the cursor in any direction.
Another connected line segment ·appears.
~ Click Bound.
The line segment disappears and you are ready to select another tool.
~---NOTE---~
Completing the The next step in creating the organization chart is to Organization connect the crossbar to the circle.
Chart
Use the Connected Line tool to draw a line from the bottom of the circle to the top of the crossbar. Notice that the Connected Line tool is still selected.
~ Move the cursor to the middle of the crossbar, below the center of the circle.
1135-033
~ Stretch the line segment until it touches the circle.
113IHIJ+
~ Click Mark.
Saving the Organization Chart
:;Set Default Directory Save Chart Format .. Get Picture
I
Save PictureV'rewFiles
I
When you are finished, the screen looks like this:
NoName
1135-035
Now is a good time to save your drawing. Saving your drawing stores it safely on disk, but does not remove it from the screen.
To save your drawing:
~ Select the Files Function label from the Function menu at the bottom of the screen.
Your drawing displays in a temporary viewing area, along with an entry line, located just above the Function label.
Temporary Viewing Area
~N~o~N~a~m~e~~~~~~~~~~~0
Type a picture filename and press GO to execute.
Entry Line 113lH131
Naming Your Drawing
Saving ..• IOrgChart
To name the drawing:
~ Use the Backspace key to delete "NoName."
~ Type OrgChart (the name of your new picture file).
~ Select Go. board.)
(Or press Go on the
key-1135-037
Using the Picture Library
The Picture
Library
Viewing the Files in the Picture Library
OrgChart
One of the simplest ways to enhance your drawing is to add objects to it from the Picture Library.
The Picture Library is a set of picture files that come with the Art Designer. Each file contains several objects that you can add to your drawings.
The Picture Library offers a variety of objects that otherwise might be difficult or time consuming to create.
To set up your screen so that it is easy to work with the Picture Library:
~ Select the Dual Work Area icon.
Dual Work Area Icon
NoName
1135-0311
The screen divides, and your drawing appears in the left side of the Preview Area. The picture tab says
,Set Default Directory ; Save Chart Format
; Get Picture
Save Picture IView Files
Arrows 1 Arrows2
Notice that the Draw menu remains on the screen.
~ Select the Files Function label.
~ Select the View Files option.
Notice that "OrgChart" remains in the left picture tab, but your picture is removed from the screen.
The picture library files appear above the picture tab.
Electron icSym bois 1 Hardware1 MiscSymbols1 Money1 Money2 OfficeObjects1 OfficeOb jects2 OfficeOb jects3 People1 People2
Picture Library Filenames
m
NoNa me1130-0J8
What if my Picture Library files don't appear?
Opening a
Second File in "the Preview
Area
INoName
If only one picture file name appears above the Preview Area, your Picture Library files have been placed somewhere else. Ask your system administrator for assistance.
The
Preview Area is used" to search for and select files from your Picture Library. You cannot work on pictures in the Preview Area.N ow you want to recall "OrgChart" to view in the left work area." Then you will view the second file in the right Preview Area.
To redisplay "OrgChart":
~ Select the Preview icon.
"OrgChart" reappears in the left Preview Area.
Next, preview the other file, "People!," in the right Preview Area. "People!" is in the Picture Library.
~ Select the picture tab at the top of the right Preview Area. It says "NoName."
The highlight moves to the right picture tab. The right Preview Area is now the active Preview Area.
Arrows 1 Arrows2
ElectronicSymbols 1 Hardware1
MiscSymbols1 Money1
OrgChart
Money2 OfficeObjects1 OfficeOb jects2 OfficeOb jects3 People1 People2
o
Arrows1 Arrows2
ElectronicSymbols 1 Hardware1
MiscSymbols1 Money1
OrgChart
~ Move the cursor to the file "People!."
~ Click Mark.
What if I select the wrong picture file name?
If you select the wrong file name and a different file appears in the Preview Area, it is easy to replace it with the correct file.
~ Move the cursor to the correct file name and select it.
The correct file appears in the Preview Area.
Redisplaying Both picture files are now visible in the Preview the Draw Menu Area. You can look at your pictures in the Preview Area, but you cannot work with them. To work with
OrgChart
your pictures you need to redisplay the Draw menu.
~ Select the Go icon above the Preview Area.
1135-042
The Draw menu returns to the screen.
OrgChart
The Dual Work Area looks the same as the Preview Area, but in the Dual Work Area you can work with the Draw menu. The Dual Work Area has two windows, each of which can be used to work on a separate picture.
Dual Work Area with a File in Each Window
Copying Objects Into Your Picture
\11
-g-:-IJ\
The file "People!" has several figures in it. You are going to copy the single figure in the left corner into your drawing.
-
0
hl
0 CD~
?~ ~~,
~/~
The last time you copied an object, you used the Pick tool to pick the object first. Here's a shortcut:
~ Select the Copy tool.
The hand cursor appears.
IOrgChart
The body and the head of the figure are two separate objects, so be sure to include them both in the box when you pick the figure.
~ Pick the single figure in the left corner.
A copy box appears in the right work area after you have picked the figure. The box indicates that you have something to copy.
Copy Box ---. and Cursor
1
I~Box Showing
: Picked Objects
1
11~
~ Select the picture tab for "OrgChart."
OrgChart
1135-047
~ To make "OrgChart" the active work area, click Mark.
The copy box now appears in the left work area. You are ready to copy the figure into your picture.
~ Place the copy box as shown, at the bottom of the work area.
~ Click Mark.
The figure appears in "OrgChart."
~ Move the cursor to the Unpick tool.
Notice that the copy box remains in the left work area.
~ Select the Unpick tool.
Both the copy box and the outline around the figure in "Peoplel" disappear.
What 111 make more copies than I want?
When you copy the figure from "People 1" into "OrgChart" you may mistakenly make more than one copy. Or you may miss the picture tab for "OrgChart" and copy the figure into your Picture Library file.
Be sure to delete the copies by picking both the head and body of the figure with the Delete cursor.
If you accidentally delete a part of your chart or Picture Library file, select Undo and restore the deleted work.
To delete any unwanted copies:
~ Select the Delete tool.
Finishing Your Drawing
Refining Your Organization Chart
Retum to the Single Work
Area
OrgChart
Scale and Move
the Left Square
All the objects you need to produce a finished organization chart are now in your picture. All you need to do is work the picture into its final shape.
To do this you are going to move the squares and circle, reduce their size, duplicate the figure, and add text. To move these objects, you need to return to the single work area.
To return to the single work area:
~ Select the single work ~ icon.
Single Work Area Icon
~
o
1135-048
The drawing returns to the large screen.
The Scale and Move tool enables you to increase or decrease the size of an object, to change its proportions, and to move it around on the screen.
\1/
-x-
11\6-?8
gXg8 ".
(0
ru
DO
6-?~
Select the Scale and Move tool.
Notice that the hand cursor remains on the screen •
~ Pick the square on the left, being careful not to pick the crossbar" (even touching the cross bar will pick it).
If you pick the crossbar, select Unpick and pick the square again.
Scale and Move When the square is picked, its outline changes. Nine Uses Handles small boxes, called handles, appear, as shown. Handles are used to alter the size and proportion of an object, and to move an object around on the screen.
1 0
02
03
40
05
D6
70
08
09
1135-050For the purpose of illustration, these handles are numbered, one through nine. These numbers do not appear on the Art Designer screen.
Notice that when the handles appear around the square the cursor has also changed, and now appears
Changing the Length of the Square
Next, stretch the length of the square so that it be-comes a rectangle. You do this by grabbing a handle with the cursor, and moving it in the direction you want it to go.
To grab a handle on the square:
~ Move the cursor to handle 6.
Notice that the handle increases slightly in size.
1
0
L
03
40
El5
CK!
7El
ElB
09
11:111-11111~ Press and hold Mark.
The handles disappear, and the box is highlighted on the screen.
~ Move the cursor to the right approxi-mately one inch, and release Mark.
El2
1 Etl r---.l.---==-=---,.---.,
03
4El
Etl5
~
Stretching the Other Side of the Square
Don't be concerned about the exact distance you stretch the square. For now, focus on making the square longer. When you stretch the square, be sure not to overlap the figure.
Repeat these steps on the left side of the square.
~ Move the cursor to handle 4.
1D~
____
~__
~D~2~~____
~D305 06
70 08 09
11l5--a!2A
~ Press and hold Mark.
~ Move the cursor to the left, approximately the same distance you moved it to the right, and release Mark.
1EJ
02
EJ3LKJ
05
[J671Il 1Il8
09
1135-053
Experiment with the Handles
Unpick the Rectangle
Now play with each handle. Move the handles in any direction, and watch what happens.
Grabbing the center handle, handle 5, moves the rectangle on the screen. Move the rectangle, and return it to its original position.
You cannot damage your picture by experimenting with the handles. After you feel comfortable with each handle, return the rectangle to its original position.
Now that you have finished experimenting with the handles, unpick the rectangle.
~ Select the Unpick tool.
The box that surrounded the rectangle disappears.
Notice also that the Scale and Move tool is still highlighted on the Draw menu. (It is still the selected tool.)
Scale and Move
the Figure
10 02 [J3
4005 08
70 [] []9
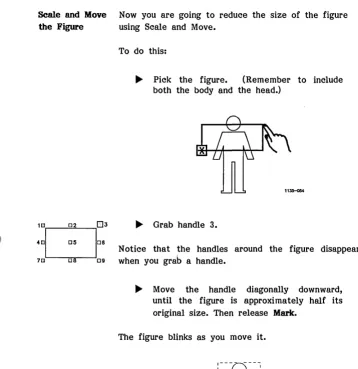
Now you are going to reduce the size of the figure using Scale and Move.
To do this:
~ Pick the figure. (Remember to include both the body and the head.)
~ Grab handle 3.
Notice that the handles around the figure disappear when you grab a handle.
~ Move the handle diagonally downward, until the figure is approximately half its original size. Then release Mark.
The figure blinks as you move it.
[image:66.433.45.403.68.437.2]Scale and Move the Crossbar
andSquares
OrgChart
~ Unpick the figure by selecting the Unpick tool from the Draw menu.
The handles disappear.
Now you are going to Scale and Move the crossbar and squares. You can use Scale and Move with one object, or with several objects. When several objects are picked and worked on together they are called a group.
~ Place the cursor as shown.
~ Press and hold Mark.
~ Move the cursor as shown. Be careful not to cross the edge of the figure. If you cross the figure, unpick the group and pick it again.
NoNa me
1135-067
~ Release Mark.
Scale and Move To Scale and Move the group:
the Group
1 CI Cl2 C3
{~~:=l'
7C1 Cl8 C9
~ Move the cursor to handle 6.
~ Press and hold Mark.
The handles disappear and the group is highlighted.
~ Move the cursor to the right. Stretch the group until it is close to the right edge of the screen, and release Mark.
The handles reappear.
~ Move the cursor to handle 4 on the left side of the group.
o
1
1
01 1
o
Your picture now looks like this:
NoName
o
---1
o
1 1
1
1
1 1 1
1 1
:0
r---'---,
--- ----0--- --- --- --- -
...L...-_ _ _ _ _ - - ' 0Filling the Figure
IQOQQQQO
.DI~~~DDIIIIII H
•
~ ~ _\~/\. \ "- \ 1/\
~-+g
g8gg ' ".
10
'7..J
DO
~-+~
To enhance the figure in your organization chart, you are now going to fill the figure with a pattern from the Fill Palette, located on the Draw menu.
You use the Fill Palette to change an existing pattern or to fill objects that do not have patterns.
To fill the figure:
~ Select the Unpick tool, and unpick the group.
~ Select the Pick tool, and pick the figure •
~ Move the hand cursor to the Fill Palette and select any pattern.
The figure fills with the selected pattern.
t
1135-058, . . . - . - - - N O T E - - - -...
Copying the Figure
h
h
\1/
-g-11\
6~g gXg8
"
. ~
ru
D
0
6~~
~~
l"(..J
~
Notice that the organization chart at the beginning of this booklet has six figures. To complete your chart, copy the figure using the Copy tool.
Follow these steps:
~ Select the Copy tool.
~ Move the copy box below the rectangle on the left, and click Mark •
11311-0lI0
~ Copy the figure three more times as shown.
OrgChart
ttit
~ Place the copy box under the square on the right and copy the figure another three times.
NoNa me
1135-(181
iiii
t
iti
D
Deleting the Figure
h
h
\11
-g-I1 \
~-)8 g8 g
g
"
ru
~
D
0
6-)~
~~
.
(\0
'"'0
Notice that you have one too many figures in your organization chart. To delete the figure from the middle of your screen:
~ Select the Delete tool from the Draw menu.
~ Delete the figure.
The figure disappears from the middle of the screen •
Adding "/ext
Text Completes Now you are going to use text to identify the boxes
Your Picture in the organization chart. Text not only adds information, it also adds visual appeal to your picture.
To add text to your picture:
~ Select the Tools Function label. Charts
lliLJ
The Tools Function menu appears. DrawingsThe Text Menu The Draw menu disappears. The Text menu is
OQQQQQQ
Justification ++
+ SW! 5t '"
S1W.c..b
1.0
t '"
[QD1• Standard o Complex o Bold o Gothic
\1/
h
h
g-/1\
6~g ggg g
"
+
Text is an Object, Too
displayed, along with the text entry line.
The Text menu gives you the ability to add or delete text, move text, change the size and style of type, and set justification.
While the Text menu is displayed you can do many of the same things you do with the Draw menu. You can view the Picture Library, open more than one picture file, and copy text in the Dual Work Area.
Like something you draw, the text you enter is considered an object. Text can be moved, altered, and combined with other objects.
r---NOTE---~
You cannot alter objects you have drawn when you are working with the Text menu.
The Text Marker
The most commonly used tool in the Text menu is the Text Marker tool. It is highlighted when you invoke the Text menu.
Text is typed into the text entry line and appears on the screen at the location of the Text Marker. The
-Text Marker is the cross that appears in the upper portion of the screen.
NoName
Text Marker ---f-~
itii
Position text cursor, type in text, and press GO to execute.
L
Text Entry Line
D
iti
11J5-{J1IJ
Using the Text Marker
Placing the Text Marker in the proper position is the first step toward entering text into your picture.
Experiment with the Text Marker by moving the cursor and clicking Mark several times. (Experi-menting will not affect your picture.) Notice that the Text Marker moves to the position exactly at the tip of the cursor.
When you finish experimenting with the Text Marker, follow these steps to enter text in your drawing:
~ Position the cursor inside the circle, as shown.
1135-014
~ Click Mark.
The Text Marker moves to the position of the cursor.
Entering Text When you type text into the text entry line, the text appears on the screen as an expanding box, called the text placement box. The text placement box appears at the Text Marker.
1
01
1
L_
o
To enter text into the circle:
1
10
11l!HlS1
~ Type XYZ, Inc. on the text entry line.
Notice how the text placement box expands outward from the Text Marker as you type.
~ Select (or press) Go.
XYZ, Inc. appears in the work area, centered from the Text Marker position.
What if the circle is too small?
If the circle you created is too small for the text, you can do one of two things:
1. Increase the size of the circle using Scale and Move, or
Setting the Text Size
n
h
6~g gggg
+
\ II
g
-I 1\
"
Justification
+
+
+~
5
tm
.s.tr.c.tcb
1.0 t
+
In
h
\1/
-g-11\
6~g gXgX
"
+
If the text is too large or too small for the circle, change the size of the text using the Size option on the Text menu. Follow these steps:
~ Select the Pick tool.
~ Pick the text. (Picking only one letter is sufficient to pick all of the text.)
~ Move the cursor to the Size option on the Text menu.
~ Select the Down Arrow.
The size of the text at the Text Marker is reduced slightly. The number decreases by one (for example, 5 becomes 4).
~ Click Mark as many times as needed to reduce the text to a size that fits inside the circle.
Entering Additional Text
If your text is too small, follow the above steps and click Mark on the Up Arrow. This will increase the size of your text.
Once the text size is set, enter the remaining text:
~ Select the Text Marker tool from the Text menu.
To place the text marker in the left square:
~ Move the cursor to the center of the box and click Mark.
~ Type Plastics MFD.
~ Select (or press) Go.
If the text is too large, follow the directions above and modify it.
To place the text marker in the right square:
~ Move the cursor to the center of the box and click Mark.
~ Type FC, Ltd.
Your screen looks like this:
NoName
Plastics MFD
tilt
tii
What
ifI want to change the text I just entered?
If you have entered text, and you want to change it, you have several options.
If you want to change the content of the text:
~ Select the Pick tool and pick the text.
The text is highlighted and the text entry line appears above the Function labels.
The following message appears above the text entry line: UModify text here and press Go to execute"
~ To remove the existing text from the text entry line, and from the screen, press Backspace.
~ Type in the new text.
~ Press Go.
The modified text is displayed on the screen.
~ Unpick the text.
Centering Your Text Using
Scale and Move
If the text is typed over the boundaries of an object, it may appear that a part of the object is removed when you delete
the text. Don't worry; this is an illusion. To correct the appearance of an object:
~ Select the Redraw Function label.
The picture is redrawn and restored to its original appearance.
Once you have entered the additional text, you may notic'e that although you have sized the text cor-rectly, it may not be centered in the box or circle.
To center the text, use Scale and Move as follows:
~ Select the Scale and Move tool.
~ When the hand cursor appears, pick' the text.
Handles surround the text.
~ Grab handle 5 and center the text inside the box or circle.
A Finished Picture!
Congratulations! Now that you have centered the text, your drawing is complete. -You have successfully drawn and edited your first picture.
Plastics MFD
ttit
ttt
Be sure to save your picture now that you are finished. Your picture is not stored on disk until it
Fine Tuning Your Picture
Using Zoom
Printing or Plotting Your Picture
Exiting the Art Designer
The Art Designer offers additional features for fine tuning your picture. One such feature is Zoom. Using Zoom is like passing a magnifying glass over your picture. The part that is magnified stands out. Zoom is useful for making adjustments that enhance your pictures.
Zoom is described in detail in the Art Designer: Charts and Drawings manual.
Now that you have completed your picture, you may want to print it to a dot matrix or laser printer, or plot it on a plotter. For more information on printing and plotting your drawing, see the Art Designer: Charts and Drawings manual.
To end this session and exit the Art Designer:
~ Press Finish.
~ Press Go.
What Other Drawings Can I Create with the Art Designer?
,,\I//,
-~-
...,~
You can create several other kinds of drawings using the Art Designer. Many are much more complex than an organization chart.
Below are three examples of other kinds of drawings you may want to make.
For more specific information on different kinds of pictures, see the Art Designer: Charts and Drawings manual.
r---.
~
..
":-~
'r-~~ 'r-~~ ~
I
I
I
I
I
I
I
r
1
1135-071