Remote Data Collection System - SITRAIN
22/03/2011 Remote Data Collection System – Users’ Manual C.O.N.SO.B.
2
Amendment History
Date Version Type of amendment 28/01/2011 1.0 Document creation.
25/02/2011 1.1 Amendment to the name of the function “Complete Online”.
Amendment to the name of the section “Documentation on an event basis”.
22/03/2011 Remote Data Collection System – Users’ Manual C.O.N.SO.B.
3
Contents Summary
1 Introduction ... 5
2 Accessing/Exiting the System ... 6
2.1 Accessing the system ... 6
2.2 Exiting the System ... 7
3 General Functions ... 8 3.1 Complete OnLine ... 9 3.2 Send File ... 9 3.3 Check File ... 10 3.4 Send XML File ... 11 3.5 Check XML File ... 11 3.6 Search ... 11 3.7 Rectify ... 14
3.8 Copy from historical list ... 14
3.9 Report Receipt ... 15
4 List of communications issued within the home State ... 16
4.1 Available Functions ... 16
4.2 Complete Online ... 16
4.3 Search ... 18
4.4 Rectify ... 18
5 Information on provisions taken against tied agents ... 19
5.1 Available Functions ... 19
5.2 Complete Online ... 19
5.3 Search ... 22
5.4 Rectify ... 23
5.5 Copy from historical list ... 23
6 Data on tied agents’ operations ... 24
6.1 Available Functions ... 24
6.2 Send XML File ... 24
6.3 Check XML File ... 24
6.4 Search ... 24
6.5 Rectify ... 24
7 Commencement, interruption and resumption of investment service provisions ... 25
7.1 Available Functions ... 25
7.2 Complete Online ... 25
7.3 Search ... 28
7.4 Rectify ... 28
7.5 Copy from historical list ... 28
8 List of the placement agents ... 29
8.1 Available Functions ... 29 8.2 Complete Online ... 29 8.3 Send XML File ... 33 8.4 Check XML File ... 33 8.5 Search ... 34 8.6 Rectify ... 34
4
Summary of Figures
Figure 1 – Accessing the system ... 6
Figure 2 – Exiting the System ... 7
Figure 3 – Welcome Page ... 8
Figure 4 – Send File ... 10
Figure 5 – Example of incorrect reporting ... 10
Figure 6 – Search ... 12
Figure 7 – Search Result ... 12
Figure 8 – Communication Completed ... 15
Figure 9 – Heading of list of communications issued within the home State ... 16
Figure 10 – Summary of list of communications issued within the home State, without a document attached ... 17
Figure 11 – Document attached to list of communications issued within the home State ... 17
Figure 12 – Summary of list of communications issued within the home State with a document attached ... 18
Figure 13 – Heading of information on provisions taken against tied agents ... 19
Figure 14 – Summary of information on provisions taken against tied agents ... 20
Figure 15 – Add Provision ... 21
Figure 16 – Summary of information on provisions taken against tied agents with a provision entered ... 22
Figure 17 – Data on main tied agents’ operations ... 24
Figure 18 – Heading of commencement, interruption and resumption of investment service provisions ... 25
Figure 19 – Summary of commencement, interruption and resumption of investment service provisions ... 26
Figure 20 – List of Services ... 26
Figure 21 – Summary with services entered ... 27
Figure 22 – Heading of list of the placement agents... 29
Figure 23 – Summary of list of the placement agents ... 30
Figure 24 – Entry of UCI ISIN code ... 30
Figure 25 – Summary of UCI ISIN code ... 30
Figure 26 – Entry of placement agent (Legal Entity) ... 31
Figure 27 – Entry of placement agent (Individual) ... 31
Figure 28 – Summary of UCI ISIN Code with placement agent ... 32
5
1
Introduction
The herein document describes the use of the Remote Data Collection System. Access to this system is only permitted for enabled parties and stockbrokers for forwarding reports as foreseen by the Consob resolution no. 14015 and later updates.
The system can only be used by authorised users who have identification codes (“Username” and “Password”) issued to them by Consob.
In order to use the remote data collection system, a standard Internet browser is required, with no other additional component.
The minimum browser requirements are as follows: Mozilla Firefox 3.6.x;
Microsoft Internet Explorer 6.x.
The document below contains a description of the methods for using the various functions for each case of reporting.
The manual is set out as follows:
Chapter 2 “Accessing/Exiting the system”: Describes the system access methods.
Chapter 3 “General Functions”: Describes the management modes (“Send”, “Search”, “Display” etc) shared by all the reports.
Chapter 4 and following: Describes the management modes (“Send”, “Search”, “Display” etc) showed in detail in each report.
6
2
Accessing/Exiting the System
2.1
Accessing the system
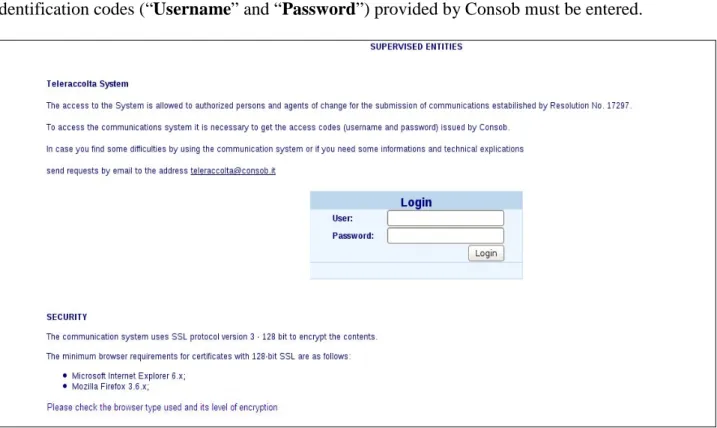
On opening the application, the “System Access” page can be seen (Figure 1), where the identification codes (“Username” and “Password”) provided by Consob must be entered.
Figure 1 - Accessing the system
The “Login” button activates the access control function and, if the parameters entered correspond to a valid system user, the Welcome page then appears (Figure 3), otherwise an error is reported, with the message “Account not valid, try again…” and it is necessary to change the identification data to access the system.
7
2.2
Exiting the System
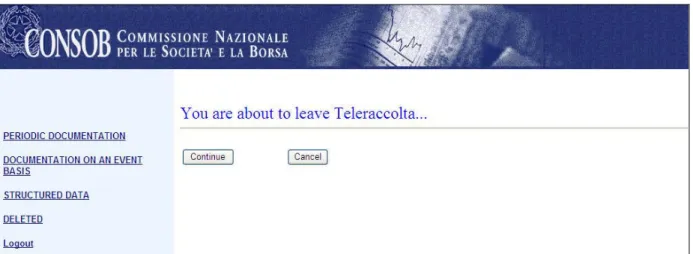
By selecting the item “Logout” from the menu, the remote data collection system exit page then appears (Figure 2) .
The “Continue” button allows the user to exit the work session and return to the “System Access” page (Figure 1) to connect to the system with a new user.
The “Cancel” button allows the user to continue using the system for the current work session.
8
3
General Functions
The system’s main functions are briefly described on the Welcome Page (Figure 3) that is organised into three frames like all the pages: The upper part contains the Consob logo; the left part contains the main menu, with links to accessible information obligations, built dynamically according to the authorisations that the connected user has been granted; the right part is the operating area where the user/system interaction pages are shown.
Figure 3– Welcome Page
The main functions available are as follows: Complete Online; Send File; Check File; Send XML File; Check XML File; Search; Rectify;
9 Copy from historical list.
General Notes
The following graphic symbols are used in the description of the system: An asterisk next to the field indicates that the field is mandatory;
A red triangle next to the field indicates that the system has found a formal error in the field (e.g. syntax error, mandatory field not filled out, etc). The associated error message can be seen by passing the mouse over the triangle.
3.1
Complete OnLine
The function “Complete Online” allows information regarding the specific report to be entered (using electronic models that reproduce the paper statements described by the attachments to Resolution 14015). It is also possible to forward the information to CO.N.SO.B. and obtain the relative receipt.
Please refer to the specific chapters on reports for detailed information on these functions.
3.2
Send File
The function “Send File”, which is only available for structured reports, allows a file containing information about a specific report to be sent to CO.N.SO.B. and the relative communication receipt to be received1.
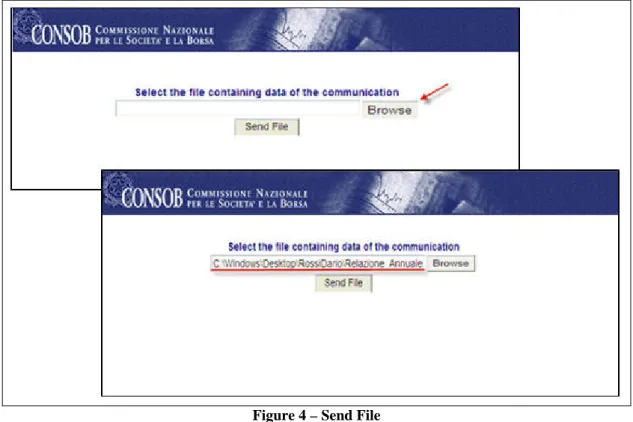
By selecting the menu item “Send File”, the page “Send File” (Figure 4) is then displayed, from where it is possible (“Browse” button) to select the file contained on one’s own workstation and then send it (“Send File” button) to CO.N.SO.B.
10
Figure 4 – Send File
If the file contains formal errors (such as inconsistencies in the types of data, incorrect or missing values compared to what is set out in Resolution 14015), an error page appears (Figure 5) and the relative report is not sent to CO.N.SO.B. It is therefore necessary to correct these errors and repeat sending.
Figure 5– Example of incorrect reporting
3.3
Check File
The function “Check file” allows the formal correctness of the file to be sent to CO.N.SO.B. to be checked without proceeding with sending it.
The checks carried out are the same as the ones used in the “Send File” function. If the file is found to be formally correct, the message “The file is correctly formatted” appears.
11
3.4
Send XML File
The function “Send XML File”, which is only available for structured reports, allows a file containing information about a specific report to be sent to CO.N.SO.B. and the relative communication receipt to be received2
By selecting the menu item “Send XML File”, the page “Send XML File” is then displayed, from where it is possible (“Browse” button) to select the file contained on one’s own workstation and then send it (“Send File” button) to CO.N.SO.B.
.
If the file contains formal errors (such as inconsistencies in the types of data, incorrect or missing values compared to what is set out in Resolution 14015), an error page appears and the relative report is not sent to CO.N.SO.B. It is therefore necessary to correct these errors and repeat sending.
3.5
Check XML File
The function “Check XML File” allows the formal correctness of the file to be sent to CO.N.SO.B. to be checked without proceeding with sending it.
The checks carried out are the same as the ones used in the “Send XML File” function. If the file is found to be formally correct, the message “The file is correctly formatted” appears.
Operational modes are similar to the ones described for the “Send XML File” function.
3.6
Search
The “Search” function works to select (based on some parameters) and then view the reports sent to CO.N.SO.B. with the possibility of printing the contents and transmission information.
By selecting the menu item “Search”, the search page appears (Figure 6 ), where it is possible to select the reports according to the following optional parameters:
Period of sending report;
Communication mode: Complete the web form [ on-line ] or sending the file [ upload ].
12
Figure 6 – Search
The “Search” button activates the search, based on the set parameters and the relative results can be seen on the “Search Result” page (Figure 7).
Figure 7 – Search Result
The following information about the selected communications can be seen: Link “details”:shows the report that has been sent.
Report: Type of information obligation;
Transmission: Complete the web form (Online) or sending the file (Upload);
Date: The date and time of receipt;
Status: This indicates whether the report has been corrected or not (If it has been corrected, it is
possible to view the correction by selecting the link “corrected”);
Result: This indicates whether the report has been processed and the relative result. The possible
values are as follows:
13
Refused: Indicates that during processing, some irregularities in the report were found (the description of the irregularities found, if present, can be seen by keeping the mouse over the red triangle next to the word “Refused”) .
Substituted: This is a result associated with a report corrected by the user. The word “Substituted” indicates that the system has substituted the data present in the report with the data in the relative correcting report.
14
3.7
Rectify
The “Rectify" function allows the reports sent to CO.N.SO.B. based on some parameters (see Search”) to be selected and then viewed, with the possibility of carrying out corrections, modifying contents and the transmission information.
By selecting the menu item “Rectify”, the “Search for Rectify” page appears, where it is possible to select the reports according to the following optional parameters:
Period of sending report;
Communication mode: Complete the web form [On-line] or sending the file [Upload] The “Search” button activates the search, based on the set parameters and the relative results can be seen on the “Search Result” (Figure 7).
By selecting the “details” link3
N.B. It is possible to rectify one report only using the same communication mode (Online or Upload) used for the original report.
it is possible to access the original report. By pressing the “Prepare Correction” button, the same report appears to the user in a format wherein the data can be modified for correction purposes.
3.8
Copy from historical list
The “Copy from historical list" function allows the reports sent to CO.N.SO.B. based on some parameters (see.“Search”), to be selected and then viewed, with the possibility of creating a new report starting with the contents of a previously sent report.
By selecting the menu item “Copy from historical list”, the “Search for Copy from historical list” page appears, where it is possible to select the reports according to the following optional parameters:
Period of sending report;
Communication mode: Complete the web form web [On-line] or sending the file [Upload] The “Search” button activates the search, based on the set parameters and the relative results can be seen on the “Search Result” page (Figure 7).
By selecting the “Details” link, it is possible to view the report that is to be used as the original for the copy 4.
3 By selecting a report which has a “Corrected” status, the original report is accessed, but without the possibilityof
correcting it. From here, the user has the possibility via the link “The communication has been corrected”. To see the details of the new communication, press “here” to access the correctable version and then correct the latter.
4 The System does not allow the automatic re-use of attachments found in the original report for the copy from historical
15
N.B. It is not possible to copy a report sent via upload: in this case, the system will send the following message “The communication has been sent via file, therefore it cannot be copied from the historical list”.
3.9
Report Receipt
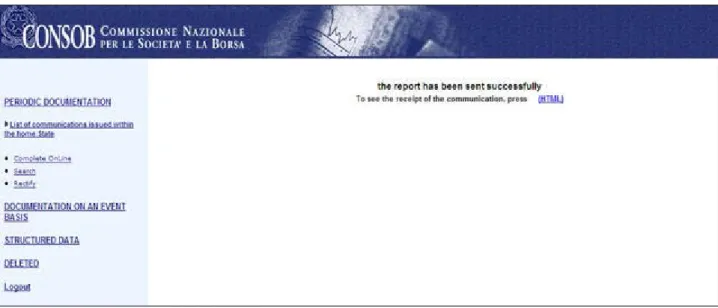
If the report sending was successful (via the “Complete OnLine”, “Send File”,”Rectify” or “Copy
from historical list” functions), the “Communication completed” (Figure 8) page appears, where, by
selecting the “HTML” link, the transmission receipt is obtained, in the HTML format, on which it is possible to carry out the usual operations (view, print, save, etc), allowed by the browser.
16
4
List of communications issued within the home State
4.1
Available Functions
Complete Online;
Search;
Rectify.
4.2
Complete Online
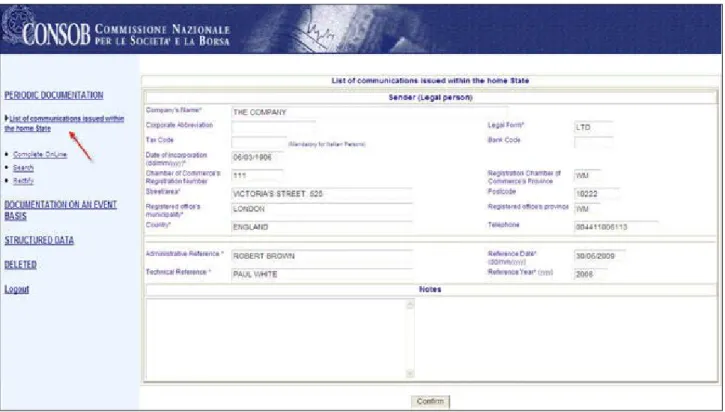
By activating this function from the menu, the system proposes the heading page, in which it is possible to enter general information about the report (Figure 9 ).
The system automatically displays the data of the Sender (Legal person) who carried out authentication.
Figure 9 - Heading of list of communications issued within the home State
By selecting the “Confirm” button, the system carries out controls on the entered data, highlighting any errors found; in the event that the report is correct, it is saved and the summary page is then displayed (Figure 10 ).
17
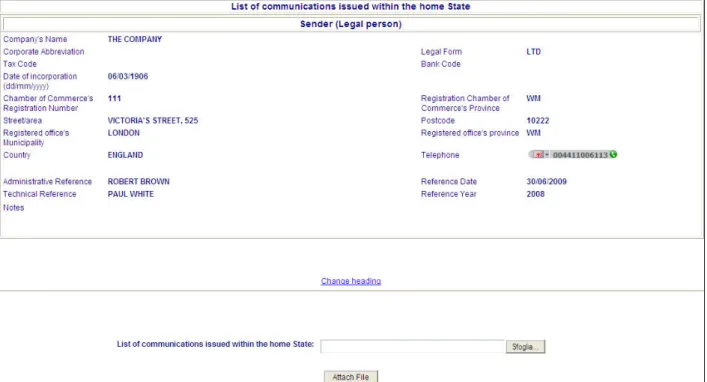
Figure 10 - Summary of list of communications issued within the home State, without a document attached
It is possible to carry out the following operations from this page:
“Change Heading” link: allows the user to return to the report heading page (Figure 9 ) and change the previously entered data.
To send the report it is necessary to attach a document.
It is possible to select the document to be attached (“Browse” button), cancel the selection (“Cancel” button), returning to the previous page, or confirm the document entry (“Confirm” button) and view the summary page (Figure 12 ), containing the summary of the general information of the report and the selected document.
Figure 11 - Document attached to list of communications issued within the home State
In this page it is possible to:
• Attach the document, by selecting the “Browse” button;
18
After selecting this button, the system shows the summary page (Figure 12 ), containing the summary of the general information about the report and the selected document.
Figure 12 - Summary of list of communications issued within the home State with a document attached
It is possible to carry out the following operations on this page:
“Remove Attachment” link: this selection removes the relative document.
“Change Heading” link: allows the user to return to the heading page (Figure 9 ) and change the previously entered data.
“Send Report” button: sends the data shown on the summary page to Consob.
If the sending is successful, the “Communication completed” (Figure 8) page appears, where, by selecting the “HTML” link, the transmission receipt is obtained, in the HTML format, on which it is possible to carry out the usual operations (view, print, save, etc), allowed by the browser.
(IMPORTANT: The “Send Report” button only appears when the general information and document required for information obligations have been entered).
4.3
Search
See paragraph 3.6 “Search”
4.4
Rectify
19
5
Information on provisions taken against tied agents
5.1
Available Functions
Complete Online;
Search;
Rectify;
Copy from historical list.
5.2
Complete Online
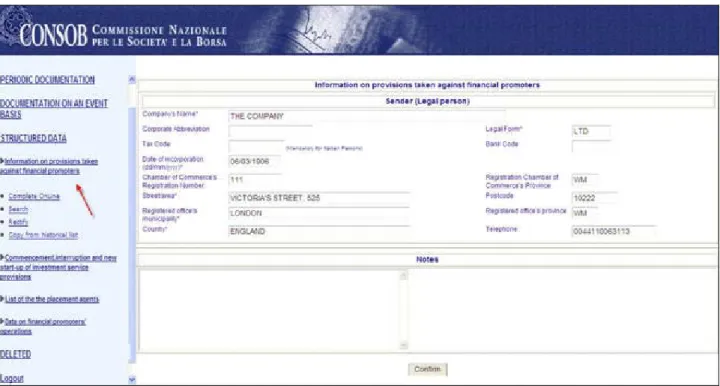
By activating this function from the menu, the system proposes the heading page, in which it is possible to enter general information about the report (Figure 13 ).
The system automatically displays the data of the Sender (Legal person) who carried out authentication.
Figure 13 - Heading of information on provisions taken against tied agents
By selecting the “Confirm” button, the system carries out controls on the entered data, highlighting any errors found; in the event that the report is correct, it is saved and the summary page is then displayed (Figure 14 ).
20
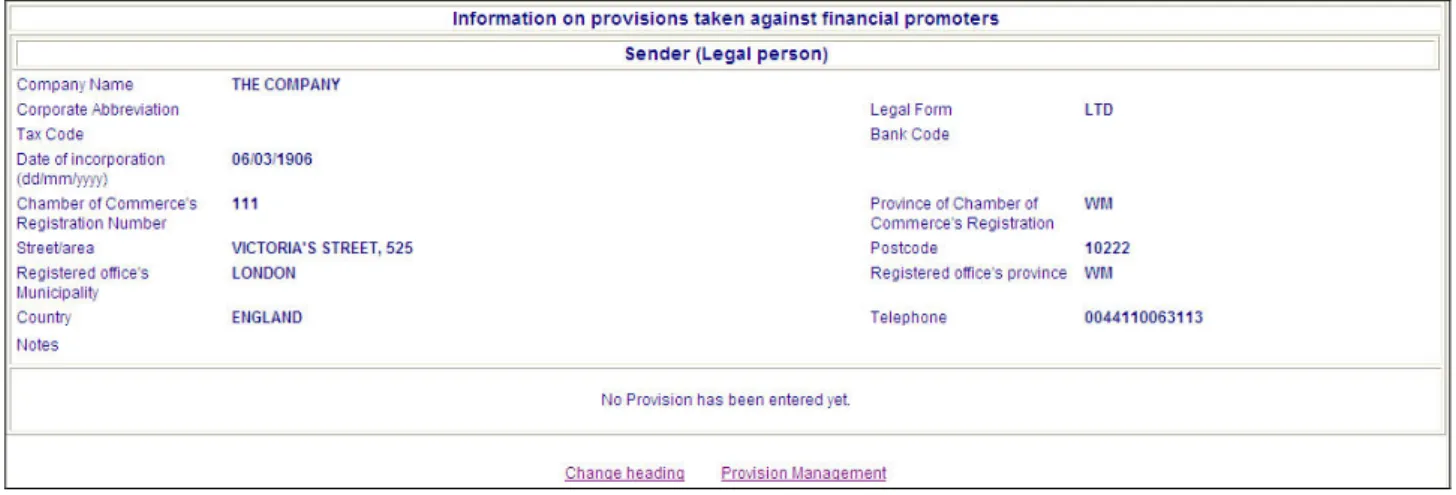
Figure 14 - Summary of information on provisions taken against tied agents
It is possible to carry out the following operations from this page:
“Change Heading” link: allows the user to return to the heading page (Figure 13 ) and change the previously entered data.
“Provision Management” link: this allows the user to access the page (Figure 15 ) for entering information about the tied agent and the provisions.
21
22
It is possible to enter information about the tied agent and the provision on this page and carry out the following operations:
“Cancel” button: returns the user to the summary page (Figure 14 ) without making any changes to the report’s general data.
“Confirm” button: This checks the entered data, highlighting any errors found; if the communication is correct, it is saved and then the summary page of the provisions taken against the tied agents appears (Figure 16) updated with the information entered.
Figure 16 – Summary of information on provisions taken against tied agents with a provision entered
It is possible to carry out the following operations on this page:
“Change Heading” link: allows the user to return to the “heading” page (Figure 13 ) and change the previously entered data.
“Provision Management” link: this allows the user to access the page (Figure 15 ) for entering information about the tied agent and the provisions.
“Send Report” button: sends the data shown on the summary page to Consob.
If the sending is successful 5 the “Communication completed” (Figure 8) page appears, where, by selecting the “HTML” link, the transmission receipt is obtained, in the HTML format, on which it is possible to carry out the usual operations (view, print, save, etc), allowed by the browser.
(IMPORTANT: The “Send Report” button only appears when the general information and document required for information obligations have been entered).
5.3
Search
See paragraph 3.6 “Search”
5 For all the reports that so require, if the user enters an Italian subject and does not fill out the field “Tax Code”, which
23
5.4
Rectify
The “Rectify" function allows the reports sent to CO.N.SO.B, based on some parameters (see
“Search”) to be selected and then viewed, with the possibility of carrying out corrections,
modifying contents and the transmission information.
By selecting the menu item “Rectify”, the “Search for Rectify” page appears where it is possible to make the selection based on the following optional search parameters:
Period of sending report;
Communication mode: Filling out the web form [On-line] o invio file [Upload].
The “Search” button activates the search, based on the set parameters and the relative results can be seen on the “Search Result” page (Figure 7).
By selecting the “details”6
Figure 15
link, it is possible to access the original report. By using the “Prepare Correction” button, the same report shows the provision details page ( ).
N.B. It is possible to correct one report only using the same communication mode (Online or Upload) used for the original report.
5.5
Copy from historical list
See paragraph 3.8 “Copy from historical list”
6
By selecting a report which has a “Corrected” status, the original report is accessed, but without the possibilityof correcting it. From here, the user has the possibility via the link “The communication has been corrected”. To see the details of the new communication, press “here” to access the correctable version and then correct the latter.
24
6
Data on tied agents’ operations
Figure 17 – Data on main tied agents’ operations
6.1
Available Functions
Send XML File; Check XML File; Search; Rectify.6.2
Send XML File
See paragraph 3.4 “Send XML File
6.3
Check XML File
See paragraph 3.5 “Check XML File”
6.4
Search
See paragraph 3.6 “Search”
6.5
Rectify
25
7
Commencement, interruption and resumption
of
investment service provisions
7.1
Available Functions
Complete Online;
Search;
Rectify;
Copy from historical list.
7.2
Complete Online
By activating this function from the menu, the system proposes the heading page, in which it is possible to enter general information about the report (Figure 18 ).
The system automatically displays the data of the Sender (Legal person) who carried out authentication.
Figure 18 - Heading of commencement, interruption and resumption of investment service provisions
By selecting the “Confirm” button, the system carries out controls on the entered data, highlighting any errors found; in the event that the report is correct, it is saved and the summary page is then displayed (Figure 19 ).
26
Figure 19 - Summary of commencement, interruption and resumption of investment service provisions
It is possible to carry out the following operations from this page:
“Change Heading” link: allows the user to return to the heading page (Figure 18 ) and change the previously entered data.
“Services management” link: Allows the user to access the “List of Services” page (Figure 20 ) and enter the reference dates (start date, interruption date, re-start up date) concerning services and investment activities.
NOTE: It is necessary to give a value to at least one of the services, entering a reference date (start, interruption, re-start).
Figure 20 – List of Services
The services differ depending on the types of enabled subjects, and are summarised in Table 1
• Consultancy services for investments; Investment Companies,
BCA, AGC, IICCS, IECS, IESS
• Own negotiations;
• Carrying out of orders on clients’ behalf;
• Receipt and transmission of orders;
• Management of multi-lateral negotiation systems;
• Placement without firm underwriting or guarantee for issuing party;
• Portfolio management;
• Underwriting and/or placement with firm underwriting or with guarantee for issuing party.
• Placement and cold calling; IFIN
• Own negotiations;
27
• Consultancy services for investments; Saving Companies, SGCS, SGSS • Commercialisation of UCIs; • Portfolio management; • Collective management; • Pension funds. • Commercialisation of UCIs. SICAV Table 1
It is possible to enter the services reference data on this page and carry out the following operations: “Cancel” button: returns the user to the summary page (Figure 19 ) without making any changes to the report’s general data.
“Confirm” button: This checks the data entered, highlighting any errors found; if the communication is correct, the data is saved and then the summary page appears (Figure 21) updated with the information entered.
Figure 21 - Summary with services entered
It is possible to carry out the following operations on this page:
“Change Heading” link: allows the user to return to the “heading” page (Figure 18 ) and change the previously entered data.
“Remove Service” link: removes the entered service.
“Services Management” link: allows the user to return to the “List of Services” page (Figure 20 ) and change the previously entered data.
“Send Report” button: sends the data shown on the summary page to Consob.
If the sending is successful, the “Communication completed” (Figure 8) page appears, where, by selecting the “HTML” link, the transmission receipt is obtained, in the HTML format, on which it is possible to carry out the usual operations (view, print, save, etc), allowed by the browser.
28
(IMPORTANT: The “Send Report” button only appears when the general information and document required for information obligations have been entered).
7.3
Search
See paragraph 3.6 “Search”
7.4
Rectify
See paragraph 3.7 “Rectify”
7.5
Copy from historical list
29
8
List of the placement agents
8.1
Available Functions
Complete Online; Send XML File; Check XML File; Search; Rectify; Copy from historical list.
8.2
Complete Online
By activating this function from the menu, the system proposes the heading page, in which it is possible to enter general information about the report (Figure 22 ).
The system automatically displays the data of the Sender (Legal person) who carried out authentication.
Figure 22 - Heading of list of the placement agents
By selecting the “Confirm” button, the system carries out controls on the entered data, highlighting any errors found; in the event that the report is correct, it is saved and the summary page is then displayed (Figure 23).
30
Figure 23 - Summary of list of the placement agents
It is possible to carry out the following operations from this page:
“Change Heading” link: allows the user to return to the heading page (Figure 22 ) and change the previously entered data.
“Addition of UCI ISIN” link: This allows the user to access the “UCI ISIN” page (Figure 24 ) and enter the UCI ISIN code.
Figure 24 - Entry of UCI ISIN code
It is possible to carry out the following operations from this page:
“Cancel” button: returns the user to the summary page (Figure 23) without making changes to the report’s general data.
“Confirm” button: this carries out the checks on entered data, highlighting any errors found; if the communication is correct, it is saved and then the summary page appears (Figure 25 ), updated with the UCI ISIN code entered.
31
It is possible to carry out the following operations from this page:
“Modify UCI” link: allows the user to return to the heading page (Figure 24 ) and change the previously entered data about the UCI. ISIN code.
“Add Placement (Legal Entity)” Link: This link accesses the “Placement agent” page (Figure 26 ) where it is possible to enter the information on the legal entity placement agent.
“Add Placement (Individual)” Link: This link accesses the “Placement agent” page (Figure 27) where it is possible to enter the information on the individual placement agent.
Figure 26 – Entry of placement agent (Legal Entity)
32
It is possible to carry out the following operations from these pages:
“Cancel” button: allows the user to return to the summary page with the code entered (Figure 25 ). “Confirm” button: this checks the data entered, highlighting any errors found; if the communication is correct, the data is saved and then the “UCI ISIN” summary page appears (Figure 28) updated with the placement agent entered.
Figure 28 - Summary of UCI ISIN Code with placement agent
It is possible to carry out the following operations from this page:
“Company Name” link: This link accesses the “Placement agent” page (Figure 26 ) where it is possible to modify the information on the legal entity placement agent.
“Name Surname” link: This link accesses the “Placement agent” page (Figure 27) where it is possible to modify the data entered on the individual placement agent.
“Remove” link: removes the entered placement agent.
“Modify UCI” link: allows the user to return to the heading page (Figure 24 ) and change the previously entered data about the UCI. ISIN code.
“Add Placement (legal entity)” Link: This link accesses the “Placement agent” page (Figure 26 ) where it is possible to enter the information on the legal entity placement agent.
“Add Placement (individual)” Link: This link accesses the “Placement agent” page (Figure 27) where it is possible to enter the information on the individual placement agent.
“Confirm” button: this checks the data entered and then displays the report summary page (Figure 29 ), updated with the UCI ISIN code entered.
33
Figure 29 - Summary of list of the placement agents report
It is possible to carry out the following operations from this page:
“UCI ISIN Code” link: allows the user to return to the “UCI ISIN” page (Figure 28) and change the previously entered data on the UCI ISIN and placement agent entered.
“Remove” link: removes the UCI ISIN code entered.
“Change Heading” link: allows the user to return to the heading page (Figure 22 ) and change the previously entered data.
“Addition of UCI ISIN” link: This allows the user to access the “UCI ISIN” page (Figure 24 ) and enter a new UCI ISIN code.
“Send Report” button: sends the data shown on the summary page to Consob.
If the sending is successful, the “Communication completed” (Figure 8) page appears, where, by selecting the “HTML” link, the transmission receipt is obtained, in the HTML format, on which it is possible to carry out the usual operations (view, print, save, etc), allowed by the browser.
(IMPORTANT: The “Send Report” button only appears when the general information and document required for information obligations have been entered).
8.3
Send XML File
See paragraph 3.4 “Send XML File
8.4
Check XML File
34
8.5
Search
See paragraph 3.6 “Search”
8.6
Rectify
See paragraph 3.7 “Rectify”
