Funk Software, Inc. 222 Third Street Cambridge, MA 02142
617 497-6339
617 491-6503 (technical support)
© Copyright 1992-1996 Funk Software, Inc. All rights reserved. 2nd Edition, September 1996.
Part No. 166-024-764
Proxy © 1992-1996 Funk Software, Inc. All rights reserved.
Table of Contents
Introducing Proxy
5
Welcome to Proxy ... 6
How Proxy Works ... 6
System Requirements ... 9
Installing Proxy... 9
Technical Support... 10
The Proxy Basics
11
Starting Proxy ... 12Using the Proxy Menu... 12
Standard Control Menu Commands... 13
Connecting to a Host PC via IPX... 14
Connecting to a Host PC via IP... 17
Wildcards in Station Names ... 21
Passwords... 21
Request Permission ... 21
Creating a Shortcut ... 22
Interacting with the Host PC ... 23
Copying to the Clipboard ... 24
Rebooting the Host PC ... 25
Disconnecting ... 25
Proxy Settings and Preferences
27
The Settings Dialog ... 28Master Settings ... 29
Mouse Transmission... 30
Local Keys ... 32
Host Settings... 32
Proxy Tasks
39
Task Capabilities ... 40
The Task Dialog ... 40
The Task Description Dialog ... 42
The Proxy Host
45
Starting the Proxy Host ... 46The Host Control Panel ... 46
DOS Proxy Host Support ... 56
Tips and Techniques
59
Controlling Many Host PCs ... 60Setting Up Banks of Host PCs ... 60
The Proxy Command Line ... 61
Introducing Proxy
Welcome to Proxy
Thank you for selecting Proxy.
Proxy is a network-based remote control program that lets you fully take over any PC on your network, right from a Windows or Windows 95 session. You can control multiple PCs simultaneously; the controlled PCs can be running DOS, Windows, or Windows 95.
Typical uses for Proxy include:
network-based technical support and help desk
accessing files and applications on a remote network over a remote node dial-in connection
centralized software installation, updates, and system configuration
software training
monitoring of unattended PCs, such as job servers or data-collecting workstations
How Proxy Works
Proxy contains two major components:
The Proxy “Master” is a Windows application that allows you to take over other PCs on your network.
The Proxy “Host” is a program that you load on the PC that you’d like to take over.
The Master and Host communicate via the IPX or IP protocols.
The Proxy Master
With the Proxy Master program (PROXY.EXE), you can control any host machine on your network from Windows or Windows 95, using the IPX or IP protocol.
When you want to connect to a PC, Proxy will poll the network to locate all the workstations that have the Proxy Host loaded and are available to be taken over. You simply select the PC you want to take over from the list of workstation names that Proxy displays.
You can also set up Windows shortcuts that automatically run Proxy and connect to different machines. You’ll then be able to take over any PC simply by clicking on its icon.
Once connected, the screen of the host PC will be displayed in your window, and you’ll have complete mouse and keyboard control of the host PC. Proxy can render the screen of the other PC whether it is in text mode, graphics mode, or even if it is running Windows.
You can display each PC in a full-sized window, or you can trim the windows down to see a number of PCs at once. Even when the windows are reduced in size, you can scroll to see any section using the scroll bars, or you can let Proxy automatically scroll based on mouse and cursor position.
The Proxy Master has many other features that make it easy to connect to and operate other PCs. You’ll be able to:
Customize text mode display with a selection of fonts
Copy any part of any screen (text or graphics) to the clipboard
Reboot the host remotely, with automatic re-connect
Poll the local network segment or across routers for available hosts
The Proxy Host
With the Proxy Host software loaded, your workstation is available to be controlled by Proxy Master stations across the network.
The Proxy Host software can be run from the following PC operating systems:
Windows or Windows 95 — Using a special Windows application, PHOSTWIN.EXE, using the IP or IPX protocol. After installation, PHOSTWIN will always run whenever Windows is started.
DOS — Using PHOST.EXE, a memory-resident program (TSR) that is loaded on the machine that you want to control using the IPX protocol. PHOST can be loaded into high memory on a 386 or above if you use DOS version 5.0 or higher, or a suitable memory manager.
The Host Control Panel permits you to set various options for controlling access to your host PC. You can:
Lock out others at any time, or require specific permission to connect
Set times during which outside access is permitted
Require a password for access
Elect that your host PC beep whenever a Proxy Master takes or relinquishes control
Elect that your host PC beep while a Proxy Master has control
Determine if a session is in progress, and which master station is currently connected
System Requirements
The Proxy Master software runs as a Windows or Windows 95 application, and requires a 386 or higher PC with at least 4 MB of RAM.
The Proxy Host software runs as a Windows or Windows 95 application, and requires a 386 or higher PC with at least 4 MB of RAM.
The DOS Proxy Host software runs as a memory resident program, and requires DOS version 5.0 or higher; it uses approximately 9K of conventional memory when loaded with the DPMS memory manager.
Proxy can be run over any type of network including dial-up, ethernet, token ring, and FDDI, using either one of the following standard protocols:
IPX — usually run on networks using Novell NetWare. It is not
necessary for either the master or host workstation to be logged in to a server, nor is it necessary to run a network client.
For Windows 3.x you need the Novell 16-bit (VLM) or 32-bit Client IPX protocol support.
For Windows 95 you need to use the Microsoft Client for NetWare Networks, or Novell’s Client-32 IPX protocol support.
IP — a general purpose protocol supported on a wide variety of
networks and servers.
For Windows 3.x you need to use a Winsock 1.1-compliant IP stack.
When running Windows 95 you need to use a TDI-compliant 32-bit IP stack, such as Microsoft’s TCP/IP.
Installing Proxy
Technical Support
If you have questions or problems as you install or use Proxy, please contact our Technical Support engineers using one of the following methods.
This manual and the README files on your diskettes may contain the information you need to solve the problem you are having. Please re-read the relevant sections — you may find a solution you overlooked.
We can be reached by sending e-mail to our Internet address
[email protected]. Note that most on-line services such as
CompuServe, America On Line, Microsoft Network, and Prodigy offer an Internet e-mail gateway.
We can also be reached through our world wide web server on the Internet at http://www.funk.com.
Our technical support staff is available to assist you Monday through Friday between 9:00 AM and 5:30 PM Eastern Standard Time at (617) 491-6503, or via fax at (617) 547-1031.
If you’re located outside North America, please refer to the enclosed sheet entitled Authorized International Partners for the name of the support provider in your country.
The Proxy Basics
Starting Proxy
You start Proxy just as you would any Windows application—either double-click on its icon, or use the Windows 95 Start Run or Windows Program Manager
File Run command. The name of the program to run is PROXY.EXE.
Each time you start Proxy you create a new Proxy window. You can have several Proxy windows active at once. Each Proxy window can be connected to a
different host PC.
Using the Proxy Menu
When you first start up Proxy, you’ll notice that, unlike most Windows
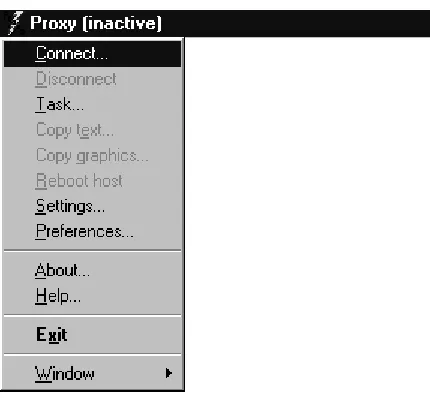
applications, Proxy does not have a menu bar. Instead, all Proxy commands are contained in the Control Menu. This is to allow more space for showing the screen of the host PC.
[image:11.612.219.434.306.505.2]To issue a Proxy command, simply click the Control Menu button in the upper left corner of the Proxy window, then select the appropriate command.
Figure 2-1: The Proxy Control Menu
Standard Control Menu Commands
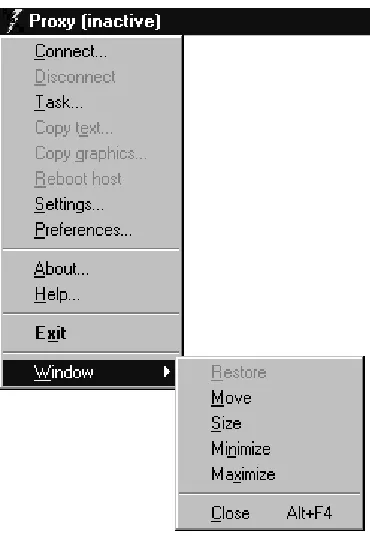
Note that the Proxy commands completely replace the standard
window-management commands that are normally found in the Control Menu (Restore,
Minimize, Maximize, etc.).
[image:12.612.265.450.140.408.2]The standard Control Menu has not been eliminated. It is still available, but as a popup menu attached to the Window command.
Connecting to a Host PC via IPX
To connect to a PC using the IPX protocol:
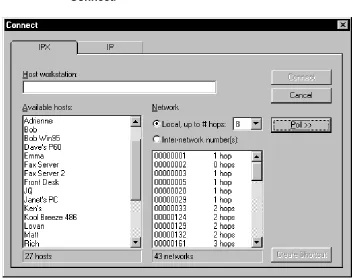
1 Select Connect ... on the Proxy menu. 2 Click the IPX tab.
3 The IPX Connect dialog will appear, and Proxy will poll the network and display the names of all host PCs that it finds.
4 Use one of the following methods to connect to a host PC:
select a host PC from the list and click Connect
double-click a host PC on the list
type a station name in the Host workstation field and click
[image:13.612.148.504.225.505.2]Connect.
Figure 2-3: Connecting to a host PC using IPX
IPX Polling
“Polling” refers to Proxy’s process of searching the network for host PCs. When using Proxy to search for IPX-based workstations, Proxy can poll in two ways:
A local poll searches for host PCs on the local network segment and on neighboring segments. Each time you bring up the Connect dialog, Proxy automatically performs a local poll (if this feature is set in the Preferences dialog).
The “# of hops” setting lets you control how wide-ranging a search to perform; each hop represents the crossing from one network segment to another over a router. PCs on the local segment are 0 hops away, PCs on adjacent segments are 1 hop away, and so on.
An inter-network poll searches for host PCs on the network segments you specify. You can select one or more network segments from a list of known segments; Proxy will search for host PCs on only those segments you select.
Proxy automatically performs a local poll when you bring up the Connect dialog. You can poll again at any time while the Connect dialog is displayed by clicking
Poll. Proxy will poll the network based on the settings you’ve entered. To perform a local poll:
1 Make sure Local is selected and # of hops is to your liking. 2 Click Poll.
To perform an inter-network poll:
1 Click Inter-network number(s).
2 Highlight one or more network segment(s) in the list.
3 Click Poll.
Specifying IPX Station Names
Each Proxy Host station has a “station name” that is assigned using the Host Control Panel. When Proxy polls for host PCs, it displays their station names in a list for you to select.
If you enter the station name of a host PC on your local network segment (i.e., not across a bridge or a router), you don’t have to worry about specifying a network number in order to make a connection.
However, to connect across a router to a host PC on a different network segment, you must precede the station name with the number of the network on which the PC may be found. The network number and the station name must be separated by a colon (:).
For example, to connect to a host PC on IPX network segment 00000028 named “George’s P200,” you’d specify:
28:George's P200
It is not necessary to supply the leading zeroes of the IPX network number.
If you’re not sure of the network number of a Proxy Host, you can find out by running the Host Control Panel at the host PC; the network and node address will be shown.
Specifying IPX Addresses
You can also connect to a host workstation by specifying its IPX address. To indicate that you are specifying an IPX address rather than a station name, prefix it with the @ symbol; for example:
@1B3893A1 Address of node on local segment
Connecting to a Host PC via IP
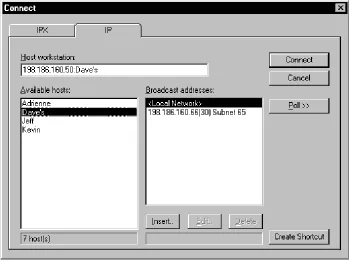
To connect to a PC using the IP protocol:
1 Select Connect ... on the Proxy menu. 2 Click the IP tab.
3 The Connect dialog will appear, and Proxy will display a list of all known broadcast addresses that you have previously saved.
4 To show a list of host PCs shown in the Broadcast Addresses list, select one or more addresses from the list and click Poll.
[image:16.612.183.532.230.492.2]5 To connect to a host PC shown on the Available Hosts list, select a host PC from the list and click Connect, or double-click a host PC on the list.
Figure 2-4: Connecting to a host PC using IP
IP Polling
“Polling” refers to Proxy’s process of searching the network for host PCs. When Proxy searches for IP-based workstations it allows you to select one or more broadcast addresses in one of the following ways:
<Local Network>— searches your local subnet based on a standard IP
broadcast. This type of poll may only work on a local segment, and results may vary based on your particular IP stack implementation.
<Local Network> is always available in the broadcast address list. Each
time you bring up the Connect dialog, Proxy automatically performs a <Local Network> poll (if this feature is set in the Preferences dialog).
IP Broadcast address — searches for a host PC on a specific IP address
in dot notation form a.b.c.d. For example, 198.186.160.55 would search for a host PC by sending a packet to the address 198.186.160.55 only.
IP Scan address range — searches for a host PC on a range of IP
addresses in dot notation form a.b.c.d(e). For example,
198.186.160.5(99) would scan all addresses starting at 198.186.160.5 for
99 addresses.
Symbolic DNS name — searches for a host PC using a symbolic DNS
name. For example, machine.company.com, would first do a DNS lookup on the name machine.company.com, then send a packet to its IP address.
Depending on how much of the network you choose to poll, your search for IP-based workstations could take anywhere from a couple of seconds to much longer. A status bar in the Connect dialog shows your polling progress; if need be, you can choose Stop Poll to stop your search.
Adding a Broadcast Address
To add an address to the Broadcast Address list:
1 Click Insert to bring up the Add/Edit Broadcast Address dialog box, then click the Broadcast to address button.
2 Enter a valid IP broadcast address or DNS name in the Address field.
3 Enter an optional description string in the Description field.
4 Click OK.
Figure 2-5: Adding an IP broadcast address
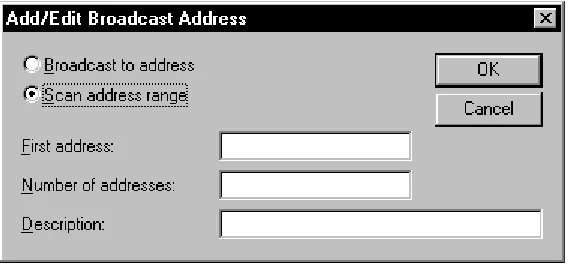
Adding a Scan Address Range
To add an address range to the Broadcast Address list:
1 Click Insert to bring up the Add/Edit Broadcast Address dialog box, then click the Scan address range button.
2 Enter a valid broadcast IP address in the Address field.
3 Enter the number of IP addresses to scan sequentially in the Number of
addresses field.
4 Enter an optional description string in the Description field.
5 Click OK. Your address range will appear in the Broadcast address list with the number of addresses to scan displayed in parentheses.
[image:18.612.217.502.385.518.2]Editing a Broadcast or Scan Address
To edit an address in the Broadcast Address list:
1 Select an entry in the list.
2 Click Edit.
3 Switch between the Broadcast to address and Scan address range, if you wish.
4 Edit the Address and Description fields to your liking.
5 Click OK.
To delete an address in the Broadcast Address list:
1 Select a single entry in the list.
2 Click Delete.
Specifying IP Station Names
In addition to its IP address, each Proxy Host station has a “station name” that is assigned using the Host Control Panel. When Proxy polls for host PCs, it displays their station names in a list for you to select.
You can also type an IP address or DNS name directly into the Host workstation field, then click Connect. Proxy will attempt to establish a connection to that IP address (or the IP address of the translated DNS name).
To connect across a router to a host PC on a different network segment, you must provide the IP address or IP subnet mask on which the PC may be found. The IP address/mask and the station name must be separated by a colon (:).
For example, to connect to a host PC on IP subnet 198.186.160.255 named “George’s P200,” you’d specify:
198.186.160.255:George's P200
Wildcards in Station Names
Wildcards can be used for pattern matching when specifying a station name to connect to. Proxy will connect to the first available host PC it finds whose station name matches the name you specify.
Wildcards are useful when you want to make use of one of several idle host PCs, but you don’t care exactly which PC you use. For example, you might set up a bank of several spare PCs, naming them SPARE–1, SPARE–2, SPARE–3, etc. These hosts might be shared by a number of users needing extra processing power. By specifying “SPARE–∗” as the station to connect to, a Proxy user can grab the first spare PC available at that time.
The following special symbols are used for pattern matching:
? matches a single character
∗∗ matches the remainder of the station name
\ treats the next character literally, even if it is a special symbol Examples:
Joe's ?86 matches Joe's 386, Joe's 486, Joe's 586, etc.
IBM∗∗ matches IBM, IBM PC, IBM PS/2 Model 60, etc.
Star \∗∗ PC matches Star ∗∗ PC
Passwords
The host PC to which you are connecting may require that you enter a password for access. If so, the Password dialog will appear; the connection will be
established once you enter the correct password.
Request Permission
Creating a Shortcut
You may want to save a connection to a particular PC for easy single-click access in the future. This single-click access is called a shortcut, and can be accessed as an icon in your Windows program group, or as a Windows 95 shortcut.
To create a shortcut:
1 Select or enter an IPX or IP host name in the Host Workstation field.
2 Click Create Shortcut.
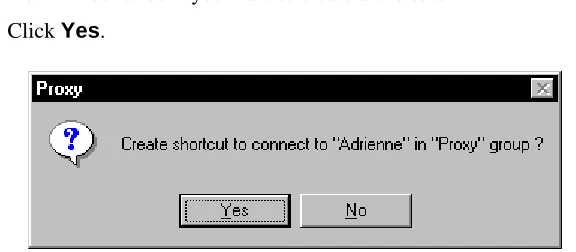
3 You will be asked if you want to create a shortcut.
[image:21.612.178.466.169.295.2]Click Yes.
Figure 2-7: Creating a shortcut to a Proxy host PC
You can now connect to the selected host using the Proxy icon in the Windows program group or using a Windows 95 shortcut.
NOTE: To change the program manager group in which to create shortcuts, use the Preferences dialog.
Shortcut Formats
When you create a shortcut, you are creating a special command line string to run Proxy. These strings are formatted to instruct PROXY.EXE on which station to connect to using the protocol, address and host station name in the command line.
Interacting with the Host PC
Once you’re connected to the host PC, it’s almost as if you were sitting right in front of it. You can control it with your keyboard and mouse, and you can watch its screen in the Proxy window in front of you.
The Proxy Display
The screen of the host PC will be shown in the Proxy window.
If the host PC’s screen is larger than the Proxy window, scroll bars will appear that allow you to make any part of the screen visible.
To control the size of the Proxy window, you can:
Size it with the mouse
Click the Maximize button (in the upper right corner of the window) to make the Proxy window match the size of the host PC’s screen.
NOTE: The size of the Proxy window is limited by the size of your own screen, and it sometimes may not be possible to make the Proxy window large enough to completely display the screen of the host PC without scroll bars.
How Proxy Maps the Screen of the Host PC to its Own Window
Proxy maps the host PC’s screen to its own differently depending on whether the host PC is in text mode or in graphics mode.
The host PC is in text mode while at the DOS command prompt or while running non-graphical DOS applications. In text mode, Proxy uses its own local font to display the text from the host PC’s screen. You can select from among several font sizes from the Settings dialog.
Copying to the Clipboard
You can easily copy any part of the host PC’s display to your local Windows clipboard. You can then paste it into a document you are creating with another Windows program.
Proxy has two commands for copying to the clipboard:
Copy text
Copy graphics
When the host PC is running a graphics-mode DOS program or Windows, your only option is the Copy graphics command.
However, if the host PC is running a text-mode DOS program, you can copy its screen in either text or graphics mode. Which you choose depends on how you’d like to use the data:
If you use Copy text, you will be able to paste whatever you copied into a word processor as ordinary text. You will then be able to perform text editing and formatting on it within the word processor.
If you use Copy graphics, the area you designate is copied as a
bitmapped image, and you will be able to paste it into desktop publishing programs as a graphic, retaining the exact look that it had in the Proxy window.
To copy a part of the host PC’s screen to the clipboard:
1 Select Copy text or Copy graphics from the Proxy menu. The mouse cursor will change shape to indicate “copy” mode.
2 Position the cursor at one of the corners of the rectangle that you’d like to copy, and press the left mouse button.
3 Drag the cursor, highlighting the entire rectangle you’d like to copy.
Rebooting the Host PC
To reboot the host PC, select Reboot host from the Proxy menu, and confirm by selecting Yes.
Proxy will send a reboot command to the host PC, and the screen will go blank. Once the host PC has rebooted and Proxy is able to re-establish a connection, the host PC’s screen will reappear.
In order to regain control of the host PC after a reboot, the host PC must have installed and loaded the Proxy host and be running Windows.
NOTE: PCs running the DOS version of Proxy Host require that their
AUTOEXEC.BAT contain a command to load PHOST. Unless PHOST is loaded, Proxy will not be able to re-establish a connection.
Disconnecting
You can disconnect from the host PC you are controlling by selecting Disconnect from the Proxy menu. The host PC will be released from your control, and the Proxy screen will be blank.
You can also disconnect by simply closing the Proxy window. To close the window, either:
Select Exit from the Proxy menu; or
Proxy Settings and Preferences
The Settings Dialog
Proxy’s Settings dialog lets you control Proxy’s operation in a variety of ways. You can:
Set the master to use View Only and/or Resize window
Establish host PC settings to disable the host PC’s keyboard and mouse and/or blank the host screen
Control how mouse events are transmitted to the host PC
Set Proxy’s automatic scrolling behavior
For DOS sessions, set the text font and refresh rates
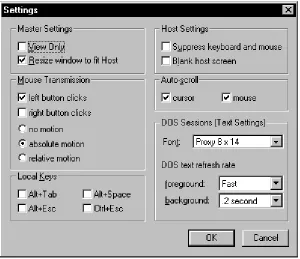
Specify which Windows control keys are transmitted to the host PC and which remain local to your Windows session
[image:26.612.177.477.280.539.2]To bring up the Settings dialog, select Settings from the Control Menu. The Settings dialog shows the current status of each item, and allows you to modify any item you like.
While in the Settings dialog, you can:
Modify any item
Click OK to save the currently displayed settings as the default settings, to automatically take effect each time you open a new Proxy window
Click Cancel to cancel your changes.
Master Settings
Master settings affect the mode in which the master operates relative to the host PC. The master setting modes are:
View Only
Resize window to fit Host
View Only Mode
If you’d like to see the host PC without controlling it, check the “View Only” box.
When this box is checked, the host PC will be displayed as usual, but keystrokes and mouse clicks on your PC will not be transmitted to the host. This ensures that you cannot disturb the host PC by accident.
Resize Window to Fit Host Mode
If you’d like to see the host PC using its actual dimensions, check the “Resize window to fit Host” box.
Mouse Transmission
Remote mouse operation can be a little confusing at first. Keep in mind that your local mouse must do double-duty: it must allow you to operate your local Windows session, and it also must allow you to operate the host PC.
The way mouse transmission is handled differs depending on whether you are controlling a DOS or Windows session on the host PC.
Mouse Transmission to a Host Windows Session
When the host PC is running Windows, Proxy handles the mouse in a straightforward way:
While the mouse is inside the Proxy window, the mouse is entirely “remote” and all movement and clicks are transmitted to the Host Windows session.
While the mouse is anywhere else, the mouse is entirely local and any mouse operation affects only your local Windows session or Proxy itself.
Note that the “Mouse transmission” checkboxes in the Settings dialog do not apply while the host PC is running Windows: all mouse activity is transmitted as long as the mouse is positioned over the remote Windows session inside the Proxy window.
Mouse Transmission to a Host DOS Session
When you are controlling a mouse-driven DOS program on the host PC, you will see two mouse cursors on your screen. One of them is Proxy’s local mouse, and is shaped like a diamond. The other is the mouse of the host PC, and its shape is controlled by the program that is running on the host PC.
Normally, when you move your local mouse without clicking a button, it has no effect on the Host mouse. This is necessary to allow you to use your local mouse to operate your local machine (both Proxy and Windows) without any
undesirable side-effects on the host PC.
A set of checkboxes and radio buttons allows you to define how the local mouse controls the mouse on the host PC. Subject to these settings, you can operate the host PC using the local mouse when you:
Drag the mouse with either button held down—Proxy will transmit the button clicks as well as all mouse motion while the button is depressed
Move the mouse while holding down [Ctrl]—Proxy will transmit all mouse motion while the [Ctrl] key is held down
Controlling Click Transmission
The checkboxes “left button clicks” and “right button clicks” allow you to independently control whether left and right button clicks are transmitted to the host PC. If the box is checked, the clicks are transmitted. The original defaults are set to transmit left button clicks and suppress right button clicks.
The rationale for this is that in most programs that utilize the mouse, left button clicks are an essential part of the mouse interface, while right button clicks are either unused or perform operations that are available through other means. When the transmission of right button clicks is suppressed, the right button becomes available as an alternative to using the Control key to force transmission of mouse motion and to auto-scroll the display, without risking undesired side-effects on the host PC.
Controlling Transmission of Mouse Motion
The radio buttons “absolute motion” and “relative motion” allow you to control how mouse motion in Proxy is transmitted to the host PC. Either or neither of these checkboxes may be checked, but not both.
Proxy offers two different mouse motion transmission techniques to accommo-date how DOS programs on the host PC might interpret mouse motion.
If “absolute motion” is selected, Proxy will transmit mouse motion as absolute mouse position.
If “relative motion” is selected, Proxy will transmit mouse motion as the difference between successive mouse positions.
Local Keys
As a general rule, Proxy transmits any keystrokes you type to the host PC. There are certain control keys, however, that have special meaning to Windows and you may want to reserve them for local use.
You can reserve the following keys as local keys:
key meaning
[Alt-Tab] switch between windows
[Alt-Esc] switch between windows
[Alt-Space] activate Control Menu
[Ctrl-Esc] activate Start menu
You can control how Proxy handles each of these keys with a checkbox:
If the box is not checked, Proxy will transmit the key to the host PC.
If the box is checked, the key will operate your local Windows session. You should set a key to local if you are accustomed to using it to control your Windows session, and you don’t need that key to operate the host PC. If you don’t have a mouse, you should, at a minimum, set [Alt-Space] to local in order to have access to the Proxy menu.
Note that a key’s local setting only has meaning while you are connected to a host PC. Until a connection is made, all special keys are local and will operate your Windows session, regardless of the setting.
NOTE: Windows intercepts the [PrintScreen] keystroke before Proxy has a chance to process it. [PrintScreen] is always local to your Windows session.
Host Settings
Normally, the host PC is under dual control. You are controlling it remotely from the Proxy master, while the person sitting in front of the host PC can also control it directly using its keyboard and mouse. The controlled screen is visible by the Proxy master (from PROXY.EXE) and by the host PC (on the video display).
Control over the keyboard, mouse, and the ability to blank the video display on the host can be requested by the Proxy master.
Suppressing the Host Keyboard and Mouse
Normally, keystrokes and mouse movements are handled on a come, first-served basis whether received from the Proxy master or host.
The Proxy master can gain exclusive control of the host PC from Proxy by selecting “Suppress host keyboard/mouse.” When this checkbox is selected, the host PC’s own keyboard and mouse will stop operating, and the host PC will only be operable from your Proxy window. The host PC will regain control when you de-select the checkbox, or when you disconnect.
This feature is extremely useful when you are using an unattended PC and you want to prevent the “what’s going on here?” syndrome. This syndrome is characterized by passers-by who notice a PC operating “all by itself” and feel an uncontrollable urge to poke at its keyboard!
Blanking the Host Screen
Normally, the host PC screen is visible both from the Proxy master and from the host PC. Any operations performed by the Proxy master are visible to anyone who can view the host PC screen.
To temporarily “blank” the screen during remote control you can select “Blank host screen.” When this checkbox is selected, the host PC’s own screen will appear as a blank screen, and the keyboard and mouse will be suppressed. The host PC screen will once again be visible and the keyboard and mouse active again when you de-select the checkbox, or when you disconnect.
This feature is useful as a security precaution when you are using an unattended PC and you want to prevent passers-by from seeing the operations performed.
Auto-scroll
Auto-scrolling comes into play when your Proxy window is too small to enclose the entire screen of the host PC. Auto-scrolling is often more convenient than using the scroll bars to view various parts of the screen.
If “cursor auto-scroll” is checked, the window will scroll to include the text cursor whenever it moves out of view. This affects text mode only.
If “mouse auto-scroll” is checked, the window will scroll to include the mouse whenever you move the mouse out of view while pressing a mouse button or the
DOS Sessions (Text Settings)
DOS Sessions settings control the text settings for full-screen DOS sessions. DOS boxes displayed as a window in Windows and Windows 95 are not affected. The DOS session settings are used to control the Text Font displayed, and the Text refresh rate.
Text Font
The Text Font is the typeface and type size that Proxy uses to display the host PC’s screen when it is in text mode.
By varying the Text Font, you can increase or decrease the size of the host PC’s screen as displayed in the Proxy window. With a smaller Text Font, you’ll be able to see more of the host PC in a smaller window. With a larger Text Font, you’ll improve readability at the expense of requiring a larger window.
To select a Text Font:
1 Click the Text Font control to get a drop-down list of fonts.
2 Click one of the fonts in the list.
The fonts in the list are shown previewed as they will actually appear. The names of the fonts are composed of a typeface name and a size. Thus, the font “Proxy 8 x 14” is typeface “Proxy,” whose character dimensions are 8 horizontal pixels by 14 vertical pixels.
NOTE: The text fonts called “Proxy” are fonts that came with your Proxy package. Fonts with other typeface names are other Windows fonts that are also suitable for text display.
DOS Text Refresh Rate
The “refresh rate” settings allow you to control how frequently the host PC sends screen updates to Proxy. You can select from a list of refresh rates ranging from “Fast” (the maximum) to “10 seconds.”
There are two refresh rate settings:
The “foreground” refresh rate applies whenever the Proxy window is active
The “background” refresh rate applies whenever the Proxy window is not active
The refresh rate of the foreground is the more important of the two, since it determines the speed of response of the window that you are actually operating. If you set a slower background rate, the window will update more slowly whenever you switch out of it, but will resume speed as soon as you re-activate it.
In general, if both the Proxy Master PC and the host PCs are fast (386 or higher), you can usually leave both refresh rates set to “Fast” without much worry.
You should consider slower refresh rates if:
You are running a computationally-intensive graphics mode program on the host PC and you notice that it slows down when connected
You are running multiple Proxy windows, all of which are simultaneously updating the display
The Preferences Dialog
Proxy’s Preferences dialog lets you control Proxy’s behavior in a variety of ways. You can:
Specify if polling is done when you enter the IPX or IP Connect dialogs
Set the name of the Program Manager group where Shortcuts will be created
Specify connection identification for the host PC
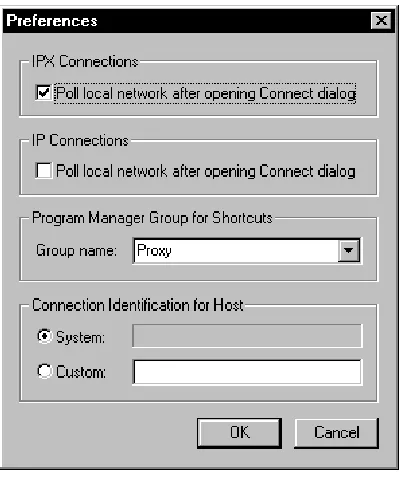
[image:34.612.226.426.209.448.2]To bring up the Preferences dialog, select Preferences from the Control Menu. The Preferences dialog shows the current status of each item, and allows you to modify any item you like.
Figure 3-2: The Preferences dialog
While in the Preferences dialog, you can:
Modify any item
Click OK to save the currently displayed settings as the default settings, to automatically take effect each time you open a new Proxy window
IPX Connections Polling
When you enter the IPX Connections dialog, you have the option of polling for any Proxy hosts which may be available.
You can set this polling behavior by setting “Poll local network after opening Connect dialog” in the IPX Connections box. When this checkbox is selected, the network will be polled for all Proxy hosts according to the settings in the
Connect dialog. If you do not select this checkbox, then you will need to poll manually by clicking Poll in the Connections dialog.
IP Connections Polling
When you enter the IP Connections dialog, you have the option of polling for any Proxy hosts which may be available.
You can set this polling behavior by setting “Poll local network after opening Connect dialog” in the IP Connections box. When this checkbox is selected, the local network will be polled for all Proxy hosts. If you do not select this
checkbox, then you will need to poll manually by clicking Poll in the Connections dialog.
Shortcuts Group Name
When you create a Shortcut for a connection, Proxy will create an entry in a particular program manager group, usually the same one into which you installed Proxy.
You can change the name of this group by setting “Group name” in the Program
Manager Group for Shortcuts box. To change the name, click on the pull-down
menu and a list of all available program manager groups will be displayed; you can click on the one you want to use.
Connection Identification for Host
When the Proxy Master connects to a Proxy Host, the Proxy Master displays its name on the Proxy Host’s control panel. The System and Custom radio buttons let you determine the displayed name, as follows:
System — Proxy attempts to get and display the name of the Proxy Master workstation and show it in this field. This name will appear on any Proxy Host’s Control Panel to which this master is connected.
Proxy Tasks
Task Capabilities
Proxy’s Task feature lets you describe the parameters of a session and save them by name.
When you create a task, you specify the following:
The name of the host PC to connect to
Optionally, a new set of settings to put into effect
Optionally, a DOS, Windows, or Windows 95 program to automatically start up when connected
Suppose, for example, there is a spare PC on your network which you take over in order to run an Excel report macro. You could then set up a task called “Excel Report,” which would automatically connect to the correct host PC, set the desired settings, and run Excel with the appropriate command line.
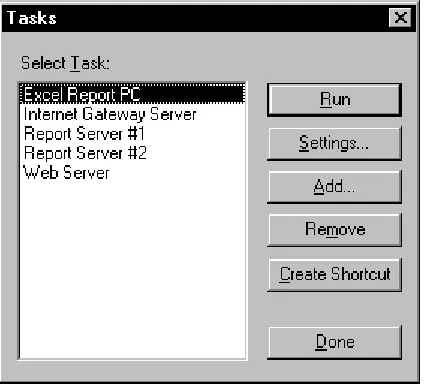
The Task Dialog
[image:37.612.221.433.339.532.2]Using the Task dialog, you can create, edit, and run tasks. To bring up the Task dialog, select Task from the Control Menu.
The Task dialog will list all the tasks that you’ve already defined. Initially, this list will be empty.
Push-button commands in the Task dialog allow you to:
Run a task
Add a new task
Remove a task
Edit a task’s settings
Create a shortcut to a task
Adding a Task
To create a new task:
1 Click Add.
2 When prompted, type the name of the new task you’d like to create, and click OK.
3 The Task Description dialog will appear. Edit the task description to your liking, then click OK.
The new task will be added to the list.
Editing a Task
To edit an existing task:
1 Highlight a task on the list, and click Settings.
2 The Task Description dialog will appear. Edit the task description to your liking, then click OK.
Removing a Task
To remove a task, highlight the task and click Remove. The task you selected
Running a Task
To run a task, highlight a task on the list and click Run, or double-click a task on the list.
Creating a Shortcut to a Task
To create a shortcut to a task, highlight a task on the list and click Create Shortcut.
NOTE: To change the program manager group in which to create shortcuts, use the Preferences dialog.
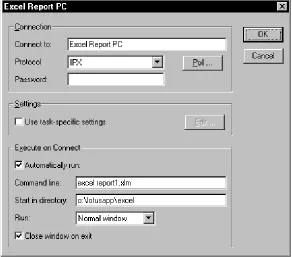
The Task Description Dialog
[image:39.612.180.472.292.549.2]The Task Description dialog allows you to set all the parameters of a task. It appears when you click Add or Settings from the Task dialog.
Setting the Host PC
The “Connect to” box contains the name of the host PC you’d like to connect to when you run the task; the “Protocol” chooses whether to use IPX or IP.
To enter the name of the host PC, either:
Type the name directly into the box and select the Protocol, or
Click Poll to get a list of host PCs.
When you click Poll, Proxy will show the Host Workstations dialog with a choice of IPX or IP to poll the network for available host PCs. Select a protocol and a host PC. Once selected, the host name will be placed in the “Connect to” box, and the protocol used will be placed in the “Protocol” list.
Passwords
If the host PC requires a password, you can enter it into the “Password” box to automate the connection process. If the host PC does not require a password, you can leave this box blank.
If the host PC requires a password and you don’t supply it in the “Password” box, you will be prompted for the password when you run the task.
Defining Special Settings
The “Use task-specific settings” checkbox determines whether Proxy changes the settings when you run the task:
If it is not checked, Proxy will not alter the current settings when you run the task.
If it is checked, Proxy will switch to specially defined settings when you run the task.
To define special settings for the task:
1 Check “Use task-specific settings.”
2 Click Edit. The Settings dialog will appear.
Executing a Program Automatically when you Connect
You can set up a task to automatically run a specific program as soon as it connects to the host PC. This is useful if you have spare PCs on your network that you use as an extension of you own desktop for running particular programs.
To set a task to automatically run a program on the host PC:
1 Check “Automatically run:”
2 In the “Command line:” box, type the command line you’d like to execute on the host PC.
3 In the “Start in directory:” box, type the drive/directory you’d like to make current on the host PC when the program is run.
4 In the “Run:” box, select Normal Window, Minimize, or Maximize for the mode in which you want the Windows program to run on the host.
4 Check or uncheck the “Close window on exit” box. If this box is checked, the connection will automatically shut down and the Proxy window will close as soon as you exit from the program.
NOTE: If you are taking over a PC running DOS (using PHOST.EXE TSR), then the host PC must be at the DOS command prompt in order for automatic
The Proxy Host
Starting the Proxy Host
The Proxy Host software, once installed and loaded, makes your workstation a Proxy Host that is available to Proxy Master stations across the network.
The Proxy Host software can be run from the following PC operating systems:
Windows or Windows 95 — Using a special Windows application, PHOSTWIN.EXE, your PC will be available to Proxy Master stations using the IP or IPX protocol.
DOS — Using a DOS TSR, PHOST.EXE, your PC will be available to Proxy Master stations using the IPX protocol.
You can run PHOST.EXE (in DOS) and PHOSTWIN.EXE (in Windows) at the same time to make your PC available to Proxy Master stations from IPX, whether your PC is in DOS or Windows.
In order to use the Proxy Host, you must use one of the following stacks:
IPX: For Windows 3.x, you need to use Novell 16-bit (VLM) or 32-bit
Client IPX protocol support. For Windows 95, you need to use the Microsoft Client for NetWare Networks, or Novell’s Client-32 IPX protocol support.
IP: For Windows 3.x, you need to use a Winsock-1.1 compliant IP stack.
For Windows 95, you need to use a TDI-compliant 32-bit IP stack, such as Microsoft’s TCP/IP.
NOTE: When using IPX it is not necessary to be logged in to a server, or even to run the NetWare client; all that is required is for IPX to be loaded.
The Host Control Panel
The Host Control Panel lets you view and alter the Proxy Host’s status and settings. You can:
See which Proxy Master, if any, is connected to the host PC
Abort the connection with the Proxy Master
Set the conditions under which a Proxy Master may establish a connection
Running the Control Panel
To run the Control Panel from Windows double-click the Proxy Host Control
Panel icon, or use the Program Manager’s File Run or Windows 95 Start Run
[image:44.612.213.504.104.236.2]command to run the program PHOSTWIN.EXE from the Proxy directory.
Figure 5-1: The Host Control Panel
Enabling and Disabling Host Operation
The Enable Host operation checkbox on the Control Panel menu allows you to control whether or not a Proxy Master can take over your PC.
If you want to disable Proxy Host operation, uncheck Enable Host operation and Proxy Master machines will be unable to connect to your PC.
If you want to enable Proxy Host operation, check Enable Host operation and Proxy Master machines will be able to connect to your PC based on time restrictions, permissions, and/or password security you may have set.
NOTE: In order to completely remove the Proxy Host from your system, you need to double-click the Uninstall Proxy Host icon.
Status Information
The Control Panel indicates the current status of your PC:
“Protocols” indicates the IPX address, in the form “network:node” and the IP address, in the form “a.b.c.d” of the host PC
Aborting the Current Connection
If a Proxy Master is in control of your PC, you can abort the connection by selecting Options, then Abort session.
The Settings Dialog
[image:45.612.197.455.172.437.2]To view or modify settings, select Options, then Settings from the main menu. The Settings dialog will appear with four tab dialogs: General, Access, Security, and Protocols.
Figure 5-2: The General Settings Tab Dialog
While in the Settings dialog, you can:
Switch to the General, Access, Security or Protocols tab dialogs by clicking on that tab
Modify any item within a tab dialog
Click OK to save the currently displayed settings as the default settings, to automatically take effect each time you open a new Proxy window
General Setting
The General tab dialog allows you to change the most commonly updated values for the Proxy Host. The station name, password, notification (beeping) values, and the appearance of the Control Panel itself.
The Station Name
The Station Name identifies your PC to Proxy Masters which may want to connect to it.
You’ll probably want to assign a station name that makes it easy to identify the PC. Combining the name of the person who uses the PC with the PC’s brand or type is usually a good practice; for example, “George’s P200” or “Gracie’s Model 60.”
The Password
If you’d like to restrict access to your PC to only certain Proxy Master users, you can assign a password. Whenever a Proxy Master tries to connect to your PC, that password will have to be supplied before the connection is accepted.
The password can be any sequence of up to 16 characters. The password is never displayed on screen; as you edit it, asterisks appear in place of the characters you type. You can change the password at any time.
If you don’t want to require a password for access, you should leave this field completely blank.
Beeping
You can set Proxy Host to alert you whenever a Proxy Master makes or breaks a connection with your PC, and to periodically beep while a session is in progress.
If you check “Beep on connect/disconnect,” you will hear a quick series of three tones rising in pitch whenever a Proxy Master connects to your PC, and another series of tones falling in pitch when it disconnects.
Proxy Host Appearance
The Proxy Host Control Panel program (PHOSTWIN.EXE) can be set to appear (or not) as an icon on your desktop. This is useful if you want to know when a Proxy Master has connected to you.
If you select the “When there is no connection:” Hidden option, then the Control Panel will not normally appear on your desktop. If you select the Icon
option, then the Control Panel icon will appear as soon as Windows starts.
If you select the “When a connection is active:” Hidden option, then the Control Panel will not appear on your desktop even if a connection is made. If you select the Icon option, then the Control Panel icon will appear as soon as a Proxy Master connects to your PC.
NOTE: You can bring up the Control Panel at any time by running PHOSTWIN.EXE.
Access Setting
[image:47.612.198.455.302.567.2]The Access tab dialog allows you to change the conditions for a successful connection. You can set access restrictions, and select the connection permission required before a station can be taken over.
Access Restrictions
A set of three radio buttons control whether a Proxy Master will be permitted to establish a connection with the host PC. You can select any one of these options:
Permit connection—while this button is checked, Proxy Masters are
welcome to connect to this host PC.
Lock out connection—while this button is checked, Proxy Masters are
unconditionally denied permission to connect to this host PC.
Lock out or Permit connection based on time zone—while this button
is checked, Proxy Masters are allowed to connect based on the day of the week and the time of day, as specified in the time zone map.
If you’ve chosen the last of the three options —“Lock out or Permit based on time zone”— then the time zone map will determine when a Proxy Master will be permitted to connect to the host PC.
[image:48.612.181.537.259.432.2]Click on Time Zone Settings to bring up the Time Zone map.
Figure 5-4: The Time Zone Settings Dialog
The time zone map is divided into half-hour time slots for each day of the week. Each half-hour time slot is marked with either:
A dot (·), indicating connection is permitted, or
A blank, indicating connection is locked out To edit the time zone map in the Settings dialog:
Tab to the time zone map, then use the arrow keys to navigate and press
[+] or [-] to set any entry to PERMITTED or LOCKED. When you’ve modified the settings to your liking, click OK.
Connection Permission
A set of three radio buttons controls whether a Proxy Master will be given permission to establish a connection to the host PC. You can select any one of these options:
No permission required — while this button is checked, Proxy Masters
are welcome to connect, according to password and time zone settings you've specified.
Permission must be granted by host—while this button is checked,
Proxy Masters must be explicitly granted permission by the host within a specified period of time; if the host is unattended, or no permission is granted, then the connection is rejected.
Permission requested from host—while this button is checked, Proxy
Masters will request permission from the host within a specified period of time; if the host is unattended, or permission is not explicitly denied, then the connection is allowed.
[image:49.612.216.437.354.492.2]If you’ve chosen one of the last two options, then a permission message box will be shown on the host PC when a Proxy Master attempts to make a connection.
Figure 5-5: Permission Message Box
Security Setting
[image:50.612.220.497.114.377.2]The Security tab dialog allows you to change the security features for a host connection. You can grant the master permission to change local suppression of the keyboard/mouse or screen blanking, and set local security features such as reboot on disconnect, keyboard disabling, and screen blanking.
Figure 5-6: The Security Settings Tab Dialog
Permit Master Requests
A set of two checkboxes controls whether a Proxy Master will be permitted to suppress the keyboard and mouse, and whether screen blanking on connect will be allowed.
If you check “Permit screen blanking on connect,” you will allow a Proxy Master to optionally blank the screen (set it to black) during a connection. If you
uncheck this field, then you will always be able to see the screen during a connection, even if the Proxy Master has requested screen blanking.
Local Security Settings
A set of three checkboxes give the Proxy Host local control to enforce security on incoming Proxy Master connections. You can select any one of these options:
Reboot on disconnect or termination—while this is checked, the Proxy
Host PC will automatically reboot whenever a Proxy Master disconnects or the connection is terminated. This is useful to establish a standard startup process on the PC, and to protect against accidental takeover of a previous session.
Disable keyboard and mouse on startup—while this is checked, the
Proxy Host PC cannot be changed by someone who has physical access to the keyboard and mouse. This is useful to guard against tampering with a configuration once the Proxy Host is started.
Blank screen on startup—while this is checked, the Proxy Host PC
screen will be blanked (all video will become black) as soon as the Proxy Host is running. This guarantees that any activity by a Proxy Master cannot be viewed by a passerby.
If you have chosen one of the last two options, the “Confirm Security Settings” message box will be displayed on the Host PC at Windows startup. To take control of the Host PC before screen blanking and/or keyboard and mouse disabling, answer Disable Security Settings within 30 seconds.
Protocols Setting
[image:52.612.228.489.87.359.2]The Protocol tab dialog allows you to set which protocols you wish to allow the host to use.
Figure 5-7: The Protocols Settings Dialog
A set of two checkboxes controls whether a Proxy Master will be permitted to connect via IPX or IP protocol.
Each protocol that is currently available will have its address displayed. If a protocol is currently unavailable then <not enabled> will be shown in place of the network address.
If you check “IPX,” you will allow a Proxy Master to see your host PC using the IPX protocol, and connect to you via IPX.
Password for Settings Access
To prevent a Proxy Master from using the Settings dialog to change your Host settings, select Options, then Password for Settings Access from the Host Control Panel menu. This option works as follows:
A password can only be set by a local user when the machine is not taken over
If a password is set, it only needs to be entered while the machine is taken over
DOS Proxy Host Support
Loading PHOST.EXE allows your PC to be available to Proxy Master stations using the IPX protocol while it is running DOS. PHOST.EXE is a TSR program, which means that once it is loaded, you can continue to use your PC for other applications.
To load PHOST, switch to the directory in which it is installed, or make sure that directory is on the path, and type:
PHOST ↵↵
You can also load PHOST by specifying a complete path; for example:
C:\PROXY\PHOST ↵↵
If you’d like PHOST to be loaded automatically at boot time, simply add the PHOST command to your AUTOEXEC.BAT file.
Loading PHOST High
PHOST can be loaded high on 386 or higher PCs running DOS version 5 or later. When loaded high, PHOST occupies memory between 640K and 1M, leaving more space for typical DOS applications that reside below 640K.
To load PHOST high, type:
LOADHIGH PHOST ↵↵
PHOST Command Line Switches
PHOST will recognize switches on its command line as follows:
PHOST /U unload PHOST
PHOST /C run the Host Control Panel
PHOST /B forces a reboot when disconnected
PHOST /D disables the keyboard and mouse on the host
PHOST /S blanks the screen on the host
Running the DOS Control Panel
To run the Control Panel from DOS, run PHOST with the /C switch:
PHOST /C ↵↵
Note: Some Proxy Host Settings are only applicable in Windows and are not available from the DOS Host Control Panel.
Operating the Control Panel is easy. These are the basic operations:
To issue a command, press the appropriate function key.
[image:54.612.190.527.351.531.2] To move to any setting use the up/down arrows or click the setting with the mouse. The setting you select will be highlighted and may be edited.
To edit a text setting, just start typing to overwrite the current entry, or use the arrow keys, [Backspace], and [Del] to edit the current entry. To erase an entry entirely, press [Esc].
To toggle a [ ] checkbox, press either [Space] or [Enter], or click the checkbox with the mouse.
To select from among several ( ) radio buttons, highlight the radio button you’d like to select and press either [Space] or [Enter]; or click the radio button with the mouse.
To edit the time zone map, position the cursor with the arrow keys, then use:
[∗∗] or [+] to set PERMITTED
[Space] or [-] to set LOCKED
[Enter] to toggle between PERMITTED and LOCKED
To mark a rectangular range for editing, press [F5] to set block mode, or hold down [Shift] while marking the block with the cursor keys. You can also toggle any item by clicking it with the mouse; you can toggle a range by clicking and dragging the mouse.
When you’ve performed whatever operations you like, press [F10] to exit to DOS.
Unloading PHOST
PHOST may be unloaded by running it with the /U switch. From the DOS prompt, type:
PHOST /U ↵↵
PHOST will remove itself from memory and make the memory it had taken up available to DOS.
Tips and Techniques
Controlling Many Host PCs
In theory, a Proxy Master can control up to 254 host PCs at one time.
In practice, you’ll run out of memory before you’ll be able get close to that many Proxy windows running at once.
If you have the memory and the processing power, you should be able to
simultaneously display and control 5, 10, or more host PCs at once from a single Windows session.
Proxy’s ability to keep up with multiple host PCs depends largely on how much display activity there is. If each host PC’s display is quiet until you switch to it to perform operations, then Proxy should have no trouble keeping up.
If, on the other hand, the various host PCs are independently active with constantly changing displays, you might want to adjust the background refresh rate in the Settings dialog to allow Proxy to respond less quickly to display changes on host PCs that are not in the active window.
Setting Up Banks of Host PCs
One of the typical uses for Proxy is to provide a computing resource that can be made available to the entire network. For example, you might set up one or more high-powered PCs as Proxy Hosts that various people might take over in order to do CAD or database queries. Or, you might have several modem-equipped host PCs that can provide shared communications service to anyone on the network.
If you have more than one PC performing the same type of function, you can set them up as a bank of interchangeable PCs, with similar names. Since users don’t care which of the several PCs they connect to, they can use wildcards in the station name; the connection will be made to the first available PC.
Suppose, for example, you have three PCs you’d like to make available as CAD servers. You might assign them the station names “CAD-1,” “CAD-2,” and “CAD-3.” You could then set up a Proxy icon that connects to any one of the available CAD machines with the following command line:
The Proxy Command Line
Proxy can be given instructions right on the command line that you use to run it. This allows you to create separate Proxy icons in Program Manager that operate Proxy in different ways.
(In fact, when you use the Create Shortcut function in Proxy, you are specifying and saving Proxy command lines.)
You can set up:
Shortcuts that automatically open Proxy windows and connect to particular host PCs, either by station name, IPX address, or IP address
Shortcuts that automatically open Proxy windows and run particular tasks
You can also customize the title bar of your Proxy window using a command line switch.
Connecting by IPX Address
To connect to a particular station by IPX address, use the /P switch with the name of the protocol, then specify the station’s IPX address, preceded by the @
symbol:
PROXY /PIPX @node
or
PROXY /PIPX @network:node
For example:
PROXY /PIPX @20:1B31DAE9
Connecting by Name with IPX
To connect by name to a particular IPX station, use the /P switch with the name of the protocol followed by the name of the station you would like to connect to, optionally preceded by the network segment:
PROXY /PIPX stationname
or
If the station you want to connect to is on a different network segment, you must prefix its network number and a colon (:) to the station name. For example, to connect to station “Dell P200” on network number 2:
PROXY /PIPX 2:Dell P200
Note that the stationname may include wildcards.
Connecting by IP Address
To connect to a particular IP-based station by IP address, use the /P switch with the name of the protocol, followed by the station’s IP address or DNS name.
PROXY /PIP address PROXY /PIP DNS-name
For example, to connect to the station at IP address 198.186.160.138, use the following command line:
PROXY /PIP 198.186.160.138
If the station you want to connect to has a DNS address, you can use it. For example, to connect to station jackson.company.com, use the following command:
PROXY /PIP jackson.company.com
Running a Task
To start up a task, specify the /T or /t switch, followed by the name of the task:
PROXY /Ttask
For example, to run a task called “report,” use a command line like the following:
PROXY /Treport
Customizing the Window Title
The title bar of a Proxy window normally has the caption “Proxy,” along with the name of the host PC to which you are connected and, if the connection was made through a task, the name of the task.
For example, to connect to station “Dell P200” in a Proxy window entitled “Analysis,” use the following command line:
PROXY /WAnalysis Dell P200
Proxy will consider the first space that follows the /W switch to be a separator, and will expect a workstation name, IPX address, or task name to follow. If you’d like to include spaces in your custom window title, you must enclose the text in quotes.
Thus, to entitle the window in the example above “Stock Market Analysis,” use the following command line:
PROXY /W“Stock Market Analysis” Dell P200
Display Mode Support
Proxy is able to reproduce the display of the host PC while it is in a wide variety of display modes, both in DOS and Windows.
Proxy’s ability to render colors accurately depends on the capabilities of the Windows display driver. The most accurate color reproduction will occur when the Proxy Master’s color capability matches or exceeds that of the host PC. For example, a Proxy Master running in a Windows session with a 16-color display driver will be able to render a host PC running Windows with a 16-color display driver perfectly; however, if the host PC’s display driver is 256-color, the Proxy Master will have to approximate some colors as best it can.
For accuracy in color rendering, it is better to use a 256-color than a 16-color Windows display driver on the Master machine. The 16-color display driver, however, will give significantly better performance, while still providing a range of colors that is adequate for most purposes.
Host Display Modes—Windows
Proxy can display a host PC running Windows provided the Windows display driver of the host is either monochrome, 16-color, 256-color, 15/16-bit or 24/32-bit color. Note that host PCs running Windows in monochrome mode may display in full-color in the Proxy window.
Host Display Modes—DOS
While the host PC is in DOS, Proxy can render its display when it is in any of the following modes:
mode description
0/1 40 x 25 16-color text 2/3 80 x 25 16-color text 4/5 320 x 200 4-color graphics 6 640 x 200 monochrome graphics 7 80 x 25 monochrome text D 320 x 200 16-color graphics E 640 x 200 16-color graphics 10 640 x 350 16-color graphics 11 640 x 480 monochrome graphics 12 640 x 480 16-color graphics 13 320 x 200 256-color graphics
A
Absolute motion 31 Auto-scroll 31, 33
cursor 33 mouse 33 Automatically run 44
B
Background 34
Broadcast address 17, 18, 19, 20
C
Caption 62 Clipboard 24
Close window on exit 44 Command line 44, 57, 60, 61 Connect 13, 14, 15, 17, 18, 19, 20 Control Menu 12
Control Panel 46, 47 Copy graphics 24 Copy text 24 Cursor Auto-scroll 33
D
Disconnect reboot on 54 DOS 6
control panel 57 host TSR support for 56 unloading PHOST 58
F
Foreground 34
G
Graphics
copying to clipboard 24 DOS host display modes 64 Windows host display modes 64
Host
overall functionality of 8 Host Control Panel 47
I
Icon 61 IP address
of the host PC 47 polling using 18, 19, 20 specifying for connection 20 IPX address
connecting to host by 61, 62 of the host PC 47
specifying for connection 16
K
Keyboard
disable on startup 54, 57 permit suppression of 53 suppressing on host 33 Keystrokes 29, 32, 33
L
Local Keys 32 Local network 15
M
Master
overall functionality of 7 Mouse 29, 30, 31
disable on startup 54, 57 permit suppression of 53 suppressing on host 33 Mouse Auto-scroll 33 Mouse motion
absolute 31 relative 31
N
P
Paste 24
Pattern matching 21 Poll
connecting via IP 17 connecting via IPX 14 IP method 18, 19, 20 IPX method 15
preferences for IP connect dialog 37 preferences for IPX connect dialog 37 Preferences 36
IP connect dialog 37 IPX connect dialog 37 shortcut group name 37 Proxy Host
for DOS 6 for NetWare 6 for Windows 6 for Windows 95 6 Proxy Server Host 6
R
Reboot host 25, 54, 57 Refresh rate
background 34 foreground 34 Relative motion 31 Run
maximize 44 minimize 44 normal window 44
S
Screen blanking on host 33
permit on connect 53 Shortcut
creating 22 customizing 61 format 22
setting group name for 37 Start in directory 44 System requirements 9
T
Text font Proxy 34 type size 34 typeface 34
W