WORD
PROCESSOR
PAC
A Professional Word Processing
oystem for the Sorcerer Computer
#########################################
#
*
*
#
#
===================================
#
#
=
*******************************
=
#
#
=*
*
=#
#
=
*
THE WORD PROCESSOR PAC
*
=
#
#
=
*
*
=
#
#
=
*******************************
=
#
#
===================================
#
#
*
*
#
#########################################
A PROFESSIONAL WORD PROCESSING SYSTEM
FOR THE SORCERER COMPUTER
FROM
EXIDY INC.
DATA PRODUCTS DIVISION
TABLE OF CONTENTS
Page
I.
INTRODUCING WORD PROCESSOR
1
Entering Text
1
Editing Text
2
Saving the Text on Cassette Tape
5
Loading Text from Ccassette Tape
6Printing the Text
6Error Messages
7
II.
WORD PROCESSOR INSTRUCTION SUMMARY
9
The EDIT Mode
9
EDIT Mode Functions
9
\
The COMMAND Mode
10
)
COMMAND Mode Commands
1 1
III.
DATA STORAGE
14
Cassette Basics
14
Saving Files on Tape
15
Loading Files from Tape
17
Premature Exit from Tape
17
Motor Ccontrolled Tape Operations
18
Opening and Closing Files
18
Changing the Baud Rate
19
Verifying a Cassette File
20
IV.
SPECIAL FEATURES
21
Wraparound and Carriage Returns
21
Line Length Vvariability
22
Underlining
23
Boldfacing
23
Tabs
23
Indenting
24
Hyphens
25
Using Marks
27
Search and Replace (Global Changes)
28
Holding Buffer
29
Autocommand
30
Macro Programming
31
TABLE OF CONTENTS
Page
V.
PRINTING OPTIONS
34
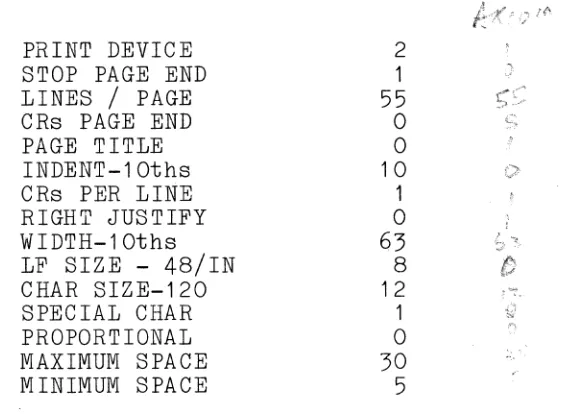
1- Print Device
35
2. Stop Page End
35
3. Lines / Page
35
4. CRs Page End
35
5. Page Title
36
6. Indent - 10ths
36
7. CRs Per Line
36
8. Right Justify
36
9. Width-10ths
37
10. LF Size-48/IN
37
11- Car Space -120
37
1 2. Special Char
37
1 3. Proportional
37
14. Maximum Space
38
1 5. Minimum Space
38
VI.
PRINTING
39
Printing Errors
39
Locating Printing Errors
40
Correcting Printing Errors
40
VII.
DYNAMIC PRINTER CONTROLS
41
1- Formfeed
41
2. Vertical Tab
41
3. Downshift
41
4. Upshift
41
5. Reformat
42
6. Merge Character
43
7. Line Tweaker
43
8. Macro Delimiter
44
9. Mark
44
Figure No.
1-2.
3·
LIST OF FIGURES
Title
Function Keys on the Numeric Keyboard
The Y Table with Default Values
Phi Command Format
vi
Pag~
3
34
I. Introducing Word Processor Page
I. INTRODUCING WORD PROCESSOR
This introductory section is intended to help you become familiar with the Word Processor's text editing features. It does not give a complete description of all Word Processor's functions and commands. It is best for you to become accustomed to the basic text entering and editing functions before you go on to the more sophisticated features.
To begin with, just try entering text from the keyboard and editing it. As you gain confidence and experience, try the more advanced features one at a time, as you need them.
***
Don't be afraid to experiment with different functions and commands: A manual can not teach you more about how the Word Processor works than you can teach yourself, by sitting at the keyboard and trying out lots of different commands.vie
have tried to make the \{ord Processor easy and natural to use.Entering Text
After the Word Processor has signed on, the word "EDIT" appears in the upper left corner of the screen; and a blinking cursor (a light field against a dark background) also appears halfway down the screen at the left margin. You are now ready to begin entering text. The keyboard is used like a typewriter keyboard; anything you type will appear on the screen. The blinking cursor indicates where the characters you type will be located on the screen.
The top line of the screen is called the message line and will always display the "mode" in the upper left corner. Two numbers also appear on the message line to inform you of the current cursor location. The first number, tells you the line number from the top of text, and the second number, tells you the cursor's position from the left margin.
I. Introducing Word Processor Page 2
***
You should type a carriage return only at the end of a paragraph. The automatic "wraparound" takes care to properly arrange the text into lines as you type.***
Type in several lines of text and observe how the text rolls upward on the screen as you finish each new line. The line with the blinking cursor always stays in the center of the screen.***
The line you are entering (typing on), always appears in the center of the screen. This is called the "edit line". The blinking cursor shows where the next character will be located.Editing Text
Once you have familiarized yourself with entering text, it is time to try the editing operations of changing, adding, and deleting text.
1. Modes of Operation
Word Processor has two modes of operation, the EDIT mode and the COMMAND mode. Text is entered from the keyboard and editing operations are performed in the EDIT mode. Major changes in text are performed in the COMMAND mode. Either "COMMAND" or "EDIT" appears at all times on the message line to identify the current mode of operation. You can change from one mode to the other at any time by striking the MODE key.
2. Funct ion Characters
_I_. _____ I_n
__
t_r_o_d_u_c_l_·n~g__
W_o_r_d ___ P_r
__
o_c_e_s_s_o_r ______________________
~----P-a~ge3
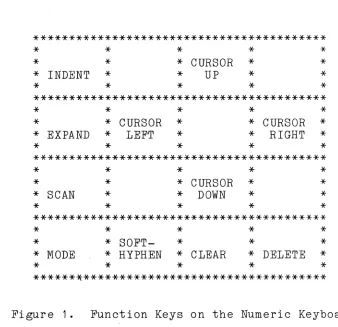
3.
Function Keys
[image:10.612.150.488.297.624.2]Function Keys
are used to perform many of the same
functions
as control characters,
but they do not
require you to hold down the CTRL key while striking
another key.
The
Function keys are located on the
numeric
keyboard
to the
right of the
regular
keyboard.
Figure
1,
shows
all the Function keys and their
locations on the numeric keyboard.
*****************************************
*
*
*
*
*
*
*
*
CURSOR
*
*
*
INDENT
*
*
UP
*
*
*
*
*
*
*
*****************************************
*
*
*
*
*
*
*
CURSOR
*
*
CURSOR
*
*
EXPAND
*
LEFT
*
*
RIGHT
*
*
*
*
*
*
*****************************************
*
*
*
*
*
*
*
*
CURSOR
*
*
*
SCAN
*
*
DOWN
*
*
*
*
*
*
*
*****************************************
*
*
*
*
*
*
*
SOFT-
*
*
*
*
MODE
*
HYPHEN
*
CLEAR
*
DELETE
*
*
*
*
*
*
******~**********************************
Figure 1.
Function Keys on the Numeric Keyboard
4.
Moving the Cursor
1. Introducing Word Processor
All cursor movement is accomplished Function keys with arrows. To quickly cursor from one end of a line to the the Scan Function key. Striking the key once transports the cursor to the twice to the left margin.
Page
4
by using the transport the other~ strike Scan Function right margin;
Moving the cursor with these keys does not alter the text over which the cursor passes. However, an attempt to move the cursor using the space bar will replace characters with spaces.
Notice as you move from line to line in text, the line on which the blinking cursor appears remains in the center of the screen. Word Processor always displays 29 lines of text, but at any given time you may only alter the text on the "edit line", or the center line of the 29 lines displayed.
5.
Changing TextChanges in the text can be made in any of the followi ng ways.
A. Typing Over Entered Text
Position the cursor over the character you wish to change. As you type the new character, the old one is deleted and the new one inserted in its place.
B. Using the Delete Function Key
To delete text without typing over it, position the cursor directly over the first character of the text to be deleted. Strike the Delete Function key for each character or space to be deleted. A "rubout" (or blank white space) will appear over each character you have deleted. After you have deleted all the desired characters, strike the Clear Function key. The rubouts will disappear and all the text following them will be shifted, so that a "hole" is not left by the removal of the deleted characters.
_I_. _____
I_n_t_r_._od_u
__
c_i_n~g~W_o_r_d__ P_r
__
o_c_e~s-s~o_r___________________________
P~a~g.e 5C.
Using the Expand Function Key
If you wish to insert new characters in the
middle
of text without typing over old text,
you must
perform a special "insert" operation
which
pushes
aside
the existing text to make
room for the new characters.
Place the cursor over the character where you
wish the old text to be pushed aside to make
room for the inserted characters.
Hit the Expand
Function key.
The text will
break apart,
and all text to the right of and
below .the cursor
(including the character on
which
the cursor was
positioned)
will be
relocated
several lines down
on the screen.
You
can now
insert text in the space left by
this relocation.
After you have typed the insertion, strike the
Expand
Function key again,
and the old text
will close up around the new.
,
Saving the Text on Cassette Tape
Once you have
typed
in some text, you should try saving it
on a cassette tape.
To save text on tape you must complete the
following steps:
1. Locate the cursor at the beginning of the text you wish
to save.
2. Put Word
Processor
into the COMMAND mode by striking
the Mode Function key.
3.
Start the recorder in the record mode at a place on the
tape just prior to where you want to store your text.
4.
Just as the digital locator on the recorder displays
the
number
that will identify the location of this
particular text, type
"w/c2"
and a carriage return.
I.
Introducing Word Processor
Page
6
6. Stop the recorder.
***The text is now saved on tape.
You should familiarize yourself with the cassette recorder
and
tape
handling procedures in the "Data Storage"
section,
before attempting extensive text loading and saving.
Loading Text from Cassette Tape
Try loading the text you
just saved
by
performing the
following steps:
1. Put Word
Processor
into the COMMAND mode and type "e"
followed by a
carriage return, to position the cursor at
the end of the text.
2. Start the
recorder
in the play mode
on the tape just
prior to the location of the text you saved.
3.
Type "r"
and
a
carriage
return.
When
requests
a filename,
type
another
return.
reappears on the screen, along with the text
when the read operation has been completed.
4.
Stop the recorder.
the program
The
cursor
just loaded,
***The text that you saved on tape should reappear on the
screen starting on the edit line.
Printing the Text
After you have
typed
the text
and
made
all necessary
corrections,
the text
is ready to be printed.
For
detailed
instructions see the section on "Printing Options."
I .
Introducing Word Processor
Page
7
Error Messages
When you make
certain errors using Word Processor, error
messages will appear in the upper right corner of the screen on
the message line.
These error messages include the following:
INVALID
ENTRY:
This message appears
if you
have
typed
an
incorrect
COMMAND mode command.
Here are some
possible causes:
NO
ROOM:
DEVICE ERROR:
EXPAND:
OFF END:
The command letter does not correspond
to a command.
An
illegal
number
of lines were
entered for the command.
An
attempt was made to hold or save 0
(zero) lines of text.
Appears
if you attempt to enter text from
cassette tape,
but there is not enough memory
space to accommodate all of the new text.
Appears
if there is insufficient memory space
to
perform
a
hold
command.
(The
holding
command
requires 256 characters of memory for
operation.
That much
space must be available
at the time you attempt a hold.
Appears if the cassette reading operation is
not functioning correctly.
Malfunctions will
occur
if cassette plugs are not in, volume or
tone adjustments are not right, or if the tape
was not started at the beginning of a file.
Appears
if you are
mode,
and
attempt
unrelated
to
the
operations cannot be
longer in the expand
operating in the expand
to perform an
operation
insertion of
text.
Such
attempted until you are no
mode.
The cursor is currently in the
off end-zone.
Only cursor movement controls may be performed
in this zone.
I.
Introducing Word Processor
Page 8
HOLD EMPTY:
HOLD FULL:
NOT OPEN:
Appears if COMMAND mode
command "u" is entered
when there is not text in the holding buffer.
Appears if COMMAND mode
command "h" is entered
when there is text in the holding buffer.
II.
Word Processor Instruction Summary
Page
9
II.
WORD PROCESSOR INSTRUCTION SUMMARY
Word Processor has two modes of operation, the EDIT mode and
the COMMAND mode.
You can change from one mode to the other at
any time by striking the Mode Function key.
The
current mode
is always displayed
in the upper left hand corner of the
screen.
The EDIT Mode
***
EDIT mode
functions are used for entering and editing
text, one line at a time.
***
EDIT mode
functions
are performed using the control
characters or one of the Function keys.
***
EDIT mode
functions always work at the location shown
by the blinking cursor.
See the section on "Introducing Word
Processor" for more
information on how to use the EDIT mode to enter text.
EDIT Mode Functions
CONTROL CHARACTER/FUNCTION
CURSOR LEFT KEY or CTRL (a)
Moves the cursor back one-character.
CURSOR RIGHT KEY or CTRL (s)
Moves the cursor forward one character.
CURSOR DOWN KEY or CTRL (z)
Moves the cursor forward one line in text.
CURSOR UP KEY or CTRL (w)
Moves the cursor
oacK
one line in text.
RETURN (m)
Carriage-return.
This key is generally used at the end of
a paragraph.
DELETE KEY
II.
Word Processor Instruction Summary
Page 10
CLEAR KEY
Realigns the text from
the current line to the next
carriage return.
This
instruction closes up any "holes"
in the text created by deletions.
EXPAND KEY
Expands text.
This
the cursor to
allow
After the new text is
to close the old text
SCAN KEY
key
opens a space at the location of
the
insertion of additional text.
entered, strike the Expand key again
around the new.
Scans the current line to the end.
This key is used to
quickly transport the cursor to either end of a line, or
to view text extending beyond the
63
character screen.
TAB SKIP
Moves the cursor to the next tab setting.
This function
acts like the tab key on a regular typewriter. To set or
clear tabs, use the "z" command.
HYPHN KEY
Inserts a soft-hyphen.
See the "Special Features" section
on hyphens for further information.
INDENT KEY
Indents the current line to the next tab stop.
This key
works within 15
characters of the beginning of a line.
See the "Special Features" section on indents.
MARK
"'P'I8:Ces a "mark"
in the text.
A mark is a non-printing
character
(omega)
generally used
in print and save
options.
A mark
is entered by holding down the GRAPHIC
key and striking
"9".
See the "Special Features" section
on marks.
The COMMAND Mode
***
COMMAND
mode
commands are used to make major changes
in text, for cassette operations, and for printing. '
***
COMMAND
mode commands are performed using the regular
keyboard characters.
II.
Word Processor Instruction Summary
Page 11
Some COMMAND mode commands require you to specify the number
of lines on which
the command is to act.
For example, the
command
'If" moves the cursor forward to another line.
If you
want
to move the cursor forward 50 lines, enter "f 50". In the
following list of commands,
any number that may be used
to
specify a certain number of lines is represented
by Un".
The
largest value you may enter for Un" is 255.
***
If you do
not enter a value for "nfl, the operation is
perfomed on the text from
the cursor to the first mark
character, or to the end of file if a mark is not found.
If you make a
mistake while
entering a
command, you can
delete the last character you typed by using the Cursor
Left
key.
The
entire line can be removed by striking the MODE
key
twice.
To get into the
COMMAND mode from the EDIT mode, strike the
MODE key.
vlhen" COMMAND" appears in the upper
left corner of
the screen,
enter one
of the following letter commands,
followed by a carriage return.
COMMAND Mode Commands
CHARACTER/COMMAND
f n
Moves the cursor forward n lines.
b n
Moves the cursor back n lines.
t
Moves the cursor to beginning of text.
e
Moves the cursor to end of text.
d
II.
Word Processor Instruction Summary
Page 12
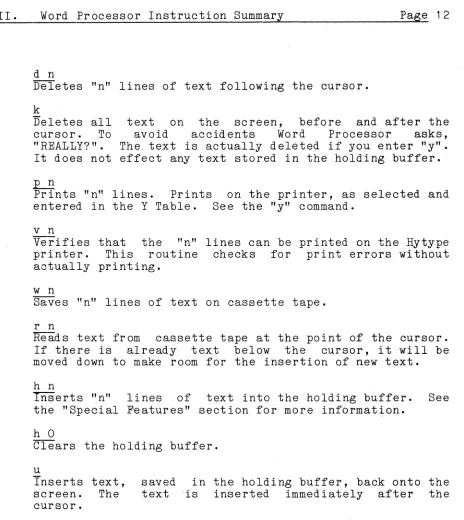
d n
Deletes "n" lines of text following the cursor.
k
Deletes all
cursor.
To
"REALLY?".
It does not
text on the screen,
before and after the
avoid
accidents
Word
Processor
asks,
The text is actually deleted if you enter "y".
effect any text stored in the holding buffer.
LE:
Prints "n" lines.
Prints on the printer, as selected and
entered in the Y Table.
See the "y" command.
v n
Verifies
printer.
actually
w
nthat the
"n" lines can be printed on the Hytype
This
routine checks for
print errors without
printing.
Saves "n" lines of text on cassette tape.
r n
Reads text from
cassette tape at the point of the cursor.
If there is already text below the cursor, it will be
moved down to make room for the insertion of new text.
h n
Inserts "n"
lines of text into the holding buffer.
See
the "Special Features" section for more information.
h 0
Clears the holding buffer.
u
Inserts text,
screen.
The
cursor.
1 n
saved
in the holding buffer, back onto the
text 'is
inserted
immediately after the
Realigns (sets newline length for) text.
This command
allows you to
set a line length of 15 to 120 characters.
All text is realigned
to the line length specified.
See
the "Special Features" section for more information.
1
lhsplays the current line length, in characters.
m
[image:19.612.86.550.65.585.2]II.
Word Processor Instruction Summary
Page 13
s
Searchs for
a
string of
another string.
See
the
more information.
x
characters and
replaces with
"Special Features" section for
Exits the Word
Processor
Pac
and
enters
the
System
Monitor.
Y...
Sets page
length,
right
justification, proportional
spacing, titling, pagination and other printing options.
Specific instructions are displayed
on the screen after
you type "y".
See
the "Printing Options"
section for
further information.
z
Sets tab stops.
See
the
"Special Features"
section on
tabs for further information.
a
Removes characters from the point of cursor to the end of
text and puts them in the macro buffer.
See the "Special
Features" section on Macro Programming.
a 0
Removes contents of macro buffer and displays them on the
screen.
a n
Executes list of commands in macro buffer "n" times.
i
~auses
macro
command
chain to stop and wait for keyboard
input.
'1
'1
0'11
'12
Provides motor
on, '1 0 turns
unit 2.
'13
'112
control of tape recorder. "'1" turns both
both off, '1 1 turns on unit 1, '1 2 turns on
Sets the Baud
rates for
cassette drivers.
'13 sets the
Baud rate to 300, and '112 sets it to 1200.
c1
Closes the read file.
c2
Closes the write file.
III. Data Storage Page 14
III. DATA STORAGE
When you create text it is stored in Word Processor's internal memory. This storage is not permanent. If Word Processor is turned off or you exit the program, the text is lost. After you have completed a file, you will generally want to save it on a storage medium such as cassette tape or disk. The text will remain there until you erase it or record over it.
Word Processor offers several options of storage. It is possible to write to, or read from, two separate cassette recorders. With the optional Word Processor Disk Driver Package, it is also possible to read from, or write to, up to four CP/M compatible disk drives. If you are working from a cassette recorder you may read/write at either 300 or 1200 Baud. At either Baud rate you may use one of two different file transfer formats.
All files begin with a filename block which contains 16 characters, followed by blocks of 256 characters separated by gaps on the tape. If the rapid file option is used, the blocks are written out with only a fraction of a second between each. This is the best choice for ordinary text files. At the slower rate, there is approximately a three second inter-record gap. The slower rate is appropriate for more complex operations in which motor control is used, such as mailing lists in which the list of names and addresses is longer than available memory or keyword searches of data files. The discussion below will start with the simplest cassette operation.
Cassette Basics
Cassette operations are performed with a regular tape recorder using regular cassette tape. Text is stored on the tape in the form of magnetic impressions., To avoid disturbing these impressions, you should keep the tape clean (do not touch it with your fingers), and away from magnets and electric motors (such as those found in vacuum cleaners) which generate strong magnetic fields.
III. Data Storage Page 15
Saving Files on Tape
Positioning Files on Tape
Many different files can be stored on a single tape. The files should be stored one after the other, with spaces left between to prevent overlap. The location of files on a tape
is indicated by the recorder's digital locator. If your recorder doesn't have a digital locator, we recommend using short cassettes and only writing one file on each cassette. Although the Word Processor is capable of "searching" a tape to find a particular file, it is very time consumming when it is the last one on the tape.
For example, the first file on a tape should be stored at the beginning of the tape. To save the file you should:
1. Locate the cursor at the beginning of the file. Be sure that Word Processor is in the COMMAND mode.
2. Insert the cassette tape into the recorder.
3. Rewind the tape until it is at its beginning
4. Go forward on the tape until the tape head is we~ past the leader and on the magnetic tape itself.
Start the recorder in the record mode.
6. Type "w n/c2" and a carriage return to indicate that you want to write n lines of text to a file which is to be closed immediately after the write. If you wish to save the entire text, which is usually the case, simply type "w/c2".
_I_I_I_. ___
D_a_t_a __
S_t_o_r_a~g~e________________________________________
P~a~g.e16
because
as
immediately
case, we do
following:
the
if
not
file
is read,
you can ascertain
the tape is correctly located.
In this
want motor
control so we enter the
/DOCUMT <CR>
8.
When the tape
is in position to
record,
enter the
carriage return.
The save operation begins immediately.
The cursor will disappear, and then reappear along with
the text,
after the save has been completed.
Prior to
the completion of the save, the message line reports the
length of the file by the number of characters.
9.
When the save
operation is completed, the the blinking
cursor reappears beside the COMMAND on the message line
and the text
is again displayed on the screen. Let the
recorder run for a couple of digits to make a blank spot
at the end of the file, then turn off the recorder.
Be sure that you
remember
the
recorder--r8 in the record
continue it will erase any other
of the tape.
to stop the recorder.
Because
mod~i~it
is allowed
to
files stored on the
remainder
***Your file is now saved at the beginning of the tape.
Continue in this manner
to save files sequentially on a
single tape.
Be
sure to leave
about
5seconds
of space
between the end of one file and the beginning of the next.
It is important
to keep a
directory showing the exact
location of each file. on each tape.
Location is indicated by
the numbers on the recorder's digital locator.
Be sure to note
both the beginning and ending numbers of each file.
Erasing Files
You can erase
a
file by recording a new file over it. Be
sure when recording the new file, to start the recorder in the
III. Data Storage
Page
17Loading Files from Tape
It is possible to load a file into Word Processor's memory
even if text is already present in memory .. The new
file being
loaded will be added at the end of the present text.
To load a file from tape, do the following:
1.
Type "r", and a carriage return in the COMMAND mode.
2. vlord Processor will respond with
"#
IFILENAME:"
Specify
unit number
1or 2
if you are
running under motor
control.
Simply type
a slash
"I"
if you are not using
motor control.
You
may
enter a file name which can be
searched for
on
the tape or simply strike the carriage
return to
read
the
next file on the tape.
Now, start
the recorder
running
in the play mode just before the
tape file you want to read, and enter a carriage return.
3.
The first block of material to be read contains the name
of the file.
The
na~eappears
on the message
line
shortly after data transfer begins.
4. When the read operation is complete, the new text appears
on the screen and
the blinking cursor returns, next to
the word Cm1MAND.
On the left side of the message line,
either the
number
of characters read or the words "END
OF FILE" appears.
If the error message
"NO ROOM" appears in the upper right
corner of the screen during a loading operation, it means that
Word Processor's available memory space cannot
accomodate the
text you are attempting to load.
In this case,
you
should
close the file using the "c
1"command and delete enough
text
to load the whole file.
If the error message
"DEVICE
ERROR"
appears during a
loading operation, the Word Processor program has not been able
to
read
your
file from tape.
Check the plugs and volume and
tone controls of the recorder to be sure they are correct. Also
check to be sure the file is positioned properly on the tape.
Premature Exit from Tape
Sometimes, you will decide after you have already started
writing that you don't want to write.
To
return to Word
III. Data Storage Page 18
If the ESC key doesn't work immediately, hold it down until it does. If you have started read ing, the escape key will not work, but you can shut off the recorder. When the Sorcerer doesn't receive data for 10 sec., it aborts the read.
Motor Controlled Tape Operations
To permit the computer to control the cassette recorder, the motor control plug from the Sorcerer must be plugged into a
jack on the recorder generally labelled "remote". Now, the Sorcerer controls the motor of the recorder, and will turn it on only when it has data to write or read.
There will be occassions when you want to turn the motor on, to position the tape, and the Sorcerer won't let you. There are a set of commands for these occassions to overrule the Sorcerer. These commands entered in the COMMAND mode are:
qO Turn both motors off q1 Turn on motor 1
q2 Turn on motor 2
When you are reading or writing files from tape under motor control (file number 1/ or 2/), the program automatically inserts a delay between tape blocks. This gives the recorder time to start. This greatly reduces the overall speed of cassette operations, but it also allows you to do some other nice things, as we shall seG. Don't forget:
*-**You cannot control if it trans fer mode. option if you motor control.
read a file back into text under motor was written out using the fast cassette Be careful not to specifiy the /FI1PlNAflE
plan to read the file back later using
Opening and Closing Files
The cannot lines Then Here
motor control cassette file allows you to do things you do using the fast option. It reads or writes a few from, or to, a fi~e and performs some other operations. it returns to read or write again ,from the same file. are some examples:
1. You can store a file on tape which is longer than the total memory capacity of your computer.
III. Data Storage Page 19
---~---~---~.
3. You can read or write a cassette file a few lines at a time and in between perform functions like search, hold, delete or print.
To perform multiple reads or writes from the same cassette file, the computer must know you have started to transfer data from the file and that data is going to be transferred. Such a file is called "open". The first time you attempt to read or write from a file, the Word Processor will ask you:
#/FILENAME:
If you are using motor control, specify the unit number (1 or 2) followed by a file name from 0 to 7 characters in lengh. If for some reason you have decided not to open a file after all, hit the ESC key.
When you are reading, v{ord Processor attempts to read the file header from the specified device. If it is successful, the file is "open" for reading. Successive "r n" commands are
read from that file until the end of file is reached or you "close" the read file with a "c 1" (read file close) command.
When you are wr it ing, vford Processor begins wr it ing to the specified tape unit as soon as you have entered the filename. Be sure that the recorder is on, in the record mode before you hit the carriage return at the end of the filename. Now,the file can accept successive data from "w n" commands until you execute a "c 2" (write file close) command.
***Remember: Word Processor will "open", if it has not been closed. write files with the "c2" command to forget to do this, you may lose all you are writing onto tape.
always keep a file You must close all close them. If you or some· of the data
The Word Processor program does not allow you to exit while the read or write file is open.
Changing the Baud Rate
III. Data Storage Page 20
Verifying a Cassette File
If you have just saved a file on tape and wish to verify that it has written, you may want to read it back right away.
If it is a short file, a simple "r" command reads the whole file and return with the "END OF FILE" message when it has been
read without errors.
Sometimes, there is not enough room left in memory to read the whole file back, without deleting some or all of the text already in the domputer memory. That is just what you don't want to do until you are certain that the tape just written can be read in again. The following command can be used to read a whole file in from tape without using a lot of memory:
COMMAND:250 r5/d
This command reads the file from tape, two lines at a time and then deletes the lines just read. When you reach the end of the file on tape, the program prints the "END OF FILE" message and asks you to open a new file. Now, you can escape back to the Command mode with the ESC key. If "DEVICE ERROR"
_I_V_. ____ S~p~e_c __ ia __ l __ F_e_a_t_u_r_e_s ____________________________________ P~a~g,e 21
IV. SPECIAL FEATURES
This section describes the sophisticated text formatting and macro programming features Processor. These features include:
Wraparound and Carriage Returns Line Length Variability
Underlining Boldfacing Tabs
Indenting Hyphens Using Marks
Search and Replace (Global Changes) Holding Buffer
Auto command
Macro Programming
Wraparound and Carriage Returns
text editing, of the Word
Because of Word Processor's wraparound feature, it is not necessary to enter a carriage return at the end of each line. When the line you are typing reaches the edge of the screen, the cursor automatically moves to the beginning of the next line. If you are in the middle of a word when you come to the end of a line, the entire word is automatically shifted to the beginning of the next line. Thus, carriage returns are only necessary at the end of paragraphs.
When you enter ,a carriage return, a nonprinting carriage return character (left arrow) appears on the screen. This character is displayed on the screen so you can see the location of carriage returns in the text, but it will not be printed on the finished copy.
IV. Special Features Page 22
Although, text is stored in Word Processor's memory as a continuous ribbon, it must be broken up into lines to be displayed on the screen. Most of these lines do not extend all the way to the edge of the screen, resulting in a blank area between the end of the last word and the edge of the screen. This blank area is called the off-end zone. When you move the cursor into this area the message "OFF END" appears in the upper right corner of the screen.
When the cursor is in the off-end zone, it is in an area that does not contain text. Because there is not any text in this area, you cannot perform text editing functions; such as, enter text and use the expand and the tab functions, etc. The only commands you can use when the cursor is in the off-end zone are EDIT mode commands to move the cursor. When the cursor has been moved out of the off-end zone, you can perform all text editing functions again.
Line Length Variability
Text can be composed and printed at any line length desired, from 15 to 120 characters per line. Unless you specify otherwise, Word Processor sets a line length of 63
characters per line. This is the maximum line length that can be displayed on the Sorcerer screen. To change the line length, type the COMMAND mode command "L n". In this command "n" represents the number of characters desired per line. For example, enter "L 25" to set a line length of 25 characters. If the line length is less than 63 characters, a broken white line appears down the length of the screen to identify the line length boundary. If the line length is greater than 63
characters, only part of each line can be displayed on the screen at a time.
The EDIT mode SCAN key is used to view text extending beyond the 63 character screen. SCAN is also used to transport the cursor quickly from one part of the text to the other. Striking SCAN once, moves the cursor to the end of a line on the 63 character screen. Striking SCAN a second time, causes the screen to display the text beyond the 63 character screen. Striking SCAN a third time, moves the cursor to the end of the line on the screen. Striking SCAN a fourth time, moves the cursor back to the beginning of the line.
The Cursor Right key, can also be used to move to text extending beyond the 63 character screen. Cursor Right key, you can move the cursor to the line until it reaches the end. However, once you
IV.
Special Features Page 23the cursor into the text extending beyond the 63 character screen, you cannot use the Cursor Left key to return to the first 63 character portion of the text.
It is necessary type with a printer. change margins at any the text has been change the number of useful in a number eliminate typing the page by realigning the
to set the margins before you begin to Using the Word Processor you can set or time. You can even change them after all entered, by instructing Word Processor to characters per line. This capability is of situations. For example, you can last few lines of a letter on a second text to a longer line length.
***
Since most screens are capable of displaying a maximum line length of 63 characters per line, it is generally easiest to compose text at this line length. If you wish to have a longer line length for the finished product, simply realign the text before printing.Underlining
To underline text, position the cursor over the first letter you wish to underline and strike the underline key. The text that is underlined appears on the screen with black letters on a white background.
Boldfacing
If you have a daisy wheel printer, boldfacing can be used for emphasis. Boldfacing is done exactly like underlining in the EDIT.mode. Prior to printing, the special character entry in the Y Table is changed from 0 to 1 and every character that would have been underlined is boldfaced instead. During printing, the boldfaced character is typed normally, the carriage is moved 1/120th of an inch and the letter is typed again.
Tabs
~I~V_. __ ~S~p~e~c~i~a~l __ F~e~a~t_u_r_e_s _____________________________________ P_a_ge 24
can be set by moving the cursor to the desired location and striking the TAB key. When a tab is set, a solid cursor appears on the line above the cursor to indicate the presense of a tab stop.
On the cursor line, locations are marked every 10 spaces by "up arrows". In addition, there is a message above the tab line to tell you whether the left edge of the screen is in position 0 or 60. Any number of tabs may be set in the 120 position field. The second field of 60 spaces is entered by moving the cursor to the right past the right margin of the screen.
Tab Striking stop if exists.
stops may be removed selectively in the same way. the TAB key at the location of the cursor adds a tab
none igsists and removes the tab stop if one already
After you have finished setting and clearing tabs, enter a carriage return, and the text will return to the screen.
Tab stops are used in the EDIT mode just like they are used on a typewritter. Striking the TAB key moves the cursor to the next tab stop to the right of the cursor. When the tab operation carries the cursor over text, the text remains unaltered. When it does not move over text, the area is filled with spaces. However, when the cursor is moved over a carriage
return, it automatically removes it.
Indenting
Indenting allows you to create of the normal left margin on the particularly useful for creating and/or paragraphs aligned inside the
text indented to the right screen. This feature is outlines, with sentences normal left margin.
IV.
Special Features
Page
25
To indent a
line,
strike the Indent key while the cursor
is at the beginning of the line you want to indent.
This
causes
the
indent character (right arrow) to appear
on
the
screen at the first tab on the line.
If you strike the Indent
key again,
the cursor moves farther inward, to the next
tab.
When the indent is at the desired location, proceed to type the
text.
Notice as you type over the end of the line, the usual
"wraparound" occurs,
and
Word
Processor
starts the new line
indented just like the one above it. You can continue
to type
indented
text in this manner until you hit a carriage
return.
You
do not have to strike the Indent key at the beginning of
each line.
If you want
to add to, or change the indent of text that
you have already entered, go to the beginning of the first line
of the text and strike the Indent key.
Word Processor does the
same
thing it would do if you were just creating the text for
the first time. The text from the cursor to the next carriage
return is indented to the next tab stop on the right.
If you
strike
Indent
again, the text is indented to the right again.
This can be continued until the next tab stop is farther to the
right than column
55.
Then the indent is deleted and the text
returns to the orginal left margin.
Here are some things to remember about indents:
Hyphens
1. An indent creates a
new left margin, from where
you place the indent to the next carriage return.
2. You
can always
add
or
change
the indent of a
paragraph or a line of text by going to the beginning
of the paragraph or line and striking the Indent key.
You can delete an indent by indenting past column
55
3.
You
cannot enter text to the left of the indented
character
(right arrow),
even though it looks like
there are
spaces there.
The indent feature assumes
that there is not going to be text to the left of the
indent.
The message "OFF END" appears if you attempt
to enter text to the left of an indent.
Word Processor has
a hard-hyphen and a
hard-hyphen
is used
for words that should
matter where
they
occur
in a
line.
For
"mother-in-law" should always be hyphenated.
entered by striking the hyphen key (-) on the
IV.
Special Features Page 26The soft-hyphen is used for words you wish to hyphenate at the end of a line. They are usually not necessary because of Word Processor's wraparound feature. Because, Word Processor automatically relocates a word that will not fit on the end of a line, to the beginning of the next line.
Occasionally, you may want to hyphenate a word at the end of a line. For example, you might be typing the word "independence" and as you approach the end of a line, discover the last two letters will not fit. When the wraparound feature relocates the entire word to the next line, it leaves a large, unattractive space at the end of the current line. You can correct this, by putting a soft-hyphen in the middle of the word. The soft-hyphen is only printed when "independence" appears as the last word of a line.
When you add, delete, or realign text, words move to different lines and locations on the same line. If "independence" is moved by changes to the middle of a line, the soft-hyphen disappears. If you had used a hard-hyphen, it would have remained, and "indepen-dence" would appear in the middle of the line.
A soft-hyphen is entered by striking the Hyphen Function key on the Function keyboard. There are two different techniques for entering soft-hyphens.
1. As you approach the end of a line and see there is not enough room to complete a long word before the end, you can backspace the cursor to the immediate right of where you wish to insert the soft-hyphen, and strike the Hyphen Function key. The letters under and following the cursor are moved to the next line, and a hyphen appears where the word was devided.
IV.
Special Features Page 27If the text is changed so that the soft-hyphen is no longer needed, the soft-hyphen is completly deleted from the computer memory. If the text is changed and the word again appears at the end of the line, the soft-hyphen does not reappear. Therefore, when you are typing text you expect to revise, it is better not to enter soft-hyphens. After the text has been revised and is ready for printing, go back through and insert soft-hyphens as needed.
Using Marks
A "mark" is a nonprinting character used to mark a particular location in the text. Place a mark in the text by striking the Graphic key and 9 at the same time, while in the EDIT mode. The omega character, indicating the location of the mark appears at the location of the cursor on the screen. Because, this character is displayed on the screen only as a locator in the text, it is not printed along with the text on the finished copy.
Marks may also be used to perform printing operations. For example, you may want to enter two letters in one file, and print each letter on a separate piece of paper. By placing a mark at the end of the first letter, you instruct the printer to stop at the mark. This allows you the time to insert a second piece of paper into the printer, before printing the second letter.
Marks can also be used with most of the COMMAND mode commands affecting a specified number of lines, such as f,b,d,p, and h. If the number of lines is not specified for these commands, the Word Processor program assumes the operation is to be performed on the text between the cursor and the next mark. If there are not any marks below the cursor, then the operation will be performed on the text between the cursor and the end of the file.
For example, a mark can be used with the f or b commands to enter a mark in the text as a location pOint. To accomplish this, enter a mark in the text where you wish to return. When you are ready to locate the mark, enter the command "f", if the mark is below the cursor in text, or "b" if it is above.
Marks can also specified number of you may want to move the text to the end.
be used with the command "h", to place a lines in the holding buffer. For example, a particular paragraph in the middle of
_I_V_. __ ~S~p~e_c~l~·a~I~_F_e_a~t_u_r_e~s ____________________________________ P_a~g~.e 28
in the holding buffer. Rather than count the number of lines in the paragraph, you can place a mark at the end of the paragraph and instruct the Word Processor to hold all text up to the mark.
The mark can not be used with a cassette write operation even though it is a command modified by a specific number. The "w" command saves all text from the cursor to' the end of file, including marks.
Search and Replace (Global Changes)
Word Processor allows you to search for a specific string of characters and replace them with another string. There are two search and replace modes, manual and automatic. We suggest you use the manual mode to start out, to help prevent surprises while you are still learning to use this feature.
To use the search and replace feature, enter the COMMAND mode and position the cursor above the text you wish to search. Enter a command using the following syntax example:
25s/John/*Sam/ <Carriage Return>
The number (25) specifies the number of times Word Processor should perform the operation. Often any large number will do, because the search and replace operation is automaticaly ended when the end of the file is reached. The searched for string (John), is placed inside the first set of slash marks. The replacement string is placed before the final slash (Sam).
The asterisk between the two strings is used to instruct, Word Processor to wait for instructions from the operator, each time it finds the searched for string.
The search string must be entered exactly as it appears in the text. The order of characters and capitalization must be exactly the same.
Word Processor searches through the text until it finds the string of characters specified, and then displays the text with the blinking cursor at the beginning of the string. Now, you can do one of the following:
1. Enter a carriage return to make the replacement. 2. Enter a space to skip over the string just found.
IV.
Special Features
Page 29
Unless you strike the ESC
key,
the Word Processor does
just as you instructed, and continues to search the text for
the string.
It will display the string on the screen and wait
for you to
enter one of the instructions listed above.
This
process continues until the Word Processor has repeated the
operation the specified number of times or it reaches the end
of file.
The automatic mode
is like the manual mode except you do
not
enter the asterisk in the command.
The search and replace
operation procedes too quickly to see, and it does not allow
you the opportunity to decide not to replace the string. After
the search has been completed, the cursor stops, following the
last replacement string.
Wildcards:
The period (.)
has
special significance
in the search
command.
When you enter the string to be searched, a period in
the string is understood
to be equivalent to any character.
You can use this "wildcard" feature to search for strings that
are similar to the word desired:
For example,
if you type in "/.at/, Word Processor will
find such strings as "bat" ,"cat" ,"rat" , and "mat". You may
use as many periods (.) as you wish in a search string.
The period (.) can also be used alone, as the replacement
string (/./) When used in this way, it only instructs the Word
Processor
appear to
the cursor
operations
to search for the string.
Although
this may
not
be very useful, it is an excellent means
of moving
to specific locations in the text to perform special
with macro programs (see Macro Programming).
Holding Buffer
The holding buffer
is a
section of the computer memory
used
to temporarily store text.
The
holding
buffer
is
generally used to move paragraphs from one part of the
text to
another, but it also has many other applications.
To place text
in the buffer, the cursor must be above and
to the left of the text you wish to hold.
Count the number
of
lines you wish to place in the buffer, or use a mark (see Using
Marks).
In the COMMAND mode enter the command
"h", followed
by the
number of lines you wish to save.
The lines of text
following
the
cursor will disappear from the screen and
be
stored
in the holding buffer.
If a number is not specified,
all the lines between the cursor and the end of text will be
=I~V~. __ ~S~p~e~c~l~·a~I~~F~e~a~t~u~r~e~s~ __________________________________ P_a~g~.e 30
The stored text is held in the buffer until you release it. To release text from the buffer, place the cursor where you wish the stored text to be inserted. In the COMMAND mode enter the command "u", and the text in the holding buffer will reappear on the screen.
If text is already stored in the buffer, you cannot hold additional text there. When you attempt to do this the error message "HOLD FULL" appears on the message line. Similarly, when you attempt to release text from the holding buffer when it is empty, the error message "HOLD EMPTY" appears in the upper right corner of the screen.
All normal operations can be performed on the text while text is in the buffer. If you enter the COMMAND mode command "k", to delete all the text on the screen, the text remains in the holding buffer.
After the text stored in the holding buffer has been released, it can be used as often as you like. This feature makes it easy to create repetative forms without doing the repetative typing. To empty the holding buffer enter the command "h 0" (h zero).
Autocommand
Sometimes there are repetative tasks requiring you to perform the same operations over and over again. An Auto command is a sequence of commands entered on a single command line. It can be performed up to 250 times without manual intervention.
The Autocommand is entered in the COMMAND mode and the syntax is :
nCommand1/Command2/ ... <Carriage Return>
The "n" represents the number of times the operation is to be performed. If the exact number of times is unknown, any large number will do.
The following commands can be used to form an Autocommand:
b,c,d,e,f,h,i,l,p,r,s,t,u,v,w
IV. Special Features Page 31
For example, suppose you were doing a financial report and want more space between columns two and three. Using Auto command , you might enter the following commands in the
Cm~MAND mode:
25s/
/./s/
/ /f1/ <CR)The cursor must be on· the first entry when the carrriage return is struck to execute the Autocommand. Now, vvord Processor proceeds to search the report for three spaces. They are found the first time, between columns one and two. Because, Word Processor has been instructed to leave them alone, by the period, they remain unaltered. They are found the second time, between columns two and three. This time they are replaced by five spaces, as per instruction"/ /". Word Processor then goes forward a line, as per instruction "/f1/" and repeats the entire sequence 25 times, because of instruction "25s/".
Two types of manual controls are available for use with Autocommands. Intervention can be used at any point in the command line by enter i.ng "/ i/" . When Intervention is requested, Word Processor stops before executing the next command. You can continue again by striking any key. If you decide not to continue, strike the ESC key.
Macro Programming
Macro programming is used to perform tasks that were not preprogrammed or perhaps not even thought of by the designers of the Word Processor Pac. Virtually anything can be accomplished with a series of Macro commands. Macros allow you to key in a series of commands once and place them into the macro buffer, for repetative use. When you enter the macro command "a n", it instructs Word Processor to perform the Macro program commands the number of times specified. This way, Word Processor is capable of automating nearly as many tasks as you can devise.