Introduction to
Microsoft Windows
l a b
1
1 1
Objectives:
Upon successful completion of Lab 1, you will be able to
● Describe some of the basic functions of an operating system, and Windows in particular
● Describe the parts of the Windows desktop environment
● Use the Start menu to launch programs
● Effectively use the Windows applets WordPad and Calculator
● Maximize, minimize, size, and close a window
● Use the Windows Help feature
Resources required:
● A computer running the Windows Vista operating system
Starter files:
● NonePrerequisite skills:
● Basic familiarity with using a mouse to point, click, double-click, and drag, and basic familiarity with using a keyboard.
NRC’s Top Ten Skills, Concepts, and Capabilities:
● SkillsUse basic operating system facilities • Applets (WordPad, Calculator)
• Change the appearance of the desktop Use online help and instructional materials
• Windows Help
● Concepts
Fundamentals of computers—Windows as an operating system Limitations of Information Technology
● Capabilities
Anticipate technological change
Lab Lesson
In order to be able to complete tasks such as savefiles, printdocuments, and launchprograms, a computer requires software called an operating system. One of the most popular operating systems is Windows. You have probably heard of different versions such as Windows 98, Windows 2000, Windows XP, and Windows Vista. Regardless of the version, they all have the same basic functionality.
The purpose of this hands-on lab is to provide an introduction to the Windows Operating System. Hands-on tasks will be identified by the symbol.
When a computer is powered on, you’ll hear some beeping as it does some hardware checks, and then the operating system loads. A computer running the Windows Operating System may display a login screen, or it may show the desktop immediately, depending on the setup. The Apple Macintosh family of computers runs a different operating system called Mac OS. When you purchase software, you must be sure to check the system requirements and purchase software for the operating system you are using. For example, software purchased for the Windows Operating System will not work on an Apple Macintosh.
Parts of the Windows Desktop
Turn on your computer and sign in if necessary in order to display the Windows desktop. An example of the Windows desktop is shown in Figure 1.1.
The desktop shown in Figure 1.1 has icons on the left, the Taskbar on the bottom, and an open window, which contains a document. Iconsare pictures that represent programs or files. There are icons on the desktop and on the Taskbar. The picture is wallpaper, which has been centered on the desktop. Any digital picture can be used as wallpaper.
Look at your desktop. Identify the Taskbar and icons. The Taskbar contains the following items:
Identify the Startbutton on your computer.
Click once on the Startbutton to reveal the Startmenu, similar to that shown in Figure 1.2.
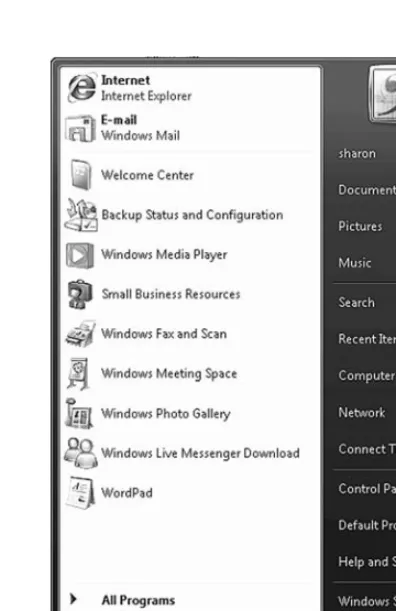
Figure 1.2 Start menu.
Your Startmenu will contain items similar to those shown in Figure 1.2. We will use this menu later to launch some programs. The most recently used programs are listed above the All Programsmenu item. You can click those to relaunch the programs.
Click the Startbutton to close the menu.
The Startbutton is used to display menu items that allow you to select and load applications programs, files, or options for changing the appearance and functionality of the Windows environment. Applications programsare programs that allow you to perform noncomputer related tasks. This includes word processing, spreadsheet, image editing, games, and other programs. The Startbutton is also used to shut down the computer.
Lab 1: Introduction to Microsoft Windows 3
Identify the Quick Launchbar on your computer. If you don’t see it to the right of the Startbutton, it may not be visible on your computer. Some computers are configured so that the Quick Launchbar is not visible.
If the Quick Launchbar is visible, move your mouse pointer over the icons and hover over each one for a second or two. You should see the name of the program or feature pop up.
The Quick Launchbar contains icons that represent programs. You can click these icons to launch the programs as a shortcut method.
Identify the System Trayon your computer. Notice that it contains the clock. If the clock is visible in the system tray, position your mouse pointer on top of the clock.
The System Traydisplays icons for programs or processes that are currently running. You may see icons representing your network connection, anti-virus software, or speaker volume.
Move your mouse pointer over icons in the System Trayand hover over each one for a second or two. You should see the name of the program or feature pop up.
If there are many items in the System Tray, only the active icons may be displayed and the inactive ones may not be visible.
Click the Show Hidden Iconarrow on the System Trayto display all icons, as shown in Figure 1.3. You may not see this icon if all items are active and
displayed.
Figure 1.3 Windows System Tray.
Notice that all icons in the system tray are visible. After a few seconds, the System Trayshould collapse to show only the active icons.
Let’s select an active feature and make some changes.
Double-click the volume icon on the System Tray.
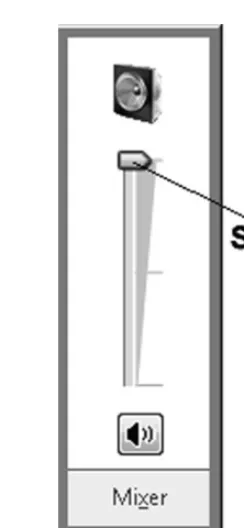
Figure 1.4 Volume Control dialog box.
Position the mouse pointer on the slider and drag it up and down to adjust the volume.
Click once on the desktop to close the Volume Controlbox.
Windows Applets—Calculator
There are a variety of small application programs available in the Windows environment. These small application programs are called applets. Applets perform just a few tasks and are not nearly as robust as the large application packages such as Word and Excel. As examples of applets, let’s explore Calculator and WordPad.
Click the Startbutton to reveal the Startmenu.
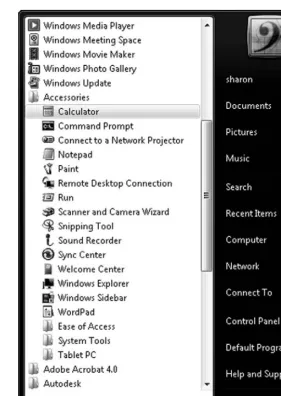
Click the All Programsmenu to reveal the list of programs on your computer. Your list will be similar to the list shown in Figure 1.5.
Click the Accessoriesmenu item.
Click the Calculatormenu item to open the Calculator applet.
Lab 1: Introduction to Microsoft Windows 5
Figure 1.5 Start Menu with Calculator selected.
Notice that the Calculator has opened and there is a corresponding button on the Taskbar as well. The Calculator applet is exactly what your intuition is telling you. You can click each of the buttons to enter a number and perform math functions. The buttons that may not be intuitive are * for multiplication and / for division.
Take a few minutes to use the calculator to perform some quick calculations. For instance try 99 199 and the answer will appear in the display. To
perform calculations you can click the number and symbol buttons on the Calculator applet or you can press the keys on the keyboard.
An open window will also contain a text menu that can be used to select features.
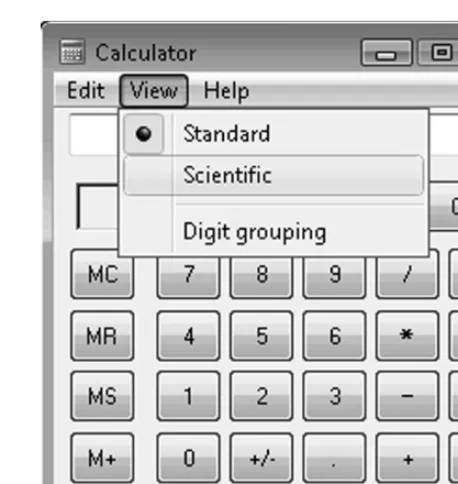
Figure 1.6 Windows Calculator menu.
Notice that the calculator is now displayed as a scientific calculator.
Click the menu items View, Standardto return the calculator view to a standard calculator.
Minimizing and Closing Open Windows
Now that the Calculator appletdialog box is open, it is a good time to review minimizing and closing windows. The Windowbuttons are located in the upper-right corner of each open window.
In the case of the Calculator applet, the Maximize/Restorebutton is disabled because this window cannot be sized. When a button is disabled, clicking on it will have no effect. There are many instances in Windows when a button or other element is disabled because a feature is not available at a particular time.
Click the Minimizebutton.
Notice that the Calculatordisappears from the desktop and a button appears on the Taskbar.
Click the Calculatorbutton on the Taskbar to restore the Calculatordialog box to the desktop.
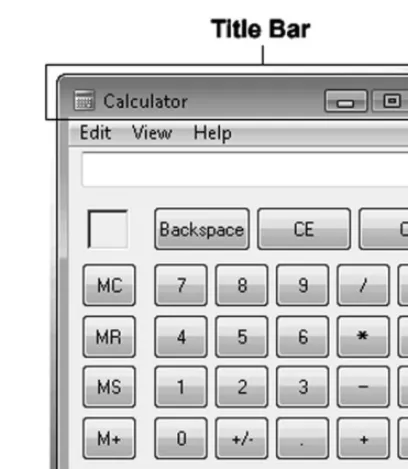
You can also use the mouse to drag a window from one position to another on the desktop. The title bar of a window is at the top of the window, as shown in Figure 1.7.
Lab 1: Introduction to Microsoft Windows 7
Figure 1.7 Calculator title bar.
Drag the Calculatortitle bar to move the Calculatorwindow around the desktop.
If there are other open or minimized windows, those buttons will be displayed on the Taskbar as well.
Let’s close the Calculator applet.
Click the Closebutton on the Calculator appletto close the window.
Notice that the Calculatorbutton has disappeared from the Taskbar.
Let’s open the Calculator appletagain in order to work with multiple windows.
Click the Startbutton and select the menu items All Programs, Accessories,
Calculator.
Using WordPad
Windows includes a small word processing applet called WordPad. It allows you to create and edit a small document such as a memo or essay. Let’s open WordPad and save a document.
Click the Startbutton to open the Startmenu.
Click the menu items All Programs, Accessories, WordPad.
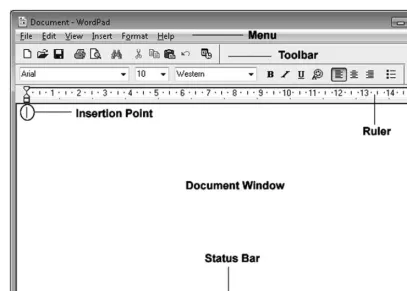
Figure 1.8 WordPad Window.
When there are several windows open, the active window generally has a darker title bar and possibly a flashing insertion point or other indicator.
Click the Calculatorwindow to activate it.
Notice that the title bar is darker, and the Calculatorbutton on the Taskbar appears to be pressed.
Click the WordPadwindow to activate it.
Notice that the title bar is darker, there is a flashing insertion point in the document window, and the WordPadbutton on the Taskbar appears to be pressed.
You can activate a window by clicking inside the window on the desktop or by clicking on the corresponding button on the Taskbar.
Let’s look at a few of the WordPad features and save a file.
Make sure the WordPadwindow is active.
The buttons on the toolbars may look a little confusing, but you can determine what each one is by hovering your mouse pointer over each button. A pop-up label with the name of the button will appear.
Move your mouse pointer over one of the buttons on the toolbar and hover for a second. The pop-up label should appear under the button.
Let’s add some text.
Lab 1: Introduction to Microsoft Windows 9
Type your name in the document window. To do this, you can hold the Shift
key down while you press letters for uppercase. You can also press the Caps Lock
key to turn on uppercase. Pressing the Caps Lockkey again will return to lowercase. You can use the Backspacekey to delete characters to the left of the insertion point, and the Deletekey to delete characters to the right.
Press the Enterkey on the keyboard to move the insertion point to the next line. Press the Enterkey again to move the insertion point to the next line.
There are many instances when it is useful to find information using the built-in Helpfeature. Let’s use the Helpfeature to learn how to center the text.
Click the Help, View Helpmenu items.
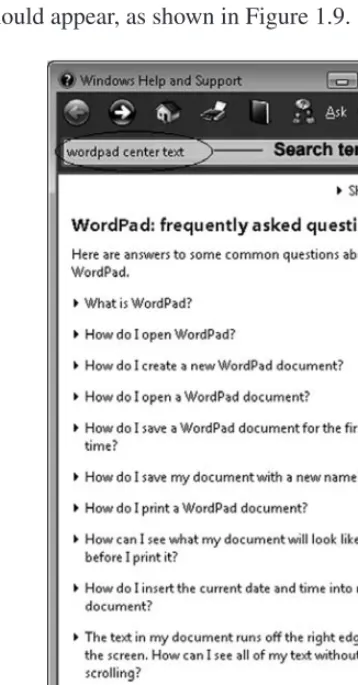
The Helpdialog box should appear, as shown in Figure 1.9.
Figure 1.9 Help dialog box.
Click in the Searchbox as shown in Figure 1.9.
We will use the keywords “WordPad center text” to search for information about the center feature.
Type: WordPad center text
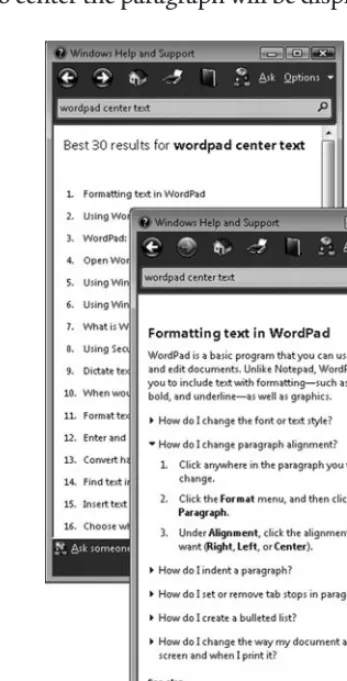
The Helpwindow displays options that may contain helpful information as shown in Figure 1.10.
Click the option “Formatting text in WordPad”.
The Help information will appear as shown in Figure 1.10.
Click the option “How do I change paragraph alignment?” A description of the steps required to center the paragraph will be displayed, as shown in Figure 1.10.
Figure 1.10 Help search results.
Following the directions in the Helpwindow, click anywhere in your name text. Click the menu items Format, Paragraph.
Click the drop-down for Alignment and select Centeras shown in Figure 1.11. Click the OKbutton.
Click the Closebutton in the Help window.
Position the mouse pointer at the end of your name text and click to position the insertion point.
Hit the Enterkey twice.
Notice that the insertion point is centered. Let’s left-align it so that the next paragraph will be left-aligned.
Click the menu items Format, Paragraph.
Lab 1: Introduction to Microsoft Windows 11
Click the drop-down for Alignment and select Left. Click the OKbutton.
Type the following paragraph:
Learning all about using Windows can be fun, but overwhelming. It will take a while to learn, but that’s okay. I will learn it one step at a time.
Do not press the Enterkey at the end of the line of text. WordPad automatically wraps the text to fit the ruler.
We can use the formatting toolbar to add formatting enhancements to the text.
Drag the mouse pointer through your name to highlight it. Hold the left mousebutton down while you drag the pointer through your name, and release the mousebutton once your name is highlighted.
Click the Underlinebutton to underline your name. Feel free to click the
Boldand Italicsbuttons to add those formatting enhancements to your name as well. Your document should look something like that shown in Figure 1.11.
Sizing an Open Window
Most open windows can be adjusted in size and maximized to fit the full desktop. Let’s play with the size of the WordPadwindow.
Move your mouse pointer along any of the edges of the WordPadwindow until a double arrow appears. Once the double arrow appears, drag the mouse pointer in either direction of the arrow to change the size of the window. When you release the mouse pointer the size will be set.
If you size a window so that the document is not completely visible, scroll bars will appear as shown in Figure 1.12.
Figure 1.12 WordPad with scroll bars.
Once your window is sized to display scroll bars, click the arrow buttons at either end of the scroll bars to scroll through the document.
The window can be maximized to fit the full size of the monitor using the Maximize/Restore button at the top-right corner of the window.
Click the Maximize/Restorebutton to maximize the WordPadwindow, as shown in Figure 1.13.
Figure 1.13 Windows buttons: Minimize, Maximize/Restore, Close.
Lab 1: Introduction to Microsoft Windows 13
Notice that the WordPadwindow has been sized to fit the full screen.
Click the Maximize/Restorebutton to restore the WordPad window.
Notice that the WordPadwindow has been restored to the size it was before it was maximized to the full screen size.
Let’s save the WordPad file as a Rich Text Format (RTF)document. Word processing
applications, regardless of the version, are able to read Rich Text documents. If you are sending your resume via email, RTF is a good file format choice.
Click the menu items File, Save As. The Save Asdialog box should appear as shown in Figure 1.14.
In the File name box, type: test
Figure 1.14 File Save As box in WordPad.
By default, WordPad will save your file as a Rich Text file, in the Documentsfolder.
Click the Savebutton to save your file.
Notice that the name of the file, test now appears in the title bar of the WordPadwindow.
Make a change to the document by adding your middle name. Click the Save
button to save the change.
Let’s close the file, and then reopen it.
Click the Closebutton in the upper-right corner of the WordPadwindow to close the window and close the file.
Click the Startbutton and the menu options All Programs, Accessories,
You should see a listing of files in the My Documentsfolder, which includes the test.rtf file.
Click the test.rtf file name and click the Openbutton to open the file. You may not see the .rtf extension; it depends on your Windows configuration.
The test.rtf document file should now be visible in the WordPadwindow.
Changing the Appearance of the Windows Desktop
In addition to manipulating open windows and using applets, the Windows Operating System allows us to adjust the appearance of the desktop and set some configuration features such as screen savers and energy saving options. We will use a shortcut menu to access the properties of the desktop. Right-clicking the mouse reveals a shortcut menu. The method is to click the right-mousebutton instead of the left-mousebutton.
Close the WordPadand Calculatorwindows.
Move your mouse pointer to an empty area on the desktop, and right-click to reveal the shortcut menu, as shown in Figure 1.15.
Figure 1.15 Windows desktop shortcut menu.
Click the Personalizemenu item with either the right-or left-mousebutton to reveal the Personalizationdialog box.
Click the Screen Saveroption, as shown in Figure 1.16.
The purpose of a screen saver is to prevent burning an image into the monitor screen if the screen does not change over a long period of time. Feel free to take a few minutes to explore the variety of screen savers available by clicking on the drop-down arrow beside the screen saver name. Choose a screen saver by clicking on a screen saver name and clicking the Previewbutton to view a sample of the screen saver. Click again when the screen saver is in preview mode to return to the desktop.
Lab 1: Introduction to Microsoft Windows 15
Figure 1.16 Windows desktop Display Properties dialog box.
Figure 1.17 Windows desktop Power Options dialog box.
Click the Closebutton to accept the power options and return to the Screen Saverdialog box.
Click the Cancelbutton to close the Screen Saver window without changes. In the Personalizationbox, click the Desktop Backgroundoption to display the properties for wallpaper, as shown in Figure 1.18.
Lab 1: Introduction to Microsoft Windows 17
Figure 1.18 Windows desktop background properties.
You can scroll through the Background list and click each background type. Some backgrounds are large pictures. You can adjust the position of a large picture to center or stretch. If a small picture is stretched, you will find that it becomes out of focus.
After you’ve finished making selections, click the OKbutton to accept the Display Background options.
Close the Personalizationwindow.
Using Windows Help
Most software, including the Windows Operating System, contains extensive help information. If you’re wondering how to use a feature, or are interested in more information about the features of the software you’re using, the Help feature is the first place to look. Let’s use the Windows Help feature to learn how to set up a printer.
Click the Startbutton.
Click the Help and Supportmenu item.
The Helpand Supportwindow will open.
Figure 1.19 Windows Help and Support.
After you click the Search Helpbutton, you should see a list of results appear in a new window, as shown in Figure 1.20.
Click the task “Getting started with printing”. If your version reveals other tasks, feel free to choose one.
Lab 1: Introduction to Microsoft Windows 19
Figure 1.20 Help and Support for setting up a printer.
Close the Help and Support Centerwindow after you have completed your search.
Shutting Down Your Computer
When you have finished using your computer, it is important to shut it down properly. Windows will close any open applications, save settings, and remove temporary files that have been stored.
When you’re ready, take the following steps to shut down your computer.
Click the Startbutton.
Figure 1.21 Windows Turn off computer buttons.
Click the Shut Downoption to turn off the computer.
The Sleepfeature can be used when you wish to conserve energy. It will power down the hard drive and monitor and retain information in memory. If there is a power interruption, information in memory will be lost, so it is wise to save your documents before you use the Sleepfeature.
Review
This has been a busy lab! We have covered the following topics:
● The Windows family of operating systems ● Parts of the desktop
Icons Taskbar
Quick Launch bar System Tray Start button ● Opening Windows
Minimize Size Maximize/Restore Close Taskbar button ● Applets Calculator WordPad
● Changing the appearance of the desktop Screen savers
Power saving options Desktop wallpaper ● Windows Help
● Shutting down your computer
Exercises
1. Right-click the desktop and select the Personalizemenu item from the shortcut menu. Click the Window Color and Appearanceoption. You can select a color scheme from the drop-down arrow on the Color Schemebox. You can also click the Advancedbutton to select custom colors. Feel free to experiment!
Lab 1: Introduction to Microsoft Windows 21
2. Open WordPad. You can open the test.rtf file or start a new file with text of your choice. Experiment with the buttons on the formatting toolbar to add color and change the font and font size. Formatting buttons are shown in Figure 1.22. Drag to select text, and then click the formatting buttons to apply the formatting feature to the highlighted text. Use the Alignment buttons to align titles or paragraphs.