INSTALLATION AND CONFIGURATION IN
The information contained in this document represents the current view of Microsoft Corporation on the issues discussed as of the date of publication. Because Microsoft must respond to changing market conditions, it should not be interpreted to be a commitment on the part of Microsoft, and Microsoft cannot guarantee the accuracy of any information presented after the date of publication.
This document is for informational purposes only. MICROSOFT MAKES NO WARRANTIES, EXPRESS, IMPLIED OR STATUTORY, AS TO THE INFORMATION IN THIS DOCUMENT.
Complying with all applicable copyright laws is the responsibility of the user. Without limiting the rights under copyright, no part of this document may be reproduced, stored in or introduced into a retrieval system, or
transmitted in any form or by any means (electronic, mechanical, photocopying, recording, or otherwise), or for any purpose, without the express written permission of Microsoft Corporation.
Microsoft may have patents, patent applications, trademarks, copyrights, or other intellectual property rights covering subject matter in this document. Except as expressly provided in any written license agreement from Microsoft, the furnishing of this document does not give you any license to these patents, trademarks, copyrights, or other intellectual property.
© 2008 Microsoft Corporation. All rights reserved. Microsoft and Solomon are either trademarks or registered trademarks of Microsoft Corporation or Dynamics NAV Software, Inc. or their affiliates in the United States and/or other countries. Dynamics NAV Software, Inc. is a subsidiary of Microsoft Corporation. The names of actual companies and products mentioned herein may be the trademarks of their respective owners.
The names of actual companies and products mentioned herein may be the trademarks of their respective owners.
Microsoft Official Training Materials for Microsoft Dynamics ® Your use of this content is subject to your current services agreement
Table of Contents
Introduction 0-1
Welcome ... 0-1 Microsoft Dynamics Courseware Contents ... 0-2 Documentation Conventions ... 0-3 Student Objectives ... 0-4Chapter 1: Architecture
1-1
Objectives ... 1-1 Introduction ... 1-1 Microsoft Dynamics NAV 5.0 Architecture... 1-2 Microsoft Dynamics NAV 2009 Architecture... 1-3 Three-Tiers on Three-Computers ... 1-7 Summary ... 1-12 Test Your Knowledge ... 1-13 Quick Interaction: Lessons Learned ... 1-14 Solutions ... 1-15
Chapter 2: Installation Requirements
2-1
Objectives ... 2-1 Introduction ... 2-1 Software Prerequisites of Microsoft Dynamics NAV ... 2-2 Microsoft Windows Server ... 2-3 Microsoft SQL Server ... 2-7 SQL Server 2005 Editions ... 2-8 Summary ... 2-10 Quick Interaction: Lessons Learned ... 2-11
Chapter 3: RoleTailored Client Install
3-1
Objectives ... 3-1 Introduction ... 3-1 Install Dynamics NAV Demo Version on a Single Computer ... 3-2 Install Dynamics NAV 2009 Clients on a Network ... 3-4 Start the RoleTailored Client ... 3-6 Lab 3.1 - Installing Microsoft Dynamics NAV 2009 Clients ... 3-15 Summary ... 3-17 Quick Interaction: Lessons Learned ... 3-18
Chapter 4: RoleTailored Client Personalization
4-1
Objectives ... 4-1 Introduction ... 4-1 Customize the Navigation Pane ... 4-2 Customize Pages ... 4-7 Lab 4.1 - Adding a Vendor List to the Role Center ... 4-14 Summary ... 4-15 Quick Interaction: Lessons Learned ... 4-16
ii
Introduction ... 5-1 NAV Server Setup ... 5-2 Server Configuration During Setup ... 5-4 NAV Server Configuration After Setup ... 5-6 Lab 5.1 - Editing the Configuration file for the NAV Server ... 5-9 Summary ... 5-10 Quick Interaction: Lessons Learned ... 5-11
Chapter 6: Classic Client Option
6-1
Objectives ... 6-1 Introduction ... 6-1 Requirements ... 6-2 Classic Client Installation ... 6-2 The Developer Environment Option ... 6-3 Summary ... 6-4 Quick Interaction: Lessons Learned ... 6-5
Chapter 7: Deployment
7-1
Objectives ... 7-1 Introduction ... 7-1 Deployment Process ... 7-2 Deploy Microsoft Dynamics NAV 2009... 7-3 Summary ... 7-17 Quick Interaction: Lessons Learned ... 7-18
Chapter 8: Optimization and Troubleshooting
8-1
Objectives ... 8-1 Introduction ... 8-1 Microsoft Dynamics NAV 2009 Troubleshooting ... 8-2 Database Performance Troubleshooting ... 8-2 Troubleshooting Software Deployed with Group Policy ... 8-15 Lab 8.1 - Use SQL Server Profiler to configure a baseline trace ... 8-21 Lab 8.2 - Configure a System Monitor Counter Log ... 8-23 Lab 8.3 - Analyzing a Workload in DTA... 8-24 Quick Interaction: Lessons Learned ... 8-26
Microsoft Official Training Materials for Microsoft Dynamics ®
Introduction
INTRODUCTION
Welcome
We know training is a vital component of retaining the value of your Microsoft Dynamics® NAV 2009 investment. Our quality training from industry experts keeps you up-to-date on your solution and helps you develop the skills necessary for fully maximizing the value of your solution. Whether you choose Online Training, Classroom Training, or Training Materials; there is a type of training to meet everyone's needs. Choose the training type that best suits you so you can stay ahead of the competition.
Online Training
Online Training delivers convenient, in-depth training to you in the comfort of your own home or office. Online training provides immediate access to training 24 hours-a-day. It is perfect for the customer who does not have the time or budget to travel. Our newest online training option, eCourses, combine the efficiency of online training with the in-depth product coverage of classroom training, with at least two weeks to complete each course.
Classroom Training
Classroom Training provides serious, in-depth learning through hands-on interaction. From demonstrations to presentations to classroom activities, you receive hands-on experience with instruction from our certified staff of experts. Regularly scheduled throughout North America, you can be sure you will find a class convenient for you.
Training Materials
Training Materials enable you to learn at your own pace, on your own time with information-packed training manuals. Our wide variety of training manuals feature an abundance of tips, tricks, and insights you can refer to again and again:
Microsoft Dynamics Courseware
The Microsoft Dynamics Courseware consists of detailed training manuals, designed from a training perspective. These manuals include advanced topics as well as training objectives, exercises, interactions and quizzes.
Look for a complete list of manuals available for purchase on the Microsoft Dynamics website: www.microsoft.com/Dynamics.
0 - 2
Microsoft Dynamics Courseware Contents
Test Your Skills
Within the Microsoft Dynamics Training Materials you find a variety of different exercises. These exercises are offered in three levels to accommodate the variety of knowledge and expertise of each student. We suggest you try the level three exercises first, if you need help completing the task look to the information in the level two exercises. If you need further assistance each step of the task is outlined in the level one exercise.
Challenge Yourself!
Level 3 exercises are the most challenging. These exercises are designed for the experienced student who requires little instruction to complete the required task.
Need a Little Help?
Level 2 exercises are designed to challenge students, while providing some assistance. These exercises do not provide step by step instructions, however, do provide you with helpful hints and more information to complete the exercise.
Step by Step
Level 1 exercises are geared towards new users who require detailed instructions and explanations to complete the exercise. Level 1 exercises guide you through the task, step by step, including navigation.
Quick Interaction: Lessons Learned
At the end of each chapter within the Microsoft Dynamics Training Material, you find a Quick Interaction: Lessons Learned page. This interaction is designed to provide the student with a moment to reflect on the material they have learned. By outlining three key points from the chapter, the student is maximizing knowledge retention, and providing themselves with an excellent resource for reviewing key points after class.
Microsoft Official Training Materials for Microsoft Dynamics ® Your use of this content is subject to your current services agreement
Introduction
Documentation Conventions
The following conventions and icons are used throughout this documentation to help you quickly and effectively navigate through the information.
CAUTION: Cautions are found throughout the training manual and are preceded by the word CAUTION in bold. Cautions are used to remind you of a specific result of a specific action which may be undesirable.
HINT: Hints are found throughout the training manual and are preceded by the word HINT in bold. Hints are used to suggest time-saving features or alternative methods for accomplishing a specific task.
NOTE: Notes are found throughout the training manual and are preceded by the word NOTE in bold. Notes are used to provide information which, while not critical, may be valuable to an end user.
BEYOND THE BASICS: Advanced information found throughout the training manual is preceded by the words BEYOND THE BASICS in bold. Beyond the Basics provides additional detail, outside of standard functionality, that may help you to more optimally use the application.
EXAMPLE: Examples are found throughout the training manual and are preceded by the word EXAMPLE in bold. Examples bring to light business scenarios that may better explain how an application can be used to address a business problem.
0 - 4
Student Objectives
What do you hope to learn by participating in this course? List three main objectives below.
1.
2.
3.
Microsoft Official Training Materials for Microsoft Dynamics ® Your use of this content is subject to your current services agreement
Chapter 1: Architecture
CHAPTER 1: ARCHITECTURE
Objectives
The objectives are:
• Review the Microsoft Dynamics® NAV 5.0 Architecture • Understand the Microsoft Dynamics NAV 2009 Architecture • Install Microsoft Dynamics NAV 2009 three-tier architecture on
three computers
Introduction
Microsoft Dynamics NAV 2009 is built on a three-tier architecture model. This differs significantly from the two-tier architecture of Microsoft Dynamics NAV 5.0.
Microsoft Dynamics NAV 2009 introduces a new layer in the architecture. This additional layer, or tier, is designed to host and execute all the business logic. In the two-tier architecture of Microsoft Dynamics NAV 5.0, the business logic resides at the client layer.
It improves security to execute the business logic on another layer that does not provide an interface, or access point, to the user. Scalability is also improved in the three-tier architecture.
1-2
Microsoft Dynamics NAV 5.0 Architecture
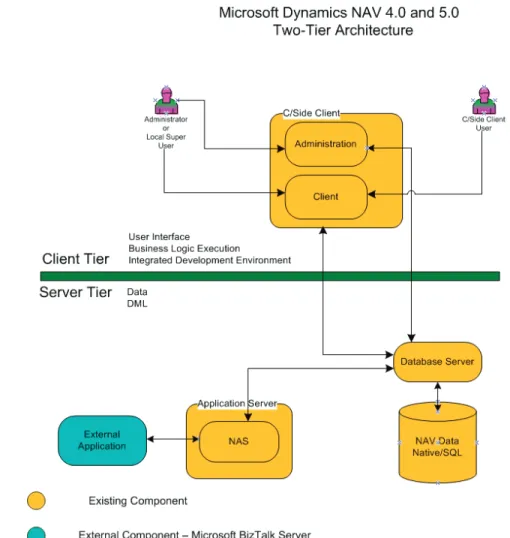
Two-tier architecture models are used in the true Client/Server Distributed Data solution. In two-tier architectures, the data and data manipulation layers reside on the server, whereas the application logic, presentation logic, and presentation layers reside on the client.
Microsoft Dynamics NAV 5.0 is designed according to the two-tier architecture model. It puts the application logic (Business Logic) and presentation
logic/layers (User Interface) on the client computer.
The two-tier architecture also puts the data and data manipulation layers (DML) on the server in the native database and SQL Server configurations.
FIGURE 1.1 THE MICROSOFT DYNAMICS NAV 5.0 ARCHITECTURE
Microsoft Official Training Materials for Microsoft Dynamics ®
Chapter 1: Architecture
The Client Tier
The C/Side Client is located on the client tier. It consists of an administration component for administrators and Microsoft Dynamics NAV 4.0/5.0 super users and client access for the C/Side client user.
Additionally, the client tier has specific connections for data transfer to the server tier and the database management component. These connections consist of the client, security approved access to the database components on the server tier, and administration access to the database management
The Server Tier
The server tier consists of the database management system and the native database for Microsoft Dynamics NAV 4.0/5.0 or the Microsoft® SQL Server® database.
The existing application server or Navision Application Server (NAS) is an integration point to the Microsoft Dynamics NAV 4.0/5.0 application. Therefore it enables connection to Microsoft® BizTalk Server®, for example. The Navision Application Server represents an effort to achieve three-tier architecture benefits. However, it is limited to only one process at a time. Therefore, multiple Navision Application Servers are needed for many production environments.
Microsoft Dynamics NAV 2009 Architecture
The three-tier architecture is used in the Client/Server Distributed Data and Application system. With this architecture, in which the data and data
manipulation layers are put on their own servers, the application logic is put on its own server, and the presentation and presentation logic are put on the client computer.
Microsoft Dynamics NAV 2009 is designed according to the three-tier architecture model.
• This version puts the presentation logic/ layers (User Interface) on the client computer.
• It puts the Business logic on another layer available in the three-tier architecture called the service tier.
• It puts the data and data manipulation layers (DML) on the database server tier.
The Microsoft Dynmics NAV 2009, three -tier architecture and the classic two-tier architecture are not mutually exclusive. The Classic client remains an essential component for developing and administering Dynamics NAV applications. (For example, you must use the Classic client to upload your Microsoft Dynamics NAV 2009 license file.)
1-4
But once administrators or Microsoft Certified Partners roll out an
implementation to a customer, end-users only see and use the RoleTailored client, which interacts with the other RoleTailored components.
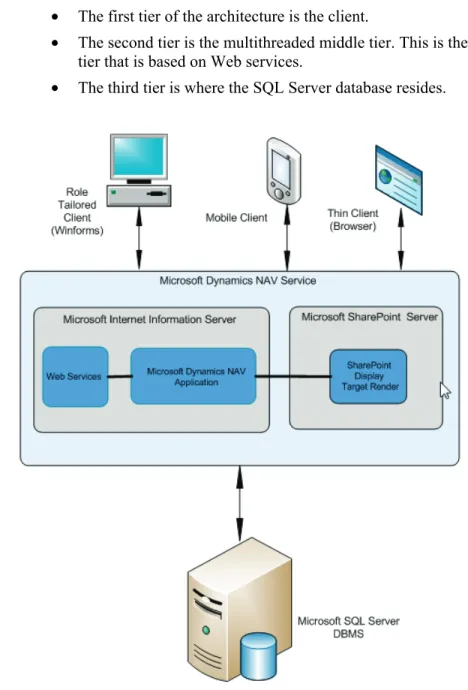
The three-tier architecture is multithreaded so that it can handle more than one process at a time. This architecture overcomes the intrinsic limitations of the two-tier architecture.
• The first tier of the architecture is the client.
• The second tier is the multithreaded middle tier. This is the service tier that is based on Web services.
• The third tier is where the SQL Server database resides.
FIGURE 1.2 THE MICROSOFT DYNAMICS NAV 2009 ARCHITECTURE
Microsoft Official Training Materials for Microsoft Dynamics ®
Chapter 1: Architecture
The Client Tier consists of the following components:
• The Microsoft Business Framework (MBF) is located on the client tier. The Client is built on Microsoft Windows Forms (Winforms) technology for smart client applications.
• Microsoft Windows Forms is the set of classes in the .NET Framework that enables the rapid development of powerful smart client applications. This logical form is a device independent representation of forms/UI parts and Web parts.
• The User Interface (UI) in the client determines the User
Experience (UX) for the user. Content is delivered to the client from the data binder layer in MBF. It will be possible for end-users to customize their user experience.
• The Data Binder consists of the data binding layer which transports data, data state, and notifications about data from the underlying business logic to forms and controls in the display target client. It also has reverse functionality and transports input data, data state and notifications from the client to the underlying business logic.
• The Form Builder requests reading metadata for a form and building a logical form with data-binding, controls and behavior. The logical form provides the functionality that is shared by all display targets: data-binding, input-validation, navigation and possible business logic.
• UX Controls are necessary because the MBF client will not deliver all the Microsoft Dynamics NAV 2009 controls. Therefore, native controls, or managed win forms controls, are wrapped in a thin abstraction. This is the physical control.
The Service Tier
The Service Tier consists of five main components: • The Microsoft Dynamics NAV Service • The Application Code
• The metadata provider • Business Web services • Navision Class Library (NCL)
Briefly, the Microsoft Dynamics NAV Service functions as a hub that handles requests coming from the new clients through Web services. The Web service is hosted by Internet Information Services (IIS). This is responsible for
1-6
As soon as a request is received and validated, it is passed on to the relevant component, metadata provider, application, or reporting service for execution. When execution is complete, the executing component sends a response to the calling client.
• The Microsoft Dynamics NAV Service represents the started state of the system and provides an interface between the application and the clients. The service exposes its functionality as methods on a Web service hosted by IIS. Within the Web service framework, IIS handles authentication and thread management. Tracing and logging of starts is also performed by the NAV Service.
• The Business Web Services Components provide a platform by which developers can use the existing NAV development
environment to build and customize Web services based on standard definitions such as SOAP and Windows Services Enhancements (WSE). Business Web Services functionality includes use of all related business logic that accompanies such operations on such objects. This includes but is not limited to field validation, and assignment of Identification (ID's) from number series and other code associated with the entry and manipulation of data in Navision, such as data modify triggers like OnCreate, OnModify and
OnDelete.
Microsoft Official Training Materials for Microsoft Dynamics ®
Chapter 1: Architecture
Three-Tiers on Three-Computers
Microsoft Dynamics NAV 2009 introduces a three-tier RoleTailored architecture that improves the security, scalability, and flexibility of Microsoft Dynamics NAV. In this lesson the installation of the new architecture in a production environment on three computers is discussed.
This table is an example of what each computer will host in the three tier architecture:
Computer Description
DYNNAV-SQL-SERVER
• Server computer hosting SQL Server. • This is the database tier.
• This computer runs Microsoft Windows Server 2003 or 2008.
DYNNAV-SERVER • Server computer hosting Microsoft Dynamics
NAV Server.
• This is the server tier.
• This computer runs Microsoft Windows Server 2003 or 2008.
DYNNAV-CLIENT • Client computer running the RoleTailored
client.
• This is the client tier.
• This computer runs Microsoft Windows Vista.
The key characteristic of this lesson is that the components are all on separate computers. In a real production environment, you might have several SQL Server computers, several Microsoft Dynamics NAV Server computers, and several RoleTailored client computers. As long as you do not install multiple Microsoft Dynamics NAV components together on a single computer, the procedures and issues presented in this lesson apply.
After completing this lesson, you will have a functioning three-tier installation on three computers. The install uses the CRONUS International Ltd. demo database. This walkthrough illustrates the following tasks:
• Installing the Microsoft Dynamics NAV database components. • Configuring Microsoft SQL Server for Microsoft Dynamics NAV. • Installing Microsoft Dynamics NAV Server.
• Installing Microsoft Dynamics NAV RoleTailored client. • Configuring delegation
1-8
Database Components
After you have installed SQL Server 2005 and SQL Server 2005 SP2, the next step is to install the Microsoft Dynamics NAV database components and the CRONUS International Ltd. demo database.
Follow these steps to install the Microsoft Dynamics NAV 2009 Database Components and demo database:
1. Insert the Microsoft Dynamics NAV 2009 DVD into the DVD drive of DYNNAV-SQL-SERVER, your database computer. The Startup screen opens and presents a set of options in the Prepare, Install, and Join the community sections.
2. Under Install, click Microsoft Dynamics NAV. 3. On the Welcome screen, click Next.
4. To accept the license terms, click I accept.
5. On the Microsoft Dynamics NAV 2009 Installer page, click
Choose an installation option.
6. On the Choose an installation option page, click Database Components. The demo database is included as part of this option. 7. On the Specify parameters page, click Install.
8. After the installation is complete, click Close to exit Setup.
Configuring SQL
NOTE: The extended stored procedure is automatically installed for 32-bit SQL Server installations. You do not need to manually configure it.
Follow these steps to configure the Microsoft Dynamics NAV 2009 stored procedure for 64 bit installations:
1. Copy xp_ndo_x64.dll from the Sql_esp\x64 folder on the DVD to the Microsoft Dynamics NAV Database folder on your server computer. In a default installation, this location is C:\Program Files (x86)\Microsoft Dynamics NAV\60\Database.
2. Open SQL Server Management Studio by clicking Start, clicking
All Programs, pointing to SQL Server, and then clicking SQL Server Management Studio.
Microsoft Official Training Materials for Microsoft Dynamics ®
Chapter 1: Architecture
3. In the Connect to Server pane, in the Server type box, fill in the following fields:
Field Action
Server Type Select Database Engine.
Server name Select DYNNAV-SERVER (the database server
computer)
Authentication Select Windows Authentication.
4. Click Connect.
5. In the left pane, click Databases, click System Databases, click
master, click Programmability, and then click Extended Stored Procedures.
6. Update the xp_ndo_enumusergroups extended stored procedure with the 64-bit DLL.
7. In the Extended Stored Procedures tab, right-click
xp_ndo_enumusergroups, and on the shortcut menu, choose
Properties.
8. In the Select a Page pane, click General. In the DLL property, provide the location of the 64-bit DLL that you previously copied, such as C:\Program Files (x86)\Microsoft Dynamics
NAV\60\Database.
9. In the Select a Page pane, click Permissions.
10. In the Users or roles section, click Add to open the Select Users or Roles window.
11. Click Browse, select [public], and click OK. Click OK to close the
Select Users or Roles window.
12. In the Users or roles section, click public. In the Explicit
permissions for public section, select the Grant check box for the
Execute permission.
13. Repeat the preceding steps for the xp_ndo_enumuserids extended stored procedure.
When using the 64-bit version of SQL Server 2005, you must configure it to be accessed by the Microsoft Dynamics NAV Server tier. The trace flag must be set before Microsoft Dynamics NAV Server can connect to the SQL database. You must restart the SQL Server service after you complete this procedure.
Follow these steps to set the Trace Flag on 64 bit version of SQL Server: 1. Open SQL Server Configuration Manger by clicking Start, clicking
All Programs, pointing to SQL Server, pointing to Configuration Tools, and then clicking SQL Server Configuration Manager. 2. In the left pane, click SQL Server 2005 Services.
1-10
3. In the right pane, right-click SQL Server (MSSQLSERVER), and on the shortcut menu, click Properties.
4. In the Properties window, click the Advanced tab.
5. Click the Startup Parameters property, and open the drop-down list.
6. Type ;-T4616 at the end of the line in the drop-down list and click
OK.
7. In the right pane, right-click SQL Server (MSSQLSERVER), and on the shortcut menu, click Restart.
The next step in completing the installation of the three-tier architecture is to install the Microsoft Dynamics NAV Server service to the second server
computer, DYNNAV-SERVER. This is a different server computer from the one where you installed SQL Server and the Microsoft Dynamics NAV database components.
To install Microsoft Dynamics NAV Server
1. Insert the Microsoft Dynamics NAV DVD into the DVD drive of
DYNNAV-SERVER.
2. Under Install, click Microsoft Dynamics NAV. 3. On the Welcome screen, click Next.
4. To accept the license terms, click I accept.
5. On the Microsoft Dynamics NAV 2009 Installer page, click
Choose an installation option.
6. On the Choose an installation option page, click Server. 7. On the Specify parameters page, click Server to open the
Installation Parameters pane.
8. In the SQL Server field, type the name of the SQL Server computer—DYNNAV-SQL-SERVER.
9. In the SQL Database field, type Demo Database NAV (6-0). 10. This identifies the CRONUS International Ltd. demo database. 11. Click Apply to save the Microsoft Dynamics NAV Server settings. 12. Click Install to begin installing software.
13. After the installation is complete, click Close to exit. The third and final tier is the client tier. The first task is to install the RoleTailored client to a workstation computer.
Follow these steps to install the Role Tailored Client:
1. Insert the Microsoft Dynamics NAV DVD into the DVD drive of
DYNNAV-CLIENT, your Microsoft Dynamics NAV client computer.
2. Under Install, click Microsoft Dynamics NAV.
Microsoft Official Training Materials for Microsoft Dynamics ®
Chapter 1: Architecture
3. On the Welcome page, click Next.
4. On the Microsoft Software License Terms page, review the software license, and then click I accept.
5. On the Microsoft Dynamics NAV 2009 Installer page, click
Choose an installation option.
6. On the Choose an installation option page, click Client to install the RoleTailored client.
7. On the Specify Parameters page, click RoleTailoredclient to configure the component.
8. On the Installation Parameters pane, type the name of the
Microsoft Dynamics NAV Server computer, DYNNAV-SERVER, in the Server Name field.
9. Click Apply to begin installing software. 10. Click Install on the Specify parameters page. 11. After installation is complete, click Close to exit.
The procedures in this section are necessary only when the logon for Microsoft Dynamics NAV Server is a domain user account, instead of the Network Service account.
In this case, the RoleTailored client must have a way of identifying the Microsoft Dynamics NAV Server service's domain account. To accomplish this, the client must get a Kerberos ticket for the Microsoft Dynamics NAV Server service. The Microsoft Dynamics NAV Server service can then allow the client to use its credentials while interacting with a SQL Server database. This extension of credentials by proxy is known as delegation.
NOTE: If you were installing Microsoft Dynamics NAV Server and SQL Server on the same computer, but using a domain user account to log in to both, all of the following steps would still be necessary except Delegating Access to the SQL Server Service.
It is a good practice to create a dedicated domain user account for the NAV Service. This action requires a domain administrator.
After you create the user, right-click it in the tree view and choose Raise Domain Functional Level. From the drop-down, click Windows Server 2003 (if it is not already at this level).
The next step is to create a Service Principal Name (SPN) for the new domain user account. This will enable you to configure the Microsoft Dynamics NAV Server service to delegate access to the SQL Server service, on behalf of the RoleTailored client.
1-12
Follow these steps to create a Service Principal Name
On any server computer in the domain, download the Windows Server 2003 Service Pack 2 32-bit Support Tools.
Create the SPN by running the setspn utility. The required syntax is: Copy Code
setspn –A
ServerName_InstanceName/FullyQualifiedDomainNameOfServer:Po rt Domain \User
1. Using DYNNAV-SERVER (the server that runs Microsoft
Dynamics NAV Server in this walkthrough) and DynamicsNAV (the default instance name for Microsoft Dynamics NAV Server), the full command should look like this
Copy Code
Setspn -A
DYNNAV-SERVER_DynamicsNAV/DYNNAV-SERVER.yourDomain.yourCompany.com:7046 yourdomain\yourUser
Summary
The new three-tier multithreaded architecture model of Microsoft Dynamics NAV 2009 provides process benefits beyond the two-tier architecture model's capability.
Understanding the Microsoft Dynamics NAV 2009 architecture enables IT professionals, system implementers and developers to install and customize Microsoft Dynamics NAV 2009
Microsoft Official Training Materials for Microsoft Dynamics ®
Chapter 1: Architecture
Test Your Knowledge
1. The following are benefits of a three-tier architecture ( ) It can accommodate up to 20 users.
( ) The business rules are located on the client tier.
( ) Business logic rules and execution are isolated from the client.
( ) Process logic is positioned at the client tier for optimal access by the end user.
2. What is the purpose of the External Component in the NAV 4.0 and 5.0 two-tier architecture?
( ) It represents another application that integrates by means of the Navision Application Server.
( ) It represents remote access to the NAV 4.0 and 5.0 systems. ( ) It provides three-tier functionality to the two-teir architecture. ( ) Is of no real use.
3. The purpose of the Data Binder component in the NAV 2009 three-tier architecture does the following: (Select all that apply.)
( ) Determines the user experience for the end-user.
( ) Saves input data, data state and data notifications only on the client ( ) Sends data, and data state, and notifications from the business logic tot the
client and vice - versa
1-14
Quick Interaction: Lessons Learned
Take a moment and write down three key points you have learned from this chapter:
1.
2.
3.
Microsoft Official Training Materials for Microsoft Dynamics ®
Chapter 1: Architecture
Solutions
Test Your Knowledge
1. The following are benefits of a three-tier architecture ( ) It can accommodate up to 20 users.
( ) The business rules are located on the client tier.
(•) Business logic rules and execution are isolated from the client.
( ) Process logic is positioned at the client tier for optimal access by the end user.
2. What is the purpose of the External Component in the NAV 4.0 and 5.0 two-tier architecture?
(•) It represents another application that integrates by means of the Navision Application Server.
( ) It represents remote access to the NAV 4.0 and 5.0 systems. ( ) It provides three-tier functionality to the two-teir architecture. ( ) Is of no real use.
3. The purpose of the Data Binder component in the NAV 2009 three-tier architecture does the following: (Select all that apply.)
( ) Determines the user experience for the end-user.
( ) Saves input data, data state and data notifications only on the client (√) Sends data, and data state, and notifications from the business logic tot
the client and vice - versa
1-16 Microsoft Official Training Materials for Microsoft Dynamics ®
Chapter 2: Installation Requirements
CHAPTER 2: INSTALLATION REQUIREMENTS
Objectives
The objectives are:
• Understand the Operating System and Software Prerequisites for Microsoft Dynamics® NAV 2009
• Select the correct Microsoft Windows® Server Version
• Understand the Microsoft® SQL Server® components
• Microsoft SQL Server Editions
Introduction
Microsoft Dynamics NAV 2009 is designed to take advantage of the Microsoft software platform. Therefore, all the software prerequisites of Microsoft Dynamics NAV are part of the Microsoft software stack.
This software platform consists of the following prerequisites for Microsoft Dynamics NAV 2009:
• Windows Server 2003 or 2008
• Microsoft SQL Server 2005 or 2008
• The Microsoft® .NET Framework 3.5
• Microsoft Windows Services Enhancements
• ASP.NET
• Microsoft Report Viewer 2008
These software requirements determine the hardware configuration.
The hardware configuration must be sufficient to run the software prerequisites. If this is not the case then the software prerequisites will not run correctly. This will lead to a failed implementation of Microsoft Dynamics NAV.
Next the focus is about how to select the hardware and software prerequisites for Microsoft Dynamics NAV 2009.
2-2
Software Prerequisites of Microsoft Dynamics NAV
Users must install and configure the following prerequisites to prepare the server on which you will load Microsoft Dynamics NAV:
Windows Server is the infrastructure platform for powering connected
applications, networks, and Web services from the workgroup to the data center. Microsoft SQL Server is a comprehensive database platform providing
enterprise-class data management with integrated business intelligence (BI) tools. The Microsoft SQL Server 2005 and 2008 database engine provides improved security and reliable storage for both relational and structured data. This enables you to build and manage highly available, performance data applications for use in your business.
The .NET Framework is a development and execution environment that enables different programming languages and libraries to work together seamlessly to create Microsoft Windows-based applications that are easier to build, manage, deploy, and integrate with other networked systems.
The Web Services Enhancements for Microsoft .NET is an add-in to Microsoft Visual Studio® 2007 and the Microsoft .NET Framework 3.5 that enables developers to build secure Web services based on the latest Web services protocol specifications.
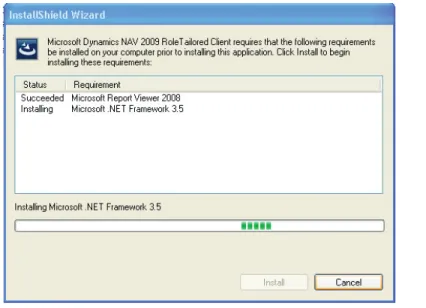
The Microsoft Report Viewer 2008 Redistributable Package includes Windows Forms and ASP.NET Web server controls for viewing reports designed by using Microsoft reporting technology. Microsoft Report Viewer control enables applications that run on the .NET Framework to display reports designed by using Microsoft reporting technology. This redistributable package contains Windows Forms and ASP.NET Web server control versions of the Report Viewer.
FIGURE 2.1 ROLE TAILORED CLIENT PRE-REQUISITES
Microsoft Official Training Materials for Microsoft Dynamics ®
Chapter 2: Installation Requirements
Microsoft Windows Server
Windows Server 2003 or Windows Server 2008 is the platform operating system for Microsoft Dynamics NAV 2009. Whether you use the 2003 or 2008 depends on your hardware and infrastructure, and your performance needs.
Windows Server 2003
Windows Server 2003 is an effective, and productive platform for running mission-critical applications. Leading Independent Software Vendors (ISVs) are actively testing, updating, and developing server applications that support changes that you make to the Windows Server 2003 family.
Windows Server 2003 includes all the functionality customers need to do more with less, while providing security, reliability, availability, and scalability. Microsoft has improved and extended the Microsoft Windows server operating systems to incorporate the benefits of Microsoft .NET which enables
information, people, systems, and devices to connect to each other
Windows Server 2003 is a multipurpose operating system able to handle a diverse set of server roles, depending on a user's needs, in either a centralized or distributed manner. Some of these server roles include
• Application server
• File and print server
• Web server and Web application services
• Mail server
• Terminal server
• Remote access and Virtual Private Network (VPN) server
• Directory services including Domain Name System (DNS), Dynamic Host Configuration Protocol (DHCP) server, and Microsoft
Windows Internet Naming Service (WINS)
• Streaming media server
Windows Server 2003 Standard Edition is designed for departmental and standard workloads.
Windows Server 2003 R2 Enterprise Edition differs from Windows Server 2003 R2 Standard Edition primarily in its support for high-performance servers and its ability to cluster servers for more load handling. These capabilities include the following:
• Eight-way Symmetric Multiprocessing (SMP)
• Eight-Node Clustering
2-4
This platform provides reliability that helps systems remain available even if problems occur.
• Windows Server 2003 Datacenter Edition is designed for:
• The highest levels of scalability and reliability
• Supporting mission-critical solutions for databases
• Enterprise resource planning software
• High-volume, real-time transaction processing
• Server consolidation
Windows Server 2003 R2, Datacenter Edition, is available in both 32-bit and 64-bit versions and includes the following:
• Thirty two-way SMP
• Eight-Node Clustering
• Up to 64 Gigabytes of RAM
Microsoft Dynamics NAV uses Windows Server 2003 as an application server, and will be installed on a Windows Server 2003 Standard Edition in most production environments. Other environments may require the Enterprise or Datacenter Editions
Windows Server 2008
Windows Server 2008, with built-in Web and virtualization technologies, enables businesses to increase the reliability and flexibility of their server infrastructure. New virtualization tools, Web resources, and security enhancements help save time, reduce costs, and provide a platform for a dynamic and optimized datacenter.
FIGURE 2.2 WINDOWS SERVER 2008
Microsoft Official Training Materials for Microsoft Dynamics ®
Chapter 2: Installation Requirements
Powerful new tools, such as Internet Information Services (IIS) 7.0 and Server Manager, provide more control over servers, and streamline Web, configuration, and management tasks. Advanced security and reliability enhancements, such as Network Access Protection and the Read-Only Domain Controller, harden the operating system and help protect the server environment to make sure a solid foundation on which to build businesses.Windows Server 2008 provides a solid foundation for all server workload and application requirements while it is easy to deploy and manage. Hallmark Windows Server reliability and increased high availability features help make sure that your important applications and data is available when you need them.
• Initial Configuration Tasks moves interactive elements of setup to after installation. This eliminates the need for the administrator to interact with the installation of the operating system.
• Server Manager, the expanded Microsoft Management Console (MMC), provides a single interface for server configuration and monitoring with wizards to streamline common server management tasks.
• Windows PowerShell, a new optional command-line shell and scripting language, enables administrators to automate routine system administration tasks across multiple servers.
• Windows Reliability and Performance Monitor provides powerful diagnostic tools to give you ongoing visibility into the server
environment, both physical and virtual, to pinpoint and resolve issues quickly.
• Optimized server administration and data replication for increased control over servers that are located in remote locations, such as a branch office.
• Componentized Server Core installation option enables minimal installations where only the server roles and features that you need are installed, reducing maintenance needs and decreasing the available attack surface of the server.
• Windows Deployment Services (WDS) provides a simplified, highly secure means of quickly deploying Windows operating systems to computers by using network-based installation.
• Failover clustering wizards make it easy for even IT generalists to implement high-availability solutions. IP version 6 (IPv6) is now fully integrated, and geographically dispersed cluster nodes no longer have to be on the same IP subnet or configured with complex Virtual Local Area Networks (VLANs).
• Network Load Balancing (NLB) supports IPv6 and includes multiple dedicated IP address support which enables multiple applications to be hosted on the same NLB cluster.
2-6
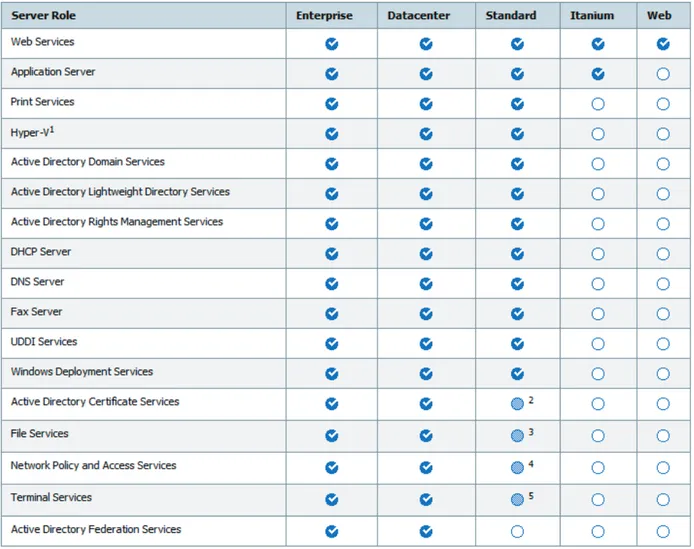
Windows Server 2008 is available in multiple editions to support the varying server needs of organizations of all sizes. Windows Server 2008 is available in five primary editions, and three of these editions are also available without Windows Server Hyper-V, bringing the total number of editions to eight. Windows Server 2008 Roles are specified in this table:
FIGURE 2.3 WINDOWS SERVER 2008 ROLES
Microsoft Official Training Materials for Microsoft Dynamics ®
Chapter 2: Installation Requirements
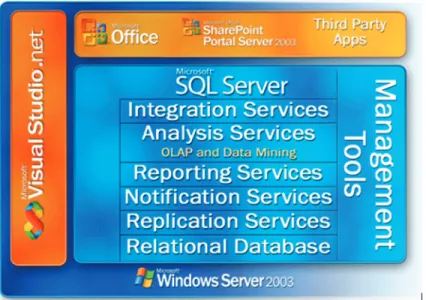
Microsoft SQL Server
Microsoft SQL Server 2005 is a comprehensive database platform providing enterprise-class data management with integrated business intelligence (BI) tools. It is fully integrated into the Microsoft Data Platform.
FIGURE 2.4 THE SQL SERVER PLATFORM CONTEXT
he Microsoft SQL Server 2005 data engine is the core of this enterprise data management solution. Additionally, Microsoft SQL Server 2005 combines analysis, reporting, integration, and notification.
Business intelligence (BI) features provide a competitive advantage. These advantages include enriching data and building complex business analytics with Analysis Services, and writing, managing, and delivering rich reports that use Reporting Services.
Microsoft Dynamics NAV 2009 uses the following components of Microsoft SQL Server 2005:
• Relational Database
• Notification Services
• Analysis Services
• Reporting Services The Relational Database
The Relational Database is where the Microsoft Dynamics NAV data is stored. Microsoft SQL Server 2005 is a robust data management solution used to manage data needs for organizations of all sizes.
2-8
Notification Services
The Notification Services are used to provide alerts within the Microsoft Dynamics NAV application. It is also used by associated Microsoft Dynamics NAV functionality such as Business Notification.
Analysis Services
Analysis Services are used by Microsoft Dynamics NAV Business Analytics to provide decision makers with accurate and timely views of the data.
Reporting Services
Reporting Services are used by Microsoft Dynamics NAV to write, manage, and deliver rich reports.
SQL Server 2005 Editions
Microsoft SQL Server 2005 offers five editions. Two of these editions are available in 32-bit and 64-bit versions. Determining the correct version for your company's requirements for Microsoft Dynamics NAV is important for a successful implementation.
SQL Server 2005 Enterprise Edition (32-bit and 64-bit)
Enterprise Edition is meant to support the largest enterprise online analytical processing environments, highly complex data analysis, data warehousing and active Web servers.
SQL Server 2005 Standard Edition (32-bit and 64-bit)
Standard Edition includes the necessary functionality for e-commerce, data warehousing and line of business solutions that most small and medium sized business use. If your organization has to track large amounts of data but do not have to have all the functionality of Enterprise Edition then Standard Edition will work well with Microsoft Dynamics NAV.
SQL Server 2005 Workgroup Edition (32-bit only)
Workgroup Edition is the data management solution for small organizations that need a database that has no limit on the size or number of users and has the capability to work as a back end to small Web servers and departmental or branch office operations.
SQL Server 2005 Developer Edition (32-bit and 64-bit)
Developer Edition includes all the functionality of SQL Server 2005 Enterprise Edition. However, it is licensed as a development and test server, not as a production server.
Microsoft Official Training Materials for Microsoft Dynamics ®
Chapter 2: Installation Requirements
SQL Server 2005 Express Edition is a free, easy to use and easy to manage database that can be redistributed to act as a client database and basic server database. It is usually suited for small data sets and will not work in some Microsoft Dynamics NAV implementations.To determine which SQL Server edition will work best your Microsoft Dynamics NAV implementation, review the features in each edition.
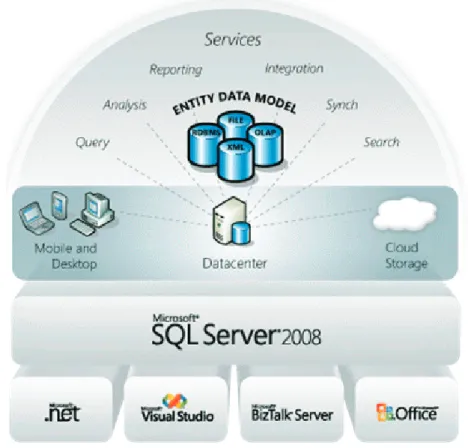
SQL Server 2008
SQL Server 2008 delivers on Microsoft’s Data Platform vision by helping your organization manage any data, any place, any time. It enables you to store data from structured, semi-structured, and unstructured documents, such as images and music, directly within the database. SQL Server 2008 delivers a rich set of integrated services that enable you to do more with your data such as query, search, synchronize, report, and analyze. Your data can be stored and accessed in your largest servers within the data center down to desktops and mobile devices. This gives you control over your data regardless of where it is stored.
2-10
SQL Server 2008 enables you to consume your data within custom applications developed by using Microsoft .NET and Visual Studio and within your service-oriented architecture (SOA) and business process through Microsoft BizTalk Server while information workers can access data directly in the tools that they use every day, such as the 2007 Microsoft Office system. SQL Server 2008 delivers a trusted, productive, and intelligent data platform for all data needs.
Summary
The prerequisites of Microsoft Dynamics NAV 2009 consist of the Microsoft Stack components including:
• Microsoft Windows Server 2003 or Microsoft Windows Server 2008
• Microsoft SQL Server 2005 or Microsoft SQL Server 2008
Microsoft Official Training Materials for Microsoft Dynamics ®
Chapter 2: Installation Requirements
Quick Interaction: Lessons Learned
Take a moment and write down three key points you have learned from this chapter:
1.
2.
2-12 Microsoft Official Training Materials for Microsoft Dynamics ® Your use of this content is subject to your current services agreement
Chapter 3: RoleTailored Client Install
CHAPTER 3: ROLETAILORED CLIENT INSTALL
Objectives
The objectives are:
• Install Microsoft Dynamics® NAV 2009 Demo version on a Single
Computer
• Install Microsoft Dynamics™ NAV 2009 Clients on a Network • Launch the Microsoft Dynamics NAV 2009 RoleTailored Client.
Introduction
Microsoft Dynamics NAV 2009 is designed to use the Microsoft software platform. Therefore, all the software prerequisites of Microsoft Dynamics NAV are part Microsoft software stack.
The following Microsoft components must be configured correctly before Microsoft Dynamics NAV 2009 can be installed.
The complete product with sample data is supported on the following operating systems:
• Microsoft® Windows® XP SP2
• Microsoft® Windows® Vista
• Microsoft® Windows® Server 2003
• Microsoft® Windows® Server 2008
NOTE: To install the Microsoft® Outlook® Add-In for Microsoft Dynamics NAV
3-2
Install Dynamics NAV Demo Version on a Single Computer
Microsoft Dynamics NAV 2009 can be installed on a single computer that has sample data for demonstration.
The following components are installed on the single computer : • RoleTailored client
• Classic client with SQL • Classic Client
• Microsoft Dynamics NAV Server • Demo database and demo license
NOTE: The Microsoft® SQL Server® 2005 - Express edition will be installed if the system does not already have SQL Server 2005 or 2008 Installed
NOTE: When doing a Typical Install, only the RoleTailored Client will install
Procedure: Installation Steps
Use the following steps to install Microsoft Dynamics NAV 2009 with sample data on a single computer:
1. Run setup.exe.
Microsoft Official Training Materials for Microsoft Dynamics ® Your use of this content is subject to your current services agreement
Chapter 3: RoleTailored Client Install
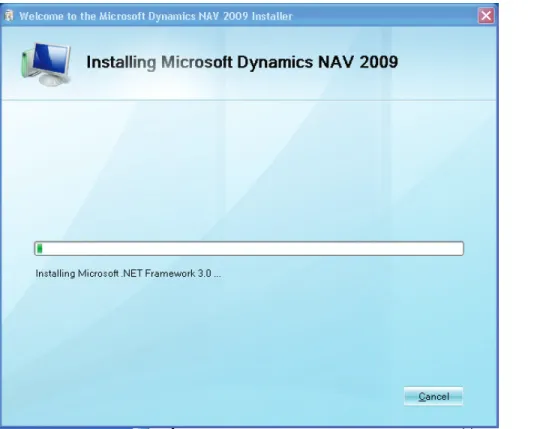
The Welcome to the Microsoft Dynamics NAV 2009 Installer windowappears.
FIGURE 3.1 MICROSOFT DYNAMICS NAV 2009 INSTALLER
1. Click Next.
2. To agree with the license agreement terms, click I accept. 3. Click the Install Demo option.
4. When the installation is complete, click Close. The following components are installed:
• RoleTailored client • Classic client
• Microsoft Dynamics NAV Server • Demo database and demo license
• Microsoft SQL Server 2005 Express Edition (if SQL Server is not already installed)
After installing the product, start the RoleTailored client or the Classic client on the Start menu. In Windows Vista, to run the Classic client or RoleTailored client that has User Account Control turned on, click Start, and then click All
3-4
NOTE: The Classic client must be connected with the Microsoft Dynamics NAV database when you start it. The installer does not connect the Classic client to a database.
NOTE: The demo database is not uninstalled when you uninstall Microsoft Dynamics NAV 2009 through the control panel. You need to remove it manually.
Install Dynamics NAV 2009 Clients on a Network
The RoleTailored client and Classic client can be installed on a different computer from where the Microsoft Dynamics NAV Server is installed. The clients are supported on the following operating systems:
• Microsoft® Windows® XP SP2
• Microsoft® Windows® Vista
• Microsoft® Windows® Server 2003 • Microsoft® Windows® Server 2008
Procedure: Installation Steps
To install the Role Tasteps to install Microsoft Dynamics NAV2009 with sample data on asingle computer
1. Run setup.exe.
Microsoft Official Training Materials for Microsoft Dynamics ® Your use of this content is subject to your current services agreement
Chapter 3: RoleTailored Client Install
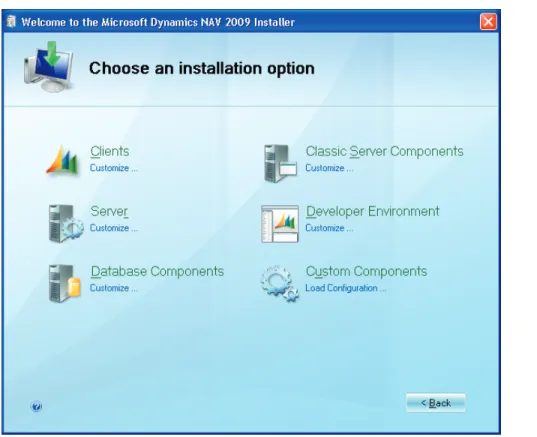
The Welcome to the Microsoft Dynamics NAV 2009 Installer page appears.FIGURE 3.2 THE MICROSOFT DYNAMICS NAV 2009 INSTALLER
2. Click Next.
3. To agree with the license agreement terms, click I accept. 4. Click Choose an installation option.
5. The Choose an installation option page appears. 6. Click Clients.
7. The Specify parameters page appears with RoleTailored client and Classic client options. Click RoleTailored client.
8. The Installation Parameters dialog box appears. Enter the following parameters to connect a RoleTailored client to Microsoft
Dynamics NAV Server:
o Server Name: The name of the server.
o Server Port: The port that the server uses for communication.
NOTE: No parameters are specified for the Classic client.
9. Click Apply. 10. Click Install.
3-6
The following components are installed:
• RoleTailored client, which can connect to a different computer that is running Microsoft Dynamics NAV Server.
• Classic client, which can connect to a SQL database on a different computer that is running SQL Server
After installing the product, start the RoleTailored client and the Classic client from the Start menu. In Windows Vista, to run the Classic client or RoleTailored client with User Access Control turned on, click Start, and then click All
Programs. Right-click the client, and on the shortcut menu, click Run as administrator
NOTE: You must connect the Classic client to the SQL database when you start it. The installer does not connect the Classic client to a database.
Start the RoleTailored Client
The biggest change in Microsoft Dynamics NAV from version 5.0 to version 2009 is the introduction of the new RoleTailored user interface (UI). The RoleTailored design provides you with a quick overview of the information relevant to your job and gives you the ability to focus, prioritize and apply your expertise.
The new task-oriented navigation structure reduces the complexity of
information the user has to sift through and allows them to focus on the key work areas for their role in their company. The Role Center links them to the processes in which they participate. On list places, the tasks and information relevant to their goals in a work process are displayed together in one window. The tasks for each process step are available in task pages. The Action Pane promotes those commands the user accesses most frequently within a given context. FactBoxes reduce searching by offering the user all the information they need for a given context in one window. Furthermore, they have the bility to customize all of these parts of the program to make them better fit the user's needs.
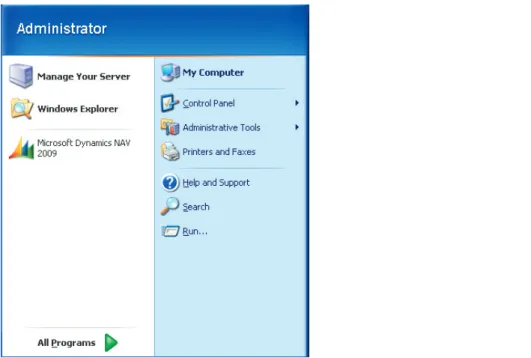
Begin on the Start Menu
Launch the RoleTailored Client by going to the start menu on you Server's user interface.
Microsoft Official Training Materials for Microsoft Dynamics ® Your use of this content is subject to your current services agreement
Chapter 3: RoleTailored Client Install
Select Microsoft Dynamics NAV 2009.FIGURE 3.3 ROLETAILORED CLIENT PINNED TO THE START MENU
As the client launches you will be presented with an opportunity to load the demonstration company.
After the client launches the first time, it is necessary to setup Outlook 2003 or 2007 for use with the client, if it is not already setup on your system.
3-8
Navigate in the RoleTailored Client
The Microsoft Dynamics NAV, Role Centered Client opens on the Role Center by default.
FIGURE 3.4 ROLE CENTERED CLIENT USER INTERFACE
The Role Center is your main point of entry into Microsoft Dynamics NAV. You can use it to get an overview of the status of your day’s work.
It can contain the following parts:
• Activities - contains stacks of documents, called “Cues” – Click a Cue to open the corresponding list or journal.
• Outlook - gives you an overview of your e-mails, calendar and Outlook tasks. You can click an item to open the corresponding folder, e-mail or appointment in Outlook.
• Charts - may contain one or more graphs that display information that is relevant to your work. Hover the cursor over a part of the chart to see the related data in text.
• Notifications - shows notes that your colleagues have sent to you. You can click on a note to open the document that the message is related to.
• Lists - may contain one or more lists with customers, vendors or items. You can decide which customers, vendors or items to include on the list. By selecting a line and clicking the Open command, you can open the card for the customer, vendor or item.
Microsoft Official Training Materials for Microsoft Dynamics ® Your use of this content is subject to your current services agreement
Chapter 3: RoleTailored Client Install
Keyboard Shortcuts
This table indicates the shortcuts in the RoleTailored Client and the Classic Client: Shortcuts in the Classic client Shortcuts in the RoleTailored client Description
Alt+F5 Not supported Get warehouse documents Alt+F9 Not supported No Actions
Alt+Arrow Left Alt+Arrow Left Accelerator to move to the previous page in the navigation travel history Alt+Arrow Right Alt+Arrow Right Accelerator to move to the
next page in the
navigation travel history Alt+Tab Alt+Tab Switch between open
items
Ctrl+A Not supported Select all (copy)
Ctrl+C Ctrl+C Copy
Ctrl+E Ctrl+E Export to Microsoft®
Excel®.
Ctrl+F Ctrl+F Find/Navigate Form
Ctrl+L Ctrl+L Show links
Ctrl+N • F8 • Ctrl+N
Create new or Insert
Ctrl+O Ctrl+O Open a company
Ctrl+P Ctrl+P Print
Ctrl+R Not supported Replace
Ctrl+V Ctrl+V Paste
Ctrl+W Ctrl+W Export to Word
Ctrl+X Ctrl+X Cut
Ctrl+Z Ctrl+Z Undo
Ctrl+F1 Not supported Toggle mark Ctrl+F2 Not supported Open Designer Ctrl+F3 Ctrl+Shift+M Split line; used in
Warehouse, for example, Form 5770
3-10 Shortcuts in the Classic client Shortcuts in the RoleTailored client Description
Ctrl+F4 Esc Cancel or close the current task or window, unless it is the main window
Ctrl+F5 Ctrl+Shift+N Show ledger entries Ctrl+F6 Alt+Tab Switch between open
windows
Ctrl+F7 Ctrl+Shift+T Add a table filter (show results/Advanced filter) in the filter pane
Ctrl+F9 Ctrl+Shift+Z Reconcile
Ctrl+F11 Ctrl+Shift+R Release a document Ctrl+Shift+A Ctrl+Shift+U Expand or collapse tree Ctrl+Shift+D Ctrl+Shift+D Show dimensions Ctrl+Shift+I Ctrl+Shift+I • (Service Lines) when
user wants to close a Service Order • (Service Shipment
Lines) used by service - example Form5975 Ctrl+Shift+F7 Ctrl+Shift+A Clear all filters in filter
pane
Delete Delete Clear selected text
End End In view mode, move to the
last field in the row or, if already in the last field, do not move. The text in the destination field is selected.
In edit mode, move to the last character position in the field or if already in the last position, do not move.
Esc Esc Cancel or close the current task or window, unless it is the main window
F1 F1 Display Help
Microsoft Official Training Materials for Microsoft Dynamics ® Your use of this content is subject to your current services agreement
Chapter 3: RoleTailored Client Install
Shortcuts in the Classic client
Shortcuts in the
RoleTailored client Description
F2 • F2
• Ctrl+Shift+E
Toggle between Edit mode and View mode or open a card, document, or editable list in Edit mode
F3 • F8
• Ctrl+N • Ctrl+ +
Create new or Insert
F4 Ctrl+D Delete F5 Ctrl+Shift+L List F6 • F4 • Ctrl+U Lookup; Launches AssistEdit F8 Ctrl+R Copy previous
F9 Ctrl+Shift+J Open statistics on a card
F10 F10 Focus on the menu bar and
display key tips
F11 F9 Post a document
F12 F12 Focus on the navigation
pane
Shift+F1 Not supported What's This… Shift+F2 • F4
• Ctrl+U
Lookup; Launches AssistEdit
Shift+F5 Ctrl+Shift+C Open a card or a document Shift+F6 Not supported Drill down
Shift+F7 Ctrl+Shift+F Add a FlowFilter (limit totals) in the filter pane Shift+F8 Ctrl+Shift+S Sort, or focus on sort in
filter pane
Shift+F9 Ctrl+Shift+Y Apply entries Shift+F11 Shift+F9 Post and print a document Shift+F12 Not supported Open Object Designer
3-12 Shortcuts in the Classic client Shortcuts in the RoleTailored client Description
Shift+Tab Shift+Tab Move keyboard focus to the previous element in the tab sequence within a part. If the element is the last in the part, focus moves to the first element in the next part.
Tab Tab Move forward through
elements within a part. The tab order skips the Action menu and the Collapse/Expand button on the FastTabs.
If the element is the last in the part, focus moves to the first element in the next part.
Not applicable Alt Key tips on action pane; focus on command bar; same as F10
Not applicable Alt+A Launch action menu Not applicable Alt+I Launch related
information
Not applicable Alt+M Open Microsoft Dynamics NAV menu
Not applicable Alt+P Launch action pane Not applicable Alt+R Launch report
Not applicable Alt+Arrow Down Open the lookup menu when focus is on a cell with a drop-down menu Not applicable Ctrl+D Delete
Not applicable Ctrl+F1 shows extended tooltip on a validation error
Not applicable Ctrl+F10 Turn on or off key tips in the action pane
Not applicable Ctrl+Arrow Down Move the focus down while the selected line stays selected
Microsoft Official Training Materials for Microsoft Dynamics ® Your use of this content is subject to your current services agreement
Chapter 3: RoleTailored Client Install
Shortcuts in the Classic client Shortcuts in the RoleTailored client DescriptionNot applicable Ctrl+Arrow Left Move focus to first cell in a row
Not applicable Ctrl+Arrow Right Move focus to last cell in a row
Not applicable Ctrl+Arrow Up Move the focus up while the selected line stays selected
Not applicable Ctrl+Delete On the filter pane, deletes a filter
Not applicable Ctrl+End Move to the last cell of the entire grid
Not applicable Ctrl+Home Move to the first cell of the entire grid
Not applicable Ctrl+Insert On the filter pane, adds a filter
Not applicable Ctrl+Shift+B Open (Journals, worksheets, accounts schedules)
Not applicable Ctrl+Shift+K Edit list Not applicable Ctrl+Shift+L View list
Not applicable Ctrl+Shift+V Open a card or a document in View mode
Not applicable Ctrl+Shift+W In View mode, open a list in a new List Task page in a new separate window Not applicable Ctrl+Shift+X Exit
Not applicable Ctrl+ + Insert a new line in a grid Not applicable F3 Focus on the filter pane Not applicable F5 Refresh the current page Not applicable F6 Move forward through
screen elements such as panes or FastTabs, with focus on the first part of a pane.
In a lookup moves focus to the Advanced action, if any.
3-14 Shortcuts in the Classic client Shortcuts in the RoleTailored client Description
Not applicable F10 Key tips on action pane; focus on command bar; same as Alt
Not applicable F11 Focus on address bar Not applicable Home In view mode, move to the
first field in a row in focus or, if already in the first field, does not move. The text in the destination field gets selected.
In edit mode, move to the first character position in the field or, if already in the first position, does not move.
Not applicable Shift+F6 Move backward through screen elements such as panes or FastTabs, with focus on the first part of a pane
Microsoft Official Training Materials for Microsoft Dynamics ® Your use of this content is subject to your current services agreement
Chapter 3: RoleTailored Client Install
Lab 3.1 - Installing Microsoft Dynamics NAV 2009 Clients
Scenario
You are the consultant implementing Microsoft Dynamics NAV 2009 Clients for Woodgrove Construction. You need install the client on 2 computers with sample data so that A/P clerks can familiarize themselves with the software. You will also launch the client to confirm that it is installed correctly.
Challenge Yourself!
In this exercise you will install the RoleTailored client with demo data on single computer. The main tasks for this exercise are as follows:
1. Install the RoleTailored client from the Setup CD. 2. Specify the Installation Parameters.
3. Launch the RoleTailored client.
Step by Step
Step 1
To install the Microsoft Dynamics NAV2009 RoleTailored client with sample data on a single computer:
1. Run setup.exe. 2. Click Next.
3. To agree with the license agreement terms, click I accept. 4. Click Choose an installation option.
5. The Choose an installation option page appears Click Clients.
6. Specify parameters page appears with RoleTailored client and Classic client options.
7. Click RoleTailored client.
8. The Installation Parameters dialog box appears. Enter the following parameters to connect a RoleTailored client to Microsoft
Dynamics NAV Server:
a. Server Name: The name of the server
b. Server Port: The port that the server uses for communication 9. Click Apply.
3-16
Step
2
To launch the RoleTailored client follow these steps:
1. From the Start Menu select Microsoft Dynamics NAV 2009. 2. Click OK to accept the loading of the demo company, Cronus
International Ltd.
Microsoft Official Training Materials for Microsoft Dynamics ® Your use of this content is subject to your current services agreement
Chapter 3: RoleTailored Client Install
Summary
This chapter covers the installation of Microsoft Dynamics NAV 2009 Role Based Client.: In particular it covers:
1. The installation of the full RoleTailored Client installation for demonstration purposes was covered.
2. The installation of the RoleTailored Client on a Network was discussed.
3. Launch of the RoleTailored Client 4. How to navigate in the Role Center
3-18
Quick Interaction: Lessons Learned
Take a moment and write down three key points you have learned from this chapter:
1.
2.
3.
Microsoft Official Training Materials for Microsoft Dynamics ® Your use of this content is subject to your current services agreement