UK and Ireland: Nintendo UK PO Box 4678, Windsor, SL4 9DZ
www.nintendo.co.uk South Africa: Nintendo Service Centre The iStore Building, No.1 Sandton Drive
Sandton, 2146 Telephone: +27 (0) 11 390 7002 E-mail: [email protected]
Operations Manual
Thank you for purchasing this system. Please read this Operations Manual before use, paying careful attention to the Health and Safety Information section on p. 9, and follow all the instructions carefully. Adults should supervise the use of this product by children.
Note:
•
See p. 2 for a complete list of items included with the system.•
In this manual, the term “Nintendo 3DS system” refers to all systems in the Nintendo 3DS™ family, which includes New Nintendo 3DS™, New Nintendo 3DS XL, Nintendo 3DS, Nintendo 3DS XL and Nintendo 2DS™.•
In this manual, the term “New Nintendo 3DS system” also refers to the New Nintendo 3DS XL system, unlessother-wise stated.
•
In this manual, the term “Nintendo DSi™ system” also refers to the Nintendo DSi XL system.Pr epara tions Using S of tw ar e Adjusting S yst em S ettings Troubleshooting [0516-UKV-M2]
2
3
Set Contents
New Nintendo 3DS system (KTR-001)
OrNew Nintendo 3DS XL system (RED-001)
x 1
New Nintendo 3DS stylus (KTR-004)
OrNew Nintendo 3DS XL stylus (RED-004)
Note: The stylus is located in the stylus holder on the underside of the system ( p. 15).
x 1
microSDHC memory card
Note:•
The microSDHC memory card is inserted in the microSD card slot ( p. 57). The microSDHC card is a third-party accessory not manufactured by Nintendo.•
The capacity of the microSDHC card is stated on the box.x 1
AR Cards
Note: These are used in conjunction with the built-in application, AR Games: Augmented Reality ( p. 26).
x 6
Quick-Start Guide
Operations Manual
x 1
(Only for New Nintendo 3DS)
New Nintendo 3DS cover plates (KTR-009/KTR-010)
•
Please attach the front plate before using the system ( p. 23).•
The back plate is attached to the system before purchase.Front plate x 1
Back plate x 1
This package does not include an AC adapter.
To recharge your system, you will need a Nintendo 3DS AC adapter (WAP-002(UKV)/ WAP-002(EUR)) (sold separately).
AC adapter included with Nintendo 3DS / Nintendo 2DS / Nintendo DSi / Nintendo DSi XL
AC adapter included with Nintendo DS™ / Nintendo DS™ Lite You can also use the AC adapter included with
the Nintendo 3DS, Nintendo 2DS, Nintendo DSi and Nintendo DSi XL systems.
or
System Comparison
New Nintendo 3DS
A light, easy-to-carry system that can be fitted with replaceable cover plates (sold separately).New Nintendo 3DS XL
Maximise your gameplay experience with an upper screen 57% larger than that of the New Nintendo 3DS system!Compared to New Nintendo 3DS
57% larger screen
3D Screen
Displays 3D images using the super- stable 3D function ( p. 21)
Circle Pad
Allows for precision movement ( p. 14)
3D depth slider
Adjusts the strength of the 3D images ( p. 22)C Stick
Reacts to the pressure you place on it, allowing for easy, precise movement ( p. 14)
HOME Button
Displays the HOME Menu ( p. 24)Touch Screen
Touch-sensitive screen that allows you to control software by touching and sliding ( p. 14)T
his seal is your assurance that Nintendo has reviewed thisproduct and that it has met our standards for excellence in workmanship, reliability and entertainment value. Always look for this seal when buying games and accessories to ensure complete compatibility with your Nintendo Product.
Thank you for selecting the New Nintendo 3DS™ / New Nintendo 3DS XL system.
Find the latest software!
Search for software Watch videos
Download software Download
demo versions
Note: This requires a Nintendo Network ID.
Connect to the internet and access Nintendo eShop to view the latest information and videos about different kinds of software, purchase downloadable software and try out software demos.
What you can buy
Downloadable software Virtual Console™ Nintendo DSiWare™
You can buy new software exclusive to Nintendo eShop, or download versions of card-based software.
You can buy the games you loved on platforms like NES™, Game Boy™ and Game Boy™ Color.
You can buy software originally released on Nintendo DSi, known as Nintendo DSiWare.
A clearer, more enjoyable 3D experience
Super-Stable 3D
The inner camera tracks
your face’s position When your position changes…
…the 3D display adapts to your movements for more
comfortable viewing
By tracking your face with the inner camera, the super-stable 3D function provides you with an optimal 3D experience ( p. 21).
Enjoy online services with a…
Nintendo Network ID
A Nintendo Network™ ID allows you to enjoy various features of Nintendo Network.Download free software and
demos from Nintendo eShop. around the world in Miiverse™.Communicate with other users You can use your Nintendo eShop funds on both your New Nintendo 3DS system and
a Wii U™ console.
6
7
Receive updates and information
SpotPass™
Your system will automatically search for wireless access points, connect to the internet and exchange data at various times, including while in Sleep Mode (when the system is closed but the power is on).
Internet
Free
software 3D content Notifications updatesSystem informationOther
Flashes blue when receiving notifications
Note: Data received via SpotPass is saved to the microSD card. You must configure Internet Settings to be able to connect to wireless access points ( p. 38).
Note:
•
SpotPass functionality may not be available if an active software title is using certain features or functionality.SpotPass functionality is not available during local wireless communication ( p. 24) or while playing Nintendo DS/Nintendo DSi software.•
Depending on the type of data received, the notification LED may not light up.•
A Nintendo Network ID is required to download free software ( p. 36).A charging cradle (sold separately) can help make recharging
more convenient.
New Nintendo 3DS charging cradle (KTR-007) New Nintendo 3DS XL charging cradle (RED-007)
Communicate automatically with other Nintendo systems
StreetPass™
Your system automatically searches for and exchanges data with other Nintendo 3DS systems when you carry it around, such as when you're out walking or when you travel by train.
Flashes green when data is being
transferred.
Note: A notification is added to your Notifications list ( p. 29).
Data will automatically be exchanged if you walk past someone who has the same software title registered with StreetPass while the system is in Sleep Mode (closed while the power is on), as well as at other times. Your StreetPass settings are saved on the system.
Note:
•
A maximum of 12 software titles can use StreetPass at any one time.•
Contact Mode settings for Nintendo DS / Nintendo DSi software titles are not saved and must be configured while playing compatible titles. Further-more, it is not possible to exchange StreetPass data for Nintendo 3DS software titles while Nintendo DS / Nintendo DSi software titles are in use.•
Data cannot be transmitted if the power or wireless functions are off ( p. 28).•
StreetPass functionality may not be available if an active software title is using certain features or functionality. StreetPass functionality is not available during local wireless communication ( p. 24) or when connected to the internet.Health and S af et y Inf orma tion
Contents
•
Set Contents 2•
Health and Safety Information 9Preparations
Component Names and Functions 13
Recharging 16
Turning the Power On and Off 17
Adjusting 3D Images 21
Exchanging Cover Plates 23
Using Software
HOME Menu 24
Card-Based Software 31
Downloadable Software 34 Configuring the System for the First Time 17
Using the Keyboards 19
Power LED 20
Battery Life 20
How to View 3D Images Properly 21
Adjusting the Strength of 3D Images 22
HOME Menu Electronic Manual 25
Software Icons 25
Opening Software 27
Software Electronic Manuals 27
HOME Menu Settings 28
HOME Menu Application Icons 29
Using Game Cards 32
Adjusting System Settings
System Settings 35
Nintendo Network ID Settings 36
Internet Settings 38
Parental Controls 43
Data Management 45
Other Settings 46
Troubleshooting
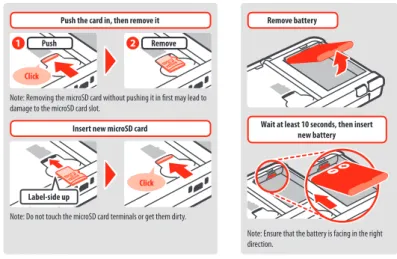
Replacing the microSD Card / Battery 57
If Your microSD Card is Full… 60
Troubleshooting 61
•
Technical Specifications 69•
Contact Information 70Creating or Linking a Nintendo Network ID 37 Required Items for Internet Connection 38
Connecting to the Internet 39
Options That Can Be Restricted 43
Configuring Parental Controls 44
System Transfer 47
System Update 55
Format System Memory 56
Health and Safety Information
Please read and observe the health and safety information. Failure to do so could result in injury or damage. Adults should supervise the use of this product by children.
WARNING – USING 3D FEATURE
3D Feature Not Suitable for Children aged six and under.
•
The use of the 3D feature by children aged six and under may cause vision damage. If children aged six and under have access to the system, parents or legal guardians should restrict the display of 3D images using the Parental Controls feature.•
Everyone has a different way of viewing 3D images. If you have difficulty in seeing 3D images clearly, do not use the 3D featureand set the display to only use 2D images. Prolonged viewing of unclear 3D images, such as double images, can lead to eye strain, dryness of the eyes, headaches, stiff shoulders, nausea, dizziness, motion sickness, fatigue and discomfort.
•
If you feel tired or unwell when viewing 3D images, adjust the 3D effects to a comfortable level or set the display to only show 2D images.•
Take a break of 10 to 15 minutes every half hour, even if you think you don’t need it.•
Please refrain from using the 3D feature while travelling as a passenger in cars or on public transport. Constant shaking can lead to 3D images becoming unclear, causing nausea and eye strain.WARNING – SEIZURES
•
Some people (about 1 in 4000) may have seizures or blackouts triggered by light flashes or patterns, and this may occur while they are watching TV or playing video games, even if they have never had a seizure before.•
Anyone who has ever experienced seizures, loss of awareness or any other symptom linked to an epileptic condition should consult a doctor before playing video games.•
Parents or legal guardians should monitor children when they play video games. Stop play and consult a doctor if you or your child have any unusual symptoms, such as: convulsions, eye or muscle twitching, loss of awareness, altered vision, involuntary movements, or disorientation.To reduce the likelihood of a seizure when playing video games, follow these precautions:
1. Do not play if you are tired or need sleep. 2. Play in a well-lit room.
3. Take a break of 10 to 15 minutes every hour (every half hour when using the 3D feature).
WARNING – EYE STRAIN AND MOTION SICKNESS
Playing video games can make your eyes hurt after a sustained period of time, and perhaps sooner if using the 3D feature. Playing video games can also cause motion sickness in some players. Follow these instructions to avoid eye strain, dizziness or nausea:
•
Avoid excessively long play sessions. Parents or legal guardians should monitor their children for appropriate play.•
Take a break of 10 to 15 minutes every hour (every half hour when using the 3D feature), even if you don’t think you need it.•
If your eyes become tired or sore while playing, or if you feel dizzy or nauseated or tired, stop and rest for several hours before playingagain.
Health and S
af
et
y Inf
orma
tion Health and S
af et y Inf orma tion
10
11
WARNING – REPETITIVE MOTION INJURIES
Playing video games can make your muscles, joints or skin hurt after a few hours. Follow these instructions to avoid problems such as tendonitis, carpal tunnel syndrome or skin irritation:
•
Avoid excessively long play sessions. Parents or legal guardians should monitor their children for appropriate play.•
Take a break of 10 to 15 minutes every hour (every half hour when using the 3D feature), even if you don’t think you need it.•
When using the stylus, you do not need to grip it tightly or press it hard against the screen. If your hands, wrists, or arms become tiredor sore while playing, or if you feel symptoms such as tingling, numbness, burning or stiffness, stop and rest them for several hours before playing again.
•
If you continue to have any of the above symptoms or other discomfort during or after play, stop playing and see a doctor.WARNING – RADIO FREQUENCY INTERFERENCE
This system can emit radio waves that can affect the operation of nearby electronics, including cardiac pacemakers.
•
Do not operate the system within 25 centimetres (10 inches) of a pacemaker while using wireless communication. If you have a pacemaker or other implanted medical device, do not use wireless communication without first consulting your doctor or the manufacturer of your medical device.•
Wireless communication may not be allowed in certain places such as aeroplanes or hospitals. Please follow respective regulations.WARNING – BATTERY
This system contains a rechargeable lithium ion battery. Leakage or combustion of the battery can cause personal injury as well as damage to your system.
To avoid battery leakage or combustion:
•
Do not damage the battery.•
Do not expose the battery to excessive physical shock, vibration, or liquids.•
Do not disassemble, deform or attempt to repair the battery.•
Do not expose the battery to heat or dispose of it in a fire.•
Do not touch the terminals of the battery with any foreign materials or metal objects.•
Always attach the battery cover (back plate).In case of leakage:
If the battery leaks, do not touch it, and contact Nintendo Customer Support. To ensure any leaked fluid on the system doesn’t come into contact with your hands, wipe the exterior of the system thoroughly with a soft, slightly damp cloth. If the leaked fluid comes into contact with your hands or any other part of your body, rinse it away with water. If liquid leaking from a battery comes into contact with your eyes, it can cause injury. Immediately rinse your eyes with plenty of water and consult a doctor.
WARNING – CHARGING THE SYSTEM
Use a compatible AC adapter and battery.
Using an incompatible AC adapter or battery can lead to battery leakage, combustion or explosion, which can in turn lead to fire and/or electrocution. For New Nintendo 3DS only use the New Nintendo 3DS Battery (KTR-003), and for New Nintendo 3DS XL only use the Nintendo 3DS XL Battery (SPR-003). Use the Nintendo 3DS AC adapter (WAP-002(UKV)/WAP-002(EUR)) (sold separately) only.
Be sure to connect the AC adapter to the correct voltage (AC 220-240V).
Be sure to plug in the AC adapter to your system’s AC adapter connector in the correct direction. To remove the AC adapter, grip the body of the plug securely and pull it straight out of the plug socket.
Do not use voltage transformers intended for use abroad or plugs that deliver reduced amounts of electricity. Also avoid using incandescent-specific light dimmers or in-car AC/DC adapters or chargers.
Do not use the AC adapter if the cable or plug is damaged.
Doing so can lead to fire and electrocution.
•
Avoid tightly wrapping, treading on, pulling, twisting or making adjustments to the cord.•
Avoid placing heavy objects on the cord.•
Do not expose the cord to extreme heat sources such as heaters or stoves.•
If you use the system while charging it, be careful not to pull on or entangle the power cord.If the AC adapter becomes damaged, please contact Nintendo Customer Support. Do not attempt to repair the adapter yourself.
The AC adapter is for indoor use only.
Do not touch the AC adapter connector or any other connector on the system with your fingers or metal objects. Do not touch the system or AC adapter while charging during a thunderstorm.
WARNING – GENERAL
Not suitable for children under 36 months of age. Do not place the system or its accessories within reach of young children or pets.
Children may place the AC adapter, stylus, microSD card or other accessories into their mouths and cause injury.
Do not use excessive volume for headphones.
Using headphones at loud volumes for long periods of time could result in impaired hearing. When using headphones, keep the volume at a level that allows you to hear background sounds. If you notice problems such as fatigue or ringing in the ears, discontinue use. If the symptoms persist, consult a doctor.
Do not get too close to the infrared transceiver.
Looking directly into the infrared transceiver can lead to impaired vision and other problems.
The AC adapter should be plugged into an easily accessible socket that is near the equipment that is to be charged.
Pr epara tions Health and S af et y Inf orma tion
Component Names and F
unc
tions
Component Names and Functions
The functions of these components are explained in this Operations Manual.Inner Camera
Used by the super-stable 3D function ( p. 21) and software with camera functionality.
Volume Control
Slide to adjust the volume.
Note: The camera's shutter sound will always be played at a fixed volume, regardless of the current volume setting.
Game Card Slot ( p. 32)
For loading Nintendo 3DS Game Cards, Nintendo DS Game Cards, Nintendo DSi Game Cards and Nintendo DSi enhanced Game Cards.
Audio Jack
For connection of commercially available stereo headphones. When connected, no sound will be played through the speakers. Note: Please use accessories that are compatible.
Microphone
Used by software with microphone functionality.
Speaker (L) Speaker (R)
3D Depth Slider ( p. 22)
Adjusts the depth of 3D images.
Power LED ( ) ( p. 20)
Lights up when the power is on.
POWER Button ( ) ( p. 17) Infrared LED
Helps track your head position when using super-stable 3D in dimly lit areas ( p. 21).
Note: You may see a red light when using the function in dimly lit areas.
Use your system carefully
Do not expose the system to high temperatures or direct sunlight for an extended period of time. Do not let the system come into contact with liquids and do not use the system with wet or oily hands.
If the system comes into contact with liquids, immediately turn the power off, remove the AC adapter, remove the battery cover and battery, then wipe the exterior clean with a soft, slightly damp cloth (use water only).
Do not expose the system to excessive physical shock.
•
Do not apply unnecessary pressure to the LCD screens. Use either the included stylus or the item specified by the software for on-screen commands. Do not use any hard objects (including fingernails) that could leave scratches on the screen.•
Do not move the Circle Pad violently from side to side.•
Do not control the C Stick with your fingernail or with any hard objects.•
Do not bend or apply unnecessary force to the stylus.Do not disassemble or try to repair the system.
If the system is damaged, please contact Nintendo Customer Support. Do not touch damaged areas. Avoid contact with any leaking fluid.
Only use compatible accessories with the system. Be aware of your surroundings while using the system. Cleaning the system:
The system should be disconnected from the AC adapter before cleaning. Dampen a cloth with warm water, carefully wring out all excess water and then wipe the system clean. After cleaning, wipe the system down again with a soft, dry cloth. Do not allow the system to come into contact with paint thinner, alcohol or any other solvent.
Pr epara tions Pr epara tions
14
15
Component Names and F
unc
tions
Component Names and F
unc
tions
LCD Screen (3D Screen) ( p. 21)
Displays 3D content.
Notification LED
Notifies you of the status of the system by flashing and changing colour.
•
Received SpotPass notification (flashes blue for five seconds) ( p. 6)•
Received StreetPass communication (flashes green for five seconds) ( p. 7)•
Friend has come online (flashes orange for five seconds) ( p. 29)•
Battery power is low (flashes red) ( p. 20)Circle Pad
Used by software that supports Circle Pad input.
Note: If the Circle Pad is not working properly, please refer to p. 64.
NFC (Near-Field Communication) Area
Touch an amiibo™ accessory or other NFC-compatible object to this area to read or write data while using the appropriate software.
C Stick
Allows control of C Stick-compatible software, and can be used instead of the Nintendo 3DS Circle Pad Pro for software compatible with that accessory.
Software compatible with the Circle Pad Pro will have the follow-ing icon on its packagfollow-ing:
Circle Pad Pro
START SELECT Control Buttons (A, B, X and Y Buttons)
Recharge LED ( ) ( p. 16)
Lights up orange while the battery is recharging.
Wireless LED ( )
Lights up yellow when wireless communication or NFC is enabled, and remains off when wireless communication is disabled. Flashes yellow when data is being sent or received.
Note:
•
When in Sleep Mode, the wireless LED will light or flash more dimly.•
Wireless communication and NFC can beactivated/deactivated from the HOME Menu Settings ( p. 28).
Control Pad LCD Screen (Touch Screen)
Touch sensitive screen that enables tactile interaction. For software that supports this control feature, use the included stylus.
Touch Gently pressing the Touch Screen with the stylus is called
"touching" (or "tapping").
Slide Tracing over the Touch Screen
with the stylus held gently against it is called "sliding".
Touch Screen Controls
HOME Button ( )
Displays the HOME Menu ( p. 24).
Wrist Strap Attachment
For attachment of a wrist strap (sold separately).
(New Nintendo 3DS only) Front Plate
For New Nintendo 3DS owners only. Cover plates can be removed and exchanged with other sets of cover plates, sold separately ( p. 23).
ZR Button ZL Button
Battery Cover (Back Plate)
Can be removed to replace the microSD card or battery ( p. 57).
Note:
•
For New Nintendo 3DS owners, the front and back plates can be replaced with separately sold cover plates ( p. 23).•
Only remove the back plate when you need to replace the microSD card, battery, or to exchange cover plates.Stylus Holder
Used to store the stylus. Note: Do not attempt to place anything into the stylus holder other than the stylus that came with this system.
AC Adapter Connector ( p. 16)
Allows connection of the Nintendo 3DS AC adapter (WAP-002(UKV)/ WAP-002(EUR)) (sold separately).
Cradle Connector
Allows recharging via the charging cradle (sold separately) ( p. 6).
Infrared Transceiver
Sends and receives signals for software with infrared functionality.
Outer Cameras
Used by software with camera functionality. These two cameras allow 3D photographs/videos to be taken.
Pr epara tions Pr epara tions Rechar ging
Recharging
You must charge the battery before you use your system for the first time.
To recharge your system, you will need the Nintendo 3DS AC adapter (WAP-002(UKV)/WAP-002(EUR)) (sold separately). Alternatively, you can use an AC adapter provided with a Nintendo 3DS, Nintendo 2DS, Nintendo DSi or Nintendo DSi XL system.
AC plug
connectors (The LED will go out when Recharge LED lit charging is complete.) DC plug
(logo facing upwards)
Note: The illustration above shows the UK version of the AC adapter.
Connect the DC connector plug to the system
Note: Be sure the DC connector plug is the right way up before inserting it into the system.
Insert the AC adapter plug into a standard 220 – 240V AC plug socket
The recharge LED will light up when charging begins, and turn off when charging is finished. When charging has finished, remove the AC adapter plug from the plug socket and remove the DC connector plug from the system.
Note:
•
If you play a game while the system is recharging, the recharge LED may not always turn off once charging has completed. This is not a malfunction.•
To detach the system from the AC adapter, hold the system and the DC connector plug, not the cable, while you remove it.About charging
•
The system takes approximately 3 hours 30 minutes to fully recharge when off. Charging time may vary if the system is being used while charging, or depending on the level of charge remaining in the battery.•
Charge the system in an environment of 5 – 35°C. Attempting to charge the battery while the ambient temperature is outside this range may degrade the battery and prevent it from charging. If the ambient temperature is low, the battery may not charge completely.•
Battery life decreases slightly over time as the battery is continually used and recharged. After 500 recharges, battery life may be reduced to 70% of the battery life at the time of purchase.•
Make sure to charge the battery at least once every six months. Lithium-ion batteries can slowly lose their charge over time if they have not been used for a while. If the system is not used for an extended period of time, the battery may become overdischarged and may be impossible to charge when connecting the AC adapter.•
If you feel the usage time has noticeably reduced, replace the battery ( p. 57). Replacement batteries are sold separately. Please contact Nintendo Customer Support for further information on where to purchase a replacement ( p. 70).1
2
Turning the P ow er O n and O ffTurning the Power On and Off
The POWER Button is used to turn the system both on and off. You must configure the System Settings the first time the power is turned on.
Turn the system on by pressing the POWER Button. The power LED will light up when the system has been turned on.
Note:
•
It may take several seconds for the HOME Menu to display after the power is turned on.•
For information about the power LED and battery life, see p. 20.Sleep Mode and Turning the Power Off
Sleep Mode
Close your system during play to suspend software and activate Sleep Mode. SpotPass ( p. 6) and StreetPass ( p. 7) remain active when the system is in Sleep Mode, but power consumption is greatly reduced.
Note: Some software cannot enter Sleep Mode while in use or while carrying out specific tasks. For example, Nintendo 3DS Sound cannot enter Sleep Mode during playback.
Turning the power off
Press the POWER Button to display the POWER Menu. From here, touch POWER OFF to turn the power off. Alternatively, pressing and holding the POWER Button has the same effect.
Close system
Configuring the System for the First Time
You must configure the system after turning it on for the first time. If this system is to be used by children, an adult should make sure to perform these steps. The following steps should be performed with the stylus on the Touch Screen ( p. 14).
Set the system language
Touch the language you would like to use, then touch OK.
Calibrate the 3D Screen
Follow the on-screen instructions in order to view 3D images correctly (see "Adjusting 3D Images" on p. 21).
Set the date and time
Touch and to set the date and time, then touch OK. Power on Lit
1
2
3
Pr epara tions Pr epara tions
18
19
Turning the P ow er O n and O ff Turning the P ow er O n and O ffEnter a user name
Note:•
For information on keyboard usage, see p. 19.•
Names can be a maximum of 10 characters.•
The name you choose will be visible on other Nintendo 3DS and Nintendo DS systems via wireless communication, so do not include words or phrases that others may find offensive. The use of inappropriate language may result in the display of your name being restricted on other Nintendo 3DS systems.Enter your date of birth
Select your country of residence, then your region
Accept the Nintendo 3DS Service User Agreement
and Privacy Policy
After reading the information, touch I ACCEPT. If you would rather accept these terms later, touch LATER.
Configure your internet settings
(
p. 38)
Connecting to the internet allows various types of data to be exchanged via SpotPass and wireless play to be used with supported software titles. To set this later, touch SET LATER.
Set Parental Controls
(
p. 43)
Set up Parental Controls to limit children’s access to certain content and functionality, such as browsing the internet and interacting with other users.
If the system is to be used by children, parents and guardians should configure Parental Controls settings as required.
Note: The use of the 3D feature by children aged six and under may cause vision damage. To prevent the use of the 3D feature, this feature can be manually turned off by selecting the appropriate option under the Parental Controls settings.
Perform a system transfer
(
p. 47)
If you own another Nintendo 3DS system and want to transfer data to your new system, please bear in mind the following:
•
Configure the initial settings as shown above for the new system before performing the system transfer.•
Do not play on the new system before starting the process, as any existing save data for down-loadable and built-in software on the new system will become unusable.•
Do not create or link a Nintendo Network ID to the new system before the transfer, otherwise you will be unable to transfer data. Your system is now ready to be used. Press the HOME Button to enter the HOME Menu ( p. 24) and begin using your system.4
5
6
7
8
9
10
Using the Keyboards
A keyboard will be displayed on the Touch Screen when you are required to input characters. Touch a character to enter it.
Standard
Predictive text
Choose the word you want from a list.
Predictive text on/off Switch between upper- and lower case for the next character entered.
Alphanumeric
Switch between input modes
Special characters Symbols Mobile phone
Switch between upper- and lowercase characters.
Show additional characters. Cycle through the characters assigned to each button by pressing it repeatedly.
Next character
Confirm character input and move to the next space.
Delete the character to the left of the cursor. Move to the next line.
Numeric Keyboard
Pr epara tions Pr epara tions
Power LED
The power LED lights up blue when the system is turned on, turns red when the battery charge is low and flashes red when the battery is starting to run out.
High
Solid Blue Solid Red Flashes Red Low Almost empty
The notification LED will also flash.
Remaining battery charge
Note: If the power LED is red, save your game quickly and recharge. If the battery charge runs out before you save, you may lose unsaved data. If the LED is blue and slowly brightens and dims, the system is in Sleep Mode ( p. 17), which will conserve battery power.
Battery Life
Battery life will vary depending on a number of factors, such as the software being used, the quantity of wireless data sent and received and the ambient temperature. As such, these times should only be taken as rough estimates.
New Nintendo 3DS New Nintendo 3DS XL
Playing Nintendo 3DS software approx. 3.5 – 6 hours approx. 3.5 – 7 hours Playing Nintendo DS software approx. 6.5 –10.5 hours approx. 7 –12 hours
The battery life will change depending on the brightness of the LCD screens. Note: Activating the Auto-Brightness function changes the brightness and colour gradient automatically according to the light level of the surrounding environment. Therefore, playing in less brightly-lit areas will extend battery life. Activating the power-saving mode also extends the battery life ( p. 28).
Screen brightness
Longer Battery life Shorter
Dark Light
Leaving the system in Sleep Mode ( p. 17) greatly reduces power consumption while leaving wireless communication such as SpotPass and StreetPass active. If the battery is fully charged, the system can remain in Sleep Mode for 3 days.
Note: The power LED slowly pulses when the system is in Sleep Mode. Some software titles do not allow the system to enter Sleep Mode while in use. Closing the system while using such software will result in the power LED remaining solidly lit. For example, Nintendo 3DS Sound cannot enter Sleep Mode during playback. Turning the P ow er O n and O ff Adjusting 3D Images
Adjusting 3D Images
The 3D Screen allows you to view 3D images. Use the 3D depth slider to adjust the 3D effects to a comfortable level.
The 3D effects generated by this system are created using the binocular disparity of the eyes (the ability to interpret 3D images due to the difference in position of the left and right eye). By manipulating the 3D Screen so that the left eye sees only the left image and the right eye only sees the right image, vivid and convincing 3D effects can be produced.
How to View 3D Images Properly
Follow the steps below to ensure that 3D images appear properly.
Approx. 30cm Approx. 35cm
Look directly into the 3D Screen. Hold the 3D Screen at the appropriate distance from your eyes.
•
Adjust the distance until you can see the 3D images easily.New Nintendo 3DS New Nintendo 3DS XL
1
2
Super-Stable 3D
This function is a feature of New Nintendo 3DS / New Nintendo 3DS XL that allows you to move your head or the system during play without losing image quality, bringing you a more comfortable 3D viewing experience. It works by tracking the position of your face using the inner camera in order to adjust the 3D image display. (See p. 63 for how to improve the system’s facial recognition.) For more information on how to activate/deactivate super-stable 3D, please see p. 46.
Note:
•
If you view the system either at an extreme angle, outside the inner camera’s field of vision, or side-on, then you will see double images or a dark screen instead of a 3D image. Check how to view 3D images correctly under the 3D Calibration option in the System Settings ( p. 46).•
The super-stable 3D function will not work while you are using the inner or outer cameras.•
Display of 3D images can be disabled in Parental Controls ( p. 43).•
Do not view 3D images in direct sunlight or in the direct path of other strong light sources. This may make the 3D images difficult to see.•
3D images may be difficult to see depending on your surroundings ( p. 62).Pr epara tions Pr epara tions
22
23
Adjusting the Strength of 3D Images
Use the 3D depth slider next to the 3D Screen to increase or decrease the 3D effect. If placing the 3D depth slider at the top (strongest 3D effect) makes the 3D images difficult to see, move it downwards little by little until you reach a point where the 3D images are distinct and easy to see. As you become more accustomed to the 3D feature, you may find that raising the 3D depth slider results in better effects.
Strong
3D Strength Weak
•
Move the 3D depth slider to the lowest point to display images in 2D. Note:•
Adjusting the 3D depth slider while viewing content that does not support the 3D feature will not result in 3D images being displayed.•
Certain types of content, including 3D videos and photos, do not allow adjustments in 3D strength. When viewing such content, adjusting the slider willonly switch between 2D and 3D images. If you find the 3D effect to be uncomfortably strong while viewing these types of content, it may help to hold the system at a greater distance from your face. If you still find it difficult to see, then try viewing the content in 2D.
Adjusting 3D Images
Ex
changing C
over Pla
tes
(Only for New Nintendo 3DS)
Exchanging Cover Plates
Swap New Nintendo 3DS cover plates (sold separately).Please make sure the cover plates are attached to the system when you start it for the first time. If the system is used by a young child, a parent or legal guardian should exchange cover plates for them.
Note: Please make sure the system is switched off and unplugged from the AC adapter.
Loosen the screws on the back plate
Loosen the two screws securing the back plate for 4 or 5 rotations using a cross-head screwdriver.
To prevent the screws from being lost, each back plate is fitted with a pair of special screws that do not rise up when loosened, and stay inside the plate when it is removed.
How to avoid damaging the screws
•
Use a cross-head screwdriver that fits perfectly in the screw head.•
Lay the system on a flat surface and gently push the screwdriver intoeach screw while turning in an anticlockwise motion. Perfect fit Gently push and turn
Remove with the stylus, then
attach the new cover plates
Lay the system on a flat surface, insert the top of the stylus firmly in between the plate and the system, and prise the two carefully apart. Note:•
Do not insert your fingernails in between the plate and the system, as this could result in injury.•
Do not use excessive force, as this could result indamage to your system and/or the plate.
•
Remove and attach the front plate in the sameway as described above.
Tighten the two screws on the back plate
Note: Make sure the back plate is attached and screwed down tightly. If the system is subjected to a shock while the back plate is off, the battery could be damaged leading to fire or explosion.
Front plate Back plate
1
2
Insert the top of the stylus into the recess in the cover plate and lift.
Remove
Attach
Using S of tw ar e Using S of tw ar e HOME Menu
HOME Menu
The HOME Menu is displayed when you turn on the power.
Software titles can be launched from the HOME Menu by touching the icon that corresponds to the title you want to play. The HOME Menu also shows the time and date, current wireless communication mode and the number of steps you’ve taken that day.
Look out for on a software icon to instantly tell when a title has received new information or an update via SpotPass ( p. 6).
Wireless communication mode
Play Coins / Today’s steps
Date and time
HOME Menu Settings
( p. 28) Adjust software icon displayTouch / to adjust the icon
display size.
Software icons ( p. 25)
New notifications for software titles are indicated with (green) / (blue) on the software icon.
StreetPass
Signal strength (internet) Signal strength (local wireless)
Battery charge Full Low Almost empty (flashing) Recharging (flashing) Recharging complete
HOME Menu application icons ( p. 29) Game Notes Friend list Notifications Internet browser Miiverse Note:
•
Press and at the same time to activate the cameras and take photos, or read QR Code patterns.•
While holding down , press up, down or right on the Control Pad to take a screenshot of the HOME Menu. Pressing up captures the upper screen, and pressing down captures the Touch Screen, while pressing right captures both screens. You can view screenshots in Nintendo 3DS Camera ( p. 26). (While software is suspended ( p. 27), only a screenshot of the Touch Screen can be captured.)•
Content displayed on the upper screen differs according to the software being used. The display moves in various ways when the microphone picks upHOME Menu
HOME Menu Electronic Manual
Touch in the top-left corner of the screen, and then select HOME MENU ELECTRONIC MANUAL to display a detailed manual on how to use the HOME Menu.
Viewing Manuals
Choose an item from the contents
Slide up and down to scroll through the contents of the manual and touch the page you want to view. Note: Press the Y Button to change the language of the manual.Close manual Change the font size
View the page
Slide up and down to scroll through the contents of the page. Slide left and right to switch pages.
1
2
Software Icons
Free software received via SpotPass and software downloaded via Nintendo eShop are added as icons on the HOME Menu.
Scrolling the Screen / Moving Software Icons
Scrolling the Screen
Touch an icon, then slide the stylus to the left or right to scroll through the available software icons.
Touch Slide
Moving Software Icons
To move an icon, touch and hold the stylus over the icon until it detaches, then drag it to where you want to place it and release the stylus.
Using S of tw ar e Using S of tw ar e
26
27
HOME Menu HOME MenuSoftware Icon Types
Card software icons
Nintendo 3DS
Game Card Nintendo DS / Nintendo DSi Game Card The software title’s icon appears after a Game Card
is inserted into the Game Card slot.
Built-in application icons
For information on how to use these software titles, please see their respective electronic manuals ( p. 27).
Health and Safety Information ( p. 9)
Read important health and safety information for your system.
Nintendo 3DS Camera
Take 3D photos and videos using this application.
Nintendo 3DS Sound
Listen to music and record sounds.
Mii Maker
Make yourself and other people into Mii characters!
StreetPass Mii Plaza
Mii characters you meet through StreetPass ( p. 7) will appear here.
Nintendo eShop ( p. 5)
View information and videos about various software, and download new software.
AR Games: Augmented Reality
Use the AR Cards together with the outer cameras to create believable augmented reality games.
Face Raiders
A shooting game that turns your face, or the faces of your friends, into the enemies!
Activity Log
Record the number of steps you take while carrying your system and the length of time you spend using software.
Download Play
Download demos and play multiplayer games!
System Settings ( p. 35)
Adjust the system settings.
Others
Gift icon
This icon appears when a new application is added to the HOME Menu. Touch a gift icon to unwrap it.
Note: The icon will flash if the application has not yet finished downloading. Place the system into Sleep Mode ( p. 17) within range of a compatible internet access point to complete the download.
•
Any software or video content that is pre-installed on the microSD card will also be displayed on the HOME Menu.Opening Software
Touch the software icon, then touch OPEN.
Closing / Suspending software
Press the HOME Button during game play to suspend a software title and display the HOME Menu. Touch RESUME or press the HOME Button again to resume play, or touch CLOSE on the HOME Menu to close the software.
Note:
•
See p. 29 for details on actions you can perform while software is suspended.•
Other software titles can be launched, but you must close the suspended title to do this.Save before closing software
Any unsaved data will be lost if you close a software title without saving.
Do not remove suspended software or turn off the power
Do not remove suspended Game Card software, microSD card, or turn the power off while in this state. Doing so can cause data corruption or loss.
Software Electronic Manuals
If a software title includes an electronic manual, the MANUAL option will be displayed when the software icon is selected. Touch this to view the manual. The manual can also be viewed while the software title is suspended.
Note: Controls for viewing a software manual are the same as for the HOME Menu electronic manual ( p. 25).
Using S of tw ar e Using S of tw ar e HOME Menu HOME Menu
HOME Menu Settings
Touch on the HOME Menu to configure the following settings, or to view the HOME Menu electronic manual.
Change Theme Change the design of the HOME Menu by selecting from various themes, or visit the Theme Shop to add more themes. Save / Load Layout Save the layouts for themes and software icons on the HOME Menu, and swap between them.
Screen Brightness Choose between five levels of brightness.
Auto-Brightness Adjusts the screen brightness automatically depending on the light level of your surroundings.Note: This function is deactivated when the camera function is in use or when playing Nintendo DS / Nintendo DSi software.
Power-Saving Mode Automatically adjusts the brightness of the screen depending on what is being displayed in order to conserve battery power. Disabling it ensures that you can maintain a constant brightness level, but results in shorter continuous play time. This function is turned off by default.
Wireless
Communication / NFC Activate/deactivate wireless communication and NFC. Nintendo 3DS
Image Share
Open the internet browser and access Nintendo 3DS Image Share to post screenshots of the HOME Menu to social networking sites like Twitter and Facebook. Further explanation can be found within Nintendo 3DS Image Share.
amiibo Settings Configure amiibo settings. For more information on amiibo, please refer to amiibo.nintendo.eu
Nintendo eShop Launch Nintendo eShop ( p. 5).
System Settings Open the System Settings ( p. 35).
HOME Menu
Electronic Manual Display the HOME Menu electronic manual.
HOME Menu Application Icons
Touch the icons displayed on the HOME Menu on the upper part of the Touch Screen to use the functions below. Note:
•
Refer to each application’s electronic manual for more details ( p. 27).•
The Miiverse manual can be viewed within Miiverse after launching the software.Game Notes Write down notes on games whenever you want.
Friend List
Play and communicate with registered friends via the internet, wherever they may be. Note: The friend data stored by your Nintendo Network ID is different to the friend data stored on this system. Making changes to this friend list will not affect the friend data attached to your Nintendo Network ID ( p. 36).
Notifications Receive notifications from Nintendo or from software titles via StreetPass and SpotPass.
Internet Browser View web pages on the internet.
Miiverse
Miiverse is an online service where people from across the world meet up using their Mii characters. Using Miiverse, you can share your experiences playing games or thoughts on a topic you're interested in with people from all over the world.
Note: A Nintendo Network ID is required to post or comment to Miiverse ( p. 36).
When suspended…
When a software title is suspended, you can adjust HOME Menu Settings and also access Game Notes, the friend list, Notifications, the internet browser, Miiverse, camera mode and software manuals.
Press the HOME Button to suspend the software and open the HOME Menu to access these features. Note:
•
Depending on the state of the software (wireless communication or outer cameras in use, etc.), the HOME Menu may not be displayed, or certain functions may not be accessible. Some software titles do not make use of certain HOME Menu functions.Using S of tw ar e Using S of tw ar e
30
31
HOME MenuPoints to note regarding the friend list
Do not share your friend code with people you do not know
The friend list is a system intended for use by you and people you know. Posting your friend code on online forums or sharing it with people you do not know can result in you receiving unwanted data or status messages containing language that you may find offensive. Do not share your friend code with people you do not know.
Parental Controls ( p. 43)
You can restrict the use of the friend list by setting Parental Controls.
Protecting children from harmful websites
You can use the Parental Controls settings ( p. 43) to restrict use of the browser in order to prevent children from accessing harmful or inappropriate websites.
Points to note regarding Miiverse
In Miiverse your posts, comments, and profile comments may be seen by many people. Do not share any personally identifying information or make posts that may be inappropriate or offensive to others. For more information, see the Miiverse guide (https://miiverse.nintendo.net/guide/).
Parental Controls ( p. 43)
You can restrict the use of Miiverse by setting Parental Controls.
Car d-Based S of tw ar e
Card-Based Software
How to use Game Cards with your Nintendo system.Note: If the system language is set to Dutch, Portuguese or Russian, non-Nintendo 3DS titles will default to English. In some cases, this may be adjustable within the software.
Nintendo 3DS, Nintendo DS, Nintendo DSi and Nintendo DSi enhanced software can be used on this system.
Nintendo 3DS Game Card Nintendo DS / Nintendo DSi Game Card
Note:
•
3D content will only be displayed on Nintendo 3DS software titles. Nintendo DS / Nintendo DSi software titles cannot display 3D content.•
SpotPass, StreetPass and the HOME Menu cannot be used while Nintendo DS / Nintendo DSi software is in use.•
Only Nintendo 3DS and Nintendo DSi software titles matching the region of the system will work. Software titles from different regions may not function.•
Nintendo 3DS software titles cannot be used with Nintendo DS, Nintendo DS Lite, Nintendo DSi or Nintendo DSi XL systems.Pan European Game Information (PEGI) age rating system
[1113/UKV]Age rating categories
Titles rated 3 are suitable for ages 3
and older
Titles rated 7 are suitable for ages 7
and older
Titles rated 12 are suitable for ages 12
and older
Titles rated 16 are suitable for ages 16
and older
Titles rated 18 are suitable for ages 18
and older
Content descriptors
Content descriptors are shown on the game packaging where applicable. These icons indicate the main reasons for a game’s age rating.
The ’Online’ logo indicates that a game allows the player to have access to online game play with other players.
The PEGI system was established to help parents and guardians make informed decisions when buying computer and video games. It replaced a number of national age rating systems with a single system now used throughout most of Europe. For further information about PEGI visit http://www.pegi.info.
Using S of tw ar e Using S of tw ar e Car d-Based S of tw ar e Car d-Based S of tw ar e
Using Game Cards
Insert a Game Card into the Game Card slot
Check which way the Game Card is facing
The label on the card and the bottom of the system should both
face in the same direction. Note:
•
If you have trouble inserting the Game Card, remove it and check that it is facing the right direction with the label facing away from the system. Forcing the card in when it is facing the wrong direction could lead to damage.•
Only insert or remove Game Cards while the HOME Menu is displayed or the power is off. (If you have suspended a software title, make sure you have closed it before removing its Game Card.)Push the Game Card in, then remove it
1
2
ClickTouch the Game Card icon, then touch OPEN
Nintendo DS / Nintendo DSi titles are displayed in an expanded format by default. To load the software at its original resolution, hold down either START or SELECT, then touch OPEN to launch the software. Keep START or SELECT held down until the software has started.
For further information, refer to the instruction manual for the software you are using
1
2
3
Closing software
Press the HOME Button to bring up the HOME Menu, then touch CLOSE to end a soft-ware title. (Any unsaved data will be lost if you close a softsoft-ware title without saving.)
•
Touch RESUME to return to the point where the software title was suspended.•
To close Nintendo DS / Nintendo DSi software titles, first save your data, thenpress the HOME Button and touch OK.
Note: If you press the POWER Button, the software title will close and the POWER Menu will be displayed ( p. 17).
Game Card system updates
Some Game Cards contain system update data. Such Game Cards will display a message if a system update is required in order to use the Game Card. Follow the instructions to update your system ( p. 55).
Incompatible software and accessories
The Nintendo 3DS charging cradle, Nintendo 3DS XL charging cradle, Nintendo 3DS Circle Pad Pro and Nintendo 3DS XL Circle Pad Pro are not compatible with this system.
In addition to these products, it is not possible to use any accessories that would connect to the Nintendo DS or Nintendo DS Lite systems via the Game Boy Advance™ Game Pak slot or anything that functions in conjunction with a Game Boy Advance Game Pak. For more details, visit support.nintendo.com.
Adjusting S yst em S ettings
35
Using S of tw ar e34
Do wnloadable S of tw ar eDownloadable Software
Enjoy free software downloaded via SpotPass or software purchased via Nintendo eShop.
This system is equipped with RF technology with a radiated output power of less than 10 mW e.i.r.p. and a maximum spectrum power density of less than -30 dBW/1MHz e.i.r.p. These parameters can be maintained when operated within a temperature range of 0 to 40°C. In accordance with this, this system is categorised as Class 1 equipment according to Commission Decision 2000/299/EC.
With the exception of Nintendo DSiWare ( p. 5), downloaded software is saved to a microSD card. The corresponding icons are displayed in the HOME Menu.
You can get new software by…
•
Receiving free software via SpotPass ( p. 6).•
Purchasing software via Nintendo eShop ( p. 5).Precautions for downloadable software
•
Because some software is transmitted automatically via SpotPass ( p. 6), it is advised that you keep a microSD card inserted at all times.•
Up to 40 Nintendo DSiWare titles can be stored in the system memory and up to 300 downloadable software titles can be stored on a microSD card.•
Downloadable software (including its save data) can only be used on the system it was originally downloaded to. Software that you save on a microSD card cannot be used with any other system.•
A linked Nintendo Network ID is required to download free or demo software ( p. 36).•
Demo versions of software may have limitations such as a time limit or number of uses. If you exceed this limit and try to open the software, a message will be displayed. Follow the instructions to delete the software or open Nintendo eShop.•
If the system language is set to Dutch, Portuguese or Russian, Nintendo DSiWare titles will default to English. In some cases, this may be adjustable within the software.•
Only Nintendo 3DS software and Nintendo DSiWare matching the region of the system will work. Software titles from different regions may not function.Opening Software
Touch the Game Card icon, then touch OPEN
Nintendo DSiWare titles are displayed in an expanded format by default. To load the software at its original resolution, hold down either START or SELECT when launching the software. Keep START or SELECT held down until the software has started.For further instructions, refer to the instruction manual for the software you are using
•
How to view the electronic manual ( p. 27)•
About software ratings ( p. 31)•
How to close a software title ( p. 33)1
2
Syst em S ettingsSystem Settings
Configure your internet settings, Parental Controls and other basic system settings here.
Touch the System Settings icon on the HOME Menu to open the System Settings.
For detailed information, consult the electronic manual.
NINTENDO NETWORK ID
SETTINGS Adjust your Nintendo Network ID profile, delete your ID or link an existing ID to your system ( p. 36).
INTERNET SETTINGS
CONNECTION SETTINGS Configure your internet connection settings ( p. 38).
SPOTPASS Change your automatic software download and sending of system information settings. NINTENDO DS
CONNECTIONS Configure internet settings for Nintendo DS software.
OTHER INFORMATION Review the Nintendo 3DS Service User Agreement and Privacy Policy, or check the system’s MAC address.
PARENTAL CONTROLS Restrict the use of software, content that can be purchased and downloaded, and system functions such as 3D images ( p. 43). DATA MANAGEMENT Manage data such as Nintendo 3DS download software, Nintendo DSiWare and StreetPass data. You can also clear your blocked-user settings ( p. 45). OTHER SETTINGS Manage your profile information, date and time settings, and more ( p. 46).
Adjusting S yst em S ettings Adjusting S yst em S ettings Nint endo N et work ID S ettings
Nintendo Network ID Settings
Create or link a Nintendo Network ID and configure your user information.A Nintendo Network ID allows you to enjoy various features of Nintendo Network.
Download free software and demos from Nintendo eShop
( p. 5).
Communicate with other users around the world in
Miiverse ( p. 29).
Use your Nintendo eShop funds on both your system and
a Wii U console.
•
An internet connection ( p. 38) and an email address are required to create a Nintendo Network ID and link it to your system.•
A Nintendo Network ID is different to a Club Nintendo account.•
Adults should create or link a Nintendo Network ID for their children.If you own another Nintendo 3DS system and want to transfer data to your new system…
Configure the initial settings for the new system and then perform the system transfer ( p. 47). Do not create or link a Nintendo Network ID to the new system before the transfer.Caution
If you link a new Nintendo Network ID to this system, you will be unable to transfer data from another Nintendo 3DS system.Points to note regarding Nintendo Network IDs
•
You will need to sign in with your ID each time you useNintendo eShop.
•
Once you have created or linked a Nintendo Network ID, your system’s Nintendo eShop account activity and funds will be merged with those of your Nintendo Network ID.NintendoMario123
•
Only one ID can be linked per system.NintendoMario123 1
•
You cannot link a Nintendo Network ID to multiple Nintendo 3DS systems.NintendoMario123
Note: You can, however, transfer all of your data to another system which has not been linked to a Nintendo Network ID using System Transfer ( p. 47).
•
You cannot merge two Nintendo Network IDs. NintendoMario123 NintendoLuigi123•
You cannot perform system transfers to a system that isalready linked to a Nintendo Network ID.
NintendoMario123 NintendoLuigi123
•
Friend data stored by your Nintendo Network ID and frienddata stored on this system are kept separately. Friend data stored by your Nintendo Network ID can only be deleted or changed using a Wii U console, and will only be needed in software that requires you to sign in with your ID.
endo N
et
work ID S
ettings
Creating or Linking a Nintendo Network ID
There are two methods:
•
Create a new Nintendo Network ID.•
Use an ID already linked to a Wii U console.Recommended for owners of
Wii U
Link
Nintendo Network ID on Wii U
New Nintendo 3DS
Nintendo eShop funds can be shared!
If you own a Wii U console…
You can link the existing ID from your Wii U console to this system. Doing so allows you to share your existing Nintendo eShop funds between devices, and to post to Miiverse as the same user.
Please be aware that if you create a new Nintendo Network ID on your system, you will not be able to combine or share Nintendo eShop funds linked to the existing Nintendo Network ID on your Wii U console.
Nintendo Network ID on New Nintendo 3DS Newly created ID Nintendo Network ID on Wii U ID linked to Wii U
Nintendo eShop funds cannot be shared! Please be aware that is it not possible to combine two existing Nintendo Network IDs.
Cannot combine
Touch NINTENDO NETWORK ID SETTINGS in the System Settings ( p. 35) to begin.
Select LINK AN EXISTING ID or CREATE A NEW ID
If you create a new ID on your system, you will not be able to merge it with an existing ID in use on a Wii U console. You will need to select LINK AN EXISTING ID if you would like to use the same ID across both devices.Follow the on-screen instructions
There are certain services which require you to sign in with your Nintendo Network ID in order to use them. If you forget your pass-word, select I FORGOT or I FORGOT MY PASSWORD, then follow the on-screen instructions.
1
Adjusting S yst em S ettings Adjusting S yst em S ettings
38
39
Internet Settings
Connect your system to the internet to open up even more options, such as purchasing software in Nintendo eShop or communicating with players around the world.
Int
ernet S
ettings
Required Items for Internet Connection
A wireless connection is required to connect your system to the internet. A computer is needed to configure the settings on your wireless access point (router).
Wireless access points
Note:
•
It is easiest to connect to wireless access points which support AOSS™ or Wi-Fi Protected Setup™.•
Use an access point which supports the 802.11b and/or 802.11g standards. Access points which onlysupport 802.11a are incompatible.
Broadband internet connection (ADSL, cable or fibre optic)
Internet
Broadband internet connection
Modem
and/or router Wireless
communication
Activating and deactivating wireless communication
To activate or deactivate wireless communication, touch in the upper-left corner of the Touch Screen while on the HOME Menu to open the HOME Menu Settings, then touch ON or OFF under Wireless Communication.
Int
ernet S
ettings
Connecting to the Internet
Once you have everything you need to connect to the internet, you can start configuring the settings on your system. Note: In order to connect to the internet when using a Nintendo DS Game Card, you must configure Nintendo DS Connections.
Touch CONNECTION SETTINGS
Touch NEW CONNECTION
Find your ideal settings with the tutorial
Touch TUTORIAL to receive help with the connection setup process. Follow the instructions on-screen and select options to configure the right settings for your connection.
•
For AOSS guidance, see p. 40.•
For Wi-Fi Protected Setup guidance, see p. 41.•
For guidance on searching for and configuring access points, see p. 42.Setting up a connection without the tutorial
If you would rather set up your connection without assistance, touch MANUAL SETUP instead, then select from the options displayed to configure your connection.