Corporate Headquarters
Cisco Systems, Inc. 170 West Tasman Drive
Catalyst 6000 Family Command
Reference
THE SPECIFICATIONS AND INFORMATION REGARDING THE PRODUCTS IN THIS MANUAL ARE SUBJECT TO CHANGE WITHOUT NOTICE. ALL STATEMENTS, INFORMATION, AND RECOMMENDATIONS IN THIS MANUAL ARE BELIEVED TO BE ACCURATE BUT ARE PRESENTED WITHOUT WARRANTY OF ANY KIND, EXPRESS OR IMPLIED. USERS MUST TAKE FULL RESPONSIBILITY FOR THEIR APPLICATION OF ANY PRODUCTS.
THE SOFTWARE LICENSE AND LIMITED WARRANTY FOR THE ACCOMPANYING PRODUCT ARE SET FORTH IN THE INFORMATION PACKET THAT SHIPPED WITH THE PRODUCT AND ARE INCORPORATED HEREIN BY THIS REFERENCE. IF YOU ARE UNABLE TO LOCATE THE SOFTWARE LICENSE OR LIMITED WARRANTY, CONTACT YOUR CISCO REPRESENTATIVE FOR A COPY.
The Cisco implementation of TCP header compression is an adaptation of a program developed by the University of California, Berkeley (UCB) as part of UCB’s public domain version of the UNIX operating system. All rights reserved. Copyright © 1981, Regents of the University of California.
NOTWITHSTANDING ANY OTHER WARRANTY HEREIN, ALL DOCUMENT FILES AND SOFTWARE OF THESE SUPPLIERS ARE PROVIDED “AS IS” WITH ALL FAULTS. CISCO AND THE ABOVE-NAMED SUPPLIERS DISCLAIM ALL WARRANTIES, EXPRESSED OR IMPLIED, INCLUDING, WITHOUT LIMITATION, THOSE OF MERCHANTABILITY, FITNESS FOR A PARTICULAR PURPOSE AND
NONINFRINGEMENT OR ARISING FROM A COURSE OF DEALING, USAGE, OR TRADE PRACTICE.
IN NO EVENT SHALL CISCO OR ITS SUPPLIERS BE LIABLE FOR ANY INDIRECT, SPECIAL, CONSEQUENTIAL, OR INCIDENTAL DAMAGES, INCLUDING, WITHOUT LIMITATION, LOST PROFITS OR LOSS OR DAMAGE TO DATA ARISING OUT OF THE USE OR INABILITY TO USE THIS MANUAL, EVEN IF CISCO OR ITS SUPPLIERS HAVE BEEN ADVISED OF THE POSSIBILITY OF SUCH DAMAGES.
AccessPath, AtmDirector, Browse with Me, CCIP, CCSI, CD-PAC, CiscoLink, the Cisco Powered Network logo, Cisco Systems Networking Academy, the Cisco Systems Networking Academy logo, Cisco Unity, Fast Step, Follow Me Browsing, FormShare, FrameShare, IGX, Internet Quotient, IP/VC, iQ Breakthrough, iQ Expertise, iQ FastTrack, the iQ Logo, iQ Net Readiness Scorecard, MGX, the Networkers logo, ScriptBuilder, ScriptShare, SMARTnet, TransPath, Voice LAN, Wavelength Router, and WebViewer are trademarks of Cisco Systems, Inc.; Changing the Way We Work, Live, Play, and Learn, and Discover All That’s Possible are service marks of Cisco Systems, Inc.; and Aironet, ASIST, BPX, Catalyst, CCDA, CCDP, CCIE, CCNA, CCNP, Cisco, the Cisco Certified Internetwork Expert logo, Cisco IOS, the Cisco IOS logo, Cisco Press, Cisco Systems, Cisco Systems Capital, the Cisco Systems logo, Empowering the Internet Generation, Enterprise/Solver, EtherChannel, EtherSwitch, FastHub, FastSwitch, GigaStack, IOS, IP/TV, LightStream, MICA, Network Registrar, Packet, PIX, Post-Routing, Pre-Routing, RateMUX, Registrar, SlideCast, StrataView Plus, Stratm, SwitchProbe, TeleRouter, and VCO are registered trademarks of Cisco Systems, Inc. and/or its affiliates in the U.S. and certain other countries.
All other trademarks mentioned in this document or Web site are the property of their respective owners. The use of the word partner does not imply a partnership relationship between Cisco and any other company. (0110R)
C O N T E N T S
Preface
xxiiiAudience
xxiiiOrganization
xxiiiRelated Documentation
xxiiiConventions
xxivObtaining Documentation
xxvWorld Wide Web
xxvDocumentation CD-ROM
xxvOrdering Documentation
xxvDocumentation Feedback
xxvObtaining Technical Assistance
xxviCisco.com
xxviTechnical Assistance Center
xxviC H A P T E R 1
Command-Line Interfaces
1-1Switch CLI
1-1Accessing the Switch CLI
1-1Operating the Switch CLI
1-3ROM Monitor CLI
1-13Accessing the ROM Monitor CLI
1-13Operating the ROM Monitor CLI
1-13C H A P T E R 2
Catalyst 6000 Family Switch and ROM Monitor Commands
2-1alias
2-2boot
2-4cd
2-5clear alias
2-6Contents
clear channel statistics
2-13clear config
2-14clear config pvlan
2-16clear cops
2-17clear counters
2-19clear crypto key rsa
2-20clear dot1x config
2-21clear gmrp statistics
2-22clear gvrp statistics
2-23clear igmp statistics
2-24clear ip alias
2-25clear ip dns domain
2-26clear ip dns server
2-27clear ip permit
2-28clear ip route
2-30clear kerberos clients mandatory
2-31clear kerberos credentials forward
2-32clear kerberos creds
2-33clear kerberos realm
2-34clear kerberos server
2-35clear key config-key
2-36clear lacp-channel statistics
2-37clear lda
2-38clear log
2-40clear log command
2-41clear logging buffer
2-42clear logging level
2-43clear logging server
2-45Contents
clear mls statistics entry
2-55clear module password
2-57clear multicast router
2-58clear ntp server
2-59clear ntp timezone
2-60clear pbf
2-61clear port broadcast
2-62clear port cops
2-63clear port host
2-64clear port qos cos
2-65clear port security
2-66clear pvlan mapping
2-67clear qos acl
2-68clear qos config
2-70clear qos cos-dscp-map
2-71clear qos dscp-cos-map
2-72clear qos ipprec-dscp-map
2-73clear qos mac-cos
2-74clear qos map
2-75clear qos policed-dscp-map
2-77clear qos policer
2-78clear qos statistics
2-80clear radius
2-81clear rcp
2-82clear rgmp statistics
2-83clear security acl
2-84clear security acl capture-ports
2-86clear security acl log flow
2-87clear security acl map
2-88Contents
clear snmp trap
2-96clear snmp user
2-97clear snmp view
2-98clear spantree mst
2-99clear spantree portcost
2-100clear spantree portinstancecost
2-101clear spantree portinstancepri
2-103clear spantree portpri
2-104clear spantree portvlancost
2-105clear spantree portvlanpri
2-107clear spantree root
2-108clear spantree statistics
2-110clear spantree uplinkfast
2-112clear tacacs key
2-113clear tacacs server
2-114clear timezone
2-115clear top
2-116clear trunk
2-117clear vlan
2-118clear vlan counters
2-119clear vlan mapping
2-120clear vmps rcp
2-122clear vmps server
2-123clear vmps statistics
2-124clear vtp pruneeligible
2-125clear vtp statistics
2-126commit
2-127commit lda
2-129Contents
dir—switch
2-145disable
2-147disconnect
2-148download
2-149enable
2-153format
2-154frame
2-156history—ROM monitor
2-157history—switch
2-158l2trace
2-159meminfo
2-162ping
2-163pwd
2-166quit
2-167reconfirm vmps
2-168reload
2-169repeat
2-170reset—ROM monitor
2-172reset—switch
2-173restore counters
2-177rollback
2-178session
2-179set
2-180set accounting commands
2-181set accounting connect
2-182set accounting exec
2-183set accounting suppress
2-185set accounting system
2-186set accounting update
2-188Contents
set authorization commands
2-198set authorization enable
2-200set authorization exec
2-202set banner lcd
2-204set banner motd
2-205set boot auto-config
2-206set boot config-register
2-207set boot config-register auto-config
2-210set boot device
2-213set boot sync now
2-215set boot system flash
2-216set cam
2-217set cdp
2-219set channelprotocol
2-221set channel vlancost
2-223set config acl nvram
2-225set config mode
2-226set cops
2-227set crypto key rsa
2-229set default portstatus
2-231set dot1q-all-tagged
2-232set dot1x
2-234set enablepass
2-237set errdisable-timeout
2-238set errordetection
2-240set feature agg-link-partner
2-242set feature mdg
2-243set garp timer
2-244Contents
set gvrp registration
2-253set gvrp timer
2-255set igmp
2-257set igmp fastleave
2-258set igmp mode
2-259set igmp querier
2-260set igmp ratelimit
2-261set inlinepower defaultallocation
2-263set interface
2-264set ip alias
2-267set ip dns
2-268set ip dns domain
2-269set ip dns server
2-270set ip fragmentation
2-271set ip http port
2-272set ip http server
2-273set ip permit
2-274set ip redirect
2-276set ip route
2-277set ip unreachable
2-279set kerberos clients mandatory
2-280set kerberos credentials forward
2-281set kerberos local-realm
2-282set kerberos realm
2-283set kerberos server
2-284set kerberos srvtab entry
2-285set kerberos srvtab remote
2-287set key config-key
2-288set lacp-channel system-priority
2-289Contents
set logging level
2-298set logging server
2-301set logging session
2-303set logging telnet
2-304set logging timestamp
2-305set logout
2-307set mls agingtime
2-308set mls cef load-balance
2-310set mls exclude protocol
2-311set mls flow
2-312set mls nde
2-314set mls statistics protocol
2-318set mls verify
2-319set module
2-321set module name
2-323set module power
2-324set module shutdown
2-325set msfcautostate
2-326set msmautostate
2-328set multicast router
2-329set ntp broadcastclient
2-330set ntp broadcastdelay
2-331set ntp client
2-332set ntp server
2-333set ntp summertime
2-334set ntp timezone
2-336set password
2-337set pbf
2-338Contents
set port dot1x
2-353set port duplex
2-355set port enable
2-356set port flowcontrol
2-357set port gmrp
2-360set port gvrp
2-361set port host
2-363set port inlinepower
2-364set port jumbo
2-365set port lacp-channel
2-366set port membership
2-368set port name
2-370set port negotiation
2-371set port protocol
2-372set port qos
2-374set port qos cos
2-376set port qos policy-source
2-377set port qos trust
2-379set port qos trust-ext
2-381set port rsvp dsbm-election
2-382set port security
2-383set port speed
2-385set port sync-restart-delay
2-386set port trap
2-387set port voice interface dhcp
2-388set power redundancy
2-390set prompt
2-391set protocolfilter
2-392set pvlan
2-393Contents
set qos acl map
2-410set qos bridged-microflow-policing
2-412set qos cos-dscp-map
2-413set qos drop-threshold
2-414set qos dscp-cos-map
2-416set qos ipprec-dscp-map
2-417set qos mac-cos
2-419set qos map
2-420set qos policed-dscp-map
2-423set qos policer
2-424set qos policy-source
2-426set qos rsvp
2-428set qos rxq-ratio
2-430set qos statistics export
2-431set qos statistics export aggregate
2-432set qos statistics export destination
2-433set qos statistics export interval
2-434set qos statistics export port
2-435set qos txq-ratio
2-436set qos wred
2-437set qos wrr
2-439set radius deadtime
2-441set radius key
2-442set radius retransmit
2-443set radius server
2-444set radius timeout
2-446set rcp username
2-447set rgmp
2-448Contents
set security acl map
2-465set snmp access
2-467set snmp community
2-469set snmp extendedrmon netflow
2-471set snmp group
2-472set snmp notify
2-473set snmp rmon
2-474set snmp rmonmemory
2-475set snmp targetaddr
2-476set snmp targetparams
2-478set snmp trap
2-480set snmp user
2-483set snmp view
2-485set span
2-487set spantree backbonefast
2-490set spantree bpdu-skewing
2-491set spantree channelcost
2-492set spantree channelvlancost
2-494set spantree defaultcostmode
2-495set spantree disable
2-497set spantree enable
2-499set spantree fwddelay
2-501set spantree global-default
2-503set spantree guard
2-505set spantree hello
2-507set spantree macreduction
2-509set spantree maxage
2-510set spantree mode
2-512set spantree mst config
2-514Contents
set spantree portfast bpdu-filter
2-524set spantree portfast bpdu-guard
2-525set spantree portinstancecost
2-526set spantree portinstancepri
2-528set spantree portpri
2-530set spantree portvlancost
2-531set spantree portvlanpri
2-533set spantree priority
2-534set spantree root
2-536set spantree uplinkfast
2-539set summertime
2-541set system baud
2-543set system contact
2-544set system core-dump
2-545set system core-file
2-547set system countrycode
2-548set system crossbar-fallback
2-549set system highavailability
2-550set system highavailability versioning
2-551set system location
2-553set system modem
2-554set system name
2-555set system switchmode
2-556set tacacs attempts
2-558set tacacs directedrequest
2-559set tacacs key
2-560set tacacs server
2-561set tacacs timeout
2-562Contents
set udld interval
2-573set vlan
2-574set vlan mapping
2-578set vmps downloadmethod
2-580set vmps downloadserver
2-581set vmps server
2-582set vmps state
2-584set vtp
2-585set vtp pruneeligible
2-587show accounting
2-588show aclmerge
2-591show alias
2-592show arp
2-593show authentication
2-594show authorization
2-595show banner
2-596show boot
2-597show boot device
2-598show cam
2-599show cam agingtime
2-601show cam count
2-602show cam msfc
2-603show cdp
2-604show channel
2-607show channel group
2-612show channel hash
2-616show channel mac
2-617show channelprotocol
2-618show channel traffic
2-619Contents
show default
2-638show dot1q-all-tagged
2-639show dot1x
2-640show dvlan statistics
2-641show environment
2-642show errdisable-timeout
2-646show errordetection
2-647show fabric channel
2-648show file
2-651show flash
2-652show garp timer
2-655show gmrp configuration
2-656show gmrp statistics
2-657show gmrp timer
2-658show gvrp configuration
2-659show gvrp statistics
2-661show ifindex
2-663show igmp mode
2-664show igmp ratelimit-info
2-665show igmp statistics
2-666show imagemib
2-668show interface
2-669show ip alias
2-671show ip dns
2-672show ip http
2-673show ip permit
2-675show ip route
2-677show kerberos
2-679Contents
show mac
2-696show microcode
2-699show mls
2-700show mls acl-route
2-702show mls cef interface
2-703show mls cef mac
2-705show mls cef summary
2-707show mls entry
2-709show mls entry cef
2-715show mls entry netflow-route
2-719show mls exclude protocol
2-721show mls multicast
2-722show mls nde
2-727show mls netflow-route
2-728show mls statistics
2-729show mls verify
2-732show module
2-733show moduleinit
2-736show msfcautostate
2-738show msmautostate
2-739show multicast group
2-740show multicast group count
2-742show multicast protocols status
2-743show multicast router
2-744show netstat
2-746show ntp
2-753show pbf
2-755show port
2-758show port auxiliaryvlan
2-766Contents
show port debounce
2-785show port dot1qtunnel
2-786show port dot1x
2-787show port flowcontrol
2-789show port inlinepower
2-791show port jumbo
2-792show port lacp-channel
2-793show port mac
2-796show port mac-address
2-798show port negotiation
2-800show port protocol
2-801show port qos
2-802show port rsvp
2-804show port security
2-805show port spantree
2-807show port status
2-808show port sync-restart-delay
2-809show port trap
2-810show port trunk
2-811show port voice
2-813show port voice active
2-816show port voice fdl
2-820show port voice interface
2-822show proc
2-823show protocolfilter
2-827show pvlan
2-828show pvlan capability
2-830show pvlan mapping
2-832Contents
show qos maps
2-848show qos policer
2-851show qos policy-source
2-853show qos rsvp
2-854show qos statistics
2-856show qos statistics export info
2-858show qos status
2-859show radius
2-860show rcp
2-862show reset
2-863show rgmp group
2-864show rgmp statistics
2-865show rspan
2-866show running-config
2-868show security acl
2-871show security acl capture-ports
2-874show security acl log
2-875show security acl map
2-878show security acl resource-usage
2-879show snmp
2-880show snmp access
2-882show snmp community
2-884show snmp context
2-886show snmp counters
2-887show snmp engineid
2-891show snmp group
2-892show snmp notify
2-894show snmp rmonmemory
2-896show snmp targetaddr
2-897Contents
show spantree blockedports
2-911show spantree bpdu-skewing
2-912show spantree conflicts
2-914show spantree defaultcostmode
2-916show spantree guard
2-917show spantree mapping
2-919show spantree mistp-instance
2-921show spantree mst
2-923show spantree mst config
2-925show spantree portfast
2-927show spantree portinstancecost
2-928show spantree portvlancost
2-929show spantree statistics
2-930show spantree summary
2-937show spantree uplinkfast
2-940show startup-config
2-942show summertime
2-945show system
2-946show system highavailability
2-949show system switchmode
2-950show tacacs
2-951show tech-support
2-953show test
2-956show time
2-961show timezone
2-962show top
2-963show top report
2-965show traffic
2-967Contents
show vmps mac
2-987show vmps statistics
2-988show vmps vlan
2-989show vtp domain
2-990show vtp statistics
2-992slip
2-994squeeze
2-995stack
2-996switch
2-997switch console
2-998switch fabric
2-999sync
2-1000sysret
2-1001telnet
2-1002test snmp trap
2-1003traceroute
2-1004unalias
2-1007undelete
2-1008unset=varname
2-1009varname=
2-1010verify
2-1011wait
2-1012whichboot
2-1013write
2-1014write tech-support
2-1017A P P E N D I X A
Acronyms
A-1Preface
This preface describes the audience, organization, and conventions of this publication and provides information on how to obtain related documentation.
Audience
This publication is for experienced network administrators who are responsible for configuring and maintaining Catalyst 6000 family switches.
Organization
This publication is organized as follows:
Related Documentation
Other documents in the Catalyst 6000 family switch documentation set include:
• Catalyst 6000 Family Installation Guide
Chapter Title Description
Chapter 1 Command-Line Interfaces
Describes the two types of CLIs found on Catalyst 6000 family switches
Chapter 2 Catalyst 6000 Family Switch and ROM Monitor Commands
Lists alphabetically and provides detailed information for all Catalyst 6000 family switch and ROM-monitor commands Appendix A Acronyms Defines the acronyms used in this
Preface Conventions
• ATM Software Configuration Guide and Command Reference for the Catalyst 5000 Family and 6000 Family Switches
• Release Notes for Catalyst 6000 Family
For information about MIBs, refer to:
http://www.cisco.com/public/sw-center/netmgmt/cmtk/mibs.shtml
Conventions
This publication uses the following conventions:
Convention Description
boldface font Commands and keywords are in boldface.
italic font Arguments for which you supply values are in italics. [ ] Elements in square brackets are optional.
{ x | y | z } Alternative keywords are grouped in braces and separated by vertical bars.
[ x | y | z ] Optional alternative keywords are grouped in brackets and separated by vertical bars.
string A nonquoted set of characters. Do not use quotation marks around the string or the string will include the quotation marks.
screen font Terminal sessions and information the system displays are in screen font.
boldface screen
font
Information you must enter is in boldface screen font.
italic screen font Arguments for which you supply values are in italic screen font.
^ The symbol ^ represents the key labeled Control—for example, the key combination ^D in a screen display means hold down the Control key while you press the D key.
< > Nonprinting characters, such as passwords are in angle brackets.
[ ] Default responses to system prompts are in square brackets.
Preface
Obtaining Documentation
Obtaining Documentation
The following sections explain how to obtain documentation from Cisco Systems.
World Wide Web
You can access the most current Cisco documentation on the World Wide Web at the following URL:
http://www.cisco.com
Translated documentation is available at the following URL:
http://www.cisco.com/public/countries_languages.shtml
Documentation CD-ROM
Cisco documentation and additional literature are available in a Cisco Documentation CD-ROM package, which is shipped with your product. The Documentation CD-ROM is updated monthly and may be more current than printed documentation. The CD-ROM package is available as a single unitor through an annual subscription.
Ordering Documentation
Cisco documentation is available in the following ways:
• Registered Cisco Direct Customers can order Cisco product documentation from the Networking Products MarketPlace:
http://www.cisco.com/cgi-bin/order/order_root.pl
• Registered Cisco.com users can order the Documentation CD-ROM through the online Subscription Store:
http://www.cisco.com/go/subscription
• Nonregistered Cisco.com users can order documentation through a local account representative by calling Cisco corporate headquarters (California, USA) at 408 526-7208 or, elsewhere in North America, by calling 800 553-NETS (6387).
Documentation Feedback
If you are reading Cisco product documentation on Cisco.com, you can submit technical comments electronically. Click Leave Feedback at the bottom of the Cisco Documentation home page. After you complete the form, print it out and fax it to Cisco at 408 527-0730.
Preface Obtaining Technical Assistance
To submit your comments by mail, use the response card behind the front cover of your document, or write to the following address:
Cisco Systems
Attn: Document Resource Connection 170 West Tasman Drive
San Jose, CA 95134-9883
We appreciate your comments.
Obtaining Technical Assistance
Cisco provides Cisco.com as a starting point for all technical assistance. Customers and partners can obtain documentation, troubleshooting tips, and sample configurations from online tools by usingthe Cisco Technical Assistance Center (TAC) Web Site. Cisco.com registered users have complete access to the technical support resources on the Cisco TAC Web Site.
Cisco.com
Cisco.com is the foundation of a suite of interactive, networked services that provides immediate, open access to Cisco information,networking solutions, services, programs, and resources at any time, from anywhere in the world.
Cisco.com is a highly integrated Internet application and a powerful, easy-to-use tool that provides a broad range of features and services to help you to
• Streamline business processes and improve productivity
• Resolve technical issues with online support
• Download and test software packages
• Order Cisco learning materials and merchandise
• Register for online skill assessment, training, and certification programs
You can self-register on Cisco.com to obtain customized information and service. To access Cisco.com, go to the following URL:
http://www.cisco.com
Technical Assistance Center
Preface
Obtaining Technical Assistance
• Priority level 2 (P2)—Your production network is severely degraded, affecting significant aspects of business operations. No workaround is available.
• Priority level 1 (P1)—Your production network is down, and a critical impact to business operations will occur if service is not restored quickly. No workaround is available.
Which Cisco TAC resource you choose is based on the priority of the problem and the conditions of service contracts, when applicable.
Cisco TAC Web Site
The Cisco TAC Web Site allows you to resolve P3 and P4 issues yourself, saving both cost and time. The site provides around-the-clock access to online tools, knowledge bases, and software. To access the Cisco TAC Web Site, go to the following URL:
http://www.cisco.com/tac
All customers, partners, and resellers who have a valid Cisco services contract have complete access to the technical support resources on the Cisco TAC Web Site. The Cisco TAC Web Siterequires a Cisco.com login ID and password. If you have a valid service contract but do not have a login ID or password, go to the following URL to register:
http://www.cisco.com/register/
If you cannot resolve your technical issues by using the Cisco TAC Web Site, and you are a Cisco.com registered user, you can open a case online by using the TAC Case Open tool at the following URL:
http://www.cisco.com/tac/caseopen
If you have Internet access, it is recommended that you open P3 and P4 cases through the Cisco TAC Web Site.
Cisco TAC Escalation Center
The Cisco TAC Escalation Center addresses issues that are classified as priority level 1 or priority level 2; these classifications are assigned when severe network degradation significantly impacts business operations. When you contact the TAC Escalation Center with a P1 or P2 problem, a Cisco TAC engineer will automatically open a case.
To obtain a directory of toll-free Cisco TAC telephone numbers for your country, go to the following URL:
http://www.cisco.com/warp/public/687/Directory/DirTAC.shtml
C H A P T E R
1
Command-Line Interfaces
This chapter describes the command-line interfaces (CLI) available on the Catalyst 6000 family switches and contains these sections:
• Switch CLI, page 1-1
• ROM Monitor CLI, page 1-13
For information regarding the ATM CLI and commands, refer to the ATM Software Configuration Guide
and Command Reference—Catalyst 5000 Family and 6000 Family Switches publication.
For information regarding the IDSM CLI and commands, refer to the Catalyst 6000 Intrusion Detection
System Module Installation and Configuration Note publication.
For definitions of terms and acronyms listed in this publication, see Appendix A, “Acronyms.”
Switch CLI
Catalyst 6000 family switches are multimodule systems. Commands you enter from the CLI can apply to the entire system or to a specific module, port, or VLAN.
You can configure and maintain the Catalyst 6000 family switches by entering commands from the switch CLI. The CLI is a basic command-line interpreter similar to the UNIX C shell. Using the CLI
session command, you can access the router configuration software and perform tasks such as history
substitution and alias creation.
Note The Catalyst 6000 family consists of the Catalyst 6000 and 6500 series switches. The Catalyst 6000 series consists of the Catalyst 6006 and 6009 switches; the Catalyst 6500 series consists of the Catalyst 6506, 6509, 6509-NEB, and 6513 switches. Throughout this publication and all
Catalyst 6000 family documents, the phrase Catalyst 6000 family switches refers to these switches, unless otherwise noted.
Chapter 1 Command-Line Interfaces Switch CLI
Note EIA/TIA-232 was known as RS-232 before its acceptance as a standard by the Electronic Industries Alliance and Telecommunications Industry Association.
Accessing the Switch CLI via the Console Port (EIA/TIA-232)
To access the switch through the console (EIA/TIA-232) port, perform these steps:
After connecting through the console port, you see this display:
Cisco Systems Console Enter password: Console> Console>
Accessing the Switch CLI via Telnet
To access the switch through a Telnet session, you must first set the IP address for the switch. You can open multiple sessions to the switch via Telnet.
To access the switch from a remote host with Telnet, perform these steps:
Task Command
Step 1 From the Cisco Systems Console prompt, press Return.
Step 2 At the prompt, enter the system password. TheConsole>prompt appears indicating that you have accessed the CLI in normal mode.
<password>
Step 3 Enter the necessary commands to complete your desired tasks.
Appropriate commands
Step 4 When finished, exit the session. quit
Task Command
Step 1 From the remote host, enter the
telnet command and the name or
IP address of the switch you want to access.
telnet hostname | ip_addr
Step 2 At the prompt, enter the password for the CLI. If no password has
Chapter 1 Command-Line Interfaces
Switch CLI
After connecting through a Telnet session, you see this display:
host% telnet cat6000-1.cisco.com Trying 172.16.44.30 ...
Connected to cat6000-1.
Operating the Switch CLI
This section describes command modes and functions that allow you to operate the switch CLI.
Accessing the Command Modes
The CLI has two modes of operation: normal and privileged. Both are password-protected. Use normal-mode commands for everyday system monitoring. Use privileged commands for system configuration and basic troubleshooting.
After you log in, the system enters normal mode, which gives you access to normal-mode commands only. You can enter privileged mode by entering the enable command followed by the enable password. Privileged mode is indicated by the word “enable” in the system prompt. To return to normal mode, enter the disable command at the prompt.
The following example shows how to enter privileged mode:
Console> enable
Enter password: <password> Console> (enable)
Using Command-Line Processing
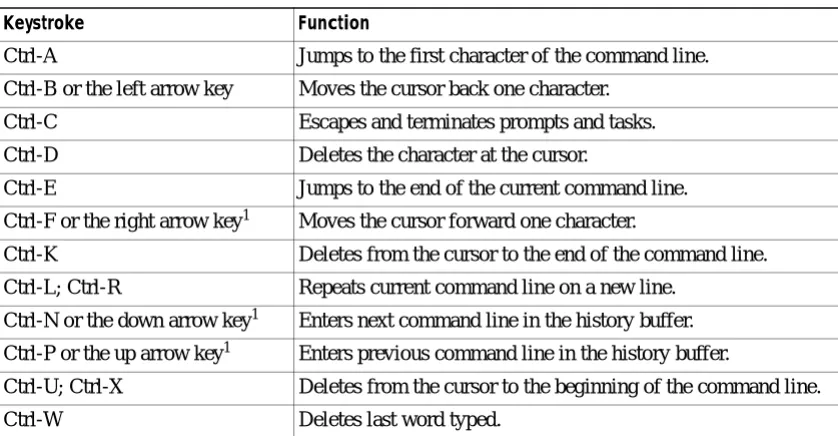
Switch commands are not case sensitive. You can abbreviate commands and parameters as long as they contain enough letters to be different from any other currently available commands or parameters. You can scroll through the last 20 commands stored in the history buffer, and enter or edit the command at the prompt. (See Table 1-1.)
Table 1-1 Command-Line Processing Keystroke
Keystroke Function
Ctrl-A Jumps to the first character of the command line. Ctrl-B or the left arrow key Moves the cursor back one character.
Ctrl-C Escapes and terminates prompts and tasks.
Ctrl-D Deletes the character at the cursor.
Ctrl-E Jumps to the end of the current command line. Ctrl-F or the right arrow key1 Moves the cursor forward one character.
Chapter 1 Command-Line Interfaces Switch CLI
Using the Command-Line Editing Features
Catalyst 6000 family switch software includes an enhanced editing mode that provides a set of editing key functions similar to those of the Emacs editor. You can enter commands in uppercase, lowercase, or a mix of both. Only passwords are case sensitive. You can abbreviate commands and keywords to the number of characters that allow a unique abbreviation.
For example, you can abbreviate the show command to sh. After entering the command at the system prompt, press Return to execute the command.
Moving Around on the Command Line
Perform one of these tasks to move the cursor around on the command line for corrections or changes:
Completing a Partial Command Name
Esc B Moves the cursor back one word.
Esc D Deletes from the cursor to the end of the word.
Esc F Moves the cursor forward one word.
Delete key or Backspace key Erases mistake when entering a command; reenter command after using this key.
1. The arrow keys function only on ANSI-compatible terminals such as VT100s.
Table 1-1 Command-Line Processing Keystroke (continued)
Keystroke Function
Task Keystrokes
• Move the cursor back one character.
Press Ctrl-B or press the left arrow key1.
1. The arrow keys function only on ANSI-compatible terminals such as VT100s.
• Move the cursor forward one character.
Press Ctrl-F or press the right arrow key1.
• Move the cursor to the beginning of the command line.
Press Ctrl-A.
• Move the cursor to the end of the command line.
Press Ctrl-E.
• Move the cursor back one word. Press Esc B.
Chapter 1 Command-Line Interfaces
Switch CLI
If your keyboard does not have a Tab key, press Ctrl-I instead.
In the following example, when you enter the letters conf and press the Tab key, the system provides the complete command:
Console> (enable) conf<Tab> Console> (enable) configure
If you enter a set of characters that could indicate more than one command, the system beeps to indicate an error. Enter a question mark (?) to obtain a list of commands that begin with that set of characters. Do not leave a space between the last letter and the question mark (?). For example, three commands in privileged mode start with co. To see what they are, enter co? at the privileged prompt. The system displays all commands that begin with co, as follows:
Console> (enable) co? configure connect copy
Pasting in Buffer Entries
The system provides a buffer that contains the last ten items you deleted. You can recall these items and paste them in the command line by performing this task:
The buffer contains only the last ten items you have deleted or cut. If you press Esc Y more than ten times, you cycle back to the first buffer entry.
Editing Command Lines That Wrap
The new editing command set provides a wraparound feature for commands that extend beyond a single line on the screen. When the cursor reaches the right margin, the command line shifts ten spaces to the left. You cannot see the first ten characters of the line, but you can scroll back and check the syntax at the beginning of the command. To scroll back, perform this task:
Task Keystrokes
• Recall the most recent entry in the buffer.
Press Ctrl-Y.
• Recall the next buffer entry. Press Esc Y.
Task Keystrokes
Return to the beginning of a command line to verify that you have entered a lengthy command correctly.
Press Ctrl-B or the left arrow key repeatedly until you scroll back to the beginning of the command entry, or press Ctrl-A to return directly to the beginning of the line1.
Chapter 1 Command-Line Interfaces Switch CLI
Deleting Entries
Perform one of these tasks to delete command entries if you make a mistake or change your mind:
Scrolling Down a Line or a Screen
When you use the help facility to list the commands in a particular mode, the list is often longer than the terminal screen can display. In such cases, a ---More--- prompt is displayed at the bottom of the screen. To view the next line or screen, perform these tasks:
Note The ---More--- prompt is used for any output that has more lines than can be displayed on the terminal screen, including show command output.
Scrolling to Specified Text
If you enter /text and press the Return key at the --More-- prompt, the display starts two lines above the line containing the text string. If the text string is not found, “Pattern Not Found” is displayed. You can also enter “n” at the --More-- prompt to search for the last entered text string. You can use this search method on all show commands that use the more buffer to display screen by screen ouput. The following is a list of show commands that do not use the more buffer and do not support this feature:
• show cam
Task Keystrokes
• Erase the character to the left of the cursor.
Press the Delete or Backspace key.
• Delete the character at the cursor. Press Ctrl-D.
• Delete from the cursor to the end of the command line.
Press Ctrl-K.
• Delete from the cursor to the beginning of the command line.
Press Ctrl-U or Ctrl-X.
• Delete the word to the left of the cursor. Press Ctrl-W.
• Delete from the cursor to the end of the word.
Press Esc D.
Task Keystrokes
• Scroll down one line. Press the Return key.
Chapter 1 Command-Line Interfaces
Switch CLI
Redisplaying the Current Command Line
If you enter a command and the system suddenly sends a message to your screen, you can recall your current command line entry. To do so, perform this task:
Transposing Mistyped Characters
If you mistype a command entry, you can transpose the mistyped characters by performing this task:
Controlling Capitalization
You can change words to uppercase or lowercase, or capitalize a set of letters, with simple keystroke sequences:
Designating a Keystroke as a Command Entry
You can use a particular keystroke as an executable command. Perform this task:
Task Keystrokes
Redisplay the current command line. Press Ctrl-L or Ctrl-R.
Task Keystrokes
Transpose the character to the left of the cursor with the character located at the cursor.
Press Ctrl-T.
Task Keystrokes
• Capitalize at the cursor. Press Esc C.
• Change the word at the cursor to lowercase.
Press Esc L.
• Capitalize letters from the cursor to the end of the word.
Press Esc U.
Task Keystrokes
Insert a code to indicate to the system that the keystroke immediately following should be treated as a command entry, not an editing key.
Chapter 1 Command-Line Interfaces Switch CLI
Using Command Aliases
Like regular commands, aliases are not case sensitive. However, unlike regular commands, some aliases cannot be abbreviated. See Table 1-2 for a list of switch CLI aliases that cannot be abbreviated.
Using History Substitution
Commands that you enter during each terminal session are stored in a history buffer, which stores the last 20 commands you entered during a terminal session. History substitution allows you to access these commands without retyping them by using special abbreviated commands. (See Table 1-3.)
Table 1-2 Switch CLI Command Aliases
Alias Command
batch configure
di show
earl cam
exit quit
logout quit
Table 1-3 History Substitution Commands
Command Function
To repeat recent commands:
!! Repeat the most recent command.
!-nn Repeat the nnth most recent command.
!n Repeat command n.
!aaa Repeat the command beginning with string aaa. !?aaa Repeat the command containing the string aaa.
To modify and repeat the most recent command:
^aaa^bbb Replace string aaa with string bbb in the most recent command.
To add a string to the end of a previous command and repeat it:
!!aaa Add string aaa to the end of the most recent command.
!n aaa Add string aaa to the end of command n.
Chapter 1 Command-Line Interfaces
Switch CLI
Accessing Command Help
To see a list of top-level commands and command categories, type help in normal or privileged mode. Context-sensitive help (usage and syntax information) for individual commands can be seen by appending help to any specific command. If you enter a command using the wrong number of arguments or inappropriate arguments, usage and syntax information for that command is displayed. Additionally, appending help to a command category displays a list of commands in that category.
Top-Level Commands and Command Categories
In normal mode, use the help command to display a list of top-level commands and command categories, as follows:
Console> help Commands:
---cd Set default flash device
dir Show list of files on flash device enable Enable privileged mode
help Show this help screen
history Show contents of history substitution buffer l2trace Layer2 trace between hosts
ping Send echo packets to hosts pwd Show default flash device quit Exit from the Admin session session Tunnel to ATM or Router module
set Set commands, use 'set help' for more info show Show commands, use 'show help' for more info traceroute Trace the route to a host
verify Verify checksum of file on flash device wait Wait for x seconds
whichboot Which file booted Console>
In privileged mode, enter the help command to display a list of top-level commands and command categories, as follows:
Console> (enable) help Commands:
---cd Set default flash device
clear Clear, use 'clear help' for more info commit Commit ACL to hardware and NVRAM configure Configure system from network
copy Copy files between TFTP/RCP/module/flash devices delete Delete a file on flash device
dir Show list of files on flash device disable Disable privileged mode
Chapter 1 Command-Line Interfaces Switch CLI
session Tunnel to ATM or Router module
set Set commands, use 'set help' for more info show Show commands, use 'show help' for more info slip Attach/detach Serial Line IP interface squeeze Reclaim space used by deleted files switch Switch to standby <clock|supervisor> telnet Telnet to a remote host
test Test command, use 'test help' for more info undelete Undelete a file on flash device
upload Upload code from a processor
verify Verify checksum of file on flash device wait Wait for x seconds
whichboot Which file booted
write Write system configuration to terminal/network Console> (enable)
Command Categories
On some commands (such as clear, set, and show), typing help after the command provides a list of commands in that category. For example, this display shows a partial list of commands for the clear category:
Console> (enable) clear help Clear commands:
---clear alias Clear aliases of commands
clear arp Clear ARP table entries
clear banner Clear Message Of The Day banner clear boot Clear booting environment variable clear cam Clear CAM table entries
clear channel Clear PAgP statistical information .
. .
Context-Sensitive Help
Usage and syntax information for individual commands can be seen by appending help to any specific command. For example, the following display shows usage and syntax information for the set length command:
Console> set length help
Usage: set length <screenlength> [default]
(screenlength = 5..512, 0 to disable 'more' feature) Console>
Designating Modules, Ports, and VLANs
Chapter 1 Command-Line Interfaces
Switch CLI
Example 2: 2/1-12 denotes module 2, ports 1 through 12.
Example 3: 2/1-2/12 also denotes module 2, ports 1 through 12.
Each VLAN is designated by a single number. You can specify lists of VLANs the same way you do for ports. Individual VLANs are separated by commas (,); ranges are separated by dashes (-). In the following example, VLANs 1 through 10 and VLAN 1000 are specified:
1-10,1000
Designating MAC Addresses, IP and IPX Addresses, and IP Aliases
Some commands require a MAC address that you must designate in a standard format. The MAC address format must be six hexadecimal numbers separated by hyphens, as shown in this example:
00-00-0c-24-d2-fe
Some commands require an IP address. The IP address format is 32 bits, written as four octets separated by periods (dotted decimal format). IP addresses are made up of a network section, an optional subnet section, and a host section, as shown in this example:
126.2.54.1
If DNS is configured properly on the switch, you can use IP host names instead of IP addresses. For information on configuring DNS, refer to the Catalyst 6000 Family Software Configuration Guide.
If the IP alias table is configured, you can use IP aliases in place of the dotted decimal IP address. This is true for most commands that use an IP address, except commands that define the IP address or IP alias.
When entering the IPX address syntax, use the following format:
• IPX net address—1..FFFFFFFE
• IPX node address—x.x.x where x is 0..FFFF
• IPX address—ipx_net.ipx_node (for example 3.0034.1245.AB45, A43.0000.0000.0001)
Using Command Completion Features
The command completion features consist of these functions:
• Using Command Self-Repeat
• Using Keyword Lookup
• Using Partial Keyword Lookup
• Using Command Completion
Using Command Self-Repeat
Chapter 1 Command-Line Interfaces Switch CLI
Console> (enable) set mls nde
disable Disable multilayer switching data export filter enable Enable multilayer switching data export filter engineer Engineer setting of the export filter
flow Setting multilayer switching export filter <collector_ip> IP address
Console> (enable) set mls nde
Using Keyword Lookup
Use the keyword-lookup function to display a list of valid keywords and arguments for a command. To display the matches, enter a space after the last parameter and enter ?. For example, five parameters are used by the set mls command. To see these parameters, enter set mls ? at the privileged prompt. In the following example, notice how the system repeats the command entered without the ?:
Console> (enable) set mls ?
agingtime Set agingtime for MLS cache entry exclude Set MLS excluded protocol ports flow Set minimum flow mask
nde Configure Netflow Data Export
statistics Add protocols to protocol statistics list Console> (enable) set mls
Using Partial Keyword Lookup
Use the partial keyword-lookup function to display a list of commands that begin with a specific set of characters. To display the matches, enter ? immediately after the last parameter. For example, enter co? at the privileged prompt to display a list of commands that start with co. The system displays all commands that begin with co and repeats the command entered without the ?:
Console> (enable) co?
commit Commit ACL to hardware and NVRAM configure Configure system from network
copy Copy files between TFTP/RCP/module/flash devices Console> (enable) co
Using Command Completion
Use the command completion function to complete a command or keyword. When you enter a unique partial character string and press Tab, the system completes the command or keyword on the command line. For example, if you enter co at the privileged prompt and press Tab, the system completes the command as configure because it is the only command that matches the criteria.
Chapter 1 Command-Line Interfaces
ROM Monitor CLI
ROM Monitor CLI
The ROM monitor is a ROM-based program that executes upon platform power-up, reset, or when a fatal exception occurs.
Accessing the ROM Monitor CLI
The system enters ROM-monitor mode if the switch does not find a valid system image, if the NVRAM configuration is corrupted, or if the configuration register is set to enter ROM-monitor mode. From the ROM-monitor mode, you can load a system image manually from Flash memory, from a network server file, or from bootflash. You can also enter ROM-monitor mode by restarting the switch and pressing the
Break key during the first 60 seconds of startup.
Note Break is always enabled for 60 seconds after rebooting the system, regardless of whether Break is configured to be off by configuration register settings.
To connect through a terminal server, escape to the Telnet prompt, and enter the send break command to break back to the ROM-monitor mode.
Operating the ROM Monitor CLI
The ROM monitor commands are used to load and copy system images, microcode images, and configuration files. System images contain the system software. Microcode images contain microcode to be downloaded to various hardware devices. Configuration files contain commands to customize Catalyst 6000 family software.
The manual boot command has the following syntax:
Note Enter the copy file-id {tftp | flash | file-id} command to obtain an image from the network.
• boot
—
Boot from ROM• boot [-xv] [device:][imagename]
—
Boot from the local device. If you do not specify an image name, the system defaults to the first valid file in the device. The image name is case sensitive.C H A P T E R
2
Catalyst 6000 Family Switch and ROM Monitor
Commands
This chapter contains an alphabetical listing of all switch and ROM monitor commands available on the Catalyst 6000 family switches.
For information regarding ATM module-related commands, refer to the ATM Software Configuration
Guide and Command Reference for the Catalyst 5000 Family and 6000 Family Switches.
For information regarding IDS module-related commands, refer to the Catalyst 6000 Intrusion Detection
System Module Installation and Configuration Note.
Except where specifically differentiated, the Layer 3 switching engine refers to either:
• Supervisor Engine 1 with Layer 3 Switching Engine WS-F6K-PFC (Policy Feature Card)
Chapter 2 Catalyst 6000 Family Switch and ROM Monitor Commands alias
alias
Use the alias command to set and display command aliases.
alias [name=value]
Syntax Description
Defaults This command has no default settings.
Command Types ROM monitor command.
Command Modes Normal.
Usage Guidelines If value contains white space or other special (shell) characters, you must use quotation marks. If value has a space as its last character, the next command line word is checked for an alias (normally, only the first word on a command line is checked).
Without an argument, this command prints a list of all aliased names with their values.
An equal sign (=) is required between the name and value of the alias.
You must issue a sync command to save your change. If you do not issue a sync command, the change is not saved and a reset removes your change.
Examples This example shows how to display a list of available alias commands and how to create an alias for the
set command:
rommon 1 > alias r=repeat
h=history ?=help b=boot ls=dir i=reset k=stack
rommon 2 > alias s=set
name= (Optional) Name you give to the alias.
Chapter 2 Catalyst 6000 Family Switch and ROM Monitor Commands
alias
k=stack s=set
rommon 4 > s PS1=rommon ! >
BOOT=bootflash:RTSYNC_llue_11,1;slot0:f1,1;
=========================================================================
Chapter 2 Catalyst 6000 Family Switch and ROM Monitor Commands boot
boot
Use the boot command to boot up an external process.
boot [-x] [-v] [device:][imagename]
Syntax Description
Defaults This command has no default settings.
Command Types ROM monitor command.
Command Modes Normal.
Usage Guidelines With no arguments, boot will boot the first image in bootflash. Specify an image by typing its name. Specify the device by typing the device ID.
If no device is given with an imagename, the image is not booted.
If a device name is not recognized by the monitor, the monitor passes the device ID to the boot helper image.
This command will not boot the MSFC if the PFC is not present in the Catalyst 6000 family switch.
Examples This example shows how to use the boot command:
rommon 2 > boot bootflash:cat6000-sup.6-1-1.bin
CCCCCCCCCCCCCCCCCCCCCCCCCCCCCCCCCCCCCCCCCCCCCCCCCCCCCCCCCCCC Uncompressing file:
########################################################################################## ########################################################################################## ################################################################################
-x (Optional) Load the image but do not execute.
-v (Optional) Toggle verbose mode.
device: (Optional) ID of the device.
Chapter 2 Catalyst 6000 Family Switch and ROM Monitor Commands
cd
2 2
cd
Use the cd command to set the default Flash device for the system.
cd [[m/]device:]
Syntax Description
Defaults The default Flash device is bootflash.
Command Types Switch command.
Command Modes Normal.
Usage Guidelines A colon (:) is required after the specified device.
For those commands where device is an option, the device set by cd is used if the default device is not specified.
Examples This example shows how to set the system default Flash device to bootflash:
Console> cd bootflash:
Default flash device set to bootflash. Console>
Related Commands pwd
m/ (Optional) Module number of the supervisor engine containing the Flash device.
Chapter 2 Catalyst 6000 Family Switch and ROM Monitor Commands clear alias
clear alias
Use the clear alias command to clear the abbreviated versions of commands.
clear alias {name | all}
Syntax Description
Defaults This command has no default settings.
Command Types Switch command.
Command Modes Privileged.
Examples This example shows how to erase the arpdel alias:
Console> (enable) clear alias arpdel Command alias deleted.
Console> (enable)
This example shows how to erase all the aliases:
Console> (enable) clear alias all Command alias table cleared. (1) Console> (enable)
(1) indicates the number of command aliases cleared.
Related Commands set alias show alias
name Alternate identifier of the command.
Chapter 2 Catalyst 6000 Family Switch and ROM Monitor Commands
clear arp
clear arp
Use the clear arp command to delete a specific entry or all entries from the ARP table.
clear arp [all | dynamic | permanent | static] {ip_addr}
Syntax Description
Defaults This command has no default settings.
Command Types Switch command.
Command Modes Privileged.
Examples This example shows how to remove IP address 198.133.219.209 from the ARP table:
Console> (enable) clear arp 198.133.219.209 ARP entry deleted.
Console> (enable)
This example shows how to remove all entries from the ARP table:
Console> (enable) clear arp all ARP table cleared. (1)
Console> (enable)
(1) indicates the number of entries cleared.
This example shows how to remove all dynamically learned ARP entries:
Console> (enable) clear arp dynamic Unknown host
Dynamic ARP entries cleared. (3) Console> (enable)
This example shows how to clear all permanently entered ARP entries:
Console> (enable) clear arp permanent
all (Optional) Keyword to clear all ARP entries.
dynamic (Optional) Keyword to clear all dynamic ARP entries.
permanent (Optional) Keyword to clear all permanent ARP entries.
static (Optional) Keyword to clear all static ARP entries.
Chapter 2 Catalyst 6000 Family Switch and ROM Monitor Commands clear banner motd
clear banner motd
Use the clear banner motd command to clear the message-of-the-day banner.
clear banner motd
Syntax Description This command has no arguments or keywords.
Defaults This command has no default settings.
Command Types Switch command.
Command Modes Privileged.
Examples This example shows how to clear the message-of-the-day banner:
Console> (enable) clear banner motd MOTD banner cleared
Console> (enable)
Chapter 2 Catalyst 6000 Family Switch and ROM Monitor Commands
clear boot auto-config
clear boot auto-config
Use the clear boot auto-config command to clear the contents of the CONFIG_FILE environment variable used to specify the configuration files used during bootup.
clear boot auto-config [mod]
Syntax Description
Defaults This command has no default settings.
Command Types Switch command.
Command Modes Privileged.
Examples This example shows how to clear the auto-config file:
Console> (enable) clear boot auto-config CONFIG_FILE variable =
Console> (enable)
Related Commands set boot auto-config show boot
Chapter 2 Catalyst 6000 Family Switch and ROM Monitor Commands clear boot device
clear boot device
Use the clear boot device command to clear the contents of the CONFIG_FILE environment variable used to specify the NAM startup configuration files used.
clear boot device mod
Syntax Description
Defaults This command has no default settings.
Command Types Switch command.
Command Modes Privileged.
Usage Guidelines This command is supported by the NAM module only.
Examples This example shows how to clear the NAM boot string from NVRAM for module 2:
Console> (enable) clear boot device 2 Device BOOT variable =
Console> (enable)
Related Commands set boot device show boot device
Chapter 2 Catalyst 6000 Family Switch and ROM Monitor Commands
clear boot system
clear boot system
Use the clear boot system command to clear the contents of the BOOT environment variable and the configuration register setting.
clear boot system all [mod]
clear boot system flash device:[filename] [mod]
Syntax Description
Defaults This command has no default settings.
Command Types Switch command.
Command Modes Privileged.
Examples This example shows how to clear the whole BOOT environment variable:
Console> (enable) clear boot system all BOOT variable =
Console> (enable)
This example shows how to clear a specific device; note how the specified device is not listed:
Console> (enable) clear boot system flash bootflash:cat6000-sup.5-5-1.bin BOOT variable = bootflash:cat6000-sup.6-1-1.bin,1;bootflash:cat6000-sup.5-5-2. bin,1;
Console> (enable)
Related Commands set boot system flash show boot
all Keyword to clear the whole BOOT environment variable.
mod (Optional) Module number of the supervisor engine containing the Flash device.
flash (Optional) Keyword to clear the Flash device.
device: Name of the Flash device.
Chapter 2 Catalyst 6000 Family Switch and ROM Monitor Commands clear cam
clear cam
Use the clear cam command to delete a specific entry or all entries from the CAM table.
clear cam mac_addr [vlan]
clear cam {dynamic | static | permanent} [vlan]
Syntax Description
Defaults This command has no default settings.
Command Types Switch command.
Command Modes Privileged.
Ex