Oracle® Enterprise Manager
Cloud Control Host Lifecycle Management
Guide
13c Release 4
F23097-05 July 2020Oracle Enterprise Manager Cloud Control Host Lifecycle Management Guide, 13c Release 4 F23097-05
Copyright © 2019, 2020, Oracle and/or its affiliates. Primary Author: Oracle Corporation
Contributors: Enterprise Manager Cloud Control Lifecycle Management Development Teams, Quality Assurance Teams, Customer Support Teams, and Product Management Teams.
This software and related documentation are provided under a license agreement containing restrictions on use and disclosure and are protected by intellectual property laws. Except as expressly permitted in your license agreement or allowed by law, you may not use, copy, reproduce, translate, broadcast, modify, license, transmit, distribute, exhibit, perform, publish, or display any part, in any form, or by any means. Reverse engineering, disassembly, or decompilation of this software, unless required by law for interoperability, is prohibited.
The information contained herein is subject to change without notice and is not warranted to be error-free. If you find any errors, please report them to us in writing.
If this is software or related documentation that is delivered to the U.S. Government or anyone licensing it on behalf of the U.S. Government, then the following notice is applicable:
U.S. GOVERNMENT END USERS: Oracle programs (including any operating system, integrated software, any programs embedded, installed or activated on delivered hardware, and modifications of such programs) and Oracle computer documentation or other Oracle data delivered to or accessed by U.S. Government end users are "commercial computer software" or “commercial computer software documentation” pursuant to the applicable Federal Acquisition Regulation and agency-specific supplemental regulations. As such, the use, reproduction, duplication, release, display, disclosure, modification, preparation of derivative works, and/or adaptation of i) Oracle programs (including any operating system, integrated software, any programs embedded, installed or activated on delivered hardware, and modifications of such programs), ii) Oracle computer documentation and/or iii) other Oracle data, is subject to the rights and limitations specified in the license contained in the applicable contract. The terms governing the U.S. Government’s use of Oracle cloud services are defined by the applicable contract for such services. No other rights are granted to the U.S. Government.
This software or hardware is developed for general use in a variety of information management applications. It is not developed or intended for use in any inherently dangerous applications, including applications that may create a risk of personal injury. If you use this software or hardware in dangerous applications, then you shall be responsible to take all appropriate fail-safe, backup, redundancy, and other measures to ensure its safe use. Oracle Corporation and its affiliates disclaim any liability for any damages caused by use of this software or hardware in dangerous applications.
Oracle and Java are registered trademarks of Oracle and/or its affiliates. Other names may be trademarks of their respective owners.
Intel and Intel Inside are trademarks or registered trademarks of Intel Corporation. All SPARC trademarks are used under license and are trademarks or registered trademarks of SPARC International, Inc. AMD, Epyc, and the AMD logo are trademarks or registered trademarks of Advanced Micro Devices. UNIX is a registered trademark of The Open Group.
This software or hardware and documentation may provide access to or information about content, products, and services from third parties. Oracle Corporation and its affiliates are not responsible for and expressly disclaim all warranties of any kind with respect to third-party content, products, and services unless otherwise set forth in an applicable agreement between you and Oracle. Oracle Corporation and its affiliates will not be responsible for any loss, costs, or damages incurred due to your access to or use of third-party content, products, or services, except as set forth in an applicable agreement between you and Oracle.
Contents
Preface
Audience x Documentation Accessibility x Related Resources x Conventions x1
Discovering Hosts and Software Deployments
Discovering Hosts Automatically and Adding Targets Manually 1-1
Discovering Hosts Manually and Adding Targets Manually 1-1
2
Provisioning Bare Metal Servers
Getting Started with Provisioning Bare Metal Servers 2-1
Overview Of Bare Metal Provisioning 2-2
Accessing Bare Metal Provisioning Page 2-3
Provisioning Environment for Bare Metals 2-4
Software Library and its Entities 2-4
Boot Server 2-4
Stage Server 2-4
Reference Host 2-4
RPM Repository 2-5
Bare Metal Provisioning Flow 2-5
Supported Releases of Linux 2-5
Setting Up Infrastructure for Bare Metal Provisioning 2-5
Setting Up Stage Server 2-6
Prerequisites to Setup a Stage Server 2-6
Setting up a Stage Server and Accessing the Management Agent files 2-6
Setting Up Boot Server and DHCP Server 2-9
Setting Up RPM Repository 2-10
Setting Up Oracle Linux RPM Repository 2-11
Exposing RPM Repository through HTTP or FTP 2-11
Configuring Boot Server 2-12
Configuring DHCP Server 2-12
Configuring RPM Repository 2-12
Checklist for Boot Server, Stage Server, RPM Repository, and Reference Host 2-13
Configuring Software Library Components 2-13
Creating Operating System Component 2-13
Creating Disk Layout Component 2-15
Creating an Oracle Virtual Server Component 2-17
Prerequisites for Provisioning Operating Systems and Oracle VM Servers 2-18
Provisioning Operating Systems 2-18
Provisioning Oracle VM Servers 2-22
Viewing Saved Plans 2-26
Using Saved Plans for Provisioning Linux Operating System and Oracle VM Server
on Bare Metal Servers 2-26
3
Patching Linux Hosts
Overview of Patching Linux Hosts 3-1
About the Deployment Procedure for Patching Linux Hosts 3-2
Supported Linux Releases 3-2
Setting Up Infrastructure for Linux Patching 3-2
Prerequisites for Using the Linux Patching Feature 3-3
Setting Up the RPM Repository for Linux Patching 3-3
Prerequisites for Setting Up the RPM Repository 3-3
Setting Up the RPM Repository for Patching 3-4
Setting Up Linux Patching Group for Compliance Reporting 3-6
Prerequisites for Setting Up Linux Patching Group 3-6
Setting Up a Linux Patching Group 3-6
Patching Linux Hosts 3-8
Applying Patches on a Linux Patching Group Based on Compliance 3-8 Applying Ad Hoc or Emergency Patches on Linux Hosts 3-10
Managing Linux Configuration Files 3-12
Overview of Linux Configuration Files 3-13
Prerequisites for Managing Configuration Files 3-13
Creating a Linux Configuration File Channel 3-13
Uploading Linux Configuration Files to a Particular Channel 3-13 Prerequisites for Uploading Linux Configuration Files 3-14
Uploading Linux Configuration Files 3-14
Importing Linux Configuration Files from One Channel to Another 3-14 Prerequisites for Importing Linux Configuration Files 3-14
Prerequisites for Deploying Linux Configuration Files 3-15
Deploying Linux Configuration Files 3-15
Deleting a Linux Configuration File Channel 3-15
Prerequisites for Deleting a Linux Configuration File Channel 3-16
Deleting Linux Configuration File Channels 3-16
Additional Linux Patching Tasks You Can Perform 3-16
Viewing Linux Patching Compliance History 3-16
Prerequisites for Viewing Linux Patching Compliance History 3-16
Viewing Linux Patching Compliance History 3-16
Patching Non-Compliant Linux Packages 3-17
Prerequisites for Patching Non-Compliant Linux Packages 3-17
Patching Non-Compliant Linux Packages 3-17
Rolling Back Linux Patch Update Sessions or Deinstalling Packages 3-17 Prerequisites for Rolling Back Linux Patch Update Sessions or Deinstalling
Packages 3-18
Rolling Back Linux Patch Update Sessions or Deinstalling Packages 3-18
Registering a Custom Package Channel 3-18
Prerequisites for Registering a Custom Package Channel 3-19
Registering a Custom Package Channel 3-19
Cloning a Package Channel 3-19
Prerequisites for Cloning a Package Channel 3-19
Cloning a Package Channel 3-20
Copying Packages from One Channel to Another 3-20
Prerequisites for Copying Packages from One Channel to Another 3-20
Copying Packages from One Channel to Another 3-21
Adding Custom Packages to a Channel 3-21
Prerequisites for Adding Custom Packages to a Channel 3-21
Adding Custom Packages to a Channel 3-21
Deleting a Package Channel 3-22
Prerequisites for Deleting a Package Channel 3-22
Deleting a Package Channel 3-22
4
Monitoring and Managing Hosts
Overview of Host Management 4-1
Host Statistics 4-1
Diagnosing Host Problems 4-2
Viewing Targets on the Host 4-2
Storage Statistics and History 4-3
Setting Up the Environment to Monitor Hosts 4-3
Setting Up Credentials 4-4
Setup Needed for Host Monitoring 4-5
Viewing Monitoring Configuration 4-5
Setting Up Monitoring Credentials 4-5
Target Setup Needed for Host Administration 4-6
Monitoring Hosts 4-6
Overall Monitoring 4-6
CPU Details 4-7
Memory Details 4-7
Disk Details 4-7
Program Resource Utilization 4-7
Log File Alerts 4-7
Metric Collection Errors 4-8
Storage Details 4-8 Storage Utilization 4-8 Overall Utilization 4-9 Provisioning Summary 4-9 Consumption Summary 4-9 ASM 4-10 Databases 4-10 Disks 4-10 File Systems 4-10 Volumes 4-11 Vendor Distribution 4-13 Storage History 4-13 Storage Layers 4-13 Storage Refresh 4-13
Ksplice for Oracle Linux 4-14
Customizing Your Host Monitoring Environment 4-14
Customizing the Host Home Page 4-14
Using Groups 4-15
Administering Hosts 4-16
Configuration Operations on Hosts 4-16
Configuring File and Directory Monitoring Criteria 4-17
Configuring Generic Log File Monitor Criteria 4-17
Configuring Program Resource Utilization Monitoring Criteria 4-19
Administration Tasks 4-20
Services 4-20
Default System Run Level 4-21
Network Card 4-22
NFS Client 4-23
User and Group Administration (Users) 4-24
User and Group Administration (Groups) 4-25
Using Tools and Commands 4-26
Enabling Sudo and Power Broker 4-26
Executing the Host Command Using Sudo or PowerBroker 4-27
Using Remote File Editor 4-27
Adding Host Targets 4-28
Running Host Command 4-29
Accessing Host Command 4-29
Executing Host Command Using Sudo or Power Broker 4-29
Execute Host Command - Multiple Hosts 4-29
Execute Host Command - Group 4-31
Execute Host Command - Single Host 4-32
Load OS Script 4-32
Load From Job Library 4-33
Execution History 4-33
Execution Results 4-33
Miscellaneous Tasks 4-34
Enabling Collection of WBEM Fetchlet Based Metrics 4-34 Enabling Hardware Monitoring for Dell PowerEdge Linux Hosts 4-34
Adding and Editing Host Configuration 4-35
Managing Oracle Linux Homes 4-36
Oracle Linux Home 4-36
Target Navigation Tree (TNT) of "Oracle Linux Home" 4-37
Oracle Linux Home Target 4-38
Oracle Linux Home page 4-38
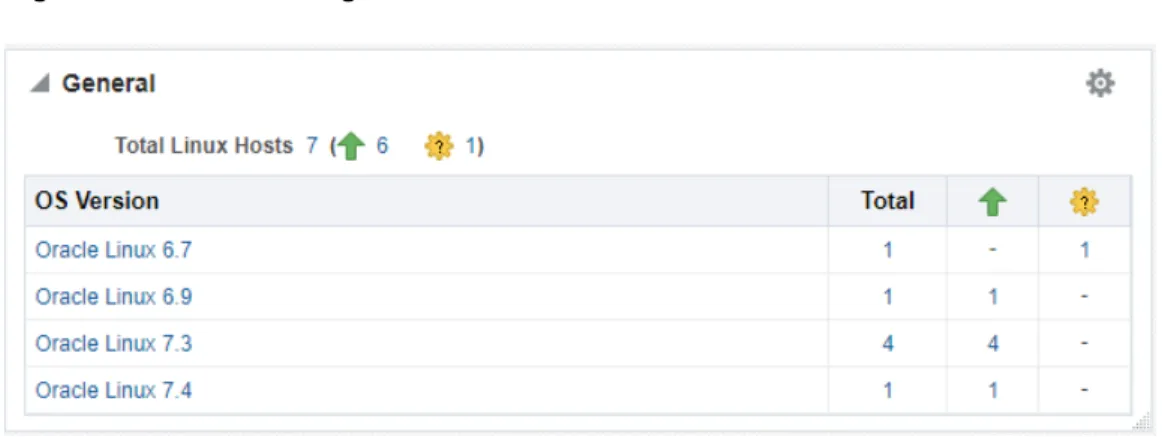
General Region 4-38
Overview of Incidents and Problems 4-38
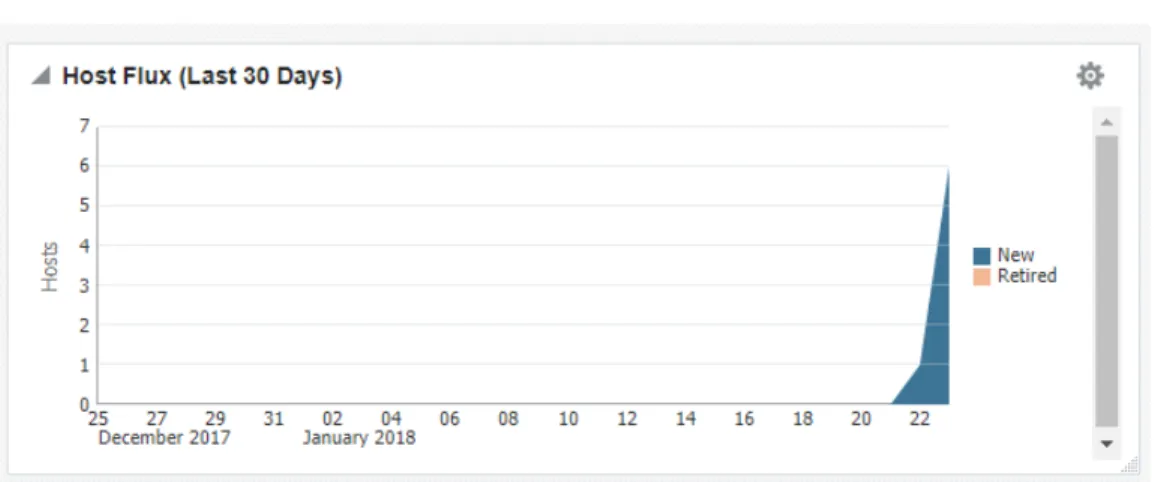
Host Flux 4-39
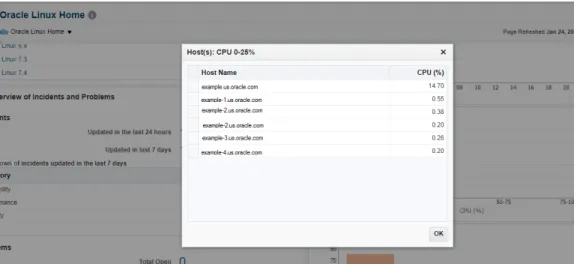
CPU 4-39
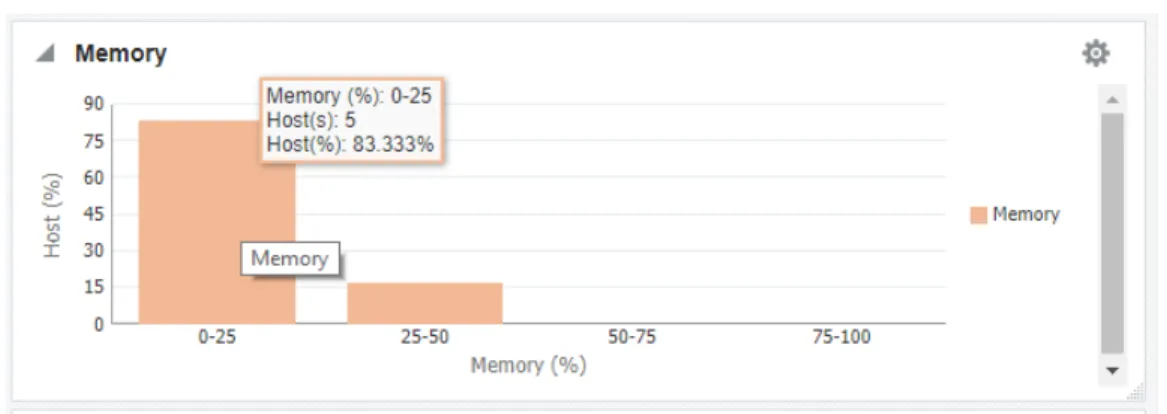
Memory 4-40
Oracle Linux Patching 4-41
Ksplice for Oracle Linux 4-44
Ksplice Metrics 4-44
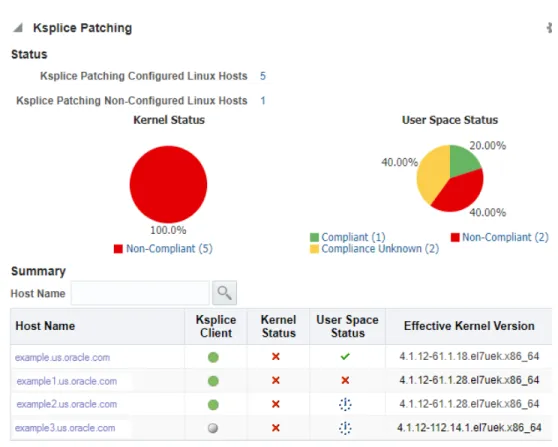
Ksplice Patching 4-46
Ksplice Linux Hosts Page 4-47
Additional Setup for Real-time Monitoring 4-48
Overview of Real-Time Monitoring 4-49
Overview of Resource Consumption Considerations 4-49
OS File Read Monitoring 4-49
Creating Facets That Have Very Broad Coverage 4-50
Cloud Control Repository Sizing 4-50
Configuring Monitoring Credentials 4-50
Preparing To Monitor Linux Hosts 4-51
OS File Monitoring 4-51
Debugging Kernel Module Or Other File Monitoring Issues 4-53
Preparing To Monitor Windows Hosts 4-54
Verifying Auditing Is Configured Properly 4-56
Subinacl External Requirements 4-56
Preparing To Monitor Solaris Hosts 4-56
Enabling BSM Auditing 4-57
Managing Audit Log Files 4-58
Preparing to Monitor AIX Hosts 4-59
Installation Prerequisite for AIX 5.3 4-59
Administering AIX Auditing 4-59
Verifying AIX System Log Files for the OS User Monitoring Module 4-60
Preparing To Monitor the Oracle Database 4-60
Setting Auditing User Privileges 4-61
Specifying Audit Options 4-61
Oracle Database Table Monitoring 4-62
Setting Up Change Request Management Integration 4-63
BMC Remedy Action Request System 7.1 Integration 4-63
Overview of the Repository Views Related to Real-time Monitoring Features 4-69
Modifying Data Retention Periods 4-74
Real-time Monitoring Supported Platforms 4-75
OS User Monitoring 4-75
OS Process Monitoring 4-77
OS File Monitoring 4-78
OS Windows Registry Monitoring 4-81
OS Windows Active Directory User Monitoring 4-81
OS Windows Active Directory Computer Monitoring 4-82
OS Windows Active Directory Group Monitoring 4-82
A
Understanding PXE Booting and Kickstart Technology
About PXE Booting and Kickstart Technology A-1
B
Troubleshooting Issues
Troubleshooting Linux Provisioning Issues B-1
Troubleshooting Linux Patching Issues B-3
Frequently Asked Questions on Linux Provisioning B-4
Preface
The Cloud Control Host Lifecycle Management Guide introduces you to the suite of operating system and host lifecycle management solutions offered by Enterprise Manager Cloud Control, and describes in detail how you can use the discovery, provisioning, patching, and monitoring features to manage your data center.
Audience
This guide is primarily meant for administrators who want to use the discovery, provisioning, patching, and monitoring features offered by Cloud Control to meet their operating system and host lifecycle management challenges. As an administrator, you can be either a Designer, who performs the role of a system administrator and does critical operating system and host operations, or an Operator, who runs the default as well custom deployment procedures, patch plans, and patch templates to manage operating system and host configurations.
Documentation Accessibility
For information about Oracle's commitment to accessibility, visit the Oracle Accessibility Program website at http://www.oracle.com/pls/topic/lookup? ctx=acc&id=docacc.
Access to Oracle Support
Oracle customers that have purchased support have access to electronic support through My Oracle Support. For information, visit http://www.oracle.com/pls/ topic/lookup?ctx=acc&id=info or visit http://www.oracle.com/pls/topic/lookup? ctx=acc&id=trs if you are hearing impaired.
Related Resources
For more information, see the documents available in the Oracle Enterprise Manager documentation library: Enterprise Manager Documentation.
Conventions
The following conventions are used in this document:
Convention Meaning
boldface Boldface type indicates graphical user interface elements associated with an action, or terms defined in text or the glossary.
italic Italic type indicates book titles, emphasis, or placeholder variables for
Convention Meaning
monospace Monospace type indicates commands within a paragraph, URLs, code in examples, text that appears on the screen, or text that you enter.
1
Discovering Hosts and Software
Deployments
Discovery is the first step toward monitoring and managing the health of your software deployments. Discovery refers to the process of identifying unmanaged hosts and their software deployments, and adding them as manageable targets in Oracle Enterprise Manager Cloud Control (Cloud Control).
This chapter describes how you can discover the hosts and their software
deployments, and add them to Cloud Control. In particular, this chapter describes the following:
• Discovering Hosts Automatically and Adding Targets Manually • Discovering Hosts Manually and Adding Targets Manually
Discovering Hosts Automatically and Adding Targets
Manually
Automatic discovery refers to the process of scanning hosts for Oracle software that can be managed and monitored by Cloud Control. By default, the automatic discovery runs every 24 hours to discover targets.
In automatic discovery, you enable a Management Agent running on the host to run an Enterprise Manager job that scans for unmanaged hosts. You then promote these unmanaged hosts to managed hosts by deploying Management Agents on these hosts, then you search for targets on these managed hosts, and finally you promote these targets to managed target status.
You can configure automatic discovery to set up a schedule for discovery, the target types to be discovered, and the hosts to scan for targets. You can then promote the discovered hosts to managed targets in Cloud Control. You can also regularly identify targets that have been newly added to the infrastructure, and add them to Cloud Control for monitoring.
Once automatic discovery has been configured, you can check the Auto Discovery Results page on a regular basis to see what targets have been discovered. For information on automatically discovering and monitoring targets, see Oracle Enterprise Manager Cloud Control Administrator's Guide.
Discovering Hosts Manually and Adding Targets Manually
In addition to automatic discovery, Cloud Control enables you to manually add hosts as well as a wide variety of Oracle software and components as managed targets. When you add a target manually, you do not need to go through the process of discovery by adding the target directly. Discovering targets in this way eliminates the
need to consume resources on the Oracle Management Agent to perform discovery when it is not needed.
For information on manually discovering and monitoring targets, see Oracle Enterprise Manager Cloud Control Administrator's Guide.
2
Provisioning Bare Metal Servers
This chapter explains how you can provision Linux on bare metal servers using Oracle Enterprise Manager Cloud Control. In particular, this chapter covers the following: • Getting Started with Provisioning Bare Metal Servers
• Overview Of Bare Metal Provisioning • Supported Releases of Linux
• Setting Up Infrastructure for Bare Metal Provisioning • Provisioning Operating Systems
• Provisioning Oracle VM Servers • Viewing Saved Plans
• Using Saved Plans for Provisioning Linux Operating System and Oracle VM Server on Bare Metal Servers
Tip:
Before you begin provisioning of Linux on bare metal boxes, it is advisable to set preferred credentials for the Stage Server. For more information, see Setting Up Credentials to set up preferred credentials. If you want to use a reference host, set credentials for the reference host also. You can also set preferred credentials when configuring the deployment procedure for provisioning Linux.
Note:
Before starting the provisioning Linux operations, ensure that you configure sudo privileges. For more information about configuring sudo privileges, see Setting Up Credentials.
Getting Started with Provisioning Bare Metal Servers
This section helps you get started with this chapter by providing an overview of the steps involved in provisioning Linux operating system. Consider this section to be a documentation map to understand the sequence of actions you must perform to successfully provision Linux operating system. Click the reference links provided against the steps to reach the relevant sections that provide more information.
Table 2-1 Getting Started with Provisioning Linux Operating System
Step Description Reference Links
Step 1 Knowing About The Supported Releases
Know what releases of Linux are supported for provisioning.
• To learn about the releases supported for Linux Provisioning, see Supported Releases of Linux.
Step 2 Knowing the Use Case
This chapter covers provisioning Linux. Understand the use case for Linux provisioning.
• To learn about provisioning bare metal boxes, see Provisioning Operating Systems.
Step 3 Setting Up Infrastructure
Before you perform Linux provisioning, you must meet the prerequisites, such as setting up of the provisioning environment, applying mandatory patches, and setting up of Oracle Software Library.
• To learn about the prerequisites to be met for provisioning bare metal boxes, see Setting Up Infrastructure for Bare Metal Provisioning.
Step 4 Provisioning Linux
Provision Linux on bare metal boxes.
• To provision Linux on bare metal boxes, follow the steps explained in Provisioning Operating Systems.
Overview Of Bare Metal Provisioning
Proliferation of low cost servers in our data centers has brought in a fresh set of management challenges. The well-acknowledged problems include the difficulty in managing consistency and compatibility across operating system and software deployments, server drifts and security vulnerabilities that lead to lack of compliance, difficulty in deploying software, difficulty in provisioning new servers with variety of configurations and applications, high cost of operation and difficulty in adapting to changes in workload of the environment. These lead to system administrators and DBAs spending significant amount of their time in software and server provisioning operations.
Oracle's answer to software and server management challenges is its Bare Metal Provisioning Application, an application built into Enterprise Manager Cloud Control. The application addresses all data center and server farm challenges by provisioning software and servers quickly and efficiently. The application uses standardized PXE (Pre Boot Execution environment) booting process for provisioning both bare-metal and live servers. It provides a role based User Interface, for easily creating gold images and initiating automated, unattended installs.
This section covers the following:
• Accessing Bare Metal Provisioning Page • Provisioning Environment for Bare Metals • Bare Metal Provisioning Flow
Accessing Bare Metal Provisioning Page
To access the Bare Metal Provisioning page, from Enterprise menu, select
Provisioning and Patching, then click Bare Metal Provisioning. On the Bare Metal Provisioning home page, the following tabs are displayed:
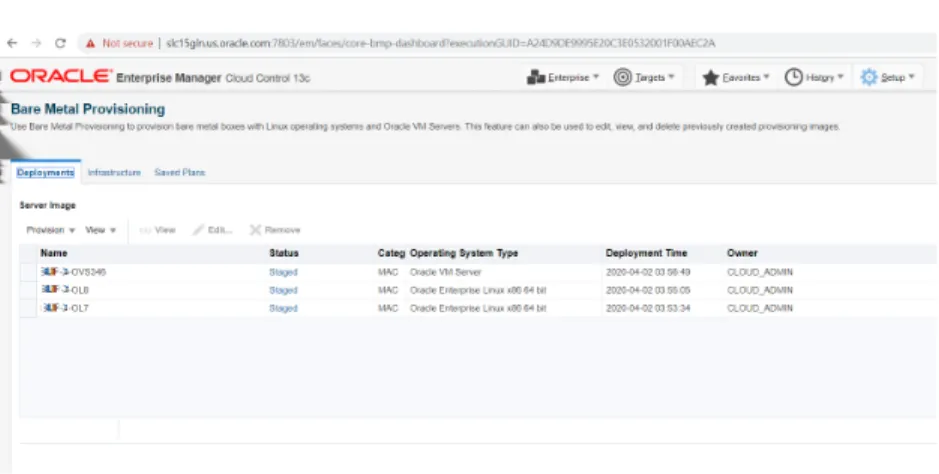
Deployments tab allows you to provision Linux operating system or Oracle VM Server on bare metal boxes. All the servers that are provisioned are displayed on this page in the Server Image section.
Figure 2-1 Image showing Deployment tab for Bare Metal provisioning
Infrastructure allows you to setup the infrastructure required to provision bare metal machines. For information about the Stage Servers, Boot Servers, DHCP Servers, and RPM Repositories, see Provisioning Environment for Bare Metals. For details on setting up and configuring each of these servers, see Setting Up Infrastructure for Bare Metal Provisioning.
Figure 2-2 Infrastructure tab for Bare Metal Provisioning
Chapter 2
Saved Plans tab allows you to view all the deployment procedures that were saved as a templates with all the essential attribute values for future runs. However, note that these plans can only be viewed from this tab, to run these saved plans see Using Saved Plans for Provisioning Linux Operating System and Oracle VM Server on Bare Metal Servers.
Provisioning Environment for Bare Metals
The deployment environment in the data center needs to be setup in a certain manner in order to support the provisioning application. Besides the Oracle Management Server (OMS) which hosts Cloud Control and Provisioning Application, the following need to be setup and configured before using the provisioning application.
Software Library and its Entities
For information about configuring Software Library and its entities, see Setting Up Oracle Software Library.
Boot Server
One of the key requirements of application is the ability of the hardware server to boot up over the network (rather than from a local boot device). A boot server must be set up so that it is able to service the requests from the designated hardware servers in order for them to boot over the network. Boot server must be an Cloud Control target and should be able to receive the BOOTP and TFTP (Trivial File Transfer Protocol) requests over the network from the hardware server. SeeSetting Up Boot Server and DHCP Server for setting up a boot server with DHCP/TFTP combination. Also, see Configuring Boot Server. It is also recommended that the users read about DHCP, PXE, and Redhat Kickstart technology before going through the boot server setup. See Understanding PXE Booting and Kickstart Technology for a detailed discussion on PXE.
Stage Server
During provisioning of an image on hardware servers, the required binaries and files are first transferred to a stage server. This is known as Staging phase and is responsible for preparing images to be installed over the network, and exposing installable or executable software elements over the network to the target hardware server being provisioned.
The Provisioning application requires at least one stage server on which all the activities related to staging can be performed. Stage server should again be an Cloud Control target. Refer to section Setting Up Stage Server for setting up a stage server. Also, see Configuring Stage Server.
Reference Host
A Reference Host (also called a gold machine) is the machine that the Provisioning application uses as a reference to create the Linux operating system component. The Provisioning application picks up the list of RPMs (along with their versions) installed on the reference host, and fetches those RPMs from a RPM repository to create an Linux OS component that represents the operating system installed on the reference host. The reference host must be an Cloud Control target.
RPM Repository
The Provisioning application picks up the RPMs for the operating system from the RPM repository. At least one repository needs to be setup for use by the Provisioning application. From the networking perspective, you are advised to keep the RPM Repository as close to the target machines as possible. It will help in bringing down the installation time drastically by reducing the time taken to transfer RPMs from the RPM Repository to the hardware servers. If you have multiple hardware server groups residing at physically different locations, it would be better to have one RPM Repository for each of these locations. Refer to section Setting Up RPM Repository for setting up a RPM repository. Also refer to section Configuring RPM Repository.
Bare Metal Provisioning Flow
The provisioning process consists of the following two high-level tasks:
1. Setting Up Provisioning Environment (Setting Up Infrastructure for Bare Metal Provisioning):
• Setting up and configuring Boot/DHCP server and Stage server, setting up RPM repository and Software Library
• Optionally, creating baremetal provisioning entities
2. Provisioning Linux using Bare Metal Provisioning Application (Provisioning Operating Systems):
• Launching the Baremetal Provisioning wizard to configure the bare metal machines using MAC addresses, subnet, or re-imaging Cloud Control hosts. • Powering up the bare metal machine on the network to begin the PXE-based
OS boot and install process. For information about PXE Booting and KickStart, see Understanding PXE Booting and Kickstart Technology.
Supported Releases of Linux
Cloud Control supports bare metal provisioning of 32-bit and 64-bit variants of the following operating systems:
• Oracle Linux 6 • Oracle Linux 7 • Oracle VM Server 3.4
Setting Up Infrastructure for Bare Metal Provisioning
This section describes how to set up the infrastructure required to provision bare metal machine. In particular, this section describes the following:
• Setting Up Stage Server
• Setting Up Boot Server and DHCP Server • Setting Up RPM Repository
• Configuring Stage Server
Chapter 2
• Configuring DHCP Server • Configuring RPM Repository
• Checklist for Boot Server, Stage Server, RPM Repository, and Reference Host • Configuring Software Library Components
Setting Up Stage Server
This section contains:
• Prerequisites to Setup a Stage Server
• Setting up a Stage Server and Accessing the Management Agent files
Prerequisites to Setup a Stage Server
Ensure that you meet the following prerequisites before setting up the stage server: • The user or role used to create the top-level directory (stage directory) where you
stage the Agent rpms should have Sudo access to root. To ensure that you have sudo access on the stage storage, log in to the Cloud Control console and set the sudo privileges.
Note:
Oracle recommends that the stage server must have very limited access due to the criticality and sensitivity of the data it hosts. The super
administrator can enforce this by creating one account on the stage server, and setting it as the preferred credential, to be used by all the provisioning users in Cloud Control. This preferred credential should also be a valid ORACLE_HOME credential (belonging to ORACLE_HOME owner's group).
• The user creating the top-level directory must have write permissions on it. To ensure that you have write access on the stage server, log in to the Cloud Control console and set the privileged preferred credentials for the stage server host. • The minimum space requirement for the stage directory is 100 MB.
Setting up a Stage Server and Accessing the Management Agent files
To set up a stage server, and access the Management Agent RPM files, follow these steps:
1. Set up an NFS Stage Server or a HTTP Server.
• To setup an NFS Stage Server, see Setting up an NFS Stage Server. • To set up a HTTP Server, see Setting up a HTTP Stage Server.
2. Log in to the stage server running on the Management Agent, and create a top-level directory to store all the Management Agent installation files. In this section, the variable STAGE_TOP_LEVEL_DIRECTORY is used to refer to the top level directory
on the stage server.
For example:
User: aime
Stage Server: upsgc.example.com Stage Directory: /scratch/stage
Note:
In this case, the aime user should have sudo access to root, and should
have write permissions on /scratch/stage directory
3. To create and copy the Management Agent Files to Stage location, run the following commands on the OMS:
For using the NFS Stage Server:
STAGE_TOP_LEVEL_DIRECTORY=/scratch/stage For using the HTTP based Stage Server:
STAGE_TOP_LEVEL_DIRECTORY=/var/www/html/stage emcli get_agentimage_rpm -destination="$
{STAGE_TOP_LEVEL_DIRECTORY:?}" -platform="Linux x86-64" [root@upgps1t12 stage]# pwd /scratch/stage [root@upgps1t12 stage]# ls 1 10 21 6 9 oracle-agt-13.4.0.0.0-1.0.x86_64.rpm Note:
• If NFS is used then the staging process will automatically discover the agent rpm and there's no requirement for you to provide a URL for the rpm.
• If HTTP is used then a URL will be required to reference the Agent rpm. The Agent URL is http://host.example.com/agent_dir/oracle-agt-13.4.0.0.0-1.0.x86_64.rpm. For more information on setting up
HTTP Stage Server, see Setting up a HTTP Stage Server.
Setting up an NFS Stage Server
During the installation, hardware servers mount the stage directory so that all the files required for installation appear as local files. In such a scenario, the stage server functions as the NFS server, and the hardware servers as its clients. IF the stage server is an NFS server then any files that it NFS exports must be available to its clients; for files on NAS storage it might be necessary to configure the NAS to allow this to happen.
Make sure that you perform the following steps on the stage server:
Chapter 2
1. Run the following command to install an NFS service:
rpm --quiet -q nfs || yum -y install nfs
2. Run the following commands to configure NFS to export the stage server's top level directory (STAGE_TOP_LEVEL_DIRECTORY):
STAGE_TOP_LEVEL_DIRECTORY=/scratch/stage
echo "${STAGE_TOP_LEVEL_DIRECTORY}*(ro,sync)" >>/etc/exports
3. To reflect these changes on the NFS daemons, run the following command: • Oracle Linux 6:
service nfs restart
• Oracle Linux 7 and up:
systemctl start nfs
4. Ensure NFS starts up on reboot, and is working now: • Oracle Linux 6:
chkconfig nfs on
• Oracle Linux 7 and up:
systemctl enable nfs
5. To install a Management Agent see: Oracle Enterprise Manager Cloud Control Basic Installation Guide .
Setting up a HTTP Stage Server
To setup a HTTP Stage Server, follow these steps:
1. Run the following commands to install a stage server and start it: • For Oracle Linux 6:
rpm --quiet -q httpd || yum -y install httpd service httpd restart
chkconfig httpd on
• For Oracle Linux 7 and above:
rpm --quiet -q httpd || yum -y install httpd systemctl start httpd
systemctl enable httpd
2. Create a HTTP stage directory as follows:
mkdir /var/www/html/stage
3. The URL to access the HTTP stage server is:
http://host.example.com/stage
4. To install a Management Agent see: Oracle Enterprise Manager Cloud Control Basic Installation Guide .
Note:
/var/www/html/stage is the stage directory, and http://host.example.com/ stage is the base URL.
Setting Up Boot Server and DHCP Server
Note:
Ensure that you have 2 GB RAM available for boot server, stage server, and RPM repository server.
If you have the required boot server, stage server, and RPM repository already created, then set up the preferred credentials.
Complete the following steps to setup a machine as the boot server: 1. Install DHCP and TFTP Servers if not already installed.
The two servers could be running either on the same machine, or on different machines. Oracle recommends running the TFTP server on the same host machine as the DHCP server. In case the two servers are installed and configured on different machines, the machine running the TFTP server will be referred to as the boot server.
2. Configure the TFTP server:
Ensure that the pxelinux boot loader (pxelinux.0) exists in the directory that is configured for your TFTP server (/var/lib/tftpboot in the given examples).
3. Configure DHCP Server:
Edit the /etc/dhcpd/dhcpd.conf file. A sample dhcpd.conf file for PXE setup is
shown below:
allow booting; allow bootp;
option domain-name <domain_name>; option domain-name-servers dns_servers; option routers <default_router>;
subnet <subnet-number> netmask <netmask> { [ parameters ]
[ declarations ] }
Chapter 2
group {
# PXE-specific configuration directives... next-server <TFTP_server_IP_address>; filename "linux-install/pxelinux.0"; host <hostname> {
hardware ethernet <MAC address>; fixed-address <IP address>; }
}
The next-server option in the DHCP configuration file specifies the host name or IP Address of the machine hosting the TFTP server. Oracle recommends running the TFTP Server on the same host machine as the DHCP Server. Therefore, this address should be the IP Address or host name for the local machine.
The filename option specifies the boot loader location on the TFTP server. The location of the file is relative to the main TFTP directory.
Any standard DHCP configuration file is supported. The sample file format above shows one entry (line 12-15) for each target host. The DHCP service must be restarted every time you modify the configuration file.
4. Enable the TFTP service. Edit the /etc/xinetd.d/tftp file to change the disable
flag as no (default=no). 5. Restart the following services:
• For Oracle Linux 6:
service dhcpd restart service xinetd restart
• For Oracle Linux 7 and above:
systemctl restart dhcpd systemctl restart xinetd
6. Install Oracle Management Agent. This step is not necessary if the DHCP and Boot servers are installed on the Cloud Control server. For more information see: Oracle Enterprise Manager Cloud Control Basic Installation Guide.
Setting Up RPM Repository
Note:
It is recommended that you use RAM of 2 GB.
Setting Up Oracle Linux RPM Repository
You can set up Oracle Linux Repository by using the Oracle Linux installation media as follows:
1. Download Oracle Linux from http://edelivery.oracle.com/linux.
2. Copy all the contents of the first CD to a directory, for example: Root Directory.
3. Add custom RPM to the repository as follows:
a. If there are custom RPM installed on the reference host that need to be provisioned on the bare metal machine, make sure to copy them to the directory containing the RPMS packages.
b. Run the createrepo <Root Directory> command on this directory.
4. Create a symbolic link in /var/www/html to <Directory> directory.
The repository should now be available through HTTP if an Apache server is running.
Exposing RPM Repository through HTTP or FTP
To expose RPM Repository through HTTP, follow these steps:
1. Ensure that Apache Web Server is installed and HTTP service is running. 2. Create a symbolic link in document root to RPM Repository directory. For
example, /var/www/html to <RPM_REPOS> directory.
To expose RPM Repository through FTP, ensure that FTP server is running.
Configuring Stage Server
During provisioning of an image on hardware servers, the required binaries and files are first transferred to a stage server. This is known as Staging phase and is responsible for preparing images to be installed over the network, and exposing installable or executable software elements over the network to the target hardware server being provisioned.
The Provisioning application requires at least one stage server on which all the activities related to staging can be performed. From the networking perspective, you are advised to keep the stage server as close to the target machines as possible. It will help in bringing down the installation time drastically, by reducing the time taken to transfer image data from the stage server to the hardware servers. If you have multiple hardware server groups residing at physically different locations, it would be better to have one stage server for each of these locations. Stage server should again be an Cloud Control target.
Follow these steps:
1. Log in to Cloud Control as an administrator.
2. From the Enterprise menu, select Provisioning and Patching and then select Bare Metal Provisioning.
3. In the Infrastructure tab, in the Stage Servers section, click Add Server.
Chapter 2
4. In the Add Staging Server dialog, select a Stage Server, specify a Stage Directory, for example, /scratch/stage, and Base URL, for example, file:// stgserver.example.com/scratch/stage. Click OK.
Configuring Boot Server
One of the key requirements of application is the ability of the hardware server to boot up over the network (rather than from a local boot device). A boot server must be set up so that it is able to service the requests from the designated hardware servers in order for them to boot over the network. Boot server must be an Cloud Control target and should be able to receive the BOOTP and TFTP (Trivial File Transfer Protocol) requests over the network from the hardware server. Refer to Setting Up Boot Server for setting up a boot server with DHCP/TFTP combination.
Follow these steps:
1. Make sure that you have administrator privileges.
2. From the Enterprise menu, select Provisioning and Patching, then select Bare Metal Provisioning.
3. In the Infrastructure tab, in the Boot Servers section, click Add.
4. In the Add Boot Server dialog, select a Boot Server and specify a TFTP Boot Directory. For example: /var/lib/tftpboot. Click OK.
Configuring DHCP Server
Follow these steps:
1. Ensure that you have administrator privileges.
2. From the Enterprise menu, select Provisioning and Patching, then select Bare Metal Provisioning.
3. In the Infrastructure tab, in the DHCP Servers section, click Add.
4. In the Add DHCP Server dialog, select a DHCP Server and specify a DHCP Configuration File, for example, /etc/dhcpd.conf that has been modified to
support your target hosts. Click OK.
Configuring RPM Repository
The Provisioning application picks up the RPM for the operating system from the RPM repository. At least one repository needs to be setup for use by the Provisioning application.
To configure the RPM repository follow these steps: 1. Ensure that you have administrator privileges.
2. From the Enterprise menu, select Provisioning and Patching, then select Bare Metal Provisioning.
3. In the Infrastructure tab, in the RPM Repositories section, click Add.
4. In the Add RPM Repository Server dialog, specify a Repository Name and URL, For RPM repository either accessible by HTTP or on a local server, specify the URL in the HTTP format, for example, http://example.com/OL7/. For NFS
Click OK.
Checklist for Boot Server, Stage Server, RPM Repository, and
Reference Host
Ensure that the following criteria are met before provisioning:
Table 2-2 Checklist for Boot Server, Stage Server, RPM Repository, and Reference Host
Resource Name Checklist
Boot Server • DHCP server is up and running.
• The next_server entry in /etc/dhcp/dhcpd.conf file points to this boot server.
• TFTP is up and running.
• Boot Server is present in the same Subnet where the target machines to be provisioned are present or will be added.
• Management Agent is installed.
• Boot server machine is visible as a managed target in Cloud Control.
• A brand new PXE-bootable box actually detects the boot server and starts to boot it, even if no image is installed yet.
Stage Server • Large storage, High Memory and Sufficient Memory.
• If NAS server is used for storage then it should have NFS support.
• Management Agent is installed.
• Boot server machine is visible as a managed target in Cloud Control.
• The required agent rpm is staged for installing agents on targets.
• Preferred Credentials are set.
• Stage server is reachable from the box to be provisioned, or the same Subnet. RPM Repository • RPM Repository is as close as possible to the target servers.
• Install tree structure is as indicated in Configure RPM repository section.
• RPM repository is available via HTTP.
• Provide the exact URL and test the RPM repository access over HTTP. Reference Host • Agent is installed on local disk and not on NFS mounted directory.
• Preferred Credentials are set.
Software Library • Shared storage used for Software Library is accessible through NFS mount points to all OMS servers.
Configuring Software Library Components
To set up and configure the Software Library, see Setting Up Oracle Software Library in Oracle Enterprise Manager Lifecycle Management Administrator's Guide.
You can create the following Bare Metal provisioning entities and store them in Software Library:
• Creating Operating System Component • Creating Disk Layout Component
• Creating an Oracle Virtual Server Component
Creating Operating System Component
Follow these steps to create an operating system component:
Chapter 2
1. From the Enterprise menu, select Provisioning and Patching, then select Software Library.
2. From the Software Library Home, from the Actions menu, select Create Folder. 3. In the Create Folder pop up, specify a Name and Description for the folder and
select the folder location. For example, create a folder BMP-OL77 to represent the
components you will use to provision a bare metal server of Oracle Linux 7 Update 7 Click Save.
4. From the Actions menu, select Create Entity and then Bare Metal Provisioning Components.
5. In the Create Entity: Bare Metal Provisioning Components dialog box, select Operating System Component and click Continue.
6. On the Describe page, enter the Name, Description, and Other Attributes that describe the entity.
Note:
The component name must be unique to the parent folder that it resides in. Sometime even when you enter a unique name, it may report a conflict, this is because there could be an entity with the same name in the folder that is not visible to you, as you do not have view privilege on it.
Click +Add to attach files that describe the entity better such as readme, collateral, licensing, and so on. Ensure that the file size is less than 2 MB.
In the Notes field, include information related to the entity such as changes being made to the entity or modification history that you want to track.
7. In the Basic Operating System page, select a Time Zone and specify the Root Password.
In the Operating System Users List, add the users for the operating system by specifying the User Name, Password, Primary Group, and Additional Groups. Specify if you want to Enable Sudo Access for the user.
In the Fetch Configuration properties from Reference Enterprise Manager Host target section, select Fetch Properties to apply the host properties. Select the reference host and select the Configurations you want to fetch.
Click Next.
8. In the Advanced Configuration page, specify the agent properties, boot configuration, and other configuration as explained in the tables.
The Configure Package Selection section displays the packages from the operating component or reference host you specified in the previous screen. You can retain or remove these packages from the component.
Click Next.
9. In the Review page, verify the information and click Finish.
The operating system component will be saved in Software Library with the status Ready.
Table 2-3 Agent Settings
Element Description
Install User User name for installing the agent. Install Group Install group for agent.
Agent Registration Password Specify the password to be used to register the agent with Oracle Management Server.
RPM URL Location where agent RPM are stored. Table 2-4 Additional OS Configuration
Element Description
Require TTY Select this option if you want sudo user to Log in to a separate terminal. SELinux You can choose to enable or disable SELinux.
Mount Point Settings Specify entries for the /etc/fstab file. You can specify mount points on the newly provisioned Linux machine. By default, mount point settings from the reference Linux machine are inherited.
NIS Settings Specify entries for the /etc/yp.conf file. You can specify NIS settings for the newly provisioned Linux machine. By default, NIS settings from the reference Linux machine are inherited.
NTP Settings Specify entries for the /etc/ntp.conf file. You can specify NTP settings for the newly provisioned Linux machine. By default, NTP settings from the reference Linux machine are inherited.
Kernel Parameter Settings Specify scripts for Kernel Parameters.
Initab Settings Specify settings for/etc/inittab file. All processes are started as part init
operation in boot process. Init operation decides the processes that will start on booting of a machine or when runlevel changes.
Firewall Settings Specify firewall settings for the Linux target. Firewall settings are disabled by default and can be configured. Make sure that the port used by Management Agent is open for its communication with the Management Service. By default, Management Agent uses port 3872 or a port number in the range 1830-1849, unless configured to use some other port.
Table 2-5 Boot Configuration and Configuration Scripts
Element Description
Advanced Configuration & Power Interface
Specify settings for boot time parameter for kernel (acpi) in the /boot/grub/ grub.conf file.
Use Para-Virtualized kernel Select if you are using para-virtualized kernel.
Post Install Script Specify any set of commands that need to be executed on the newly provisioned machine. These commands will be appended to the post section of the kickstart file.
First Boot Script Specify any set of commands that need to be executed on the newly provisioned machine when it starts up for the first time.
Creating Disk Layout Component
Follow these steps to create a disk layout component:
1. From the Enterprise menu, select Provisioning and Patching, then select Software Library.
Chapter 2
2. From the Software Library Home, from the Actions menu, select Create Folder. 3. In the Create Folder popup, specify a Name and Description for the folder and
select the folder location. Click Save.
4. From the Actions menu, select Create Entity and then Bare Metal Provisioning Components.
5. In the Create Entity: Bare Metal Provisioning Components dialog box, select Disk Layout Component and click Continue.
6. On the Describe page, enter the Name, Description, and Other Attributes that describe the entity.
Note:
The component name must be unique to the parent folder that it resides in. On some occasions when you enter a unique name, it may report a conflict. This is because there may be an entity with the same name in the folder that is not visible to you, as you do not have view privilege on it.
• Click +Add to attach files that describe the entity better like readme, collateral, licensing, and so on. Ensure that the file size is less than 2 MB.
• In the Notes field, include information related to the entity like changes being made to the entity or modification history that you want to track.
7. In the Configure page, specify the hard disk, RAID, partition, and logical configurations.
• To specify the hard disk profile, click Add. Specify the Mount Point, RAID Level, Partitions, and File System Type.
• To specify the Partition Configuration, click Add. Specify the Mount Point, Device Name, File System Type, and Size (MB).
• To specify RAID configuration, click Add. Specify the Device Name and Capacity.
• To specify the Logical Volume Group Configuration, click Add. Specify the Group Name, Partitions, and RAIDs.
• To specify the Logical Volume Configuration, click Add. Specify the Mount Point, Logical Volume Name, Logical Group Name, File System Type, and Size (MB).
Note:
Valid characters for Logical Volume Name and Logical Group Name names are: a-z, A-Z, 0-9, and these special characters: + _ . -. See lvm(8) for valid names.
Click Next.
The disk layout component will be saved in Software Library with the status Ready.
Creating an Oracle Virtual Server Component
Follow these steps to create an operating system component:
1. From the Enterprise menu, select Provisioning and Patching, then select Software Library.
2. From the Software Library Home, from the Actions menu, select Create Folder. 3. In the Create Folder popup, specify a Name and Description for the folder and
select the folder location.
4. From the Actions menu, select Create Entity and then Bare Metal Provisioning Components.
5. In the Create Entity: Bare Metal Provisioning Components dialog box, select Oracle Virtual Server Component and click Continue.
6. On the Describe page, enter the Name, Description, and Other Attributes that describe the entity.
Note: The component name must be unique to the parent folder that it resides in. Sometime even when you enter a unique name, it may report a conflict, this is because there could be an entity with the same name in the folder that is not visible to you, as you do not have view privilege on it.
Click +Add to attach files that describe the entity better like readme, collateral, licensing, and so on. Ensure that the file size is less than 2 MB.
In the Notes field, include information related to the entity like changes being made to the entity or modification history that you want to track.
7. In the Basic Operating System page, select a Time Zone and specify the Root Password and the OVM Agent Password.
In the Operating System Users List, add the users for the operating system by specifying the User Name, Password, Primary Group, and Additional Groups. Specify if you want to Enable Sudo Access for the user.
Click Next.
8. In the Advanced Configuration page, specify the Dom0 Configuration, Boot Configurations, and Additional OS Details as explained in the tables. Click Next.
9. In the Review page, verify the information and click Finish.
The oracle virtual server component will be saved in the Software Library with the status Ready.
Table 2-6 Additional OS Details
Element Description
Mount Point Settings Specify entries for the /etc/fstab file. You can specify mount points on the newly provisioned Linux machine. By default, mount point settings from the reference Linux machine are inherited.
Chapter 2
Table 2-6 (Cont.) Additional OS Details
Element Description
NIS Settings Specify entries for the /etc/yp.conf file. You can specify NIS settings for the newly provisioned Linux machine. By default, NIS settings from the reference Linux machine are inherited. NTP Settings Specify entries for the /etc/ntp.conf file. You can specify NTP settings for the newly provisioned Linux machine. By default, NTP settings from the reference Linux machine are inherited. Kernel Parameter Settings Specify scripts for Kernel Parameters.
Initab Settings Specify settings for/etc/inittab file. All processes are started as part init operation in boot process. Init operation decides the processes that will start on booting of a machine or when runlevel changes.
Firewall Settings Specify firewall settings for the Linux target. Firewall settings are disabled by default and can be configured. Make sure that the port used by Management Agent is open for its communication with the Management Service. By default, Management Agent uses port 3872 or a port number in the range 1830-1849, unless configured to use some other port. Table 2-7 Boot Configuration and Configuration Scripts
Element Description
Post Install Script Specify any set of commands that need to be executed on the newly provisioned machine. These commands will be appended to the post section of the kickstart file.
First Boot Script Specify any set of commands that need to be executed on the newly provisioned machine when it starts up for the first time.
Prerequisites for Provisioning Operating Systems and
Oracle VM Servers
• Ensure that you meet the prerequisites described in Setting Up Oracle Software Library in Oracle Enterprise Manager Lifecycle Management Administrator's Guide.
• Ensure that you set up the bare metal provisioning infrastructure described in Setting Up Infrastructure for Bare Metal Provisioning.
• Ensure that you have Cloud Control administrator privileges.
Provisioning Operating Systems
The following sections explain how to provision Linux on bare metal boxes: Follow these steps:
1. From the Enterprise menu, select Provisioning and Patching, then select Bare Metal Provisioning.
2. In the Server Image section, from the Provision menu, select Operating System. 3. In the General/Target Selection page, in the General section, specify the
Deployment Name. Select the Operating System you want to provision and provide a description. Select the Patching Groups and Monitoring Templates you want to associate with the system.
In the Target Selection section, select the Provisioning Category as one of the following:
• MAC Addresses if you want to provision the bare metal systems by specifying MAC addresses. Click Add to specify the list of MAC Address. In the Add MAC dialog box, specify the MAC addresses. Click OK.
Optionally, click Add from File to add the MAC address from a file. In the Add from File dialog box, click Browse and select the file from the location where you have stored it.
• Subnet to specify the subnet for the bare metal provisioning. In the Subnet to be Provisioned section, specify the Subnet IP, Netmask, Number of Network Interfaces, and Bootable Network Interface.
• Re-image EM Host Targets to re-provision an existing Cloud Control host target. In the Enterprise Manager Hosts to be Provisioned section, click Add to search and select the host target. Click OK. Select the Bootable Network Interface.
Optionally, you can click Save As Plan and save the configuration details you have specified. Specify a name and description and click OK to save the plan. You can later use the saved plan to provision bare metal boxes. You can save as plan on any page of the wizard or configure the wizard completely and save the plan on the last page of the wizard.
Click Next.
4. In the Deployment page, in the Infrastructure section, specify:
a. Stage Server and select the Storage. Select Run Stage Server Pre-requisite checks to check if the stage server is configured properly.
b. Boot Server and select Run Boot Server Pre-requisite checks to check if the Boot server is configured properly.
c. DHCP Server and select Run DHCP Server Pre-requisite checks to check if the DHCP server is configured properly.
d. Local RPM Repository.
In the Fetch Configuration Properties from Pre-Created Components section, select the Operating System Component, Disk Layout Component, and Provisioning Directive from the Software Library. Otherwise, you can specify the operating system, disk layout, and other properties in the respective pages. Click Next.
5. In the Basic OS Details page, set the Time Zone and OS Root Password. In the Add Operating System Users list section, click Add. Specify the User Name, Password, Primary Group, and Additional Groups to add the operating system users. Enable or Disable sudo access. Click OK.
If you have a reference host from which you want to provision your bare metal servers, then in the Fetch Properties from Reference Enterprise Manager Host Target section, select Fetch Properties to select reference host properties. Select the reference host and the configurations you want to fetch. Specify reference host credentials. The credentials you specify must have root access or you must have sudo privileges set up for the target.
Chapter 2
You can choose to use preferred credentials, named credentials, or enter your credentials. If you choose to enter your credentials, specify the user name and password and select the Run Privilege. Choose to Save Credentials to use these credentials in future deployments.
Click Next.
6. In the Additional OS Details page, specify agent settings, configuration scripts, package selection, and additional operating system configuration, and boot configuration as explained in Table 2-8, Table 2-9, and Table 2-10.
The Configure Package Selection section displays the packages from the operating component or reference host you specified in the previous screen. You can retain or remove these packages for your provisioning operation.
If you have selected an OS component in step 4, these settings will be displayed here. You can edit or retain these values.
Click Next.
7. In the Disk Layout page, specify hard disk profile, partition configuration, RAID configuration, Logical Volume Group configuration, and Logical Volume configuration.
• To specify the hard disk profile, click Add. Specify the Device Name and Capacity.
• To specify the Partition Configuration, click Add. Specify the Mount Point, Device Name, File System Type, and Size (MB).
• To specify RAID Configuration, click Add. Specify the Mount Point, RAID Level, Partitions, and File System Type. To configure RAID, ensure that your hard disk has two partitions at the minimum.
• To specify the Logical Volume Group Configuration, click Add. Specify the Group Name, Partitions, and RAIDs.
• To specify the Logical Volume Configuration, click Add. Specify the Mount Point, Logical Volume Name, Logical Group Name, File System Type, and Size (MB).
Note:
Valid characters for Logical Volume Name and Logical Group Name names are: a-z, A-Z, 0-9, and these special characters: + _ . -. See lvm(8) for valid names.
Note:
If you selected a Disk Layout component in step 4, these settings will be displayed here. You can edit, remove, or retain these values.
Click Next.
8. In the Network page, the network properties for the MAC Address or Subnet as specified during target selection, is displayed.
Click Add to configure the network interfaces. In the Input Network Interface Properties dialog box, specify the Interface name. Select the Configuration Type as:
• Static if you want to specify the IP addresses
• DHCP if you want the DHCP server to assign a network address
• Network Profile if you want to assign network addresses from a network profile.
Select the Interface Type as bond master, slave, or non-bonding. Click Next.
9. In the Schedule/Credentials page, provide a schedule for the job, either immediately or at a later date. Specify the Stage Server and Boot Server credentials. You can choose to use preferred credentials, named credentials, or enter your credentials. If you choose to enter your credentials, specify the user name and password and select the Run Privilege. Choose to Save Credentials to use these credentials in future deployments.
Click Next.
10. In the Review page, verify that the details you have selected are correctly
displayed and submit the job for the deployment. If you want to modify the details, click Back repeatedly to reach the page where you want to make the changes. Click Save As Plan to save the configuration details you have specified. Specify a name and description and click OK to save the plan. You can later use the saved plan to provision bare metal boxes. For more information, see Using Saved Plans for Provisioning Linux Operating System and Oracle VM Server on Bare Metal Servers
Click Submit.
11. The Deployment Procedure is displayed in the Bare Metal Provisioning page with Status Running. Click on the Status message.
12. In the Procedure Activity page, view the job steps and verify that Status is Success. If the status is Failed, view the steps that have failed, and fix them and resubmit the job.
13. After bare metal systems have been provisioned, verify that they appear in the All Targets page.
Table 2-8 Agent Settings
Element Description
Install User User name for installing the agent. Install Group Install group for agent.
Agent Registration Password Specify the password to be used to register the agent with Oracle Management Server.
Agent RPM URL Agent RPM location. Table 2-9 Additional OS Configuration
Element Description
Require TTY Select this option if you want sudo user to Log in to a separate terminal. SELinux You can choose to enable or disable SELinux.
Chapter 2
Table 2-9 (Cont.) Additional OS Configuration
Element Description
Mount Point Settings Specify entries for the /etc/fstab file. You can specify mount points on the newly provisioned Linux machine. By default, mount point settings from the reference Linux machine are inherited.
NIS Settings Specify entries for the /etc/yp.conf file. You can specify NIS settings for the newly provisioned Linux machine. By default, NIS settings from the reference Linux machine are inherited.
NTP Settings Specify entries for the /etc/ntp.conf file. You can specify NTP settings for the newly provisioned Linux machine. By default, NTP settings from the reference Linux machine are inherited.
Kernel Parameter Settings Specify scripts for Kernel Parameters.
Initab Settings Specify settings for the /etc/inittab file. All processes are started as part
init operation in boot process. Init operation decides the processes that will
start on booting of a machine or when runlevel changes.
Firewall Settings Specify firewall settings for the Linux target. Firewall settings are disabled by default and can be configured. Make sure that the port used by Management Agent is open for its communication with the Management Service. By default, Management Agent uses port 3872 or a port number in the range 1830-1849, unless configured to use some other port.
Table 2-10 Boot Configuration and Configuration Scripts
Element Description
Advanced Configuration & Power Interface
Specify settings for boot time parameter for kernel (acpi) in the /boot/grub/ grub.conf file.
Use Para-Virtualized kernel Select if you are using para-virtualized kernel.
Post Install Script Specify any set of commands that need to be executed on the newly provisioned machine. These commands will be appended to the post section of the kickstart file.
First Boot Script Specify any set of commands that need to be executed on the newly provisioned machine when it starts up for the first time.
Note:
After Linux is provisioned on the bare metal system, out-of-box Deployment Procedures can be used to provision Database and other Oracle products on the server.
Provisioning Oracle VM Servers
To provision an Oracle VM server on a bare metal box, follow these steps:
1. From the Enterprise menu, select Provisioning and Patching, then select Bare Metal Provisioning.
2. In the Server Image section, from the Provision menu, select Oracle VM Server. 3. In the General/Target Selection page, in the General section, specify a unique
Deployment Name. In the Target Selection section, select one of the following
• MAC Addresses: If you want to provision the bare metal systems by specifying MAC addresses. Click Add to specify the list of MAC Address. Alternately, to add the addresses from a file, click Add from File. In the Add from File dialog box, select the file that contains the addresses and click OK. • Subnet: To specify the subnet for the bare metal provisioning. In the Subnet to
be Provisioned section, specify the Subnet IP, Netmask, Number of Network Interfaces, and Bootable Network Interface.
The Oracle VM Registration section allows you to select an OVM Manager registered in cloud to manage the Oracle VM servers you are provisioning. To do so, click the search icon. From the Select Target dialog box, select a target VM machine, and click Select.
Optionally, you can click Save As Plan and save the configuration details you have specified. Specify a name and description and click OK to save the plan. You can later use the saved plan to provision future bare metal boxes. You can Save As plan on any page of the wizard or configure the wizard completely and save the plan on the last page.
Click Next.
4. In the Deployment page, in the Infrastructure section:
a. Select Stage Server, and a location on the stage server for preparing images to be installed over the network. Select Run Stage Server Pre-requisite checks to check if the stage server is configured properly.
b. Select Boot Server, and select Run Boot Server Pre-requisite checks to check if the Boot server is configured properly.
c. Select DHCP Server, and select Run DHCP Server Pre-requisite checks to check if the DHCP server is configured properly
d. Select Local RPM Repository from the available list.
In the Fetch Configuration Properties from Pre-Created Components section, select an existing Operating System Component, Disk Layout Component, and Provisioning Directive from the Software Library home page. By doing so, the property values of the selected entities are fetched from Software Library, and are populated accordingly. Doing so allows you can skip updating the remaining pages in the wizard and directly go to the scheduling page. However, if you do not have the required entities on Software Library, then you can specify the operating system, disk layout, and other properties in the subsequent pages.
Click Next.
5. In the Basic OS Details page, set the Time Zone, OS Root Password, and the Oracle VM Agent password. In the Operating System Users list section, click Add. Specify the User Name, Password, Primary Group, and Additional Groups to add the operating system users. Enable or Disable sudo access. Click OK. Click Next.
6. In the Additional OS Details page, do the following:
a. In the Dom0 Configuration section, you can provide the memory and power requirements for the target provisioned.
b. In the Additional OS details, you can click the configure icon to add certain other configuration details such as: Mount Point Settings, NIS Settings, NTP Settings, Kernel Parameter Settings, Inittab Settings, Firewall Settings. c. In the Boot Configuration section, click First Boot to add commands/scripts
that must be run on the system when it boots for the first time after installation.
Chapter 2