Users Guide
Unified Agent and Agent
Management Console
2.0.2
DOCUMENT ID: DC00384-01-0202-01 LAST REVISED: November 2008
Copyright © 2008 by Sybase, Inc. All rights reserved.
This publication pertains to Sybase software and to any subsequent release until otherwise indicated in new editions or technical notes. Information in this document is subject to change without notice. The software described herein is furnished under a license agreement, and it may be used or copied only in accordance with the terms of that agreement.
To order additional documents, U.S. and Canadian customers should call Customer Fulfillment at (800) 685-8225, fax (617) 229-9845.
Customers in other countries with a U.S. license agreement may contact Customer Fulfillment via the above fax number. All other international customers should contact their Sybase subsidiary or local distributor. Upgrades are provided only at regularly scheduled software release dates. No part of this publication may be reproduced, transmitted, or translated in any form or by any means, electronic, mechanical, manual, optical, or otherwise, without the prior written permission of Sybase, Inc.
Sybase trademarks can be viewed at the Sybase trademarks page at http://www.sybase.com/detail?id=1011207. Sybase and the marks listed are trademarks of Sybase, Inc. ® indicates registration in the United States of America.
Java and all Java-based marks are trademarks or registered trademarks of Sun Microsystems, Inc. in the U.S. and other countries.
Unicode and the Unicode Logo are registered trademarks of Unicode, Inc.
All other company and product names mentioned may be trademarks of the respective companies with which they are associated.
Use, duplication, or disclosure by the government is subject to the restrictions set forth in subparagraph (c)(1)(ii) of DFARS 52.227-7013 for the DOD and as set forth in FAR 52.227-19(a)-(d) for civilian agencies.
Contents
About This Book ... vii
CHAPTER 1 Overview ... 1
What is Unified Agent?... 1
Services provided... 1
Agent Management Console... 2
CHAPTER 2 Installing and Configuring Unified Agent and Agent Management Console ... 3
Pre-installation tasks ... 3
Installing Unified Agent ... 4
Starting the JINI server... 4
Starting and stopping Unified Agent ... 4
Starting Unified Agent as a service on UNIX platforms ... 5
Starting Unified Agent as a service on Windows platforms ... 5
Installing the Agent Management Console... 6
Configuring Unified Agent ... 7
Post-configuration tasks ... 7
CHAPTER 3 Security ... 9
Unified Agent security ... 9
Encryption ... 9
Authentication... 10
Authorization ... 12
Role mappings ... 12
Permissions ... 13
CHAPTER 4 Agent Management Console Features and Functionality ... 15
Managing look-up services ... 15
Creating a network lookup profile ... 16
Discovering Unified Agents ... 16
Contents
Changing a network look-up profile... 17
Specifying a network plug-in name filter... 17
Managing Unified aAgents ... 17
Manually adding an agent ... 17
Connecting to an agent ... 18
Adding credentials... 18
Disconnecting from an agent... 19
Restarting an agent ... 19
Retrieving the agent log ... 19
Viewing and changing agent properties ... 19
Managing discovery adaptors ... 20
Creating a discovery adaptor ... 20
Deleting a discovery adaptor... 21
Viewing and changing discovery adaptor properties... 21
Setting discovery adaptor password ... 22
Managing security modules ... 22
Creating a security module... 22
Deleting a security module ... 23
Ordering the security module authentication... 23
Viewing and changing security module properties ... 23
Setting a security module password... 24
Managing role mappings ... 24
Creating a role mapping ... 24
Managing agent services ... 25
Starting an agent service... 25
Restarting an agent service... 26
Stopping an agent service... 26
Viewing agent service properties ... 26
Managing agent plug-ins ... 26
Loading an agent plug-in... 27
Unloading an agent plug-in ... 27
Reloading an agent plug-in ... 27
Viewing agent plug-in properties ... 27
Server-based plug-ins ... 28
Managing attributes... 29
Viewing attributes ... 29
Updating attribute values... 30
Viewing properties and changing permissions ... 30
Managing operations... 31
Viewing operations ... 31
Adaptive Server agent plug-in server password encryption ... 35
Pluggable Authentication Module (PAM) configuration ... 35
A P P E N DI X B SNMP Agent Plug-in... 37
Overview... 37
Terminology... 37
Sybase Adaptive Server MIB... 38
Unified Agent SNMP services and plug-ins... 39
UAF SNMP Service ... 39
UAF SNMP Service MIBs ... 40
Adaptive Server-to-SNMP client architecture ... 41
Security... 41
Security for connections from Adaptive Server... 41
Security for connections from SNMP... 42
Configuring Adaptive Server for the SNMP Agent Plug-in... 43
TDS services ... 44
UAF SNMP Agent Service... 44
Adaptive Server runtime ... 45
Using the Adaptive Server SNMP Agent Plug-in... 47
Viewing the SNMP information from NET-SNMP ... 48
Sybase MIB ... 48
A P P E N DI X C Tabular Data Stream (TDS) Service ... 55
What is TDS? ... 55
Using the TDS service... 56
UAF services ... 57 uaf_list_service_operations ... 58 uaf_list_services ... 59 uaf_list_service_operation_arguments ... 60 uaf_invoke_service_operation ... 61 uaf_list_service_attributes ... 61 uaf_get_service_attribute ... 62 uaf_set_service_attribute... 62 UAF plug-ins... 62 uaf_list_plugins ... 63 uaf_list_plugin_operations ... 63 uaf_list_plugin_operation_arguments... 64 uaf_invoke_plugin_operation... 65 uaf_list_plugin_attributes ... 65 uaf_get_plugin_attribute ... 66 uaf_set_plugin_attribute ... 66
Setting up examples for the Adaptive Server client ... 67
Examples for configuring the Adaptive Server client ... 68
Examples for using the Adaptive Server client ... 68
Examples for configuring the Adaptive Server client ... 70
Reporting functionality and error recovery... 70
About This Book
Audience The Unified Agent and Agent Management Console User’s Guide is intended as a reference tool for Sybase™ database administrators.
How to use this book • Chapter 1, “Overview” – provides an description of the Unified Agent.
• Chapter 2, “Installing and Configuring Unified Agent and Agent Management Console” – provides information about installing and configuring Unified Agent and the Agent Management Console. • Chapter 3, “Security” – describes general security concepts for
Unified Agent.
• Chapter 4, “Agent Management Console Features and
Functionality” – provides information about Agent Management Console features and functionality
• Appendix A, “Password Encryption and Security Configuration” – provides information about encrypting passwords and configuring security.
• Appendix B, “SNMP Agent Plug-in” – provides information about using the plug-in to configure and use the Unified Agent.
• Appendix C, “Tabular Data Stream (TDS) Service” – provides information about using TDS protocol.
Related documents The Adaptive Server® Enterprise documentation set consists of the following:
• The release bulletin for your platform – contains last-minute information that was too late to be included in the books.
A more recent version of the release bulletin may be available on the World Wide Web. To check for critical product or document information that was added after the release of the product CD, use the Sybase Technical Library.
• The Installation Guide for your platform – describes installation, upgrade, and configuration procedures for all Adaptive Server and related Sybase products.
• What’s New in Adaptive Server Enterprise? – describes the new features
in Adaptive Server version 15.0, the system changes added to support those features, and changes that may affect your existing applications. • ASE Replicator User’s Guide – describes how to use the Adaptive Server
Replicator feature of Adaptive Server to implement basic replication from a primary server to one or more remote Adaptive Servers.
• Component Integration Services User’s Guide – explains how to use the
Adaptive Server Component Integration Services feature to connect remote Sybase and non-Sybase databases.
• The Configuration Guide for your platform – provides instructions for performing specific configuration tasks for Adaptive Server.
• Enhanced Full-Text Search Specialty Data Store User’s Guide – describes
how to use the Full-Text Search feature with Verity to search Adaptive Server Enterprise data.
• Glossary – defines technical terms used in the Adaptive Server
documentation.
• Historical Server User’s Guide – describes how to use Historical Server to
obtain performance information for SQL Server® and Adaptive Server. • Java in Adaptive Server Enterprise – describes how to install and use Java
classes as datatypes, functions, and stored procedures in the Adaptive Server database.
• Job Scheduler User's Guide – provides instructions on how to install and
configure, and create and schedule jobs on a local or remote Adaptive Server using the command line or a graphical user interface (GUI). • Messaging Service User’s Guide – describes how to useReal Time
Messaging Services to integrate TIBCO Java Message Service and IBM WebSphere MQ messaging services with all Adaptive Server database applications.
• Monitor Client Library Programmer’s Guide – describes how to write
Monitor Client Library applications that access Adaptive Server performance data.
• Monitor Server User’s Guide – describes how to use Monitor Server to
obtain performance statistics from SQL Server and Adaptive Server. • Performance and Tuning Series – a series of books that explain how to
About This Book
• Basics – the basics for understanding and investigating performance
questions in Adaptive Server.
• Locking and Concurrency Control – describes how the various
locking schemas can be used for improving performance in Adaptive Server, and how to select indexes to minimize concurrency.
• Query Processing and Abstract Plans – describes how the optimizer
processes queries and how abstract plans can be used to change some of the optimizer plans.
• Physical Database Tuning – describes how to manage physical data
placement, space allocated for data, and the temporary databases. • Monitoring Adaptive Server with sp_sysmon – describes how to
monitor Adaptive Server’s performance with sp_sysmon.
• Improving Performance with Statistical Analysis – describes how
Adaptive Server stores and displays statistics, and how to use the set statistics command to analyze server statistics.
• Using the Monitoring Tables – describes how to query Adaptive
Server’s monitoring tables for statistical and diagnostic information. • Quick Reference Guide – provides a comprehensive listing of the names
and syntax for commands, functions, system procedures, extended system procedures, data types, and utilities in a pocket-sized book (regular size when viewed in PDF format).
• Reference Manual – is a series of four books that contains the following
detailed Transact-SQL information:
• Building Blocks – Transact-SQL datatypes, functions, global
variables, expressions, identifiers and wildcards, and reserved words. • Commands – Transact-SQL commands.
• Procedures – Transact-SQL system procedures, catalog stored
procedures, system extended stored procedures, and dbcc stored procedures.
• Tables – Transact-SQL system tables and dbcc tables. • System Administration Guide –
• Volume 1 – provides an introduction to the basics of system
administration, including a description of configuration parameters, resource issues, character sets, sort orders, and diagnosing system problems. The second part of this book is an in-depth description of security administration.
• Volume 2 – includes instructions and guidelines for managing
physical resources, mirroring devices, configuring memory and data caches, managing multiprocessor servers and user databases, mounting and unmounting databases, creating and using segments, using the reorg command, and checking database consistency. The second half of this book describes how to back up and restore system and user databases.
• System Tables Diagram – illustrates system tables and their entity
relationships in a poster format. Full-size available only in print version; a compact version is available in PDF format.
• Transact-SQL User’s Guide – documents Transact-SQL, the Sybase
enhanced version of the relational database language. This manual serves as a textbook for beginning users of the database management system. This manual also contains descriptions of the pubs2 and pubs3 sample databases.
• Troubleshooting Series (for release 15.0) –
• Troubleshooting: Error Messages Advanced Resolutions – contains
troubleshooting procedures for problems that you may encounter when using Sybase® Adaptive Server® Enterprise. The problems addressed here are those which the Sybase Technical Support staff hear about most often
• Troubleshooting and Error Messages Guide – contains detailed
instructions on how to resolve the most frequently occurring Adaptive Server error messages. Most of the messages presented here contain error numbers (from the master..sysmessages table), but some error messages do not have error numbers, and occur only in Adaptive Server’s error log.
• User Guide for Encrypted Columns – describes how configure and use
encrypted columns with Adaptive Server
• Using Adaptive Server Distributed Transaction Management Features –
explains how to configure, use, and troubleshoot Adaptive Server DTM features in distributed transaction processing environments.
About This Book
• Using Sybase Failover in a High Availability System – provides
instructions for using Sybase Failover to configure an Adaptive Server as a companion server in a high availability system.
• Unified Agent and Agent Management Console – describes the Unified
Agent, which provides runtime services to manage, monitor and control distributed Sybase resources.
• Utility Guide – documents the Adaptive Server utility programs, such as
isql and bcp, which are executed at the operating system level. • Web Services User’s Guide – explains how to configure, use, and
troubleshoot Web Services for Adaptive Server.
• XA Interface Integration Guide for CICS, Encina, and TUXEDO –
provides instructions for using the Sybase DTM XA interface with X/Open XA transaction managers.
• XML Services in Adaptive Server Enterprise – describes the Sybase native
XML processor and the Sybase Java-based XML support, introduces XML in the database, and documents the query and mapping functions that comprise XML Services.
Other sources of
information Use the Sybase Getting Started CD, the SyBooks CD, and the Sybase Product Manuals Web site to learn more about your product:
• The Getting Started CD contains release bulletins and installation guides in PDF format, and may also contain other documents or updated information not included on the SyBooks CD. It is included with your software. To read or print documents on the Getting Started CD, you need Adobe Acrobat Reader, which you can download at no charge from the Adobe Web site using a link provided on the CD.
• The SyBooks CD contains product manuals and is included with your software. The Eclipse-based SyBooks browser allows you to access the manuals in an easy-to-use, HTML-based format.
Some documentation may be provided in PDF format, which you can access through the PDF directory on the SyBooks CD. To read or print the PDF files, you need Adobe Acrobat Reader.
Refer to the SyBooks Installation Guide on the Getting Started CD, or the
README.txt file on the SyBooks CD for instructions on installing and
• The Sybase Product Manuals Web site is an online version of the SyBooks CD that you can access using a standard Web browser. In addition to product manuals, you will find links to EBFs/Maintenance, Technical Documents, Case Management, Solved Cases, newsgroups, and the Sybase Developer Network.
To access the Sybase Product Manuals Web site, go to Product Manuals at http://www.sybase.com/support/manuals/.
Sybase certifications
on the Web Technical documentation at the Sybase Web site is updated frequently. ❖ Finding the latest information on product certifications
1 Point your Web browser to Technical Documents at http://www.sybase.com/support/techdocs/.
2 Click Certification Report.
3 In the Certification Report filter select a product, platform, and timeframe and then click Go.
4 Click a Certification Report title to display the report. ❖ Finding the latest information on component certifications
1 Point your Web browser to Availability and Certification Reports at http://certification.sybase.com/.
2 Either select the product family and product under Search by Base Product; or select the platform and product under Search by Platform. 3 Select Search to display the availability and certification report for the
selection.
❖ Creating a personalized view of the Sybase Web site (including support pages)
Set up a MySybase profile. MySybase is a free service that allows you to create a personalized view of Sybase Web pages.
1 Point your Web browser to Technical Documents at http://www.sybase.com/support/techdocs/.
About This Book
Sybase EBFs and software
maintenance
❖ Finding the latest information on EBFs and software maintenance
1 Point your Web browser to the Sybase Support Page at http://www.sybase.com/support.
2 Select EBFs/Maintenance. If prompted, enter your MySybase user name and password.
3 Select a product.
4 Specify a time frame and click Go. A list of EBF/Maintenance releases is displayed.
Padlock icons indicate that you do not have download authorization for certain EBF/Maintenance releases because you are not registered as a Technical Support Contact. If you have not registered, but have valid information provided by your Sybase representative or through your support contract, click Edit Roles to add the “Technical Support Contact” role to your MySybase profile.
5 Click the Info icon to display the EBF/Maintenance report, or click the product description to download the software.
Conventions The following sections describe conventions used in this manual.
SQL is a free-form language. There are no rules about the number of words you can put on a line or where you must break a line. However, for readability, all examples and most syntax statements in this manual are formatted so that each clause of a statement begins on a new line. Clauses that have more than one part extend to additional lines, which are indented. Complex commands are formatted using modified Backus Naur Form (BNF) notation.
Table 1 shows the conventions for syntax statements that appear in this manual:
Table 1: Font and syntax conventions for this manual Element Example
Command names,procedure names, utility names, and other keywords display in sans serif font.
select sp_configure
Database names and datatypes are in sans serif font. master database Book names, file names, variables, and path names are
in italics.
System Administration Guide sql.ini file
column_name
• Syntax statements (displaying the syntax and all options for a command) appear as follows:
sp_dropdevice [device_name] For a command with more options:
select column_name from table_name where search_conditions
In syntax statements, keywords (commands) are in normal font and identifiers are in lowercase. Italic font shows user-supplied words. • Examples showing the use of Transact-SQL commands are printed like
this:
select * from publishers
• Examples of output from the computer appear as follows:
Variables—or words that stand for values that you fill in—when they are part of a query or statement, are in italics in Courier font.
select column_name
from table_name
where search_conditions
Type parentheses as part of the command. compute row_aggregate (column_name)
Double colon, equals sign indicates that the syntax is written in BNF notation. Do not type this symbol. Indicates “is defined as”.
::=
Curly braces mean that you must choose at least one of the enclosed options. Do not type the braces.
{cash, check, credit}
Brackets mean that to choose one or more of the enclosed options is optional. Do not type the brackets.
[cash | check | credit]
The comma means you may choose as many of the options shown as you want. Separate your choices with commas as part of the command.
cash, check, credit
The pipe or vertical bar( | ) means you may select only one of the options shown.
cash | check | credit
An ellipsis (...) means that you can repeat the last unit as many times as you like.
buy thing = price [cash | check | credit] [, thing = price [cash | check | credit] ]...
You must buy at least one thing and give its price. You may choose a method of payment: one of the items enclosed in square brackets. You may also choose to buy additional things: as many of them as you like. For each thing you buy, give its name, its price, and (optionally) a method of payment.
About This Book
pub_id pub_name city state
--- --- --- ---
0736 New Age Books Boston MA
0877 Binnet & Hardley Washington DC 1389 Algodata Infosystems Berkeley CA
(3 rows affected)
In this manual, most of the examples are in lowercase. However, you can disregard case when typing Transact-SQL keywords. For example, SELECT, Select, and select are the same.
Adaptive Server’s sensitivity to the case of database objects, such as table names, depends on the sort order installed on Adaptive Server. You can change case sensitivity for single-byte character sets by reconfiguring the Adaptive Server sort order. For more information, see the System Administration Guide.
Accessibility
features This document is available in an HTML version that is specialized for accessibility. You can navigate the HTML with an adaptive technology such as
a screen reader, or view it with a screen enlarger.
Adaptive Server HTML documentation has been tested for compliance with U.S. government Section 508 Accessibility requirements. Documents that comply with Section 508 generally also meet non-U.S. accessibility guidelines, such as the World Wide Web Consortium (W3C) guidelines for Web sites.
Note You might need to configure your accessibility tool for optimal use. Some screen readers pronounce text based on its case; for example, they pronounce ALL UPPERCASE TEXT as initials, and MixedCase Text as words. You might find it helpful to configure your tool to announce syntax conventions. Consult the documentation for your tool.
For information about how Sybase supports accessibility, see Sybase Accessibility at http://www.sybase.com/accessibility. The Sybase Accessibility site includes links to information on Section 508 and W3C standards.
If you need help Each Sybase installation that has purchased a support contract has one or more designated people who are authorized to contact Sybase Technical Support. If you cannot resolve a problem using the manuals or online help, please have the designated person contact Sybase Technical Support or the Sybase subsidiary in your area.
C H A P T E R 1
Overview
This chapter discusses the following topics.
What is Unified Agent?
Unified Agent provides runtime services to manage, monitor, and control distributed Sybase resources. The Unified Agent provides a common set of services, as well as the ability to host agent plug-ins to manage server resources or to perform various operations. These agent plug-ins can perform product specific command, control, and discovery capabilities including: status, start, stop, restart, ping and server log retrieval. Unified Agent extends Java Management Extensions (JMX) to provide these management interfaces. Unified Agent enables other Sybase products to “plug in” to an agent to provide remote management capabilities.
Services provided
The most important services provided are port configuration and port conflict resolution.
Topic Page
What is Unified Agent? 1
Services provided 1
Agent Management Console
Agent Management Console
The Agent Management Console is a Sybase Central™ plug-in that manages Unified Agent and its components. The Agent Management Console is a centralized tool for a system administrator to monitor, configure, administer, and manage the agent environment.
For more information on Agent management, see “Agent Management Console Features and Functionality” on page 15.
C H A P T E R 2
Installing and Configuring
Unified Agent and Agent
Management Console
This chapter contains information about installing and configuring Unified Agent and the Agent Management Console.
Pre-installation tasks
Before installing Unified Agent, determine what type of discovery services to use:
• User Datagram Protocol (UDP) Listener – opens a listener on the current subnet and “listens” for a broadcast request for information. This discovery method contacts those agents that respond to the broadcast request. If the resources you want to discover are all on the same subnet, choose UDP.
• JINI registry – requires a running JINI server to be accessible in the enterprise, that is across subnet boundaries. If a JINI discovery service is to be used, you must enter the JINI server’s host name and port number during the installation process. If the resources you want to discover are not all on the same subnet, allocate a resource to run the JINI discovery server.
These values are provided during installation at the Custom Configure Unified Agent step of the Adaptive Server™ Installer. After installation, users can use the Agent Management Console to add, configure, and remove discovery adaptors.
Topic Page
Pre-installation tasks 3
Installing Unified Agent 4
Installing Unified Agent
Installing Unified Agent
Unified Agent is installed as a component of the Adaptive Server™
installation. For information about installing Adaptive Server, see the Adaptive
Server Installation Guide for your platform.
Installation requires that you log in with administrative privileges.
Upon installation, the $SYBASE/ua directory includes the following folders: • bin – start and stop scripts for the agent and JINI server.
• conf – configuration information for agent, security service, and security
policy.
• ldap – LDAP schema definition.
• log – log file for agent, RMI server, and JINI server.
• plugins – contains agent plug-ins for each managed resource (for example,
the ASEAgentPlugin.)
Starting the JINI server
If JINI has been selected as the discovery method, you must start a JINI server. On the host where the JINI server will run:
1 Change to the Sybase installation directory $SYBASE on UNIX platforms or %SYBASE% on Windows platforms.
2 Set the Sybase environment variables by sourcing SYBASE.csh or executing SYBASE.bat.
3 Change to the $SYBASE_UA/bin or %SYBASE_UA%\bin directory. 4 Execute startJini or startJini.bat.
Starting and stopping Unified Agent
Before you open a support call, or when you identify candidates for new boundaries:
1 Change to the Sybase installation directory—$SYBASE or %SYBASE%. 2 Set the Sybase environment variables by sourcing SYBASE.csh or
CHAPTER 2 Installing and Configuring Unified Agent and Agent Management Console
3 Change to the $SYBASE_UA/bin or %SYBASE_UA%\bin directory. 4 Execute uafstartup.sh or uafstartup.bat, or add the parameter /background
to run the Unified Agent in the background. To stop Unified Agent:
1 Change to the Sybase installation directory—$SYBASE or %SYBASE%. 2 Set the Sybase environment variables by sourcing SYBASE.csh or
executing SYBASE.bat.
3 Execute shutdown or uafshutdown.bat.
Starting Unified Agent as a service on UNIX platforms
A UNIX service is a process that automatically runs in the background after the machine is started. On UNIX and Linux platforms, a shell script, agentd, is available in the directory $SYBASE_UA/bin. To install the agent as a service: 1 Copy the agentd into the /etc/init.d directory.
2 Make two soft links in the directory /etc/rcX.d (where X is the run level, for example, 3) that link to /etc/init.d/agentd: SXXagentd and KXXagentd (where XX is a two digit number, for example, 88). One is for starting the service and the other is for stopping the service.
Note Different UNIX systems might have slightly different directory structures.
Starting Unified Agent as a service on Windows platforms
Unified Agent can be started as a Windows service using the Microsoft Windows Administrative Tools | Services dialog. If you cannot find the “Service” dialog, contact your system administrator.
1 Locate the “Sybase Unified Agent” in the list of services.
2 Double-click the service. A dialog containing several tabs displays. 3 From the General tab, choose Start. Unified Agent starts.
4 You can set the service to automatically start when the system starts by changing “Startup type” to “Automatic.”
Installing Unified Agent
5 Additionally, you can automatically restart the service in case of failover by choosing the “Recovery” tab on this same dialog and changing the First, Second, and Subsequent failures to “Restart Service.”
6 Click Apply to save the modifications before closing the dialog.
Installing the Agent Management Console
The Agent Management Console is a Sybase Central™ plug-in that manages Unified Agent and its components. The Agent Management Console is a centralized tool for a system administrator to monitor, configure, administer, and manage the agent environment.
After successfully installing Adaptive Server and the Unified Agent, register the Agent Management Console Plug-in to Sybase Central and start Sybase Central. To do this, run the following scripts:
For Windows:
• %SYBASE%\AMCP\bin\registerAMCP.bat
• %SYBASE%\Shared\Sybase Central 4.3\win32\scjview.exe
For UNIX:
• $SYBASE/AMCP/bin/registerAMCP
• $SYBASE/source SYBASE.csh
• $SYBASE/shared/sybcentral43/scjview.sh
An alternate way to register the Agent Management Plug-in from within Sybase Central is to select Tools | Plug-ins. Click the Register button and specify the plug-in registration file found in:
• On Windows – %SYBASE%\AMCP\amcplugin.jpr • On UNIX – $SYBASE/AMCP/amcplugin.jpr Click Finish to complete the plug-in registration.
CHAPTER 2 Installing and Configuring Unified Agent and Agent Management Console
Configuring Unified Agent
For information on how to update configurations for your environment’s specific requirements, see Chapter 4, “Agent Management Console Features and Functionality.”
Post-configuration tasks
Security • In a simple login module:
• Assign a password for the default administrative login, uafadmin. Enter a password that conforms to your password standards. This login allows you to connect to Unified Agent and perform
administrative tasks when other security modules are not available. • Turn on encryption for the password. By default, encryption is not
enabled.
• Security Services – the security service provides encryption services used by various components such as the Simple Login Module. The default encryption algorithm is set to DES. To change the algorithm to RSA, see Appendix A, “Password Encryption and Security Configuration.” Discovery • Login modules – define role mappings for each login module defined in
addition to the Anonymous Login Module and the Simple Login Module. Create mappings between native roles and the roles defined in Unified Agent. At a minimum, map to the “uaAgentAdmin” role to allow administrators to administer the agent without using the Simple Login Module.
• Discovery Adapters – add discovery adapters to enable the agent to register with additional discovery services. You can also edit or delete existing adapters.
Agent Properties • SNMP Service – the SNMP Service is a Simple Network Management Protocol Agent that responds to client requests and sends SNMP notification messages, called traps. The default port for the SNMP command responder is UDP 1498. The default notification port for SNMP traps is 49152. This service is not started unless it is required by another service or an agent plug-in, and its enablement depends on the plug-in’s ability to use it .
Configuring Unified Agent
• TDS™ Service – The TDS Service provides Tabular Data Stream remote procedure calls into the Unified Agent Framework. The default TDS port number is 9995. This service is not started unless it is required by another service or an agent plug-in, and its enablement depends on the plug-in’s ability to use it.
C H A P T E R 3
Security
This chapter discusses general security concepts for Unified Agent. All administrative tasks are performed through the Agent Management Console. See Chapter 4, “Agent Management Console Features and Functionality” for details on how to administer security.
Unified Agent security
Unified Agent security does not maintain its own security repository, except in supporting a UAF enabled from outside the machine running UAF. Instead, it delegates the authentication to existing systems such as Adaptive Server or the operating system. Security modules define these systems to which security has been delegated.
When a user is authenticated, roles for the user are retrieved by the security module and are mapped to Unified Agent defined roles. Permission to Unified Agent resources are granted to Unified Agent roles. Authorization is resolved through the mappings between the security module native roles and Unified Agent roles.
The Security Service authenticates logins and authorizes access to agent resources. It also provides password encryption services.
Encryption
The agent-config.xml and csi.properties files can contain passwords. By default, these passwords are not encrypted. To enable the encryption of these passwords, use the Agent Management Console to set the “encrypted” property to true for the Simple Login Module and for any LDAP discovery adaptors defined for the agent.
Topic Page
Unified Agent security
To allow installations to choose their own encryption algorithm and cipher provider, Unified Agent does not enable encryption by default. Therefore, it is important that you enable encryption and to set the encryption and cipher provider class.
Note Encryption is not enabled by default.
Use the attributes of the Security Service to specify the encryption algorithm and the cipher provider class. The attributes are encryptionAlgorithm and cipherProviderClass. The default encryption algorithm is DES and the cipher provider class is Sun’s JCE provider.
Authentication
Authentication is the process by which the system confirms the identity of each user. Unified Agent provides a set of five predefined login modules. All login modules are defined in the $SYBASE_UA/conf/csi.properties file or the
%SYBASE_UA%\conf\csi.properties file. The syntax is defined by the Sybase
Common Security Infrastructure (CSI) framework. By assembling and configuring different login modules, you can customize Unified Agent authentication to your strength requirements.
Login modules
• Anonymous Login Module – accepts a client connection whose user name is “anonymous,” and assumes the role of uaAnonymous. The anonymous login does not require a password. The Anonymous Login Module is required and cannot be removed.
• Simple Login Module – defines a user name, password, and a list of roles. The default user name is “uafadmin” with a blank password and a native role of uaAgentAdmin. By default, encryption is not enabled.
• Adaptive Server Login Module – delegates the authentication of users to the Adaptive Server. This module requires ASE Agent Plug-in. The user name must conform to the format of ase_login@ase_servername, for example, sa@testmachine. To authenticate, Adaptive Server must be running on the Agent’s machine and have an ASE Agent plug-in configured.
CHAPTER 3 Security
• UNIX Proxy Login Module – delegates authentication to the underlying UNIX or Linux operating system using Pluggable Authentication Modules (PAM).
Note On some platforms, the SYBASE_UA rtlib proxy file needs to have execute permission or the UNIX Proxy Login Module will fail.
• NT Proxy Login Module – delegates authentication to the underlying Windows operating system. The user name must conform to the format of
username@nt-domain-name. For example, user@sybase.
When you log in, each login module attempts authentication in the order specified in the csi.properties file until a successful module is found.
Note The Anonymous Login Module must always appear first.
Security module control flags
Each security module has a control flag that determines how the overall authentication process behaves. The control flag value indicates whether the success of the security module is:
• Required – the LoginModule is required to succeed. If it succeeds or fails, authentication still continues to proceed down the LoginModule list. • Requisite – the LoginModule is required to succeed. If it succeeds,
authentication continues down the LoginModule list. If it fails, control immediately returns to the application (authentication does not proceed down the LoginModule list).
• Sufficient – the Login Module is not required to succeed. If it does succeed, control immediately returns to the application (authentication does not proceed down the LoginModule list). If it fails, authentication continues down the LoginModule list.
• Optional – the LoginModule is not required to succeed. If it succeeds or fails, authentication still continues to proceed down the LoginModule list.
Unified Agent security
Authorization
Authorization determines if a user has permission to access a service or plug-in resource. A resource is defplug-ined as an attribute or operation of an agent service or agent plug-in.
Unified Agent security is role-based. Permissions to agent service and agent plug-in resources are granted to unified agent roles. These unified agent roles are mapped back to roles returned by each security module.
The mapping of unified agent roles to security module roles allows the agent to tie its authorization model back to the authenticating security module. When a client application attempts to access a resource, the authorizer compares the user's rights with the resource's access requirements.
Unified agent resources have default permissions set to the predefined unified agent roles. In most cases, only the role mappings need to be defined. The predefined unified agent roles are:
• uaUser – for a typical end user • uaGuest – for a temporary user
• uaAnonymous – for an unauthenticated user
• uaAgentAdmin – for the administrator of the Unified Agent • uaPluginAdmin – for the administrator of agent plug-ins • uaASEAdmin – for the administrator of the Adaptive Server • uaOSAdmin – for the administrator of the operating system
Role mappings
Since Unified Agent delegates authentication through the security modules, role mappings between native security module roles and Unified Agent roles determine authorization. You must define mappings for each security module to allow access to agent resources.
Note On some platforms, administrators may need to know the groups that you are a member of in order to map to these groups.
CHAPTER 3 Security
Permissions
A set of permissions determines access to agent resources. Permissions are granted to Unified Agent roles for each resource. Attribute resources have read and write permission and operation resources have execute permission. Agent resources have default permissions assigned to the Unified Agent roles. Most installations would not need to change the permissions for individual resources.
C H A P T E R 4
Agent Management Console
Features and Functionality
This chapter contains information about Agent Management Console features and functionality.
The Agent Management Console is a Sybase Central plug-in that manages Unified Agent and its components. The Agent Management Console is a centralized tool for a system administrator to monitor, configure, administer, and manage the agent environment.
Managing look-up services
Unified Agent servers can broadcast themselves on a subnet using UDP, or register themselves with a look-up server such as JINI or LDAP. Within the Agent Management Console plug-in, the ‘Lookup Services’ folder allows the administrator to create look-up profiles to query such services. Each profile specifies the network protocol, host, port, and an optional plug-in name search filter.
Topic Page
Managing look-up services 15
Managing Unified Agents 17
Managing discovery adaptors 20 Managing security modules 22
Managing role mappings 24
Managing agent services 25
Managing agent plug-ins 26
Managing attributes 29
Managing look-up services
Creating a network lookup profile
❖ Creating a network look up profile
1 Specify a unique user defined name for the lookup profile to be created. 2 From the drop-down menu, select the protocol. Your choices are:
• JINI
• LDAP
• UDP
3 Specify the host name of the JINI or LDAP server. The UDP protocol does not require a host name and is therefore disabled when UDP is selected. If you do not know the name and port of the lookup server, contact your Unified Agent or network administrator.
4 The default port for JINI is 4160. However, if you do not know the port for the lookup server, contact your Unified Agent or network administrator. 5 Specify an optional plug-in name search filter. The discovery process uses
this filter to perform a string pattern match on the Agent plug-ins registered on each agent. Only agents with positive matches are returned in the lookup query.
For example, if you create a plug-in search filter called ASE, your search will return all agents with plug-ins having the letters ASE. This search is case sensitive.
Discovering Unified Agents
To discover Unified Agents, open the defined network lookup profile. The list of discovered agents are displayed on the right side details pane.
The list of discovered agents can be refreshed through the menu File | Refresh option.
You can establish a connection to a listed agent through the Connect or Connect As menu options. For more information on agents, see “Managing Unified Agents” on page 17.
CHAPTER 4 Agent Management Console Features and Functionality
Deleting a network look-up profile
❖ Deleting a network lookup profile
1 Right click the network lookup profile. 2 Select Delete.
3 Select Yes on the confirmation dialog.
Changing a network look-up profile
The properties dialog for the network lookup profile has information about the protocol, the host name, the port number, and the plug-in search filter. The values here are the values you specified in the Add a new network profile wizard. You can edit these values in this dialog.
When you have finished editing the dialog, select OK to save any new values, and begin your plug-in search.
Specifying a network plug-in name filter
By specifying an optional plug-in name search filter, the discovery process will use this filter to perform a string pattern match on the agent plug-ins registered on each agent. Only agents with positive matches are returned in the lookup query.
Managing Unified Agents
A Unified Agent is a process on a server that is running a service or plug-in
Manually adding an agent
❖ Manually adding an agent the remembered agents in the tree view
1 Right click the Agent Management Console node in Sybase Central. 2 Select Add agent.
Managing Unified Agents
3 Enter a host name and port number of the agent server. 4 Click OK.
Connecting to an agent
❖ Connecting to an agent
1 Right click on a remembered agent on the tree view or on an agent listed under a network lookup profile.
2 Select Connect to connect to the agent anonymously, or:
Select Connect As to create an authenticated connection. If you select Connect As you must provide a user ID and password.
3 Click OK.
Adding credentials
When you connect to an agent, you are authenticated through a login module. You acquire the native roles of that login to create a set of credentials for your session. You can add credentials to your session by providing another login ID and password. The additional login can be through the same login module or a different login module. After the additional login is authenticated, native roles for the new login are added to your session. This allows you to build up a set of credentials for session to perform the desired tasks.
❖ Adding credentials
1 Right click on a connected agent in the Agent Management Console in Sybase Central and select Add Credential, or select File | Add Credential. 2 Enter a new user ID and password to add additional login information. 3 Click OK.
4 If successful, your session assumes additional privileges of the new login credentials.
CHAPTER 4 Agent Management Console Features and Functionality
Disconnecting from an agent
❖ Disconnecting from an agent
1 Right-click on a connected agent. 2 Select Disconnect.
Restarting an agent
Certain changes made to agents require that you restart the agent. ❖ Restarting an agent
1 Right-click on the agent. 2 Select Restart.
Retrieving the agent log
You can view the Unified Agent log through the Agent Management Console in Sybase Central. The log contains status information, activity, warnings, and errors.
❖ Retrieving the agent log
1 Right-click on the agent. 2 Select retrieve log.
3 The agent log is displayed in the bottom window in Sybase Central.
Viewing and changing agent properties
❖ Viewing agent properties1 Right-click on the agent. 2 Select Properties.
3 The agent properties dialog contains three tabs that displays detail, encryption and session information.
Managing discovery adaptors
4 The details tab gives you read-only information about the agent’s:
• Name • Version • Build • Operating System • OS Version • OS Architecture • Time started • Connection URL • RMI Port
5 The encryption tab allows you to configure the default encryption used by the agent. You can configure the encryption algorithm and the encryption provider class.
6 The session tab shows you available security modules, and which modules are currently authenticated. This is read-only information.
Managing discovery adaptors
Discovery adaptors allow the agent to configure how it can be discovered.
Creating a discovery adaptor
You may register the agent to multiple discovery servers by creating multiple discovery adapters. Since UDP, unlike JINI and LDAP, is a connectionless protocol and broadcasts within a subnet, only one UDP adaptor is supported. ❖ Creating a discovery adaptor
1 Open the Discovery Adaptor wizard from the Discovery Adaptor folder for an agent.
CHAPTER 4 Agent Management Console Features and Functionality
4 Click Next.
5 A screen displays notifying you that the new discovery adaptor will be created with default values for the selected adaptor class. Use the properties dialog to change any default values before restarting the agent. Click finish to complete the wizard.
6 See “Viewing and changing discovery adaptor properties” on page 21 to change any default values for the new discovery adaptor.
Deleting a discovery adaptor
❖ Deleting a discovery adaptor
1 To delete a discovery adaptor, right click delete.
2 Click Yes to confirm that you want to delete the selected discovery adaptor.
Viewing and changing discovery adaptor properties
❖ Viewing discovery adaptor properties1 Right click on a discovery adaptor. 2 Select properties.
3 Click Yes to apply the changes.
4 The changes take effect when you restart the agent.
The properties page has the following information. This information is different depending on the discovery adaptor class:
• Heartbeat period – notifies the JINI server that the agent is still running. The default is every 900 seconds.
• Class • Host name • Port number
Once you have selected the values for the discovery adaptor, restart the agent. When you restart the agent, your connection is lost, so you must reconnect to the agent.
Managing security modules
There are three different types of discovery protocols: • JINI
• LDAP
• UDP
Setting discovery adaptor password
If a discovery adaptor, such as LDAP, requires a password, the password can be set through a menu item.
❖ Setting a discovery adaptor password
1 Right click on the adaptor. 2 Select Set Password.
3 Type and confirm the password. 4 Click OK.
Managing security modules
The Unified Agent does not maintain its own security repository. Instead, it delegates the authentication to existing systems such as Adaptive Server or the operating system. Security modules define these systems to which security has been delegated. Unified Agent security is based on the JAAS framework.
Creating a security module
❖ Creating a security module
1 Specify a unique name for the security module. 2 Select the security provider class for the new module.
3 When multiple security modules are configured, the control flag defines the authentication sequence. The options are optional, required, requisite and sufficient.
CHAPTER 4 Agent Management Console Features and Functionality
5 Specify the order for the security modules by selecting a modules and using the Move up and Move down buttons. The order is significant because authentication is performed sequentially adhering to the rules set by the control flags.
6 Click Next.
7 A security module wizard prompt reminds you to create valid role mappings for the security module using the role mapping wizard. You can view and change security module default property values in the properties dialog.
8 Click Finish.
Deleting a security module
❖ Deleting a security module
1 Right click on the security module. 2 Select Delete.
3 Click Yes in the confirmation box.
Ordering the security module authentication
The order of the security modules is significant. Authentication is performed sequentially adhering to the control flags defined for each security module. ❖ Modifying the security module authentication order
1 Select a security module by clicking on it.
2 Use the move up or move down button to change the position of the selected module.
3 Click OK when you have finished. Changes are not in effect until the agent is restarted.
Viewing and changing security module properties
The Security Module Properties dialog allows you to:Managing role mappings
• View and change properties of the security modules.
Note The security module class cannot be modified.
• The list of properties shown is dependent on the defined security module class.
Setting a security module password
If a security module requires a password, it can be set through a dialog accessed from the menu.
❖ Setting a security module password
1 Right click on the security module. 2 Select Set Password.
3 Type and confirm the password. 4 Click OK.
Managing role mappings
Unified agent security is role-based. Resource permissions are granted to unified agent roles. The mapping of native roles or groups, from the security modules to the unified agent roles, determines authorization. A user ID authenticated through a security module possesses roles or groups. These native roles, or groups, are mapped to unified agent roles. Each security module contains a set of mappings.
Creating a role mapping
❖ Mapping a new security role
1 Specify the name of the role or group for which you wish to create a mapping.
CHAPTER 4 Agent Management Console Features and Functionality
2 Then choose a Unified Agent role to which you want to map. Unified Agent comes with default permissions for these UA roles.Your choices are:
• uaUser – an authenticated user with general levels of access. • uaGuest – a temporary user with limited levels of access. • uaAnonymous – an unauthenticated user with low level access. • uaAgentAdmin – an administrator for the agent with the highest level
of access.
• uaPluginAdmin – a plug-in administrator with administrative access restricted to the plug-ins.
• uaASEAdmin – similar to uaPluginAdmin but restricted only to the ASE Agent plug-in. Usually mapped to Adaptive Server
administrators.
• uaOSAdmin – an administrator with a high level of access. Usually mapped to an OS administrator.
3 Click finished to create the new role mapping.
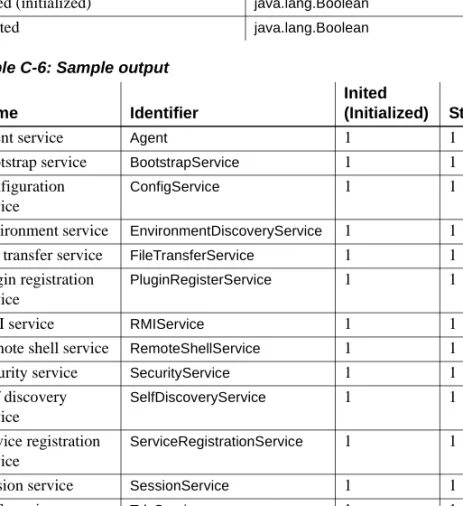
Managing agent services
The AgentService folder includes a list of services, mandatory as well as optional, running on the agent. Each service provides a set of functionalities, used by the agent, other services, or agent plug-ins. The mandatory services listed are Agent Service, Configuration Service, Environment Service, and Session Service. Mandatory services cannot be started or stopped individually.
Starting an agent service
If optional agent services are not running, you can start them. ❖ Starting an agent service
1 Right click on the agent service. 2 Select Start.
Managing agent plug-ins
Restarting an agent service
If you want to implement changes you have made in the agent service, you can select restart.
❖ Restarting an agent service.
1 Right click on the agent service. 2 Select Restart.
3 Select Yes in the confirmation box.
Stopping an agent service
Some of the optional agent services can be stopped. ❖ Stopping an agent service
1 Right-click on the agent service. 2 Select Stop.
3 Select Yes in the confirmation box.
Viewing agent service properties
❖ Viewing agent service properties
1 Right click on the agent service. 2 Select Properties.
3 The properties dialog displays with information about the name and class.
Managing agent plug-ins
An agent plug-in is a process that runs on the agent that performs tasks. Tasks can include monitoring, managing, and controlling a server such as the Adaptive Server.
CHAPTER 4 Agent Management Console Features and Functionality
Loading an agent plug-in
If an agent plug-in is not loaded, you can load them. ❖ Loading an agent plug-in
1 Right click on the agent plug-in. 2 Select Load.
3 Select Yes in the confirmation box.
Unloading an agent plug-in
Agent plug-ins can be unloaded. ❖ Unloading an agent plug-in
1 Right click on the agent plug-in. 2 Select Unload.
3 Select Yes in the confirmation box.
Reloading an agent plug-in
Agent plug-ins can be reloaded. ❖ Reloading an agent plug-in
1 Right click on the agent plug-in. 2 Select Reload.
3 Select Yes in the confirmation box.
Viewing agent plug-in properties
The agent plug-in properties page displays read-only information about the name and class.
❖ Viewing agent plug-in properties
1 Right click on the agent plug-in. 2 Select Properties.
Managing agent plug-ins
3 The properties dialog displays with information about the name and class.
Server-based plug-ins
Server based ins are ins that manage servers. For server-based plug-ins there is server specific functionality that they can perform on the server.
Pinging the server
❖ Pinging a server
1 Right click on the server-based plug-in. 2 Select Ping Server.
Starting the server
❖ Starting the server
1 Right click on the server-based plug-in. 2 Select Start.
3 You are notified that the start command has been invoked on the server. 4 The server’s log is retrieved and displayed on the bottom panel to show the
status of the server.
Restarting the server
❖ Restarting the server
1 Right click on the server-based plug-in. 2 Select Restart.
3 You are notified that the restart command has been invoked on the server. 4 The server’s log is retrieved and displayed on the bottom panel to show the
CHAPTER 4 Agent Management Console Features and Functionality
Stopping the server
❖ Stopping the Server
1 Right Click on the server-based plug-in. 2 Select Stop Server.
3 You are notified that the stop command has been invoked on the server. 4 The server’s log is retrieved and displayed on the bottom panel to show the
status of the server.
Retrieving the server log
❖ Retrieving the server log
1 Right click on the server-based plug-in. 2 Select Retrieve server log.
3 The server’s log is retrieved and displayed on the bottom panel.
Managing attributes
Agent Services and Agent Plug-ins contain attributes that can be managed individually. An attribute has a name, type, access level, description and value. Depending on the attribute's access level, you can assign permissions for UA-defined roles.
Viewing attributes
You can view an attribute through the details pane of Sybase Central. The details pane shows:
• Name – is the name of the attribute
• Type – is the Java class or datatype of the attribute
• Access – shows whether the attribute is readable and or writable: • RO – read only
Managing attributes
• WO – write only
• Value – the display of the attribute’s value is dependent on its access as well as your login’s rights.
• Description – displays the description of the attribute
Updating attribute values
❖ Updating attribute values
1 Right click on the attribute.
2 If the attribute is writable and you have sufficient permissions, you can select Update.
3 For an attribute where you have insufficient access, you are prompted for additional credentials.
4 You are prompted for a new attribute value. 5 Enter the new value and click OK.
Viewing properties and changing permissions
❖ Viewing attribute properties1 Right click on the attribute. 2 Select properties.
3 The properties dialog displays.
4 The details tab has read-only information about:
• Name
• Type • Access • Description
5 The permissions tab has a list of roles to which you can grant and revoke access.
CHAPTER 4 Agent Management Console Features and Functionality
Managing operations
An operation is a method or function of an agent service or agent plug-in.
Viewing operations
❖ Viewing operations
1 Select a service or a plug-in.
2 On the details pane, select the operations tab. 3 The operations tab has information about
• Name – is the name of the operation.
• Signature – the signature is the parameters for the operation. • Return Type – is the type of data or object that is returned by the
operation.
• Description – of the operation.
A P P E N D I X A
Password Encryption and
Security Configuration
Password encryption utility
A password encryption utility passencrypt is available in the agent bin directory. It can be used to generate encrypted passwords using a supported encryption algorithm.
Syntax of passencrypt:
passencrypt [-help] -[algorithm <encryption_algorithm>] [-provider <cipher_provider_class>] -text <clear_text>
where:
• help – print help
• algorithm – is the encryption algorithm, and is optional. The default value is DES. The supported algorithms are DES and RSA.
• provider – is the cipher provider class, optional. The default DES provider Sun’s JCE. Default RSA provider is
org.bouncycastle.jce.provider.BouncyCastleProvider. • text – clear text, required.
Topic Page
Password encryption utility 33 Enabling Rivest-Shamir-Adleman (RSA) encryption 34 Adaptive Server agent plug-in server password encryption 35 Pluggable Authentication Module (PAM) configuration 35
Enabling Rivest-Shamir-Adleman (RSA) encryption
Enabling Rivest-Shamir-Adleman (RSA) encryption
Due to United States export restrictions, Unified Agent does not ship with an RSA encryption provider. Unified Agent has been tested with theBouncyCastle encryption provider. To enable RSA base encryption complete the following steps:
1 Download the the Bouncy Castle RSA encryption provider at http://www.bouncycastle.org.
2 Register Bouncy Castle with JRE by:
a Copying the bcprov-jdk14-124.jar to $SYBASE/shared-1_0/JRE-1_4/lib/ext or %SYBASE%\shared-1_0\JRE-1_4\lib\ext.
b Adding the following line to $SYBASE/shared-1_0/JRE-1_4/lib/security/java.security or the
%SYBASE%\shared-1_0\JRE-1_4\lib\security\java.security after the line
"security.provider.<number>=sun.security.jgss.SunPr ovider":
security.provider.<nextnumber>=org.bouncycastle .jce.provider.BouncyCastleProvider
Note Security providers are listed sequentially. Modify next number to be the next sequential number.
3 From within the Agent Management Console, change the following attributes values in the Security Service:
encryptionAlgorithm = RSA cipherProviderClass =
org.bouncycastle.jce.provider.BouncyCastleProvider
APPENDIX A Password Encryption and Security Configuration
Adaptive Server agent plug-in server password
encryption
The Adaptive Server agent plug-in requires a valid and privileged Adaptive Server login and password to perform its management functions. These functions include retrieving the server log and checking user roles for other parts of the Authentication systems. The password is encrypted using the Data Encryption Standard (DES). To change the password:
1 Create an encrypted form of the password using the passencrypt program. First, change directory to $SYBASE_UA/bin or
%SYBASE_UA%\bin. Then, execute the passencrypt utility. For example, enter:
passencrypt –text <clear-text-password>
Remember the encrypted string that was produced.
2 Start the Agent Management Console (AMC) which runs as a Plug-in under Sybase Central.
3 Connect to the Agent. If the agent is not listed as a child of AMC add the Agent by using the drop down menu on AMC and choosing “Add Agent.” A dialog will appear requesting the host and port name. The agent host name is the network name of the host that the agent is running. The port is typically 9999 but that can be changed on a per agent basis. Use the drop down menu over the Agent and choose “Connect as”. Enter a user name and password that provides and administrative role over the
ASEAgentPlugin.
4 Locate the ASEAgentPlugin in the plug-ins tab. On the detail pane locate the “Attributes” tab and find the “password” attribute. Update the password attribute with the saved results of the passencrypt program from above by using the drop down menu over the password attribute and choosing “update”.
The ASE Agent Plug-in password has now been changed.
Pluggable Authentication Module (PAM) configuration
After enabling the UNIX login modules on UNIX platforms, complete the following steps using an ID with root privileges:Pluggable Authentication Module (PAM) configuration
For Solaris platforms: 1 Append the contents of the $SYBASE_UA/utility/sunos/pam.conf file, provided with the Unified Agent, to the /etc/pam.conf file on your Solaris platform.
2 Restart the PAM services.
For Linux platforms: 1 Copy the $SYBASE_UA/utility/linux/sybase-ua file, provided with the Unified Agent, to the /etc/pam.d directory on your Linux platform.
2 Restart the PAM services.
For HP-UX platforms: 1 Append the contents of the $SYBASE_UA/utility/hp-ux/pam.conf file, provided with the Unified Agent, to the /etc/pam.conf file on your HP-UX platform.
2 Restart the PAM services. For IBM AIX
platforms: 1 Create or edit the contents of the content of the $SYBASE_UA/utility/aix/pam.conf/etc/pam.conf file and include the file, provided with the UnifiedAgent.
A P P E N D I X B
SNMP Agent Plug-in
Overview
The Sybase Adaptive Server Simple Network Management Protocol (SNMP) Agent Plug-in is a Unified Agent Framework plug-in, which provides SNMP-based network monitoring for Adaptive Servers. SNMP provides a means to monitor and control network devices, usually in TCP/IP networks.
SNMP sends messages, called protocol data units (PDUs), to different parts of a network. SNMP-compliant devices, called agents, store data about themselves in Management Information Bases (MIBs) and return this data to the SNMP requesters.
The Adaptive Server SNMP Agent Plug-in implements the Adaptive Server Management Information Base (MIB). The Adaptive Server MIB contains descriptions of the objects SNMP manages.
Terminology
These acronyms are used throughout this document for the SNMP Agent Plug-in.
JMX Java Management Extension. Supplies tools for managing and monitoring applications, system objects, devices, and service-oriented networks. This API allows Java classes to be dynamically constructed and changed. UAF is implemented using JMX.