Copyright © 2010 by Liferay, Inc.
Put ISBN Number Here if this is a published work
This work is offered under the Creative Commons Attribution-Share Alike Unported license.
You are free:
● to share—to copy, distribute, and transmit the work
● to remix—to adapt the work
Under the following conditions:
● Attribution. You must attribute the work in the manner specified by the author or licensor (but not in any way that suggests that they endorse you or your use of the work).
● Share Alike. If you alter, transform, or build upon this work, you may distribute the resulting work only under the same, similar or a compatible license.
The full version of this license appears in the appendix of this book, or you may view it online here:
http://creativecommons.org/licenses/by-sa/3.0 Contributors:
Ray Auge, Jian Cao (Steven), Brian Chan, Alice Cheng, Bryan Cheung, Ivan Cheung, Shepherd Ching, Alexander Chow, Bruno Farache, Jorge Ferrer, Mike Han, Jeffrey Handa, JR Houn, Scott Lee, Wei Hong Ma (Sai), Charles May, James Min, Alberto Montero, Jerry Niu, Michael Saechang, Li Ji Shan (Dale), Ed Shin, Joseph Shum, Stephen Wilburn, Michael Young
1. Introduction...15
ROBUST FUNCTIONALITY...16
AWARD-WINNING USER INTERFACE ...17
MULTI-TENANCYVIA COMMUNITIESAND ORGANIZATIONS ...17
FLEXIBLE ARCHITECTURE ...17
ENTERPRISE APPLICATION INTEGRATION ...17
SECURITY ...17
HIGH AVAILABILITYAND HIGH PERFORMANCE ...18
THEMINGAND EASEOF BRANDING ...18
READY INTEGRATION ...19
CUSTOMIZATIONAND EASEOF DEVELOPMENT...19
2. Initial Setup...21
EDITIONSOF LIFERAY...21
OBTAINING LIFERAY...22
INSTALLINGA BUNDLE...23
INSTALLING LIFERAYFORAN ENTERPRISE...25
SAMPLE DATA...25
LIFERAY HOME...25
DATABASE SETUP...26
DEFAULT METHOD: AUTOMATIC...26
MANUAL METHOD...26
TURNINGA BUNDLEINTOAN ENTERPRISE PORTAL...27
THEPORTAL-EXT.PROPERTIES FILE...29
INSTALLING LIFERAYONAN EXISTING APPLICATION SERVER...30
INSTALLING LIFERAYIN 10 EASY STEPS...30
GLASSFISH 3.X...32 JETTY 6...35 JBOSS 5.X...37 RESIN 3.1.X...40 RESIN 3.2.X...42 TOMCAT 6.0.X...43 WEBLOGIC 10...45 ORACLE WEBLOGIC 10.3...49 WEBSPHERE 6.1...53 WEBSPHERE 7.0...57
MAKING LIFERAY COEXISTWITH OTHER JAVA EE APPLICATIONS...60
SUMMARY...61
3. Configuration...63
LIFERAY'S USER INTERFACE...63
NAVIGATING LIFERAY...64
NAVIGATINGTHE CONTROL PANEL...67
PORTAL ARCHITECTURE...69 USERS...70 USER GROUPS...70 ROLES...71 ORGANIZATIONS...71 COMMUNITIES...72 TEAMS...72
USINGTHE CONTROL PANEL...72
ADDING USERS...73
USER MANAGEMENT...75
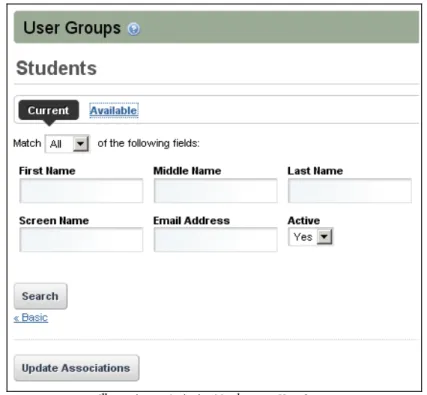
USER GROUPS...82
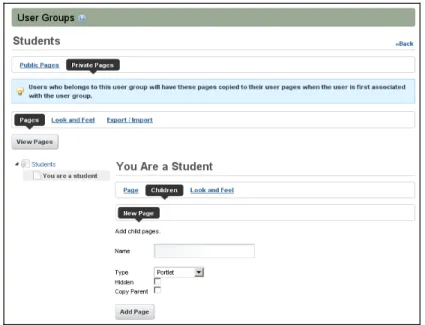
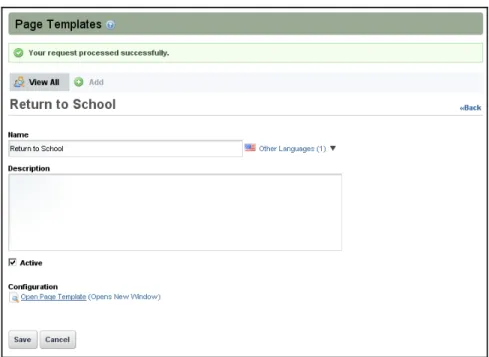
USER GROUPSAND PAGE TEMPLATES...82
ROLES...87
DEFINING PERMISSIONSONA ROLE...88
SPECIAL NOTEABOUTTHE POWER USERS ROLE...91
TEAMS...91
GLOBAL SERVER SETTINGS...92
PASSWORD POLICIES...92
SETTINGS...93
GENERAL...94
AUTHENTICATION: GENERAL SETTINGS...94
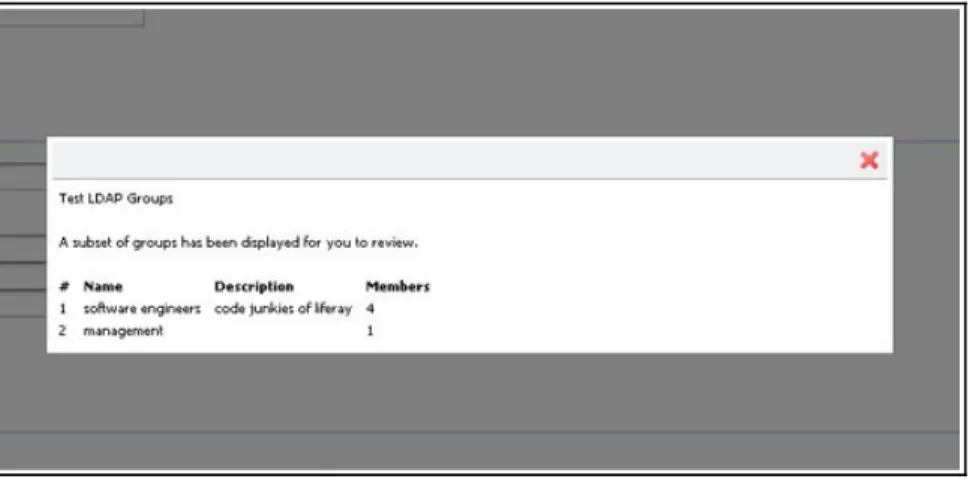
AUTHENTICATION: LDAP...95
EXPORT...99
SINGLE SIGN-ON...102
AUTHENTICATION: CENTRAL AUTHENTICATION SERVICE (CAS)...102
AUTHENTICATION: FACEBOOK...104
AUTHENTICATION: NTLM...104
AUTHENTICATION: OPENID...104
AUTHENTICATION: OPENSSO...105
AUTHENTICATION: SITEMINDER...106
USERS...106
MAIL HOST NAMES...107
EMAIL NOTIFICATIONS...107
IDENTIFICATION...107
MISCELLANEOUS: DISPLAY SETTINGS...107
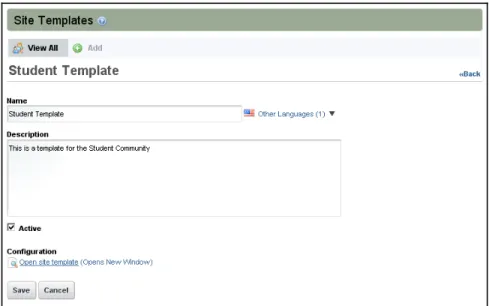
CUSTOM FIELDS...107 MONITORING...108 PLUGINS CONFIGURATION...108 PAGE TEMPLATES...109 SITE TEMPLATES...110 SERVER ADMINISTRATION...111 RESOURCES...111 LOG LEVELS...111 PROPERTIES...112 CAPTCHA...112 DATA MIGRATION...112 FILE UPLOADS...113 MAIL...113 OPENOFFICE...113 SCRIPT...114 SHUTDOWN...114 PORTAL INSTANCES...114 PLUGINS INSTALLATION...115 SUMMARY...115
4. Web Content Management...117
PAGE CREATIONAND MANAGEMENT...118
MANAGING PAGES...119
UNDERSTANDING PUBLICAND PRIVATE PAGES...120
MANAGE PAGES INTERFACE...120
LOOKAND FEEL...121
EXPORT / IMPORT...122 SETTINGS...122 VIRTUAL HOST...123 LOGO...123 SITEMAP...123 MONITORING...124
WHATIS WEB CONTENT MANAGEMENT?...135
HOW CAN LIFERAY'S WCM HELP YOU? ...135
WHAT FEATURES DOES LIFERAY WCM HAVE? ...135
BUILDINGA SITEWITH LIFERAY'S WCM...136
SIMPLE CONTENT CREATION...136
WEB CONTENT SECTIONOFTHE CONTROL PANEL...137
PUBLISHING CONTENTWITHTHE WEB CONTENT DISPLAY PORTLET...140
ADVANCED CONTENT CREATION...143
STRUCTURES...144
TEMPLATES ...148
ASSIGNING TEMPLATE PERMISSION...153
ADVANCED PUBLISHING OPTIONS...153
SCHEDULING WEB CONTENT ...154
TAGSAND CATEGORIES...155
USING LIFERAY'S INTEGRATED WORKFLOWWITH CONTENT MANAGEMENT...157
DEFINING WORKFLOWSFOR WEB CONTENT ...158
USINGTHE ASSET PUBLISHER PORTLET...159
QUERYINGFOR CONTENT...160
ORDERINGAND GROUPING...162
DISPLAY SETTINGS...163
SUMMARY...166
5. Liferay Collaboration Suite...167
SCOPES...168 ARCHIVED SETUPS...169 PERMISSIONS...170 SHARING...170 ANY WEB SITE...171 FACEBOOK...171 GOOGLE GADGET...172 NETVIBES...173 FRIENDS...173 BLOGS...173 THE BLOGS PORTLET...174
CONFIGURINGTHE BLOGS PORTLET...175
PERMISSIONS...176
ADDING BLOG ENTRIES...176
AGGREGATING BLOG ENTRIES...179
CALENDAR...180
CONFIGURINGTHE CALENDAR PORTLET...181
EMAIL FROM...181
EVENT REMINDER EMAIL...181
DISPLAY SETTINGS...182
USINGTHE CALENDAR PORTLET...182
CHAT ...183
MAIL...184
MESSAGE BOARDS...186
GENERAL...186
EMAIL FROM...187
MESSAGE ADDED EMAIL...187
MESSAGE UPDATED EMAIL...187
THREAD PRIORITIES...187
USER RANKS...188
RSS...188
PERMISSIONS...188
ADDING CATEGORIESAND MAILING LISTS...189
MOVING THREADS...193 DELETING THREADS...193 BANNING USERS...194 SPLITTING THREADS...194 EDITING POSTS...194 PERMISSIONS...194 WIKIS...195
GETTING STARTEDWITHTHE LIFERAY WIKI...195
MANAGING WIKIS...197
ADDINGAND EDITING WIKI PAGES...198
PAGE DETAILS...200
DETAILS...200
HISTORY...200
INCOMING / OUTGOING LINKS...201
ATTACHMENTS...201
NAVIGATINGINTHE WIKI PORTLET...201
TAGS...201
CATEGORIES...202
SOCIAL EQUITY...204
SUMMARY...205
6. Advanced Liferay Configuration...207
THEPORTAL-EXT.PROPERTIES FILE...208
PROPERTIES OVERRIDE...208
LIFERAY HOME...209
PORTAL CONTEXT...209
RESOURCE REPOSITORIES ROOT...209
TECHNOLOGY COMPATIBILITY KIT...209 SCHEMA...209 UPGRADE...210 VERIFY...210 AUTO DEPLOY...210 HOT DEPLOY...213 HOT UNDEPLOY 213 SANDBOX DEPLOY...214 PLUGIN...214 PORTLET...214 PERSISTENCE...215 JPA...215 TRANSACTION MANAGER...216 PORTLET COORDINATION...217 THEME...218 RESOURCE ACTIONS...218 MODEL HINTS...219 SERVICE BUILDER...219 SPRING...219 HIBERNATE...220 JDBC...222 CUSTOM SQL...224 DATABASE...224 EHCACHE...225 JAVASCRIPT...225 COMBO...227 SQL DATA...228 COMPANY...228 USERS...229 FACEBOOK CONNECTION...233
AUTHENTICATION TOKEN...233
GROUPSAND ROLES...234
ORGANIZATIONS...237
SECURITY MANAGER...238
BASIC AUTHENTICATION...238
LANGUAGESAND TIME ZONES...238
LOOKAND FEEL...240
LAYOUTS...240 EDITORS...240 FIELDS...241 REQUEST...241 SESSION...242 HTTP...244 JAAS...244 LDAP...245 CAS...247 NTLM...248 OPENID...248 OPENSSO...248 SITEMINDER...249 AUTHENTICATION PIPELINE...249 AUTO LOGIN...252
SSO WITH MAC (MESSAGE AUTHENTICATION CODE)...253
PASSWORDS...253 PERMISSIONS...255 CAPTCHA...257 STARTUP EVENTS...258 SHUTDOWN EVENTS...259 PORTAL EVENTS...259 LOGINEVENT...260 LOGOUTEVENT...260
DEFAULT LANDING PAGE...260
DEFAULT LOGOUT PAGE...260
DEFAULT GUEST PUBLIC LAYOUTS...260
DEFAULT USER PRIVATE LAYOUTS...261
DEFAULT USER PUBLIC LAYOUTS...262
SANITIZER...263
SOCIAL EQUITY...263
VAADIN...264
DEFAULT ADMIN...264
LAYOUTS...264
DEFAULT SETTINGS LAYOUTS...265
PORTLET URL...270
PREFERENCES...270
STRUTS...270
REDIRECT...270
IMAGES...271
FILESYSTEMHOOK...272
EDITORS...272 FIELDS...272 MIME TYPES...273 AMAZON...273 BROWSER LAUNCHER...273 CONTROL PANEL...274 INSTANT MESSENGER...274 LUCENE SEARCH...275
COMMUNICATION LINK...280 CLUSTER LINK...280 CLUSTER EXECUTOR...281 MINIFIER...281 MONITORING...282 MULTICAST...282
CONTENT DELIVERY NETWORK...283
COUNTER...283 LOCK...284 JBI...284 JCR...284 LIVE USERS...284 LOCK...285 MAIL...285 OPENOFFICE...287 POLLER...287 POP...287 QUARTZ...288 SCHEDULER...288 SEARCH CONTAINER...288 SHAREPOINT...288 SOCIAL BOOKMARKS...289 VELOCITY ENGINE...289 VIRTUAL HOSTS...290 HTTP...291 SERVLET FILTERS...291
UPLOAD SERVLET REQUEST...294
WEB SERVER...295
WEBDAV...295
MAIN SERVLET...295
AXIS SERVLET...295
GOOGLE GADGET SERVLET...296
JSON TUNNEL SERVLET...296
LIFERAY TUNNEL SERVLET...296
NETVIBES SERVLET...296
SPRING REMOTING SERVLET...296
WEBDAV SERVLET...296
WIDGET SERVLET...296
ADMIN PORTLET...296
ANNOUNCEMENTS PORTLET...297
ASSET PUBLISHER PORTLET...298
ASSET...298 BLOGS PORTLET...299 BREADCRUMB PORTLET...300 CALENDAR PORTLET...300 COMMUNITIES PORTLET...300 DISCUSSION TAG LIBRARY...301
DOCUMENT LIBRARY PORTLET...301
DOCKBAR PORTLET...302
FLAGS PORTLET...302
EMAIL NOTIFICATION SETTINGS...302
IFRAME PORTLET...302
IMAGE GALLERY PORTLET...303
LOGIN PORTLET...303
INVITATION PORTLET...303
MESSAGE BOARDS PORTLET...306
MY PLACES PORTLET...307
NAVIGATION PORTLET...308
NESTED PORTLETS PORTLET...308
PORTLET CSS PORTLET...308
SEARCH PORTLET...308
SHOPPING PORTLET...309
SOFTWARE CATALOG PORTLET...310
TAGS COMPILER PORTLET...310
TAGS PORTLET...310 TASKS PORTLET...310 TRANSLATOR PORTLET...311 WIKI PORTLET...311 PLUGIN MANAGEMENT...313 PORTLETS...313 THEMES...314 LAYOUT TEMPLATES...315 HOOK PLUGINS...315 WEB PLUGINS...315
INSTALLING PLUGINSFROM REPOSITORIES...316
INSTALLING PLUGINS MANUALLY...318
PLUGIN TROUBLESHOOTING...320
LIFERAY CONFIGURATION ISSUES...321
DEPLOY ISSUESFOR SPECIFIC CONTAINERS...323
CHANGINGTHE CONFIGURATION OPTIONSIN MULTIPLE PLACES...325
CREATING YOUR OWN PLUGIN REPOSITORY...325
THE SOFTWARE CATALOG...326
MANUALLY CREATING A SOFTWARE CATALOG...334
CONNECTINGTOA SOFTWARE CATALOG...334
LIFERAY SERVICES ORIENTED ARCHITECTURE...334
ACCESSING LIFERAY'S WSDL...337
SUMMARY...338
7. Enterprise Configuration...341
LIFERAY CLUSTERING...342
ALL NODES SHOULD BE POINTINGTOTHE SAME LIFERAY DATABASE...344
DOCUMENT LIBRARY CONFIGURATION...344
DEFAULT FILE SYSTEM HOOK...344
JACKRABBIT SHARING...344
OTHER STORAGE OPTIONS...345
SEARCH CONFIGURATION...347
PLUGGABLE ENTERPRISE SEARCH...347
LUCENE CONFIGURATION...349
HOT DEPLOY...351
DISTRIBUTED CACHING...351
HIBERNATE CACHE SETTINGS...353
CLUSTERING JACKRABBIT...354
WORKFLOWWITH KALEO...355
INSTALLATION...355
KALEO WORKFLOWINA NUTSHELL...356
PROCESS DEFINITIONS...356
WORKFLOWINTHE CONTROL PANEL ...364
INTEGRATINGWITH USERS, COMMUNITIES, ORGANIZATIONSAND ROLES...366
USING KALEO WORKFLOW PROCESSESIN LIFERAY PORTAL...367
PERFORMANCE TUNING...368
MEMORY...368
PORTLETS...372
READ-WRITER DATABASE CONFIGURATION...373
DATABASE SHARDING...374
SUMMARY...376
8. Maintaining A Liferay Portal...377
LIFERAY MONITORING USING GOOGLE ANALYTICS...377
BACKING UP A LIFERAY INSTALLATION...378
SOURCE CODE...379
LIFERAY'S FILE SYSTEM 379 DATABASE...379
LIFERAY'S LOGGING SYSTEM...380
UPGRADING LIFERAY...382
LIFERAY UPGRADE PROCEDURE...383
UPGRADE STEPS...383
UPGRADING FROM LIFERAY 5.1 TO LIFERAY 5.2...384
PREREQUISITE ...384
CHANGESINCONFIGURATIONPROPERTIES ...384
THEME UPGRADE ...385
API CHANGES ...386
UPGRADING FROM LIFERAY 5.2 TO LIFERAY 6.0...386
PREREQUISITE...387
UPGRADING YOUR PERMISSIONS ALGORITHM...387
UPGRADING EXT TO EXT PLUGINS...388
SUMMARY...388
9. Appendix: Documentation License...391
CREATIVE COMMONS LICENSE...391
LICENSE...391
CREATIVE COMMONS NOTICE...399
P
P
REFACE
REFACE
Liferay Portal is the leading open source portal in the marketplace today. It has received awards from multiple leading industry publications, and has an impressive download rate (over 60,000 downloads a month and over a mil-lion downloads total). Why is it so popular? Because Liferay Portal has out of the box all of the features you need to run a successful web site, whether that site is a public Internet site, a corporate Intranet, a social network, or any-thing in between.
This book was written for anyone who has any part in setting up, using, or maintaining a web site built on Liferay Portal. It will guide you step-by-step through the installation, configuration, and use of Liferay Portal. Use this book as a handbook to getting your Liferay Portal installation running smoothly, and then keep it by your side as you configure and maintain your Liferay-powered web site.
The information contained herein has been organized in a way that makes it easy to locate information. We start at the beginning: downloading and configuring the Liferay bundles. From there, we work all the way through the multiple ways of installing Liferay manually on an application server, to portal administration. After this, we cover the many features of Liferay Portal, including its web content management system, its collabora-tion suite, and the Kaleo workflow engine. From there we go into advanced administration topics and enterprise configuration, including clustering and integrating Liferay with other services, such as search. We round things out by showing you how to optimize Liferay's performance, how to manage a
What's New in the Fourth Edition
Liferay Portal version 6 is a significant upgrade from the last release. This edition of the book has been exhaustively overhauled so that it covers Liferay Portal version 6 as well as contains material that hasn't been covered before. Of course all of the new portal properties are covered, upgrading and installing the new version is covered, and the rest of the book has been ex-haustively gone through and updated.
You'll be treated to an expanded control panel in Liferay Portal 6, and every option is detailed and explained here. You'll gain an understanding of all of the constructs within Liferay, including users, roles, communities, or-ganizations, user groups, and now teams.
You'll be introduced to Liferay portal's collaboration suite which in-cludes like blogs, calendar, chat, mail, message boards, and wikis. Your users will be able to collaborate like never before using this suite of integrated ap-plications.
But more than that, for the first time we've been able to provide docu-mentation on the use of Liferay portal's web content management suite. Now you'll have a ready reference showing you how to load and maintain your site's content without having to guess.
With all of this new stuff, the book is a bit thicker. But we've tried to keep it to a manageable size by excising material which applied to Liferay 4.x and below. The result is what you have in your hands: a lean, mean guide chock full of information that is relevant to you as you build your site on Liferay portal.
Conventions
Sections are broken up into multiple levels of headings, and these are de-signed to make it easy to find information.
Source code and configuration file directives are presented monospaced and in gray boxes, as below.
If source code goes multi-line, the lines will be \ separated by a backslash character like this.
Italics are used to represent links or buttons to be clicked on in a user in-terface.
Tip: This is a tip. Tips are used to indicate a suggestion or a piece of information that affects whatever is being talked about in the surrounding text. They are always accompan-ied by this gray box and the icon to the left.
Bold is used to describe field labels and portlets.
Page headers denote the chapters, and footers denote the particular sec-tion within the chapter.
Publisher Notes
It is our hope that this book will be valuable to you, and that it will be an indispensable resource as you begin to administer a Liferay portal server. If you need any assistance beyond what is covered in this book, Liferay, Inc. of-fers training, consulting, and support services to fill any need that you might have. Please see http://www.liferay.com/services for further information about the services we can provide.
It is entirely possible that some errors or mistakes made it into the final version of this book. Any issues that we find or that are reported to us by the community are documented on the Official Liferay Wiki. You can view them or contribute information that you've found about any issues here:
http://www.liferay.com/ community / wiki /-/ wiki /Main/Liferay+Administrator's+Guide+Errata
As always, we welcome any feedback. If there is any way you think we could make this book better, please feel free to mention it on our forums. You can also use any of the email addresses on our Contact Us page (http://www.liferay.com/contact-us). We are here to serve you, our users and customers, and to help make your experience using Liferay Portal the best it can be.
Author Notes
RICHARD SEZOV:
The first edition of this book was outlined in a small notebook (paper, not a computer) on a plane flying from Philadelphia to Los Angeles. Covering Liferay 4.3, it was the first actual, physical book Liferay produced. The book has come a long way since then, and somehow we're able to get it to be more comprehensive with each edition.
For this fourth edition, for the first time we have multiple authors. We did that in order to cover the material we needed to cover in such a short time, and also because in parallel, I am working on another book for de-velopers called Liferay in Action. I very much appreciate the help from my co-author, and am glad for his help. This book could not have come together without him. I also want to especially thank Stephen Wilburn for his contri-butions.
I have endeavored to give credit to everyone who made a contribution (it's on the copyright page), but if I missed somebody—which would not be surprising—please let me know so your name is not left out of the next edi-tion! I cannot express enough how wonderful it is to be surrounded by so
The engineering team at Liferay is a fantastic group of people, and the documentation team is highly indebted to them because we pepper them with so many questions all the time. So special thanks are due to Ray Auge, Julio Camarero, Nate Cavanaugh, Brian Chan, Alex Chow, Bruno Farache, Jorge Ferrer, and Mike Young. I also have to especially thank Cynthia Wil-burn, who keeps us all on track and who somehow juggles a huge incoherent pile of stuff that needs to get done into an organized plan that we can all fol-low.
I'd also like to thank my daughter Julia for the brightness of her coun-tenance and her marvelous ability to tell me when work is done and it's time to play. And of course, I want to thank my wife, Deborah, who continually has to put up with long hours as a computer widow, for her understanding and support—especially for this edition. I couldn't do any of this without her.
Rich Sezov
http://www.liferay.com/web/richard.sezov/ blog
STEPHEN KOSTAS:
As this book comes to completion, I'm approaching my one year an-niversary as a member of the Liferay team. Being part of Liferay has meant working with a great group of people from all over the world, each doing their part to bring us to the release of Liferay 6. It has also meant a lot of hard work, working with Rich, the other Steve, and the engineering team to make sure that this 4th edition of the Administrator's Guide provides
everything that you need to get Liferay working for you.
I suppose that this is where I should thank people, so thanks to Rich, for all of his toil and late nights spent putting this together, my wife Dana, for putting up with me paying attention to my laptop instead of her, and the en-gineering team, for answering our questions, providing us with all sorts of useful information, and of course, building Liferay.
Stephen Kostas
1.
1.
I
I
NTRODUCTION
NTRODUCTION
Liferay Portal is the world's leading open source enterprise portal solu-tion using the latest in Java and Web 2.0 technologies. Now in its 11th year of development, the award-winning Liferay Portal is one of the most widely de-ployed portal technologies on the market, with an estimated 250,000 deploy-ments worldwide.
More than a portal, Liferay is a platform for creating effective business applications and solutions. It offers a robust feature set, impressive scalabil-ity, time-saving development tools, support for over 30 languages, and a flex-ible, scalable architecture that is open source developed and enterprise re-fined. Notable differentiators include:
• Compatible with all major databases, operating systems, and app servers
• Hierarchical system of communities and organizations
• Granular, delegable permissioning system
• Highly scalable, supporting more than 5,000 concurrent transactions (33,000 simultaneous users) per server
• Real-world performance of millions of page views and 1.3 million users
• Supports 22 languages, out-of-the-box
Robust Functionality
The product is also known for robust functionality with over 60 out-of-the-box portlets that can be categorized into three main categories:
1. Content Management & Web Publishing
Liferay Portal’s built-in content management system is a structured system with support for roles-based workflow, separation of presentation from content creation, and editorial approval and ver-sioning processes. Its document library features verver-sioning, ment locking, and automatic file-type conversions for docu-ment-based collaboration, as well as WebDAV, and Microsoft Office® integration for dynamic document sharing. Content may also be stored on third-party systems such as Jackrabbit, Magnolia, and Al-fresco. What’s more, users can seamlessly integrate content with native collaboration and social networking features, as well as third party applications, to publish full-bodied enterprise solutions to the web.
2. Collaboration
Liferay’s collaboration suite includes Message Boards, Blogs, Wikis— featuring RSS capabilities, tagging, common meta-data, and social bookmarking—that work within Liferay Portal’s flexible system of communities and organizations. As a whole, they enable productive discussion around your collective knowledge; not only can users manage their own work experiences with our built-in webmail client and personal calendars, they can dynamically share their work and thoughts as part of a team.
3. Social Networking
Tying our content and collaboration features together is an enter-prise-ready social networking suite with presence-enabled features like instant messaging and activity tracking that facilitate fluid, real-time communication within your organization. Moreover, Liferay’s Social API gives users a platform for building their own social applic-ations. Users can plug into Liferay’s social capabilities and allow third party applications to take part in Liferay’s activity feeds, mem-ber and “friend” lists, and other social assets, and customize these assets per their specific needs. In essence, Liferay provides you with the tools and framework for building a fully functional social net-work that can be customized to meet your unique specifications.
Award-winning User Interface
Liferay offers a rich, easy-to-use “Web 2.0” interface using AJAX and oth-er presentation layoth-er technologies. It features effortless GUI-based poth-ersonal- personal-ization, drag-and-drop portlets, dynamic navigation and breadcrumb fea-tures, and an instant-add portlet library. The portal platform also integrates with YUI3, jQuery or your JavaScript library of choice.
Multi-tenancy via Communities and Organizations
Liferay Portal gives enterprises the ability to organize users by business-defined categories such as departments, geographies, or offices, as well as by cross-departmental teams and workgroups. Each community and organiza-tion can inherit and define its own permissions and administer user, group, and role management for the various portlets it chooses to include.
Virtual hosting allows them each to apply their own individual friendly URLs, themes, and configurations, independent of the others.
Flexible Architecture
Organizations choose Liferay Portal for the flexibility of its architecture and the ease of integration. Thanks to our use of Service Oriented Architec-ture, users get accelerated development cycles, re-usable services, and com-posite application development.
Enterprise Application Integration
Moreover, Liferay Portal is an open framework with a completely ex-posed API supporting web services (SOAP), JSON, RMI and our own propriet-ary tunneling classes. As long as your existing applications are open and provide support through some service layer or API, Liferay can integrate with those applications.
There is a range of options for application integration depending on your needs, from web services and a Liferay iFrame portlet for lighter integration scenarios, to a web proxy or WSRP for more complex integration scenarios.
Security
Liferay Portal uses industry standard, government-grade encryption technologies, including advanced algorithms such as DES, MD5, and RSA, and was benchmarked as among the most secure portal platforms using LogicLib-rary’s Logicscan suite. It offers a customizable single sign-on (SSO) that integ-rates with Yale CAS, JAAS, LDAP, Netegrity, Microsoft Exchange, and more.
What’s more, Liferay Portal ships with robust user management and se-curity features including password policies, user reminder settings, and com-plete log-in security procedures. Liferay also abides by OWASP guidelines to reduce the risk of security vulnerabilities. Other security features include:
• Pluggable Authentication • Email Verification
• Session Management
High Availability and High Performance
Liferay Portal has been tested to support more than 3,000 concurrent transactions (33,000 simultaneous users) on a single 8-core application serv-er, with mean login times under one second and maximum ½ throughput of 79+ logins per second. Our Web Content Management (WCM) system scales to beyond 150,000 concurrent users on a single Liferay Portal server with aver-age transaction times under 50ms and 35% CPU utilization; In high-traffic web-publishing scenarios, Liferay Portal has proven to handle millions of page views and over 1.3 million users. Additionally, in collaboration and so-cial networking scenarios, each physical server supports over 1300 concur-rent users at average transaction times of under 800ms.
Liferay Portal is also deployable to the Cloud and virtual server environ-ments and ensures high availability and performance with:
• Hardware/Software Load Balancing, HTTP Failover, Session
Replica-tion
• Distributed Cache using Lightweight Multicast Protocol • Terracotta, Oracle RAC, and other scalability solutions
Theming and Ease of Branding
Theming in Liferay Portal allows you to create dynamic sites of any kind, from traditional portals to heavily branded solutions that may not resemble a portal at all. Via the creation and dynamic inheritance of CSS and Javascript templates, you have full control over the look-and-feel of your site without actually having to modify any code within the portal or portlets. Since all components of the Liferay SDK (Themes, Hooks, Layout Templates and Port-lets) are hot deployable to your Liferay environment, you can install and change these customizations while the portal is still running. This makes for impressive flexibility in customizing Liferay Portal, extremely painless up-dates, as well as notable savings in development time.
Ready Integration
As the only independent enterprise portal on the market, Liferay is fully committed to keeping its platform compatible with all major databases, oper-ating systems, and application servers. Liferay Portal is built with standard integration technologies including JSR 168/286, JSR 170, WebDav, iCal and WSRP. The core source is comprised of open source frameworks such as Struts, Spring and Hibernate and the product runs PHP, Ruby, Python, Grails and other lightweight scripting technologies within a robust Java framework. Thanks to its adherence to open standards and this flexible architecture, Liferay Portal integrates easily with both open source and mainstay propriet-ary products such as Documentum, Microsoft Office®, Alfresco, Intalio, JasperSoft, Magnolia, MuleSource, Pentaho, Terracotta, and more.
Customization and Ease of Development
Created, designed, and honed by developers, Liferay Portal places high value on the ease of development and offers its own SDK. It includes tools such as Liferay Service Builder that automatically generates data tiers (SQL and Hibernate logic / classes), Spring Dependency Injection wiring, and Web Service access. This frees your development team to focus on higher priority matters like business logic. Meanwhile, Liferay Hooks give you access to modify core Liferay functionality without modifying Liferay’s core source code. Liferay’s extensible development environment permits an easy upgrade path for your customizations because it creates a clean separation between the platform and your modifications. The modular nature of our hooks res-ults in less code to maintain and fewer scenarios to test. Other features in-clude:
• Industry-standard Struts/Tiles MVC framework
• Integrated Kaleo workflow engine allowing developers to define dy-namic business processes (i.e., publishing and editorial approval, user registration, e-commerce transactions)
• Spring framework for easy transaction management
• Support for other frameworks including JSF and IceFaces, Wicket, Spring MVC, and others
2.
2.
I
I
NITIAL
NITIAL
S
S
ETUP
ETUP
Liferay Portal is one of the most flexible applications with regard to ap-plication server environment on the market today. You can install Liferay Portal on everything from a shared Tomcat installation to a multi-node cluster running a commercial application server, and on everything in between. In fact, Liferay is used successfully in all of these scenarios every day.
You will find that because Liferay is extremely flexible in its deployment options, it is easy to install as well. If you already have an application server, you can simply use the tools for deployment that came with your application server. If you do not have an application server, Liferay provides several ap-plication server bundles from which to choose. These are very easy to install and with a small amount of configuration can be made into production-ready systems.
Editions of Liferay
Liferay ships in two different editions: Liferay Portal Community Edition (CE) and Liferay Portal Enterprise Edition (EE). CE is the same Liferay Portal that has been available for years: frequently updated and bursting with the latest features, the Community Edition of Liferay Portal is offered for free un-der the Lesser GNU public license, an open source license. This license gives you the flexibility to link Liferay with your own code in your portlet, theme, hook, layout, Ext, or web plugins, no matter what license you use for your code. If, however, you modify Liferay directly, those modifications need to be contributed back to the open source product. This is really the best of both worlds: you have the freedom to do what you want with your code, and
Liferay Portal EE is a supported version of Liferay Portal for the enterprise. Hardened for security and designed to be rock solid stable, EE is offered with a subscription and support package, allowing organizations to build their portals on a stable version of the product that is offered over an extended period of time.
Because the release cycle for EE is longer than that for CE, each enter-prise release is supported for 4 years. All bug fixes in Liferay Portal are back-ported to your version of Liferay for the duration of your subscription. This gives organizations the peace of mind that comes from knowing that their Liferay-powered web sites are stable and will run for years to come, enabling them to build their sites on a proven, stable platform. Additionally, Liferay's professional services team offers training and consulting on the Enterprise Edition to ensure long-term support and stability for our clients.
Obtaining Liferay
The CE version of Liferay is freely downloadable from our web site at http://www.liferay.com. Click on the Downloads link at the top of the page, and you will be presented with multiple options for getting a copy of Liferay, including our convenient bundles or a .war package for installation on your application server of choice.
The EE version of Liferay is provided to you as a result of your support subscription. You will receive download links which will allow you to obtain a copy of a Liferay bundle or a .war package for installation on your application server of choice.
So what is a bundle anyway? A bundle is simply an open source applica-tion server with Liferay preinstalled. If you want to install a bundle, there is a list of bundles available. If you do not currently have an application server, it is best to download the Tomcat bundle, as Tomcat is one of the smallest and most straightforward bundles to configure. If you have an application server preference, you can also choose the server you prefer from the available Liferay Portal bundles. All of the bundles ship with a Java Runtime Environ-ment for Windows; if you are using a different operating system, you will need to have a JDK (Java Development Kit) installed prior to launching Liferay.
Please note that Liferay is not able to provide application server bundles for proprietary application servers such as WebLogic or WebSphere, because the licenses for these servers do not allow for redistribution. Liferay Portal, however, runs just as well on these application servers as it does on open source application servers. You will need to use the .war package to install Liferay on these application servers.
For a manual install, you will need the Liferay .war file as well as Liferay'-s dependency .jarLiferay'-s. Later in thiLiferay'-s chapter are inLiferay'-structionLiferay'-s for inLiferay'-stalling Liferay on many of the major application servers available today.
Installing a Bundle
Liferay bundles contain the same direct-ory structure regardless of application serv-er. The top-level folder is named for the re-lease of Liferay. This folder is also some-times called Liferay Home.
Inside this folder, you will find folders for various uses:
Data: This folder is used to store the embedded HSQL database which the bundles use, as well as the configuration and data for the Jackrabbit JSR-170 content repository and the Lucene search index.
Deploy: Plugins which you wish to deploy to Liferay can be copied into this folder. It is also used by Liferay's graphical plugin installer utility, which is available from the Control Panel.
License: Contains both Liferay's license and a file which describes the li-censes for many of the other open source projects that are used internally by Liferay.
[Application Server]: There will also be an application server folder which is different depending on which bundle you have downloaded. This folder contains the application server in which Liferay has been installed.
In most cases, installing a bundle is as easy as uncompressing the archive and then starting the application server. For example, if you were to install Liferay Portal on Tomcat, you would simply unzip the bundle to a location of your choice.
Now you would start Tomcat in the same way as you would if you had downloaded it manually. Tomcat is launched by way of a script which is found in its bin folder. If you drop to a command prompt and go to this folder, you can launch Tomcat via the following command on Windows:
startup
or the following command on Linux / Mac / Unix:
./startup.sh
The Liferay / Tomcat bundle will then launch. If you are on Windows, you will see another command prompt window appear with Tomcat's console Illustration 1: Bundle directory structure
in it. If you are on Linux, you can see the Tomcat console by issuing the fol-lowing command:
tail -f ../logs/catalina.out
Once Tomcat has completed its start up, it should automatically launch a web browser so you can see the home page. If it does not, launch your web browser and then go to the following address: http://localhost:8080. The de-fault Liferay home page will then appear in your web browser. It will be using an embedded database for its configuration, but it is fully functional. You can now begin exploring the various features of Liferay.
Liferay ships by default with a sample web site included, called 7 Cogs. You can access this site and log in as the various users to get familiar with Liferay and what it can do.
Installing a different bundle is done in exactly the same way: unzip the bundle into the folder of your choice, launch the application server, and then view the portal in your web browser.
As you can see, bundles are the easiest way to get started with Liferay. They come pre-configured with a running Liferay that can be used immedi-ately to explore all of the things that Liferay can do. And with minimal extra configuration (which we will see later), bundles can be converted into full production-ready systems.
Installing Liferay for an Enterprise
When it comes time to install Liferay Portal on your server, you'll find it is easiest to do this by starting with a bundle and then reconfiguring that bundle so that it is enterprise-ready. Because this is by far the quickest and easiest method to get a production Liferay system running, we will look at this first. Often, however, enterprises will have an established Java EE infra-structure upon which they would like to install Liferay. In this situation, a bundle will not suffice. Most of the rest of this chapter, therefore, will focus on installing Liferay onto an already-established application server.
Sample Data
Liferay CE ships with some sample data to help you see some of the things Liferay Portal can do. While the sample 7 Cogs data is a good example of how Liferay might be used, when you are ready to build your own site, you won't want that data cluttering up your database. So before you connect Liferay to your production database, you will want to make sure you have re-moved the sample 7 Cogs data from your Liferay installation. This is as simple as undeploying the application that installs the 7 Cogs data.
There is only one application included in the bundle that you will need to remove. It's a hook that copies the 7 Cogs data into the database when Liferay is started. Because we want to revert Liferay's behavior back to its defaults for a clean install, you will want to remove the sevencogs-hook application. The other two applications related to 7 Cogs are both themes, which you can leave installed if you wish.
If you forget to undeploy the sevencogs-hook application before you con-nect Liferay to your real database, the sample data will be created in your database and may cause issues, especially if you already have data in your database. So you want to make sure that you get sevencogs-hook undeployed before setting up your server. Use your application server's method for unin-stalling applications in order to remove them.
Liferay Home
Liferay Portal uses a special folder defined as Liferay Home. This folder is one folder higher than the location of the application server itself. This is why the bundles place the application server one folder in from the bundle's root folder.
If Liferay is unable to create the resources it needs in this folder, or if it finds itself running on certain application servers, it will fall back to defining the home folder in the home folder of the user ID that is running Liferay.
As described above in the Bundles section, the home folder is very im-portant to the operation of Liferay. The aforementioned folders (data, deploy,
and license) will be created there, and you can also put a special configuration file called portal-ext.properties there.
This file is fully documented in Chapter 6: Advanced Liferay Configuration, but we will use it in this chapter for some basic configuration, including set-ting up Liferay to talk to our database.
Database Setup
Default Method: Automatic
If you create your database and grant a user ID full access to it, Liferay can use that user ID to create its indexes and tables automatically. This is the recommended way to set up Liferay, as it allows you to take advantage of Liferay's ability to automatically maintain its database during upgrades or through various plugin installs which may create tables of their own. It is by far the best way to set up your Liferay installation.
If you will be setting up Liferay's database with the recommended per-missions, you can skip the next section.
Manual Method
Even though Liferay can create its database automatically, some enter-prises prefer not to allow the user ID configured in an application server to have the permissions over the database necessary for Liferay and its plugins to maintain their tables. For these organizations, Select, Insert, Update, and Delete are generally all the permissions that are granted, and so we will go over how to set up the database manually. If your organization is willing to grant the Liferay user ID permissions to create and drop tables in the data-base—and this is the recommended configuration—you can skip this section.
One other caveat is this: Liferay has an automatic database upgrade func-tion which runs when the version of Liferay is upgraded to a new release. If the user ID that accesses the database does not have enough rights to create /
Note: This is not the recommended set up for Liferay installations, but is documented here so that enterprises with more restrictive standards can install Liferay with more strict — but suboptimal — database settings. If it is at all possible, Liferay recommends that you use the automatic method as documented above instead of the procedure outlined below.
modify / drop tables in the database, you will need to grant those rights to the ID before you start your upgraded Liferay for the first time. Once the up-grade is complete, you can remove those rights until the next upup-grade. Addi-tionally, many plugins provided by Liferay require that new tables be added to Liferay's database. These plugins cannot be installed if Liferay does not have permission to create these tables automatically. If you wish to install these plugins, you will need to grant rights to create tables in the database before you attempt to install them.
Liferay provides an SQL script archive download on the web site. For the CE version, it is in the Additional Files section of the Downloads page. For the EE version, you will be provided a link to this archive. Download this file and unzip it. You will find that it contains a folder structure that is broken down by the type of script (full, minimal, or upgrade), and then further by database vendor type.
It is best to use the create-minimal script if you are installing a fresh version of Liferay on a development, QA, or production server. This script creates the necessary Liferay tables in the database, with a minimum config-uration. This is most appropriate for a new installation of Liferay.
The create script, by contrast, configures a Liferay database with a por-tion of the content from http://www.liferay.com embedded in it. This can be useful from a development perspective, as it contains working examples of the use of many of Liferay's features, including the Content Management System.
Inside the create or create-minimal folders are scripts for every data-base that Liferay supports. A DBA can use the script provided to create the Liferay database, complete with the indexes necessary for optimal perform-ance. Once this is done, be sure that the ID that the portal will use to connect to the database has at least Select, Insert, Update, and Delete permissions. Preferably, however, the ID should also have rights to create, modify, and drop tables and indexes, as this makes upgrading easier. This, however, is not necessary for the daily operation of Liferay.
Once your DBA has created the database and provided the credentials for accessing it, you are ready to begin 1) making a bundle enterprise-ready or 2) manually installing Liferay on your application server.
Turning a Bundle into an Enterprise Portal
Liferay Portal is distributed with the following bundle options for servlet containers and full Java EE application servers:
• Geronimo+Tomcat
• JBoss
• Jetty
• JOnAS
• Resin
• Tomcat 6.0
Choose your preferred bundle and download it from the downloads page on Liferay's web site or via the EE links that were provided to you. A pre-requisite for running any of the bundles is that you have the proper version of the Java Development Kit (1.5 or higher) installed on the machine to which you are installing Liferay. Make sure that you have also created the JAVA_HOME environment variable and have pointed it to your Java installation. Unzip the bundle to the location from which you are going to run it. For example, you might use D:\apps in Windows or /opt in Linux or UNIX vari-ants. The default bundle installation of Liferay Portal uses an embedded data-base. While this is a good method to have it up and running fast for evalu-ation or development, it has several drawbacks:
• Only one user can access it at a time. This is because the data is
stored on a file on disk and HSQL locks it when doing changes.
• The data is stored inside the bundle and might be lost on re-deployment.
• This configuration does not scale well and will have perform-ance problems when multiple users are accessing the system. Obviously, you do not want to be running Liferay against the embedded database. Fortunately, Liferay has great support for a good number of pro-duction-ready databases, and it is easy to configure Liferay to use them. The exact instructions will depend on the application server and database, but can be summarized as:
1. Create the database in your DBMS of choice (see the above section labeled Database Setup for further information).
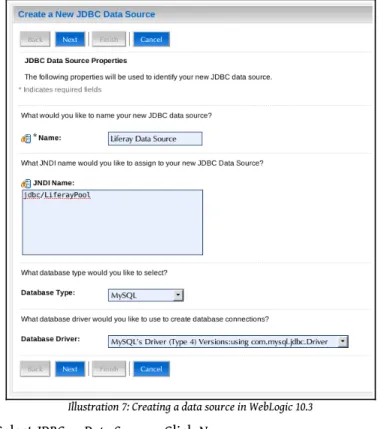
2. [Optional] Create a Data Source called jdbc/LiferayPool in your ap-plication server which points to your database and has the proper credentials to access it.
3. [Optional] Create a mail session called mail/MailSession in your ap-plication server which points to your mail server, so Liferay can send mail.
4. Create a portal-ext.properties file in the Liferay Home folder which either points directly to the database and mail session or points to the application server's Data Source and mail session. 5. Start Liferay. Liferay will create the tables automatically and start.
Otherwise, you will have had to prepare the database first by run-ning the appropriate create script.
Refer to the manual installation instructions below for further details on configuring the various application servers. There is no difference between the Liferay bundles and the regular distribution archives of the application servers as they are available from their own sites, with the exception that Liferay is pre-installed in them, and the JVM settings may have been optim-ized for use with Liferay.
The portal-ext.properties File
To point your Liferay bundle to your database, create a file called portal-ext.properties in your Liferay Home folder. This file overrides de-fault properties that come with Liferay. You are going to override the dede-fault configuration which points Liferay to the embedded HSQL database.
There are two ways to set up the connection:
• Use your application server's connection pool. • Use the built-in connection pool.
If you want to use your application server's connection pool, you will have to create one in your application server that points to your database. It should be called jdbc/LiferayPool. To cause Liferay to use this connection pool, add the following directive to your portal-ext.properties file:
jdbc.default.jndi.name=jdbc/LiferayPool
To use the built-in connection pool—based on C3P0—add the template which is provided in Chapter 6 for your particular database. The template for MySQL is provided as an example below.
# # MySQL # jdbc.default.driverClassName=com.mysql.jdbc.Driver jdbc.default.url=jdbc:mysql://localhost/lportal? useUnicode=true&characterEncoding=UTF-8&useFastDateParsing=false jdbc.default.username= jdbc.default.password=
You would provide the user name and password to the database as values for the username and password directives.
For mail, there is a similar procedure. Again, you have two ways to con-figure your server:
• Use your application server's mail session.
• Use the built-in mail session.
To use your application server's mail session, you will have to create one in your application server that points to your mail server. Once you have done that, add the following directive to your portal-ext.properties file:
mail.session.jndi.name=mail/MailSession
To use the built-in mail session, add the following directives to your portal-ext.properties file, substituting your mail server information:
mail.session.mail.pop3.host=localhost mail.session.mail.pop3.password= mail.session.mail.pop3.port=110 mail.session.mail.pop3.user= mail.session.mail.smtp.auth=false mail.session.mail.smtp.host=localhost mail.session.mail.smtp.password= mail.session.mail.smtp.port=25 mail.session.mail.smtp.user= mail.session.mail.store.protocol=pop3 mail.session.mail.transport.protocol=smtp
Save the file. You can now start your application server.
Installing Liferay on an Existing Application Server
This section contains detailed instructions for installing Liferay Portal using its WAR distribution. This allows system administrators to deploy Liferay in existing application server installations. It is recommended that you have a good understanding of how to deploy Java EE applications in your application server of choice.
Installing Liferay in 10 Easy Steps
There are 10 generic steps to installing Liferay on an existing application server:
1. Obtain the Liferay .war file and the dependencies archive.
2. Make sure you do not have an application listening at the root (/) of your server. If you do, move it to a different context or undeploy it. 3. Decide whether you want to use your application server's data
want to use your application server's data source, create a data source for Liferay called jdbc/LiferayPool.
4. Decide whether you want to use your application server's mail ses-sion or if you want to use the one included with Liferay. If you want to use your application server's mail session, create one called mail/MailSession.
5. Shut your application server down.
6. Extract the dependencies to a location on your server's global class path. This allows both Liferay and plugins to access these dependen-cies.
7. Create a portal-ext.properties file and place it in the Liferay Home folder. See the notes on specific application servers below for the location of this folder for your application server.
8. Add either the JNDI name of your data source or the JDBC paramet-ers above to connect Liferay to your database.
9. Add either the JNDI name of your mail session or the mail paramet-ers above to connect Liferay to your mail server.
10. Start your application server, deploy the Liferay .war file, and start it.
The instructions below are specific for each application server that Liferay supports. Liferay supports a wide combination of application servers and databases. Because of this, for brevity this section assumes MySQL as the database, that the database has already been created, and that you are using your application server's mail session and data source. To use other data-bases, substitute the JDBC driver and URL construct for your database in place of the MySQL ones shown here.
We also assume your application server is already installed and running successfully. If you still need to install your application server, please follow your vendor's instructions first.
The following instructions assume an installation on a local machine. When installing to a remote server, substitute localhost with the host name or IP of the server.
Tip: Note that Liferay 5.x and above requires JDK 1.5 or greater. Do not attempt to install Liferay 6.x on an application server that runs under Java 1.4 or lower; it will not work. If you are running an ap-plication server that ships with a JDK and that JDK is 1.4 or lower, you will need to upgrade your application server in order to run cur-rent versions of Liferay Portal. Liferay 4.x, however, will run fine on these ap-plication servers.
Remember, for all of these application servers, create your portal-ext.-properties file in the Liferay Home folder and make sure it points to your database connection pool and mail session.
GlassFish 3.x
Liferay Home is in the Glassfish root folder. We will assume for these in-structions that you are using the default domain stored in [GlassFish Root]/glassfish/domains/domain1.
1. Before starting GlassFish, you will need to modify some settings in the domain you will be using to increase the default amount of memory available. In your domain folder is a config folder. Open the file called domain.xml in this folder.
2. At approximately line 166 of this file, you will find the following JVM option being set:
<jvm-options>-Xmx512m</jvm-options>
Change this to:
<jvm-options>-Xmx1024m</jvm-options>
3. Add another line after this line with the following JVM option:
<jvm-options>-XX:MaxPermSize=256m</jvm-options>
Save and close the file.
4. In your domain folder is a folder called docroot. This folder contains a default page for the domain in a file called index.html. Delete or move this file to another location.
5. Extract the Liferay dependencies archive into your domain's lib folder. Extract your database's JDBC driver here as well.
6. On Glassfish 3.0.1, you will need to extract commons-codec.jar from the Liferay WAR file, rename it to commons-codec-repackaged.jar, and copy it to [Glassfish Root]/glassfish/modules/, overwriting Glassfish's version of the file
Database Configuration
If you want GlassFish to manage the data source, use the following in-structions. If you want to use the built-in Liferay data source, you can skip this section.
1. Go to the GlassFish console URL: http://localhost:4848. 2. Under Other Tasks, select Create New JDBC Connection Pool.
3. In the first screen, give it a name of LiferayPool, a Resource Type of javax.sql.ConnectionPoolDataSource, and select MySQL as the Database Vendor. Click Next.
4. On the next page, scroll down to the Additional Properties section. Find the property called URL, and set its value to:
jdbc:mysql://localhost/lportal?
useUnicode=true&characterEncoding=UTF-8&emulateLocators=true
5. If your database is not on the same server as GlassFish, substitute your database server's host name for localhost above.
6. Click Add Property, and add a property called user with a value of the user name to connect to the database.
7. Click Add Property again, and add a property called password with a value of the password to connect to the database.
8. Click Finish.
9. You will now see a list of Connection Pools. To test your connection, click the LiferayPool and click the Ping button. If you get a Ping
Succeeded message, everything has been set up correctly.
10. Click JDBC Resources. You will see a list of JDBC Resources by JNDI Name.
11. Click New.
12. Make the JNDI Name jdbc/LiferayPool and select the LiferayPool you created earlier.
13. Click OK.
Mail Configuration
If you want GlassFish to manage your mail session, follow the instruc-tions below. If you want Liferay to manage your mail session, you can skip this section.
1. Under Resources, click JavaMail Sessions. 2. Click New.
3. Give the JavaMail Session a JNDI name of mail/MailSession, and fill out the rest of the form with the appropriate information for your mail server.
Click OK.
Deploy Liferay
1. Create a file called portal-ext.properties. Add the following dir-ectives to the file:
jdbc.default.driverClassName=com.mysql.jdbc.Driver jdbc.default.url=jdbc:mysql://localhost/lportal?
useUnicode=true&characterEncoding=UTF-8&useFastDateParsing=false jdbc.default.username=root
jdbc.default.password=root
If you are using GlassFish's data source, add the JNDI name instead:
jdbc.default.jndi.name=jdbc/LiferayPool
Do the same thing for the Mail Session. If you are using the built-in configuration, set the following properties for your system:
mail.session.mail.pop3.host=localhost mail.session.mail.pop3.password= mail.session.mail.pop3.port=110 mail.session.mail.pop3.user= mail.session.mail.smtp.auth=false mail.session.mail.smtp.host=localhost mail.session.mail.smtp.password= mail.session.mail.smtp.port=25 mail.session.mail.smtp.user= mail.session.mail.store.protocol=pop3 mail.session.mail.transport.protocol=smtp
If you are using GlassFish's mail session, add the JNDI name instead:
Save and close the file.
2. Go to the GlassFish console URL: http://localhost:4848 3. Click Applications in the tree on the left.
4. Click the Deploy button.
5. Under Packaged File to Be Uploaded to the Server click Choose File, and browse to the location of the Liferay .war file.
6. Leave the rest of the defaults and click OK.
Liferay will be deployed and started automatically.
Jetty 6
Liferay Home is one folder above Jetty's install location. 1. Download and install Jetty 6.
2. Download the Liferay Portal .war file. 3. Download Liferay Portal Dependencies.
4. Copy the dependencies to$JETTY_HOME/lib/ext. 5. Edit $JETTY_HOME/extra/etc/start-plus.config.
$(jetty.home)/lib/ext/
$(jetty.home)/lib/ext/*
6. Create a data source bound to jdbc/LiferayPool by editing $JETTY_HOME/etc/jetty.xml. <Call name="addService"> <Arg> <New class="org.mortbay.jetty.plus.JotmService"> <Set name="Name">TransactionMgr</Set> <Call name="addDataSource"> <Arg>jdbc/LiferayPool</Arg> <Arg> <New class="org.enhydra.jdbc.standard.StandardXADataSource"> <Set name="DriverName">com.mysql.jdbc.Driver</Set> <Set name="Url">jdbc:mysql://localhost/lportal? useUnicode=true&characterEncoding=UTF-8</Set> <Set name="User"></Set> <Set name="Password"></Set> </New> </Arg> <Arg> <New class="org.enhydra.jdbc.pool.StandardXAPoolDataSource"> <Arg type="Integer">4</Arg> <Set name="MinSize">4</Set> <Set name="MaxSize">15</Set> </New> </Arg> </Call> </New> </Arg> </Call>
7. Download mysql-connector-java-{$version}-bin.jar and copy to $JETTY_HOME/lib/ext. This is the JDBC driver for MySQL. If you are using a different database, copy the appropriate driver.
8. Create a mail session bound to mail/MailSession by editing $JETTY_HOME/etc/jetty.xml: <Call name="addService"> <Arg> <New class="org.mortbay.jetty.plus.MailService"> <Set name="Name">MailService</Set> <Set name="JNDI">mail/MailSession</Set> <Put name="mail.smtp.host">localhost</Put> </New> </Arg> </Call> 9. Create $JETTY_HOME/etc/jaas.config.
PortalRealm {
com.liferay.portal.kernel.security.jaas.PortalLoginModule required; };
10. Create directory $JETTY_HOME/webapps/root and unpack the Liferay .war file into it.
11. Go to $JETTY_HOME/webapps/root/WEB-INF/lib and delete xerces-Impl.jar and xml-apis.jar.
15. Copy $JETTY_HOME/webapps/root/WEB-INF/lib/commons-logging.-jar to $JETTY_HOME/ext (overwriting the existing one).
16. Create batch file: run.bat.
@echo off
if "" == "%JAVA_HOME%" goto errorJavaHome
%JAVA_HOME%/bin/java -Xmx512m -Dfile.encoding=UTF8 -Duser.timezone=GMT -Djava.security.auth.login.config=../etc/jaas.config
-DSTART=../extra/etc/start-plus.config -jar ../start.jar ../etc/jetty.xml goto end
:errorJavaHome
echo JAVA_HOME not defined. goto end
:end
Note: If you get a java.lang.OutOfMemoryError exception while starting up Jetty, give your JVM more memory by setting -Xmx1024m.
Start Liferay by running run.bat. Open your browser to http://local-host:8080. You should see the default Liferay home page.
JBoss 5.x
Liferay Home is one folder above JBoss's install location.
1. Download and install JBoss AS 5.0.1 GA into your preferred directory. This directory will be referred to below as $JBOSS_HOME.
2. Download the latest version of the Liferay Portal .war file.
3. Remove hibernate-validator.jar from $JBOSS_HOME/common/lib. 4. Go to $JBOSS_HOME/server/default/lib/. Download
is the JDBC connector for MySQL. Use the appropriate driver for your database.)
5. Download Liferay's Portal Dependencies. Unzip to $JBOSS_HOME/server/default/lib.
6. Configure JAAS. Edit $JBOSS_HOME/server/default/conf/lo-gin-config.xmland comment out the entire XML for policy other in lines 115-131.
<!--<application-policy name = "other">--> ...
<!--<authentication>
<login-module code = "org.jboss.security. auth.spi.UsersRolesLoginModule"
flag = "required" /> </authentication> </application-policy>-->
Database Configuration
If you want JBoss to manage the data source, use the following instruc-tions. If you want to use the built-in Liferay data source, you can skip this section.
Create $JBOSS_HOME/server/default/deploy/liferay-ds.xml with the following content: <datasources> <local-tx-datasource> <jndi-name>jdbc/LiferayPool</jndi-name> <connection-url> jdbc:mysql://localhost/lportal? useUnicode=true&characterEncoding=UTF-8 </connection-url> <driver-class>com.mysql.jdbc.Driver</driver-class> <user-name></user-name> <password></password> <min-pool-size>0</min-pool-size> </local-tx-datasource> </datasources> Mail Configuration
If you want JBoss to manage the mail configuration, use the following in-structions. If you want to use the built-in Liferay mail session, you can skip this section.
Set mail properties by replacing the contents of $JBOSS_HOME/server/default/deploy/mail-service.xml with:
<?xml version="1.0"?> <server>
<mbean code="org.jboss.mail.MailService" name="jboss:service=MailSession"> <attribute name="JNDIName">mail/MailSession</attribute>
<attribute name="User">nobody</attribute> <attribute name="Password">password</attribute> <attribute name="Configuration">
<configuration>
<property name="mail.store.protocol" value="imap" /> <property name="mail.transport.protocol" value="smtp" /> <property name="mail.imap.host" value="localhost" /> <property name="mail.pop3.host" value="localhost" /> <property name="mail.smtp.host" value="localhost" /> </configuration>
</attribute> </mbean> </server>
Deploy Liferay
1. Delete all the files and folders in $JBOSS_HOME/server/default/de-ploy/ROOT.war
2. Unzip the Liferay .war file to the ROOT.war directory.
3. Remove jaxrpc.jar, stax.jar, xercesImpl.jar, xml-apis.jar from:
$JBOSS_HOME/server/default/deploy/ROOT.war/WEB-INF/lib 4. Navigate to the Liferay Home folder, which is one folder above
JBoss's install location.
5. Create a file called portal-ext.properties. Add the following dir-ectives to the file:
jdbc.default.driverClassName=com.mysql.jdbc.Driver jdbc.default.url=jdbc:mysql://localhost/lportal?
useUnicode=true&characterEncoding=UTF-8&useFastDateParsing=false jdbc.default.username=root
jdbc.default.password=root
If you are using JBoss's data source, add the JNDI name instead:
jdbc.default.jndi.name=jdbc/LiferayPool
Do the same thing for the Mail Session. If you are using the built-in configuration, set the following properties for your system:
mail.session.mail.pop3.host=localhost mail.session.mail.pop3.password= mail.session.mail.pop3.port=110
mail.session.mail.pop3.user= mail.session.mail.smtp.auth=false mail.session.mail.smtp.host=localhost mail.session.mail.smtp.password= mail.session.mail.smtp.port=25 mail.session.mail.smtp.user= mail.session.mail.store.protocol=pop3 mail.session.mail.transport.protocol=smtp
If you are using JBoss's mail session, add the JNDI name instead:
mail.session.jndi.name=mail/MailSession
Save and close the file.
Start JBoss. Open your browser to http://localhost:8080. You should see the default Liferay home page.
Resin 3.1.x
Liferay Homeis one folder above Resin's install location.
1. Download and install Resin into your preferred directory. From now on, the directory where you installed Resin will be referred to as $RESIN_HOME.
2. Edit $RESIN_HOME/conf/resin.conf. Replace lines 8-13 with:
<class-loader> <tree-loader path="${resin.home}/lib"/> <tree-loader path="${server.root}/lib"/> <compiling-loader path="$ {server.rootDir}/common/classes"/> <library-loader path="${server.rootDir}/common/lib"/> </class-loader>
And add the following:
<database> <jndi-name>jdbc/LiferayPool</jndi-name> <driver type="com.mysql.jdbc.Driver"> <url>jdbc:mysql://localhost/lportal? useUnicode=true&characterEncoding=UTF-8</url> <user></user> <password></password> </driver> <prepared-statement-cache-size>8</prepared-statement-cache-size> <max-connections>20</max-connections> <max-idle-time>30s</max-idle-time> </database>
<resource jndi-name="mail/MailSession" type="javax.mail.Session"> <init>
<mail.store.protocol>imap</mail.store.protocol> <mail.transport.protocol>smtp</mail.transport.protocol> <mail.imap.host>localhost</mail.imap.host> <mail.pop3.host>localhost</mail.pop3.host> <mail.smtp.host>localhost</mail.smtp.host> </init> </resource> <system-property javax.xml.parsers.DocumentBuilderFactory="org.apache.xerces.jaxp.Do cumentBuilderFactoryImpl" /> <system-property javax.xml.parsers.SAXParserFactory="org.apache.xerces.jaxp.SAXParser FactoryImpl" /> <system-property javax.xml.transform.TransformerFactory="org.apache.xalan.processor.T ransformerFactoryImpl" /> <system-property org.xml.sax.driver="org.apache.xerces.parsers.SAXParser" />
3. Go to $RESIN_HOME and create a new directory called common/lib. Download mysql-connector-java-{$version}-bin.jar and copy to this directory. This is the JDBC connector for MySQL. If you are using another database, substitute this with the appropriate driver. 4. Download the Liferay Portal Dependencies and unzip into
$RES-IN_HOME/common/lib.
5. Delete contents of $RESIN_HOME/webapps/ROOT.
6. Unzip liferay-portal-x.x.x.war to $RESIN_HOME/webapps/ROOT. 7. If you are using Resin 3.1.9 or higher, remove
$RES-IN_HOME/lib/portlet-01.jar. This contains the old Portlet 1.0 classes. The Portlet 2.0 classes are backwards compatible, so this should not affect anything.
8. Next, you will need several .jar files which are included as part of the Liferay source distribution. Many application servers ship with these already on the class path, but Resin does not. The best way to get the appropriate versions of these files is to download the Liferay source code and get them from there. Once you have downloaded the Liferay source, unzip it to a temporary folder.
1. Go to $LIFERAY_SOURCE/lib/development/ and copy activa-tion.jar and mail.jar to $RESIN_HOME/common/lib. Copy sax-path.jar and xalan.jar to $RESIN_HOME/lib.
2. Go to $LIFERAY_SOURCE/lib/portal and copy xercesImpl.jar and xml-apis.jar to $RESIN_HOME/lib.