Thomas Eschenbacher
Nieuwe vertaler: Dit document is nog maar gedeeltelijk
vertaald. Wilt u meehelpen, stuur een bericht naar:
Vertaler/Nalezer: Freek de Kruijf
K
K
1 Inleiding 15
1.1 Kwave hulpbronnen . . . 16
1.2 Revisiegeschiedenis van Kwave . . . 16
2 Installatie 17 2.1 Hoe Kwave te verkrijgen . . . 17
2.2 Vereisten . . . 17
2.3 Manual Compilation and installation . . . 18
2.4 Build options . . . 19
2.5 Building RPM packages from tar.bz2 archives . . . 19
2.5.1 With working rpmbuild -ta . . . 19
2.5.2 With broken rpmbuild -ta support . . . 20
2.6 Building RPM packages from GIT . . . 20
2.6.1 Checking out the sources . . . 20
2.6.2 Updating fresh sources from GIT . . . 21
2.6.3 Compileren . . . 21
2.7 Building a DEB package for testing and personal use . . . 22
2.8 Building CPU optimized packages . . . 22
2.8.1 RPM optimizations . . . 23
2.8.2 How to pass optimizer options to the compiler manually . . . 23
3 Basics about digital audio 24 3.1 The analogue world . . . 24
3.2 Digitalization . . . 25
3.3 Sample Encoding . . . 26
4 Using Kwave 28
4.1 User Interface Mode . . . 28
4.2 Memory Setup . . . 30
4.3 Opdrachtregel . . . 31
4.3.1 List of Files or Commands . . . 31
4.3.2 GUI Type . . . 31
4.3.3 Xt Toolkit options . . . 31
4.3.4 Opstartopties . . . 31
4.4 Bestanden openen en opslaan . . . 32
4.4.1 Ondersteunde bestandsformaten . . . 32
4.4.2 Converting to and from .wav . . . 32
4.4.3 Format of ASCII files . . . 33
4.5 Een nieuw bestand aanmaken . . . 33
4.6 Opnemen . . . 34
4.7 Afspelen . . . 35
4.8 Bestandseigenschappen . . . 37
4.9 Zooming and navigating . . . 37
4.9.1 Zooming in and out . . . 37
4.9.2 Scrolling left and right . . . 38
4.9.3 Using the overview . . . 38
4.9.4 Vertical zoom . . . 38 4.10 How to select . . . 39 4.10.1 Selecting channels . . . 39 4.10.2 Selecting samples . . . 39 4.11 Klembord . . . 40 4.12 Slepen en neerzetten . . . 40
5 Automization and Scripting with Kwave 41 5.1 General Syntax . . . 41
5.2 Using the Command Line . . . 41
5.3 Script bestanden van Kwave . . . 42
5.3.1 Algemene structuur . . . 42
5.3.2 Comments and Empty Lines . . . 42
5.3.3 Termination . . . 43
5.3.4 Labels . . . 43
5.4 Overzicht van de opdrachten . . . 43
5.5 a . . . 43
5.5.1 about_kde . . . 43
5.5.1.1 Syntax:about_kde() . . . 43
5.5.2 add_label . . . 43
5.5.2.2 Parameters . . . 43 5.5.3 add_track . . . 44 5.5.3.1 Syntax:add_track() . . . 44 5.5.3.2 Zie ook . . . 44 5.6 c . . . 44 5.6.1 clipboard_flush . . . 44 5.6.1.1 Syntax:clipboard_flush() . . . 44 5.6.2 close . . . 44 5.6.2.1 Syntax:close() . . . 44 5.6.2.2 Zie ook . . . 44 5.6.3 continue . . . 44 5.6.3.1 Syntax:continue() . . . 44 5.6.3.2 Zie ook . . . 44 5.6.4 copy . . . 44 5.6.4.1 Syntax:copy() . . . 44 5.6.4.2 Zie ook . . . 45 5.6.5 crop . . . 45 5.6.5.1 Syntax:crop() . . . 45 5.6.6 cut . . . 45 5.6.6.1 Syntax:cut() . . . 45 5.7 d . . . 45 5.7.1 delayed . . . 45
5.7.1.1 Syntax:delayed(milliseconds,command) . . . . 45
5.7.1.2 Parameters . . . 45
5.7.1.3 Zie ook . . . 45
5.7.2 delete . . . 46
5.7.2.1 Syntax:delete() . . . 46
5.7.3 delete_label . . . 46
5.7.3.1 Syntax:delete_label(index) . . . 46
5.7.3.2 Parameters . . . 46
5.7.4 delete_track . . . 46
5.7.4.1 Syntax:delete_label(index) . . . . 46
5.7.4.2 Parameters . . . 46
5.7.5 dump_metadata . . . 46
5.7.5.1 Syntax:dump_metadata() . . . 46
5.8 e . . . 46
5.8.1 edit_label . . . 46
5.8.1.1 Syntax:edit_label(index) . . . . 46
5.8.1.2 Parameters . . . 47
5.8.2 expandtolabel . . . 47
5.9.1 fileinfo . . . 47
5.9.1.1 Syntax:fileinfo(index) . . . . 47
5.9.1.2 Parameters . . . 47 5.9.2 forward . . . 47 5.9.2.1 Syntax:forward() . . . 47 5.9.2.2 Zie ook . . . 47 5.10 g . . . 48 5.10.1 goto . . . 48
5.10.1.1 Syntax:goto(pos) . . . . 48
5.10.1.2 Parameters . . . 48
5.11 i . . . 48
5.11.1 insert_at . . . 48
5.11.1.1 Syntax:insert_at(pos) . . . . 48
5.11.1.2 Parameters . . . 48
5.11.1.3 Zie ook . . . 48
5.11.2 insert_track . . . 48
5.11.2.1 Syntax:insert_track(index) . . . . 48
5.11.2.2 Parameters . . . 48
5.11.2.3 Zie ook . . . 49
5.12 l . . . 49
5.12.1 loadbatch . . . 49
5.12.1.1 Syntax:loadbatch(filename) . . . . 49
5.12.1.2 Parameters . . . 49 5.12.2 loop . . . 49 5.12.2.1 Syntax:loop() . . . 49 5.12.2.2 Zie ook . . . 49 5.13 m . . . 49 5.13.1 menu . . . 49
5.13.1.1 Syntax:menu(command,path, [hotkey], [id]) . . . . 49
5.13.1.2 Parameters . . . 49
5.13.1.3 Sub Commands . . . 50
5.13.2 msgbox . . . 52
5.13.2.1 Syntax:msgbox(text) . . . 52
5.13.2.2 Parameters . . . 52
5.14 n . . . 52
5.14.1 newsignal . . . 52
5.14.1.1 Syntax:newsignal(samples,rate,bits,tracks) . . . 52
5.14.1.2 Parameters . . . 52 5.14.2 next . . . 52 5.14.2.1 Syntax:next() . . . 52 5.14.2.2 Zie ook . . . 52 5.15 o . . . 53 5.15.1 open . . . 53
5.15.1.1 Syntax:open([filename]) . . . . 53
5.15.1.2 Parameters . . . 53
5.15.1.3 Zie ook . . . 53
5.15.2 openrecent . . . 53
5.15.2.1 Syntax:openrecent(filename) . . . . 53
5.15.2.2 Parameters . . . 53 5.15.2.3 Zie ook . . . 53 5.16 p . . . 53 5.16.1 paste . . . 53 5.16.1.1 Syntax:paste() . . . 53 5.16.1.2 Zie ook . . . 54 5.16.2 pause . . . 54 5.16.2.1 Syntax:continue() . . . 54 5.16.2.2 Zie ook . . . 54 5.16.3 playback_start . . . 54 5.16.3.1 Syntax:playback_start() . . . 54 5.16.4 plugin . . . 54
5.16.4.1 Syntax:plugin(name, [parameter...]) . . . . 54
5.16.4.2 Parameters . . . 54
5.16.4.3 Zie ook . . . 54
5.16.5 plugin:execute . . . 55
5.16.5.1 Syntax:plugin:execute(name, [parameter...]) . . . 55
5.16.5.2 Parameters . . . 55
5.16.6 plugin:setup . . . 55
5.16.6.1 Syntax:plugin:setup(name, [parameter...]) . . . . 55
5.16.6.2 Parameters . . . 55 5.16.7 prev . . . 55 5.16.7.1 Syntax:prev() . . . 55 5.16.7.2 Zie ook . . . 55 5.17 q . . . 56 5.17.1 quit . . . 56 5.17.1.1 Syntax:quit() . . . 56 5.17.1.2 Zie ook . . . 56 5.18 r . . . 56 5.18.1 redo . . . 56 5.18.1.1 Syntax:redo() . . . 56 5.18.1.2 Zie ook . . . 56 5.18.2 redo_all . . . 56 5.18.2.1 Syntax:redo_all() . . . 56 5.18.2.2 Zie ook . . . 56 5.18.3 reenable_dna . . . 56
5.18.3.1 Syntax:reenable_dna() . . . 56 5.18.4 reset_toolbars . . . 56 5.18.4.1 Syntax:reset_toolbars() . . . 56 5.18.5 revert . . . 57 5.18.5.1 Syntax:revert() . . . 57 5.18.6 rewind . . . 57 5.18.6.1 Syntax:rewind() . . . 57 5.18.6.2 Zie ook . . . 57 5.19 s . . . 57 5.19.1 save . . . 57 5.19.1.1 Syntax:save() . . . 57 5.19.1.2 Zie ook . . . 57 5.19.2 saveas . . . 57
5.19.2.1 Syntax:saveas([filename]) . . . . 57
5.19.2.2 Parameters . . . 57
5.19.3 saveselect . . . 58
5.19.3.1 Syntax:saveselect() . . . 58
5.19.3.2 Zie ook . . . 58
5.19.4 select_gui_type . . . 58
5.19.4.1 Syntax:select_gui_type(mode) . . . 58
5.19.4.2 Parameters . . . 58 5.19.5 select_track:all . . . 58 5.19.5.1 Syntax:select_track:all() . . . 58 5.19.5.2 Zie ook . . . 58 5.19.6 select_track:invert . . . 58 5.19.6.1 Syntax:select_track:all() . . . 58 5.19.6.2 Zie ook . . . 58 5.19.7 select_track:none . . . 59 5.19.7.1 Syntax:select_track:none() . . . 59 5.19.7.2 Zie ook . . . 59 5.19.8 select_track:off . . . 59
5.19.8.1 Syntax:select_track:off(index) . . . 59
5.19.8.2 Parameters . . . 59
5.19.9 select_track:on . . . 59
5.19.9.1 Syntax:select_track:on(index) . . . 59
5.19.9.2 Parameters . . . 59
5.19.10 select_track:toggle . . . 59
5.19.10.1 Syntax:select_track:toggle(index) . . . 59
5.19.10.2 Parameters . . . 59
5.19.11 selectall . . . 60
5.19.11.1 Syntax:selectall() . . . 60
5.19.12.1 Syntax:selectnext() . . . 60 5.19.12.2 Zie ook . . . 60 5.19.13 selectnextlabels . . . 60 5.19.13.1 Syntax:selectnextlabels() . . . 60 5.19.13.2 Zie ook . . . 60 5.19.14 selectnone . . . 60 5.19.14.1 Syntax:selectnone() . . . 60 5.19.15 selectprev . . . 60 5.19.15.1 Syntax:selectprev() . . . 60 5.19.15.2 Zie ook . . . 61 5.19.16 selectprevlabels . . . 61 5.19.16.1 Syntax:selectprevlabels() . . . 61 5.19.16.2 Zie ook . . . 61 5.19.17 selecttoleft . . . 61 5.19.17.1 Syntax:selecttoleft() . . . 61 5.19.17.2 Zie ook . . . 61 5.19.18 selecttoright . . . 61 5.19.18.1 Syntax:selecttoright() . . . 61 5.19.18.2 Zie ook . . . 61 5.19.19 selectvisible . . . 61 5.19.19.1 Syntax:selectvisible() . . . 61 5.19.20 start . . . 62 5.19.20.1 Syntax:start() . . . 62 5.19.20.2 Zie ook . . . 62 5.19.21 stop . . . 62 5.19.21.1 Syntax:stop() . . . 62 5.19.21.2 Zie ook . . . 62 5.19.22 sync . . . 62 5.19.22.1 Syntax:sync() . . . 62 5.19.22.2 Zie ook . . . 62 5.20 u . . . 62 5.20.1 undo . . . 62 5.20.1.1 Syntax:undo() . . . 62 5.20.1.2 Zie ook . . . 62 5.20.2 undo_all . . . 63 5.20.2.1 Syntax:undo_all() . . . 63 5.20.2.2 Zie ook . . . 63 5.21 v . . . 63 5.21.1 view:scroll_end . . . 63 5.21.1.1 Syntax:view:scroll_end() . . . 63 5.21.1.2 Zie ook . . . 63
5.21.2.1 Syntax:view:scroll_left() . . . 63 5.21.2.2 Zie ook . . . 63 5.21.3 view:scroll_next . . . 63 5.21.3.1 Syntax:view:scroll_next() . . . 63 5.21.3.2 Zie ook . . . 63 5.21.4 view:scroll_next_label . . . 63 5.21.4.1 Syntax:view:scroll_next_label() . . . 63 5.21.4.2 Zie ook . . . 64 5.21.5 view:scroll_prev . . . 64 5.21.5.1 Syntax:view:scroll_prev() . . . 64 5.21.5.2 Zie ook . . . 64 5.21.6 view:scroll_prev_label . . . 64 5.21.6.1 Syntax:view:scroll_prev_label() . . . 64 5.21.6.2 Zie ook . . . 64 5.21.7 view:scroll_right . . . 64 5.21.7.1 Syntax:view:scroll_right() . . . 64 5.21.7.2 Zie ook . . . 64 5.21.8 view:scroll_start . . . 64 5.21.8.1 Syntax:view:scroll_start() . . . 64 5.21.8.2 Zie ook . . . 64 5.21.9 view:zoom_all . . . 65 5.21.9.1 Syntax:view:zoom_all() . . . 65 5.21.10 view:zoom_in . . . 65
5.21.10.1 Syntax:view:zoom_in([position]) . . . 65
5.21.10.2 Parameters . . . 65
5.21.10.3 Zie ook . . . 65
5.21.11 view:zoom_normal . . . 65
5.21.11.1 Syntax:view:zoom_normal() . . . 65
5.21.12 view:zoom_out . . . 65
5.21.12.1 Syntax:view:zoom_out([position]) . . . . 65
5.21.12.2 Parameters . . . 65 5.21.12.3 Zie ook . . . 66 5.21.13 view:zoom_selection . . . 66 5.21.13.1 Syntax:view:zoom_selection() . . . 66 5.22 w . . . 66 5.22.1 window:activate . . . 66
5.22.1.1 Syntax:window:activate(titel]) . . . . 66
5.22.1.2 Parameters . . . 66
5.22.2 window:cascade . . . 66
5.22.2.1 Syntax:window:cascade() . . . 66
5.22.3 window:click . . . 66
5.22.3.2 Parameters . . . 66
5.22.4 window:close . . . 67
5.22.4.1 Syntax:window:close(klasse) . . . . 67
5.22.4.2 Parameters . . . 67
5.22.5 window:minimize . . . 67
5.22.5.1 Syntax:window:minimize . . . 67
5.22.6 window:mousemove . . . 67
5.22.6.1 Syntax:window:resize(klasse,x,y) . . . . 67
5.22.6.2 Parameters . . . 67 5.22.7 window:next_sub . . . 68 5.22.7.1 Syntax:window:next_sub() . . . 68 5.22.8 window:prev_sub . . . 68 5.22.8.1 Syntax:window:prev_sub() . . . 68 5.22.9 window:resize . . . 68
5.22.9.1 Syntax:window:resize(class,width,height) . . . . 68
5.22.9.2 Parameters . . . 68
5.22.10 window:screenshot . . . 68
5.22.10.1 Syntax:window:screenshot(class,filename) . . . . 68
5.22.10.2 Parameters . . . 68
5.22.11 window:sendkey . . . 69
5.22.11.1 Syntax:window:sendkey(class,key code) . . . 69
5.22.11.2 Parameters . . . 69 5.22.11.3 Zie ook . . . 69 5.22.12 window:tile . . . 69 5.22.12.1 Syntax:window:tile() . . . 69 5.22.13 window:tile_vertical . . . 69 5.22.13.1 Syntax:window:tile_vertical() . . . 69 6 Plug-ins 70 6.1 Plugin Reference . . . 70
6.2 about (About Kwave) . . . 70
6.3 amplifyfree (Amplify Free) . . . 71
6.4 band_pass (Band Pass Filter) . . . 72
6.5 codec_ascii (ASCII Codec) . . . 73
6.6 codec_audiofile (Audiofile Codec) . . . 73
6.7 codec_flac (FLAC Codec) . . . 74
6.8 codec_mp3 (MP3-codec) . . . 75
6.9 codec_ogg (Ogg Codec) . . . 76
6.10 codec_wav (WAV-codec) . . . 76
6.11 debug (Debugfuncties) . . . 77
6.14 insert_at (Invoegen op) . . . 79
6.15 lowpass (Low Pass Filter) . . . 80
6.16 memory (Memory Settings) . . . 81
6.17 newsignal (New Signal) . . . 82
6.18 noise (Noise Generator) . . . 83
6.19 normalize (Normalisatie) . . . 83
6.20 notch_filter (Notch-filter) . . . 84
6.21 pitch_shift (Pitch Shift) . . . 85
6.22 playback (Afspelen) . . . 86
6.23 record (Opnemen) . . . 87
6.24 reverse (Omdraaien) . . . 87
6.25 samplerate (Conversie van samplesnelheid) . . . 87
6.26 saveblocks (Save Blocks) . . . 88
6.27 selectrange (Select Range) . . . 91
6.28 sonagram (Sonagram) . . . 92
6.29 stringenter (Voer commando in) . . . 93
6.30 volume (Volume) . . . 94
6.31 zero (Nulgenerator) . . . 95
7 Developer’s Guide to Kwave 96 7.1 Creating API documentation . . . 96
7.2 Starting in a test environment . . . 96
8 Vragen en antwoorden 98 9 Dankbetuigingen en licentie 100 9.1 Belangrijkste auteurs . . . 100
9.2 Major Contributors . . . 100
9.3 Minor contributors, copyright holders and others . . . 101
9.4 Met dank aan . . . 102
Lijst van tabellen
5.1 Vertaaltabel voor URL-codering . . . 42
Hoofdstuk 1
Inleiding
Dit is ´´Kwave´´, een eenvoudige geluidsbewerker voor KDE-4. zijn functies omvatten: • een gebruikersinterface dat omgeschakeld kan worden naar SDI-, MDI- of tabbladmodus • eenvoudige functies voor knippen, kopiëren en plakken
• ongedaan maken/opnieuw op meerdere niveaus • labeling van signalen
• Functies voor opnemen, inclusief vooraf opnemen • Afspelen via ALSA en OSS
• Opnemen via ALSA en OSS
• Importeren/exporteren van/naar MP3 • Importeren/exporteren van/naar Ogg/Vorbis • Importeren/exporteren van/naar FLAC • enige functies voor analyse zoals Sonagram
• gebruikt intern 24 bits vaste precisie voor gegevens in samples • vrij te selecteren samplesnelheden
• ondersteuning voor bewerking van multikanaal bestanden
• afspelen van geluidsbestanden met meerder kanalen (geluidsuitvoer zal gemixt worden tot mono of stereo)
• uitbreidbaar via een gemakkelijk te gebruiken interface met plug-ins • importeren/exporteren van andere audio-formaten viaaudiofile
Als u geïnteresseerd bent in wat is gedaan en wat nog gedaan moet worden, kijk dan naar de bestanden CHANGES en TODO in het broncodepakket. Hulp en constructieve opmerkingen zijn altijd welkom.
1.1
Kwave hulpbronnen
Dus als u in contact wilt komen met de ontwikkelaars, enige verdere hulp nodig heeft bij het gebruik van Kwave, patches, bugrapporten of andere zaken wilt bijdragen, dan kunnen de vol-gende hulpbronnen interessant voor u zijn:
• Homepagina van het project
Voor informatie over nieuwe bijgewerkte uitgaven of andere informatie over dit project, neem een kijkje op deKwave homepagina
• E-maillijst
Als u enige hulp bij het gebruik van Kwave nodig hebt of mee wilt doen in het ontwikkelen, wordt dan lid van de e-mailijst van de ontwikkelaars van Kwave
´´https://lists.sourceforge.net/lists/listinfo/kwave-devel´´. • GIT-repository
Er is ook een GIT-repository, gehost doorSourceForgewaar u de broncode van de laatste ont-wikkelversie kunt vinden. Voor instructies over hoe toegang te krijgen tot de repository, lees in het hoofdstuk overbouwen vanuit GITof kijk op´´http://sourceforge.net/p/kwave/code/´´. Er is ook een goedwebinterfacedat u kunt gebruiken om door de broncode te bladeren.
1.2
Revisiegeschiedenis van Kwave
Dit project is gestart door Martin Wilz in de zomer van 1998 en is ontwikkeld en verbeterd door hem en enige andere mensen. In november 1999 is Thomas Eschenbacher hier en daar gestart met de reparatie van enige kleine bugs en steeds dieper in de broncode van het programma gestapt. Tot vandaag heeft hij bijna elke component van het programma uitgebreid, herschreven od herzien en veel tijd gestopt in de verbetering.
Sinds Kwave v0.8.0 is de log met wijzigingen niet langer in deze handleiding ingevoegd. Dus als u geïnteresseerd bent in een complete lijst met wijzigingen, dan kunt u de volledige geschiedenis hier vinden:http://sourceforge.net/p/kwave/code/ci/HEAD/tree/CHANGESof zelf door de broncode bladeren in hetGIT webinterface.
Hoofdstuk 2
Installatie
2.1
Hoe Kwave te verkrijgen
Kwave heeft een eigen homepagina onderhttp://kwave.sourceforge.net/. Hier kunt u verdere informatie vinden over het project, evenals informatie over de huidige stabiele en bijgewerkte ontwikkelversies.
If you want to get a Kwave release, you have the choice to visithttp://kwave.sourceforge.net/ download.htmland
• download a binary package of the latest stable version, if there is one for your distribution, • download a source RPM package of the latest stable version,
• compile on your own, from a .tar.bz2 archive with the source code of the latest stable version, • compile on your own, from the latest GIT source.
Don’t be afraid, compiling Kwave should be quite simple even if you are not a programmer. It just needs some developer packages to be installed.
2.2
Vereisten
Om Kwave met succes te kunnen gebruiken hebt u nodig:
• een computer met Linux (Kwave kan ook werken onder een ander besturingssysteem, maar dat hebben we nooit getest, laat het ons weten als u dat hebt werken op een ander platform / besturingssysteem)
• werkend geluid afspelen (niet echt vereist voor gebruik maar wat zou u willen doen met een geluidsbewerker als u het resultaat van uw werk niet kanhoren?)
• KDE-4.5 of hoger (minstens de bibliotheken, als u een fan van gnome bent, dan kunt u Kwave ook gebruiken als de juiste bibliotheken zijn geïnstalleerd).
• Qt-4.7 of hoger (komt normaal met KDE4) • ALSA 1.0.14 or higher (for record/playback) • PulseAudio 4.0 or higher (for record/playback)
• mad-0.15 or higher (optionally for MP3 import/export) • flac-1.2.0 or higher (for FLAC import/export)
• libsamplerate-0.1.3 or higher (sample rate conversion)
For a more complete and up-to-date list, please consult the’README’file that is included in the source distribution. This file also contains some special hints for getting Kwave running and/or building Kwave under some distributions.
If you intend to compile Kwave from the sources, you will need at least: • cmake-2.6.0 or newer
• A recent C/C++ compiler. GCC-4.x works fine, some older and any newer version (like gcc-5.0) may work too.
• The glibc2 (libc-6) development environment. On SuSE systems the package is called ´´libc´´, on other systems it might be called ´´libc-devel´´.
• The KDE4 development environment: ´´kdelibs4-devel´´, ´´kdemultimedia4-devel´´, ´´kdesdk4´´.
• The Qt4 development environment, the package is normally called ´´qt4-devel´´ or similar. • pulseaudio-0.9.16 or newer
• id3lib-devel-3.8.1 or newer • fftw-3.0 or newer
• mad-devel-0.15 or newer (if you have the permission to use MP3 code) • flac-devel-1.2.0 newer
• If you intend to get the Kwave sources via GIT, you will also need a current git package. • ...many other packages, please take a look at the’README’file included in the source package.
2.3
Manual Compilation and installation
Since version 0.7.10 Kwave uses cmake, a make system that is also used by KDE itself. So if you know how to build other KDE applications, you should not have any difficulties in building Kwave. If you run into problems please report them to the Kwavemailing list.
In order to compile and install Kwave on your system, it is best practice to do aout-of-treebuild. This means that you hold the sources of Kwave in one directory and build the package in another (temporary) directory.
For example, assuming that your sources are already unpacked in$HOME/src/kwave-0.9.0, you can do the following:
% mkdir / tmp / kwave - build % cd / tmp / kwave - build
% cmake $HOME / src / kwave -0 .9.0 [ build o p t i o n s ] % make
% su root -c " make i n s t a l l "
(Specifying build options is a way to enable or disable specific features. See the following section for descriptions)
2.4
Build options
By specifying build options, you can enable or disable some features of Kwave, like excluding some components or plugins from the generated package. Here is a list of the available options: • WITH_ALSAenable playback/recording via ALSA [on/off, default=on]
• WITH_DEBUGbuild a debug version [on/off, default=off] • WITH_DOCbuild online documentation [on/off, default=on] • WITH_FLACenable support for FLAC files [on/off, default=on]
• WITH_MP3enable support for mp3 files [on/off, default=off] Please note that you need the permission to use code covered by the MP3 software patents!
• WITH_OGG_OPUSenable support for Ogg/Opus files [on/off, default=on] • WITH_OGG_VORBISenable support for Ogg/Vorbis files [on/off, default=on]
• WITH_OPTIMIZED_MEMCPYuse an optimized version of memcpy, available for X86, X86_64 and PPC platforms [on/off, default=on]
• WITH_OSSenable playback/recording via OSS [on/off, default=on]
• WITH_PHONONenable playback via Phonon (for testing only) [on/off, default=off] • WITH_PULSEAUDIOenable playback/recording via PulseAudio [on/off, default=on]
These options can be passed tocmakewith-Doption=value. For example, if you want to enable
MP3 support, you can pass the corresponding option as follows:
% cmake [ sou rce d i r e c t o r y ] - D W I T H _ M P 3 = ON [ other o p t i o n s ...]
2.5
Building RPM packages from tar.bz2 archives
2.5.1
With working rpmbuild -ta
If you are running a system with RPM support, the preferred way to install Kwave on your system will be the creation of a nice RPM package. First you should get the current source of Kwave, either as a tar.bz2 archive from the Kwave download page or check out an up-to-date copy viaGIT(like described in thechapter about GIT) and read thenextchapter.
If you have downloaded tar.bz2 archives of Kwave, create and install the RPMs just by doing the following steps (where[arch]stands for the platform you have built the package and might
be something likei586,i686,sparcor whatever,XXX stands for the version number you have
downloaded).
To build the Kwave package and install it do: % r p m b u i l d - ta kwave - XXX . tar . bz2
% rpm -i / usr / src / red hat / RPMS /[ arch ]/ kwave - XXX .[ arch ]. rpm
OPMERKING
Note for SuSE users: you have to specify the directory/usr/src/packagesinstead of/usr/src/r edhat!
If you haven’t seen any errors, then that’s it and you can skip the rest of this chapter. If rpm was unable to build the packages and says something like ´´spec file not found´´, then go on and read
2.5.2
With broken rpmbuild -ta support
If you cannot getrpmbuild -taworking, here are the steps for making that manually (the hard way):
1. Go to your RPM ´´topdir´´. This normally is/usr/src/redhatfor the redhat distribution or
/usr/src/packagesif you have the SuSE distribution. % cd / usr / src / re dhat
2. Put the tar.bz2 archive into the SOURCES subdirectory (you have to replace ´´somewhere´´ with the real directory where the files are, of course).
% cp / s o m e w h e r e / kwave - XXX . tar . bz2 S O U R C E S
3. Extract the spec file from the archives and put it into the SPEC subdirectory. % tar - xOjf S O U R C E S / kwave - XXX . tar . bz2 \*. spec > SPECS / kwave . spec
4. Let rpm do the compile job and generate the rpm of Kwave. If you only want to make a binary package, you can specify -bb instead of-ba, or just-bsto build only a source package.
% r p m b u i l d - ba SPECS / kwave . spec
5. If everything was ok, you can install the binary rpm of Kwave, it will be in the BUILD directory. If you already have a version of Kwave installed, please remove it first or use the parameter-Uinstead of-ifor upgrading instead of installing.
% rpm - ivh BUILD /[ arch ]/ kwave - XXX .[ arch ]. rpm
2.6
Building RPM packages from GIT
2.6.1
Checking out the sources
For initially checking out the sources you will need some disk space (about 25 megabytes) in a directory of your choice, the git package of your favorite distribution and full access to the Internet. If you get error messages about rejected connections you either have typed something wrong or your provider doesn’t give you full access. A good place for the source files will be
´´$HOME/src´´.
1. First create the directory that will receive the subdirectory with Kwave sources and change into it:
% mkdir -p $HOME / src % cd $HOME / src
2. Then check out the latest sources from the GIT server:
% git clone git :// git . code . sf . net / p / kwave / code kwave
% git clone git :// git . code . sf . net / p / kwave / code kwave % cd kwave
% git c h e c k o u t tags /[ release - tag ]
You can look up the names of the release tags in the git web page athttp://sourceforge.net/ p/kwave/code/ref/master~/tags/. The release tags are always built out of the wordRel ease-and the version number of the release, with underscores instead of dots. For example ´´Release-0_9_0´´ for v0.9.0.
WAARSCHUWING
Theremust notbe a directory namedkwaveunder the directory you want to check out. Otherwise the git program will complain about already existing files and the checkout will not work.
2.6.2
Updating fresh sources from GIT
The procedure described in the previous section is only necessary once. For further updates it is much easier. Just change into the directory where you have the checked out sources and do the following to update to the latest version:
% git pull
Then go on to the next section and compile as usual.
OPMERKING
If you think that you have messed up your local source tree or if there are conflicts during updating and you want to start through from a clean state, you can do the following to discard all local changes and switch back to the latest version from the master branch:
% git clean -- force -d % git reset -- hard % git c h e c k o u t ma ster
2.6.3
Compileren
Building rpm package from a GIT snapshot is quite simple. The procedure is nearly the same as described in the last section, so it unhappily also has the same problem with therpmbuild -ta command our method internally uses. Like in the previous chapter,[arch] stands for the
platform you have built the package and might be something likei386,i586,sparcor whatever,
XXXstands for the version number you have checked out.
OPMERKING
Note for SuSE users: here you have to specify the directory/usr/src/packagesinstead of/usr/s rc/redhattoo!
Assuming that you are in the root of where you checked out from GIT, do the following to create a Makefile, the Kwave package and install it. If you already have a version of Kwave installed, please remove it first or userpm -Uinstead ofrpm -ifor updating instead of installing.
% mkdir / tmp / kwave - build % cd / tmp / kwave - build % cmake $HOME / src / kwave % make rpm
% rpm - ivh / usr / src / re dhat / BUILD /[ arch ]/ kwave - XXX .[ arch ]. rpm
OPMERKING
If you still have problems withmake rpm, you will find the tar.bz2 archive that was produced in/tmp. Please follow the instructions in thepreviouschapter.
2.7
Building a DEB package for testing and personal use
If you want to create a deb package of Kwave, bijv. for testing a version that is not yet available via official package repositories, then you can create your own package quite easily. First of all, you need to install some required tools:
% sudo apt - get i n s t a l l build - e s s e n t i a l c h e c k i n s t a l l
Then you can install the required build dependencies by pretending to install the dependencies of the official Kwave version:
% sudo apt - get build - dep kwave
After installing the required packages, you can build Kwave as described in the chapters before. After building you can type this to get a .deb file in your current build directory:
% make deb
OPMERKING
The .deb file you get from this step will not have the quality that a package from your official distribution has - it is just good enough for installing and safely uninstalling Kwave for testing purposes and for personal use.
2.8
Building CPU optimized packages
If you are owner of a Pentium, an AMD K6, Athlon or Athlon-XP CPU, you might want to use compiler optimizations to compile your version of Kwave that is running some percents faster. The gain in speed will be up to 30% on some systems, whereas the functions dealing with signal manipulation and all functions that do complex time-frequency operations (like FFT and Sona-gram) will profit most from it.
You do not need to understand much about programming for using an optimized compiler to compile Kwave, but maybe you will need some time to get the compiler itself working and in-stalled.
2.8.1
RPM optimizations
You can easily compile the RPM package optimized for Athlon, Athlon-XP, Pentium and Pentium Pro (and some other CPUs) by using some defines in yourrpmrcfile. You can either modify your system’srpmrcfile in /usr/lib/rpmor the .rpmrcfile in your home directory. There you can specify option lines like these:
o p t f l a g s : i586 - O2 - march = p e n t i u m - D N D E B U G - fomit - frame - p o i n t e r o p t f l a g s : i686 - O2 - march = p e n t i u m p r o - D N D E B U G - fomit - frame - p o i n t e r o p t f l a g s : at hlon - O2 - march = at hlon - D N D E B U G - fomit - frame - p o i n t e r o p t f l a g s : k6 - O3 - march = k6 - D N D E B U G - fomit - frame - p o i n t e r
o p t f l a g s : k7 - O3 - march = athlon - xp - D N D E B U G - fomit - frame - p o i n t e r
(I found those nice tricks at http://www.keywarrior.net/duesti/rpmopt.en.html. Thanks to Matthias Düsterhöft!).
This means that on ak7 architecture the rpm package will be compiled using-O3 -march=at hlon-xp -DNDEBUG -fomit-frame-pointeras compiler option and so on, you might extend or adapt these to your own needs. The settings apply to all of the sections before in all places where
rpmbuild -tais used or where a binary RPM is to be created out of a source rpm usingrpmbuild --rebuild.
OPMERKING
Ifrpmrefuses to install your package because it seems not to fit to your computer’s architecture, you can normally just install an optimized package by specifying the additional parameter --ignorearch and don’t care.
2.8.2
How to pass optimizer options to the compiler manually
The invocation of the compiler is quite simple. It normally is sufficient to set the environment variablesCFLAGSandCXXFLAGSin the correct way and then compile as usual. For the best settings please consult the documentation or homepage of the corresponding compiler.
If you build Kwave from a source tree (unpacked tar.bz2 or from GIT) the flags need to be speci-fied before the call. For example:
% CFL AGS =" - O4 - march = athlon - xp - mcpu = athlon - xp - pipe " \ C X X F L A G S =" - O4 - march = athlon - xp - mcpu = athlon - xp - pipe " \ cmake [ so urce d i r e c t o r y ]
If you re-build Kwave from a source rpm package, please follow the instruction in theprevious section.
Hoofdstuk 3
Basics about digital audio
This chapter should give a short introduction about the basics of digital audio processing, wit-hout going too much into details. Of course this might be a bit incomplete, but if you have questions, you can ask at the Kwave mailing list or consult some further literature.
3.1
The analogue world
First of all, one must know that the world isanalogue- but computers workdigitally. So there are several ways to convert analogue audio to digital audio and back again. As the way from digital to analogue normally is the reversion of the way from analogue to digital, we only describe the way from analogue to digital.
Conversion from sound to bits
Before continuing, analogue audio has to be transformed into electronic signals in order to find its way into a computer. One common way to do this is by using a microphone and an amplifier. This combination gets sound (changes of air pressure) at its input and a voltage at its output. Higher amplitude of the pressure changes will be represented by higher voltages at the ampli-fier’s output. This output is also called a’signal’. Instead of a microphone you can of course also imagine other sources of audio. And the ´´amplifier´´ can be the one that is integrated into your sound card, where you normally cannot see it.
Conversion to electronic signal
At this stage, the electrical signal has three limitations that one should keep in mind:
1. Theamplitude(volume) is limited to some maximum level. This is a consequence of the electronic (amplifiers) that are only able to handle voltages within some specific range. That’s no problem as long as sounds are not too loud. In that case the signal would be
clipped, which means that the electrical signal will run against its margins and the result will be disturbed.
2. Thefrequency rangeis also limited. Due to the mechanical constrains of microphones and the limited frequency range of amplifiers, a signal’s frequency range is limited. There are no hard borders besides which the sound abruptly disappears, but below some low and above some higher frequency the amplitude of the signal starts to decrease more and more. The existence of a maximum frequency can be easily understood as a limited speed of the electrical signal to rise and fall. By using high quality amplifiers and microphones, the limits can be spread into ranges where the human ear is no longer able to hear their results and thus get out of interest. The human ear normally is not able to hear sound above 20 kHz.
3. The signal containsnoise. Noise is the most ugly enemy of everyone who has to handle audio signals in any way. Noise is a typical analogue effect, that makes the audio signal ´´unsharp´´ and disturbed, it is always present and cannot be avoided. One can only try to use high quality components that produce as low noise as possible, so that one cannot hear it. Normally noise has a certain volume, so that the interesting sound should be much louder in comparison to the noise. This is called thesignal to noise ratio (SNR), the higher it is the better the sound’s quality will be. Sounds that have lower volume than the noise cannot be heart.
3.2
Digitalization
When we want to store and play audio in a computer, we must convert the analogue sound into digital data first. This process is calleddigitalization. It converts an electronic signal into a sequence of digital values.
Digitalization of the electronic signal
The conversion can be understood as a repetitive measurement of the electronic signal’s value at certain time, thus taking asampleof the signal. The result is then encoded as a digital value. The sampling could be done in arbitrary distances or in constant intervals. The later method is much easier to handle, and thus it is normally used, with a constant rate - the so-calledsample rate. Usual sample rates are 8000, 11025, 22050, and 44100 samples per second. In practice sample rates are also given as frequencies, in Hz or kHz.
The sample rate limits the highest frequency a digitized signal can represent. Due to Shannon’s theorem the highest usable frequency is half of the sample rate, so with 44.1 kHz sample rate you cannot sample signals with more than 22 kHz. To avoid a violation of that half-sample rate rule,
your soundcard already has built-in filters that filter away frequencies that are higher than half of the used sample rate.
Sampled signal
3.3
Sample Encoding
The result of the digital sampling process is a sequence of singlesamples. One sample is a digital representation of a signal’s value at a certain time.
The value of a sample can be interpreted and encoded in several ways. The simplest one islinear
encoding. This means that each sample’s value directly represents the analogue signal’s value multiplied with a constant factor. This is easy to handle, but has the disadvantage that noise will be audible especially on low amplitudes, where it disturbs most, and less audible on high amplitudes, where it is less audible.
One way to reduce the influence of noise isnon-linearencoding. This means that lower ampli-tudes are amplified before processing. As lower ampliampli-tudes are amplified, their distance from noise increases and the quality improves. The most common methods for this areA-Law and
U-Lawencoding - some standardized logarithmic amplification curves, used in digital telephony (ITU G.711 standard).
Nonlinear Encoding
3.4
Sample Formats
Samples can be stored in different formats and precisions. The most common ones are integer (fixed-point) formats, that store values withfixed quantisations. Depending on where the zero line is defined, it has to be destinguished betweenunsigned(only positive values, ´´zero line´´ is at half of the numeric range) andsigned(positive and negative values) integer formats.
Signed Format
Unsigned Format
As the quantisation loses some accuracy, it produces noise, the so-calledquantisation noise. That kind of noise has more effect on low amplitudes, so this method of storing samples is not op-timal, but quite easy and very fast to handle (computers are fast in calculating with fixed point numbers).
The second way of encoding samples is withfloating pointnumbers. With floating point numbers, noise is spread nearly equal over all ranges of amplitudes and has advantages especially on low amplitudes. However, this format is much slower when used for processing (computers are much slower on calculating with floating point values in comparison to fixed point numbers).
OPMERKING
Kwave internally usessigned integerformat with 24 bit precision, stored in 32 bit integers. This has the disadvantage of higher memory consumption when processing files with lower precision (bijv. 8 bits), but processing 32 bit numbers is very fast and also leaves some reserves for internal calculations, as only 24 bits are normally used.
Hoofdstuk 4
Using Kwave
Here is a little screenshot of the Kwave main window, so that you get an impression what Kwave looks like...
4.1
User Interface Mode
Depending on your personal preferences or use cases you can configure how Kwave handles multiple open files. You can switch this setting on the fly through the menuSettings→Show Files in....
The three possible settings are:
• Separate Windows (SDI): When using the Single Document Interface (SDI), each file will be shown in a separate main window.
• Same Window (MDI): When using the Multi Document Interface (MDI), there is only one Kwave main window, but within this window you have an area which shows sub windows, which can be resized, moved, tiled, cascaded or minimized.
You can select a window from theWindowsmenu or cycle through the sub windows with
Ctrl-Tab.
• Tabs: This is a variant of the MDI interface, where files are shown within separate tabs. You may know this mode from some popular Internet browsers.
4.2
Memory Setup
When using Kwave for the first time, you should go to the memory setup dialog and modify the settings to be suitable for your needs and the installed memory of your computer. You can reach it underSettings→Memory....
Kwave is able to use two types of memory:physicalandvirtualmemory.
Physical memoryis the memory (RAM) that is installed in your computer. You should limit the usage of physical memory to some reasonable size, as a rule of thumb, half of the installed
me-mory should be ok. If you set the limit too high, Linux will take meme-mory from other applications, which means that it swaps out memory of other programs to the hard disk (swap), which is ra-ther slow. If you set the limit too low, you might lose some performance when working with big files, because you use less of the fast physical memory than you could.
If you enablevirtual memory, Kwave is able to load and process files that are bigger than the amount of real installed physical memory. Kwave does this by using temporary files in a con-figurable directory, which is much faster and more cooperative to other applications than using the operating system’s swapping. The directory that you configure should be on your local hard disk.
4.3
Opdrachtregel
4.3.1
List of Files or Commands
If you start Kwave from the command line, you can specify a list of files that should be opened. The first specified file will be opened first, then the other files. Each file will be opened in an own new window or sub window of the same Kwave instance. If you specify wildcards, you can open a large number of files at once.
For example, the following command starts a Kwave and opens all sounds of the KDE window manager, each in a new window or sub window:
% kwave / usr / share / so unds / K D E _ W i n d o w *. wav
It is also possible to pass Kwave text commands, encoded as a special URI1, this will be described
in alater section.
4.3.2
GUI Type
The parameter--gui-type=SDI|MDI|TABlets Kwave start in one of the three possible GUI modes:
SDI,MDIorTAB.
4.3.3
Xt Toolkit options
In addition to a list of files, you can specify a list ofXt toolkitoptions like-geometryfor specifying the size and/or position of the first opened Kwave window and/or -displayfor starting the Kwave on a different display.
For example, the following command starts a Kwave window with an initial width of 600 pixels and a height of 400 pixels, with the right border positioned 30 pixels away from the right and 0 pixels away from the top of the screen.
% kwave - g e o m e t r y 600 x400 -30+0
4.3.4
Opstartopties
With the option--disable-splashscreenyou can disable the splash screen that comes up when starting Kwave. This might be useful when you start Kwave from a script.
The command line option--iconiclets Kwave start up minimized (iconified). This might be useful when you want to start Kwave without GUI interaction, bijv. when running from a script. This option also implicitly disables the splash screen!
By using the command line option--logfile=kwave.logyou can log the sequence of actions of a Kwave session into a file. This is useful for debugging, you might be asked for such a logfile when reporting an error.
4.4
Bestanden openen en opslaan
Bestanden openen met Kwave werkt hetzelfde als met de meeste andere toepassingen, u kunt • een lijst bestanden op deopdrachtregelspecificeren bij het starten van Kwave,
• een leeg venster met Kwave openen (bijvoorbeeld metBestand→Nieuw...(Ctrl-W) ) en daar een bestand in stoppen viaslepen en loslatenof u kunt
• een bestand openen via het menu metBestand→Openen(Ctrl-O)
• of een van de laatste recent geopende bestanden onderBestand→Recent geopend
• sla het huidige bestand op metBestand→Opslaan(Ctrl-S),
• opslaan onder een andere naam metBestand→Opslaan→als...(Shift-Ctrl-S)
• save all areas that are separated by markers, each one to an own file, with File→Save→
Blocks...
• or only the current selection withFile→Save→Selection...
4.4.1
Ondersteunde bestandsformaten
Kwave supports the following file formats:
• The favourite file format of Kwave is (like you can guess from the name).wav. This format is very common to other ´´operating systems´´ and also is commonly used within the KDE environment.
• The second format that Kwave supports is ´´ASCII´´. You can export to and also import from ASCII. Please be aware that storing in this format might produce very large files! The file format will be describedbelow.
• .mp3and.mp2import is available throughlibmadfor the MP3 decoding in combination with
id3libfor decoding ID3 tags andlamefor encoding.
• Ogg/Vorbis (*.ogg) import and export. Seehttp://www.xiph.orgfor details. • FLAC (*.flac) import and export. Seehttp://flac.sourceforge.net/ for details.
• Additionally Kwave supports many other common formats through theaudiofileplugin. You can import files like*.auand*.snd(NeXT,Sun Audio),*.aiff(Audio Interchange Format) and*.sf(Berkeley,IRCAM,Carl Sound Format).
4.4.2
Converting to and from .wav
The best way to work with formats other than those supported by Kwave is to use an external converter program. A good set of tools for this is in theSoXpackage, they have also some nice documentation!
The plans for future include support for import and also export filters for more formats and maybe some filter that uses a user-definable script with a call to an external filter, so that even formats not supported bySoX(like MP3) can be read and/or written.
4.4.3
Format of ASCII files
The ASCII format is quite useful for scientific and educational purposes. Due to it’s simple for-mat, you can either write simple files on your own with a text editor or you can use the output of some other application and convert it into ASCII. As the format isreallysimple, you should not have big problems in writing a converter and most scientific applications use to have some kind of their own ASCII format for export.
The format of an ASCII file is quite simple and has the following rules:
1. At the start of the file comes a block of properties, with one property per line. 2. Each property line starts with##.
3. After the properties comes a list of samples, with one sample per line. When using multiple channels, the samples are separated by commas.
4. Lines might end with a carriage return and/or a line feed character (so DOS files are sup-ported too). But when saving, files will always be saved with line feed character as the end of the line.
5. Empty lines and characters after a#are treated as comments and are ignored.
6. Values have to be given in signed integer format with a 24 bit range, which is the internal storage format of Kwave.
7. Everything after a#(except property lines, see above) will be treated as comment and will be ignored. Empty lines will also be ignored.
Here is an example of a simple ASCII file that represents a sine wave with eleven samples:
Voorbeeld 4.1content of an ASCII file with a single sine wave ## ’ rate ’ = 4 4 1 0 0
## ’ tracks ’=2 ## ’ bits ’=16 ## ’ length ’=11
## ’ Date ’= ’2013 -11 -09 ’
## ’ Software ’= ’ Kwave - 0 . 8 . 1 1 for KDE 4.11.3 ’ 5930496 , 5 9 3 0 4 9 6 # 0 0 , 8 3 8 8 3 5 2 # 1 -5930752 , 5 9 3 0 4 9 6 # 2 -8388608 , 0 # 3 -5930752 , -5930752 # 4 0 , -8388608 # 5 5930496 , -5930752 # 6 8388352 , 0 # 7 5930496 , 5 9 3 0 4 9 6 # 8 0 , 8 3 8 8 3 5 2 # 9 -5930752 , 5 9 3 0 4 9 6 # 10 # EOF
4.5
Een nieuw bestand aanmaken
You can select the sample rate, resolution in bits per sample and the number of tracks. Per default the file format will be ´´.wav´´, but it can still be changed at the time when the file is saved. The length of the new signal can be set by time (hours, minutes, seconds) or by the number of samples. Additionally you can select it relative to the highest possible length, which is limited by the available memory and Kwave’s internal limit (2 GB).
4.6
Opnemen
Kwave is able to record audio data from various sources, with all sample rates, sample formats and other modes that your sound hardware supports. Currently Kwave records through the old OSS sound interface, and since v0.7.4 also the newer and more powerful ALSA interface that is the preferred choice for linux kernel 2.6.
The recording can be reached from the menu underFile→Record.
Here is a screenshot of the Kwave record dialog, showing the first page with the recording con-trols during a running recording session. Like in most dialogs of Kwave you can get some help or see tooltips on the controls.
Screenshot of the Record Dialog Here you have the following controls:
• Pre-Record: If the pre-recording feature of Kwave is enabled and the recording is started, Kwave records into an internal buffer which is some seconds long. If you press theRecord(
) button again, then the recording really starts, and also keeps the already pre-recorded data. This is useful for example if you want to record your favorite song from radio, but you recognize too late that the song has started. In this case you can still press the record button and get the start of the song from what Kwave has already pre-recorded before, so that you will no longer miss a start.
• Record Time: If the length of the recording should be limited to some time, you can activate this setting and select a time in hours, minutes, seconds for your recording. If this option is not enabled, the recording runs until you press theStop( ) button.
• Start At: If this setting is activated, you can set a date and time when the recording will be started. Please keep in mind that if the configured time is in the past, the recording will start immediately.
• Record Trigger: If enabled, the recording starts only if the volume of the input goes over a certain limit, which can be defined from 0 to 100% of the highest possible input volume. This is useful if you do not want to record leading silence. (Hint: combine this with the prerecording feature mentioned above to catch also some seconds before reaching the trigger, so that you don’t miss any silent fade-ins.)
• TheNew( ) button is active when the recording is not running or is finished, to discard the current file content and start again.
• TheStop( ) button is active when the recording or pre-recording is running or Kwave is waiting for the trigger. If pressed, the current progress will be stopped.
• ThePause( ) button is active when the recording or pre-recording is running. The first time you press it, the recording will be halted and the button starts blinking. When you press it again the button will stop blinking and recording will continue immediately, without waiting for a trigger.
• TheRecord ( ) button starts the recording and/or prerecording, depending on the features enabled above:
1. If neither prerecording nor trigger level are used, the recording starts as soon as you press the record button.
2. If prerecording is not used and a trigger level is set, the first press will let Kwave wait for the trigger level to be reached. While waiting for a trigger, you can force the recording to start immediately by pressing the record button again, otherwise the recording will start automatically when the trigger level has been reached.
3. If prerecording is enabled, the first press starts only the prerecording and the second press really starts the recording.
4.7
Afspelen
Depending on the compilation options Kwave is able to play sounds trough one of the following playback methods:
• ALSA (Advanced Linux Sound Architecture): Supercedes OSS, supports more features and more hardware. Might collide with KDE or other applications like OSS does, but has a plugin called ´´dmix´´ as a way out. Newer versions of ALSA use a dmix like plugin per default, so this should the best choice for you!
• OSS (Open Sound System): The oldest linux implementation, capable of mono and stereo output. Deprecated since linux kernel 2.6, but still wide spread. Might collide with KDE or other sound applications, only one application at a time can use OSS playback !
Before trying to play sounds, you should take a look on the playback configuration dialog:
Currently Kwave supports only 8 and 16 bit playback, with mono or stereo output through the OSS interface, but many also all modes your sound hardware supports through the ALSA inter-face.
If your sound file uses more or less channels than the playback allows, all channels will be mixed together during playback. For example if you have a file with three channels and you use stereo playback, the left channel will play channel 0 (upper) and half of channel 1 (middle), the right channel will play the half of channel 1 (middle) and channel 2 (lower).
For getting a smooth playback without interruptions, you should also set the buffer size to an appropriate value. If you encounter problems with interrupted playback, you should increase the buffer size here. But the bigger you set the buffer, the bigger is the latency between the audible sound and the display of the playback position in the signal display.
The playback settings dialog also provides a button for playing a simple test sound. You should hear a 440Hz tone that wanders over all speakers, from one to the next.
Once you have configured playback, you can use the playback controls of the Kwave main win-dow or through thePlaymenu or with keyboard shortcuts:
• Play→Start (P): Start playback of the current selection from its beginning or the whole file from the current cursor position if nothing was selected. Play only once.
• Play→Loop: Like before, but repeat in a loop.
• Play→Pause(Space): Pause the playback at the current position. Only available when the playback is running.
• Play→Continue(Space): Continue the playback from the position where it has been paused. Only available if the playback is paused.
4.8
Bestandseigenschappen
Kwave is able to handle several meta information that is stored within an audio file. It tries to import and export as much of that information as possible. For example, if you import an MP3 file with ID3 tags, you can keep that information when exporting to a Wave file. If Kwave would lose meta information when saving, it shows a warning.
You can view and modify the meta information underEdit→File Properties.... There you can also change things like sample format, resolution and compression.
4.9
Zooming and navigating
Kwave provides several ways to zoom and navigate, using keyboard shortcuts, menu com-mands, toolbar buttons and by using the mouse. The following sections should give an overview on how to use all of these functions.
4.9.1
Zooming in and out
• zoom to whole signal: selects a zoom factor that makes the whole signal visible in the current window.
– menu entry: View→Zoom to whole signal – toolbar button: zoom all button
• zoom to 100%:zooms in up to a scale where on sample is represented by on pixel on the screen.
– menu entry: View→Zoom to 100% – toolbar button: zoom to 100% button
• zoom in:zooms in to see more details, magnifies by factor 3.
– toolbar button: zoom in button
• zoom out:zooms in to see less details, shrinks by factor 3.
– menu entry / keyboard shortcut:View→Zoom Out(Ctrl--)
– toolbar button: zoom out button
• zoom selection:zooms to a factor where the current selection is completely visible in the current view.
– menu entry / keyboard shortcut:View→Zoom to Selection(Ctrl-Space)
– toolbar button: zoom to selection button
• select predefined zoom:select a zoom factor from the zoom combo box in the toolbar.
4.9.2
Scrolling left and right
• scroll left:scrolls to the start of the signal by 1/3 of the current view. menu entry / keyboard shortcut:View→Scroll left(cursor Left) toolbar button: scroll left button
• scroll right:scrolls to the end of the signal by 1/3 of the current view. menu entry / keyboard shortcut:View→Scroll right(cursor right) toolbar button: scroll right button
• previous page:scrolls to the position right before the current view (left). menu entry / keyboard shortcut:View→Previous Page(Page up) toolbar button: previous page button
• next page:scrolls to the position right after the current view (right). menu entry / keyboard shortcut:View→Next Page(Page down) toolbar button: next page button
• to begin:scrolls the current view so that it starts at the beginning of the signal. menu entry / keyboard shortcut:View→Begin(Ctrl-Home)
• to end:scrolls the current view so that it ends at the end of the signal. menu entry / keyboard shortcut:View→End(Ctrl-End)
4.9.3
Using the overview
The main screen of Kwave shows a smalloverviewof the whole signal above the horizontal scroll bar of the main window. This overview also provides some functionality for navigating:
• single click with left mouse button: directly move the current view to the clicked position. • double click with left mouse button: directly move the current view to the clicked position and
additionally zoom in.
• double click with left mouse button, with shift pressed: directly move the current view to the clicked position and additionally zoom out.
4.9.4
Vertical zoom
You can zoom the current view vertically by pressing theAltkey and scrolling with the mouse wheel.
4.10
How to select
Kwave allows you to select a continuous range of samples as well as any combination of chan-nels (if you edit a multi-channel file). By selecting a range of samples (time scope) all following commands will be limited to that range and by de-selecting a channel its content will not be changed.
4.10.1
Selecting channels
Selecting or de-selecting a channel is quite simple. Just click on the lamp symbol on the left side of the signal to toggle its state:
a green lamp means ´´enabled´´, whereas a red lamp means ´´disabled´´.
OPMERKING
Note: If a channel is de-selected it will also not be audible for playback!
4.10.2
Selecting samples
If you select a range of samples in Kwave, that range will be inclusive. That means that the first and the last selected sample both belong to the selection and will be used for the following actions. So even if you not selected arangebut only a single sample, the selection will never be really ´´empty´´. So for example if you see no selected range, the ´´delete´´ function applies to that single sample.
The easiest way of selecting a range of samples is just to do that with mouse. It works like you are used from other applications: just press the left mouse button at the point you want to let the selection start and release the button where you want it to end.
If you want to adjust or move the selection’s start or end, you can move the mouse cursor near to the start or the end of the selection until it changes from the standard arrow cursor into the left-right arrow cursor and then press the left mouse button and adjust.
You can also extend or shrink the selection to a specific point by holding down theShift key while clicking with the left mouse button. Depending on which border is nearer, the left or right border of the selection will be set to a new position.
There are also some functions available via the menu and of course some keyboard shortcuts: • select the whole signal:Edit→Selection→All(Ctrl-A)
• remove any selection and select ´´nothing´´:Edit→Selection→Nothing(N) • the currently visible area:Edit→Selection→Visible(V)
• the next block of samples, starting one sample after the end of the current selection and with the same length:Edit→Selection→Next(Shift-+)
(Hint: use the ´´+´´ key from the numeric keypad!)
• the previous block of samples, ending one sample before the start of the current selection and with the same length:Edit→Selection→Previous(Shift--)
(Hint: use the ´´-´´ key from the numeric keypad!)
Shift-• expand the selection to the end of the signal (last sample): Edit→Selection→to end( Shift-End)
• expand the current selection left and right up to the next label (or start/end of the signal if there is none), starting at the current cursor position:Edit→Selection→Expand to labels(E) • select the area between the next two labels that are right from the current selection or up to the
end of the signal:Edit→Selection→to next labels(Shift-Ctrl-N)
• select the area between the previous two labels that are left from the current selection or up to the start of the signal:Edit→Selection→to previous labels(Shift-Ctrl-P)
4.11
Klembord
Kwave since v0.8.1 uses the clipboard of KDE. This way it is possible to exchange audio data between different Kwave windows. It might be possible as well to exchange data between Kwave and other audio applications, depending on their ability to use the KDE clipboard.
When copying data to the clipboard through thecopyfunction Kwave uses the mime typeaud io/vnd.waveas data format, conforming toRFC 2361which is the same as the well knownwav
format. When pasting from the clipboard into Kwave all data formats that are available as file import formats are supported, like for example Ogg/Vorbis, FLAC and so on.
4.12
Slepen en neerzetten
Kwave supports the KDE Drag and Drop protocol. This enables you to open files just by picking them up in akonquerorwindow or the Desktop and let them drop into a window of Kwave. Please note that if you drop a file into a Kwave window that already contains an opened file, the currently opened file will be closed first and then the file you dropped will be opened in it. If you don’t want that, you should open a new empty Kwave window first.
You can also select a range of samples and drag or drop them into a Kwave window. Per default the drag operation is done inmovemode where the selected range is deleted from the original place and inserted at the drop position. By pressing theCtrlkey you can modify this and drag in
Hoofdstuk 5
Automization and Scripting with
Kwave
Kwave since its first version uses an internal text command language. This command language is used internally for menu handling, GUI control, builtin effects and plugin invocations. The commands will be described later in the section .
5.1
General Syntax
• All commands consist of a command name and an optional parameter list in round brackets, depending on the command.
• Allowed characters for command names areletters,digitsandcolon. Commands are case sen-sitive and are always in lower case.
• Parameters within a parameter list are separated bycomma.
• Numerical parameters can be given as fixed point numbers or as floating point numbers, using a dot as decimal separator.
• String parameters are automatically trimmed (all white space at the start and at the end is removed). If that is not wanted, they can be surrounded by double quotes (´´). If a string parameter contains special characters (like ‘,’, ‘;’, ‘#’ or a ‘\’ itself), these special characters have to be escaped by preceding a ‘\’.
• Multiple commands can be concatenated to acommand listby using a ‘;’ as separator. Example:
f i l e i n f o ( Comments ," This is an \" e x a m p l e \" c o m m e n t .")
This example consists of the command ‘fileinfo’ and has two parameters: the keywordComments
and the text ‘´´This is an \´´example\´´ comment.´´’. (These parameters are explained in
the corresponding section in the command reference).
5.2
Using the Command Line
In addition to the command line options listed in the sectionCommand Line which are used to start Kwave in iconified mode or without splash screen, you can pass text commands on the
kwave:command[?parameter[,parameter ...] ]
The rules for transforming a Kwave text command into a valid URI are as follows: • The URI starts with the wordkwave, followed by a ‘:’ and the command name.
• If the command has parameters, they have to be appended after the command name, using a ‘?’ as separator.
• Meerdere parameters kunnen achtergevoegd worden door een ‘,’ als scheidingsteken te ge-bruiken.
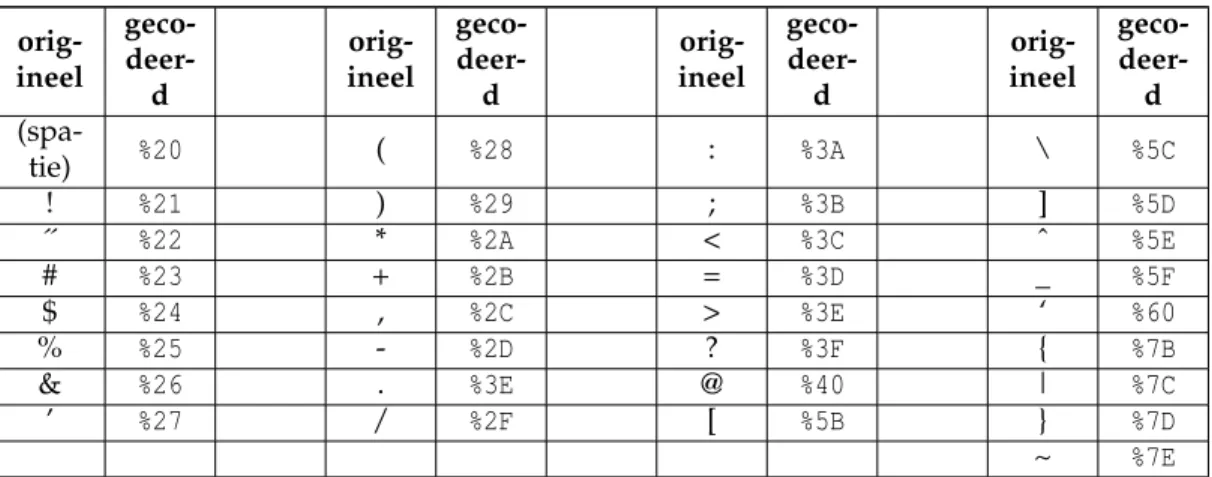
• Alle speciale tekens in de commandonaam en parameters moeten URL gecodeerd zijn. Hier is een lijst met de vertalingen:
orig-ineel geco- deer-d orig-ineel geco- deer-d orig-ineel geco- deer-d orig-ineel geco- deer-d (spa-tie) %20 ( %28 : %3A \ %5C ! %21 ) %29 ; %3B ] %5D ´´ %22 * %2A < %3C ˆ %5E # %23 + %2B = %3D _ %5F $ %24 , %2C > %3E ‘ %60 % %25 - %2D ? %3F { %7B & %26 . %3E @ %40 | %7C ’ %27 / %2F [ %5B } %7D ~ %7E
Tabel 5.1: Vertaaltabel voor URL-codering
5.3
Script bestanden van Kwave
5.3.1
Algemene structuur
A Kwavescriptconsists of a list of lines, where each line can be: • a singlecommand,
• acommand list, with two or more commands concatenated by a ‘;’. • acomment,
• alabel
• or anempty line, that contains white space only
5.3.2
Comments and Empty Lines
All characters that follow a ‘#’ (except when used in quotes or when escaped) are treated as comments, they will be silently ignored.
5.3.3
Termination
A Kwave script terminates either when all commands have been executed successfully without an error or when a command has returned an error code. There is no special command for aborting the execution of a script. If you want to implement a possibility for the user to end a script, you can use the command ‘msgbox(text)’. This shows a message box with the two buttons ‘OK’ (which lets the script continue) and ‘Cancel’ (which returns an error code and stops the script).
5.3.4
Labels
Lines that consist only of an identifier, followed by a ‘:’ are treatedlabels. They can be referenced later in the script by the special keyword ‘GOTO’1 , which makes the execution of the script continue at the location of that label (see example below).
A line that contains a label must not contain any other content (except comments or white space) after the ‘:’.
Voorbeeld:
start : # <= this is a label
# do s o m e t h i n g ... msgb ox ( once again ?) GOTO start
5.4
Overzicht van de opdrachten
5.5
a
5.5.1
about_kde
5.5.1.1 Syntax: about_kde()
Shows a dialog window with information about the KDE version used by the computer Kwave is running at.
5.5.2
add_label
5.5.2.1 Syntax: add_label(pos[,text])
Add a new label at a given position. If the given position already contains a label, then this command does nothing. The label can be given an optional description.
5.5.2.2 Parameters
pos: position in samples where to insert the label