Current Protocols in Mouse Biology
Ms#CP-15-0143
Intestinal Preparation Techniques for Histological Analysis in the Mouse
1) Jonathan M Williams
Pathology and Pathogen Biology Royal Veterinary College
Hatfield
AL9 7TA
Email:[email protected]
2) Carrie A Duckworth
Gastroenterology Research Unit
Department of Cellular and Molecular Physiology Institute of Translational Medicine
University of Liverpool L69 3GE
Email:[email protected]
3) Kate Vowell Mary Lyon Centre
Medical Research Council Harwell Oxford
OX11 0RD
4) Michael D Burkitt
Gastroenterology Research Unit
Department of Cellular and Molecular Physiology Institute of Translational Medicine
University of Liverpool L69 3GE
Email: [email protected]
5) D Mark Pritchard*
Gastroenterology Research Unit
Department of Cellular and Molecular Physiology Institute of Translational Medicine
University of Liverpool L69 3GE
Email: [email protected] * Corresponding author
9 figures
0 tables
0 multi-line equations
NIH-funded author? No
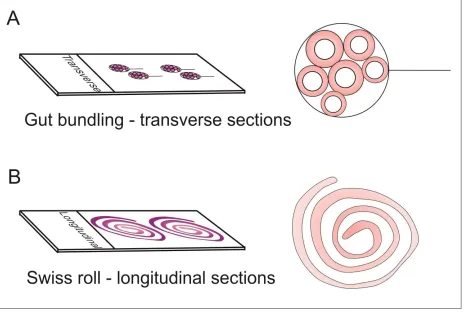
The murine intestinal tract represents a difficult organ system to study due to its long convoluted tubular structure, narrow diameter, and delicate mucosa which undergoes rapid changes after sampling prior to fixation. These features do not make for easy histological analysis, as rapid fixation in situ, or after simple removal without careful dissection, results in poor post-fixation tissue handling, and limited options for high quality histological sections. Collecting meaningful quantitative data by analysis of this tissue is further complicated by the anatomical changes in structure along its length. This protocol unit describes two methods of intestinal sampling at necropsy that allow systematic histological analysis of the entire intestinal tract, either through examination of cross sections (circumferences) by the gut bundling technique, or longitudinal sections (adapted Swiss roll technique) together with basic methods for data collection.
Keywords: mouse; intestine; crypt; villus; histology
INTRODUCTION
This unit details the techniques that may be employed for histological assessment of the murine intestinal tract. This is a challenging organ system to study, as it represents a delicate convoluted muscular tube with a very thin wall and a complex internal organization which varies along its length (Figure 1 & Figure 2). It also undergoes rapid autolysis (self-digestion) and sloughing of epithelium immediately after death. This is particularly the case in the small
intestine, probably due to a combination of exposure to gastric acid and bile; the proximal small
et al., 2007; Potten, 1990) and a central lumen laden with digesta, digestive enzymes and bacteria; factors which all complicate its sampling and examination. Every endeavour should therefore be made to minimize, and as much as possible standardize the time taken between the animal’s death and tissue fixation so that autolytic changes are not misinterpreted as genuine pathological changes. When designing a study involving histological analysis, it is then necessary to decide what view is most appropriate to answer specific research questions (see strategic planning). This article describes the step-by-step preparation of the small intestine (SI) and large intestine (LI), either for cross sectional histological analysis (gut bundling technique; Basic Protocol 1) or longitudinal histological analysis (adapted Swiss roll technique; Alternate Protocol 1: Figure 3), together with quantification of intestinal injury by quantification of epithelial cell features (cell scoring; Support Protocol 1) and measurement of villus/crypt lengths using Image J (Support Protocol 2).
NOTE: Investigators are required to obtain appropriate ethical approval from their Institutional
HISTOLOGY
It is important when considering interpreting changes in the intestinal tract (as with other organs) that there is familiarity with the basic anatomy and histology of normal tissue, which is described in standard textbooks on murine (Scudamore, 2014; Treuting and Dintzis, 2012) and human (Young, 2006) histology. The murine intestinal tract is a muscular tube with the same basic structure throughout its length. It is comprised of a central lumen which contains the digesta, an inner mucosal surface, a muscularis mucosae, a minimal submucosa, an inner circular muscle layer, an outer longitudinal muscle layer and an outer connective tissue serosa. The small intestine consists of three functionally but not morphologically distinct units; the duodenum, jejunum, and ileum. The most proximal part of the small intestine beginning immediately distal to the pylorus of the stomach is the duodenum which is associated with the pancreas and forms a U-shaped loop to the level of the umbilicus (“MGI - Biology of the
and begins as the wider proximal colon with prominent mucosal folds (which is usually considered the proximal half of the colon), continues as the distal colon (which is usually considered the distal half of the colon) and terminates in the rectum and anus. Gut-associated lymphoid tissue (GALT) tissue occurs throughout the intestinal tract. Multiple smooth raised white-yellow oval plaques within the small intestinal wall which represent organized lymphoid nodules termed Peyer’s patches can often be seen macroscopically.
Small intestine
antibacterial functions. Other specialized cell types include enteroendocrine (neuroendocrine) cells, tuft cells, and microfold cells (also known as M cells) which reside in the dome epithelium overlying Peyer’s patches.
Large intestine
The defining feature of the large intestinal mucosa is that it comprises crypts of Lieberkühn populated by a high proportion of goblet cells with a flat inter-cryptal surface epithelium
(Figure 2). Similarly to the small intestine, the stem cell (crypt base columnar cell) compartment of the large intestine is contained within the base of the crypts (Barker et al., 2007). The cecum represents the first part of the large intestine, representing a blind ended J-shaped sac
(Treuting and Dintzis, 2012) within which there is prominent lymphoid tissue at the tip. Both the cecum and proximal large intestine contains undulating mucosal folds (Scudamore, 2014). Goblet cells are also more prominent in the cecum and proximal large intestine and decrease in number distally within the large intestine (Scudamore, 2014). The mid colon has a flat, non-folded mucosa, and the distal colonic mucosa is more subtly non-folded. Other cell types present in the colon include, absorptive colonocytes, and enteroendocrine cells. Paneth cells are not present in the large intestine of mice. Mice have an extremely short rectum, with an abrupt transition from the colonic mucosa to the squamous epithelium of the rectal mucosa.
It is critically important before experiments are conducted to design a study appropriately, working to the Animal Research: Reporting of In Vivo Experiments (ARRIVE) guidelines (Kilkenny et al., 2010) preferably with assistance from a statistician. This includes considering firstly whether animal research is necessary for the research questions posed, or whether these may be addressed with other methods such as cell or organoid culture. If mice are to be used, it is then appropriate to ask whether a similar model has been applied previously, and to base the study design on literature review. Thought should be given to the anticipated experimental results based on the hypothesis and how these are to be measured and statistically analysed.
It may then be necessary to decide what strains of mice are to be examined, the numbers required based on power analysis, and what appropriate controls are to be used for comparison. It is also important to consider how diet, microbiota and health status of the colony may impact intestinal research (regular health screening for pathogens and parasites is as described by the FELASA working group on revision of guidelines for health monitoring of rodents and rabbits 2014). In terms of intestinal examination, it is important to ask what the critical samples are to answer the research question(s). Histological examination is highly recommended even when more complex tissue investigations are the primary focus of the study. This simple process can confirm/characterise the changes that have taken place in these tissues, in conjunction with other results.
histology, and the remainder taken as a scrape. Some pertinent questions to designing a study with a primary focus on intestinal pathology are:
Is luminal content required?
If luminal content is required (for example for microbiome studies), this can be
incorporated into the gut bundling technique or the Swiss roll method, by sampling of
content from specific parts of the gastrointestinal tract prior to fixation. This can be
achieved by making a small incision in the intestinal wall with scissors. This maintains
the continuity of the intestinal tract which is important for later orientation.
Is it useful to preserve luminal content for microscopic analysis?
Digesta, content, sloughed or shed epithelial cells and organisms (bacteria, yeasts,
parasites etc.) are better preserved with gut bundling, where the lumen is not opened
Is it useful to preserve the mucus layer?
This can be done by either examining frozen sections, or by fixing the intestine with a
closed method (such as gut bundling) and fixing in Carnoy’s fixative as described
elsewhere (Matsuo et al., 1997)
Are villus/crypt lengths required?
This is best achieved by employing the gut bundling method
To assess features such as villus tip apoptosis (Williams et al., 2013) extra care must be
taken to rapidly fix the small intestine, as the villus tip is the most susceptible to
artefactual changes. For studies such as this, the gut bundling method is preferred over
the Swiss roll technique due to the rapid immersion in formalin with less tissue handling,
less compression and distortion of villi, and preservation of apoptotic cells in the lumen
Is tumor formation to be evaluated?
If small or large intestinal tumor formation is to be assessed, the intestinal tract should
be opened and prepared by the Swiss Roll method, which will allow photography and
potentially quantification of gross lesions, and better appreciation of randomly
distributed tumors along the length of the intestine by histology. The help of a
pathologist should be sought to evaluate tumor formation by histopathology, with
consultation of classification schemes (Washington et al., 2013)
Is localization of lesions to specific regions of the intestinal tract required?
More precise assessment of localization and distribution of intestinal lesions is much
better achieved by the Swiss roll method as complete longitudinal continuity is achieved,
rather than by gut bundling, where only generalised localisation to intestinal segments is
possible
Is evaluation of gut associated lymphoid tissue (GALT) required?
GALT is sporadically present along the length of the intestinal tract and is therefore
organized lymphoid aggregates located in the small intestinal wall which are appreciable
to the naked eye. If there is enlargement of the GALT, photography of gross lesions may
also be beneficial. If these are the focus of a study, these can also be dissected out after
intestinal fixation. By cutting out cylindrical portions of intestine in which a Peyer’s patch
has been identified (including 0.5cm of normal intestine each side), this cylinder can be
processed, then cut exactly in the middle through the Peyer’s patch. Each section is then
embedded with the freshly cut surface face down in the mould. For isolation of Peyer’s
patch lymphocytes this can be performed as described previously (Lefrançois and Lycke,
2001)
Are frozen sections required?
Frozen sections may be indicated where particular studies or antibodies for
immunohistochemistry or immunofluorescence only work on fresh tissue. The gut
bundling technique can be adapted to allow filling with a cryoembedding medium and
rapid freezing in moulds. Tissue must be frozen within 3 minutes of euthanasia. A 5ml
syringe is filled with optimal cutting compound) OCT medium and a 200μl pipette tip is
placed on the end. Following intestinal isolation and flushing with PBS (as described for
the gut bundling procedure), the intestine is cut into 1cm lengths and filled with OCT
medium using the syringe. Gut segments are placed into a loop of 3M™ micropore™
tape and bundled using the gut bundling method (but is not bundled as tightly). Bundles
on dry ice and left to solidify. Gut bundles are removed from the mould and can be
cryo-sectioned using standard techniques.
BASIC PROTOCOL 1: PREPARATION OF INTESTINES FOR CROSS SECTIONAL HISTOLOGICAL ANALYSIS (GUT BUNDLING TECHNIQUE)
This technique (Figure 4 and Figure 5) represents a rapid method of fixing the murine small and large intestine at necropsy, and provides high quality cross sections through villi and crypts. Particular indications for this method are for studies where diffuse changes or injury to the gastrointestinal tract are anticipated, where quantification of cell features (Support Protocol 1) or villus/crypt lengths (Support Protocol 2) are likely to be informative. Autolytic changes can be avoided with this technique by making sure that tissue is immersed in fixative (formalin) as quickly as possible (ideally <3 minutes) after euthanasia.
Materials
At necropsy
Mice
Safety glasses
Dissection mat or board
10cm and/or 12cm sharp/sharp standard pattern scissors
Dressing tissue forceps (12cm)
Petri dish (plastic or glass)
4-0 sofsilk coated suture material or similar: for stomach ligation (Tyco Healthcare, US)
Fixative: Formalin; this is 3.75% formaldehyde in phosphate buffered saline (PBS)
representing a 1:10 solution of 37.5% stock formaldehyde (Sigma–Aldrich) in PBS. This should be made up fresh (and should not be used if older than 2 weeks as cross-linking reduces fixative properties). A ready to use, pre-prepared 10% neutral buffered
formalin solution (Sigma–Aldrich) can also be purchased to reduce dilution errors and provide clear guidance on expiry dates.
2x 30ml Universal Containers per mouse labeled with unique animal identifier filled
with formalin
2 ml syringe with 26 gauge (G) needle attached pre-filled with formalin
20 ml syringe with 23 G 2.5cm needle attached pre-filled with PBS
White card approximately 7cm x 7.5cm to fit into a 30ml universal tube (one per
mouse; Figure 4)
Sharps bin
Fume hood/down draft table
For tissue trimming after 24h fixation
Size 22 scalpel (Swann-Morton Ltd: Sheffield, UK)
Ruler
Dressing tissue forceps (12cm)
Fine tipped forceps (12cm)
70% ethanol
Solvent resistant pencil or pen
Tissue cassettes (Sigma–Aldrich)
Tissue processor
Solvents for processing
Tissue embedding centre
Dissection
1. Humanely euthanize mouse
This should be by an appropriate manner for the study and in compliance with local
guidelines
2. Pick up the mid-abdominal skin with dressing tissue forceps, and cut a small (approximately 1cm) transverse incision with scissors
Use both hands to pull the skin back towards the head and the tail. A moderate amount
of force is required, and more so in older/male mice
4. Pick up the abdominal musculature with dressing tissue forceps and extend the midline incision towards the sternum and pelvis with scissors
5. Cut down the abdominal muscle wall close to the ribcage towards the spine on both sides avoiding entering the thoracic cavity
This increases the exposure of the abdominal cavity. If the stomach is also to be taken
for histological analysis and prepared by instillation with fixative, the pylorus can be
located and ligated at this point with 4 metric sofsilk™ suture material (see Duckworth et
al., 2015 for detailed description of protocol)
6. Cut across the large intestine as far towards the anus as possible
If the distal colon rectum and anus are required for analysis, the pelvis (pubis and
ischium) can be cut through with scissors and the anus can be dissected out – however if
this is to be done, it is recommended that the small intestine is fixed first to avoid
compromising its preservation
7. Gently grasp the rectum/distal colon with dressing tissue forceps, and gently pull and reflect the intestines away from the carcass, cutting the mesenteric attachment adjacent to the serosal surface of the intestine as necessary
This will begin to tear the mesentery. Some experience will be required in judging the
proximally along the intestine to avoid the GI tract snapping, and when a cut in the
mesentery with some scissors is necessary to facilitate exteriorization
8. Continue to retract the intestine until the entire small intestine has been freed from the mesentery and exteriorized
9. Cut across the small intestine immediately distal to the pylorus
The root of the mesentery containing the mesenteric lymph nodes should be attached to
this last part of dissected intestine and remains as a soft white mass due to the adipose
tissue contained within it, and can be left attached or fixed separately at this point if the
mesenteric lymph nodes are to be assessed. The pancreas will also be associated with
this tissue, and between the spleen and its attachment to the stomach
10.Remove the intestinal tract and place onto a dissection board or other suitable surface
11.Separate the small intestine from the large intestine, by cutting the cecum longitudinally in half with fine sharp scissors
This leaves a remnant of the cecum to allow orientation of proximal and distal small
intestine later
12.Lower the distal end of the small intestine into the center of a petri dish, and lay down in a spiral with proximal end outermost
Keep the clamped end of the intestine on the floor of the Petri dish
14.With your dominant hand, pick up the 20ml syringe pre-filled with PBS (preferably ice
cold) with 23 gauge 2.5cm needle attached, and introduce needle into the lumen of the proximal end of the small intestine immediately adjacent (distal) to portion grasped with forceps
Resting your dominant hand on a stable bench-top surface near the Petri dish, balancing
the shaft of the needle on the edge of the Petri dish, and bringing the “clamped” end of
the intestine to the needle, can all make introducing the needle steadier and easier
15.Press down on syringe plunger with thumb to flush the small intestine with PBS under pressure
Care is needed and protective eyeware is recommended, as leaks and back pressure can
lead to jetting of digesta laden PBS at this stage. Also ensure that sterile or delicate
equipment is protected. A new grip/clamping point should be sought further (more
distal) along the intestinal tract if a bolus of digesta precludes efficient flushing.
Alternatively, rather than flushing out digesta, small amounts of formalin can be instilled
at intervals along the length of the intestine with a 5ml syringe filled with formalin and
26 G needle to achieve immediate fixation. However if formalin is used, this should be
done with appropriate ventilation (either a fume hood or downdraft extraction)
17.The colon can be flushed, or small amounts of formalin introduced into the lumen in a similar way
As fecal pellets are usually firmer than small intestinal content in an untreated mouse,
and lodged within the distal colon, removing all of them may cause the colon to snap
which should be avoided. The apposed tip of a pair of wet curved forceps can be used to
gently massage the content out of the proximal or distal luminal end. This should be
abandoned in favor of fixation if the process exceeds 2 minutes
18.Place the colon alongside the small intestine in the central fold of the card
19.Fold the card entrapping and immobilizing the intestinal tract
20.Place the card and intestines into the universal tube pre-filled with at least 10x the tissue volume of fixative
21.Leave to fix for 24h at room temperature
When fixed this will give several straight lengths of intestine. Tissue may remain in
formalin for extended periods until processing if only morphological assessment is to be
performed. However over-fixation (ie > 24h) must be avoided if immunohistochemistry,
immunofluorescence, or in-situ hybridisation may at some point be required
Tissue trimming, processing and embedding
23.Pick up small intestine with dressing tissue forceps and place on dissection board
24.By orientating according to the hemisected cecum, cut across the small intestine with a
scalpel to isolate the estimated proximal third
A ruler can be used to help estimate the proximal, middle and distal thirds of the
intestine
25.The proximal small intestine is then cut into short, approximately 1cm lengths with a scalpel (Figure 4 & Figure 5)
It is very important to make sure that these are of approximately equal length for the
subsequent bundling step. This can be aided by advancing the small intestine up
alongside, and parallel to the first cut length before cutting. Any unequally sized portions
should be added to the tissue cassette separately. Once the entire proximal third of the
small intestine has been prepared in this way, place these short lengths on top of each
other and lined up with each other as a bundle
26.Make a Micropore™ tape loop (Figure 4 & Figure 5)
Cut an approximately 10cm length of tape with scissors and make sure the cut is square.
Attach the first few millimeters of this length of tape to the lab bench, and pick it up
again at the free end with some fine tipped straight forceps held in your dominant hand
(fine tipped straight forceps mean a reduced surface area and makes it easier to release
them from the adhesive side). Place the non-adhesive surface of the free end down onto
stick it to itself, adhesive side to adhesive side with edges exactly parallel and
maintaining a loop (if not exactly parallel, Micropore™ bundles may come loose during
processing)
27.Whilst gripping the adhered end with tissue dressing forceps, place the tape loop alongside the intestinal segments and gently brush the intestinal bundle into the loop (Figure 5)
This can be achieved by placing a scalpel parallel to the end of the bundle and sliding the
bundle into the loop. The loop diameter can be increased by gentle downward pressure,
and the sliding of the intestines into the loop can be aided if the tape loop is slightly wet
28.By sliding a pair of fine tipped straight forceps along the tape loop parallel to the orientation of the intestinal segments, firmly tighten the tape loop around the bundle
It is important to make sure that the bundle is tight at this stage to prevent loosening of
the bundle during the next step
29.Cut this tightened gut bundle transversely at approximately 5mm intervals with a scalpel and in such a way as to maintain a small tab of adhered tape to create a mini-bundle with a handle
This final tightening should help to prevent the dehydration and shrinkage of the tissue
that occurs during processing from causing the bundle to fall out of the tape loop
31.Place these bundles into a tissue cassette indelibly labeled or printed with a unique animal identifier and the name of the intestinal segment and proceed with tissue processing
32.Repeat steps 5-10 for the middle and distal small intestine, and for proximal and distal colon in separate tissue cassettes
For the colon it is worth removing any luminal content at this stage by using curved
forceps as described in step 17. The hemi-sected cecum can be placed directly into a
cassette, however it is highly advisable to carefully remove the cecal content with some
curved forceps as the fibrous digesta often interferes with microtomy
33.Transfer tissue cassettes to a tissue processor for standard tissue processing to serially dehydrate sections and allow embedding in paraffin wax
34.Embed sections in molten paraffin wax (preferably with embedding centre)
Fill a mould of sufficient depth and size with molten wax to allow embedding of the
bundles with intestinal lengths perpendicular to the mould base. Orientation of the
bundles is the most important factor to consider at the embedding stage. Transfer
tissues from the tissue cassette to the mould placed on a cold plate with (preferably
depths within the mould, and try to keep them relatively central within the mould (this
aids microtoming and subsequent immunohistochemistry)
35.Once wax blocks have been sufficiently cooled, they can be sectioned on a standard microtome at 3-5µm thickness and floated onto glass slides for hematoxylin and eosin (H&E) staining, or electrostatically coated slides for immunohistochemistry (see UNIT 14.34 Duckworth et al., 2015 for detailed description of protocol)
ALTERNATIVE PROTOCOL 1: PREPARATION OF INTESTINES FOR LONGITUDINAL HISTOLOGICAL ANALYSIS (ADAPTED SWISS ROLL TECHNIQUE)
This method may be used to examine the entire length of the small and large intestine.
Particular indications are for cancer studies that induce tumor formation (intestinal neoplasia), for evaluating gastrointestinal associated lymphoid tissue (GALT), or for evaluating studies which may cause multifocal or segmental lesions along the length of the intestine which may be missed through examining transverse sections. As this technique opens the intestinal lumen at necropsy, once fixative has been applied to the mucosa, photography of gross lesions may be performed.
Materials
Mice
Equipment for humane euthanasia
Dissection mat or board
11.5cm self-closing forceps
12.5cm curved serrated forceps
10 and/or 12cm sharp standard/pattern scissors
10cm spring scissors (Vannes type; Figure 6) with a 4mm cutting blade (curved or
straight as per personal preference)
5ml Syringe with 26 G needle for applying fixative (formalin; Figure 6)
Labeled containers containing 5ml fixative for storing samples until processed.
30 Gauge needles for pinning rolls
Downdraft or fume hood ventilation
Double-deep tissue cassette (IHCWORLD).
All instruments can be sourced from Interfocus Ltd/WPI Instruments Ltd
Dissection
1. Follow steps 1-5 as per gut bundling technique (without ligating stomach)
2. Instill small amounts of formalin into the small intestinal lumen at a few regular intervals to start fixation
3. Carefully lift the alimentary tract with curved forceps, find and cut the esophagus close to the diaphragm (Figure 6)
4. Holding the stomach, gently pull the intestines towards the tail freeing them from the carcass, cutting the dorsal mesenteric attachments with scissors as necessary
5. Cut across the colon as it enters the pelvis (Figure 6), or cut the pelvis either side of the colon enabling the colon to be dissected to include the anus
6. Gently remove the entire intestinal tract en bloc (as a whole) cutting any mesenteric attachments, including the stomach, spleen and pancreas
Once the intestinal tract is removed from the carcass, identify the descending colon by
proximity to the stomach, mesentery and pancreas
7. Gently hold the colon with the curved forceps and peel away the mesentery from the serosal surface of the intestine, which will allow the small intestine to be unraveled.
The more mesentery that can be removed from the intestinal wall, the easier the rolling
will be
8. Once the intestines have been dissected free of the carcass, cut the stomach at the pylorus and remove it (Figure 6)
Intestinal length can be measured at this point
By rolling consistently from proximal to distal, anatomical location can be estimated in
histological sections
10.With the curved forceps, hold the proximal end of the intestines, insert the tip of the spring scissors into the lumen, and start cutting along one side along the length of the intestine (Figure 6)
Keep a steady gentle tension on the intestines with the forceps whilst cutting. Also keep
the cutting action as smooth as possible to give a straight edge; an uneven edge makes
the intestine more difficult to keep flat and roll well
11.After opening a section of intestine, gently open so that the lumen is facing upward by carefully running the curved forceps along the intestinal lumen (Figure 6)
Do not touch the mucosal surface with the tip of the forceps, but guide them along the
lumen to roll back the edge of the intestine and clear away any digesta or feces
12.Flush the opened mucosal surface of the intestine with a small volume of fixative (5ml Syringe with 26 G needle; Figure 6) to gently dislodge digesta, prevent autolysis, keep it moist, and hold it flat while the other sections are rolled
Application of enough volume of fixative to wet the mucosal surface, and maintain tissue
moistness is all that is required. Re-application is recommended if mucosal surface starts
to dry
The colon does not need to be cut into smaller lengths as it is much shorter than the
small intestine. It is easiest to begin the incision from the anus/distal end. Try to keep the
cut as straight as possible, and to begin this cut along the side of the colon which will
allow the incision to eventually be extended along the greater curvature of the cecum
(Figure 6). Carefully clean out the cecum and clear fecal pellets ready for rolling, and wet
mucosa with fixative as for the small intestine
Rolling
1. Open the self-closing forceps and clamp them to the cranial end of the opened intestine closest
This does cause damage to the initial part of the intestine but enables greater control of
the sample (once the roll unravels, or the intestine folds up on itself, it is difficult to go
back)
2. Gently lift the forceps so the first couple of centimeters of intestine are hanging down, and start to roll over the greater curvature of the forceps (Figure 7)
The opposing curve of the forceps and the natural curve of the intestines encourage the
lumen to stay open and flat for rolling
3. Gently roll the intestines around the self-closing forceps evenly (Figure 7)
Make sure that each successive roll lies neatly overlying the previous with edges flush.
Do not roll too tightly as this will compress the villi and degrade the morphological
4. When the roll is complete, use a 30G needle to pin the last piece of intestine through the center of the roll by opening the forceps slightly to allow the pin through the center (Figure 7)
5. Once pinned securely, open the forceps just enough to release the pinned intestinal roll. Gently slide the roll off the forceps and place into an appropriately labeled pot
containing 10x the tissue volume of formalin
6. For the large intestine, hold with the self-closing forceps at the distal (rectal) end, and roll as before (Figure 7). At the cecum lay it over the roll as centrally as possible and trim off the outer edges to match the width of the colon on the roll (Figure 7)
As for the small intestine, care should be taken to consistently roll the large intestine
from its distal to proximal end to allow later orientation
7. Repeat step 5 for the large intestine (Figure 7)
8. Place into an appropriately labeled pot containing 10x the tissue volume of fixative and leave to fix for 24h at room temperature
9. Transfer to a deep tissue cassette that does not compress tissue, labeled with unique animal identifier and indication of intestinal segment and proceed with tissue
processing
10.Repeat steps 12-14 as for gut bundling protocol
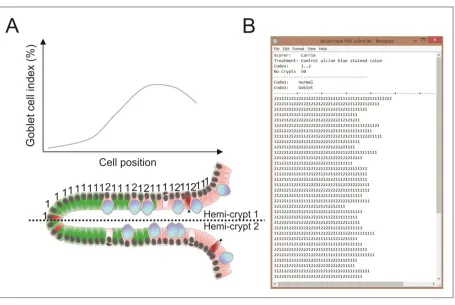
SUPPORT PROTOCOL 1: QUANTIFICATION OF EPITHELIAL CELL FEATURES (CELL SCORING)
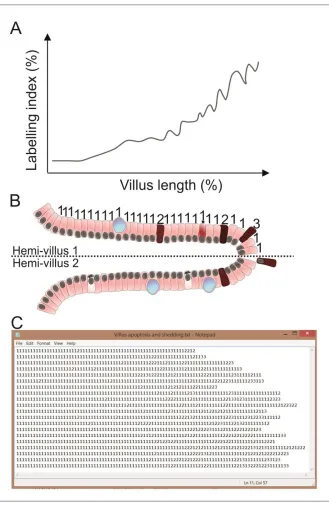
This is a method by which individual intestinal epithelial cells can be counted along the villus or
crypt axis and categorized to give the relative percentages of cells exhibiting particular features (Figure 8 & 9 respectively). In simple terms this can be achieved by counting with the aid of a mechanical multiple unit counter or with a computer. This is most easily achieved by counting cells in a well orientated crypt or villus, in which a single layer of epithelial cells can be
percentage of positively labeled/unlabeled cells, and where along the crypt-villus axis these may occur.
Statistical and power analyses will determine how many hemi-villi or hemi-crypts need to be counted per animal and per intestinal segment for a particular experiment, and may vary according to the segment of the small/large intestine. However, in LPS induced villus IEC
apoptosis and shedding that 18-20 hemi-villi per intestinal segment is sufficient (Williams et al., 2013). Comparisons should only be made between data collected from for the same
anatomical location of the intestine between experimental and control groups (i.e. proximal, middle, or distal third of small intestine, or proximal/distal colon).
Materials
High quality H&E stained sections or immunohistochemically stained slides from
treatment and control animals (for protocols see Duckworth et al., 2015)
Standard light microscope (x10 and x40 objective lens and x10 eyepieces)
Multiple unit laboratory counter with totalizer (Thomas Scientific) or computer with
appropriate software (e.g. Microsoft Excel, specialist software; Wincrypts and Score designed by Steve Roberts)
Scoring
limited set of experimental samples unblinded should allow a suitable number of categories to be allocated.
2. Examine slide and find a well orientated “hemi-villus” or “hemi-crypt” (Figure 8 & 9 respectively)
This should be representative (i.e. similar to other villi or crypts surrounding it), have an
appreciable monolayer of epithelial cells to allow longitudinal counting, and be free of
artefacts. Both sides of the same villus or crypt can be scored if they meet this criteria.
The observer should be blinded to the identity/treatment group of individual mice to
avoid bias
3. Begin at the crypt or villus base, and count cells by category until reaching the top of the crypt or apical epithelial cell of the villus respectively
4. Repeat this process for a statistically appropriate number of hemi-crypts and hemi-villi per mouse and per intestinal segment
5. Mean percentages of categorized cells can be compared statistically
Repeat the process several times for several slides on different days to check consistency of
method. Data should be tested for normality, and parametric or non-parametric statistical
testing applied appropriately. Statistical analyses can be applied to results obtained by
different observers, and at different times to assess for significant differences, and/or
correlation between observers to ensure consistency. If cells are analyzed on a cell-positional
hemi-crypts per mouse, in 4-6 mice is representative and statistically appropriate (Potten
and Grant, 1998). For cell positional data, statistical comparisons can be made by a modified
median test.
SUPPORT PROTOCOL 2: MEASUREMENT OF VILLUS/CRYPT LENGTHS USING IMAGE J
This protocol describes how to quantitatively assess villus and crypt lengths in order to assess small intestinal damage. It also compliments the findings made through cell scoring.
Materials
H&E stained (cross sections of small intestine prepared as per gut bundling technique)
Photomicroscope (e.g. Olympus BX43 microscope with Olympus SC-30 camera)
Appropriate image acquisition software (e.g. Olympus cellSens)
Hemocytometer or other scale of known size for calibration
Appropriate image analysis software such as ImageJ version 1.48 (Schneider et al.,
2012); download for free at http://rsb.info.nih.gov/ij/download.html
Image Capture and Analysis
1. Calibrate the image acquisition software for each objective lens by taking an image of a hemocytometer grid
This should allow appreciation of both the crypt and villus
3. Open the calibration image in ImageJ
4. Use the Straight Line selection tool and draw a line originating and finishing over a known distance
5. Choose Analyze > Set Scale and define the known distance in µm
6. The segmented line tool can then be used to measure the length of the villus/crypt from base to tip for 10 villi from an intestinal segment
The observer should be blinded to the identity/treatment group of individual mice to
avoid bias
7. Choose Measure (Ctrl+M) to record measurement Each measurement is recorded in a table by Image J
8. The same can also be done for the crypts
9. This value can then be averaged for villi and crypts
The division of the mean length of the former by the latter will also give a mean
villus:crypt ratio. Data should be tested for normality, and parametric or non-parametric
statistical testing applied appropriately for comparisons.
COMMENTARY
The gut bundling technique was first developed at The Paterson Institute for Cancer Research, Manchester, initially for the study of radiation induced crypt apoptosis and proliferation (Booth and Potten, 2002; Potten et al., 1990). The Gastroenterology Research Unit at The University of Liverpool has further developed the gut bundling technique to prepare intestinal samples for optimized histology, and quantitative analysis by cell scoring and can be used for many types of intestinal disease models (Burkitt et al., 2015; Duckworth et al., 2013; Duckworth and Pritchard, 2009; Williams et al., 2013). For cancer progression studies it may be more appropriate to utilise the adapted Swiss roll intestinal preparation technique (Moolenbeek and Ruitenberg, 1981).
It is essential to decide which of these techniques will best answer the critical questions to be addressed (see Strategic Planning). It is also critical to understand that there are fundamental differences in the site of sampling along the gastrointestinal tract, and consistency in sampling between animals is critical to allow accurate comparisons. It is also important to understand that the rapid degradation that occurs in the small intestine means that it should be prioritized for fixation ahead of other organs (including colon and pancreas) in a study to prevent
autolytic/artefactual changes.
For the Gut Bundling technique, it is very important at the trimming stage, that the various segments of intestine (e.g. proximal, middle and distal third of small intestine) are trimmed consistently and put in separate cassettes from which both the animal and the intestinal segment can be readily identified. This is important as although small and large intestinal sections are easily differentiated by appearance, the specific localisation within the small or large intestine is not; especially if there are superimposed lesions. Tight bundling of the
intestine is critical to preventing failure of this technique during processing. Correct orientation of tissue during embedding, tissue sections of the correct thickness (i.e. 3-5µm) and optimized H&E/immunohistochemical protocols are also critical to interpretation and quantification of intestinal tissues.
Troubleshooting:
Outlined below are some common problems encountered with the techniques described and their solutions:
Delay in fixation: Make sure that there is adequate time between the dissection of each
mouse, and that there is adequate familiarity with the anatomy and techniques
employed, preferably through practising these techniques on cull mice. Make sure that formaldehyde is made up freshly in PBS either from solid paraformaldehyde, or from concentrated stock (37.5%) formaldehyde (N.B. concentrated stock solution also undergoes degradation and should be used within expiry date). as the use of old
start fixation process and reduce potential tissue damage. N.B. tissues for histology should not be frozen; this leads to ice crystal formation and damage to cell/tissue morphology. See Strategic Planning if frozen sections are required.
Overfixation causing cross-linking of epitopes, and failure of immunohistochemistry,
immunofluorescence, or in-situ hybridization.
Trimming and tape looping: Practice is needed to become proficient in creating tape
loops of sufficient quality to allow efficient tightening around intestinal bundles, and in trimming intestines correctly. A small tab of excess tape should be left on the bundle to allow efficient handling at embedding. Micropore™ tape cannot be substituted for other forms of tape in this technique.
Care is needed that the pen or pencil used to label cassettes is solvent resistant.
Processing: artefacts can occur if solvents are not regularly replaced in the tissue
processor. Avoid excessive handling of labeled areas of cassettes, as labelling can be smudged or removed.
Embedding: It is important when transferring intestinal tissues prepared by the Swiss
roll method that an extra deep histology cassette is used, as standard histology
Histological analysis: common problems encountered with these sampling methods are
often only identified at the histological analysis stage, at which point it is very difficult to
correct them. These include the presence of contracted villi with epithelial “rafts” (whole rows of epithelial cells) separating from the villus core, indicative of the rapid autolysis and artefacts induced by delayed/inadequate fixation. Optimization of microtomy, H&E staining, and immunohistochemistry is required to produce high quality slides, and the use of experienced technicians is advisable. Loss of sections during immunohistochemical staining can be avoided by using electrostatically charged slides.
Anticipated Results: The anticipated results for the outlined methods are multiple high quality, well preserved intestinal sections which may be stained by H&E or with immunohistochemical stains. This should allow both qualitative and quantitative data to be obtained from these tissues in the context of mouse models of intestinal diseases.
Time Considerations: Considerable time should be dedicated to the strategic planning of experiments (see Strategic Planning section) and practicing the techniques prior to use on critical study animals. Mice should be adequately acclimatized to their environment (for at least one week) prior to commencement of experiments.
used to check that intestines are being fixed optimally i.e. <3 minutes elapses between death and fixation. For gut bundling at least 10 minutes should be left between each mouse to allow for time for euthanasia, dissection, placing samples in fixative and washing of instruments. A considerably longer interval is required for the Swiss roll technique. A minimum of 24h is recommended for adequate tissue fixation in formalin. Tissue trimming is time consuming and laborious for the gut bundling technique (allow 10 minutes per mouse sample), whereas this step is not necessary for the Swiss roll technique. Tissue processing on a standard processor is usually conducted overnight for approximately 15h. Whilst villus/crypt lengths are relatively quickly measured (the main time constraint being imaging via a photomicroscope), cell scoring needs considerable practice and repetition to achieve consistency and can take 15-20 minutes per slide for experienced operators.
ACKNOWLEDGEMENT DMP is funded by grants from North West Cancer Research (NWCR) and Worldwide Cancer Research.
LITERATURE CITED
Barker, N., van Es, J.H., Kuipers, J., Kujala, P., van den Born, M., Cozijnsen, M., Haegebarth, A., Korving, J., Begthel, H., Peters, P.J., Clevers, H., 2007. Identification of stem cells in small intestine and colon by marker gene Lgr5. Nature 449, 1003–1007.
doi:10.1038/nature06196
Booth, C., Potten, C.S., 2002. The Intestine as a Model for Studying Stem-Cell Behavior, in: Teicher, B.A. (Ed.), Tumor Models in Cancer Research, Cancer Drug Discovery and Development. Humana Press, pp. 337–357.
Burkitt, M.D., Hanedi, A.F., Duckworth, C.A., Williams, J.M., Tang, J.M., O’Reilly, L.A., Putoczki, T.L., Gerondakis, S., Dimaline, R., Caamano, J.H., Pritchard, D.M., 2015. NF-κB1, NF-κB2 and c-Rel differentially regulate susceptibility to colitis-associated adenoma
Duckworth, C.A., Burkitt, M.D., Williams, J.M., Parsons, B.N., Tang, J.M.F., Pritchard, D.M., 2015. Murine Models of Helicobacter (pylori or felis)-associated Gastric Cancer, in: Current Protocols in Pharmacology. John Wiley & Sons, Inc.
Duckworth, C.A., Clyde, D., Worthley, D.L., Wang, T.C., Varro, A., Pritchard, D.M., 2013.
Progastrin-induced secretion of insulin-like growth factor 2 from colonic myofibroblasts stimulates colonic epithelial proliferation in mice. Gastroenterology 145, 197–208, e3. doi:10.1053/j.gastro.2013.03.012
Duckworth, C.A., Pritchard, D.M., 2009. Suppression of apoptosis, crypt hyperplasia, and altered differentiation in the colonic epithelia of bak-null mice. Gastroenterology 136, 943–952. doi:10.1053/j.gastro.2008.11.036
FELASA working group on revision of guidelines for health monitoring of rodents and rabbits, Mahler (Convenor), M., Berard, M., Feinstein, R., Gallagher, A., Illgen-Wilcke, B., Pritchett-Corning, K., Raspa, M., 2014. FELASA recommendations for the health monitoring of mouse, rat, hamster, guinea pig and rabbit colonies in breeding and experimental units. Lab. Anim. 48, 178–192. doi:10.1177/0023677213516312 Kilkenny, C., Browne, W., Cuthill, I.C., Emerson, M., Altman, D.G., 2010. Animal research:
Reporting in vivo experiments: The ARRIVE guidelines. Br. J. Pharmacol. 160, 1577–1579. doi:10.1111/j.1476-5381.2010.00872.x
Leblond, C.P., Stevens, C.E., 1948. The constant renewal of the intestinal epithelium in the albino rat. Anat. Rec. 100, 357–377. doi:10.1002/ar.1091000306
Lefrançois, L., Lycke, N., 2001. Isolation of Mouse Small Intestinal Intraepithelial Lymphocytes, Peyer’s Patch, and Lamina Propria Cells, in: Current Protocols in Immunology. John Wiley & Sons, Inc.
Matsuo, K., Ota, H., Akamatsu, T., Sugiyama, A., Katsuyama, T., 1997. Histochemistry of the surface mucous gel layer of the human colon. Gut 40, 782–789.
MGI - Biology of the Laboratory Mouse [WWW Document], n.d. URL
http://www.informatics.jax.org/greenbook/frames/frame13.shtml (accessed 9.14.15). Moolenbeek, C., Ruitenberg, E.J., 1981. The “Swiss roll”: a simple technique for histological
studies of the rodent intestine. Lab Anim 15, 57–9.
Moore, R., Carlson, S., Madara, J.L., 1989. Villus contraction aids repair of intestinal epithelium after injury. Am. J. Physiol. - Gastrointest. Liver Physiol. 257, G274–G283.
Potten, C.S., 1990. A comprehensive study of the radiobiological response of the murine (BDF1) small intestine. Int J Radiat Biol 58, 925–73.
Potten, C.S., Grant, H.K., 1998. The relationship between ionizing radiation-induced apoptosis and stem cells in the small and large intestine. Br. J. Cancer 78, 993.
Potten, C. s., Owen, G., Roberts, S. a., 1990. The Temporal and Spatial Changes in Cell Proliferation within the Irradiated Crypts of the Murine Small Intestine. Int. J. Radiat. Biol. 57, 185–199. doi:10.1080/09553009014550431
Ritsma, L., Ellenbroek, S.I.J., Zomer, A., Snippert, H.J., de Sauvage, F.J., Simons, B.D., Clevers, H., van Rheenen, J., 2014. Intestinal crypt homeostasis revealed at single-stem-cell level by in vivo live imaging. Nature 507, 362–365. doi:10.1038/nature12972
Scudamore, C.L., 2014. Gastrointestinal system, in: Scudamore, C.L. (Ed.), A Practical Guide to the Histology of the Mouse. John Wiley & Sons, Ltd, pp. 43–61.
Snipes, R.L., 1981. Anatomy of the cecum of the laboratory mouse and rat. Anat. Embryol. (Berl.) 162, 455–474. doi:10.1007/BF00301871
Treuting, P.M., Dintzis, S.M., 2012. 12 - Lower Gastrointestinal Tract, in: Dintzis, P.M.T.M. (Ed.), Comparative Anatomy and Histology. Academic Press, San Diego, pp. 177–192.
Washington, M.K., Powell, A.E., Sullivan, R., Sundberg, J.P., Wright, N., Coffey, R.J., Dove, W.F., 2013. Pathology of rodent models of intestinal cancer: progress report and
recommendations. Gastroenterology 144, 705–717. doi:10.1053/j.gastro.2013.01.067 Watson, A.J.M., Pritchard, D.M., 2000. VII. Apoptosis in intestinal epithelium: lessons from
transgenic and knockout mice. Am. J. Physiol. - Gastrointest. Liver Physiol. 278, G1–G5. Wiley: A Practical Guide to the Histology of the Mouse - Cheryl L. C. Scudamore [WWW
Document], n.d. URL http://eu.wiley.com/WileyCDA/WileyTitle/productCd-1119941202.html (accessed 6.3.15).
Williams, J.M., Duckworth, C.A., Watson, A.J.M., Frey, M.R., Miguel, J.C., Burkitt, M.D., Sutton, R., Hughes, K.R., Hall, L.J., Caamaño, J.H., Campbell, B.J., Pritchard, D.M., 2013. A mouse model of pathological small intestinal epithelial cell apoptosis and shedding induced by systemic administration of lipopolysaccharide. Dis. Model. Mech. 6, 1388–1399.
doi:10.1242/dmm.013284
Young, B. (Ed.), 2006. Wheater’s functional histology: a text and colour atlas, 5th ed. ed. Churchill Livingstone/Elsevier, Edinburgh
INTERNET RESOURCES
http://rsb.info.nih.gov/ij/download.html: ImageJ download site
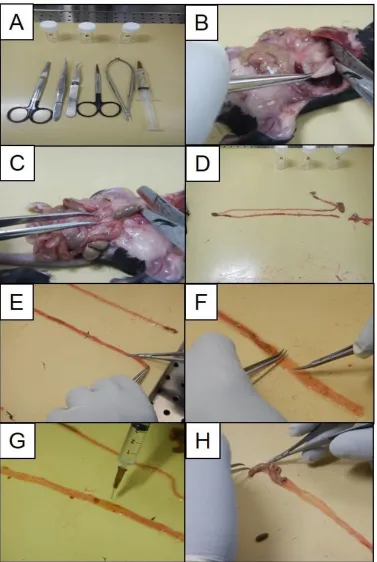
white card (B) then wrapping the intestines around this card (C). The card is folded to immobilize the intestines within the folded sections (D). The intestines wrapped around the card are immersed in formalin in a 30ml universal tube (E) labeled with unique animal
identifier. After 24h the fixed intestine is cut into three (small intestine) or two sections (colon). These segments are then cut into 1cm long lengths (F). These are then placed into a tape loop (G) to form a bundle which is tightened. The tape loop is trimmed with a scalpel (H), usually with 3 cuts as indicated, and the bundles placed in a cassette (I).
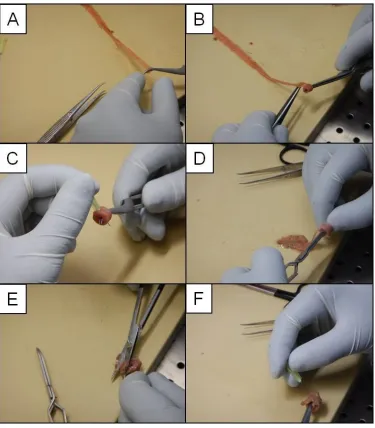
serrated forceps, self-closing forceps, standard scissors (sharp/sharp), spring scissors (Vannes type), 5ml Syringe with appropriate sized needle for bathing intestine in fixative (A).Opened abdominal cavity and cutting across the esophagus (B). Dissection of alimentary tract, showing opened abdominal cavity and cutting across the colon (C). Alimentary tract completely
dissected from the abdominal cavity and stomach removed (D). Opening of the intestine with spring scissors as part of the Swiss roll method, whilst gripping with forceps (E). Careful flattening of the mucosal surface of the intestine (moistened with fixative) prior to rolling for the Swiss roll method (F). Gentle flushing/moistening of intestinal mucosal surface with fixative in a 5ml syringe with 26 G needle attached (G). The large intestine is opened with spring
Figure 7: Rolling the intestine. The Swiss roll is started by picking up the end of the intestine nearest the operator with self-closing forceps (A). The intestine is rolled over the self-closing
into histology mould (E). The large intestine is pinned with a 30G needle at the end of the rolling process as shown, by slightly releasing the self-closing forceps (F).
processes are occurring along the hemi-villus axis (A). This is achieved by counting by category each cell from the base to the tip of the hemivillus (B). The end result is a text file that can be analyzed (C).