1.888.969.4249
wowforbusiness.com
Service
Reference
Guide
Table of Contents
Table Of COnTenTs
WOW! billing
WOW! Payment Options ... 5
Understanding Your Monthly Bill ...6
How to Register for Online Bill Pay ... 8
WOW! business Internet
Introduction ...12
Product Description ...12
Product Upgrade Opportunities ...12
Troubleshooting ...12
Pop-Up Ads, Browser Hijackers, Hackers and other Malware ... 14
WOW! business email
WOW! Email ...15
WebMail ...16
Login ...16
WOW! Business WebMail Main Screen ...17
Import/Export Contacts ...18
Mobile ...19
Outlook Express Email ...21
POP and SMTP Servers ...22
Account Username and Password...23
WOW! Recovercloud backup services
Introduction ...24
Product Description ...24
Product Upgrade Opportunities ...24
Table of Contents
WOW! business Phone
WOW! Business Phone Features ...25
Call Waiting ...25
Call Forwarding ...25
Call Forward Remote Activation ...25
3-Way Calling ...26
Call Return ...26
Speed Call 30 ...26
Call Transfer ...27
Multi-Ring ...27
Distinctive Ringing ...27
Directory Number Hunt ...27
Call Forward Busy ...27
Call Forward No-Answer ...27
Validated Personal Account Code ...28
Caller ID ...28
Caller ID for Call Waiting ...28
Alternate Caller ID ...28
Repeat Dialing ...28
Selective Call Rejection ... 29
Selective Call Forwarding ... 29
Voicemail ...32
Frequently Asked Questions ...35
Frequently Asked Telephone Questions ...37
Table of Contents
WOW! business Digital Cable
Getting Started ...40
WOW! Digital Cable Remote
Programming your WOW! Digital Remote ...40
Symbols Used On the Guide ... 42
Browsing ... 43
Searching ... 43
Favorites ... 44
HD Picture Formatting ... 44
Parental Controls ... 45
Settings ...47
Timers ... 50
Troubleshooting ...51
WOW! atlas Universal Remote
Programming your WOW! Atlas Universal Remote ... 54
Programming Channel Control Lock ...55
Programming ID Lock ...56
Programming “Tune-In” Keys for Specific Channels ...56
Using the Master Power Key ...57
Re-Assigning Device Keys ...57
Changing Volume Lock ...58
WOW! Atlas Cable Remote Control Codes ...59
Digital Cable Self-Installation ...65
Digital Cable Receiver ...65
Advanced Digital Equipment Setup ... 68
Digital Cable Receiver Setup Troubleshooting ... 70
Programming Your Digital Cable Remote Control ...71
WOW! Digital Cable Remote Control Codes ...72
Digital adapter
Self-Install Instructions ...75
Table of Contents
WOW! business High-Definition (HD)
Before you Begin ...77
Connecting the Set-Top ...79
Using the Set-Top ...81
Setting Menu Options ...81
Troubleshooting ...81
WOW! legal
WOW! Business Customer Agreement General Terms and Conditions ...83
Important Information – VIDEO ...106
WOW! Customer Privacy Notice For Cable Television,
Internet and Phone Services ...108
Billing
WOW! PaymenT OPTIOns
HOW DO I Pay my bIll?
Each month you will receive a monthly statement which includes the amount
due for the current billing cycle and any past due amount. Your monthly
billing cycle begins the day after installation of service has been completed.
You can mail us your payment, pay automatically with AutoPay (our
automatic payment system), make a payment at one of our local payment
locations or pay your bill online at wowforbusiness.com. You can also pay
your bill by check or credit card with our automated system at
1-888-969-4249.
For more information on how to sign up for AutoPay or to get a list of our
local payment locations, please visit our website at wowforbusiness.com or
call us toll-free at 1-888-969-4249.
Billing
UnDeRsTanDInG yOUR mOnTHly bIll
Account Snapshot
Last bill ...$ 176.79 Payment 5/12/13 ... - $ 176.79 New Charges Since Last Bill – See Below ....$ 183.93 Total Amount Due ...$ 183.93 Payment Due Date ... 06/20/13
New Charges Summary
WOW! Service Charges ...$ 101.00 Partial Month Charges & Credits ...$ 21.90 Other Charges & Credits ...$ 50.00 Taxes, Surcharges & Fees ...$ 11.03 Total New Charges ...$ 183.93 Account Name ... Any Business, Inc. Account Number ...012345678 Statement Code ...999 Customer Phone ...(123) 456-7890 Billing Date ...06/02/2013
Page 1 of 2
Contact Information:
Customer Service & Billing: 1-888-969-4249 Email: [email protected]
Customer Service Hours:
Monday - Friday 6:00am to 7:00pm CST Saturday - Sunday 7:00am to 4:00pm CST
NEWS AND INFORMATION
Thank you for being a WOW! Business customer. We know you have a choice in providers, and we value your business.
885511009065394600000000 PO BOX 4350
CAROL STREAM, IL 60197-4350
ANY BUSINESS, INC. 1234 MAIN STREET ANYTOWN, USA 12345-6789
WOW! BUSINESS PO BOX 4350
CAROL STREAM, IL 60197-4350
Account Name Any Business, Inc.
Account Number 012345678
Customer Phone (123) 456-7890
Billing Date 06/02/2013
Total Amount Due $183.93
Payment Due Date 06/02/13
AMOUNT ENCLOSED... $ To pay by phone, call 1-888-969-4249.
To pay online, visit wowforbusiness.com. Please detach and enclose this coupon with your payment. Do not send cash. Make checks payable to WOW! Business.
1
neWs anD
InfORmaTIOn
Important messages and reminders will appear in this area.2
CUsTOmeR
seRVICe
Information on ways to contact us.3
aCCOUnT
InfORmaTIOn
Displays your account name, your WOW! account number and the phone number linked to your account. The billing date is the date you are being billed.4
snaPsHOT &
sUmmaRy
Overview of payment information since your prior monthly bill and a summary of your current charges. Includes the payment due date and total amount due.5
PaymenT
OPTIOns
How to pay your bill by mail, phone or online.6
PaymenT
aDDRess
Address to which payment should be sent.The Front Side of Your Bill
1
2
3
4
6
5
Billing
Page 2 of 2
WOW! SERVICE CHARGES
LOCATION A 1234 MAIN STREET ANYTOWN, USA 12345-6789
06/02 - 07/01 Bus Basic Phone ...$40.00 Business 10% Discount - 12 Month ... -$4.00 06/02 - 07/01 Bus Essential Phone ...$30.00 Business 10% Discount - 12 Month ... -$3.00 06/02 - 07/01 Business Unlimited LD ...$0.00 06/02 - 07/01 Business .05 LD ...$0.00 06/02 - 07/01 Business Advanced Modem ...$2.50 06/02 - 07/01 Business 5/1 HSD ...$35.00 Business 10% Discount - 12 Month ... -$3.50 06/02 - 07/01 Network Line Fee ...$4.00
Offsets cost for WOW! interconnection to phone network. Not a tax or gov’t imposed fee.
Total WOW! Service Charges ... $101.00
PARTIAL MONTH CHARGES & CREDITS
Certain changes were made to your account after your last billing statement was issued. Below are the charges and/or credits applied to your account to reflect these changes.
LOCATION A 1234 MAIN STREET ANYTOWN, USA 12345-6789
05/23 - 06/01 Bus Basic Cable ...$21.90
Total Partial Month Charges & Credits ... $21.90
OTHER CHARGES & CREDITS
LOCATION A 1234 MAIN STREET ANYTOWN, USA 12345-6789
05/23 Installation ...$50.00
Total Other Charges & Credits ... $50.00
TAXES, SURCHARGES & FEES
LOCATION A 1234 MAIN STREET ANYTOWN, USA 12345-6789
06/02 FCC Phone Fee ...$0.10 06/02 State 911 Surcharge ...$0.38 06/02 Telecom Relay Service Fee ...$0.43 06/02 Sales Tax ...$3.78 06/02 Federal Universal Service Fund ...$6.34
Total Taxes, Surcharges & Fees ... $11.03
Account Name ... Any Business, Inc. Account Number ...012345678 Statement Code ...999 Customer Phone ...(123) 456-7890 Billing Date ...06/02/2013
Closed Captioning: For immediate assistance call 1-888-969-4249 or email [email protected]. For written complaints: Gary Nilsen, Vice President, 1674 Frontenac Road, Naperville, IL 60563 or email [email protected], call 719-388-1071 or fax 630-445-5001.
UnDeRsTanDInG yOUR mOnTHly bIll
The Back Side of Your Bill
7
sTaTemenT DeTaIls
An itemized listing of your service
8
PaRTIal mOnTH DeTaIls
Lists the details for credits and chargesBilling
HOW TO ReGIsTeR fOR OnlIne bIll Pay
Go to www.wowforbusiness.com and click on the “Login” in the upper right
hand corner.
Billing
Select “Bill Pay Account”
Billing
Enter your WOW! account number and the phone number that is associated
with your account. Your account number is located on your installation work
order (Figure 1). Click “submit”.
Billing
Continue to the User Information screen. (Figure 2) In the User Name field
you will create the primary WOW! Internet email address associated with this
account. For example, if you choose JohnDoe1234, your main WOW! Internet
email address will be [email protected]. If the user name
is already in use, you will be prompted to select a different user name. Your
user name must be at least four characters.
Your password must be at least eight characters. You will also need to
choose a security question that you will be prompted to answer if you forget
your user name or password. Your answer is case sensitive.
Internet
WOW! bUsIness InTeRneT
InTRODUCTIOn
Thank you for choosing WOW! Business Internet. This section of the User
Guide will help you get up and running as quickly as possible. In this guide,
you will find:
• A WOW! Business Internet Service Overview
• Product Descriptions
• Troubleshooting Tips
• Solutions to Stay Protected from Malicious Internet Activity
• Product Upgrade Opportunities
• Guidelines for Use and Summary of Information/Terms
WOW! bUsIness InTeRneT seRVICe OVeRVIeW
WOW! Business Internet is a flagship product that gives your business the
flexibility and speed you need to enhance your business experience. You can
upgrade or downgrade your service based on your needs at any time. WOW!
Business Internet provides your business with a variety of speeds, including
our highest download of 50Mbps and highest upload of 5Mbps. Visit our
website to learn more about what these speeds can do for your business.
With WOW! Business Internet’s asynchronous service, you can send and
receive information in a timely and reliable manner. Data from the Internet is
received from or sent to your office over our cable network, referred to as
HFC (Hybrid Fiber Coax), to give you assurance that your information will
reach its destination without delay.
If you have a small business that needs regular access to the internet,
then WOW! Business Internet is the perfect solution for you. When the
demands of your business began to grow, WOW! Business Internet also
has a Dedicated Internet Access product. Dedicated Internet Access is
a carrier grade synchronous service ideal for businesses that are either
growing month over month, have very active websites, are experiencing
slow downloads, are increasing headcount and/or have an increased need
to connect to the Internet using more bandwidth. With Dedicated Internet
Access you get higher bandwidth speeds, better Service Level Agreements
and scalable solutions to expand as your business demands.
TROUblesHOOTInG TIPs
If you happen to experience issues with your Business Internet service
either not working or running slowly, it’s usually an indication that there is a
problem with your cable modem or the WOW! cable network. Don’t worry -
there are some easy things you can do to try to fix the problem.
Cable modem Troubleshooting Tips
If your service does not perform as expected and you think it is an issue
with the cable modem, try these tips to see if they resolve the issue. If you
need further assistance, please don’t hesitate to contact the WOW! Business
Service Center at any time.
• Can’t send or receive data?
Check to make sure the coaxial cable, power, Ethernet/USB, and modem
connections are tight. Secure any loose connections.
Internet
• PC light is dark and not connected to the modem?
Check that your cables are plugged into the correct sockets. One very common
error is to plug the USB cable into the modem’s Ethernet socket. Be sure that
your USB cable is connected to the USB socket. The sockets on the back of the
modem are labeled. When this is done, your PC light (or equivalent) will light
up and there will be a connection between the modem and the PC.
• The cable light is not on or is blinking?
Check to see if your modem is connected to the WOW! Business network. Look
at your cable modem and confirm that the cable light is solid green. If the light
is green and is not blinking, unplug the modem’s power cord, wait 30 seconds
and then plug it back in.
• Still no connection?
Reboot your computer.
• Connection not established?
Please call WOW! Business Solutions Technical Support at 1-888-969-4249 for
assistance.
Use this table to help with the functions of your cable modem lights. The
names and colors of your lights may vary, but the indications are common to
most cable modems.
lIGHTs
InDICaTIOn
Power
Cable,
sync
or
block
sync
Steady green means modem is on and is connected to the cable
Internet network. Usually flashes during initial synchronization. No
green light means “off” with no cable connection. At this time, check
all cable connections and turn the modem “on”. If the problem persists,
contact WOW! Business Solutions Technical Support. Please note that
some modems do not have this light or an equivalent. If that is the
case, turn off the modem and turn it back on.
Data
or
activity
Flashing green means data is flowing through the modem. Some
modems have a light (RD or RX for example) that indicates when your
modem is receiving data as well as a separate light (TD, TX or SD for
example) that indicates when your modem is transmitting data.
Test
or
error
Normally off. May flash during initial self-test or software downloading.
Steady light usually indicates some kind of failure of the modem or the
network.
What if my Internet connection is not working?
If your Internet connection is not working and you also have WOW! Business
Cable and/or WOW! Business Phone, please check your other services to see
if they are working. If they are also not working, then there may be a cable
outage in your area. Please contact WOW! Business based on the following
states for service-related issues.
midwest Region
Internet
Troubleshooting frequently asked Questions
What should I do if my cable TV is working but my Internet is not and I
have a WOW! business modem?
If your WOW! Business cable television service is working but your Internet
and phone service is not, you may need to reset the modem.
How do I reset the modem?
To reset the modem, press the recessed “reset” button on the back of the
modem using a toothpick, pen tip or other pointed, non-metallic object..
Once the online light is on solid, connectivity to the network has been
restored.
What is the “standby” button on the modem?
The Standby button may be used to disconnect your computer from the
Internet when it is not in use (enabling the standby mode). Pressing the
button again will reconnect your computer to the Internet (disabling the
standby mode). The Standby button has no effect before the modem has
registered on our network. The current standby mode setting is stored on
non-volatile memory. If the modem is reset or loses power, the modem will
return to its original state.
sOlUTIOns TO sTay PROTeCTeD fROm malICIOUs
InTeRneT aCTIVITy
POP-UP aDs, bROWseR HIjaCkeRs, HaCkeRs anD
OTHeR mal-WaRe
On the Internet, the term “pop-ups” refers to programs that redirect your
homepage to another site without your permission. Usually pop-ups go
hand-in-hand with spyware and adware. Before you know it, you’ll get
deluged with pop-up ads while your homepage is being mysteriously reset.
Even if you change your homepage back, the hijacker will just redirect it
again after your next reboot for as long as it is installed on your PC.
Pop-ups and hijackers are becoming an increasingly large problem online.
To protect you and your business from these malicious activities, WOW!
Business strongly recommends purchasing an Internet security software
program that includes an antivirus/anti-spyware scanner as well as an email
scanning capability. This will help to deter advertisers and hackers from
interrupting and corrupting your data on a regular basis.
Internet
WOW! bUsIness emaIl
Welcome to WOW! Business Email. WOW! Business Email is a server-based
product that allows you to send or receive emails on a regular basis, any
time of day, in a secure way. Whether your email accounts use your own
website domain extension (a vanity email) or you use an email extension
from WOW! Business, “wowforbusiness.com”, we have you covered. WOW!
Business Email gives you the freedom to send or receive as many emails as
you need to, without limitation.
In rare cases, the WOW! Business email servers will block an email account
it detects is sending out virus-like activity. We take this step proactively
to slow or stop the spread of that virus. If your account becomes blocked,
simply install and run an anti-virus utility, then call us to have the account
reinstated. We will need to know what utility you ran and what virus (or
viruses) it detected and removed before we can reinstate the account, so
please have this information handy.
To login into your email service, go to www.wowforbusiness.com and click
on the “Login” tab in the upper right hand corner.
Internet
Select “Webmail”
WebmaIl
WOW! Business WebMail is an online email client which runs in your web
browser. WOW! Business WebMail allows you to access your email, contact
list, and calendar from any computer with an internet connection and a web
browser.
login
1. 1Enter your full email address
2. Enter your email password
Internet
WOW! bUsIness WebmaIl maIn sCReen
The Main Screen allows you to navigate through a Main Menu, access Quick
Links and view Statistics.
logout
Help
feedback
Internet
ImPORT/exPORT COnTaCTs
In order to import or export contacts click on the “Import/Export” button
from the secondary menu.
You will be prompted with the following form:
You may toggle among the tabs on top of the form depending whether you
want to import or export contacts.
To import contacts:
1. Choose an address book from the drop down menu. This address book will be
the one that you will import the contacts into.
2. Choose a file format from the drop down menu.
3. Choose an “input character set” from the drop down menu.
4. Click “Browse” to locate the file that you want to import.
5. Click “Import” to import the file.
Internet
To export contacts:
1. Choose an address book from the drop down menu. This address book will be
the one that you will import the contacts into.
2. Choose a file format from the drop down menu.
3. Choose an “output character set” from the drop down menu.
4. Click “Export” to export the file.
• Click “Close” to exit the “Import/Export” form.
mObIle
Mobile is divided into two sections:
1. “SyncSuite” which enables you to download SyncSuite services which allow
wireless data synchronization of Contacts and Calendars between multiple
devices. Updating data on one device will lead to all devices being updated
with the changes.
2. “Mobile Email” which allows you to forward your email address to either a
mobile device or another email account.
SyncSuite is only available with Collaborative Services.
1) syncsuite
There are 4 SyncSuite clients to download:
1. SyncJe for RIM Blackberry
2. SyncJe for Outlook
3. SyncJe for Outlook Express
4. SyncJe for SyncML enabled wireless devices
Internet
2) mobile email
Allows you to forward you email address to receive mail on your mobile
device or alternative email address.
set email forwarding
1. Enter the email address you wish to forward your email account to.
2. Check “Keep a copy of forwarded mail in my inbox,” if you wish to retain a
copy of the mail in your email box.
3. Click “Save.”
If you set forwarding in this section, it will auto update in Preferences
section so that you will not have to update forwarding elsewhere in
Webmail.
For a complete User Guide of WOW! Business Webmail, visit
www.wowforbusiness.com.
Internet
OUTlOOk exPRess emaIl
This section contains information that will assist you in configuring Microsoft
Outlook Express for use with WOW! Business Internet.
Outlook Express is Microsoft’s mail and news program that will allow you
to exchange email messages and read and post messages to Internet
newsgroups. Follow the instructions below to set up this program for use
with WOW! Business Internet.
Configuring Outlook express mail
To Configure Outlook Express to access your WOW! Business Internet
email accounts, launch Outlook Express by clicking Tools, Mail and News,
Read Mail from the Internet Explorer Browser menu bar, or double-click the
Outlook Express icon on your desktop or in your Programs menu.
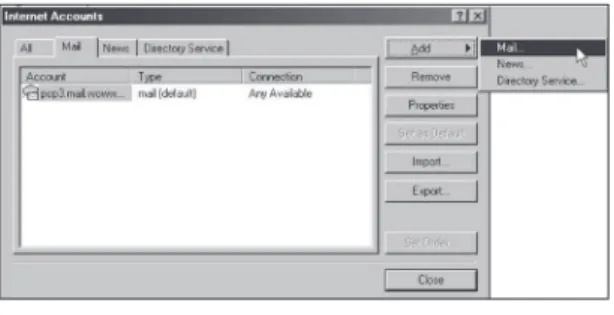
Internet accounts
To begin the setup procedure, click Tools, Accounts on the Outlook Express
menu bar. When the Internet Accounts window appears, click Add and select
Mail (see Figure 3.9).
Figure 3.9: Internet Accounts dialog
your name
Outlook Express will launch a “wizard” that will guide you through the
configuration of your email account. The first screen (see Figure 3.10) allows
you to specify your real (full) name:
Internet
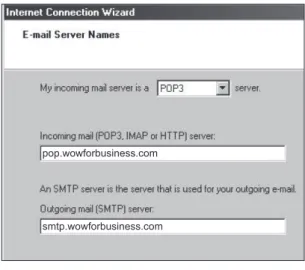
POP and smTP servers
A POP (Post Office Protocol) server is a computer that receives and stores
your incoming email messages. The server allows you to retrieve these
messages. A SMTP (Simple Mail Transfer Protocol) server is a computer that
accepts outgoing messages from your email software and delivers them to
the appropriate computers on the Internet. Locate the text fields for these
servers (see Figure 3.11) and enter them as shown below:
pop.wowforbusiness.com
smtp.wowforbusiness.com
Figure 3.11: Entering server mail names
Make sure to set up your incoming mail server type to POP3 and enter
pop.wowforbusiness.com in the incoming mail server field and smtp.
wowforbusiness.com in the outgoing mail server field. Click Next.
Internet
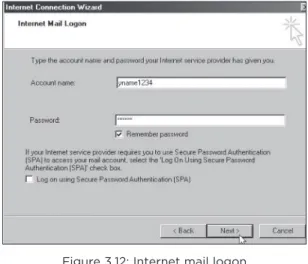
account Username and Password
Before the WOW! mail server will allow you to send or receive email, you
must provide it with the username and password for the mailbox you are
accessing. The Internet mail logon step (see Figure 3.12) is where you enter
the Username and Password for the mailbox you are configuring (your
Primary Account Username and Password if setting up your primary mailbox,
or the Username and Password you specified when creating an additional
mailbox).
Figure 3.12: Internet mail logon
NOTE: You may prefer to leave the Remember password option unchecked if you
share a computer with several users and you want to maintain the privacy of your
mail. If you select that option you can check email in the future without having to
enter your password again.
Click Next when you’ve entered these items (see Figure 3.13).
Internet
WOW! bUsIness ReCOVeRClOUD baCkUP
Get the most out of your WOW! Business RecoverCloud Backup service.
Please review the following information to learn more about the product,
including:
• A Product Description
• Product Upgrade Opportunities
• Troubleshooting Tips
WOW! Business RecoverCloud Backup is a file storage solution that allows
you to archive and retain data on a secure, offsite system. When you use the
RecoverCloud Backup systems, you get peace of mind knowing that your
data is stored on highly reliable disks and is available when you need it most.
Our backup agents leverage sophisticated block-level incremental features
to minimize the amount of data written to disk and transferred across your
network. Our data validation routines ensure 100% data restorability.
If you have backup service with WOW! Business and you are finding that
you may need additional storage, please call our WOW! Business Customer
Service Center. We will put you in contact with the right person to address
your data storage needs. Today we offer 500GB, 1TB, 2TB and 3TB storage
options.
TROUblesHOOTInG TIPs
Follow these steps to reset your service:
1. Reboot your client machine
2. Proceed to restart your RecoverCloud client software
3. Verify that you have Internet connectivity
4. Click on the “test connectivity” button located within the software
Please ignore the “SSL/Security Cert error” in all cases.
If you continue to experience errors, please contact the WOW! Business Data
Center Customer Service Center associated with your region and request to
be connected with the WOW! Business Data Center NOC. We will set-up a
webex/teamviewer session with you to identify any problems that you may
have encountered.
midwest Region
855-796-9249
Central Region
888-969-4249
southeast Region
855-796-9249
Kansas
Illinois
Alabama
South Dakota
Indiana
Florida
Ohio
Georgia
Michigan
South Carolina
Phone
WOW! bUsIness PHOne
Welcome to WOW! Business Phone. On the following pages, you will find
useful information on how to use your WOW! Business Phone service.
WOW! bUsIness PHOne feaTURes
Call Waiting
Call Waiting alerts you another caller is trying to reach you when you are
already on a call. When a second call comes in, the caller hears normal
ringing while you hear a special tone.
To answer a second call:
Press and quickly release the “receiver” or “flash” button on your phone. While
you talk with one caller, the other caller is automatically put on hold. Each
conversation is private.
To alternate between calls:
Press and quickly release the “receiver” or “flash” button again to return to the first call.
To end either call:
Hang up and your phone will ring right away. When you answer it, you will be
connected with the other call.
To cancel Call Waiting:
Dial *70, wait for a dial tone and dial the telephone number of the party you wish
to call. Call Waiting will be canceled for the duration of the call. You must do this
each time you wish to cancel call waiting.
Call forwarding
The Call Forwarding feature will direct a call to the number the user dictates
- this destination number can be changed each time Call Forwarding is set.
To activate, dial *72. Dial the number you want to forward your calls to.
When someone at that number answers, Call Forwarding is activated. If no
one answers or the line is busy, press the receiver button for one second and
repeat the steps listed above within two minutes. When you hear two beeps,
Call Forwarding has been activated. To deactivate, dial *73. You’ll hear two
short tones followed by the dial tone.
Call forward Remote activation
This feature allows the user to activate call forwarding on your business line
from any phone line.
first Use:
Before using this for the first time, you must change your Call
Forwarding Remote Access password. The default password is 2372. This
must be completed from the telephone line that the feature is assigned to.
To change your pin:
Phone
To Use:
1. Dial the local access number to access the feature.
2. You will be prompted for your 10 digit phone and 4 digit password. This should
be entered as a continuous 14 digit string. Enter # when finished entering. Make
sure you use the password you selected when setting this up for first use. (If
you have not changed your password from the telephone line this feature is
assigned to, you will get an error message instructing you to do this.)
3. You will then be prompted for the *72 or *73 and # to activate or deactivate
the feature. If you are deactivating, this process is complete. (*72=activate,
*73=deactivate)
4. If you enter the activation code, you will be prompted to enter the number you
wish to forward your calls to. Enter the forward to phone and then pound # to
complete. You are now finished activating your call forwarding remotely.
5. User must also have the Call Forward feature for this to work.
access numbers:
Naperville 630-219-6246 Troy
248-439-6246 Evansville 812-491-0000
Berea
440-973-4970 Columbus 614-396-6246
3-Way Calling
This feature permits a 3-Way conference call. To use three-way calling, place
the person you’re talking with on hold by pressing the “receiver” or the
“flash” button for one second. A dial tone will follow. Call the second person.
When you get an answer, press the “receiver” or “flash” button briefly again.
All three of you will be connected. When either of the people you called
hangs up, you remain connected to the other person. As center of the
conference, if you hang up, the conference ends.
Call Return
Use Call Return to automatically dial your last incoming call, whether the
call was answered or unanswered. Also known as Automatic Callback. To
activate, dial *69 and listen for a recording of the last number that was
called. To call that number, dial 1 as instructed by the recording or hang up if
you decide not to place the call.
speed Call 30
Speed Call-30 allows you to store up to 30 numbers for abbreviated dialing. Be
sure to keep a list of the numbers you enter, and their codes near your phone.
To add a number to your list
1. Obtain dial tone on controlling telephone number.
2. Press *75.
3. Listen for the dial tone.
4. Dial the two-digit code (20 through 49) you wish to assign.
5. Then dial the telephone number you wish to enter.
6. Two short tones confirm your request.
To change a number on your list
1. Repeat steps 1-3 above.
2. Dial the code of the number you wish to change. Then dial the new number.
To place a call with speed Call
1. Obtain dial tone
2. Dial one of your Speed Call codes. (20 through 49) Then Press # (Touch-tone
customers only).
Phone
Call Transfer
Call Transfer allows you to transfer an active call to another phone number
while on the call.
1. While on a call ask the party to whom you are speaking to hold.
2. Press the flash hook or link button on your phone.
3. Wait for dial tone then dial the number you want to transfer to.
4. You may hang up for a “blind transfer” or you may wait for the 3rd party to
answer for a “supervised transfer.”
5. For a supervised transfer, you may wait for the 3rd party to answer, announce
the call and press the flash hook again. All three parties will now be connected.
6. You may hang up at any time and the other two parties will remain connected.
multi-Ring
Multi-Ring allows you to have two phone numbers ring in on one phone line.
Only the primary TN will be displayed on outbound Caller ID.
Distinctive Ringing
Distinctive Ringing adds a distinctive ring tone to a secondary directory number
(SDN) of a Multi-Ring line. Fax machines can be programmed to answer only on
a distinctive ring so customers can use one line for both fax and voice service.
Directory number Hunt
Directory Number Hunt allows multiple calls to be completed to one dialed
telephone number to minimize busy signals. An account must have two
or more lines provisioned for this feature to work. Call Waiting and Call
Forward Busy cannot be activated when this feature is in use.
1. When the first line of the group (pilot number) is dialed and that line is busy,
the call will ring to the next number assigned to the group.
2. Calls to the pilot will continue to “hunt” for the next available line in a sequential
order until an open line is found for the call to ring in to.
3. If all lines in the group are occupied, the caller will get a busy signal.
Call forward busy
Call Forward Busy will forward calls to a predetermined number when the
dialed number is busy. Call Waiting and Directory Number Hunt cannot be
activated when this feature is in use.
1. The destination number must be a working telephone number set up with
WOW! in advance.
2. Long distance charges will apply if calls are forwarded to a number outside of
the local calling area.
3. To have this feature deactivated, please contact WOW!.
Call forward no-answer
Call Forward No-Answer will forward calls to a predetermined number when
the dialed number is not answered.
1. The destination number must be a working telephone number set up with WOW!
in advance.
2. Long distance charges will apply if calls are forwarded to a number outside of
the local calling area.
Phone
Validated Personal account Code
A Validated Personal Account Code requires you to dial an account code
from your predefined list when placing a long distance call. Personal Account
Codes can be 2, 3, 4 or 5 digits in length but all codes on a list must be
the same numbers of digits. Personal Account Codes allow for call activity
management throughout an office.
1. Customer dials long distance call as normal.
2. After the last digit is dialed a tone will sound prompting the customer to dial a
valid code.
3. If a valid code is dialed the call will complete as normal.
4. If dialed code is invalid the caller will receive a fast busy signal.
5. Some businesses such as law firms use this feature to bill their clients for time
spent on the phone with them.
Caller ID
Caller ID allows you to see who’s calling before you answer the phone. After
the first ring, the information of the person calling you automatically appears
on your Caller ID screen.
1. If you see “Private” or “P”, the caller may have blocked the display of their
name and number by pressing *67 before placing the call.
2. If you see “unknown name”, “unknown number”, “out of area” or “O”, the caller
is in an area that does not support Caller ID.
3. You must have a Caller ID display telephone or an add-on display unit to enable
Caller ID.
Caller ID for Call Waiting
Caller ID for Call Waiting allows you to see who is trying to reach you
while you’re on another call. It displays in the same way you would see an
identifier for a caller if the phone were not being used.
alternate Caller ID
Alternate Caller ID is used to keep others from looking at their Caller ID
and calling back a number designated for outbound calling that may not
be answered or forwarded to an answering service after hours. Any of your
lines can now show the name and number of another line when placing an
outbound call. This feature is set up by WOW! and can only be changed by
contacting WOW! The alternate number must also be an active number at
the same address as your WOW! account.
Repeat Dialing
This feature also known as Auto Busy Redial keeps redialing a busy phone
number and notifies you when the line is free with a distinctive ring.
1. After reaching a busy signal, hang up, lift the handset and listen for the
normal dial tone.. Press *66. You will hear an announcement telling you how
to proceed. Hang up. Your line will keep trying to reach the busy line for up
to 30 minutes. When the line becomes free, a special ring (short-short-long
ring pattern) will notify you. When you hear the special ring, lift the handset to
automatically place the call.
2. To cancel: Lift the handset and listen for the normal dial tone. Press *86. Listen
for a confirmation announcement indication that you have canceled all of your
requests to call persons back. Hang up.
3. Feature will be difficult to activate in a PBX environment where the user can not
direct select a particular line
Phone
selective Call Rejection
Selective Call Rejection allows you to screen calls from up to 12 numbers that
you specify. Selective Call Rejection cannot be used with cell phones, pay
phones or virtual numbers.
To activate or deactivate selective Call Rejection:
1. Listen for dial tone
2. Dial *60
3. Listen to the ON/OFF announcement
4. To turn the feature ON or OFF, press 3
To program a number:
1. Listen for a dial tone
2. Dial *60
3. Press #
4. Wait for tone
5. Enter the selected phone number
6. Press # again
7. Hang up
To add the number of the last incoming call to the list:
1. Listen for a dial tone
2. Dial *60
3. Dial #01#
To remove or hear the phone numbers on your list:
1. Listen for a dial tone
2. Dial *60 and listen for instructions
selective Call forwarding
The Selective Call Forwarding feature makes sure you never miss an important
call. With Selective Call Forwarding you can forward calls from a list of
up to 12 phone numbers to any phone number you choose. Selective Call
Forwarding cannot be used with cell phones, pay phones or virtual numbers.
To activate or deactivate selective Call forwarding:
1. Listen for a dial tone
2. Dial *63
3. Listen to the ON/OFF announcement
4. To turn the service on press 3
5. To add an entry to the forwarding list press #
6. To remove one or more entries from the forwarding list press *
7. To hear entries on the forwarding list press 1
8. To repeat instructions dial 0
To turn the selective Call forwarding feature On for the first time:
1. Listen for a dial tone
2. Dial *63
3. Press 3 and then add the phone number that you would like your selected phone
numbers forwarded to. You will need to add the destination phone number and
the specific selected phone numbers to your forwarding list. See details below.
Phone
To add the destination phone number you want your calls forwarded to:
1. Listen for a dial tone
2. Dial *63
3. Press 3
4. Enter the destination phone number you would like your calls forwarded to
5. Press # and the announcement will list the new phone number that your selected
calls are being forwarded to
6. Press 1 to confirm the new destination phone number
7. If you want to turn the service ON, follow prompts or instructions below to add
a phone number to your forwarding list
8. If you want to keep the feature OFF, hang up
To change the destination phone number you want your calls forwarded to:
1. Listen for a dial tone
2. Dial *63
3. Press 3 and the announcement will list the phone number that your selected
calls are 3 being forwarded to
4. Press 0 to change the phone number you would like your select calls forwarded to
5. Enter the new destination phone number
6. Press # and the announcement will list the new phone number that your selected
calls are being forwarded to
7. Press 1 to confirm the new destination phone number
8. When finished, hang up
To remove the destination phone number you want your calls forwarded to:
It is not possible to completely remove the destination phone number once the
Selective Call Forwarding feature has been activated. As long as Selective Call
Forwarding is OFF, selected phone numbers will not be forwarded to the last
stored destination phone number. The system will still store the last destination
phone number should you decide to turn the feature back on at a later date.
To add a specific phone number to your forwarded list with selective Call
forwarding Off:
1. Listen for a dial tone
2. Dial *63
3. Listen to the ON/OFF announcement. The announcement will indicate how
many phone numbers are on your list
4. Press # to add an entry
5. Enter the selected phone number you wish to add to your forwarding list
6. Press # again
7. The system will confirm the phone number and add it to your forwarding list
8. If you would like to add another phone number press # and enter the next
phone number followed by #
9. If you do not want to add more entries, hang up
To add the phone number of the last incoming call to your forwarded list with
selective Call forwarding Off:
1. Listen for a dial tone
2. Dial *63
3. Listen to the ON/OFF announcement
4. The announcement will indicate how many phone numbers are on you
forwarding list
5. Dial #01#
6. The system will confirm the last phone number received and add it to your
forwarding list
7. If you would like to add another phone number press # and enter the next
phone number followed by #
Phone
To add a specific phone number to your forwarded list with selective Call
forwarding already On:
1. Listen for a dial tone
2. Dial *63
3. Listen to the ON/OFF announcement. The announcement will indicate how
many phone numbers are on your list
4. Press 1
5. Press # to add an entry
6. Enter the selected phone number to be added to your forwarding list
7. Press # again
8. The system will confirm the phone number and add it to your forwarding list
9. If you would like to add another phone number press # and enter the next
phone number followed by #
10. If you do not want to add more entries, hang up
To add the phone number of the last incoming call to your forwarded list with
selective Call forwarding already On:
1. Listen for a dial tone
2. Dial *63
3. Listen to the ON/OFF announcement
4. The announcement will indicate how many phone numbers are on your
forwarding list
5. Press 1
6. Dial #01#
7. The system will confirm the last phone number received and add it to your forwarding list
8. If you would like to add another phone number press # and enter the next
phone number followed by #
9. If you do not want to add more entries, hang up
To remove a specific phone number from your forwarded list:
1. Listen for a dial tone
2. Dial *63
3. Listen to the ON/OFF announcement
4. The announcement will indicate how many phone numbers are on your
forwarding list
5. Press 1
6. Press the * key to remove one or more entries
7. Dial the phone number to be removed
8. Press the * key again
9. The announcement will confirm the phone number to be removed
10. When finished, hang up
To remove all phone numbers from your forwarded list:
1. Listen for a dial tone
2. Dial *63
3. Listen to the ON/OFF announcement
4. The announcement will indicate how many phone numbers are on your forwarded list
5. Press 1
6. Dial *08 to remove all entries
7. The announcement will confirm that there are no more phone numbers on your list
8. When finished, hang up
Phone
To review all phone numbers on your forwarded list and delete one or all of the
phone numbers on the list:
1. Listen for a dial tone
2. Dial *63
3. Listen to the ON/OFF announcement
4. The announcement will indicate how many phone numbers are on your forwarded list
5. Press 1
6. The announcement will indicate how many phone numbers are on your
forwarded list again
7. The system will repeat all numbers on your list
8. If you would like to delete a specific phone number from your list at this time
dial 07 after hearing the entry and the system will confirm the phone number
was removed and continue listing phone numbers
9. If you would like to delete all phone numbers from your list you may dial 08 at
any time
10. When finished, hang up
To turn the selective Call forwarding feature Off:
1. Listen for a dial tone
2. Dial *63
3. Listen to the ON/OFF announcement
4. Press 1
5. Press 3
6. The system will announce that Selective Call Forwarding is now off
7. When finished, hang up
To turn the selective Call forwarding feature back On:
1. Listen for a dial tone
2. Dial *63
3. Press 3
4. The system will announce what destination phone number was previously set
up for Call Forwarding
5. Press 1 if the phone number is correct. Selective Call Forwarding will be turned
back on.
6. When finished, hang up
NOTE: Selective Call Forwarding and Call Forwarding can be available on the same line, but only one can be active at a time. The destination of your Selective Call Forwarding may be local or long distance.
Voicemail
Commercial Voice Mail can be purchased as a single mailbox that will answer
the company’s lines or can be customized so that the caller can leave a
message for up to five additional users that share the same phone number.
mailbox
mailbox number
menu Option #
General Mailbox
npa-nxx-xxxx
0
Additional mailbox 1
npa-nxx-xxxx-1
1
Additional mailbox 2
npa-nxx-xxxx-2
2
Additional mailbox 3
npa-nxx-xxxx-3
3
Additional mailbox 4
npa-nxx-xxxx-4
4
Additional mailbox 5
npa-nxx-xxxx-5
5
Users with only 1 mailbox
npa-nxx-xxxx
None
(npa-nxx-xxxx = the customers 10 digit telephone number)
Phone
To access your general mailbox:
• Dial the local access phone number or *98 from your primary phone number
associated with the Voice Mail.
Voicemail access Phone numbers
• Cleveland (440) 973-4971
• Columbus (614) 396-6247
• Illinois
(630) 219-6247
• Michigan (248) 439-6247
• When prompted dial the 10 digit mailbox number. (your phone number) or enter
your password as directed. The default password is 1234.
• Only the general mailbox for users that order additional user mailboxes is
provisioned at time of install.
• The general mailbox user has full control to add, delete, activate or deactivate
additional users.
• Initial passwords for the additional mailboxes are randomly assigned when a
new mailbox is created.
• After the general mailbox user creates the additional users, they may dial in to
the system by dialing the local Voice Mail access number and entering their 10
digit phone number when prompted.
• VM system will then play the recorded user names followed by a prompt to dial
the associated number (1, 2, 3, etc.) to access the individual mailbox.
• When user makes their selection they are then prompted for their password.
The password will be given to them by the person with the general mailbox who
created the additional user.
• After each user gains access to their mailbox for the first time they will go
through a tutorial to help them change their password, record their name and
record their personal greeting.
Phone
Voicemail access Phone numbers
listen to new and saved
messages
press 1
after listening to messages
Repeat press 1
Reply press 5
Forward press 6
Delete press 7
Save as new press 9
Leave as new/saved press #
To exit press *
enter 10 digit phone
number then #
To exit press **
Personal Greeting press 1 Extended absence press 2 System generated / Name press 3
Group Greeting* press 4
Out of hours press 6
To exit press *
Enable a secondary mailbox press 1 Disable a secondary mailbox press 2 Add a secondary mailbox* press 3 Delete a secondary mailbox press 4 * Group greeting and mailbox options
only appear when secondary mailboxes are ordered.
* Group greeting must be enabled to add and access secondary mailboxes.
* Secondary mailbox PIN’s are automatically generated when mailbox is added by the customer. Hands free / time saver
options press 2
Security options press 3 Group mailbox options* press 4
Notification press 5
Additional press 6
To exit press *
Enter 10 digit mailbox number then #
Helpful Hints
send message to another
WOW! mailbox subscriber
press 2Greetings
press 3Personal options
press 4leave mailbox and log into
another
press 7