APPLICATION
APPLICATION
N
N
o
o
t
t
e
e
T
T
EELLEECCOOMMS
S
OOLLUUTTIIOONNSS FFOORR TTHHEE2
2
1
1
SSTTC
C
EENNTTUURRYYUsing the PB-100
for All-Call Dialing
March 22, 2002
Using the PB-100 to Make Calls and
Announcements From a Database
P
P
h
h
o
o
n
n
e
e
.
.
.
.
.
.
7
7
1
1
5
5
.
.
3
3
8
8
6
6
.
.
8
8
8
8
6
6
1
1
i
i
n
n
f
f
o
o
@
@
v
v
i
i
k
k
i
i
n
n
g
g
e
e
l
l
e
e
c
c
t
t
r
r
o
o
n
n
i
i
c
c
s
s
.
.
c
c
o
o
m
m
h
h
t
t
t
t
p
p
:
:
/
/
/
/
w
w
w
w
w
w
.
.
v
v
i
i
k
k
i
i
n
n
g
g
e
e
l
l
e
e
c
c
t
t
r
r
o
o
n
n
i
i
c
c
s
s
.
.
c
c
o
o
m
m
• Compatible with Windows 95, 98, ME, NT 4.0, 2000 • Male sub-D 9 pin cable provided
• 20 digit Touch Tone buffer
• Accepts standard RS-232 ASCII commands • Dials Touch Tones 0-9, ✱, # and 2 second pauses • Audio In jack for playing announcements
• Audio Out jack for recording announcements • Able to send and receive 1200 baud data • Analog C.O. line port
• Analog phone port
Power: 120V AC/12V DC 500mA, UL listed adapter provided Dimensions: 127mm x 127mm x 25mm (5" x 5" x 1.5") Weight: 1.36 kg (3 lbs.)
Environmental: 0°C to 32°C (32°F to 90°F) with 5% to 95% non-condensing humidity
P.C. Interface: 9-pin RS-232 (cable included) Software/Hardware Requirements:
• IBM Compatible personal computer with an available serial port CD-rom drive, and Windows compatible sound card
• Windows: 95 or 98 (with OLE32 updates), NT 4.0 (service pack 6 or higher ), 2000 (service pack 2 or higher)
• 5MB of hard drive space • 8MB of free physical RAM
F
F
e
e
a
a
t
t
u
u
r
r
e
e
s
s
S
S
p
p
e
e
c
c
i
i
f
f
i
i
c
c
a
a
t
t
i
i
o
o
n
n
s
s
The PB-100 hardware and software provides
inexpen-sive PC to Telephony applications on an open source basis and makes it easy to create your own application solutions using standard programming languages such as Microsoft’s Visual Basic®. Applications such as mes-sage announcement centers, auto attendants, voice dialers and auto attendants may easily be created to your custom specifications.
The PB-100 accepts simple ASCII serial
com-mands to seize the phone line, dial or decode DTMF Touch Tones, watch for busy signal, detect loop status, perform timed hook-switch flashes or hang-up the line. If your PC is equipped with a sound card, the audio ports can also be coupled to the phone line through the PB-100for voice recording or playing announcements using standard file formats such as .wav files.
The PB-100hardware features a serial port interface, an “AUDIO IN” and “AUDIO OUT” port, an
analog C.O. line interface and an analog phone port. Several pre-written applications are included and can be installed for use. In addition, all available source code is provided to allow changes or improvements to existing programs.
Inexpensive Automated Telemarketing For:
• Insurance companies • Mortgage companies • Research companies
A
L
L
i
i
c
c
e
e
n
n
s
s
e
e
A
A
g
g
r
r
e
e
e
e
m
m
e
e
n
n
t
t
/
/
W
W
a
a
r
r
r
r
a
a
n
n
t
t
y
y
THE SOFTWARE, FIRMWARE, SOURCE CODE, HTML CODE, DOCUMENTATION OR ANY OTHER ACCOM-PANYING COMPUTER FILES (hereafter referred to as "THE FILES") ARE PROVIDED "AS IS" AT "NO CHARGE" AND WITHOUT WARRANTY OF ANY KIND, INCLUDING, BUT NOT LIMITED TO, THE IMPLIED WARRANTIES OF MERCHANTABILITY OR NON-INFRINGEMENT. Because of the various hardware and soft-ware environments into which the FILES may be put, NO WARRANTY OF FITNESS FOR A PARTICULAR PUR-POSE IS OFFERED. Viking explicitly disclaims the fitness or usefulness of all files and/or software, or the infor-mation contained herein, for any purpose.
Good data processing procedure dictates that any program be thoroughly tested with non-critical data before relying on it. The user must assume the entire risk of using “THE FILES”.
TO THE FULLEST EXTENT PERMISSIBLE PURSUANT TO APPLICABLE LAW, IN NO EVENT SHALL VIKING ELECTRONICS, INC. NOR ANY OTHER PARTY INVOLVED IN CREATING, PRODUCING, DELIVERING, INSTALLING OR USING "THE FILES", BE HELD LIABLE FOR ANY SPECIAL, DIRECT, INCIDENTAL, CON-SEQUENTIAL, INDIRECT OR PUNITIVE DAMAGES ARISING OUT OF YOUR ACCESS TO, USE OF, OR INABILITY TO USE "THE FILES" (INCLUDING, WITHOUT LIMITATION, DAMAGES FOR LOSS OF BUSINESS PROFITS, BUSINESS INTERRUPTION, LOSS OF BUSINESS INFORMATION, OR ANY OTHER PECUNIARY LOSS) ARISING OUT OF THE USE OF OR INABILITY TO USE "THE FILES", EVEN IF VIKING ELECTRON-ICS, INC. HAS BEEN ADVISED OF THE POSSIBILITY OF SUCH DAMAGES.
BECAUSE SOME STATES AND JURISDICTIONS DO NOT ALLOW THE EXCLUSION OR LIMITATION OF LIABILITY FOR CONSEQUENTIAL OR INCIDENTAL DAMAGES, THE ABOVE LIMITATION MAY NOT APPLY TO YOU.
Because the files and/or software is provided "AS IS" at "NO CHARGE," it is done so with the condition that LIM-ITED, and in most cases, NO TECHNICAL SUPPORT WILL BE PROVIDED for "THE FILES" use or installation thereof.
All OF "THE FILES" ARE AND WILL DURABLY REMAIN THE SOLE COPYRIGHTED COMMERCIAL PROP-ERTY OF VIKING ELECTRONICS, INC. "THE FILES” are NOT PUBLIC DOMAIN, FREEWARE OR SHARE-WARE. You may NOT REDISTRIBUTE OR REPRODUCE THESE FILES AND/OR SOFTWARE in any form, electronic or otherwise WITHOUT THE EXPRESS WRITTEN PERMISSION OF VIKING ELECTRONICS, INC. If you DO NOT ACCEPT OR AGREE TO ALL of the above terms, conditions, and disclaimers, you must DELETE all of "THE FILES" from your local or network drive immediately and return or destroy the media on which "THE FILES" were delivered. Any and all USE or INSTALLATION of "THE FILES" will be considered ACCEPTANCE of all TERMS, CONDITIONS and DISCLAIMERS.
If any provision of this Agreement shall be unlawful, void, invalid or for any reason unenforceable then that pro-vision shall be deemed severable from this Agreement and shall not affect the validity and enforceability of any remaining provisions.
The information provider, smart terminal, voice recorder and AES-2000 programmer use a Sax Software Comm Objects third party driver for serial port communication. Due to licensing issues, this driver CAN NOT be sup-plied with the source code. If you use the source code as is, a pop-up message will inform you that you may use the Sax Software Comm Objects driver for evaluation purposes ONLY. YOU WILL NOT BE ABLE TO COM-PILE THE SOURCE CODE!
If you wish to compile the source code, you must purchase the program from Sax Software If you already own a Sax Software Comm Objects license, simply fill in your serial number in the properties box for each screen that uses the Sax Software Comm Objects driver.
USE ONLY LISTED CLASS 2 POWER SOURCE 12VDC O.5A MAX LINE PHONE SERIAL DATA
(RS-232) AUDIO IN AUDIOOUT
Mic In
Audio Out Serial
Port
The PB-100comes complete with a telco cord, serial cable, audio cables and a 12V DC power adapter.
H
H
a
a
r
r
d
d
w
w
a
a
r
r
e
e
I
I
n
n
s
s
t
t
a
a
l
l
l
l
a
a
t
t
i
i
o
o
n
n
S
S
o
o
f
f
t
t
w
w
a
a
r
r
e
e
a
a
n
n
d
d
I
I
n
n
s
s
t
t
a
a
l
l
l
l
a
a
t
t
i
i
o
o
n
n
120V AC
Phone Line RS-232 Serial Cable
12V DC Adapter (included)
To “Audio Out”
To “Audio In” or “Mic In”
Step 1. Using the telco cord, connect a phone line to the rear panel jack labeled “LINE”. If the PB-100is to be used in series with another piece of equipment, the telecom device can be plugged into the “PHONE” jack.
Step 2. Connect one end of the 9 pin serial cable into the jack labeled “SERIAL DATA” and the other end into an open serial port of the P.C.
Step 3. If audio is to be used through the PB-100, connect the “Audio Out” port of the sound card to the “AUDIO IN” port of the PB-100, and “Audio In” or “Mic In” of the sound card to the “AUDIO OUT” port of the PB-100.
Step 4. Plug the 12V DC power adapter (included) into the rear panel power jack. Rear View of the PB-100
Rear View of the P.C.
The All Call Dialing program maintains a list of names and phone numbers in a Microsoft Access database. When start-ed, the software calls each number stored in the database and plays a selected wave (.wav) file stored on your com-puter's hard drive.
A. About the Software
B. System Requirements
1. Hardware Requirements
• IBM Compatible personal computer with: Windows 95, 98 or ME (with OLE32 updates), Windows NT 4.0 (service pack 6 or higher), Windows 2000 (service pack 2 or higher).
• PB-100hardware.
• Available RS-232 serial port.
• Male sub-D 9 pin cable (provided with PB-100hardware). • Windows compatible sound card.
• 5MB minimum free hard drive space for each installation. • 8MB of free physical RAM for each Vikingapplication running.
• Internet Explorer or Netscape Navigator Version 4 or newer to navigate CD contents.
• Windows: 95 or 98 (with OLE32 updates), NT 4.0 (service pack 6 or higher ), 2000 (service pack 2 or higher). • Adobe Acrobat Reader®version 4.x or newer to view Product and Software Documentation.
S
S
o
o
f
f
t
t
w
w
a
a
r
r
e
e
P
P
r
r
o
o
g
g
r
r
a
a
m
m
m
m
i
i
n
n
g
g
C. Installing Software
D. Un-Installing Software
Step 1. Connect the hardware as shown in “Hardware Installation”. Step 2. Insert the Vikingmaster CD to start the program.
Step 3. Follow the instructions on the CD.
Step 1. Go to “Control Panel”, then select “Add/Remove Programs”. Step 2. Select the Vikingsoftware you want to remove.
Step 3. Click “Remove”.
Note: If you have disabled the “Auto-Run” feature on your computer and the CD does not automatically start, double click the setup.htm file in the root directory of your CD-Rom drive.
Important: New records entered and changes made to existing records are temporary until the "Apply" button is pressed and the file is saved to a drive. To avoid losing data, please "Save" your work often and always save before the program is terminated.
MODEL PB-100
VIKING ELECTRONICS, HUDSON WI 54016 1 2 3 4
1 2 3 4
POLLING BRIDGE
ON OFF
RESET STATUS
VIKING©
P
P
r
r
o
o
g
g
r
r
a
a
m
m
m
m
i
i
n
n
g
g
Switch 1 1 2 2 3 4
ON/OFF OFF
ON OFF
ON
-Description
1600A Series polling mode enabled 1600A Series polling mode disabled AES-2000programming disabled AES-2000programming enabled (not used)
(not used)
Important: Before starting the software, the PB-100hardware must be attached to the RS-232 serial port of your com-puter.
Upon running the software for the first time, a "Serial Setup" dialog box will open to allow you to configure the software to operate with your PC. Configure the software to operate correctly with the RS-232 serial port on your computer. (all-call/config_screen.psd)
A. Configuring the Software
(see Diagram A)Diagram A
Comm Port Baud Rate Data Bits Stop Bits Parity
1 9600 8 1 none Serial Setup
The PB-100 All Call software can read a Microsoft Access database, so long as the following requirements are met: a. The Access file must be an Access 97 (Office 97) or older.
Note: If you are using Access 2000 or Access XP to create your database, you must export your database to an Access 97 format.
b. The first 3 fields must be ID, Name, and Phone in order (see diagram B).
B. Database
Diagram B
1. Database Format
2. Opening an Existing Database
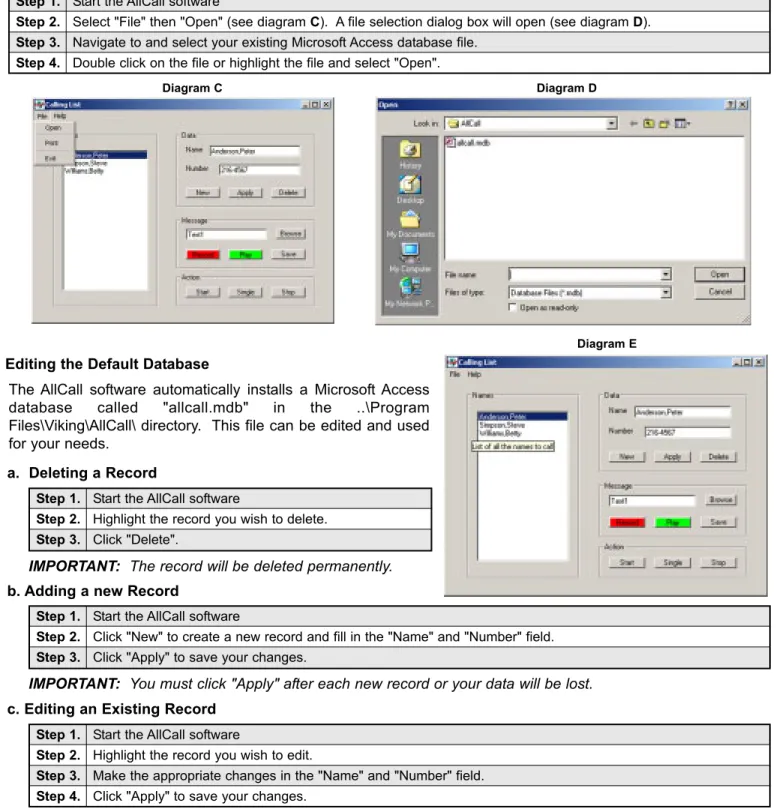
The AllCall software automatically installs a Microsoft Access database called "allcall.mdb" in the ..\Program Files\Viking\AllCall\ directory. This file can be edited and used for your needs.
3. Editing the Default Database
a. Deleting a Record
Step 1. Start the AllCall software
Step 2. Highlight the record you wish to delete. Step 3. Click "Delete".
b. Adding a new Record
IMPORTANT: The record will be deleted permanently.
Step 1. Start the AllCall software
Step 2. Click "New" to create a new record and fill in the "Name" and "Number" field. Step 3. Click "Apply" to save your changes.
IMPORTANT: You must click "Apply" after each new record or your data will be lost.
Diagram C Diagram D
c. Editing an Existing Record
Step 1. Start the AllCall software
Step 2. Highlight the record you wish to edit.
Step 3. Make the appropriate changes in the "Name" and "Number" field. Step 4. Click "Apply" to save your changes.
IMPORTANT: You must click "Apply" after each new record or your data will be lost.
Step 1. Start the AllCall software
Step 2. Select "File" then "Open" (see diagram C). A file selection dialog box will open (see diagram D). Step 3. Navigate to and select your existing Microsoft Access database file.
Step 4. Double click on the file or highlight the file and select "Open".
Due to the dynamic nature of the product design, the information contained in this document is subject to change without notice. Viking Electronics, and its affiliates and/or subsidiaries assume no responsibility for errors and omissions contained in this information. Revisions of this document or new editions of it may be issued to incorporate such changes.
Fax Back Doc 861 Printed in the U.S.A. Rev 5
P
P
r
r
o
o
d
d
u
u
c
c
t
t
S
S
u
u
p
p
p
p
o
o
r
r
t
t
L
L
i
i
n
n
e
e
.
.
.
.
.
.
7
7
1
1
5
5
.
.
3
3
8
8
6
6
.
.
8
8
6
6
6
6
6
6
F
F
a
a
x
x
B
B
a
a
c
c
k
k
L
L
i
i
n
n
e
e
.
.
.
.
.
.
7
7
1
1
5
5
.
.
3
3
8
8
6
6
.
.
4
4
3
3
4
4
5
5
2. Recording Your Own .wav File
Step 1. Attach a microphone to the input port of your sound card. Step 2. Enter the path and name of the file you wish to create in
the "Message" box
Step 3. Click the "Record" button and begin speaking into the Microphone.
Step 4. When finished click the "Stop" button. You may review your message be clicking the "Play" button
Step 5. Click the "Save" button to save your message.
Step 1. Setup and configure AllCall software as explained in previous sections. Step 2. Click the "Single" button.
Step 3. When you wish to stop calling, click the "Stop" button
A. Dialing a Single Number
The All Call software will dial the highlighted name and play the recorded “message” file.
O
O
p
p
e
e
r
r
a
a
t
t
i
i
o
o
n
n
Step 1. Setup and configure AllCall software as explained in previous sections. Step 2. Click the "Start" button.
Step 3. When you wish to stop calling, click the "Stop" button
B. Dialing All Numbers in the Database
C. Recording Your Outgoing Message
The AllCall Software can play any .wav file as your outgoing message and allows you to open an existing .wav file or record and save your own.
1. Using an Existing .wav File
Step 1. Click on the "Browse" button and navigate to the .wav file you desire (see diagram F).
Step 2. Double click on the file or highlight the file and select "Open".
Diagram F
Important:You must click the "Save" button or your message will be lost.
You may dial individual records selectively or dial all records in the database automatically.
The All Call software will begin dialing all names in alphabetical order. After dialing it will play the recorded “message” WAV file. Upon finishing the “message,” the All Call software will begin dialing the next name in the list alphabetical-ly.