EMC
Avamar
7.0
for VMware
User Guide
P/N 300-015-230
REV 07
Published January, 2015
EMC believes the information in this publication is accurate as of its publication date. The information is subject to change without notice.
The information in this publication is provided as is. EMC Corporation makes no representations or warranties of any kind with respect to the information in this publication, and specifically disclaims implied warranties of merchantability or fitness for a particular purpose. Use, copying, and distribution of any EMC software described in this publication requires an applicable software license. EMC2, EMC, and the EMC logo are registered trademarks or trademarks of EMC Corporation in the United States and other countries.
All other trademarks used herein are the property of their respective owners.
For the most up-to-date regulatory document for your product line, go to the technical documentation and advisories section on the EMC online support website.
EMC Avamar 7.0 for VMware User Guide 3
Preface
Chapter 1
Introduction
Avamar for VMware image backup and restore ... 16
Overview... 16
Supported configurations... 17
Guest backup and restore ... 17
Choosing a data protection method ... 18
Changed block tracking... 20
Virtual Machine Quiescing ... 21
Additional VMware resources... 21
Chapter 2
Configuration and Setup
Task road map ... 24Enabling support for multiple vCenters... 24
Downloading and installing vSphere Client software (optional) ... 25
Downloading and installing Avamar Administrator software ... 26
Configuring vCenter-to-Avamar authentication... 26
Installing an authentication certificate on the Avamar MCS ... 27
Turning off certificate authentication for all vCenter-to-Avamar MCS communications ... 28
Creating a dedicated vCenter user account ... 29
Adding a vCenter client in Avamar Administrator ... 31
Deploying proxies ... 32
Adding DNS Entries ... 33
Downloading the proxy appliance template file ... 33
Deploying a proxy appliance in vCenter ... 33
Registering and activating a proxy with Avamar server... 38
Configuring proxy settings in Avamar Administrator... 39
(Optional) Configuring proxy certificate authentication ... 40
(Optional) Performing proxy performance optimization... 42
Upgrading Avamar proxy software ... 42
Performing optional proxy plug-in configuration ... 44
Re-registering a proxy with a different Avamar server... 44
Changing the proxy operating system root password ... 46
Protecting virtual machines with both guest and image backup... 46
Chapter 3
Administration
Clients and containers ... 50Dynamic versus static containers ... 50
Dynamic container behavior... 50
How independent and container protection interact ... 51
Icons and what they mean... 51
Adding clients and containers ... 52
Editing clients and containers ... 55
Renaming a vCenter client... 55
Viewing replicated virtual machine name ... 57
vCenter connection monitor ... 57
Manually synchronizing Avamar Administrator with a vCenter... 58
VMware Image Dataset... 58
Groups... 59
Default Proxy Group ... 59
Default Virtual Machine Group ... 59
vCenter groups... 59
Virtual machine and proxy relationships within vCenter groups ... 59
Adding a vCenter group ... 60
Editing a vCenter group ... 64
Editing proxy datastore and group settings... 64
Best practices ... 66
Chapter 4
Backup
Limitations... 70Performing an on-demand backup ... 72
Scheduling backups... 73
Chapter 5
Restore
Overview... 76Guidelines for performing image restores versus file-level restores... 76
Limitations... 77
Restoring the full image or selected drives to the original virtual machine ... 79
Restoring the full image or selected drives to a different (existing) virtual machine ... 81
Restoring the full image or selected drives to a new virtual machine... 83
Restoring specific folders or files to the original virtual machine... 84
Where folders and files are actually restored ... 84
Restore procedure... 85
Restoring specific folders or files to a different virtual machine... 87
Instant access... 89
Prerequisites... 89
Task 1: Restore the virtual machine... 89
Task 2: Postrestore migration and clean-up... 91
Chapter 6
Troubleshooting
Installation and configuration problems and solutions ... 94Backup problems and solutions ... 94
Restore problems and solutions... 96
Chapter 7
Protecting the vCenter Management Infrastructure
Overview... 100Backing up the vCenter management infrastructure... 100
Task 1: Implement guest backups ... 101
Task 2: Define a custom dataset for vCenter backups ... 101
Task 3: Add a backup client for vCenter database hosts ... 102
Recovering vCenter management infrastructure from Avamar backups... 102
EMC Avamar 7.0 for VMware User Guide 5
Listen ports... 104
Appendix B
Plug-in Options
How to set plug-in options ... 106Linux VMware Image plug-in options ... 106
Windows VMware Image plug-in options ... 107
Linux VMware File-level Restore plug-in options ... 107
Windows VMware File-level Restore plug-in options... 107
EMC Avamar 7.0 for VMware User Guide 7
Title Page
1 Revision history ... 9
2 Avamar client guides... 17
3 Minimum required vCenter user account privileges ... 29
4 New vCenter client settings ... 32
5 Important vCenter management infrastructure components ... 101
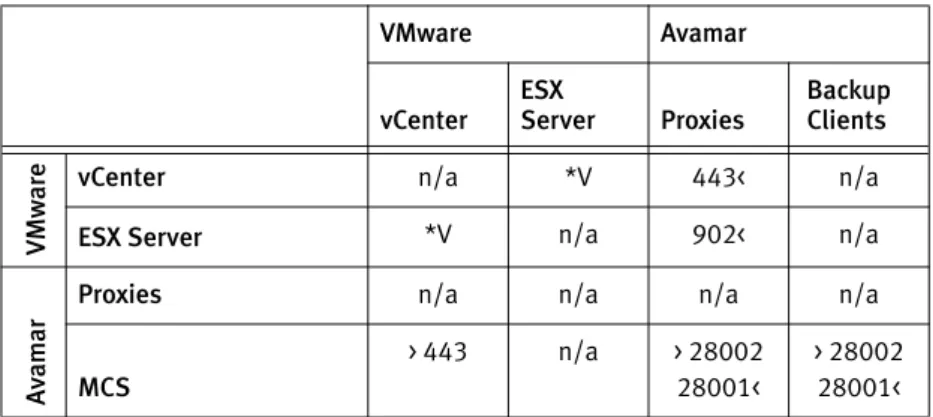
6 vSphere communication ports... 104
7 vSphere listen ports ... 104
8 Linux VMware image backup options ... 106
9 Linux VMware image restore options ... 106
10 Windows VMware image backup options ... 107
Preface 9
As part of an effort to improve its product lines, EMC periodically releases revisions of its software and hardware. Therefore, some functions described in this document might not be supported by all versions of the software or hardware currently in use. The product release notes provide the most up-to-date information on product features.
Contact your EMC technical support professional if a product does not function properly or does not function as described in this document.
Note: This document was accurate at publication time. Go to EMC Online Support (https://support.emc.com) to ensure that you are using the latest version of this document.
Purpose
This publication describes various methods and strategies for protecting VMware virtual machines.
Audience
The information in this publication is intended for system administrators familiar with: • Basic Avamar system administration principles, and procedures found in the EMC
Avamar Administration Guide
• Other Avamar client software information (primarily installation, and configuration procedures) found in various Avamar client guides
A comprehensive discussion of basic Avamar system administration concepts and principles, such as clients, datasets, schedules, retention policies, groups, and group policy, is beyond the scope of this publication. The EMC Avamar Administration Guide
provides details.
Revision history
The following table presents the revision history of this document.
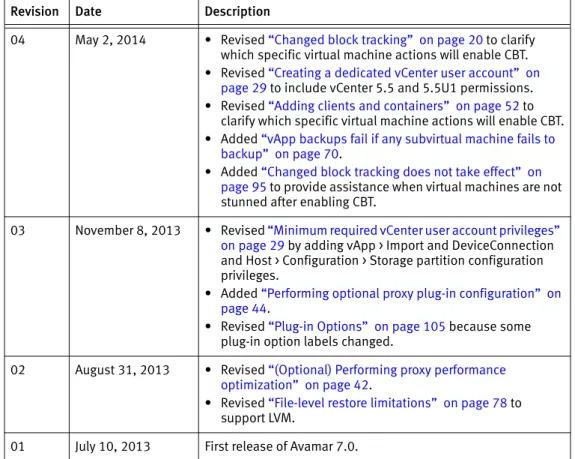
Table 1 Revision history (page 1 of 2)
Revision Date Description
07 January 15, 2015 • Added “(Optional) Configuring proxy certificate authentication” on page 40
• Revised “(Optional) Performing proxy performance optimization” on page 42
06 August 12, 2014 • Revised “Clients and containers” on page 50
• Revised “Limitations” on page 70
• Revised “Limitations” on page 77
05 July 17, 2014 • Revised “Performing optional proxy plug-in configuration” on page 44 with new socket and core recommendations. • Revised “File-level restore limitations” on page 78 to explain
that progress bytes are not shown in the Activity Monitor. • Revised “Listen ports” on page 104.
Related documentation
The following EMC publications provide additional information: • EMC Avamar Compatibility and Interoperability Matrix
• EMC Avamar Release Notes
• EMC Avamar Administration Guide
• EMC Avamar Operational Best Practices
• EMC Avamar Product Security Guide
• EMC Avamar Backup Clients User Guide
• EMC Avamar for Exchange Guide
• EMC Avamar for IBM DB2 User Guide
• EMC Avamar for Lotus Domino User Guide
• EMC Avamar for Microsoft SharePoint Guide
• EMC Avamar for Oracle User Guide
• EMC Avamar for SQL Server User Guide
04 May 2, 2014 • Revised “Changed block tracking” on page 20 to clarify which specific virtual machine actions will enable CBT. • Revised “Creating a dedicated vCenter user account” on
page 29 to include vCenter 5.5 and 5.5U1 permissions. • Revised “Adding clients and containers” on page 52 to
clarify which specific virtual machine actions will enable CBT. • Added “vApp backups fail if any subvirtual machine fails to
backup” on page 70.
• Added “Changed block tracking does not take effect” on page 95 to provide assistance when virtual machines are not stunned after enabling CBT.
03 November 8, 2013 • Revised “Minimum required vCenter user account privileges” on page 29 by adding vApp > Import and DeviceConnection and Host > Configuration > Storage partition configuration privileges.
• Added “Performing optional proxy plug-in configuration” on page 44.
• Revised “Plug-in Options” on page 105 because some plug-in option labels changed.
02 August 31, 2013 • Revised “(Optional) Performing proxy performance optimization” on page 42.
• Revised “File-level restore limitations” on page 78 to support LVM.
01 July 10, 2013 First release of Avamar 7.0. Table 1 Revision history (page 2 of 2)
11
Conventions used in this document
EMC uses the following conventions for special notices:
NOTICE is used to address practices not related to personal injury.
Note: A note presents information that is important, but not hazard-related. IMPORTANT
An important notice contains information essential to software or hardware operation.
Typographical conventions
EMC uses the following type style conventions in this document:
Where to get help
The Avamar support page provides access to licensing information, product documentation, advisories, and downloads, as well as how-to and troubleshooting information. This information may enable you to resolve a product issue before you contact EMC Customer Support.
To access the Avamar support page:
1. Go to https://support.EMC.com/products. 2. Type a product name in the Find a Product box. 3. Select the product from the list that appears. 4. Click the arrow next to the Find a Product box.
5. (Optional) Add the product to the My Products list by clicking Add to my products in the top right corner of the Support by Product page.
Bold Use for names of interface elements, such as names of windows, dialog boxes, buttons, fields, tab names, key names, and menu paths (what the user specifically selects or clicks)
Italic Use for full titles of publications referenced in text
Monospace Use for:
• System output, such as an error message or script • System code
• Pathnames, filenames, prompts, and syntax • Commands and options
Monospace italic Use for variables. Monospace bold Use for user input.
[ ] Square brackets enclose optional values
| Vertical bar indicates alternate selections — the bar means “or”
{ } Braces enclose content that the user must specify, such as x or y or z
Documentation
The Avamar product documentation provides a comprehensive set of feature overview, operational task, and technical reference information. Review the following documents in addition to product administration and user guides:
• Release notes provide an overview of new features and known limitations for a release.
• Technical notes provide technical details about specific product features, including step-by-step tasks, where necessary.
• White papers provide an in-depth technical perspective of a product or products as applied to critical business issues or requirements.
Knowledgebase
The EMC Knowledgebase contains applicable solutions that you can search for either by solution number (for example, esgxxxxxx) or by keyword.
To search the EMC Knowledgebase:
1. Click the Search link at the top of the page.
2. Type either the solution number or keywords in the search box.
3. (Optional) Limit the search to specific products by typing a product name in the Scope by product box and then selecting the product from the list that appears.
4. Select Knowledgebase from the Scope by resource list.
5. (Optional) Specify advanced options by clicking Advanced options and specifying values in the available fields.
6. Click the search button.
Online communities
Visit EMC Community Network at https://community.EMC.com for peer contacts,
conversations, and content on product support and solutions. Interactively engage online with customers, partners and certified professionals for all EMC products.
Live chat
To engage EMC Customer Support by using live interactive chat, click Join Live Chat on the Service Center panel of the Avamar support page.
Service Requests
For in-depth help from EMC Customer Support, submit a service request by clicking Create Service Requests on the Service Center panel of the Avamar support page.
Note: To open a service request, you must have a valid support agreement. Contact your EMC sales representative for details about obtaining a valid support agreement or with questions about your account.
To review an open service request, click the Service Center link on the Service Center panel, and then click View and manage service requests.
13
Facilitating support
EMC recommends that you enable ConnectEMC and Email Home on all Avamar systems: • ConnectEMC automatically generates service requests for high priority events. • Email Home emails configuration, capacity, and general system information to EMC
Customer Support.
Your comments
Your suggestions help us to continue to improve the accuracy, organization, and overall quality of the user publications. Send your opinions of this document to:
Please include the following information: • Product name and version
• Document name, part number, and revision (for example, 01) • Page numbers
Introduction 15
Introduction
This chapter discusses the following:
• Avamar for VMware image backup and restore ... 16
• Guest backup and restore ... 17
• Choosing a data protection method ... 18
• Changed block tracking... 20
• Virtual Machine Quiescing ... 21
Avamar for VMware image backup and restore
The following topics introduce and describe Avamar for VMware image backup and restore.
Overview
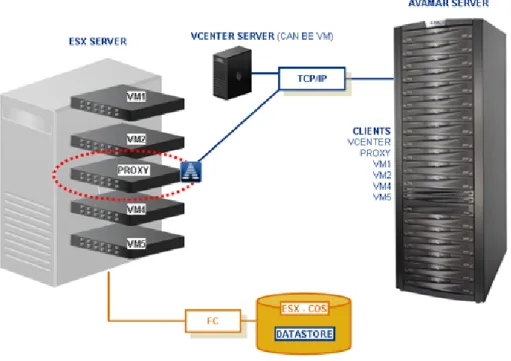
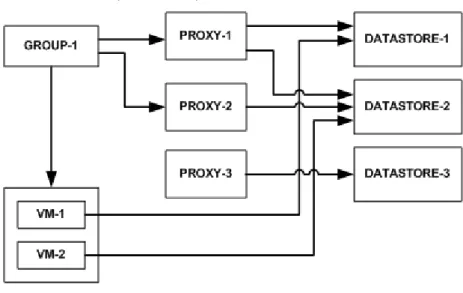
Avamar for VMware image backup and restore uses VMware vStorage API for Data Protection (VADP). Avamar for VMware image backup and restore is fully integrated with VMware vCenter Server to provide detection of virtual machine clients within the vCenter, and enable efficient centralized management of backup jobs.
Figure 1 Avamar for VMware image backup and restore diagram
Backups and restores require the use of proxy virtual machine clients. Each proxy virtual machine client provides all of the following capabilities:
• Backup of Microsoft Windows and Linux virtual machines (entire images or specific drives)
• Restore of Microsoft Windows and Linux virtual machines (entire images or specific drives)
• Selective restore of individual folders and files to Microsoft Windows and Linux virtual machines
Proxies run Avamar software inside a Linux virtual machine, and are deployed using an appliance template (.ova) file.
Guest backup and restore 17
Supported configurations
• The following storage architectures are fully supported: • Fiber channel SAN storage hosting VMFS or RDMS • iSCSI SAN storage
• NFS
• The image backup process requires temporary creation of a VMware virtual machine snapshot.
If the virtual machine is running at the time of backup, this snapshot can impact disk I/O and consume space on the VMware vmfs datastore. Snapshot creation and deletion can take a long time if the virtual machine runs a heavy disk I/O workload during backup. This requirement also limits the types of virtual disks that are supported to the following:
• Flat (version 1 and 2)
• Raw Device Mapped (RDM) in virtual mode only (version 1 and 2) • Sparse (version 1 and 2)
Guest backup and restore
Guest backup and restore is another way to protect virtual machine data. It is
implemented by installing Avamar client software in a virtual machine just as if it were a physical machine, then registering and activating that client with an Avamar server. No special configuration is required.
When registering virtual machine clients protected by guest backup, do not register them to a vCenter domain. Doing so will prevent you from locating or managing that virtual machine in Avamar Administrator. Instead register any virtual machine clients protected by guest backup to some other domain or subdomain (for example, /clients).
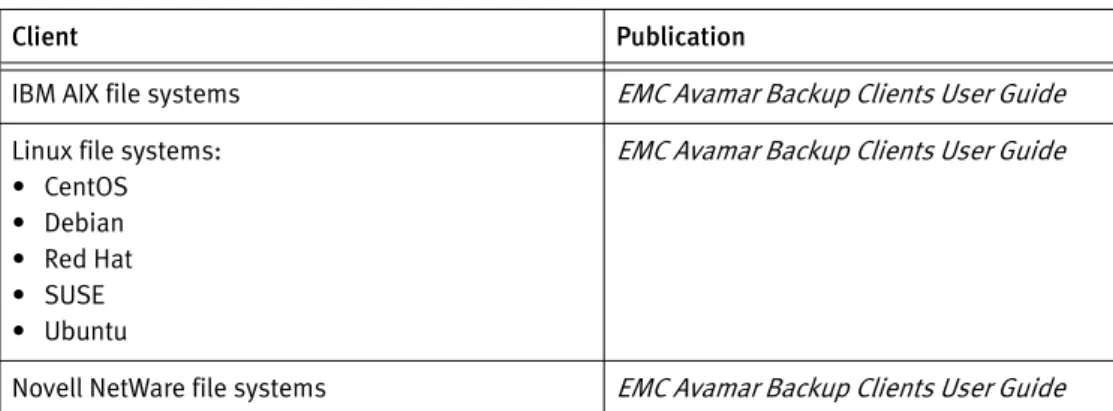
The following Avamar client guides provide details about installing Avamar client software in virtual machines:
Table 2 Avamar client guides (page 1 of 2)
Client Publication
IBM AIX file systems EMC Avamar Backup Clients User Guide
Linux file systems: • CentOS • Debian • Red Hat • SUSE • Ubuntu
EMC Avamar Backup Clients User Guide
Choosing a data protection method
This topic explores the various advantages and considerations associated with image backup and restore versus guest backup and restore.
Note: A virtual machine can be protected by both guest backup and image backup. For example, a daily guest backup might be used to protect selective files, and a less frequent or on-demand full image backup might be used to protect the full machine. This scheme accommodates scenarios with limited backup windows.
Types of virtual machines
Guest backup is generally the preferred strategy for protecting application servers such as Microsoft Exchange, Microsoft Office SharePoint, Microsoft SQL Server, and Oracle. The reason that guest backup is particularly suited for this is that the Avamar agent gracefully quiesces applications prior to backup, ensuring a true “application consistent” backup. Guest backup and restore is also the only way to back up virtual machines, such as desktops and laptops, that are not hosted within a vCenter.
Avamar for VMware image backup and restore is generally the preferred strategy for protecting any nonapplication intensive virtual machines that are hosted within a vCenter. Avamar's integration with vCenter enables multiple virtual machines to be protected with the least amount of effort.
Ease of implementation
Guest backup and restore:
• Supports any virtual machine running an operating system for which Avamar client
UNIX file systems: • FreeBSD • HP-UX
• SCO Open Server and UnixWare • Sun Solaris
EMC Avamar Backup Clients User Guide
IBM DB2 databases hosted on IBM AIX, Red Hat
and SUSE Linux, and Microsoft Windows EMC Avamar for IBM DB2 User Guide Lotus Domino databases EMC Avamar for Lotus Domino User Guide
Mac OS X file systems EMC Avamar Backup Clients User Guide
Microsoft Exchange databases EMC Avamar for Exchange Guide
Microsoft Office SharePoint implementations EMC Avamar for Microsoft SharePoint Guide
Microsoft SQL Server databases EMC Avamar for SQL Server User Guide
Microsoft Windows file systems EMC Avamar Backup Clients User Guide
Oracle databases hosted on IBM AIX, Red Hat, and
SUSE Linux, Sun Solaris, and Microsoft Windows EMC Avamar for Oracle User Guide Table 2 Avamar client guides (page 2 of 2)
Choosing a data protection method 19 • Supports applications such as DB2, Exchange, Oracle, and SQL Server databases • Easily fits into most existing backup schemes; day-to-day backup procedures do not
change
• Avamar client software must be individually installed, and managed inside each virtual machine
Avamar for VMware image backup and restore:
• Can leverage vCenter to discover virtual machines, and add them to the Avamar server in batches
• Requires moderate amount of initial setup and configuration
Efficiency
Guest backup and restore:
• Offers highest level of data deduplication efficiency
• Backups do not consume ESX Server CPU, RAM, and disk resources
• Backups consume small amounts of guest virtual machine CPU, RAM, and disk resources when backups are occurring
Avamar for VMware Image backup and restore: • Moderate deduplication efficiency
• Backups do not consume guest virtual machine CPU, RAM, and disk resources • Backups consume ESX Server CPU, RAM, and disk resources when backups are
occurring
Backup and restore
Guest backup and restore:
• Applications are gracefully quiesced before each backup, ensuring a true “application consistent” backup
• Backups are highly optimized (temp files, swap files, and so forth not included) • Backups are highly customizable (supports full range of include and exclude features) • Database backups support transaction log truncation, and other advanced features • Unused file system space is not backed up
• Individual folder and file restores are supported
• Backup and restore jobs can execute pre- and postprocessing scripts • Virtual machines must have a network connection to Avamar server • Virtual machines must be running for backups to occur
Avamar for VMware Image backup and restore:
• Image backups are supported for all machines that are currently supported by VMware • Individual folder and file restores supported for both Windows and Linux virtual
• Virtual machines need not have a network connection to Avamar server • Virtual machines need not be running for backups to occur
• Unused file system space is backed up
• Backups not optimized (temp files, swap files, and so forth are included)
• Backups can comprise an entire virtual machine image (all drives) or selected drives (vmdk files)
Required VMware knowledge
Guest backup and restore requires no advanced scripting or VMware knowledge. Avamar for VMware Image backup and restore requires moderate VMware knowledge. Integrators should have working knowledge of actual vCenter topology in use at that customer site (that is, which ESX Servers host each datastore, and which datastores store each virtual machine’s data), and the ability to log in to vCenter with administrator privileges.
Changed block tracking
Changed block tracking is a VMware feature that tracks which specific file system blocks on a virtual machine have changed between backups.
Changed block tracking identifies unused space on a virtual disk during the initial backup of the virtual machine, and also empty space that has not changed since the previous backup. Avamar data deduplication performs a similar function. However, using this feature provides valuable I/O reduction earlier in the backup process. Changed block tracking dramatically improves performance if SAN connectivity is not available.
If changed block tracking is not enabled, each virtual machine file system image must be fully processed for each backup, possibly resulting in unacceptably long backup windows, and excessive back-end storage read/write activity.
Changed block tracking can also reduce the time required to restore (“roll back”) a virtual machine to a recent backup image by automatically eliminating unnecessary writes during the restore process.
Changed block tracking is only available with the following types of virtual machines that use the following specific types of virtual disk formats:
• Virtual machine versions 7 and later
The earlier version 4 is commonly used on ESX 3.X hosts and in virtual machines deployed from templates that support both ESX 3.x and 4.0 hosts. The version of a virtual machine does not change when the underlying ESX host is upgraded. Many commercial appliances exist in version 4 to allow deployment on ESX 3.x hosts. vCenter version 4 provides the ability to upgrade version 4 virtual machine hardware from to version 7 virtual machine hardware. This upgrade is irreversible and makes the virtual machine incompatible with earlier versions of VMware software products. Refer to vCenter online help for details.
• Disks cannot be physical compatibility RDM
Virtual Machine Quiescing 21 • Virtual machines must be in a configuration that supports snapshots
Enabling changed block tracking will not take effect until any of the following actions occur on the virtual machine: reboot, power on, resume after suspend, or migrate.
Virtual Machine Quiescing
Avamar for VMware image backup and restore does not provide any additional virtual machine quiescing capabilities other than those provided by VMware Data Recovery (VDR).
Prior to performing a backup, three levels of virtual machine quiescing are possible: • Crash-consistent quiescing
• File system-consistent quiescing • Application-consistent quiescing
Crash-consistent quiescing is the least desirable level of quiescing because the virtual disk image being backed up is consistent with what would occur by interrupting power to a physical computer. File system writes might or might not be in progress when power is interrupted. Because of that, there is always a chance of some data loss.
File system-consistent quiescing is more desirable because the virtual machine is allowed to complete any file system writes before the disk is backed up. This level of quiescing is only available on Windows virtual machines capable of providing Windows Volume Snapshot Service (VSS) services, and that are running VMware Tools.
Application-consistent quiescing is the most desirable level of quiescing because, in addition to the advantages provided by file system-consistent quiescing, applications are notified that a backup has occurred so that they can clear their transaction logs.
Application-consistent quiescing is only available on Windows 2008 32-bit/64-bit, and Windows 2008 R2 virtual machines that are running VMware Tools. Additionally, for application-consistent quiescing to be available, the following conditions must be met: • The UUID attribute must be enabled. This is enabled by default on virtual machines
created on ESX 4.1 hosts.
• The virtual machine must use only SCSI disks. For example, application-consistent quiescing is not supported for virtual machines with IDE disks.
• The virtual machine cannot use dynamic disks.
A complete discussion of virtual machine quiescing and VDR is beyond the scope of this publication. Refer to your VMware Data Recovery Administration Guide for details including specific platform capabilities and limitations.
Additional VMware resources
A comprehensive discussion of VMware technology is beyond the scope of this publication. The following VMware documentation provides additional details: • Introduction to VMware vSphere
• vSphere Basic System Administration
• vSphere Resource Management Guide
• vSphere Web Access Administrator's Guide
• ESX and vCenter Server Installation Guide
• ESX Configuration Guide
Configuration and Setup 23
Configuration and Setup
This chapter provides essential configuration and setup procedures, for both vCenter and Avamar environments, that must be performed before Avamar for VMware image backup and restore can be used to protect virtual machine data. Topics in this chapter include: • Task road map ... 24
• Enabling support for multiple vCenters... 24
• Downloading and installing vSphere Client software (optional) ... 25
• Downloading and installing Avamar Administrator software ... 26
• Configuring vCenter-to-Avamar authentication... 26
• Creating a dedicated vCenter user account ... 29
• Adding a vCenter client in Avamar Administrator ... 31
• Deploying proxies ... 32
• (Optional) Configuring proxy certificate authentication ... 40
• (Optional) Performing proxy performance optimization... 42
• Upgrading Avamar proxy software ... 42
• Performing optional proxy plug-in configuration ... 44
• Re-registering a proxy with a different Avamar server... 44
Task road map
Successfully configuring Avamar for VMware image backup and restore comprises the following tasks, which must be performed in this specific order:
• “Enabling support for multiple vCenters” on page 24 (only required if Avamar server was upgraded from a previous version)
• “Downloading and installing vSphere Client software (optional)” on page 25
• “Downloading and installing Avamar Administrator software” on page 26
• For each vCenter, perform the following tasks:
• “Configuring vCenter-to-Avamar authentication” on page 26, by performing one of the following tasks:
– “Installing an authentication certificate on the Avamar MCS” on page 27
– “Turning off certificate authentication for all vCenter-to-Avamar MCS communications” on page 28
• “Creating a dedicated vCenter user account” on page 29
• “Adding a vCenter client in Avamar Administrator” on page 31
• “Deploying proxies” on page 32, by performing all of the following tasks: • “Adding DNS Entries” on page 33
• “Downloading the proxy appliance template file” on page 33
• “Deploying a proxy appliance in vCenter” on page 33, by performing one of the following tasks:
– “Deploying a proxy appliance in vCenter using the vSphere Web Client” on page 35
– “Deploying a proxy appliance in vCenter using the vSphere Client” on page 34
• “Registering and activating a proxy with Avamar server” on page 38
• “Configuring proxy settings in Avamar Administrator” on page 39
Enabling support for multiple vCenters
Avamar for VMware image backup and restore supports protecting up to 5 vCenters from a single Avamar server. Beginning with Avamar 6.0, support for multiple vCenters is enabled by default during new Avamar server software installations. However, if your Avamar server was upgraded from the previous version, you might need to perform the following manual configuration in order to enable support for multiple vCenters.
To enable support for multiple vCenters, perform the following:
1. Open a command shell and log in using one of the following methods: • To log in to a single-node server, log in to the server as admin. • To log in to a multi-node server, log in to the utility node as admin.
Downloading and installing vSphere Client software (optional) 25 2. Change directories by typing:
cd /usr/local/avamar/var/mc/server_data/prefs
3. Open mcserver.xml in a UNIX text editor.
4. Find the com.avamar.mc.vmware.max_number_of_vcenters node, as shown below:
<root type="system"> <node name="com">
<node name="avamar"> <node name="mc">
<node name="vmware">
<entry key="max_number_of_vcenters" value="1" />
Note: Substantial portions of mcserver.xml have been omitted for clarity. 5. Change the max_number_of_vcenters entry to 5.
6. Save your changes. 7. Restart the MCS by typing:
dpnctl stop mcs dpnctl start mcs
8. Close the command shell.
Downloading and installing vSphere Client software (optional)
This task is only required if you will be using the vSphere Client running on a Windows computer, rather than the vSphere Web Client, which supports multiple computing platforms.
If you have not already done so, download and install vSphere Client software by performing the following:
1. Open a web browser and type the following URL:
https://VSPHERE
where VSPHERE is the vSphere server network hostname or IP address. Note: This URL must be a secure (HTTPS) web address.
The vSphere Welcome page appears. 2. Click Download vSphere Client.
3. Either open the installation file in place (on the server), or double-click the downloaded installation file.
The installation wizard appears. 4. Follow the on-screen instructions.
5. When prompted, click Finish to complete the installation procedure. The installation wizard closes.
Downloading and installing Avamar Administrator software
If you have not already done so, download and install Avamar Administrator software by performing the following:
1. Open a web browser and type the following URL:
http://AVAMARSERVER
where AVAMARSERVER is the Avamar server network hostname or IP address. The EMC Avamar Web Restore web page appears.
2. Click Downloads.
3. Click + next to the Windows for x86 (32 bit) folder.
4. Click + next to the Microsoft Windows XP, Vista, 7, 8, Microsoft Windows Server 2003 folder.
5. Locate the Java Runtime Environment (JRE) install package (it is typically the last entry in the folder).
6. If the JRE on the client computer is older than the JRE hosted on the Avamar server, download and install the newer JRE from the Avamar server as follows:
a. Click the jre-VERSION-windows-i586-p install package. where VERSION is the JRE version.
b. Open the installation file, or download the file, and then open it from the saved location.
c. Follow the onscreen instructions to complete the JRE installation.
7. Click the AvamarConsoleMultiple-windows-x86-VERSION.exe install package. where VERSION is the Avamar Administrator software version.
Avamar Administrator is only available as a 32-bit application. However, it will also run on 64-bit windows computers.
8. Open the installation file, or download the installation file, and then open it from the saved location.
9. Follow the onscreen instructions to complete the Avamar Administrator software installation.
Configuring vCenter-to-Avamar authentication
Avamar VMware Image Backup will not work unless:
• A valid authentication certificate is present on the Avamar Management Console Server (MCS).
• Certificate authentication for all MCS-to-vCenter communications is turned off.
Configuring vCenter-to-Avamar authentication 27
Installing an authentication certificate on the Avamar MCS
This procedure assumes that you are installing the default certificate provided with vCenter.
The procedure uses the java keytool command, a utility that manages certificate keys. The keytool command is located in the Java bin folder (/usr/java/jreVERSION/bin), where VERSION is the specific Java Runtime Environment (JRE) version currently installed on the MCS. If this folder is not in your path, you can either add it to the path, or specify the complete path when using keytool.
1. Open a command shell and log in using one of the following methods: • To log in to a single-node server, log in to the server as admin. • To log in to a multi-node server, log in to the utility node as admin. 2. Stop the MCS by typing:
dpnctl stop mcs
3. Switch user to root by typing:
su
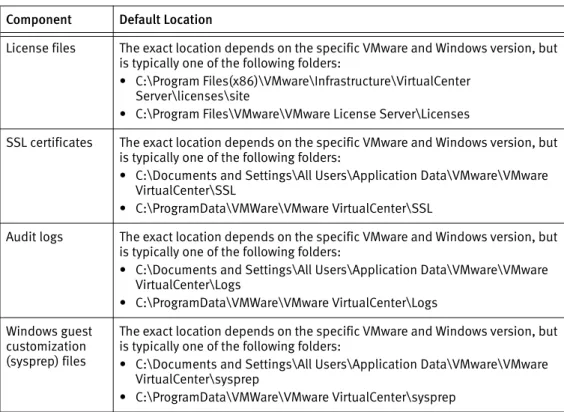
-4. Copy rui.crt from the vCenter machine to /tmp on the utility node or single-node server.
The default certificate provided with vCenter is:
• Windows 2008: C:\ProgramData\VMware\VMware VirtualCenter\SSL\rui.crt • Other Windows versions: C:\Documents and Settings\All Users\Application
Data\VMware\VMware VirtualCenter\SSL\rui.crt • Linux: /etc/vmware-vpx/ssl/rui.crt
5. Create a temporary version of the MCS keystore by copying the live keystore to /tmp by typing:
cp /usr/local/avamar/lib/rmi_ssl_keystore /tmp/
6. Add the default vCenter certificate to the temporary MCS keystore file by typing:
cd /tmp
$JAVA_HOME/bin/keytool –import –file rui.crt -alias ALIAS
-keystore rmi_ssl_keystore
where ALIAS is a user-defined name for this certificate, which can often be the file name.
7. When prompted for a password, type the keystore password. The following appears in the command shell:
Trust this certificate?
9. Back up the live MCS keystore by typing:
cd /usr/local/avamar/lib
cp rmi_ssl_keystore rmi_ssl_keystore.DATE
where DATE is today’s date.
10. Copy the temporary MCS keystore to the live location by typing:
cp /tmp/rmi_ssl_keystore /usr/local/avamar/lib/
11. Exit the root subshell, and restart the MCS by typing:
exit
dpnctl start mcs
Turning off certificate authentication for all vCenter-to-Avamar MCS communications
If you do not want to Install an authentication certificate on the Avamar MCS, as described in “Installing an authentication certificate on the Avamar MCS” on page 27, turn off certificate authentication for all vCenter-to-Avamar MCS communications by performing the following:1. Open a command shell and log in using one of the following methods: • To log in to a single-node server, log in to the server as admin. • To log in to a multi-node server, log in to the utility node as admin. 2. Stop the MCS by typing:
dpnctl stop mcs
3. Open /usr/local/avamar/var/mc/server_data/prefs/mcserver.xml in a UNIX text editor.
4. Locate the ignore_vc_cert preference.
5. Change the ignore_vc_cert preference setting to true. For example:
<entry key="ignore_vc_cert" value="true" />
6. Save your changes. 7. Restart the MCS by typing:
Creating a dedicated vCenter user account 29
Creating a dedicated vCenter user account
EMC strongly recommends that you set up a separate vCenter user account that is strictly dedicated for use with Avamar. Use of a generic user account such as “Administrator” might hamper future troubleshooting efforts because it might not be clear which actions are actually interfacing, or communicating with the Avamar server. Using a separate vCenter user account ensures maximum clarity if it becomes necessary to examine vCenter logs.
The user account must be added to the top (root) level in each vCenter you intend to protect.
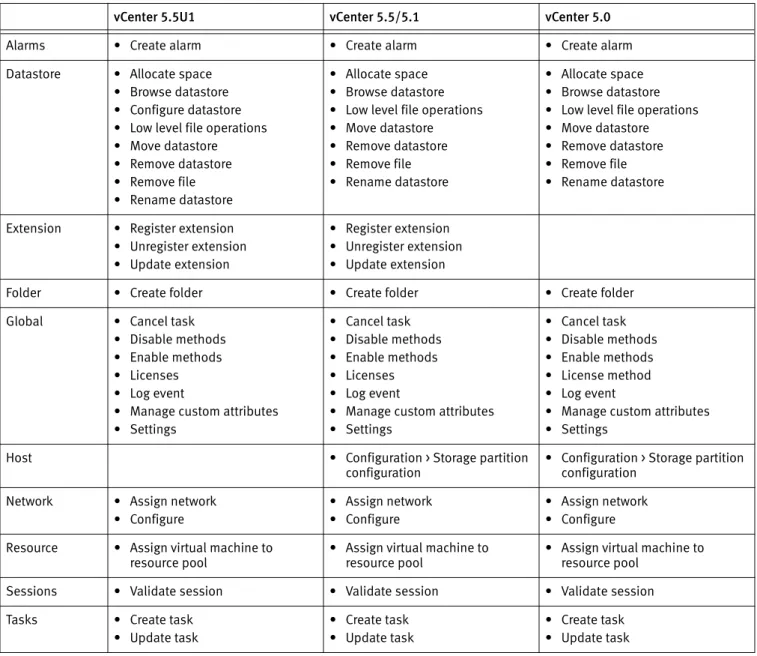
This vCenter user account must have the following minimum privileges:
Table 3 Minimum required vCenter user account privileges (page 1 of 3) vCenter 5.5U1 vCenter 5.5/5.1 vCenter 5.0
Alarms • Create alarm • Create alarm • Create alarm
Datastore • Allocate space • Browse datastore • Configure datastore • Low level file operations • Move datastore • Remove datastore • Remove file • Rename datastore
• Allocate space • Browse datastore • Low level file operations • Move datastore • Remove datastore • Remove file • Rename datastore
• Allocate space • Browse datastore • Low level file operations • Move datastore • Remove datastore • Remove file • Rename datastore
Extension • Register extension • Unregister extension • Update extension
• Register extension • Unregister extension • Update extension
Folder • Create folder • Create folder • Create folder
Global • Cancel task • Disable methods • Enable methods • Licenses • Log event
• Manage custom attributes • Settings
• Cancel task • Disable methods • Enable methods • Licenses • Log event
• Manage custom attributes • Settings
• Cancel task • Disable methods • Enable methods • License method • Log event
• Manage custom attributes • Settings
Host • Configuration > Storage partition
configuration • Configuration > Storage partition configuration Network • Assign network
• Configure
• Assign network • Configure
• Assign network • Configure Resource • Assign virtual machine to
resource pool • Assign virtual machine to resource pool • Assign virtual machine to resource pool Sessions • Validate session • Validate session • Validate session
Tasks • Create task • Update task
• Create task • Update task
• Create task • Update task
vApp • Export • Import
• vApp application configuration
• Export • Import
• vApp application configuration
• Export • Import
• vApp application configuration Virtual machine
Configuration • Add existing disk • Add new disk • Add or remove device • Advanced
• Change CPU count • Change resource • Disk change tracking • Disk Lease
• Extend virtual disk • Host USB device • Memory
• Modify device setting s • Raw device
• Reload from path • Remove disk • Rename
• Reset guest information • Settings
• Swapfile placement • Upgrade virtual machine
compatibility
• Add existing disk • Add new disk • Add or remove device • Advanced
• Change CPU count • Change resource • Disk change tracking • Disk Lease
• Extend virtual disk • Host USB device • Memory
• Modify device setting s • Raw device
• Reload from path • Remove disk • Rename
• Reset guest information • Settings
• Swapfile placement • Upgrade virtual hardware
Guest
Operations • Guest Operation Modifications• Guest Operation Program Execution
• Guest Operation Queries
• Guest Operation Modifications • Guest Operation Program
Execution
• Guest Operation Queries
• Guest Operation Modifications • Guest Operation Program
Execution
• Guest Operation Queries Interaction • Console interaction
• DeviceConnection • Guest operating system
management by VIX API • Power off
• Power on • Reset
• VMware Tools install
• Console interaction • DeviceConnection • Guest operating system
management by VIX API • Power off
• Power on • Reset
• VMware Tools install
• Acquire guest control ticket • Console interaction • DeviceConnection • Power off • Power on • Reset
• VMware Tools install
Inventory • Create new • Register • Remove • Unregister
• Create new • Register • Remove • Unregister
• Create new • Register • Remove • Unregister Table 3 Minimum required vCenter user account privileges (page 2 of 3) vCenter 5.5U1 vCenter 5.5/5.1 vCenter 5.0
Adding a vCenter client in Avamar Administrator 31
Adding a vCenter client in Avamar Administrator
The vCenter must exist, and be operational before this type of client can be added. Avamar Administrator attempts to make a connection with the vCenter.
If the vCenter client is already registered as a normal client (for example, to support guest level backup), adding that same vCenter client again will fail because the system will not allow you to register the same client twice. If this occurs, you must retire the existing client instance in Avamar Administrator, add the vCenter client (using the following procedure), then re-invite the vCenter client as a normal client to support guest level backup from the vCenter Server.
You must perform this task for each vCenter you intend to protect. Adding a vCenter client in Avamar Administrator automatically: • Adds the vCenter client to the Default Group.
However, this client is not activated as normal Avamar clients are. Therefore, no backups are performed for it on behalf of the Default Group.
• Creates a default vCenter Server with the same name as the vCenter's fully qualified hostname.
• Creates a VirtualMachines subdomain within that vCenter Server. • Creates a Default Virtual Machine Group.
This group performs scheduled backups for the target virtual machines. This group cannot be deleted without first deleting the virtual center domain.
To add a vCenter client:
1. In Avamar Administrator, click the Administration launcher button. The Administration window appears.
2. Select the Account Management tab.
Provisioning • Allow disk access
• Allow read-only disk access • Allow virtual machine download • Mark as Template
• Allow disk access
• Allow read-only disk access • Allow virtual machine download • Mark as Template
• Allow disk access
• Allow read-only disk access • Allow virtual machine download • Mark as Template
Snapshot
Management • Create snapshot• Remove Snapshot • Revert to snapshot
• Create snapshot • Remove Snapshot • Revert to snapshot
State • Create snapshot
• Remove Snapshot • Revert to snapshot Table 3 Minimum required vCenter user account privileges (page 3 of 3)
3. In the tree, select the top-level (root) domain, and select Actions > Account Management > New Client(s)…
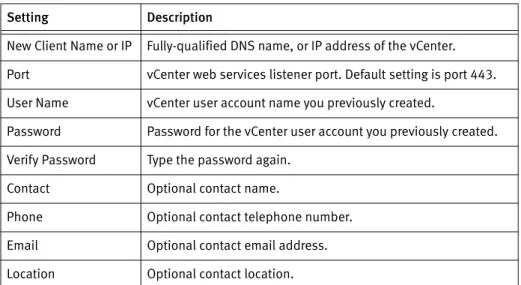
The New Client dialog box appears. 4. For Client Type, select VMware vCenter. 5. Complete the following settings:
6. Click OK.
The New Client dialog box closes.
Deploying proxies
Backups and restores require deployment of proxy virtual machines. Once deployed, each proxy virtual machine client provides all of the following capabilities:
• Backup of Microsoft Windows and Linux virtual machines (entire images or specific drives)
• Restore of Microsoft Windows and Linux virtual machines (entire images or specific drives)
• Selective restore of individual folders and files to Microsoft Windows and Linux virtual machines
Proxies run Avamar software inside a Linux virtual machine, and are deployed using an appliance template (.ova) file.
Proxies are allowed in any part of Avamar Administrator account management tree except the vCenter Server domain or subdomains.
Although it is possible to restore across datacenters (that is, use a proxy deployed in one datacenter to restore files to a virtual machine in another datacenter), restores will take noticeably longer than if the proxy and the target virtual machine are both located in the same datacenter. Therefore, for best performance, deploy at least one proxy on each datacenter you are protecting.
Table 4 New vCenter client settings Setting Description
New Client Name or IP Fully-qualified DNS name, or IP address of the vCenter. Port vCenter web services listener port. Default setting is port 443. User Name vCenter user account name you previously created.
Password Password for the vCenter user account you previously created. Verify Password Type the password again.
Contact Optional contact name.
Phone Optional contact telephone number. Email Optional contact email address. Location Optional contact location.
Deploying proxies 33 For best results, always register and activate proxies from the client during deployment (as described in “Registering and activating a proxy with Avamar server” on page 38). Using the alternative method of inviting the proxy to register with the Avamar server from Avamar Administrator is known to have unpredictable results.
Adding DNS Entries
During “Deploying a proxy appliance in vCenter” on page 33, you will be asked to assign a unique IP address to each proxy. vCenter performs a reverse DNS lookup of that IP address to ensure that it is resolvable to a hostname. For best results, configure all required DNS entries for proxies you plan to deploy before proceeding with the remainder of this procedure.
Downloading the proxy appliance template file
If adding more than one proxy, you only need to perform this task once. Download the proxy appliance template file by performing the following: 1. Open a web browser and type the following URL:
http://AVAMARSERVER
where AVAMARSERVER is the Avamar server network hostname or IP address. The EMC Avamar Web Restore web page appears.
2. Click Downloads.
3. Click + next to the VMware vSphere folder.
4. Click + next to the EMC Avamar VMware Image Backup/FLR Appliance folder. 5. Click the AvamarCombinedProxy-linux-sles11_64-VERSION.ova link.
where VERSION is the specific version Avamar software available for download. 6. Save AvamarCombinedProxy-linux-sles11_64-VERSION.ova to a temporary folder,
such as C:\Temp, or the desktop.
Deploying a proxy appliance in vCenter
When deploying a proxy appliance in vCenter, two vSphere Client applications are available. Use the correct vSphere Client for your specific vCenter environment.
• If you are deploying a proxy in a vCenter running on a Windows virtual machine, you can use either the vSphere Client running on a Windows computer, or the vSphere Web Client.
• If you are deploying a proxy in a vCenter running on a Linux virtual machine, you must use the vSphere Web Client.
Deploying a proxy appliance in vCenter using the vSphere Client
To deploy a proxy appliance in vCenter using the vSphere Client running on a Windows computer:
1. Launch the vSphere Client and log in to the vCenter Server. The vSphere Client window appears.
2. Select File > Deploy OVF Template. The Deploy OVF Template wizard appears. 3. In the Source screen, complete the following:
a. Click Browse.
The Open dialog box appears.
b. Select Ova files (*.ova) from the Files of Type list.
c. Browse to the appliance template file that was previously downloaded in
“Downloading the proxy appliance template file” on page 33. d. Select the appliance template file and click Open.
The Open dialog box closes.
The full path to the appliance template file appears in the Deploy from file field. e. Click Next.
4. In the OVF Template Details screen, ensure that the information is correct, and then Next.
5. In the Name and Location screen, complete the following: a. Type a unique fully-qualified hostname in the Name field.
A proxy can potentially have three different names:
– The name of the virtual machine on which the proxy runs. This is also the name managed and visible within vCenter.
– The DNS name assigned to the proxy virtual machine.
– The Avamar client name after the proxy registers and activates with server.
In order to avoid confusion and potential problems, EMC strongly recommends that you consistently use the same fully-qualified hostname for this proxy in all contexts.
b. Select a datacenter and folder location for this proxy in the Inventory tree. c. Click Next.
6. In the Host / Cluster screen, complete the following: a. Select an ESX Server or cluster.
Deploying proxies 35 7. In the Specific Host screen, complete the following:
a. Select a specific ESX Server from the Host Name list. b. Click Next.
8. In the Storage screen, complete the following: a. Select a storage location for this proxy. b. Click Next.
9. In the Disk Format screen, click Next.
10. In the Network Mapping screen, complete the following: a. Select a destination network from list.
b. Click Next.
11. In the Networking Properties screen, complete the following:
Proxy network settings are difficult to change once they proxy is registered and activated with the Avamar server. Therefore, ensure that the settings you enter in the Networking Properties screen are correct.
a. Enter the default gateway IP address for your network in the Default Gateway field. b. If not using DHCP, enter one or more Domain Name Server (DNS) IP addresses in
the DNS field. Separate multiple entries with commas.
c. If not using DHCP, enter a valid IP address on your network in the Network IP Address field.
d. Type the correct network mask in the Network Netmask field. e. Click Next.
12. In the Ready To Complete screen, ensure that the information is correct. 13. Click Finish.
The Deploy OVF Template wizard closes. 14. Wait for the deployment operation to complete.
This might take several minutes. A confirmation message appears.
15. Click Close to dismiss the confirmation message.
Deploying a proxy appliance in vCenter using the vSphere Web Client
To deploy a proxy appliance in vCenter using the vSphere Web Client:1. Connect to the vCenter Server by opening a web browser, and then typing the following URL:
http://vCenterServer:9443/
The vSphere Web Client web page appears. 2. Download and install the Client Integration Plug-in:
Note: These steps only need to be performed the first time you connect to this vCenter Server using the vSphere Web Client. You can skip these steps on subsequent vSphere Web Client sessions.
a. Click the Download Client Integration Plug-in link at the bottom of the vSphere Web Client web page.
b. Run the installation program. c. Close your web browser.
d. Complete the remaining on-screen installation instructions.
e. After the installation completes, reconnect to the vCenter Server by repeating step
1.
3. Log in to the vCenter Server by typing your User name and Password, and then clicking Login.
4. Select Home > vCenter > Hosts and Clusters. 5. Select Actions > Deploy OVF Template. 6. Allow plug-in access control.
The Deploy OVF Template wizard appears. 7. In the Source screen, complete the following:
a. Select Local file and then click Browse. The Open dialog box appears.
b. Select Ova files (*.ova) from the Files of Type list.
c. Browse to the appliance template file that was previously downloaded in
“Downloading the proxy appliance template file” on page 33. d. Select the appliance template file and click Open.
The Open dialog box closes.
The full path to the appliance template file appears in the Deploy from file field. e. Click Next.
8. In the OVF Template Details screen, ensure that the information is correct, and then Next.
9. In the Select name and folder screen, complete the following: a. Type a unique fully-qualified hostname in the Name field.
A proxy can potentially have three different names:
– The name of the virtual machine on which the proxy runs. This is also the name managed and visible within vCenter.
Deploying proxies 37 – The Avamar client name after the proxy registers and activates with server.
In order to avoid confusion and potential problems, EMC strongly recommends that you consistently use the same fully-qualified hostname for this proxy in all contexts.
b. Select a datacenter and folder location for this proxy in the tree. c. Click Next.
10. In the Select a resource screen, complete the following:
a. Select an ESX Server host, cluster, vApp or resource pool in which to run this proxy. b. Click Next.
11. In the Select storage screen, select a storage location for this proxy, and then click Next.
12. In the Setup networks screen, complete the following: a. Select a Destination network from list.
b. Select an IP protocol from the list. c. Click Next.
13. In the Customize template screen, complete the following:
Proxy network settings are difficult to change once they proxy is registered and activated with the Avamar server. Therefore, ensure that the settings you enter in the Networking Properties screen are correct.
a. Enter the default gateway IP address for your network in the Default Gateway field. b. If not using DHCP, enter one or more DNS IP addresses in the DNS field. Separate
multiple entries with commas.
c. If not using DHCP, enter a valid IP address on your network in the Isolated Network IP Address field.
d. Type the correct network mask in the Isolated Network Netmask field. e. Click Next.
14. In the Ready To Complete screen, ensure that the information is correct. 15. Click Finish.
The Deploy OVF Template wizard closes. 16. Wait for the deployment operation to complete.
Registering and activating a proxy with Avamar server
For best results, always register and activate proxies as described in this task. Using the alternative method of inviting the proxy from Avamar Administrator is known to have unpredictable results.
1. From either the vSphere Client or vSphere Web Client, locate and select a Avamar image backup proxy that was previously deployed in “Deploying a proxy appliance in vCenter” on page 33.
2. Power on the new proxy virtual machine by right-clicking the proxy and selecting Power > Power On.
3. Open a console to the proxy by right-clicking it and selecting Open Console. The Console window appears.
4. Wait for the Main Menu to appear.
5. Register the proxy with an Avamar server by typing 1. The following appears in the console window:
Enter the Administrator server address (DNS text name, or numeric IP address, DNS name preferred):
6. Type the actual network hostname as defined in DNS of the Avamar server from which you want to initiate, and manage backups and restores.
7. Press Enter.
The following appears in the console window:
Enter the Avamar server domain [clients]:
The default domain is “clients.” However, your Avamar system administrator may have defined other domains, and subdomains. Consult your Avamar system administrator for the specific domain you should use when registering this client.
Note: If typing a subdomain (for example, clients/MyClients), do not include a slash (/) as the first character. Including a slash as the first character will cause an error, and prevent you from registering this client.
8. Press Enter to accept the default domain (clients).
In order to implement file-level restore, this proxy requires the Avamar server root password.
The following appears in the console window:
Has the Avamar server software root password changed since last running this utility? [no]
Deploying proxies 39 9. Do one of the following:
• If the Avamar server software root password has not changed since you last ran this utility, press Enter and go directly to step 11.
• If the Avamar server software root password has changed since you last ran this utility, type y and press Enter, then go to step 10.
The following appears in the console window:
Enter the Avamar server software root password:
10. Enter the Avamar server software root password and press Enter. 11. Wait for the Main Menu to appear.
12. Type 2 and press Enter to quit.
Configuring proxy settings in Avamar Administrator
Each deployed proxy appliance provides 8 image backup and restore, and 8 file-level restore plug-ins. Each of these plug-ins functions as a separate logical proxy that can be independently assigned to different groups.
In order to differentiate between these logical proxies, proxy names in Avamar
Administrator have “proxy-1” through “proxy-8” appended to the hostname you defined in “Deploying a proxy appliance in vCenter” on page 33.
1. In Avamar Administrator, click the Administration launcher button. The Administration window appears.
2. Select the Account Management tab.
3. In the tree, select a proxy and select Actions > Account Management > Client Edit… The Edit Client dialog box appears.
4. Select the Datastores tab, then select all vCenter datastores that host virtual machines you want to protect with this proxy.
5. Select the Groups tab, then assign this proxy to one, or more existing groups by selecting the Select checkbox next to each group.
6. (Optional) complete the following optional contact information: a. Enter an optional contact name in the Contact field.
b. Enter an optional contact telephone number in the Phone field. c. Enter an optional contact email address in the Email field. d. Enter an optional contact location in the Location field. 7. Click OK.
(Optional) Configuring proxy certificate authentication
By default, Avamar proxies do not validate SSL certificates when connecting to the vCenter Server. This can leave the vCenter Server vulnerable to a man-in-the-middle exploitation, which might result in unauthorized access to the vCenter Server. Configuring each Avamar proxy to use SSL certificate authentication when connecting to the vCenter Server corrects this vulnerability.
Before you begin
Ensure that a Certificate Authority (CA) signed SSL certificate is installed on the vCenter Server.
Detailed instructions for generating and installing a CA signed SSL certificate and installing it on the vCenter Server are found in the VMware Knowledge Base.
This procedure supports both standalone certificates and chained permission files. For the remainder of this procedure, certificate-file can be either a standalone
certificate (*.crt) or chained permission (*.pem) file. Use the correct certificate-file
for your site.
Procedure
1. Open a command shell and log in to the proxy as root.
2. Copy the vCenter Server certificate file to /usr/local/avamarclient/bin on the proxy. 3. Set the proper operating system permissions on the certificate by typing:
chmod 600 /usr/local/avamarclient/bin/certificate-file
where certificate-file is a standalone certificate (*.crt) or chained permission
(*.pem) file.
4. Use OpenSSL to obtain the fingerprint of the SSL certificate of the vCenter Server by typing:
openssl x509 -in certificate-file -fingerprint | grep Finger
The command returns the SHA1 fingerprint of the SSL certificate of the vCenter Server. The format of the returned value is:
SHA1 Fingerprint=
C7:35:19:95:9C:3F:56:1D:73:35:52:41:F3:02:46:A3:B9:46:4F:D9
where C7:35:19:95:9C:3F:56:1D:73:35:52:41:F3:02:46:A3:B9:46:4F:D9 represents the fingerprint.
5. Open /usr/local/avamarclient/var/avvcbimageAll.cmd in a UNIX text editor. 6. Append the following entry to the end of the file:
--ssl_server_authentication_file=/usr/local/avamarclient/bin/certif icate-file
where certificate-file is a standalone certificate (*.crt) or chained permission
(Optional) Configuring proxy certificate authentication 41 7. Append the following entry to the end of the file:
--ssl_server_cert_thumbprint="fingerprint"
where fingerprint is the fingerprint of the SSL certificate of the vCenter Server that
was obtained by using OpenSSL.
For example, when the fingerprint value is:
C7:35:19:95:9C:3F:56:1D:73:35:52:41:F3:02:46:A3:B9:46:4F:D9
the appended entry is:
--ssl_server_cert_thumbprint="C7:35:19:95:9C:3F:56:1D: 73:35:52:41:F3:02:46:A3:B9:46:4F:D9"
8. Save the changes and close /usr/local/avamarclient/var/avvcbimageAll.cmd. 9. Open /usr/local/avamarclient/var/avvmwfileAll.cmdin a UNIX text editor. 10. Append the following entry to the end of the file:
--ssl_server_authentication_file=/usr/local/avamarclient/bin/certif icate-file
where certificate-file is a standalone certificate (*.crt) or chained permission
(*.pem) file.
11. Save the changes and close /usr/local/avamarclient/var/avvmwfileAll.cmd. 12. Open /etc/vmware/config in a UNIX text editor.
13. Append the following entries to the end of the file:
vix.enableSslCertificateCheck = "true" vix.sslCertificateFile =
"/usr/local/avamarclient/bin/certificate-file"
where certificate-file is a standalone certificate (*.crt) or chained permission
(*.pem) file.
14. Open /usr/local/avamarclient/var/vddkconfig.ini in a UNIX text editor. 15. Find the vixDiskLib.linuxSSL.verifyCertificates=0 entry.
16. Change the value of the vixDiskLib.linuxSSL.verifyCertificates=0 entry to 1.
vixDiskLib.linuxSSL.verifyCertificates=1
17. Save the changes and close /usr/local/avamarclient/var/vddkconfig.ini. 18. Ensure that there are no running backup or restore jobs on this proxy. 19. Restart the avagent and vmwareflr services by typing:
service avagent restart service vmwareflr restart
After you finish
(Optional) Performing proxy performance optimization
By default, Avamar proxies are configured with four virtual CPU sockets and one core per socket. However, changing the proxy configuration to four virtual CPU sockets and two cores per socket will achieve better backup and restore performance.
Upgrading Avamar proxy software
Perform the following procedure when a newer version of the Avamar proxy software is available for download from the Avamar server.
This procedure cannot be used to upgrade an Avamar 6.0 proxy. Instead, use the upgrade procedure in the EMC Avamar 6.0 for VMware Guide.
1. On the computer where the software will be installed, open a web browser and type the following URL:
http://AVAMARSERVER
where AVAMARSERVER is the Avamar server network hostname or IP address. The EMC Avamar Web Restore web page appears.
2. Click Downloads.
3. Click + next to the VMware vSphere folder.
4. Click + next to the EMC Avamar VMware Image Backup/FLR Appliance folder. 5. Click the AvamarCombinedProxy-linux-x86-VERSION.iso link.
where VERSION is the specific version Avamar software available for download. 6. Save AvamarCombinedProxy-linux-x86-VERSION.iso to a temporary folder, such as
C:\Temp, or the desktop.
7. Launch the vSphere Client, and log in to the vCenter Server. The vSphere Client window appears.
8. Locate and select the ESX Server that hosts the proxy you want to update. 9. Select the Summary tab.
10. In the Resources pane, select a datastore in the Datastore list. This datastore is where you will upload the ISO file.
Note: If you are performing multiple upgrades, you should select a datastore that is accessible to the greatest number of proxies.
11. Right click the datastore and select Browse Datastore. The Datastore Browser window appears.
Upgrading Avamar proxy software 43 13. Click Upload files to this datastore, then select Upload file.
The Upload Items dialog box appears.
14. Browse to the ISO file that you downloaded in step 6. 15. Select the ISO file and click Open.
The Upload Items dialog box closes.
16. If an Upload/Download Operation Warning appears, click Yes to dismiss the warning and continue with the upload.
17. Wait for the upload to complete.
18. Switch to vSphere Client window VMs and Templates view by clicking View > Inventory > VMs and Templates.
19. In the left pane, locate and select the proxy you want to upgrade. 20. Right click Edit Settings.
The Virtual Machine Properties dialog box appears. 21. In the Hardware list, select CD/DVD Drive 1. 22. Set the following options:
a. In Device Status, select Connected.
b. In Device Status, select Connect at power on. c. In Device Type, select Datastore ISO File. 23. Click Browse.
The Browse Datastores dialog box appears.
24. Locate and select the ISO file you uploaded in steps 8–17. 25. Click Open.
The Browse Datastores dialog box closes.
26. Switch to Virtual Machine Properties dialog box and click OK. The Virtual Machine Properties dialog box closes.
The ISO file is mounted on the proxy.
The proxy automatically waits until no backups are running, then updates itself. Because the polling interval is set to 30 minutes, it make take up to 30 minutes after the last backup completes for the upgrade to begin.
When you reboot the proxy VM, it updates its software. Backups that are running during the reboot fail. You should only reboot when you are absolutely certain the proxy is not being used for backups.
27. Switch to vSphere Client window VMs and Templates view by clicking View > Inventory > VMs and Templates.
29. Right click Edit Settings.
The Virtual Machine Properties dialog box appears. 30. In the Hardware list, select CD/DVD Drive 1. 31. In Device Status, clear the Connected option. 32. Click OK.
The Virtual Machine Properties dialog box closes. 33. Repeat steps 18–32 to upgrade additional proxies.
Performing optional proxy plug-in configuration
By default, each 7.0 proxy provides eight plug-in instances, each of which appears as a separate logical proxy instance in Avamar Administrator. This topic provides instructions for changing this setting.
1. From the vSphere Client window, locate and select a Avamar image backup proxy. 2. Ensure that the proxy is powered on.
3. Open a console to the proxy by right-clicking it and selecting Open Console. The Console window appears.
4. Wait for the Main Menu to appear.
5. Type 2 and press Enter to quit the default script session. The login screen appears.
6. Log in as root.
7. Run the initproxyappliance.sh shell script in expert mode by typing:
cd /usr/local/avamarclient/etc
./initproxyappliance.sh start --expert
8. Wait for the Main Menu to appear. 9. Type 1 and press Enter.
10. Press Enter to accept the previous settings until the following prompt appears:
Number of proxy clients (1 to 8) [8]: 8
11. Type the number of logical proxy clients and press Enter.
12. Continue pressing Enter to accept the previous settings until the Main Menu appears. 13. Type 2 and press Enter to quit.
Re-registering a proxy with a different Avamar server
Should it become necessary to re-register an existing proxy virtual machine with a different Avamar server, perform the following: