Remote Support Center 2.6.5
Installation Guide
©2014 Dell Inc. ALL RIGHTS RESERVED.
This guide contains proprietary information protected by copyright. The software described in this guide is furnished under a software license or nondisclosure agreement. This software may be used or copied only in accordance with the terms of the applicable agreement. No part of this guide may be reproduced or
transmitted in any form or by any means, electronic or mechanical, including photocopying and recording for any purpose other than the purchaser’s personal use without the written permission of Dell Inc.
The information in this document is provided in connection with Dell products. No license, express or implied, by estoppel or otherwise, to any intellectual property right is granted by this document or in connection with the sale of Dell products. EXCEPT AS SET FORTH IN THE TERMS AND CONDITIONS AS SPECIFIED IN THE LICENSE AGREEMENT FOR THIS PRODUCT, DELL ASSUMES NO LIABILITY WHATSOEVER AND DISCLAIMS ANY EXPRESS, IMPLIED OR STATUTORY WARRANTY RELATING TO ITS PRODUCTS INCLUDING, BUT NOT LIMITED TO, THE IMPLIED
WARRANTY OF MERCHANTABILITY, FITNESS FOR A PARTICULAR PURPOSE, OR NON-INFRINGEMENT. IN NO EVENT SHALL DELL BE LIABLE FOR ANY DIRECT, INDIRECT, CONSEQUENTIAL, PUNITIVE, SPECIAL OR INCIDENTAL DAMAGES (INCLUDING, WITHOUT LIMITATION, DAMAGES FOR LOSS OF PROFITS, BUSINESS INTERRUPTION OR LOSS OF INFORMATION) ARISING OUT OF THE USE OR INABILITY TO USE THIS DOCUMENT, EVEN IF DELL HAS BEEN ADVISED OF THE POSSIBILITY OF SUCH DAMAGES. Dell makes no representations or warranties with respect to the accuracy or completeness of the contents of this document and reserves the right to make changes to specifications and product descriptions at any time without notice. Dell does not make any commitment to update the information contained in this document.
If you have any questions regarding your potential use of this material, contact: Dell Inc.
Attn: LEGAL Dept 5 Polaris Way Aliso Viejo, CA 92656
Refer to our Web site (software.dell.com) for regional and international office information. Trademarks
Dell, the Dell logo, Expert Assist, and Help Desk are trademarks of Dell Inc. and/or its affiliates. Other trademarks and trade names may be used in this document to refer to either the entities claiming the marks and names or their products. Dell disclaims any proprietary interest in the marks and names of others.
Legend
CAUTION:A CAUTION icon indicates potential damage to hardware or loss of data if instructions are not followed.
WARNING:A WARNING icon indicates a potential for property damage, personal injury, or death. IMPORTANT NOTE,NOTE,TIP,MOBILE, orVIDEO:An information icon indicates supporting information.
Remote Support Center Installation Guide Updated - April 2014
Contents
About this guide 5
Document summary 5
Overview and basics 6
RSC overview 6
User roles and concepts 6
Management models 7
LAN model 9
Global model 10
Security measures 11
Using RSC OpenSSL to Create an IIS SSL Certificate 11 Gateways and intercommunications 12
Component services 13
System requirements 14
RSC/DMZ Server system 14 RSC Server requirements 14 Database Requirements 16 DMZ Server Operating System requirements (for Global Model) 16 Remote Client Computers Operating System Requirements 17 RSC user’s browser requirements 17
Installing/Upgrading Remote Support Center and its components 18
Installing Remote Support Center 18
Before you begin 18
RSC Server installation procedure 18
Upgrading RSC 29
Initial Remote Support Center startup 30 Implementing the global model 30
Before you begin 30
Preparing the DMZ Server package 31 Deploying the DMZ Server package 33 Changing the Internet Gateway IP Address/Uninstalling Internet Gateway 39
Configuring IIS 7 and IIS 8 for Remote Support Center setup 41
Specifying role services 45 Review the Web Server Role Setup Configuration Settings 46
Configuring IIS Binding settings 50
Configuration settings for IIS 6 on Windows Server 2003 50 Configuration settings for IIS 7/ IIS 8 on Windows Server 2008 and Windows Server 2012 53
About Dell 55
Contacting Dell 55
Technical support resources 55
1
About this guide
This guide is intended for Windows network administrators of small to enterprise businesses who are responsible for:
l Deploying the Remote Support Center product in the enterprise
l Planning network infrastructure and running initial product configurations
l Reconfiguring the product and analyzing business needs selecting management model that best fits
corporate demands
In addition, this guide can be useful for professionals who are evaluating the product or analyzing requirements for deploying this product in their organization.
NOTE:There is a companion Remote Support Center Administrator’s Guide containing information about administering the product. Please refer to this guide to find out more about the product, how to use and configure it to your needs.Replace this text with a description of a feature that is noteworthy.
Document summary
This document comprises several chapters each discussing the steps necessary to estimate, plan, understand, and implement Remote Support Center (RSC) deployment.
RSC overview- Here you get a sneak peak on what RSC provides including a comprehensive overview of its core features. The chapter then focuses on the management models that can be implemented in RSC. Here we show you how to tailor the RSC to your network infrastructure. Drawing further on the schematic management models, the chapter also outlines best practices in using a particular model. This chapter also discusses the measures implemented in RSC to guarantee secure data communications and protected privacy during remote management and remote control sessions. It also sheds light on how RSC helps you to automate some routine security checkups necessary to secure web access. This chapter will also inform you on the core RSC components and how they communicate with each other while you work with RSC.
System requirements- This chapter provides you with information to estimate hardware and software requirements necessary to deploy RSC. You will discover what servers are needed for RSC and how each one should be provisioned before deploying RSC. You will understand what is necessary to enable the desired RSC management model. This chapter also covers network security and the configuration of your firewalls to achieve the best security for all management models supported by RSC. Additionally, a list of supported operating systems and browsers is provided to help you estimate all necessary software.
Installation- In this chapter you will find a detailed set-by-step installation process. These steps guide you through the RSC deployment process based on the chosen management model from start to finish. Additionally, the chapter discusses product licensing and helps you upgrade from earlier versions.
2
Overview and basics
RSC overview
Welcome to the Remote Support Center Installation Guide. This guide will walk you through the product deployment steps providing all of the necessary information to select the best management model for your enterprise, prepare your environment, and quickly rollout the product.
Remote Support Center (RSC) is a comprehensive system designed to enable network administrators to remotely manage and control computers regardless of their location.
RSC allows you to remotely connect to any Microsoft Windows-based computer be it in the LAN, WAN, or any external network supporting TCP/IP. The administrator does not have to worry about direct access to a remote computer from their current location. Once configured, the management product automatically takes the responsibility of routing your requests to a remote computer, creating an experience of working on the remote computer interactively.
Once logged into RSC, the administrators can remotely connect to a desired computer. RSC allows you to gain access to many of the helpful management tools such as desktop remote control, file transfer protocol (FTP) for downloading and uploading files, configuration of the, remote computer, remote-to-local printing, advanced scripting, and dozens of other features. All communications are encrypted and all hosts are authenticated using x.509 digital certificates to ensure a secure environment for all remote management operations. Using this technology, an administrator is able to assist users wherever they may be.
User roles and concepts
The following lists of RSC user roles and RSC concepts are essential for you to get started with Remote Support Center.
RSC User Roles are general categories of users defined within RSC with respect to administering RSC or managing remote computers via RSC, etc.
RSC Concepts are terms and concepts used throughout the RSC graphical user interface and the RSC documentation.
Table 1: Terms and concepts
Term Explanation
DMZ Server A server within the perimeter network that is exposed to both internal and external networks and hosts RSC Internet Gateway.
Term Explanation
RSC. ExpertAssist Client (EA
Client)
The RSC client software – ExpertAssist - that is required to be installed on the remote computer to make it available for remote administration via RSC. IA Client Computer The computer deployed with InstantAssist Client and ready to be managed via
RSC. InstantAssist Client (IA
Client)
The RSC client software – InstantAssist - that is required to be installed on the remote computer to make it available for remote administration via RSC. InstantAssist Technician The InstantAssist Client usage is licensed per technician (domain users) that has
been authorized for managing a remote computer via the InstantAssist Client. (See the RSC Licensing section of the Remote Support Center Administrator Guide.)
RSC Administrator A user of Remote Support Center who is able to configure and manage the RSC Management Console and configure the users who would have access to it (RSC Helpdesk Specialists). The RSC Administrator can also perform remote
management tasks. (See the RSC Administrator Role section of Remote Support Center Administrator Guide for details.)
RSC Client See EA Client and IA Client.
RSC Client Computer The computer deployed with RSC Client and ready to be managed via RSC. RSC Helpdesk Specialist A user of RSC who is typically responsible for managing target computers. (See
the RSC Helpdesk Specialist section of the Remote Support Center Administrator Guide for the whole list of RSC Helpdesk Specialist-specific tasks.)
RSC Management Console (RSC Console)
A web application component that implements both the RSC system’s main component and graphical user interface. It runs on IIS, communicates with other system components and provides for performing all the configuration and management operations.
RSC Remote User The user of the target computer who in some use cases is responsible for downloading/installing and running RSC Clients. (See the RSC Remote User section of the Remote Support Center Administrator Guide for the whole list of RSC Remote User-specific tasks.)
RSC Server The corporate LAN server where the RSC software is installed to and running. RSC User The RSC Administrator and RSC Helpdesk Specialist users.
RSC User’s Browser (Browser)
The Internet Explorer browser enabled with Java Runtime Environment used to connect to RSC Console.
Management models
Remote Support Center (RSC) is deployed in the internal LAN network. The RSC Server that RSC is deployed to should be a part of the Active Directory infrastructure. This allows you to manage any of your internal LAN computers from any computer that has access to RSC on an immediate availability basis. No special preparations are required from the remote user on the client side for an RSC administrator to reach the remote computer via RSC. Just install the desired remote client and remotely connect when needed, from where ever you want.
RSC is a highly customizable product which can be easily configured to the desired management model. This allows you to fine-tune the RSC by significantly extending its management capabilities: computer reachability and operation flexibility.
Discussed below are the two management models—LAN Model and Global Model— implemented in RSC and the benefits of using each one.
TheLAN Modelsection describes the basic management model of RSC. This model best fits an environment that does not have a DMZ (perimeter network). But it does not limit the management facilities for either type of networks. You deploy RSC in the LAN and gain the ability to manage your LAN or WAN computers from any type of network depending upon the configuration of your firewall.
TheGlobal Modelsection outlines the configuration of RSC on a network that should include an isolated LAN/Active Directory domain network and network perimeter that is exposed to external networks. This model extends the LAN model to allow computers and administrators located outside of your network, work with RSC through the DMZ component.
LAN model
Figure 1: LAN ModelTheLANmodel is the default RSC model serving a rapid “no time to lose” management style and has the easiest deployment. It is used as the base model for the initial deployment of RSC. Any further configuration and RSC system component topology enhancements are made on top of this management model.
You may plan to use RSC in an isolated internal LAN network, or you may want to manage both internal and external computers. Do not have a plan yet? Start with this model. You can manage remote computers in the WAN sitting behind a computer that is inside the LAN. Depending on your corporate firewall settings, you even can manage your LAN computers from the internet.
The server where RSC will be installed should meet the following criteria: 1. Must be an Active Directory domain member
2. Must be addressable by clients in the LAN (remote users and computers) or the WAN if you plan to work with external networks
In this all-in-one model, all RSC components will be installed to a single server inside the LAN. This server should be able to query and change Active Directory.
A complementary database server holding RSC configuration data may be installed on a separate server. This will off-load the RSC Server from managing time-consuming database specific tasks. This server may or may not be a domain member.
This management model separates your network structure into two sets— your internal corporate LAN network and everything that is external to your LAN network. From this point of view, the internet or any other network that is not a part of your local LAN are external to your internal network.
Typically with this model your LAN firewall filters out all inbound connections and accepts outbound connections only. If necessary, you can configure the corporate firewall to allow inbound connections and permit management of internal or external computers from the WAN.
Global model
Figure 2: Global modelIn order to be able to manage computers which do not reside within your LAN, or to get access to the RSC Console from the Internet you will need to install the optional Internet Gateway if your RSC Server is not accessible from the Internet and you are looking to perform at least one of the following operations:
l Manage computers which reside outside of your LAN network over the Internet l Access the RSC Console from Internet
The RSC Internet Gateway can be created and downloaded from the Application Status page of RSC Management Console, once RSC has been installed and configured. The RSC Internet Gateway should be installed on the server located in the DMZ segment of your network. In order for the Internet Gateway to be
able to route traffic to the RSC Console, RSC requires one TCP port (by default 1529) to be open from the LAN to the DMZ (in one direction, LAN to DMZ). (See theDMZ Server Network/Firewall Requirementssection for more details on network configurations for DMZ Server.)
This model is better suited for secure environments where there is firewall and NAT separation between the DMZ and the WAN.
If you are using NAT devices, please ensure that the translation table and port forwarding is properly
configured for external network computers to be able to access computers located in your private LAN domain network. It is especially important that a NAT device which separates DMZ network from an external network provides for proper port mapping, thus allowing external computers to reach RSC.
Security measures
The Remote Support Center can use either self-signed or third-party trusted certificates. These
certificates are used to encrypt connections between the RSC components (RSC Gateways, RSC Clients, RSC Management Console).
To encrypt the communication channel between the RSC User’s Browser and the RSC Management Console, RSC requires that a valid certificate is installed on the IIS site. If there is no valid SSL certificate installed on IIS site where you install the RSC Management Console, the RSC setup wizard will offer to create a self-signed certificate using the built-in RSC OpenSSL CA. A valid certificate can also be purchased from any trusted third party commercial authority.
Connections between RSC components are automatically encrypted with server certificates. As RSC installs, its built-in OpenSSL CA issues a self-signed certificate that validates the RSC components participating in internal RSC communications and places it on the RSC Server. This certificate is placed in the Trusted Root Certification Authorities local store on the RSC Server. Using this trusted certificate, RSC issues all its components with their own certificates. Once registered in RSC, any component that provides its certificate to RSC Server then gets validated against that trusted certificate. It allows the identity of RSC on the client side to be validated and will uniquely validate the client on the RSC side.
Using RSC OpenSSL to Create an IIS SSL Certificate
The IIS server default web site certificate installation procedure can be automatically run during the setup stage of RSC by checking the Generate and Install an OpenSSL self-signed certificate in the IIS Default Web Site checkbox on the IIS SSL certificate Verification wizard page.Figure 3: Generating a missing IIS web site certificate automatically.
This installs the self-signed certificate using the RSC built-in RSC OpenSSL certification Authority (CA) on the IIS Default Web Site.
NOTE:If the server has an invalid certificate installed on the IIS default web site, the wizard will offer to replace it.
An SSL server certificate is invalid if it meets one of the following criteria:
l The certificate has expired.
l The certificate has been created by SelfSSL tool (included in IIS 6 Resource Kit Tools). This is a special
case of the criterion below.
l The certificate is signed by a certificate containing a Key Usage field and this field does not contain the
Certificate Signing bit.
Gateways and intercommunications
When configured according to the Global model, RSC actively uses two gateway components that are bundled with the product.
The RSC Internet Gateway and the RSC LAN Gateway components are used to route traffic going between various computers communicating in the RSC network when working with RSC. The traffic is routed between the RSC Management Console running on the IIS server and remote computers with RSC Clients or Browsers. An RSC Client application or Browsers used for remote management may run on computers located either on the LAN or outside the LAN in external networks such as internet or some WAN network. Routing allows you securely manage remote computers through the RSC system seamlessly bypassing network barriers such as a LAN firewall closed for incoming connections.
TheRSC LAN Gatewaycomponent is installed as part of the RSC deployment to RSC Server. This Gateway is in charge of receiving requests from RSC Clients and Browsers in the LAN and getting the request sent by the Internet Gateway. The RSC LAN Gateway directly communicates with the RSC Console delivering Browser requests from the Internet Gateway when working in the Global model.
TheRSC Internet Gatewayis installed to the DMZ Server residing in the perimeter network. This Gateway is in charge of receiving requests from the RSC Client software installed on WAN based computers. Additionally, this Gateway proxies requests to the RSC Server sent by the Browsers when RSC Users access the RSC Management Console working in Global mode. All requests received from both RSC Clients and Browsers running in the WAN are delivered to the RSC LAN Gateway as soon as the latter requests Internet Gateway for this data. This approach implements a transparent protected LAN schema when all requests sent from the WAN are delivered to the RSC Server in the LAN even though all incoming connections are blocked on the RSC Server firewall. Traffic going between an external remote RSC Client or Browser on the internet or WAN and the RSC Management Console will pass several points of RSC network implemented by RSC components.
1. The RSC Client will forward the traffic through SSL channel to the Internet Gateway component running on the DMZ Server residing within the DMZ network, and the Browser will use HTTP for these purposes. This traffic goes on port 443 opened on the DMZ Server.
2. The RSC LAN Gateway on the RSC Server establishes keep-alive connections to the RSC Internet Gateway on the DMZ Server. This organizes a constant secure channel from the RSC Server to port 1528 on the DMZ Server. As a result, this makes the RSC Management Console running on the RSC Server aware of remote, both within the LAN and WAN, RSC Clients available for management and Browsers administering RSC Client Computers.
3. The RSC Management Console is implemented as a web application incorporating several core RSC functionalities. Besides being a core, arbitrating all communication requests and responses in the RSC environment, the RSC Management Console implements the RSC web interface. This RSC Management Console is hosted on the IIS Web Server.
This makes the remote computer become visible online and available for management from the RSC Management Console. Once the traffic has reached the RSC Server, the RSC User can check the computer’s online presence by selecting corresponding computer groups in the RSC Management Console.
Tight component integration guarantees that every setting made by the RSC Administrator via the RSC
Management Console is available for other RSC Users working with RSC from other computers on the “set it – get it” basis. This level of availability is achieved by implementing centralized storage arbitrated by the RSC Core Service. All the settings and RSC configuration data as well as your personal data created for management sessions are stored in an SQL Server database. This database is then accessed by the RSC Core Service during RSC sessions to validate RSC Users, management sessions, management customizations created by various RSC Users during their management sessions, etc.
Component services
As a distributed suite, RSC incorporates several services.
Key RSC LAN and Internet Gateways are implemented as Windows services that are installed on LAN and DMZ servers correspondingly. TheRSC LAN Gatewayservice is installed and registered on the RSC Server when you deploy RSC. TheInternet Gatewayis installed on the DMZ Server by the RSC Gateway Setup when you deploy the Internet Gateway Package implementing the Global model.
Additionally, RSC installs theRSC Deployment Serviceon the RSC Server. The service installation is performed automatically by the RSC Installation wizard. This service runs the RSC Client push operations on computers in the Active Directory forest.
3
System requirements
Remote Support Center (RSC) should be installed to a server located in the LAN segment of your network. This RSC Server should be a part of Active Directory infrastructure. The RSC Server may be shielded up from external access with corporate firewall. It is generally recommended that you install the product on a member server, which does not hold a Domain Controller (DC) role. This will help to offload the Domain Controller from remote management tasks and have better response time, operability, and quality of service.
The Active Directory infrastructure must properly function in your enterprise LAN and an instance of Microsoft SQL Server must be available prior to installation for RSC to connect to. The database server should be directly accessible from the RSC Server.
RSC/DMZ Server system
RSC Server requirements
RSC Server Operating System requirements
l Microsoft Windows Server 2003 (32-bit or 64-bit) Service Pack 1 or above l Microsoft Windows Server 2008 (32-bit or 64-bit) All Service Packs l Microsoft Windows Server 2008 R2 All Service Packs
l Microsoft Windows Server 2012
NOTE:RSC is not compatible with Windows security updateKB977377. Use the Add/Remove Programs applet to check if the RSC Server is installed with the update and remove it. Restart your server after the update removal. The update removal will not cause the security issues (seehttp://support.microsoft.com/kb/977377for details).
RSC Server Hardware System Requirements
RSC Server Software Requirements
l .NET Framework 3.5 Service Pack 1 or later versions
l IIS 6.0 or above (with Metabase compatibility enabled and prerequisite features installed. See detailed
instructions inAppendix A.)
NOTE:Please ensure that your IIS server is configured to listen for HTTPS connections on all IP addresses and the All Unassigned option is selected in the site binding settings. Please refer to
Appendixes AandBfor more details on configuring the IIS server.
l [Optional] IIS Web Server SSL Certificate l Microsoft Internet Explorer 7 or above
NOTES:
l Please note that pop-up blockers in the administrator’s web browser must either be
disabled or allowed for the RSC Management Console URL.
l It is preferable to turn off IIS Logging. The log file will grow very large in size if logging is
enabled.
For configuring IIS logging refer to:
IIS 6.0 - seeKB 324279on Microsoft support sitehttp://support.microsoft.com/kb/324279
IIS 7.0 - seeKB 930909on Microsoft support sitehttp://support.microsoft.com/kb/930909
RSC Server Network/Firewall Requirements
LAN Model
The RSC Server settings should meet the following requirements for remote management. In this
configuration both the remote computer to be managed and the computer that is used for management must reside in the LAN.
l The RSC Server must be addressable within the internal LAN network.
l Fixed IP address - The RSC Server should have a static IP address that is specified during setup. l The RSC Server firewall should allow inbound HTTPS traffic to IIS SSL port (port 443 by IIS defaults). l The Gateway communication port specified during RSC setup should be allowed for inbound connections
from computers within the internal LAN network (port 1529 by RSC defaults).
NOTE:When deploying to machines with Windows Firewall turned on, the Windows Firewall for this port is configured automatically during setup.
Global Model
In order to manage both internal (LAN based) and external (WAN based) clients, one of the following requirements should be satisfied:
l The RSC Server is directly accessible from WAN:
a. port 1529 accepts inbound connections from the RSC Client software on computers in the WAN;
b. port 443 accepts inbound connections from the RSC Users’ Browsers working with RSC from the WAN.
This works best when you do not have a DMZ or do not plan to use it.
l Internet Gateway on DMZ server must be installed and configured:
a. RSC LAN Gateway installed on the RSC Server can establish an outbound TCP connection to the Internet Gateway installed on the DMZ server on port 1528.
This model provides for advanced security and flexibility by making use of a perimeter network. NOTE:If deploying to machines with Windows Firewall turned on, the Windows Firewall for the ports mentioned (default 1529, 443, 1528) can be configured automatically during setup.
Database Requirements
Database operating system requirements:l An instance of Microsoft SQL Server 2005 Enterprise, Standard, Express, or Developer Editions
(32-bit or 64-(32-bit)
l An instance of Microsoft SQL Server 2008 Enterprise, Standard, or Express Editions (32-bit or 64-bit) l An instance of Microsoft SQL Server 2012
SQL Server authentication type:
l SQL Server Authentication set to SQL Server and Windows Authentication mode.
NOTE:The database server may be installed anywhere, provided that it is directly visible from the RSC Server where you are deploying RSC to.
DMZ Server Operating System requirements (
for
Global Model
)
l The same as forRSC Server Operating System Requirements.
DMZ Server Software requirements
l No additional requirements are needed
DMZ Server Network/Firewall requirements
Global model
1. Port 443 for Browser and RSC Client Computer connections from WAN based computers.
This port is used to allow administrators to access the RSC Console from the WAN and communication with external remote computers.
This port can be changed during RSC Global Model setup. 2. Port 1528 for inbound connections from the RSC Server.
This port is used by the Internet Gateway to accept connections from the RSC LAN Gateway. This allows them both to securely route traffic from the LAN to the WAN and vice versa.
Remote Client Computers Operating
System Requirements
Operating System requirements
The Remote Support Center Clients (RSC Client) can be installed on computers with the following operating systems:
l Microsoft Windows Server 2012 l Microsoft Windows 8 (32-bit or 64-bit) l Windows Server 2008 R2 any Service Packs l Windows 7 (32-bit or 64-bit) Service Pack 1 or later l Windows Server 2008 (32-bit or 64-bit) any Service Packs l Windows Vista (32-bit or 64-bit) Service Pack 2 or later
l Windows Server 2003 (32-bit or 64-bit) any Service Pack 1 or later l Windows XP (32-bit or 64-bit) Service Pack 3 or later
Installation can be performed either locally via an invitation or remotely via the push functionality. (See the
Installing Remote Support Center Clients to Remote Computerssection of theRemote Support Center Administrator Guidefor more info.)
RSC user’s browser requirements
The following web browsers can be used to manage remote computers: 1. Windows Internet Explorer 7 or above (Java-enabled)
2. Java Runtime Environment version 1.7.0.17. Other versions starting from 1.5.0.5 are also supported, though in some configurations, some features may not fully function under these versions.
4
Installing/Upgrading Remote Support
Center and its components
In this section you’ll find information with respect to the Remote Support Center installation procedure. The section also details the process of the DMZ server deployment. The DMZ server installation allows
implementing the Global Model on the RSC Server if it is not accessible from the Internet and you are looking to manage Internet-based remote computers or connect to the RSC Console via Internet.
Installing Remote Support Center
By running the Remote Support Center main setup, you will install all of the necessary components to perform remote management via RSC and its client software. The license you’ll provide during setup defines the RSC Client(s) to use for remote control purposes.
Remote Support Center should be deployed as a part of Active Directory infrastructure on a server residing within the internal LAN network. Once deployed, RSC will be automatically configured according to your LAN model.
Before you begin
Before starting the RSC deployment, make sure:
1. That the computer where RSC will be installed meets all the necessary requirements and prerequisites (refer toSystem Requirements). Otherwise, the installer will warn you against missing configurations of any kind and quit.
2. There is a Microsoft SQL Server instance available for RSC to connect to (for requirements, refer to
Database Requirements);
3. Internet Information Services (IIS) is installed, configured and running on this server (refer toAppendix AandAppendix B).
RSC Server installation procedure
To deploy RSC, perform the following steps:
1. Run the setup executable.
2. Accept the license agreement following the welcome screen.
Once the package has extracted its setup files and prepared itself for setup, the setup wizard will be automatically launched. ClickNexton theWelcomescreen to proceed to theEnd-User License Agreement dialog.
Read carefully and selectI accept the terms on the License Agreement when ready. ClickNext to continue.
3. (If applicable) Check for prerequisites.
Warning messages may appear to notify that your machine is missing/does not meet some of the prerequisites listed in theRemote Support Center System Requirementssection. Exit the setup by clickingCancelorNext, add the missing prerequisites, and then resume the setup again.
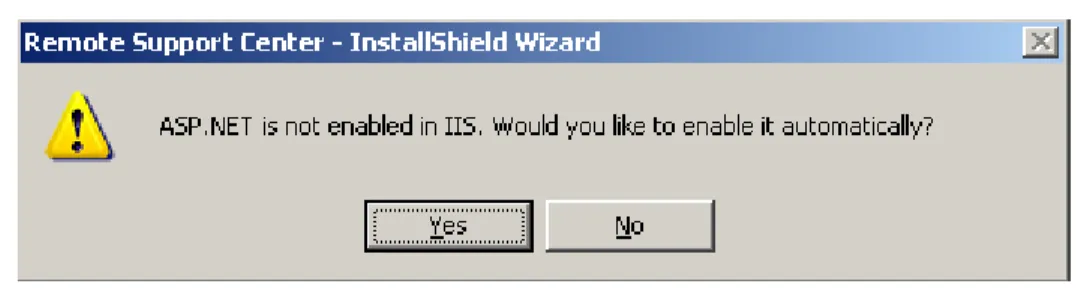
If offered to register and/or enable ASP.NET on IIS, clickYesto register ASP.NET with IIS Web Server and/or allow ASP.NET Web Service Extension on IIS and proceed with the installation.
Figure 4: The RSC setup is offering to enable an ASP.NET Web service extension on your IIS Web server.
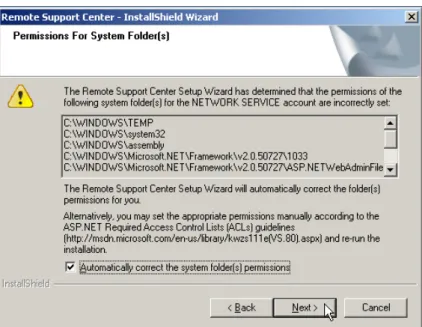
4. (If applicable) Configure system file and folder permissions for an ASP.NET Web application.
Some folders vital for the ASP.NET application may not have their Access Control Lists (ACLs) properly assigned (e.g. if IIS was installed after .NET Framework). Set theAutomatically correct the system folder(s) permissionscheckbox to make the wizard automatically correct and validate the permissions for the listed system folders. This will guarantee that ACLs on temporary folders match the standard requirements for ASP.NET applications.
Figure 5: Permissions correction and validation.
If desired, clickCancelto exit the wizard and assign the permissions manually. (Please refer to the ASP.NET Required Access Control Lists (ACLs) page on MSDN library site for the complete list of folders and permissionshttp://msdn.microsoft.com/en-us/library/kwzs111e(VS.80).aspx
ClickNextto proceed with the checkbox set. 5. (If applicable) Provide your RSC license.
When prompted to provide a license, clickBrowseto navigate to your LIC file, and then add the selected license.
Or, clickNextto proceed with the setup and install the license later viaLicense Manager(Refer to theApplying New Licenses Using RSC License Managerchapter of theRemote Support Center Administrator Guide).
NOTE:If you are upgrading from versions older than 1.x of RSC, please make sure to provide the new license file for version 2.x
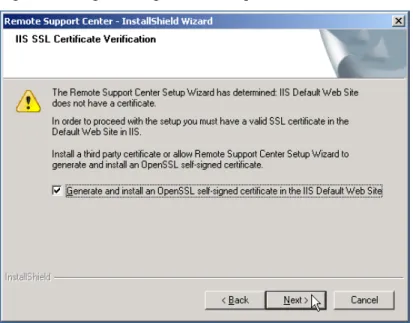
6. Generate and Install an OpenSSL self-signed certificate on the IIS Default Web Site.
TheIIS SSL Certificate Verificationpage appears next if you don’t have a valid SSL server certificate installed on your IIS Default Web Site.
Check theGenerate and Install an OpenSSL self-signed certificate in the IIS Default Web Site checkbox to let the wizard automatically generate and install the certificate for you.
Figure 6: Autogenerating and installing certificate on IIS.
The self-signed certificate will be generated using the OpenSSL Certification Authority and installed on the IIS server. Click Next to proceed. This button is inactive until you set the checkbox to generate and install the certificate.
NOTE:Please refer to theSecurity Measuressection to find more details. 7. Define the RSC installation path and virtual directory name.
On theDestination Folder and Virtual Directorywizard page, you may alter the default %Program Files%\Dell installation path for the RSC Management Console and other RSC components.
If necessary, rename the default RSC virtual directory name. This name will be used to create a virtual directory on the IIS server under the Default Web Site and will be used as a virtual path to refer to in the URL while connecting to the RSC Management Console.
ClickNextto continue. ClickCancelto quit.
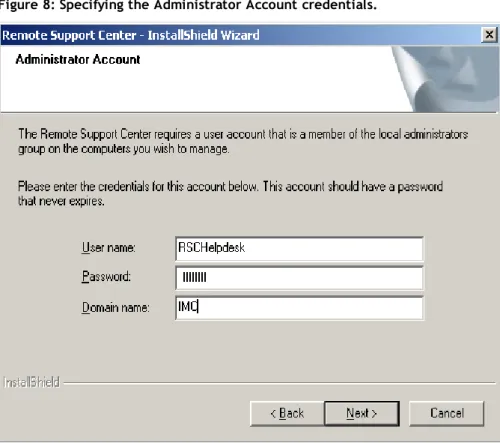
Enter the credentials of a domain user with local admin privileges to specify the Administrator Account. This account is used to authorize any remote installation (“push”) or management (“manage”)
operations initiated under the account of the RSC Administrator or a user with theFull Control permission from within the RSC Console on an Active Directory computer. By creating this account, you prevent facing the situation when a helpdesk specialist fails managing the remote computer because of missing – for some reason – local admin privileges on it.
Figure 8: Specifying the Administrator Account credentials.
When specifying these Administrator Account credentials, please ensure the user account:
l is granted local admin rights on all the Active Directory machines meant for remote
management;
l is not disabled or locked;
l is not assigned with either the “Deny log on locally” or “Deny log on as a service” user
right in Default Domain Security Settings or Local Security Settings (local to the machine RSC is being deployed to);
l credentials are valid (not misprinted or password is not going to expire, etc.).
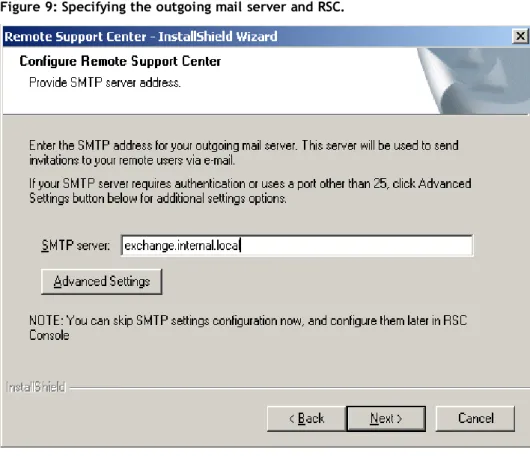
You can change this Administrator Account at any time through the RSC Console. (See the Using the Application Configuration page chapter of the Remote Support Center Administrator Guide.) 8. (Optional) Enter a DNS name or the IP address of the outgoing mail server.
NOTE:If you skip this page, be sure to provide SMTP server settings within the RSC Management Console. Otherwise, it will be impossible for the RSC client software to send an invitation (Refer to theInviting Remote Computer(s) for Management with ExpertAssistchapter of theRemote Support Center Administrator Guide).
This preferably should be your corporate SMTP server integrated into your Active Directory infrastructure. This mail server is used to send invitation e-mails to remote computers so that they could become available for management through RSC.
Figure 9: Specifying the outgoing mail server and RSC.
If the SMTP server, which name you are providing, requires authentication or setting port other than 25, or if you wish to establish secure connection between the SMTP server and RSC server, use the
Figure 10: Setting advanced SMTP server connection settings.
The options available for configuration are:
l SMTP Server
Displays a DNS name or the IP address of the SMTP Server specified on the previous screen.
l Port
The displayed 25 port is the default SMTP server port for interaction with the SMTP server. You may change it in case your mail server uses another one.
l Use secure connection
By default, the option is deactivated. Before activating the option make sure the designated SMTP server supports the ability to establish secure connections.
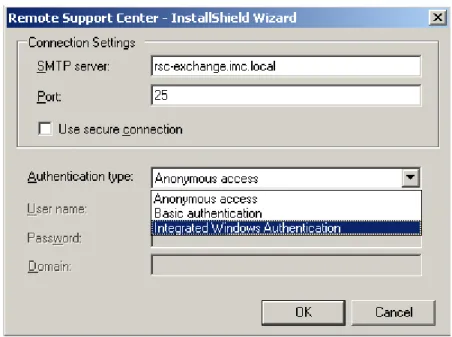
l Authentication type
Change the defaultAnonymous Accessauthentication type toBasic Authenticationor Integrated Windows Authenticationaccording to the method your SMTP server uses to authenticate the exchange.
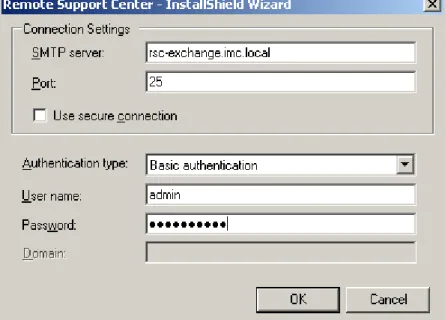
When the authentication type is defined, the associated user credentials fields will become activated. Fill in the fields. Consult your SMTP server administrator, if necessary. (See the figure below.)
Figure 11: The User name and Password fields became activated when the Basic authentication type was selected.
Any of the provided configuration settings can be changed at any time in the future via the RSC Management Console. (See theUsing the Application Configuration Pagechapter of theRemote Support Center Administrator Guide.)
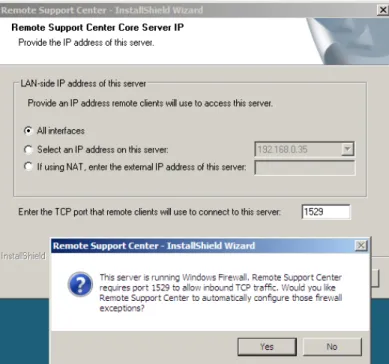
9. Specify the IP address of the RSC Server.
Choose between the available optionsAll interfaces,Select an IP address on this server, orIf using NAT…to make the RSC server accessible by remote computers that you will be managing through RSC, and then enter the TCP port for outbound connections on the RSC server.
Figure 12: Specifying internal or external facing RSC Server IP address
By leaving the default setting, you set RSC to listen on all network interfaces installed on the RSC Server.
Select an IP address on this server
Use the combo-box to specify a single IP address of the RSC Server that is accessible by remote computers that you will be managing through RSC.
If using NAT, enter the external IP address of this server
If you are using NAT translation to hide your LAN from the external network, choose theIf using NAT option and type the IP address of the NAT device/server into the edit box. In this case you will be able to manage remote computers even if the network interfaces available on RSC Server have IP addresses different than the IP address seen on the remote computers.
Selecting this option will make the LAN Gateway aware of the external address of the NAT
device/server. Thus, the RSC LAN Gateway will listen for incoming connections on all network interfaces available on the RSC Server, except for loopback (127.0.0.0/8), and remote RSC Clients access the RSC Server by using:
l NAT device/server IP if they cannot connect to the RSC Server directly using other
network interfaces available on the RSC Server;
l any other RSC Server network interface.
NOTE:RSC Clients will try to connect to RSC directly even when a NAT address is specified. If direct connection fails, remote clients will connect through NAT.
This serves for the best support for roaming users by allowing them to stay connected to the RSC network regardless of their location. The RSC Client software installed on remote client computers will automatically find the shortest and most secure route to connect to RSC. The remote users do not have to reconfigure the RSC Client for a new environment when they connect their computer to a new network!
This is done as a part of the robust and management speedup optimizations. TCP port
Enter the inbound TCP port on which RSC will use to communicate with its clients. The default port is set to 1529 but may be changed if necessary.
This port should not be set to ports that are already being used by IIS service or any other software installed on the server. (By default, IIS uses ports 80 (TCP) and 443 (SSL) for HTTP and HTTPS access respectively. This can be changed as well on IIS. These ports should not be used here.)
NOTES:
l Open the specified port for inbound connections from the LAN if you do not plan on
working with external remote computers residing in the WAN. Do so if you plan to work with external computers via the DMZ Server. This configuration is more secure.
l Open the specified port for inbound connections from both LAN and WAN if you plan
working with external remote computers residing in WAN without using the DMZ Server. This configuration is less secure.
When running setup, the installation wizard will check if the machine is running the Windows Firewall service and will either automatically configure the firewall for the specified port to allow RSC
(For Windows Server 2003) If the port specified is already on the Exceptions list for another program/service, the RSC will override the existing port entry.
ClickYesto allow configuration and proceed. Or, clickNoto reject automatic firewall configuration and perform it manually later after RSC setup.
Figure 13: The RSC setup wizard is asking permission to automatically configure the Windows Firewall on the machine with enabled Windows Firewall.
If the Windows Firewall is turned off or other than the Windows firewall protects your machine, you will see the message informing you to open the port for TCP inbound traffic through the firewall.
NOTE:Make sure that Windows Firewall is not configured to deny any connection through firewall (the “Don’t allow exceptions” (for MS Windows Server 2003) and “Block all connections” (for MS Windows Server 2008/2012) options are chosen). In this case RSC does not override these settings automatically and RSC components communication is blocked by firewall.
ClickNextto proceed.
Figure 14: Specifying the SQL database server address and authentication method.
Leave the selected item as is if you have a previously installed local SQL server instance that you want to host the RSC database.
Alternatively, type in the IP address, NetBIOS or DNS name of the SQL server, or clickBrowseto select from the list of resolved SQL servers available on your local network.
This could be any SQL Server that meets theRSC Database Server requirementsand can be accessed from this RSC Server. Please guarantee that the RSC system components can reach and communicate with the selected database server.
Specify the authentication method to be used by the RSC installation wizard to authenticate within the chosen SQL server.
SelectWindows authenticationif you want to let the wizard authenticate within the database server via Kerberos or NTLM protocol. This will allow you to authenticate with your current Windows
credentials specific to the account you are using to run the setup wizard.
SelectSQL Server authentication using the Login ID and password belowif you want the setup wizard to authenticate within the SQL server using SQL Server Authentication.
These authentication credentials need to be provided only once and are solely used by the setup wizard to create the RSC database for the RSC system on the specified SQL server and set security. Once the RSC database is deployed, all communications with the SQL server are made via SQL authentication through a specially created SQL login. This login has a limited permission set. The set includes only the permissions needed for the RSC system to operate with its own database. This approach minimizes the possible attack surface.
ClickNextto continue. ClickCancelto quit the wizard. 11. Click Install to start the installation.
ClickInstallon theReady to Installwizard page to start the installation.
ClickBack if you want to change any configuration settings made on the previous steps. Click Cancel to quit.
During installation, RSC will automatically locate the IIS Server and register itself within the web server. This provides for automated creation of the named virtual directory on the selected IIS server instance. By default, this directory is named RSC. This name may differ if you specified a custom virtual directory name in the step above.
Wait until the RSC Installation wizard registers its complementary services, creates its database and configures the product for the first use.
12. Click Finish to exit the setup wizard. RSC is now installed and ready to run.
See theInitial Remote Support Center Startupsection for the next steps to take with the RSC installation.
Upgrading RSC
The RSC upgrade allows you to install the newer RSC version over the previous version of RSC. Without the need to reconfigure the RSC settings you currently use (except for those defined during setup) if OpenSSL CA was used in previous version.
Before the upgrade, be sure that you meet the newsystem requirements. NOTES:
l The EA Clients displayed within RSC after the RSC upgrade won’t be available for management.
The client software on the remote computer must be upgraded via a push or invitation.
l The DMZ Server redeployment is not supported by an upgrade. To use it in the new version, you
must reinstall the DMZ Server. 1. Run the setup executable.
Start the installation by running the setup executable shipped with the Remote Support Center product.
Install the .NET Framework 3.5 Service Pack 1 if the setup informs that the system lacks it. 2. Confirm uninstallation of the previous version.
Confirm to start the software uninstallation, and then reboot the system, if it is not automatically started. Then resume the installation again.
The database won’t be removed during removal of the previous version of RSC. 3. Resume RSC setup.
Perform steps 2 through 11 of theRSC Server Installation Proceduresection. 4. Choose the database upgrade method.
If during the upgrade you selected the database that the previous version of RSC was using, select to upgrade the existing database or remove it and created a new one with no data.
ChooseUpgrade existing Remote Support Center databaseto keep the RSC settings.
ChooseOverwrite existing Remote Support Center databaseto create a new RSC database instead of using the existing one. With the new database, you’ll have to configure RSC settings from scratch. No “push” and “invite” operations data will be available any more.
ClickInstallto install RSC.
6. Click Finish to exit the setup wizard.
When the upgrade is finished, quit the wizard and start using RSC as usual.
Initial Remote Support Center startup
To start the Remote Support Center Management Console:
1. Login interactively to the RSC Server.
2. Log on to RSC Server using your domain account. 3. Start the RSC Management Console.
4. On the RSC Server, choose Start>All Programs>Dell>Remote Support Center>RSC Management Console.
5. Enter your credentials into the login page that will open.
NOTE:When logging into the RSC Console non-interactively - via a non-localhost URL such as
https://10.10.10.3/RSC or https://sl.mydomain.com/RSC , be sure to add the RSC Console URL address into the Local Intranet or Trusted Sites security zone in Internet Explorer. This is necessary to enable active scripting for the RSC Console.
For information on what to do next, refer toRemote Support Center Administrator Guide.
Implementing the global model
Enhancing RSC functionality to the Global model is even easier than installing the product. 1. Prepare a DMZ server.
2. Log into RSC and generate the Internet Gateway installation package. 3. Copy and install the installation package to the DMZ Server.
4. You are done.
If at any time there is a need for you to revert back to the LAN model, the only thing you have to do is to configure RSC not to use the DMZ server. You can do this right from within the browser.
Before you begin
Before starting the Global model implementation:
1. Make sure to configure your DMZ Server as defined in therequirements section for the DMZ Server. 2. Write down the DMZ Server IP address (if you will be configuring it from a remote location).
3. Make sure to add the DMZ Server IP address into the RSC IP filter (Refer to Adding a New IP Filter of the Remote Support Center Administrator Guide) if you wish to implement the model from the DMZ server.
Preparing the DMZ Server package
To enhance RSC management and relocate its publicly visible part to the DMZ, perform the following steps.
1. Start the Remote Support Center Management Console by choosingStart>All Programs>Dell>Remote Support Center>RSC Management Consoleon the RSC Server.
Type in your Windows domain credentials and clickLogin.
Alternatively, to generate the Internet Gateway, you may connect to RSC remotely, for example, from the DMZ Server. But first, you have to set theRSC Security Settingsto allow access from the DMZ Server IP address and assign the RSC Administrator. For more information on how you can allow access to the RSC Management Console from a remote computer, refer to theRemote Support Center Administrator Guide.
2. Click theView statuslink to open theRemote Support Center Statuspage.
3. In theService statuseslist, locate theRSC Internet Gatewayitem. Click theDownloadlink in the Actioncolumn next to the selected entry.
Figure 15: Generating Internet Gateway package.
4. In theDownload Internet Gatewaywindow type the IP address of the DMZ server into theIP Address edit box. Specify the port that will be used by the RSC components running on the RSC Server to connect to the DMZ Server and the DMZ Server operating system type.
Figure 16: Specifying the Internet Gateway IP address, port and target server OS.
By default, the Internet Gateway package is generated with the port 1528. This port is used by the RSC LAN Gateway running locally on your RSC Server to connect to the Internet Gateway once you deploy the generated package on the DMZ Server. Once deployed on the DMZ Server, the Internet Gateway will accept connections on this port from RSC LAN Gateway.
In theTarget Server OSdrop-down menu, select the platform type (x86 or x64) of the target server where you will be installing Internet Gateway. The package installation will fail if it does not match the DMZ Server processor type.
Click theDownloadbutton to start the package generation process.
NOTE:If necessary, please allow outgoing connections to a remote TCP socket (DMZServerIP:DMZServerPort) of the DMZ Server on the RSC Server’s firewall.
5. Wait while the Internet Gateway installation package is being generated. Depending on your RSC Server CPU load, this may take a while as the package is generated on-the-fly.
6. In theFile Downloaddialog box clickSaveto store the generated package. Place the package in a network folder accessible from the DMZ Server. Alternatively, save the package to a USB stick that you could just plug in on the DMZ Server.
If you are running the browser from the DMZ Server, you can clickRunto start the installation procedure immediately.
NOTE:If you are logging into the RSC Management Console for the first time, only the interactive logon from the RSC Server is permitted by the RSC internal security policy.
Figure 17: Saving the Generated Internet Gateway.
Once the Package is generated, click the X button to close theDownload Internet Gatewaydialog box. The specified DMZ Server IP address will be shown in theHostcolumn of theServices statuseslist of the Remote support Center Statuspage as soon as you deploy the generated Internet Gateway package on the DMZ Server.
NOTE:The Internet Gateway status in RSC Console will be shown as ‘Not Installed’ until you install the package onto the DMZ Server.
Deploying the DMZ Server package
When the Internet Gateway package is prepared you have to install it onto your DMZ Server.
See theDMZ Server Network/Firewall Requirementssection for more details on network and firewall configurations for the DMZ Server.
1. Interactively login to the DMZ Server in the perimeter network with local administrative privileges. 2. Copy the generated Internet Gateway Package to your hard drive and start the installation.
If, on starting the installation, you see the Windows Installer warning message (see figure below), then you are trying to deploy the Internet Gateway x86 package on x64 processor.Ensure the Internet Gateway package is generated to meet your x64 process type.
Windows Installer warning message.
NOTE:For systems with User Account Control (UAC) functionality turned on, the installation process must be run with elevated privileges. If you are logged into the system under a custom administrator account (such as [email protected] with a unique relative id) rather than the default Administrator user account (a well-known alias such as [email protected] with a well-known relative ID (RID) of 500), you must accept the User Account Control (UAC) prompt. Please be sure to start the
Internet Gateway installation under the elevated process. Click Start and type “command” (without quotes) into the Start Search box. Right click on the Command Prompt item and select Run as administrator from the context menu. Click Continue to start the command prompt.
Type:
cd /d <package_path>
(substitute<package_path>with the Internet Gateway package location) Press <Enter>
Type: rsc
Press <Tab> to locate the Internet Gateway installation package. Hit enter to start the Internet Gateway installation.
3. On theWelcome to the Internet Gateway Installationwizard page specify the program folder on the DMZ Server where you want the Internet Gateway components be installed to.
Figure 18: Specifying the RSC Internet Gateway package program folder.
ClickNextwhen ready to move to the next page.
Figure 19: Specifying network interfaces and ports to listen on.
Select theNAToption and specify the NAT device external IP address if you have a NAT device configured in your perimeter network and you want to make the Internet Gateway visible from outside the NAT. This enables the Internet Gateway to listen on all available network interfaces on the DMZ Server. It will accept connections from RSC clients and user browsers on all DMZ Server interfaces and also make remote computers aware of the publicly visible DMZ Server IP address specified in the edit box (address of the NAT device). On top of that, the Internet Gateway will listen on all interfaces for incoming connections from the RSC Server.
However, you can configure the Internet Gateway to listen on a specific interface by selecting the Select IPoption and choosing the interface IP address from the drop-down list. This enables the Internet Gateway to accept connections from user browsers and RSC Client Computers on the selected IP. The Internet Gateway will listen for incoming connections from the RSC LAN Gateway on all DMZ Server network interfaces.
Specify the port that the RSC Client software is installed to on the remote computers and the remote users’ browsers will be connecting to.
By default, the RSC client management software connects to TCP port 443 on the DMZ Server. This port is used by the RSC Client to notify the RSC user that the remote computer is available for management. If necessary, you can change this port by specifying custom port in theEnter the TCP portedit box. The same port 443 is used to directly connect to Internet Gateway via the browser from external (WAN) networks. This port is used to proxy connections from remote browser clients to the IIS web site when the RSC Server is not directly accessible. By default, the RSC Gateway listens for incoming connections from browsers on the SSL default port 443. This allows accessing the website via HTTPS protocol without specifying the port in the URL. A custom port can be specified if need be.
If the specified port is already used by other applications running on the DMZ Server, the wizard will warn you. To proceed with the Internet Gateway installation, release the port for the Internet Gateway or specify a different non-conflicting port.
If the Internet Gateway package was generated with an IP address of the interface that is not present on DMZ Server, the installation wizard will warn you with the corresponding message box. When
generating/installing the RSC Internet Gateway package, ensure it corresponds to the IP address of the DMZ server.
Figure 20: DMZ installation wizard warns you about non-existing interface.
This address is used by RSC in the LAN to establish a connection to the Internet Gateway. ClickYesto enable the Internet Gateway to be aware of connections from the NAT. This will make the LAN Gateway connect to the Internet Gateway via the DMZ Server’s NAT device IP address specified in the message box. Otherwise click No to exit the Internet Gateway installation.
After clicking No, make sure to generate the new DMZ package via the RSC Console specifying the IP address of an interface present on the DMZ Server. Install the newly generated package.
When running setup, the installation wizard will check if the machine is running the Windows Firewall service and will either automatically configure the firewall rules for the specified ports to allow RSC server/client communication or, if fails, ask you to execute it manually.
(For Windows Server 2003) If the ports specified are already on the Exceptions list for another program/service, the RSC will override the existing port entries.
ClickYesto allow configuration and proceed. Or, clickNoto reject automatic firewall configuration and perform it manually later after RSC setup.
Figure 21: The Internet Gateway setup wizard is asking permission to automatically configure the Windows Firewall rules on the machine with Windows firewall turned on.
If the Windows Firewall is turned off or other than the Windows firewall protects your machine, you will see the message informing you to open the ports for TCP inbound traffic through the firewall.
NOTE: Make sure that Windows Firewall is not configured to deny any connection through firewall (the “Don’t allow exceptions” (for MS Windows Server 2003) and “Block all connections” (for MS Windows Server 2008/2012) options are chosen). In this case RSC does not override these settings automatically and RSC components communication is blocked by firewall.
ClickNextto continue with the installation when ready. 5. Wait while the wizard installs the Internet Gateway.
Once deployed, the Internet Gateway becomes available for remote clients within a moment. You can now check its status by opening the RSC Management Console right from the DMZ Sever.
To open the RSC Management Console and check the Internet Gateway status:
1. Start the browser and type in the URL into the address bar based on the following template: https://DMZServerAddress:Port/RSCVirtualDirectory/
Table 2: Template's legend.
Pattern Description
DMZServerAddress IP address or DNS Name of the DMZ Server DMZ or
DMZ.mydomain.com Port Browser’s TCP port defined during Internet Gateway
installation
443 (default RSC port)
or a custom port such as
49153 RSCVirtualDirectory IIS Virtual Directory defined for RSC Management Console
during product installation on the RSC Server.
RSC
NOTE:If you stick with the default SSL port, you may skip defining the TCP port explicitly. Use the address:
https://DMZServerAddress/RSCVirtualDirectory/
2. Type in your domain credentials on the login page and clickLoginto log in.
NOTE:Make sure to allow the DMZ Server access to RSC. If you do not have the DMZ Server IP address defined in the security filter list within RSC, you will be denied access to the RSC Management Console home page.
Make sure to add your domain account that you will use to log into RSC from the DMZ Server to the RSC Administrators list.
(Refer to theRemote Support Center Administrator’s Guide). 3. ClickView statusto open theApplication Statuspage.
Figure 22: Internet Gateway is installed and available online.
This indicates that RSC has been successfully enhanced to fit your infrastructure. You can now access the RSC from external computers via your DMZ Server and gain other productivity delivered by Global Model.
TheLAN -> DMZ row specifies the IP address and port used on the DMZ Server to accept connections from RSC Server on the port specified in the Portcolumn. These connections are initiated by the LAN Gateway.
TheInternet -> DMZrow specifies the IP address and port used on the DMZ Server to accept connections from internet on the port specified in thePortcolumn. These connections generally initiated by RSC Clients and RSC Users’ Browsers running on computers on the internet.
RSC uses an intelligent technique to refresh all the remote computers deployed with RSC Clients to make them aware of the newly added Internet Gateway. Once an RSC Client connects to the LAN Gateway, client’s configuration will be immediately updated to include the IP address and port of the Internet Gateway as specified during the package deployment.
Changing the Internet Gateway IP
Address/Uninstalling Internet Gateway
Should the IP address of the DMZ Server need to be changed, do the following:1. Log into the RSC Console from the RSC Server or any other computer accessing RSC without using the Internet Gateway.
Typically, this can be any LAN computer permitted to access the RSC Console. 2. Click theView statuslink to open theRSC Statuspage.
3. In theService statuseslist, locate theRSC Internet Gatewayentry. Click theDownloadlink in the Actioncolumn next to the selected entry.
In the Download Internet Gateway window type in the new IP address of the DMZ Server into the IP Address edit box.
4. Wait while the Internet Gateway installation package is being generated. Depending on your RSC Server CPU load, this may take a while as the package is generated on-the-fly.
5. In theFile Downloaddialog box clickSaveto store the generated package. Place the package in the network folder accessible from DMZ Server. Alternatively, save the package to a USB stick that you could just plug in on the DMZ Server.
6. Move the generated package to the DMZ Server. Remove the previous Internet Gateway installation from the DMZ Server via the Add or Remove Programs Control Panel applet and install the new package. 7. You can now use the DMZ Server with the new IP.
NOTES:
l RSC will automatically make the LAN Gateway of the new Internet Gateway IP address. LAN
based RSC client software automatically selects the best connection route by switching to the LAN Gateway and is tolerant to IP address changes of the DMZ Server.
l If you want external RSC Clients to be aware of the new DMZ Server IP address, please reinstall
the RSC client software installed on WAN based external computers.
l If you do not need to use DMZ server in your RSC system, uninstall the DMZ package via the
A
Configuring IIS 7 and IIS 8 for Remote
Support Center setup
This configuration is required to make IIS 7 and IIS 8 ready for Remote Support Center setup.
(The following IIS configuring instructions apply to Windows Server 2008. As the graphical user interface and some IIS settings differ in Windows Server 2008 and Windows Server 2012, use these instructions only as guidelines to configure IIS 8 on Windows Server 2012. Follow the link to check forthe complete list of
configured role services. This list assumes that you already have the Web Server role installed and running on your server.)
1. Log into the server running Windows Server 2008 (Windows Web Server 2008 is required as a minimum) with administrative privileges.
2. Open Windows 2008 Server Manager.
3. If you are logged into the system under a simple user account rather than the default Administrator user account you must accept the User Account Control (UAC) prompt. Click Continue to start Server Manager.
4. Once Server Manager is started, navigate to Server Manager | Roles | Web Server (IIS) in the left-hand navigation pane. In the right-hand pane, scroll down to display the Role Services pane content. 5. Click theAdd Role Servicescommand in the task pane to the right of the Role Services Pane. This will
Figure 23: Adding role services.
6. On the Select Role Service wizard page, select the necessary role services. Figure 24: Specifying necessary role services.
Please see the Specifying Role Services section below for the list of services you must specify to prepare IIS 7 for Remote Support Center product installation.
The services that you have already installed on your server will be listed as grayed out. You don’t need to change the grayed out items.
7. ClickNextto review the wizard configuration summary and check the chosen options. Figure 25: Verifying selected options.
Refer to Web Server Role Services table to compare the list displayed by the wizard with the list of role services that should be installed.
You may want to check to see you if have selected all the required role services. ClickPrint, e-mail, or save this informationto open the list of services that will be installed. You may then compare them with the settings present in the table listed in Review the Web Server Role Setup
Configuration Settings.
ClickInstallto proceed with Web Server role setup.
8. Wait while the selected role services are installed and configured on your server. Click Close when setup is complete.
Figure 26: Reviewing added role services.
9. Once the wizard is closed you may review the list of installed role services in the Role Services pane. Notice the new services you have just added to the Web Server role have changed their status from Not installed to Installed.
Figure 27: Viewing role service’s statuses.
You may want to check to see that you have selected all of the required role services. Refer to the settings present in the table listed inReview the Web Server Role Setup Configuration Settings.
Specifying role services
1. In the Common HTTP Features node set the HTTP Redirectioncheckbox. Leave all other checkboxes as-is.
2. In the Application Development node set theASP.NETcheckbox.
In the Add Roles Wizard dialog clickAdd Required Role Servicesto confirm that other features will be installed with the set service.