BLACK BOX®
Advanced Console Server
Command Reference Guide
Software Version 2.6.0
BLACK BOX® Corporation 1000 Park Drive
Lawrence, PA 15055-1018 877-877-2269
http://www.blackbox.com
v© 2005 BLACK BOX® Corporation, all rights reserved
Information in this document is subject to change without notice.
BLACK BOX® is the registered trademark of BLACK BOX® Corporation in the United
States and other countries.
All trademarks, trade names, logos and service marks referenced herein, even when not
specifically marked as such, belong to their respective companies and are not to be considered
unprotected by law.
...
Table of Contents
Preface 1
Purpose... 1
Audience and User Levels . . . 1
New Users . . . 1
Power Users . . . 2
How to use the CLI (Command Line Interface) . . . 3
Modes of Operation . . . 3
Keywords meanings . . . 3
Interactive Mode . . . 4
CLI arguments and its meanings. . . 5
Other important features of the CLI . . . 5
List of CLI Keywords . . . 6
How to use this Guide . . . 9
Conventions and Symbols. . . 10
Fonts . . . 10
Hypertext Links. . . 10
Glossary Entries . . . 10
Quick Steps . . . 10
Parameter Syntax . . . 10
Brackets and Hyphens (dashes) . . . 11
Ellipses. . . 11
Pipes. . . 11
Greater-than and Less-than signs. . . 11
Spacing and Separators . . . 11
Cautionary and Instructional Information. . . 12
Networking Settings . . . 16
Performing Basic Network Configuration Using the wiz Command . . . 16
Log Into CS Through the Console . . . 16
Password . . . 16
Security Advisory . . . 16
Use the wiz Command to Configure Network Parameters . . . 17
Selecting A Security Profile . . . 20
To Select a Security Profile . . . 20
CLI Mode. . . 20
To Enable a Serial Port [vi method] . . . 22
Chapter 2 - Device Access
23
Accessing Serial Ports . . . 24
Default Configuration Parameters. . . 24
Opening and closing a Telnet session to a serial port . . . 24
Opening and closing an SSH session to a serial port . . . 25
Accessing Serial Ports using “ts_menu” . . . 25
Calling ts_menu without arguments . . . 25
Calling ts_menu with arguments . . . 26
How to close the session from ts_menu (from the console of your unit) . . . 27
How to close the session from ts_menu (from a Telnet/SSH session) . . . 27
CLI Mode - ts_menu . . . 27
Data Buffering . . . 29
Ramdisks . . . 29
Linear vs. Circular Buffering . . . 29
How to Configure . . . 30
VI mode - Parameters Involved and Passed Values . . . 30
CLI Method - Data Buffering . . . 32
Menu Shell . . . 34
How to use. . . 34
How to configure. . . 34
Setting up the Menu Shell . . . 35
Assigning ports to the Menu Shell. . . 35
CLI Method - Terminal Profile Menu . . . 36
Clustering using Ethernet Interface . . . 38
How to Configure Clustering . . . 38
VI mode . . . 38
Clustering using NAT (Enhanced) . . . 43
New Parameters and Commands . . . 43
Examples:. . . 44
How it works . . . 44
General Configuration. . . 46
Master box Configuration . . . 47
Slave-1 box Configuration . . . 48
Slave-2 box Configuration . . . 49
Slave-3 box Configuration . . . 49
Example of starting CAS session commands . . . 50
Chapter 3 - Authentication
53
Device Authentication. . . 53
How to configure . . . 53
VI mode - Parameters involved and passed values . . . 53
CLI Method - Authentication . . . .57
To configure the authentication type for the serial ports. . . 57
To configure user access to the serial ports . . . 57
To configure authentication type for device console access. . . 58
To configure an authentication server. . . 59
To activating the configuration.. . . 59
To save the configuration. . . 59
To exit the CLI mode. . . 59
Access Control via Radius Attribute NAS-Port-id . . . 60
NIS Client . . . 60
NIS Client Configuration . . . 61
How to Test the Configuration . . . 61
nsswitch.conf file format. . . 62
Examples . . . 63
Kerberos Authentication . . . 64
Kerberos Server Authentication with Tickets support . . . 64
How Kerberos Works . . . 64
Configuring CS to use Kerberos Tickets authentication. . . 64
CS Configuration . . . 65
Test the configuration: . . . 66
Kerberos Server Authentication . . . 67
LDAP Authentication . . . 71
Configuring an LDAP server on Linux . . . 71
Configuring the CS side. . . 73
Active Directory . . . 73
What needs to be set in the
/etc/ldap.conf . . . 74
Enabling TACACS+ Authorization for Serial Ports. . . 74
Configuring Authorization with a TACACS+ Server [CLI] . . . 74
Configuring Authorization with a TACACS+ Server [vi] . . . 75
Setting User Authorization Permissions on the TACACS+ Server [vi] . . . . 75
Group Authorization . . . 77
Configuring a TACACS+ authentication server. . . 77
Configuring the authorization on CS to access the serial ports [CLI] . . . 78
Configuring a RADIUS authentication server . . . 78
Configuring the authorization on CS to access the serial ports [CLI] . . . 79
Linux-PAM . . . 81
The Linux-PAM Configuration Directory . . . 82
Configuration File Syntax . . . 83
Module Path . . . 85
Arguments . . . 88
Shadow Passwords . . . 90
Certificate for HTTP Security . . . 91
Procedure. . . 91
X.509 Certificate on SSH . . . 93
To configure X.509 certificate for SSH . . . 93
vi Mode . . . 93
CLI Mode. . . 94
Script Mode . . . 94
To connect to CS using SSH X.509 certificate . . . 95
To connect to CS’s serial ports using SSH X.509 certificate . . . 95
Chapter 4 - Network
97
Introduction 97
Basic Network Settings . . . 97
Hostname. . . 97
VI mode . . . 97
CLI Method - Hostname . . . 98
IP address and Netmask . . . 98
VI mode . . . 98
CLI Method - IP address . . . 100
DHCP Client . . . 101
VI mode . . . 101
Files related to DHCP: . . . 103
CLI Method - DHCP . . . 103
Routes and Default Gateway . . . 105
VI mode . . . 105
CLI Method - Routes . . . 106
DNS Server and Domain Name . . . 108
VI mode . . . 108
CLI Method - DNS and Domain Name . . . 108
Bonding . . . 110
CLI Method - Bonding . . . 111
Hosts . . . 115
VI mode . . . 115
CLI Method - Hosts . . . 115
TCP Keepalive . . . 117
How it works. . . 117
VI mode . . . 117
CLI Method - TCP Keep Alive . . . 117
Filters and Network Address Translation . . . 119
Description . . . 119
Structure of the iptables . . . 119
Table . . . 119
Chain . . . 119
Rule . . . 120
Syntax . . . 120
Command. . . 121
Rule Specification . . . 122
Match Extensions . . . 124
TCP Extensions . . . 125
UDP Extensions. . . 126
ICMP Extension. . . 126
Multiport Extension . . . 126
Target Extensions . . . 127
LOG . . . 127
REJECT (filter table only) . . . 128
SNAT (NAT table only) . . . 128
DNAT (nat table only) . . . 129
MASQUERADE (nat table only) . . . 129
REDIRECT (NAT table only) . . . 130
How to configure it . . . 130
VI method . . . 130
VPN Configuration . . . 131
Applications of IPsec . . . 131
Using secure tunnels to create a VPN . . . 131
Road Warriors . . . 132
Before you start . . . 132
"Road Warrior" configuration. . . 133
Necessary Information . . . 133
Setup on the "Road Warrior" machine . . . 134
VPN configuration . . . 136
Authentication Keys. . . 137
IPsec Management . . . 138
The IPsec Daemon . . . 138
NAT-Transversal . . . 138
Adding and Removing a Connection . . . 139
Starting and Stopping a Connection . . . 139
IPsec whack . . . 140
The IPsec Configuration Files in Detail . . . 140
Description . . . 140
Conn Sections . . . 142
Config Section . . . 145
CLI Method - VPN Configuration . . . 146
Chapter 5 - Administration
149
SNMP . . . 149
Configuration . . . 151
VI Method - Involved parameters and passed values . . . 151
CLI Method - SNMP . . . 153
CronD . . . 155
How to configure. . . 155
Dual Power Management . . . 158
Syslog-ng. . . 159
Port Slave Parameters Involved with syslog-ng . . . 159
The Syslog Functions . . . 160
Syslog-ng and its Configuration . . . 160
Some Examples of Defining Sources: . . . 162
Some Examples of Defining Filters: . . . 164
Some examples of defining actions: . . . 168
Examples connecting sources, filters and actions:. . . 171
Syslog-ng configuration to use with Syslog buffering feature . . . 172
VI Method . . . 172
Syslog-ng configuration to use with multiple remote Syslog servers. . . 173
VI Method . . . 173
CLI Method - Syslog . . . 174
How Syslog Messages are generated . . . 176
Generated Syslog Messages . . . 176
DCD ON/OFF Syslog messages . . . 178
Examples. . . 179
Generating Alarms (Syslog-ng) . . . 181
How to configure . . . 181
VI method - Configuration to use with Alarm Feature . . . 182
CLI Method - Alarm Notification . . . 184
Terminal Appearance . . . 187
VI Method - Involved parameters and passed values . . . 187
CLI Method - Banner. . . 188
Centralized Management. . . 189
VI Method - Involved parameters and passed values . . . 189
Steps for using Centralized Configuration . . . 192
Date, Time and Timezone . . . 193
Date and Time . . . 193
CLI Method - Date and Time . . . 193
Setting Local Timezone . . . 194
Configuring using set_timezone . . . 194
Configuring Using CLI . . . 196
NTP (Network Time Protocol) . . . 197
VI mode configuration. . . 197
CLI Method - NTP. . . 198
Session Sniffing . . . 199
VI Method - Involved parameters and passed values . . . 200
CLI Method - Session Sniffing . . . 201
Saveconf and Restoreconf. . . 203
Saveconf Utility . . . 203
Restoreconf Utility. . . 203
CLI Method - Save/Restore Configuration . . . 204
Start and Stop Services . . . 205
How to Configure Them . . . 207
Security Profiles . . . 208
CLI Method - Selecting a Pre-defined Security Profile. . . 209
CLI Method - Configuring a Custom Profile. . . 210
Chapter 6 - AlterPath PM integration
215
Power Management Configuration . . . 215
. . . 216
Configuring Power Management . . . 216
VI Method - Involved parameters and passed values . . . 217
CLI Method - IPDU Configuration . . . 218
How to change the IPDU Password. . . 220
Accessing the AlterPath PM regular menu from the Console Session . . . 223
Using the Power Management Utility. . . 224
Manage Devices Plugged into a Single Outlet . . . 224
Manage Devices Plugged into Multiple Outlets . . . 227
To Manage Multiple IPDUs from the Command Line . . . 229
To Manage Power Through the Console . . . 230
Power Management for Authorized Users (firmware version prior to 2.2.0) . . . 236
Adding an user of the pmusers group . . . 236
Changing the group of an already existing user. . . 236
pm command . . . 238
Turning the outlet off . . . 240
Locking the outlets. . . 241
Retrieving the status of the outlets. . . 242
pmCommand command . . . 243
Listing the commands available for the AlterPath PM . . . 243
. . . 244
Cycling all the outlets . . . 244
Unlocking the outlets 1, 5 and 8 . . . 244
Retrieving the status of all outlets . . . 244
Turning the outlet off . . . 244
IPDU Firmware Upgrade . . . 246
Upgrade Process . . . 246
SNMP Proxy . . . 248
How to Configure . . . 248
Examples:. . . 249
Chapter 7 - PCMCIA Cards Integration
251
Supported Cards . . . 251
Tools for Configuring and Monitoring PCMCIA Devices . . . 251
Ejecting Cards . . . 251
PCMCIA Network devices configuration . . . 252
Ethernet PC cards . . . 252
VI Method . . . 252
Removing the configuration from a Ethernet PCMCIA device. . . 253
Wireless LAN PC Cards . . . 255
Removing the configuration from a wireless PCMCIA device . . . 256
CLI Method - Wireless PCMCIA . . . 256
Modem PC Cards . . . 258
VI Method . . . 258
Establishing a Callback with your Modem PC Card . . . 259
CLI Method - Modem PCMCIA . . . 262
GSM Card Configuration . . . 264
VI Method . . . 264
CLI Method . . . 264
CDMA Card Configuration . . . 266
vi Method . . . 266
CLI Method . . . 267
ISDN PC Cards . . . 269
VI Method . . . 269
Establishing a Callback with your ISDN PC Card . . . 270
Establishing a Callback with your ISDN PC Card (2nd way) . . . 272
CLI Method - ISDN PCMCIA. . . 274
Media Cards . . . 276
How it works . . . 276
VI Method - Configuration . . . 277
CLI Method - Media Cards PCMCIA . . . 279
How to Save/Load Configuration to/from CF/IDE. . . 279
CLI Method: backupconfig . . . 281
Generic Dial-Out. . . 281
Configuring the generic-dial.conf . . . 282
Configuring Generic Dial-Out . . . 283
Chapter 8 - Profile Configuration
289
The pslave.conf file . . . 289
pslave.conf common parameters. . . 289
CS1001 only: . . . 297
pslave.conf CAS (Console Access Server) parameters . . . 299
pslave.conf TS (Terminal Server) parameters . . . 309
pslave.conf Dial-in parameters . . . 311
pslave.conf Bidirectional Telnet parameters. . . 312
To configure Bidirectional Telnet . . . 313
CLI Method . . . 313
To configure a menu shell . . . 314
General State Parameters: . . . 314
Other State Parameters: . . . 315
Examples for configuration testing . . . 316
Console Access Server . . . 316
Terminal Server. . . 318
Dial-in Access . . . 320
Chapter 9 - Additional Features and Applications
323
Windows 2003 Server Management . . . 323
How it works . . . 323
How to Configure . . . 329
VI mode - Parameters Involved and Passed Values . . . 330
Server Commands . . . 333
IPMI Configuration . . . 335
How it works . . . 335
IPMI [ipmitool] . . . 335
Line Printer Daemon . . . 339
CAS Port Pool . . . 341
How to Configure it . . . 341
VI method . . . 341
Billing . . . 344
General Feature Description . . . 344
How to configure it . . . 344
VI method - Passed Values and Involved Parameters . . . 344
How it works . . . 345
Disk Space Issue . . . 345
Billing Wizard . . . 346
How to Configure . . . 346
To configure a port for billing . . . 346
Appendix A - New User Background Information
349
User and Passwords. . . 349
Who is logged in and what they are doing . . . 350
Linux File Structure . . . 350
Basic File Manipulation . . . 351
The Routing Table . . . 353
Secure Shell Session . . . 354
The Session Channel Break Extension . . . 355
How it works in SSH Client . . . 356
Configuring the Session Channel Break Extension in SSH Server . . . 356
The Process Table . . . 357
TS Menu Script . . . 358
Appendix B - Upgrades and Troubleshooting
361
Upgrades . . . 361
The Upgrade Process . . . 361
CLI Method - Firmware Upgrade . . . 363
Troubleshooting . . . 364
Flash Memory Loss. . . 364
Hardware Test . . . 365
Port Test. . . 366
To start the Port test, . . . 366
Port Conversation . . . 367
Test Signals Manually . . . 367
Single User Mode . . . 368
Using a different speed for the Serial Console . . . 369
Setting the Maximum Number of Bytes Received by the Interface . . . 370
To set a limit of bytes received by the interface per second:. . . 370
LEDs . . . 372
CPU LEDs. . . 372
Rear Panel LEDs. . . 372
Ethernet Connector . . . 372
Console Connector. . . 373
Serial Connector . . . 373
Administration parameters in the CLI interface . . . 373
Boot configuration parameters: . . . 373
Administration Menu: . . . 373
Appendix C - Cabling and Hardware Information
375
General Hardware Specifications . . . 375
The RS-232 Standard . . . 377
Connectors. . . 379
Straight-Through vs. Crossover Cables . . . 380
Which cable should be used? . . . 380
Cable Diagrams . . . 380
Cable Packages . . . 382
Cable #1: BLACK BOX® RJ-45 to DB-25 Male, straight-through. . . 382
Cable #2: BLACK BOX® RJ-45 to DB-25 Female/Male, crossover . . . 382
Cable #3: BLACK BOX® RJ-45 to DB-9 Female, crossover . . . 382
Cable #4: BLACK BOX® RJ-45 to BLACK BOX® RJ-45, straight-through . 383
Cable #5: BLACK BOX®/Sun Netra Cable. . . 383
Adapters . . . 384
Loop-Back Connector for Hardware Test . . . 384
BLACK BOX®\Sun Netra Adapter . . . 385
RJ-45 Female to DB-25 Male Adapter . . . 385
RJ-45 Female to DB-25 Female Adapter . . . 385
RJ-45 Female to DB-9 Female Adapter . . . 386
LS1001A-only Cabling Information . . . 387
LS1001A Connectors . . . 387
LS1001A-only Cabling Information . . . 387
The RS-485 Standard . . . 387
Cable #1: Terminal Block to Terminal Block, crossover half duplex . . . 388
Cable #2: Terminal Block to Terminal Block, crossover full duplex . . . 388
Appendix D - Copyrights
391
Bash. . . 391
Bootparamd . . . 391
Busybox. . . 391
Cron. . . 391
DHCPCD. . . 391
Flex . . . 392
GNU . . . 392
HardHat Linux . . . 392
IPSec . . . 392
IPtables . . . 392
Linux Kernel . . . 392
Net-SNMP. . . 392
NTP . . . 392
OpenSSH. . . 393
OpenSSL . . . 393
PAM . . . 393
Portslave . . . 393
RSYNC . . . 393
Syslog-ng . . . 393
Tinylogin. . . 393
UCD-SNMP . . . 394
WEBS . . . 394
ZLIB . . . 394
Glossary 395
Authentication . . . 395
Break Signal. . . 395
Console Access Server (CAS) . . . 395
Console Port. . . 395
Cluster . . . 395
Flash. . . 395
In-band network management . . . 395
IP packet filtering. . . 396
KVM Switch (KVM) . . . 396
Mainframe . . . 396
MIBs . . . 396
Out-of-band network management . . . 396
Off-line data buffering . . . 396
Profile. . . 396
RADIUS. . . 396
RISC. . . 397
RS-232 . . . 397
Secure Shell (SSH) . . . 397
Server Farm . . . 397
Shadow Password . . . 397
SNMP. . . 397
Telnet . . . 398
Terminal Server . . . 398
TTY . . . 398
U Rack height unit . . . 398
...
Preface
Preface
1.1 Purpose
This Reference Guide covers configuration and administration of the BLACK BOX® Advanced Console Server using vi and CLI (Command Line Interface) methods. VI is a text editor for UNIX type systems, therefore related configuration involves editing text files. All available features in the Advanced Console Server can be configured using the vi editor. For each configuration method, the feature have an indicator where the configuration is done using the vi editor or the CLI interface (when available). For further information about how to use the vi editor, consult Appendix A - New User Information.
1.2 Audience and User Levels
This command reference guide is intended for the users who are responsible for the deployment and day-to-day operation and maintenance of the CS. It assumes that the reader understands networking basics and is familiar with the terms and concepts used in Local and Wide Area Networking. UNIX and Linux users will find the configuration process very familiar. It is not necessary to be a UNIX expert, to get the Advanced Console Server up and running. There are two audiences or user levels for this manual:
New Users
These are users new to Linux and/or UNIX with a primarily PC/Microsoft background. You might want to brush up on such things as common Linux/UNIX commands and how to use the vi editor prior to attempting installation and configuration. This essential background information appears in “Appendix A - New User Background Information” on page 349. It is recommended that New Users configure the CS using a Web browser following the User’s Guide that is totally based on the Web Interface. However, new users can also configure the CS with vi or the Command Line Interface (CLI).
Power Users
These are UNIX/Linux experts who will use this manual mostly for reference. Power Users can choose between configuring the Advanced Console Server via Web browser, vi, or CLI.
The Advanced Console Server is based on an embedded Linux operating system.
Configurations are done using the vi text editor or the Command Line Interface
(CLI). If you are f new to Linux, it is advisable to refer to the BLACK BOX® CS
Installation, Administration, and User’s Guide, which is focused on the CS Web
Manager.
Appendix A - New User Background Information has a section dedicated to the vi
text editor and its commands.
1.3 How to use the CLI (Command Line Interface)
Throughout the manual a number of features can be configured using the CLI interface instead of the vi editor. The CLI, or Command Line Interface tool is preferred by many network and system administrators since it allows for automation of configuration through scripting and provides a simple way to document and record a systems configuration. This section introduces the CLI tool and provides information on how to use the interface.
Modes of Operation
1. Interactive mode - commands will be read from standard input. 2. File batch mode - commands will be taken from a file (-f <file>).
3. Batch mode - commands will be taken from the command line arguments
•
Each invocation of the CLI should return a value to the shell indicating success or failure of the command.•
Each invocation of the CLI should return a text string if any error occurred. If the command is successful then no text is returned.For example, from the CS prompt, to change the hostname you can directly do:
[root@CAS root]#/bin/CLI config network hostsettings hostname <host_name>
Both modes are oriented by keywords that allow the moving from one state to another. Each state will have a specific set of keywords attached to it.
IMPORTANT: Strings with spaces in CLI Batch Mode must be quoted with single and double
quotes. To enter strings with spaces using the Batch Mode the user must type '"<string1
string2>"' . Example:
# CLI config network hostsettings banner "'Welcome to CS'"
Keywords meanings
1. Changing from one state to another. For example: entering in configuration mode or exiting from configuration mode. Once the CLI goes to one state it will remain in this state until another keyword is entered to change the state.
2. Specifying a function or an action to be performed. For example: Apply changes (runconfig), Save changes into flash (savetoflash), back up configuration script (backupconfig), upgrade firmware (upgradefw), connect to a console (console), etc. 3. Specifying a set of parameters to be configured. For example:
cli> config security
4. Specifying a parameter to be changed. For example:
cli> network hostsettings hostsettings> dhcp yes
Interactive Mode
The CLI has some features in order to easy its use. All of them are described in the lines below:
1. AutoComplete of keywords using the tab key. 2. Cursor movement keys:
•
<Ctrl> a - Move to the start of the current line.•
<Ctrl> e - Move to the end of the line.•
<Ctrl> b - Move back a character (same as <left arrow key>).•
<Ctrl> f - Move forward a character (same as <right arrow key).•
<Esc> b - Move back to the start of the current or previous word. Words are composed of letters and digits.•
<Esc> f - Move forward to the end of the next word. Words are composed of letters and digits.•
<Ctrl> l - Clear the screen and redraw the current line, leaving the current line at the top of the screen.3. Command History keys:
•
<Ctrl> n - Move `forward' through the history list, fetching the next command (same as <down arrow key>).•
<Ctrl> p - Move `back' through the history list, fetching the previous command (same as <up arrow key>)The command history buffer is only available for the last 500 commands in the current session. The history is cumulative, so terminating the session will not clear the buffer. This means a user can login to the CLI and go back over the commands entered by a previous user.
4. Changing text keys:
•
<Ctrl> d - Delete the character under the cursor (same as <delete key>)•
<Ctrl> h - Same as <Backspace key>•
<Ctrl> k - Kill the text from the cursor to the end of the line.•
<Ctrl> u - Kill backward from the cursor to the beginning of the current line.•
<Ctrl> w - Kill the word behind point.•
<Esc> d - Kill from point to the end of the current word, or if between words, to the end of the next word•
<Esc> <tab> - This displays the current value of the parameter keyword entered. You can then edit the valueFor example: To display the current value for domain and edit it.
cli> config network hostsettings
You see:
hostsettings> domain blackbox.com
5. Special Keywords
These words are global and can be used in any state. For these special keywords to work, they must be entered first before the rest of the keywords for that state, or they must be the only word in the command line.
•
quit - It finishes the CLI session.•
return - It goes back to the previous state.•
info - This shows the help info available for the current state. For example, user can enter the network more and type ‘info’ and a brief overview about network configuration may be presented. Or he can type ‘info config network’ from thecli> prompt. Depending on the screen size of the user’s current shell, users may page through the info. If the info text lines exceeds the number of lines capable of being shown in the screen, the user will get the option to type ‘m’ for more, ‘b’ for back, or ‘q’ for quit.
•
show - Display the configuration parameter(s). It's valid only in configuration state. For example, the following displays some configurations for port 1.cli> config physicalports 1 Ports[1]> show general general: alias: protocol: consoletelnet speed: 9600 flow: none parity: none datasize: 8 stopbits: 1
CLI arguments and its meanings
When calling the CLI interface by typing CLI in the shell prompt, you can pass some arguments to it. Here is a brief description
•
-q - suppresses the output of error messages from the CLI.•
-t <time> - the timeout in minutes. Default 10 minutes.•
-T - disable idle timeout. Same as "-t 0"•
-s - save changes to flash (same as savetoflash keyword) (batch mode only)•
-r - activate changes (same as runconfig keyword) (batch mode only)•
-f<filename> - executes the commands in the file <filename>Other important features of the CLI
1. Only one user logged in as “root” or “admin” can have an active CLI or Web Manager session. A second user who connects through the CLI or the Web Manager
as the “root” or “admin” has a choice to abort the session or close the other user’s session.
If there are cron jobs running through automated scripts, a “root” or “admin” user login can
cause the automated cron jobs to fail. Make sure that the users with administrative privileges
are aware of this.
2. CLI has 3 possible user levels:
•
Root user (Linux root user) - Has access to the full functionality of the CLI. Has ‘shell’ command in the CLI that allows the user to have access to the CS Linux shell prompt. (See note below)•
Admin - Has access to the full functionality of the CLI except for the ‘shell’ command. So an admin user will not be able to have access to the CS Linux shell prompt. (See note below)•
Regular user - Has access to a limited functionality of the CLI. Only has access tocli->applications functionality.
NOTE:
Users can change the login shell in /etc/passwd to execute /bin/CLI so that they will
get the CLI right away when they log into the
CS. If user, root, is configured to have /bin/CLI
as their default shell, he/she can still have access to the
CSshell prompt by executing the
command ‘shell’ from the CLI. Any other users who configured /bin/CLI as their default shell
won’t have the ‘shell’ command so they won’t be able to have access to the
CSshell prompt.
3. The CLI will generate syslog messages when the user open or close a session and for each command executed. Examples:
Apr 19 17:51:44 src_dev_log@swes-129 CLI[413]: User root starts a interactive CLI session.
cli>config
Apr 19 16:18:02 src_dev_log@swes-129 CLI[412]: User root executed [config]config>Apr 19 16:28:02 src_dev_log@swes-129 CLI[412]: Session closed due idletimeout
Apr 19 17:54:23 src_dev_log@swes-129 CLI[413]: User root executed [quit] Apr 19 17:54:23 src_dev_log@swes-129 CLI[413]: User root finishes the CLI session
4. The CLI will write every command executed in interactive mode in the file "~/.history". This file will keep the last 1000 commands executed in any CLI session.
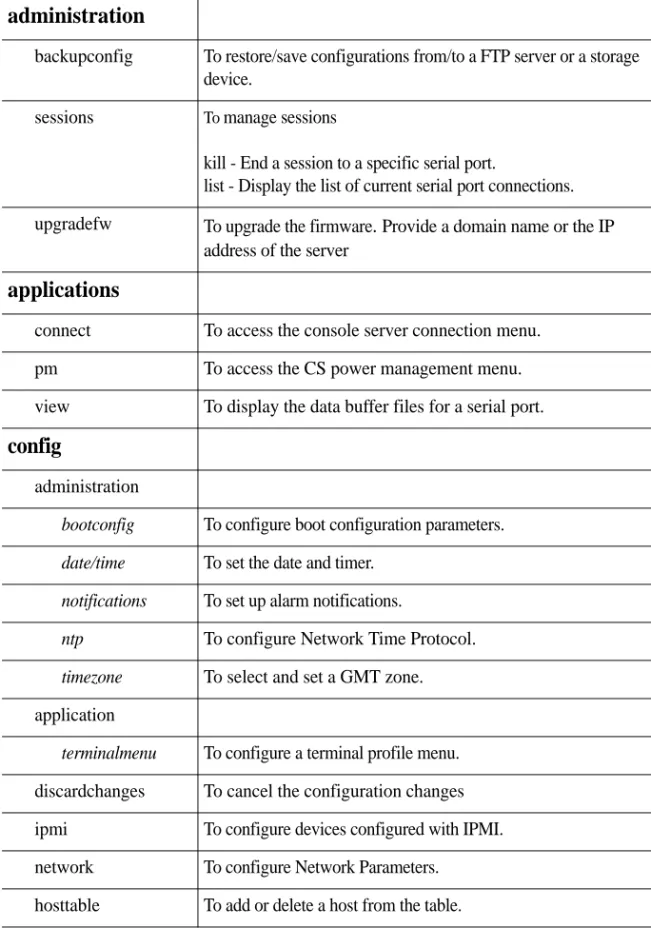
List of CLI Keywords
Table 1.1: CLI Keywords
administration
backupconfig To restore/save configurations from/to a FTP server or a storage device.
sessions To manage sessions
kill - End a session to a specific serial port.
list - Display the list of current serial port connections. upgradefw To upgrade the firmware
.
Provide a domain name or the IPaddress of the server
applications
connect To access the console server connection menu.
pm To access the CS power management menu.
view To display the data buffer files for a serial port.
config
administration
bootconfig To configure boot configuration parameters. date/time To set the date and timer.
notifications To set up alarm notifications.
ntp To configure Network Time Protocol.
timezone To select and set a GMT zone.
application
terminalmenu To configure a terminal profile menu. discardchanges To cancel the configuration changes ipmi To configure devices configured with IPMI. network To configure Network Parameters. hosttable To add or delete a host from the table.
pcmcia To configure supported PCMCIA cards.
snmp To configure SNMP server.
stroutes To setup routes manually for data routing to other subnets. syslog To setup a syslog server for logging system messages.
vpn To setup a VPN connection.
physicalports To configure serial ports individually or collectively. restorefromflash To restore the configuration saved in flash. savetoflash To save the configuration changes to flash
security To configure security profiles and authentication servers. virtualports To cascade multiple CS console servers.
portStatus
To display the status on all serial ports.shell
To open the command shell.version To display the CLI version
runconfig
To activate the changes.info
To display a brief description on the current CLI parameter.quit
To exit the CLI mode.return
To go up one level in the CLI menu structure.show
To display the current configuration information.1.4 How to use this Guide
This guide is organized into the following sections:
•
Basic Network Configuration describes the basic configuration procedures to make the Advanced Console Server operational and available on the network. It includes configuring the network parameters, logging in and selecting a security profile.•
Device Access contains the ways to access the serial ports, depending on the protocol you configured for that serial port. This chapter also has information about clustering, menu shell and data buffering.•
Authentication provides configuration instructions for different types of authentication available in the CS. This chapter includes detailed information about the Linux-PAM module and Shadow Passwords.•
Network all configuration related to network is explained in this chapter. This chapter approaches since basic configuration until the most the most advanced ones such as filters and VPN.•
Administration
contains system’s management, administration and maintenance related features.•
Power Management with AlterPath™ PM Integration involves features for those who have an IPDU being controlled by the CS.•
PCMCIA Cards Integration this chapter has information about compatible PCMCIA cards and the respective instructions to make them work with the CS.•
Profile Configuration approaches the main configuration file of the unit. This chapter explains each parameter of the pslave.conf file. It also has step by step examples for TS, CAS and RAS profiles.•
Additional Features and Applications has information about special features and step by step instructions on how to set up them.•
Appendix A - New User Background Information contains information for those who are new to Linux/UNIX.•
Appendix B - Upgrades and Troubleshooting covers the most common problems that users faces when using the CS.•
Appendix C - Cabling and Hardware Information Information has detailed information and pinout diagrams for cables used with the CS.•
Appendix D - Copyrights lists details about applications that were incorporated into the product.1.5 Conventions and Symbols
This section explains the significance of each of the various fonts, formatting, and icons that appear throughout this guide.
Fonts
This guide uses a regular text font for most of the body text and Courier for data that you would input, such as a command line instruction, or data that you would receive back, such as an error message. An example of this would be:
# telnet 200.200.200.1 7001
Hypertext Links
References to another section of this manual are hypertext links that are underlined (and are also blue in the PDF version of the manual). When you click on them in the PDF version of the manual, you will be taken to that section.
Glossary Entries
Terms that can be found in the glossary are
underlined and slightly larger
than the rest of the text. These terms have a hypertext link to the glossary.Quick Steps
Step-by-step instructions for installing and configuring the CS are numbered with a summarized description of the step for quick reference. Underneath the quick step is a more detailed description. Steps are numbered 1, 2, 3, etc.
For example:
Step 1 - Modify the pslave.conf file.
You will modify four Linux files to let the CS know about its local environment. Open the file plsave.conf and add the following lines...
Parameter Syntax
This manual uses standard Linux command syntaxes and conventions for the parameters described within it.
Brackets and Hyphens (dashes)
The brackets ([])indicate that the parameter inside them is optional, meaning that the command will be accepted if the parameter is not defined. When the text inside the brackets starts with a dash (-) and/or indicates a list of characters, the parameter can be one of the letters listed within the brackets.
Example:
iptables [-ADC] chain rule-specification [options]
Ellipses
Ellipses (...) indicate that the latest parameter can be repeated as many times as needed. Usually this is used to describe a list of subjects.
Example:
ls [OPTION]...[FILE]...
Pipes
The pipe (|) indicates that one of the words separated by this character should be used in the command.
Example:
netstat {--statistics|-s} [--tcp|-t] [--udp|-u] [--raw|-w]
When a configuration parameter is defined, the Linux command syntax conventions will be also used, with a difference.
Greater-than and Less-than signs
When the text is encapsulated with the “<>” characters, the meaning of the text will be considered, not the literal text. When the text is not encapsulated, the literal text will be considered.
Spacing and Separators
The list of users in the following example must be separated by semicolons (;); the outlets should be separated by commas (,) to indicate a list or with dashes(-) to indicate range; there should not be any spaces between the values.
sXX.pmusers: The user access list. For example: jane:1,2;john:3,4. The format of this field is:
where <outlet list>'s format is:
[<outlet number>|<outlet start>-<outlet end>][,<outlet number>|<outlet start>-<outlet end>]...
Cautionary and Instructional Information
Note boxes contain instructional or cautionary information that the reader especially needs to bear in mind. There are three levels of information:
WARNING:
A very important type of tip or warning. Do not ignore this information.
IMPORTANT:
An important tip that should be read. Review all of these notes for critical
information.
...
Chapter 1
Basic Network Configuration
This chapter describes the procedures for setting up the basic network configuration to make the CS available on the network. In addition, it provides procedures to login, change the default password, and setup the security profile.
Configuring network setting using the vi method or the CLI method are described in Chapter 4, “Network” in detail.
1.1 Networking Settings
This following section describes how to configure the network parameters using the wiz
command, vi, or CLI where applicable. The instructions assume that you are installing a new Advanced Console Server in your network, or you are restarting an existing unit from factory default parameters.
Performing Basic Network Configuration Using the wiz Command
The following procedure assumes that a hardware connection is made between the CS’s console port and the COM port of a computer.Log Into CS Through the Console
From your terminal emulation application, log into the console port as root.
It is strongly recommended to change the default password “bb” before setting up the
CSfor
secure access to the connected servers or devices.
Password
Change the “root” password. The default /etc/passwd file has the user “root” with password “bb”. You should change the password for user “root” as soon as possible. To change any user password, run the command:
# passwd <user>
Security Advisory
The following Security Advisory appears the first time CS is powered on, or when the unit is reset to factory default parameters. After you have configured the basic network settings, a Security Profile must be selected before proceeding to other configuration procedures, such as user and port settings. See “Selecting A Security Profile” on how to configure a profile using CLI. See BLACK BOX® CS Installation, Administration, and User’s Guide for detailed information on security profiles and configuration options using the Web Manager.
CS login: root
Use the wiz Command to Configure Network Parameters
Step 1 - Launch the Configuration Wizard by entering the wiz command.
[root@CAS etc]# wiz
The system brings up a configuration wizard banner similar to the following figure and begins running the wizard.
Important - Security Advisory!
Console Management provides critical access to management features of
attached equipment. Please take the required precautions to understand the
potential impacts this device may have to your SECURITY policies.
From factory, this device is configured as follows:
• Single password for ROOT;
• All serial port DISABLED;
• DHCP, Telnet, SSHv1 & SSHv2, and HTTP & HTTPS enabled.
Black Box STRONGLY recommends:
1. To change the ROOT password before setting up the box for secure
access to the CS equipment.
2. That you SELECT A SECURITY PROFILE to complete the INITIAL
SETUP. Security is dependent on Policy and is Configurable to fit in
environments with varying levels of Security. Black Box provides three
pre-set Security Levels: SECURED, MODERATE and OPEN, and in addition,
the ability to set a CUSTOM Security Profile.
3. Do not leave the equipment idle WITHOUT selecting a SECURITY
PROFILE.
4. To ENABLE Serial Ports and CONFIGURE them using Web UI or CLI.
Refer to the Quick Start Guide or the User's Guide for Security Profile
selection details and Serial Port configuration.
Set to defaults? (y/n) [n]:
Step 2 - At the prompt, enter n to change the defaults.
Step 3 - Press Enter to accept the default hostname, otherwise enter your own hostname.
Step 4 - Press Enter to keep DHCP enabled, or enter “n” to specify a static IP address for CS.
By default, CS uses the IP address provided by the DHCP server. If your network does not use DHCP, then CS will default to 192.168.160.10.
Step 5 - Change the default static IP address, see your network administrator to obtain a valid IP address.
**********************************************
*****C O N F I G U R A T I O N W I Z A R D**
**********************************************
Current configuration:
Hostname: CAS
DHCP: disabled
System IP: 192.168.48.11
Domain name: blackbox.com
Primary DNS Server: 192.168.44.21
Second DNS Server: #
Gateway IP: 192.168.48.1
Network Mask: 255.255.252.0
Set to defaults? (y/n) [n]:
Set to defaults (y/n)[n]: n
Hostname [CAS]: fremont_branch_CS
Do you want to use DHCP to automatically assign an IP for your system? (y/n) [n] :
Step 6 - Enter the domain name.
Step 7 - Enter the IP address for the Primary DNS (domain name) server.
Step 8 - Enter the IP address for the gateway.
Step 9 - Enter the netmask for the subnetwork.
The network configuration parameters appear.
Step 10 - Enter y after the prompts shown in the following screen example.
Step 11 - To confirm the configuration, enter the ifconfig command. Domain name[blackbox.com]: domain_name
Primary DNS Server[192.168.44.21]: DNS_server_IP_address
Gateway IP[eth0]: gateway_IP_address
Network Mask[#] : netmask
Are all these parameters correct? (y/n)[n]: y
Do you want to activate your configurations now? (y/n)[y]: y
1.2 Selecting A Security Profile
A security profile must be selected before proceeding further with configuration of CS. For detailed information on security profiles see BLACK BOX® CS Installation, Administration, and User’s Guide.
To Select a Security Profile
Select a pre-defined Security Profile, or define a Custom profile for specific services. The available profiles are:
•
Secured: Disables all protocols except SSHv2, HTTPS, and SSH to Serial Ports.•
Moderate: Enables SSHv1, SSHv2, HTTP, HTTPS, Telnet, SSH and Raw connections to Serial Ports, ICMP, and HTTP redirection to HTTPS.•
Open: Enables all services, Telnet, SSHv1, SSHv2, HTTP, HTTPS, SNMP, RPC, ICMP and Telnet, SSH and Raw connections to Serial Ports.•
Default: Sets the profile to the same configuration as Moderate.•
Custom: Enable or disable individual protocols and services, and configure access to ports.CLI Mode
Step 1 - Enter the CLI mode [root@CAS etc]# CLI
Step 2 - At the prompt enter the following string.
cli > config security profile
The following commands are available under the “profile” prompt. profile>
Step 3 - To configure a Default, Moderate, or Secured pre-defined security profile, enter the following string.
profile> <moderate> or,
profile> <secured> or,
profile> <default>
custom info open return show default moderate quit secured
Step 4 - To configure a custom security profile, navigate to the custom menu.
profile > custom
Step 5 - From the custom menu enable or disable desired protocols using the following syntax.
custom > [protocol] [yes/no]
To display the current configuration as shown in the following figure, enter: custom > show custom>show [custom] ftp: no telnet: no .[ssh] ..[ssh_x509] CA_file: hostkey: authorizedkeys: sshv1: yes sshv2: yes sshd_port: 22 root_access: yes snmp: no .[web] http: yes https: yes http_port: 80 https_port: 443 http2https: yes rpc: no ipsec: no icmp: yes .[ports] ssh2sport: yes telnet2sport: yes raw2sport: yes auth2sport: no bidirect: yes
1.3 Enabling Serial Ports
From the factory CS is configured with all serial ports disabled.
To Enable a Serial Port [vi method]
Step 1 - From the terminal window navigate to the portslave directory to edit the pslave.conf file.
[root@CAS /] cd /etc/portslave [root@CAS portslave]# vi pslave.conf
Step 2 - Navigate to Port-specific parameters to uncomment the sxx.tty and enable the serial ports.
# Port-specific parameters # s1.tty ttyS1 #s2.tty ttyS2 #s3.tty ttyS3 #s4.tty ttyS4 #s5.tty ttyS5 #s6.tty ttyS6 #s7.tty ttyS7 #s8.tty ttyS8
To Enable a Serial Port [CLI method]
Step 1 - Open the CLI interface by issuing the command: # CLI
Step 2 - To enable single or multiple serial ports enter the following command:
...
Chapter 2
Chapter 2 - Device Access
Device Access
This chapter will introduce all the possible ways to access the serial ports of the CS. From this point is considered that the unit is properly configured using one of the possible profiles (CAS or TS). More information about how to configure a profile can be found on Chapter 8 - Profile Configuration.
2.1 Accessing Serial Ports
There are four ways to access serial ports, depending on the protocol you configured for that serial port: setting all.protocol to socket_server for Telnet access, setting it to socket_ssh for SSH access, or setting it to socket_server_ssh both.
An administrator can access the serial port by statically addressing it (using TCP port number, alias name, or IP address) or by accessing the next free serial port available from an existent pool (by using the pool's TCP port number, alias or IP address).
Default Configuration Parameters
These are the default configuration settings:•
DHCP enabled (if there is no DHCP Server, IP for Ethernet is 192.168.160.10 with a Netmask of 255.255.255.0)•
CAS configuration•
socket_server in all ports (access method is Telnet)•
9600 bps, 8N1•
No AuthenticationOpening and closing a Telnet session to a serial port
To open a Telnet session to a serial port or the first free serial port belonging to a pool of serial ports,
issue the command:
# telnet <CAS hostname> <TCP port number>
where
•
<CAS hostname> is the hostname configured in the workstation where the Telnet client will run (through /etc/hosts or DNS table). It can also be just the IP address of the CS (Ethernet's interface) configured by the user or learned from DHCP.•
<TCP port number> is the number associated to the serial port or pool of serial ports. From factory, 7001 corresponds to serial port 1, 7002 to serial port 2 and so forth, and 3000 is a pool with all serial ports.To close the Telnet session, just press the Telnet hotkey configured in Telnet client application (usually it's "Ctrl]") and "q" to quit.
Opening and closing an SSH session to a serial port
To open a SSH session to a serial port or the next free serial port from a pool, issue the command:
# ssh -l <Username>:<Server> <CAS hostname>
•
<Username> is the user configured to access that serial port. It is present either in the local CAS database or in a Radius/Tacacs/LDAP/Kerberos, etc database.•
<Server> can be just the TCP port number assigned for that serial port (7001, 7002, etc), pool of ports (3000, etc), the alias for the server connected to that serial port or the alias of a pool of ports.•
<CAS hostname> is the hostname configured in the workstation where the SSH client will run (through /etc/hosts or DNS table). It can also be just the IP address of the CS (Ethernet's interface) configured by the user or learned from DHCP.To close the SSH session, press the hotkey defined for the SSH client followed by a “.” The default is "~."
Make sure you enter the escape character followed by a “.” at the beginning of a line to close
the SSH session.
Accessing Serial Ports using “ts_menu”
ts_menu is an application to facilitate connection to the serial ports. The following are the methods of executing the ts_menu command.
•
Calling ts_menu without specifying any arguments.•
Calling ts_menu with command line arguments•
Using CLI to call ts_menu.Calling ts_menu without arguments
To access the serial port (Telnet or SSH) using ts_menu, login to the CAS unit and, after receiving the shell prompt, run ts_menu. The servers (aliases) or serial ports will be shown as option to start a connection (Telnet/SSH). After typing ts_menu, you will see something similar to the following:
Serial Console Server Connection Menu for your Master Terminal Server 1 ttyS1 2 ttyS2 3 ttyS3 4 ttyS4
5 ttyS5 6 ttyS6 7 ttyS7 8 ttyS8
Calling ts_menu with arguments
Apart from calling ts_menu with no arguments (which directs the user to the traditional ts_menu interface) this application can be used with the following command line arguments:
ts_menu [-u<user>] [-l[c]] [-ro] [-s] [-auth] [<console port>]
The meaning of each argument is:
•
-u<user> - Invokes ts_menu as the user named by <user>. This requires a password to be entered. The user have access only to the authorized serial ports.•
-l[c] - Generates a list of all ports that the user has access to and terminates. Port aliases will be presented if defined. For the remote ports (clustering) if port alias is not defined they will be shown as "ip_addr:port" (ip_addr referring to the slave CS). The default is displaying ports in alphabetical order, but in case "c" flag is also specified the listing will be sorted by console server (master unit showing first).•
-ro - Invokes ts_menu in read only mode. It works even if the user is the only one logged to a certain port. In this mode, the user can connect to any port he has access to but cannot type in. He is in sniff mode. A message stating "Read only mode" is provided in case the user attempts to interact with that port. Note however that a real sniff session (the user isn't the first one to log to a certain port) is only allowed if he is authorized to.•
-s - Invokes ts_menu in a way that all ports (including slave CS’s) are presented in a single list sorted in alphabetical order. Not using this option causes the display to be as for the old implementation.•
-auth - For backward compatibility, this option makes the new ts_menuimplementation behave as the old one so that authentication is performed again to access each port.
•
<console port> - If issued, produces a direct connection to that port. In the case the user doesn't have access to that port or the port doesn't exist, the application returns a "console not found" message and terminates. <console port> can be the port alias or the port number. In case of clustering, port number must include a reference to the slave CS as "host:port" (where host is the slave hostname or IP address).Other options:
•
-p - Display TCP port•
-P - Use the TCP port instead of IP address•
-i - Display Local IP assigned to the serial port•
-s - Show the ports in a sorted order•
-u <name> - Username to be used in SSH/Telnet command•
-U - Always ask for an usernameHow to close the session from ts_menu (from the console of your unit)
To close the session from the ts_menu, follow the steps bellow:
Step 1 - Enter the escape character.
The escape character is shown when you first connect to the port. In character/text Mode, the Escape character is ^]
After entering the escape character, the following is shown: Console escape. Commands are:
•
l - go to line mode•
c - go to character mode•
z - suspend telnet•
b - send break•
t - toggle binary•
e - exit telnetStep 2 - Press “e” to exit from the session and return to the original menu.
Select the exit option and you will return to the shell prompt.
How to close the session from ts_menu (from a Telnet/SSH session to your unit)
You have to be sure that a different escape character is used for exiting your Telnet/SSH session; otherwise, if you were to exit from the session created through the ts_menu, you will close your entire Telnet session to your unit. To do this, when you first Telnet/SSH to your unit, use the -e option. So for example, to set Ctrl-? as the escape character, type:
# telnet -e ^? 192.168.160.10 # ssh -e ^? [email protected]
To exit from the session created through the ts_menu, just follow Step 1 from above. To exit from the entire Telnet session to your unit, type the escape character you had set. To exit from the entire SSH session to your unit, type the escape character you had set plus character "."(dot).
To close an SSH session the escape character followed by a “.” must be entered at the
beginning of a line.
CLI Mode - ts_menu
Step 1 - Open the CLI interface by issuing the command: # CLI
Step 2 - Call the menu.
To call the ts_menu, access the following menu:
cli> applications connect [Enter]
A screen similar to the following appears:
To see the “connect” options, at the following prompt press [tab] twice.
cli > applications > connect
The following options display.
consolename list readonly
To display a list of the available ports run the following command.
cli > applications > connect list
To connect to the console of a device in a read-only mode run the following command.
cli > applications > connect readonly consolename <consolename> The connection is made to the device and a “Read only mode” message is displayed.
To make a direct connection to the console of a device run the following command.
cli > applications > connect consolename <consolename>
Step 3 - Exiting the CLI mode.
To exit the CLI mode and return to CS’s shell, type the following command:
cli> quit
Serial Console Server Connection Menu for your Master Terminal Server 1 PM 2 ttyS3 3 ttyS4 4 ttyS5
5 ttyS6 6 ttyS7 7 ttyS8 8 ttyS9 9 ttyS10 10 ttyS11 11 ttyS12 12 ttyS13 13 ttyS14 14 ttyS15 15 ttyS16
Type 'q' to quit, 'b' to return to previous menu, a valid port[1-15], or anything else to refresh:
2.2 Data Buffering
Data buffering can be done in local files or in remote files through NFS. When using remote files, the limitation is imposed by the remote Server (disk/partition space) and the data is kept in linear (sequential) files in the remote Server. When using local files, the limitation is imposed by the size of the available ramdisk. You may wish to have data buffering done in file, syslog or both. For syslog, all.syslog_buffering and
conf.DB_facility are the parameters to be dealt with, and syslog-ng.conf file should be set accordingly. (Please see Syslog-ng for the syslog-ng configuration file.) For the file, all.data_buffering is the parameter to be dealt with.
Conf.nfs_data_buffering is a remote network file system where data buffering will be written, instead of using the default directory /var/run/DB. When commented, it indicates local data buffering. The directory tree to which the file will be written must be NFS-mounted and the local path name is /mnt/DB_nfs. The remote host must have NFS installed and the administrator must create, export, and allow reading/writing to this directory. The size of this file is not limited by the value of the parameter s1.data_buffering, though the value cannot be zero since a zero value turns off data buffering.
The conf.nfs_data_buffering parameter format is:
<server name or IP address>:<remote pathname>
If data buffering is turned on for port 1, for example, the data will be stored in the file ttyS1.data in local directory /var/run/DB or in remote path name and server indicated by conf.nfs_data_buffering.
Ramdisks
Data buffering files are created in the directory /var/run/DB. If the parameter
s<nn>.alias is configured for the port <nn>, this name will be used. For example, if the alias is called bunny, the data buffering file will be named bunny.data.
Linear vs. Circular Buffering
For local data buffering, this parameter allows users to buffer data in either a circular or linear fashion. Circular format (cir) is a revolving buffer file that is overwritten whenever the limit of the buffer size (set by all.data_buffering) is reached. In linear format (lin), data transmission between the remote device and the serial port ceases once the 4k bytes Rx buffer in the kernel is reached. Then if a session is established to the serial port, the data in the buffer is shown (all.dont_show_DBmenu or
sxx.dont_show_DBmenu must be 2), cleared, and data transmission is resumed. Linear buffering is impossible if flow control is set to none. Default is cir.
How to Configure
VI mode - Parameters Involved and Passed Values
To configure Data Buffering, follow the steps bellow:
Step 1 - Open the /etc/portslave/pslave.conf file.
All parameters related to Data Buffering are in the pslave.conf file. Change the desired parameters according to the table below:
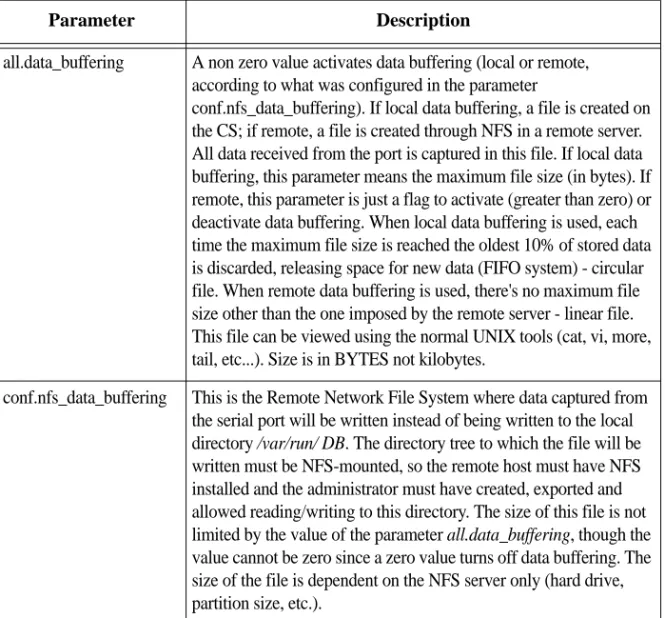
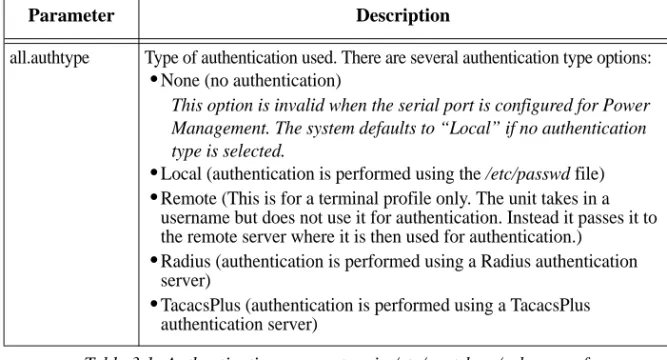
Parameter Description
all.data_buffering A non zero value activates data buffering (local or remote, according to what was configured in the parameter
conf.nfs_data_buffering). If local data buffering, a file is created on the CS; if remote, a file is created through NFS in a remote server. All data received from the port is captured in this file. If local data buffering, this parameter means the maximum file size (in bytes). If remote, this parameter is just a flag to activate (greater than zero) or deactivate data buffering. When local data buffering is used, each time the maximum file size is reached the oldest 10% of stored data is discarded, releasing space for new data (FIFO system) - circular file. When remote data buffering is used, there's no maximum file size other than the one imposed by the remote server - linear file. This file can be viewed using the normal UNIX tools (cat, vi, more, tail, etc...). Size is in BYTES not kilobytes.
conf.nfs_data_buffering This is the Remote Network File System where data captured from the serial port will be written instead of being written to the local directory /var/run/ DB. The directory tree to which the file will be written must be NFS-mounted, so the remote host must have NFS installed and the administrator must have created, exported and allowed reading/writing to this directory. The size of this file is not limited by the value of the parameter all.data_buffering, though the value cannot be zero since a zero value turns off data buffering. The size of the file is dependent on the NFS server only (hard drive, partition size, etc.).
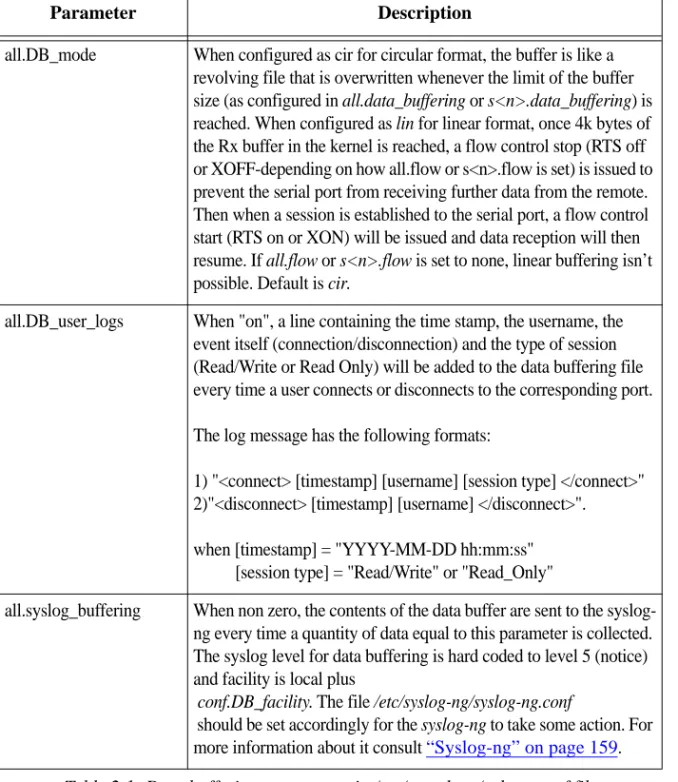
all.DB_mode When configured as cir for circular format, the buffer is like a revolving file that is overwritten whenever the limit of the buffer size (as configured in all.data_buffering or s<n>.data_buffering) is reached. When configured as lin for linear format, once 4k bytes of the Rx buffer in the kernel is reached, a flow control stop (RTS off or XOFF-depending on how all.flow or s<n>.flow is set) is issued to prevent the serial port from receiving further data from the remote. Then when a session is established to the serial port, a flow control start (RTS on or XON) will be issued and data reception will then resume. If all.flow or s<n>.flow is set to none, linear buffering isn’t possible. Default is cir.
all.DB_user_logs When "on", a line containing the time stamp, the username, the event itself (connection/disconnection) and the type of session (Read/Write or Read Only) will be added to the data buffering file every time a user connects or disconnects to the corresponding port. The log message has the following formats:
1) "<connect> [timestamp] [username] [session type] </connect>" 2)"<disconnect> [timestamp] [username] </disconnect>". when [timestamp] = "YYYY-MM-DD hh:mm:ss" [session type] = "Read/Write" or "Read_Only"
all.syslog_buffering When non zero, the contents of the data buffer are sent to the syslog-ng every time a quantity of data equal to this parameter is collected. The syslog level for data buffering is hard coded to level 5 (notice) and facility is local plus
conf.DB_facility. The file /etc/syslog-ng/syslog-ng.conf
should be set accordingly for the syslog-ng to take some action. For more information about it consult “Syslog-ng” on page 159.
Parameter Description