V
ERSION7.5.3, R
EVISIONA
M
ARCH2004
No part of this publication may be stored in a retrieval system, transmitted, or reproduced in any way, including but not limited to photocopy, photographic, magnetic, or other record, without the prior agreement and written permission of Siebel Systems, Inc.
Siebel, the Siebel logo, TrickleSync, TSQ, Universal Agent, and other Siebel product names referenced herein are trademarks of Siebel Systems, Inc., and may be registered in certain jurisdictions.
Other product names, designations, logos, and symbols may be trademarks or registered trademarks of their respective owners.
U.S. GOVERNMENT RESTRICTED RIGHTS. Programs, Ancillary Programs and Documentation, delivered subject to the Department of Defense Federal Acquisition Regulation Supplement, are “commercial computer software” as set forth in DFARS 227.7202, Commercial Computer Software and Commercial Computer Software Documentation, and as such, any use, duplication and disclosure of the Programs, Ancillary Programs and Documentation shall be subject to the restrictions contained in the applicable Siebel license agreement. All other use, duplication and disclosure of the Programs, Ancillary Programs and Documentation by the U.S. Government shall be subject to the applicable Siebel license agreement and the restrictions contained in subsection (c) of FAR 52.227-19, Commercial Computer Software - Restricted Rights (June 1987), or
FAR 52.227-14, Rights in Data—General, including Alternate III (June 1987), as applicable. Contractor/licensor is Siebel Systems, Inc., 2207 Bridgepointe Parkway, San Mateo, CA 94404.
Proprietary Information
Siebel Systems, Inc. considers information included in this documentation and in Siebel eBusiness Applications Online Help to be Confidential Information. Your access to and use of this Confidential Information are subject to the terms and conditions of: (1) the applicable Siebel Systems software license
agreement, which has been executed and with which you agree to comply; and (2) the proprietary and restricted rights notices included in this documentation.
Siebel Email Marketing Stand-Alone User Guide 1
Introduction
How This Guide Is Organized . . . 12
Additional Documentation . . . 15
Revision History . . . 16
Chapter 1. About Email Delivery
Understanding Email Delivery . . . 17Email Delivery—One to One . . . 17
Email Delivery—One to Many . . . 18
About Siebel Email Marketing Stand-Alone . . . 18
Siebel Email Marketing Stand-Alone Architecture Overview . . . 18
Multitenancy . . . 21
Siebel Email Marketing Network . . . 21
Connecting to the Siebel Email Marketing Network . . . 22
Log Files . . . 23
Siebel Email Marketing Stand-Alone API . . . 23
Technical Support . . . 24
Chapter 2. Siebel Email Marketing Stand-Alone Quick Start
Step 1—Select Recipients . . . 25Step 2—Provide Content . . . 26
Content Type Character Set . . . 28
Step 3—Define Appearance . . . 28
Step 4—Preview Mailing . . . 30
Step 5—Send the Mailing . . . 31
Chapter 3. Logging In
The Login Screen . . . 34About Default Email Addresses and Passwords . . . 34
The Password Finder . . . 35
Update User . . . 35
Chapter 4. Setting Up a Database
The Database Setup Screen . . . 38Add a Database . . . 38
Mail Modes . . . 39
Edit Database Properties . . . 40
Remove a Database . . . .41
Chapter 5. Setting up a List
Internal Versus External Lists . . . 44Creating a List . . . 44
Configuring a List . . . 46
The General Configuration Screen . . . 46
The Archives Screen . . . 49
The Posting Screen . . . 50
The Errors Screen . . . 52
The Subscriptions Screen . . . 52
The People Screen . . . 53
The Digests Screen . . . 56
The Appearance Screen . . . 57
Add Subscribers to a List . . . 61
Remove Subscribers from a List . . . 63
Bounce Handling . . . 63
Introduction . . . 63
Configure a List for Bounce Handling . . . 64
Chapter 6. Setting up a Query
What is a Query? . . . 70Query Versus List . . . 70
The Query Setup Screen . . . 70
Define a Query . . . 71
The Query Wizard . . . 72
Who Should Use the Query Wizard . . . 73
Step 1—Select a Table . . . 73
Step 2—Select a Column . . . 73
Step 3—Choose Clause Values . . . 75
Step 4—View the Preview List . . . 82
Edit a Query . . . 83
Remove a Query . . . 83
Chapter 7. Content Generation
Template Variables . . . 86Template Commands . . . 88
$(if) . . . 89
$(header) . . . 92
Named Blocks . . . 92
Tracked URLs . . . 96
$(trackMsgOpen) . . . 97
Quick Click Subscribe/Unsubscribe . . . 97
Chapter 8. Populating Template Variables
Template Variables and Aliases . . . 106
Conditional Template Variables with an External Database . . . 109
Limitations . . . 112
Chapter 9. URL Tracking
Create a New Public Web Server . . . 114Associate List(s) with the New Public Web Server . . . 115
Alter Message Content with Tracked URLs . . . 116
Parameters on URLs . . . 118
Dynamic Tracked URLs . . . 119
The $(trackMsgOpen) Template Command . . . 120
Send Your Message . . . 120
Chapter 10. Sending a Mailing
Selecting Recipients . . . 121Providing Content . . . 125
Defining Appearance . . . 128
Preview the Mailing . . . 129
Sending the Mailing . . . 131
Sending Mailings with Internationalized Content . . . 132
External Files of Recipients . . . 133
Providing Content . . . 133
Defining Appearance . . . 133
Scheduled Recurring Mailings . . . 134
Chapter 11. Mailing Control
Chapter 12. Reporting
Mailing Delivery Status . . . 146
Statistical Analysis . . . 148
The Mailing Report . . . 148
The Campaign Report . . . 155
The Subscriber Report . . . 157
Chapter 13. An Overview of Message Types
Why is Message Type Important? . . . .161What Types of Message Formats Are Available? . . . 162
Plain Text . . . 162
HTML . . . 162
America Online (AOL) . . . 163
Multipart MIME (Text & HTML) . . . 164
Wireless . . . 165
Determining the Format to Use . . . 165
Chapter 14. The Basics of Email Campaign Development
Overview . . . 167Where to Begin . . . 167
Determine the Goals of Your Campaign . . . 168
Determine Your Target Market . . . 168
Determine Your Call(s) to Action . . . 168
Develop Your Privacy Policy and Anti-Spam Policies . . . 169
Choose Your List . . . 169
The Importance of Permission . . . 170
Determine Your Content . . . 171
Determine Who Will Manage Your Creative . . . 172
Decide on a Sending Method . . . 172
How Many Mailings Will Be in Your Campaign? . . . 173
Implement Response Tracking . . . 173
Organize Internal Resources for Handling Responses . . . 174
Plan for Unsubscribes and Bounced Messages . . . 174
Develop a Message Testing Plan . . . 175
Manage Your Expectations . . . 175
Chapter 15. How to Build Effective Email Messages
Set Objectives . . . 177Designing the Email . . . 178
Compose the Email . . . 178
The Envelope . . . 179
The Title Bar . . . 180
The Greeting . . . 180
The Body . . . 180
The Offer . . . 180
The Footer . . . 180
Test Your Message . . . 181
Analyze Your Message . . . 181
Build On Your Success . . . 182
Chapter 16. How to be Opt-In Compliant
What is Spam . . . 183What is Not Spam . . . 184
Why You Do Not Want to Spam . . . 184
What to Do if You are Labeled as a Spammer . . . 187
Chapter 17. Background Information
DNS Records . . . 189HTML . . . 189
Image Server . . . 190
JavaScript . . . 190
Mailing List Managers . . . 191
MX Records . . . 191
SMTP Protocol . . . 192
SMTP Gateway . . . 192
Virtual Hosts . . . 192
Index
This guide provides information about maintaining Siebel Email Marketing Stand-Alone. For information about system requirements, see System Requirements and Supported Platforms on SupportWeb.
NOTE:This document may contain references to BoldFish. Products formerly labeled as BoldFish are now known as Siebel Email Marketing Stand-Alone.
Although job titles and duties at your company may differ from those listed in the following table, the audience for this guide consists primarily of employees in these categories:
Siebel Application Administrators
Administrators who plan, set up, and maintain Siebel applications.
Siebel Application Developers
Developers who plan, implement, and configure Siebel applications, possibly adding new functionality.
Siebel System Administrators
Administrators responsible for the whole system, including installing, maintaining, and upgrading Siebel applications.
How This Guide Is Organized
With the exception of the Quick Start chapter, the layout of this manual is similar to the workflow of Siebel Email Marketing Stand-Alone as it likely would be used for the first time.
In other words, before first-time users can send a mailing, they will have to:
■ Set up a database.
■ Create a list or query and configure it for bounce handling.
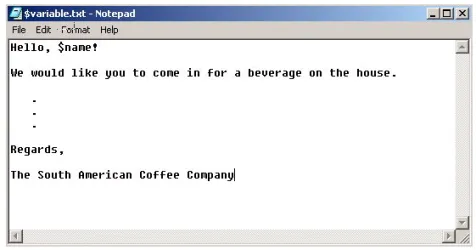
■ Create the email message content template, inserting template variables and commands where desired.
After the preceding items have been completed, users can concentrate on “Sending a Mailing” on page 121 and subsequent chapters, and see previous chapters as necessary.
Additionally, there are a few appendixes that provide supplementary material that users may find helpful.
The layout of this manual is as follows:
■ “Siebel Email Marketing Stand-Alone Quick Start” on page 25. This section provides an easily-located reference for those users who just need help with the posting process.
NOTE:The Quick Start chapter is for those users who have previously set up lists, queries, and templates, are not sending internationalized content, and simply need a quick reference regarding the posting process.
■ “Setting Up a Database” on page 37. This section provides information about connecting an external database to the system.
■ “Setting up a List” on page 43. This section provides information about creating a new list.
■ “Setting up a Query” on page 69. This section provides information about defining a query and using the query wizard.
■ “Content Generation” on page 85. This section provides information about creating and personalizing the message content template.
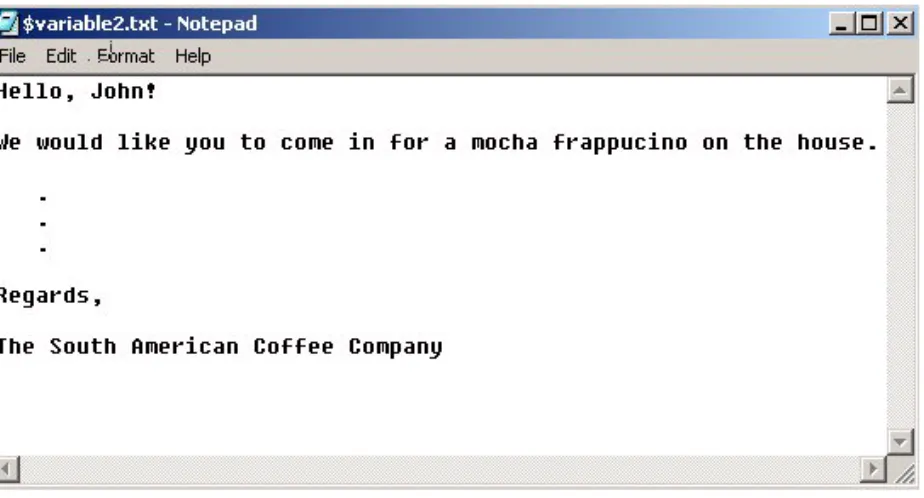
■ “Populating Template Variables” on page 105. This section provides information about incorporating template variables in a mailing.
■ “URL Tracking” on page 113. This section provides information about inserting tracked URLs into a message.
■ “Sending a Mailing” on page 121. This section provides information about sending mailings using the five-step posting process.
■ “Mailing Control” on page 143. This section provides information about controlling the delivery of a mailing.
■ “Reporting” on page 145. This section provides information about monitoring the delivery status of a mailing, as well as the statistical analysis of a mailing, campaign, or subscriber.
■ “An Overview of Message Types” on page 161. This section provides a general primer on the different types of messages.
■ “The Basics of Email Campaign Development” on page 167. This section lists the many factors you should keep in mind when planning an email campaign.
■ “How to Build Effective Email Messages” on page 177. This section provides some basic guidelines to help build effective email messages and make email campaigns a success.
■ “How to be Opt-In Compliant” on page 183. This section provides several guidelines to follow in order to keep your opt-in list happy and make sure that recipients never think of your email as spam.
■ “Background Information” on page 189. This section details Siebel Email Marketing Stand-Alone-related Internet technologies.
Siebel Email Marketing Stand-Alone fully supports double-byte character sets in GUI-initiated mailings. It is possible, for example, to send a mailing containing Japanese or French content through the user interface.
Previous versions of Siebel Email Marketing Stand-Alone could correctly deliver mailings with double-byte content only if the mailing was created programmatically through the Siebel API. For more information, see “Sending Mailings with
Additional Documentation
This guide does not contain information about upgrading Siebel Email Marketing Stand-Alone. That information is in Siebel Email Marketing Stand-Alone Installation Guide on SupportWeb.
Revision History
Siebel Email Marketing Stand-Alone User Guide
Version 7.5.3, Rev. A
Additional Changes
■ Changed the template and format for the entire book.
■ Deleted references to POP3 and Pipemail as they are no longer supported.
Table 1. Changes Made in Version 7.5.3, Rev. A
Topic Revision
“Introduction” on page 11 Added new Introduction chapter (this chapter) and moved “About this Guide” information to this chapter.
“About Email Delivery” on page 17 Changed title of Preface to Process of Email Delivery.
“Siebel Email Marketing Stand-Alone Architecture Overview” on page 18
Replaced figures and added new Architecture section.
“Multitenancy” on page 21 Added this section. “Connecting to the Siebel Email Marketing
Network” on page 22
Updated procedure.
“The People Screen” on page 53 Added privileged author and moderator definitions paragraph.
“Forward to a Friend” on page 99 Added FTF Hyperlink section for HTML. “Sending the Mailing” on page 131 Changed steps of the procedure. “Mailing Delivery Status” on page 146 Deleted bulleted list content.
Understanding Email Delivery
To understand Siebel Email Marketing Stand-Alone (EMSA), you must first understand the process of email delivery.
Email Delivery—One to One
When an email message is sent by person A to person B, a process takes place to attempt the delivery of the email. The first step in this process occurs when the user clicks theSendbutton on their email client. The email client tries to initiate a connection to an email server. This email server is often called a Mail Transfer Agent (MTA) because of its function, or a SMTP Server, because of the protocol that it uses. When the client has a connection to an MTA, the MTA and the client communicate through the SMTP (Simple Mail Transfer Protocol). The message is then transferred to the MTA. If the recipient of the email (person B) has their mail box on this server, then the server drops the email in the box and the job is done. If person B is on another domain, the MTA executes a DNS (Domain Name Service) lookup to find the address of another MTA to communicate with. Another SMTP conversation occurs, and the second MTA receives the message and delivers it to person B’s mail box. When it is in person B’s mailbox, they will be able to retrieve it using another protocol, such as POP (Post Office Protocol), and read the message in their email client.
Of course, a number of things can go wrong with this process. For example, the domain of the recipient can be unreachable, or not exist at all. In this case, an error message, or bounce, is created by the MTA that discovered the problem, and the bounce is returned to the sender of the message. Another problem might be that the domain has been found, but the user does not exist on that domain. Again, a bounce is created and sent back to the sender of the original message. Both of these examples are called hard bounces. This means that not only was the email unable to be delivered, but that it will never be able to be delivered, due to an invalid email address.
Another type of error can occur if the domain and user both exist, but the user’s mailbox is full. Or, the recipient may be out of the office for a period of time (that is, on vacation) and has temporarily configured their email program not to accept incoming email. In both of these cases, a bounce is returned as well. However, these bounces are classified as soft bounces, because although the email could not be delivered at present, it may be possible to deliver the message in the future.
Email Delivery—One to Many
Now that we have an understanding of the process of email delivery for a single message, let us see what happens if we scale this process up to thousands or even millions of messages, such as commonly occurs in email marketing campaigns. The problem with the SMTP protocol is that it is just what it was designed to be: simple. It can only handle one message at a time, and the time it takes to deliver each message is dependent on the network latency between the various MTAs involved, and the efficiency of the MTAs themselves. To send out a million messages over a single MTA will likely take hours—or more likely days—depending on message size and the speed of the MTA hardware.
About Siebel Email Marketing Stand-Alone
Siebel Email Marketing Stand-Alone (EMSA) allows you to quickly send high volumes of personalized email messages while automatically handling bounced messages, and allows you to track a variety of campaign results.
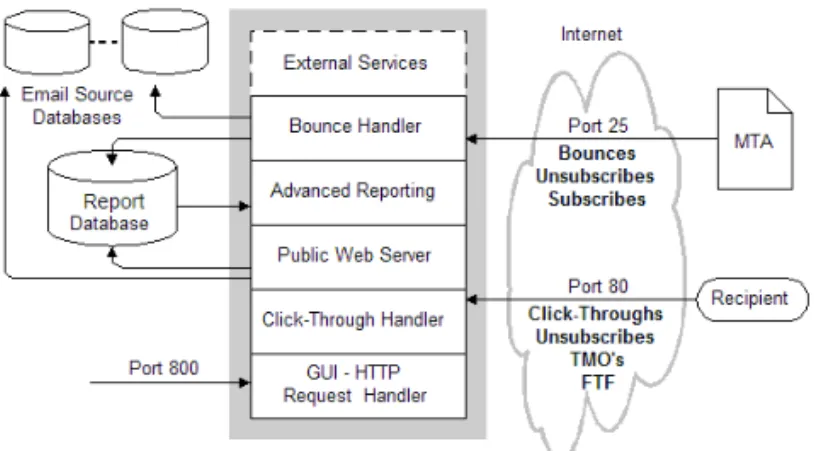
Siebel Email Marketing Stand-Alone Architecture Overview
The component architectures describe how the parts of Siebel EMSA interact from both an inbound and outbound perspective.
Siebel Email Marketing Stand-Alone architecture is separated into outbound and inbound. (See Figure 1 and Figure 2).
Figure 1. Siebel Email Marketing Stand-Alone Outbound Overview
The component outbound architecture is described as follows:
■ Email Source databases must have a JDBC driver.
■ File uploads of email addresses and personalization data are also supported.
■ External Services are Java programs that can be written and are triggered by the Siebel EMSA for events such as
■ Server start up and server shut down
■ Unsubscriptions
■ Bounces (Hard and Soft)
■ Java API (aka NetAPI) permits programmatic access to the Siebel EMSA through port 2000, by default.
■ Siebel EMSA listens on port 8000 by default for browser requests.
Figure 2. Siebel Email Marketing Stand-Along Inbound Overview
The component inbound architecture is described as follows:
■ Email Source databases must have JDBC driver. If the email source database does not support stored procedures, a PS engagement is required to implement the functionality. The infrastructure is in place, however.
■ Advanced Reporting Module (ARM).
■ External Services are generic Java programs that can be written and they may exist for events such as the following:
■ Server start up ■ Server shut down ■ Unsubscriptions ■ Bounces
■ Track Message Opens (TMO)
■ Click-throughs, unsubscribes, and TMOs are recorded in the Report Database. Unsubscribes are also processed back into the email source database through a stored procedure.
■ Bounces are processed into both the email source database via stored procedures and are recorded back into the Report Database.
■ Ports 25, 80, and 8000 must be open on the Siebel EMSA
Multitenancy
The multitenancy functionality allows multiple enterprises access to the same server. This means that users from different enterprises can create lists, send mailings, and conduct statistical analysis from the same server without conflict. There is no additional set up or configuration required to enable the multitenancy feature. It is automatically enabled, and always on.
However, it is important to understand that by allowing multiple enterprises access to the same server, individual users of Siebel Email Marketing Stand-Alone could possibly experience a loss of privacy in relation tothe Default List and uploaded files of recipients.
For example, the Default List contains the default settings inherited by all new lists. The Default List is user-configurable so that you can set limits, content policies, and other options for new lists. However, the Default List is accessible to any authorized user, and as such could possibly be reconfigured without your knowledge. Therefore, it is in your best interest not to rely on the values contained in the Default List, as those values could possibly change over time without your knowledge. If you upload an external file of recipients to send a mailing and assign Default Flights List as the configuration value, the list of recipients could be viewed by those without permission or authorization. Therefore, it is in your best interest not to leave a list of recipients in the Default Flights List over time.
These areas of caution are covered in more detail in the respective sections of this manual.
Siebel Email Marketing Network
When sending an email campaign, the user has the choice of sending email through their local network or through the Siebel Email Marketing Network.
Siebel Email Marketing Network is a dedicated, spam-free, high-speed email channel through which you can send large quantities of personalized messages much faster than conventional email systems. Siebel Email Marketing Stand-Alone (EMSA) eliminates the need for extensive internal IT support, equipment, and infrastructure while alleviating the bandwidth burden typically caused by high-volume email. Or, if you have used outside vendors to send large email campaigns for you, you will no longer have to give control of your database or customer lists to others. Siebel EMSA provides you with an extremely fast, inexpensive, secure platform for delivering your email.
Connecting to the Siebel Email Marketing Network
In order to connect to the Siebel Email Marketing Network, you must first contact Siebel Customer Support to obtain the following items:
■ A Client ID. This is a Siebel-generated string.
■ A Client Certificate. This is a Siebel-generated file.
After you have obtained the preceding items, do the following:
To connect to the Siebel Email Marketing Network
1 Stop Siebel Email Marketing Stand-Alone.
2 Paste the Client Certificate file into the appropriate location:
■ (Windows)C:\Program Files\bes\does
■ (Solaris): {Siebel Email Marketing Installation Directory}/does 3 Start Siebel Email Marketing Stand-Alone.
4 Click Advanced Menu > Site Manager > Server.
5 Scroll down to the Outbound SMTP Configuration section and enter the Client ID for Siebel Email Marketing Stand-Alone in the field.
Log Files
If you encounter any problems while using Siebel Email Marketing Stand-Alone (EMSA), you can review the contents of the following files:
■ The BoldFish.log file includes information about current general activity with
Siebel EMSA.
■ The exception.log file includes information about Java exceptions thrown by
Siebel EMSA. These can be caused by a variety of problems, such as database errors, user interface problems, and an inability to connect to SMTP Servers.
■ The console.log file includes information that is useful for troubleshooting problems that Siebel EMSA is having with the Siebel Email Marketing Network. The log also includes information about starting up Siebel EMSA.
■ The unparsablebounce.log and SMTP.log files may prove useful in
determining problems with bounce handling and connections to SMTP Servers. The SMTP.log file is only activated if logging is set to DEBUG#3Level in the log4j-congfig.properties file located in the <Siebel EMSA
Home>\j2ee\...
■ The in.mbox file includes all email received by Siebel EMSA. web.mbox contains
messages posted through Siebel EMSA’s Web interface.
Siebel Email Marketing Stand-Alone API
Although this manual is written with the assumption that the user will access Siebel Email Marketing Stand-Alone (EMSA) functionality through the user interface, it is possible to control Siebel EMSA functionality programmatically. For example, you might want to incorporate Siebel EMSA functionality into your existing user interface, or you might want to have Siebel EMSA complete certain functions automatically at a predetermined time. These items could be accomplished by means of Siebel EMSA network API protocol.
Siebel EMSA network API protocol is covered in detail in Siebel Email Marketing Stand-Alone API Guide.
Technical Support
■ For problems or questions regarding Siebel Email Marketing Stand-Alone, contact Technical Support on SupportWeb.
The majority of the time spent using Siebel Email Marketing Stand-Alone (EMSA) will be spent sending mailings. This chapter is an easily-located reference for those users who just need help with the posting process.
For more in-depth coverage of the posting process, see “Sending a Mailing” on page 121.
This chapter covers the following topics on the Siebel EMSA posting process:
■ “Step 1—Select Recipients” on page 25 ■ “Step 2—Provide Content” on page 26 ■ “Step 3—Define Appearance” on page 28 ■ “Step 4—Preview Mailing” on page 30 ■ “Step 5—Send the Mailing” on page 31
Step 1—Select Recipients
The first step in the post process is to select recipients.
To select recipients
1 Click Post.
The Recipient Source screen appears.
2 Specify who will receive your mailing:
■ If you select a list from theInternal lists field, your mailing will be sent to a
predetermined list of people.
■ If you select a list from the Predefined queries field, your mailing will be sent
to each recipient in your database who meets the criteria specified within the query.
■ For more information about predefined queries, see “Setting up a Query” on page 69.
■ If you want to send your mailing to an external file of recipients, see “Sending to an External File of Recipients” on page 122.
The view of the Recipient Source screen depends on whether or not the user has previously defined at least one query. If the user has previously defined a query, then the Recipient Source screen appears as shown in the preceding image. However, if the user is exclusively relying on internal lists, then only that section of the Recipient Source screen will be visible.
In the Recipient Source screen is a highlighted message indicating whether or not the list you are sending to adheres to the agreed-upon size specified to in the license agreement.
3 Click Next.
The Provide Content screen appears.
Step 2—Provide Content
After you have specified who will receive your mailing, you can specify the content of the mailing. The Provide Content screen will allow you to specify the following types of email as the body of your mailing:
■ A Text message. Text messages refer to messages that contain ASCII characters. Plain text messages do not contain formatting codes (such as bold or italics), and the font is usually plain with a fixed width. (The width of the font might vary from email client to email client.)
■ An HTML message. HTML (Hypertext Markup Language) is the authoring language used on the Internet. You can also use HTML to write email that contains the same formatting as Web pages. This will enable you to create graphically media rich email to send to your subscribers.
■ An AOL message. AOL messages are similar to HTML messages except that the enhancements are designed to be read through an AOL browser.
■ A Wireless message. Wireless messages are ultra-short text messages intended for cell phones, personal digital assistants (PDAs), and other small wireless devices.
Keep in mind that there is no provision for specifying a Text & HTML message, which is built automatically as long as you have specified the component Text
and HTML messages.
If you have uploaded a file of recipients who have specified Text & HTML as their preferred mail mode, make sure you provide Text and HTML versions of your content. Otherwise, those recipients will not receive the mailing.
To provide content for your mailing
1 Complete the Provide Content screen as desired:
For each mail method that you are sending, specify the location of your mailing’s body in the appropriate text field, or click the Browse button and navigate to the file as usual.
The preferred mail mode for a given list is specified in the List Owner, Subscriptions screen. (For internal lists only: You can add subscribers and specify a preferred mail mode to an existing list from the Subscription Manager screen.)
2 If you are sending a Web page as the body of your mailing, click the URL button and enter the URL you want to send.
NOTE:The URL buttons can be used when providing content as long as the specified URL points to content of the proper format. For example, if you click on the (Text) URL button, the URL must point to a text message.
3 If you want to include attachments with your mailing, see “Including Attachments” on page 127.
Content Type Character Set
If your template is in a language other than your operating system’s native language character set (which is usually English), you must specify the proper character set.
To specify the character set
1 Specify the character set of the template in the Content-Type-CharSet field.
2 Click Next.
Unspecified Format
The Unspecified Format dialog box may appear on the Provide Content screen. The Unspecified Format dialog box allows you to specify a mail mode format for those recipients who have specified a mail mode not provided for by the settings on the Provide Content screen.
To select an unspecified format
■ Select an alternative mail mode for each type displayed, then click OK. The Define Appearance screen appears.
Step 3—Define Appearance
After you have selected who will receive the mailing, you will have to specify the introductory content of your email campaign.
1 To define the appearance of your mailing
■ To. This field is automatically filled in; however, you can have each recipient’s email address used in place of the default text by checking Recipient’s Address.
If you check Recipient’s Address, Siebel Email Marketing Stand-Alone will send out email one at a time, whereas if you do not check Recipient’s Address, Siebel Email Marketing Stand-Alone will send out email in blocks of 100.
If you check Recipient’s Address, the value in the To field will be replaced with Recipient’s email address will be used.
■ From. This field is automatically filled in with the email address of the person who logged in to the system. However, you can modify this field.
■ Subject. Enter a title for the email campaign.
NOTE:This is a required field.
■ Bounces Sent To.This field is automatically filled in.
The email address specified in the Bounces Sent To field is where bounces go.
■ Reply-To. Enter the email address of the person you want replies to go to.
■ Campaign ID. Enter a unique identifier for the mailing.
You can select a campaign ID from the list of previous campaign IDs. However, the ability to do so is dependent on the level of reporting functionality built into Siebel Email Marketing Stand-Alone at the time of installation.
NOTE:This is a required field.
Make sure to use only alphanumerics in the Campaign ID field. All nonalphanumeric characters will be replaced with an underscore (_).
3 Click Next.
The Preview Mailing screen appears.
Step 4—Preview Mailing
Now that you have specified who will receive your mailing, how it will be titled, and have uploaded the body of your mailing (including any attachments), you can preview your mailing to see exactly how it appears to your recipients.
To preview a mailing
1 Select how you want to receive the preview mailing by checking the appropriate email method (Text, HTML, AOL, and so on) in the Select Content to View field. You can choose to receive a preview for each email method that you are sending. For example, if you are sending text, HTML, and AOL versions of the same mailing and wish to preview all three, simply check the appropriate email methods under the Select Content to View field. However, in doing so, you will receive three separate preview mailings.
2 Enter the email address of the preview recipient(s) in the Email Address(es) field.
By default, the Preview Mailing screen will list the email address you specified when you logged in.
3 Select whether you want the preview mailing to be sent locally or over the Siebel Email Marketing Network.
The Local Network selection will not be available if you have a license that specifies that mailings be sent through the Siebel Email Marketing Stand-Alone Network.
4 Click Preview.
The preview will be emailed to you shortly, and the Send Mailing screen appears.
You can also choose to not receive a preview either by unchecking all boxes under the Select Content to View field or deleting all email addresses in the Email Address(es) field.
Step 5—Send the Mailing
By now you have received your preview mailing. If you are satisfied, you can now send the mailing to your recipients.
Your mailing will be sent in the same manner that you specified for your preview mailing. For example, if you specified that your preview mailing be sent to the Siebel Email Marketing Network, the actual mailing will be sent to the Siebel Email Marketing Network as well.
To send a mailing
1 Specify when you want to send your mailing. You have two options: immediately (Now) or in the future (Later).
It is important to remember that if you specify that your mailing be sent at a later date (anything other than now), the mailing will be sent at the specified date as determined by the server on which Siebel Email Marketing Stand-Alone is installed. Make sure you take into account such variances as different time zones, inaccurate clock settings in the server, and so on.
For more information on scheduled mailings, see Scheduled Recurring Mailings (page 118).
2 Click Send Mailing.
The Your mailing has been sent dialog box appears.
From here you can view delivery status, explore control options for your mailing, or view a detailed mailing report.
See Also
For more information about delivery statistics, see “Mailing Delivery Status” on page 146.
For more information about mailing control, see “Mailing Control” on page 143. For more information about mailing reports, see “The Mailing Report” on page 148.
The chapter covers the following topics:
■ “The Login Screen” on page 34 ■ “Update User” on page 35
The Login Screen
To log in to Siebel Email Marketing Stand-Alone (EMSA), you must navigate to the URL where Siebel EMSA is running.
The administrative server port (the port from which you can access the user interface) is usually 8000.
■ Modify your URL so that you are logging in to the machine where Siebel EMSA is installed, and appended by the administrative server port number.
■ The URL should look like this:
http://myserver.yourcompany.com:8000/
In this case, the machine name where Siebel EMSA is installed is
myserver.yourcompany.com and the administrative server port is 8000.
About Default Email Addresses and Passwords
On either Windows or UNIX systems, the default email address/password is root/
admin.
After you have entered your email address and password, you can choose to:
■ Save your email address
■ Save your email address and password
■ Not to save either
By default, your email address and password will be saved in a cookie for future reference.
It is recommended that the Site Manager create a new Site Manager account and then remove the default Site Manager account. The default password for the Site Manager is trivial.
A cookie is a small piece of information sent by a Web server to store on a Web browser so it can later be read back from that browser.
To log in to Siebel Email Marketing Stand-Alone
1 From the Login screen, enter your email address and password.
2 Click Login.
If this is the first time logging in, the Update User Option screen appears.
The Password Finder
If you have forgotten your password, complete the following steps to request it.
To request your password
1 From the Login screen, click the Password Finder hyperlink. The Password Finder screen appears.
2 Enter your email address and click Email Me My Password. Your password will be emailed to you shortly.
Update User
If this is the first time you have logged in or if you have not changed your password, you will be sent to the Update User Options screen.
To update a user
1 Complete the form as desired and click Update Information.
The Database Setup screen allows you to add and remove databases. In addition, you can edit the database properties, as well as configure the database.
Due to the technical nature of database connections, the database administrator (DBA) should control the functionality described in this chapter.
If you are unable to access this functionality, it is probably because your external source database has not been configured. Contact Technical Support for more information.
This chapter covers the following topics:
■ “The Database Setup Screen” on page 38 ■ “Add a Database” on page 38
■ “Edit Database Properties” on page 40 ■ “Remove a Database” on page 41
The Database Setup Screen
The following sections describe the database functionality. From the Database Setup screen, you can:
■ Add or remove a database.
■ Edit the properties of a database.
■ Configure a database to identify a subscriber’s email format.
■ Configure a database for the personalization of email postings.
To access the Database Setup screen
■ Click DB Connections to navigate to the Database Setup screen.
Add a Database
You can add a database at the Database Setup screen.
To add a database
1 Click Create New DB.
The Database Setup screen displays a new section that allows you to identify the attributes of the new database.
2 Identify a JDBC driver from the JDBC Template field.
The URL and Driver fields will be populated with values provided by the JDBC driver.
■ The URL is required to execute the queries that define how to obtain a list of
email addresses for use in a mailing.
■ The Driver is the address of the JDBC driver to be used for accessing a target
database where Siebel Email Marketing Stand-Alone-defined tables exist.
4 Modify the <hostname> and <port> connection settings in the URL field so that
they are appropriate for the new database and any <> delimited strings.
CAUTION:Do not modify the JDBC driver-supplied values in the Driver field unless you are absolutely sure that it is necessary to do so.
5 Provide a user name and password for the new database in the respective User Name and Password fields.
■ The user name is the user in a target database that has privileges to read and
write to the tables. Often, this is the user that was used to create the tables.
■ The password is the password for the user that connects to the target
database to maintain Siebel Email Marketing Stand-Alone-defined tables.
6 Specify a mail mode.
For more information about mail modes, see “Mail Modes” on page 39.
7 Click Test DB Connection.
Siebel Email Marketing Stand-Alone will test the new connection, and will display the result (either a message that the connection is valid by displaying the version of the database, or an error message) at the top of the Database Setup screen.
8 Click Update.
The attributes section of the Database Setup screen will disappear, and an icon representing the newly-created database connection is displayed at the top of the Database Setup screen.
Mail Modes
To set up your database if it is set up so that mail mode values are associated with users
1 Click Enable Mail Mode.
NOTE:If you do not know whether or not your database is set up so that mail mode values are associated with users, ask your DBA.
The Mail Modes dialog box appears.
2 From here you can choose the mail modes that are associated with your users, and provide the appropriate identifying value in the respective field.
Make sure that the value you assign to a given mail mode is the same value as defined in the target database.
3 Click OK when finished.
If you specify the method in which your recipients will receive email by means of this method, you will have to use the mail mode variable &mode when defining a query. For more information regarding defining a query, see “Setting up a Query” on page 69.
To set up your database if it is not set up with user-associated mail mode values
1 Click Specify Default.
The Mail Modes dialog box appears.
2 From here you can choose a default mail mode for everyone.
3 Click OK when finished.
Edit Database Properties
You can edit database properties at the Database Setup screen.
To edit database properties
2 The attributes section for the database you want to edit appears.
3 From here you can modify the attributes, settings, and values of the selected database.
4 When finished, click Update.
The attributes section of the Database Setup screen disappears.
Remove a Database
You can remove a database at the Database Setup screen.
To remove a database
1 From the Database Setup screen, click the icon of the database you want to remove.
2 Click Delete.
Most of the mailings you send will be to a list of recipients that you have specifically designated, or to a list of recipients that resulted from a predefined query.
This chapter describes the steps necessary to create and configure a list. For more in-depth information about most of the topics in this chapter, see Siebel Email Marketing Stand-Alone Administration Guide.
If you are unable to access this functionality, it is probably because your external database has not been configured.
This chapter covers the following topics:
■ “Internal Versus External Lists” on page 44 ■ “Creating a List” on page 44
■ “Configuring a List” on page 46 ■ “Bounce Handling” on page 63
Internal Versus External Lists
For the purposes of this discussion, there are two types of lists: internal and
external.
For more information about internal and external lists, see Siebel Email Marketing Stand-Alone Administration Guide.
Creating a List
You can create an internal or external list. The differences in creating an internal versus an external list are noted where appropriate.
All newly-created lists inherit default values from a special list, called the Default List. Although you are free to configure a list as you see fit during creation, it is important to realize that, due to the possibility of multitenancy (more than one enterprise using the same Siebel Email Marketing Stand-Alone), the Default List might be reconfigured without your knowledge. Therefore, it is in your best interest not to rely on the values contained in the Default List, as those values could possibly change without your knowledge.
For more information about the Default List, see Siebel Email Marketing Stand-Alone Administration Guide.
To create a list
1 From the Site Manager screen, click the List Creation hyperlink. The Minimum List Creation Information screen appears.
2 Complete the Minimum List Creation Information form as desired:
■ List Name. Specify a distinctive/readily-identifiable name for the list.
Keep in mind that the owner-specified name for a given list may be viewable to recipients, depending on the mail client or browser.
■ List Email. Specify an email address for the list.
Make sure you include the name of the machine that Siebel Email Marketing Stand-Alone is installed on so that bounces and responses are handled properly.
■ List Owner. Specify the email address of the Owner of the list. The Owner will be able to administer the list and delegate responsibilities for various features of the list.
■ List Template. Siebel Email Marketing Stand-Alone will use the specified list as a template in creating new lists in the system. The template feature can be used as a shortcut in creating large amounts of lists with the same
characteristics. However, several list options are not copied over from the template list to the new list. These include the From: and Reply-To: headers and the default subscriber options.
■ Use Subscribers From. Siebel Email Marketing Stand-Alone will copy the specified list’s subscribers so that they become subscribers of the new list when it is created.
■ Database. You must associate a list with a database.
CAUTION:For an internal list, select Internal Database. For an external list, select a database from the list of available external databases.
For more information about configuring external databases, see “Setting Up a Database” on page 37.
■ If you are connecting to an external database, you can now add queries to
retrieve subscribers to the list/database combination. For more information about adding queries to external databases, see “Setting up a Query” on page 69.
3 Click Submit.
The Create List results screen appears. If the list was configured successfully you will get a message at the top of the screen.
4 Click the configure the list hyperlink to configure the new list.
Additionally, the new list owner will receive an email message confirming the account update.
Configuring a List
Whether you have created an internal or external list, you can configure it from here. The differences in configuring an internal versus an external list are noted where appropriate.
To configure a list
■ After you have created a new list, click the configure the list hyperlink to configure it.
The Configuring List screen appears. From here you can configure the new list.
The General Configuration Screen
The General Configuration screen allows you to specify many of the most common options that dictate how the list will behave.
Perhaps the most important option is which Web server the list will be associated with.
General Configuration
You can specify a value for the following settings:
■ List Email Address.This is the email address that the list will be known as. The other aliases for the list will be based on this email address.
This field cannot be edited, but is displayed for your reference.
Confirm that the machine name where Siebel Email Marketing Stand-Alone (EMSA) is installed is part of the List Email Address.
■ Requests for This List are.List Owners or Site Managers can lock a list so that subscribers cannot access the list through email requests. If locked by the Site Managers, the list owners and all other list administrators cannot access their list either. This is usually done during maintenance periods.
■ Mail Processing.Mail distribution for a list can be suspended by List Owners or Site Managers. In that case, for each message that is not distributed, the author is notified and the list administrators are copied.
■ List Visibility. A list should be made public only if the intention is to make it publicly available. In that case, its name and address will show up on all listings of the server's public lists, and anyone will know of its existence. If a list is made private, only its members and Site Managers will see it.
■ Confirmation Levels.The list can be configured so that subscriptions and unsubscriptions over email require a confirmation to be sent to the user, who must reply to the return email for the operation to be completed. Subscription confirmation also implies that user attempts to reset their subscription modes are also subject to confirmation.
In addition, you can choose to have all postings be authenticated. In that case, each posting has to have a special header line in the body: Confirm: password, where password is the author's password. The actual email message should follow this line; this special header line will be removed before the email is distributed. The benefits of confirmed posting are numerous: no fake posts, the same message body can be posted again, and so on.
■ Confirmation Cookie Timeout.List-specific cookie timeout for list-specific user email requests.
Siebel EMSA occasionally uses cookies to authenticate certain transactions. The authentication cookie is sent through email to the user and stored in the database. When the user responds, the cookie is removed. However, if the user never replies, the cookie will never be removed. To prevent this situation, setting a cookie timeout lets Siebel EMSA clean up the cookies after some time.
■ Processing Priority. Siebel EMSA contains a scheduler which alters the priority of various tasks running through the system. For most lists, the priority should be left to 0. However, if you find that a list is taking up too much processing time, you can alter its priority to be relatively lower then other lists. For other time-critical lists, you can set the priority to be higher. Valid values range from -25 to
25.
■ Daily Limit for Regular Mail.How many emails would you like your list to process before mail processing is suspended? Once mail distribution for this list has been suspended, EMSA will not process any more emails for that list until the end of the day, or until manually reset by the list owners. An empty entry disables this feature.
■ Message Recipient Limit.Enter how many recipients you would like to be included in each email message this list is forwarding.
The recommended value for Siebel Email Marketing Stand-Alone is 100. CAUTION:You must specify a value larger than 0.
The number of recipients actually used will be the minimum between the list-specific value and a global value that can be adjusted only by a Site Manager. If you specify a value of 1, the system will not only serialize the posting (one email per subscriber), but will also add special headers to make it easier to identify users who want to later unsubscribe from the list by choosing to reply to a post. On template variable operations (as in personalized email) the system ignores this setting and sends one email per subscriber.
■ Web Server.You can associate a list with a Web server. Select a Web server from the list of available Web servers.
■ Database.This field was specified when you created the list. For example, if you created an internal list, the value of the Database field would be Internal Database. However, if you created an external database, the value of the Database field would be one of the available external databases.
The Archives Screen
The Archives screen lets you configure all aspects of saved archives.
NOTE:The archives are archives of messages sent to the list and are stored on disk and indexed in the database.
If you intend for your archives to be viewed from the Web server, then you must either store Text or HTML archives. We recommend that you store HTML archives, as these will always have the best quality.
If you do not have archives turned on, the list will not appear on the main view page, since no archives are viewable. If you have archives and then turn them off, then old archives will not be viewable until you turn them back on.
You can specify a value for the following settings:
■ Archive Messages. Use this option to specify if messages are to be archived. You can specify if either Text, HTML or both formats are to be archived. If no formats are archived, then the archives will not be viewable through the Web site.
■ Send Messages to External Service?Whether or not Text or HTML posts are archived within Siebel Email Marketing Stand-Alone, you can also send each post to the subscriber audience to a Java class for external archiving. The
String arguments passed to the class's main() are the list name, whether this is the Text or HTML version of the post, the headers, and finally, the body. Notice that this class may be called twice (once for text, and again for HTML depending on the configuration). The message(s) sent to the class may have been modified by Siebel Email Marketing Stand-Alone and they have exactly the same content as they appear on Siebel Email Marketing Stand-Alone's archives.
■ Archive Digests.You can archive digests within; these will not affect the archives viewed through the Web interface, but the digests will be stored in an archive file. Each digest that is sent out will be appended into the digest archive in.mbox
file.
■ Archive Filename Format.The archive filename specifies the filename used to write the archives. This indirectly defines how often new files are created. You can use the following % characters; these will be replaced in the file being
■ %c = current message count ■ %m = month number (01 - 12)
■ %M = month name (Jan - Dec)
■ %d = day of month (01 - 31)
■ %D = day of year (Julian date) (001 - 366) ■ %E = day of week (Sun - Sat)
■ %w = week number in year (1 - 52) ■ %W = week number in month (1 - 5) ■ %y = 2-digit year (00 - 99)
■ %Y = 4-digit year (1900 - on)
■ Archive Timeout Interval.Archives can expire. After an archive has existed for the specified period of time, it will be removed from the system.
■ Archive File Access.You can specify who can view archives with this option.
The Posting Screen
The Posting screen allows you to configure many of the rules about posting to a list. Many of the options on this screen are regular expressions, which will either filter out or modify email. These regular expressions can either be in addition to the globally-defined regular expressions, or can be used as the only regular expressions for their purpose.
You can specify a value for the following settings:
■ Who Gets Posted Messages.Siebel Email Marketing Stand-Alone can direct incoming email to the subscribers, the Owners or an External Service, depending on this value.
To set up an external service, specify the name of the Java class to load and send the post for external processing. For more information, see Siebel Email Marketing Stand-Alone Administration Guide.
■ Where to Get Recipient Lists. Siebel Email Marketing Stand-Alone allows you to provide it with the list of recipients for each post, if you do not want to use the internal storage and retrieval mechanisms.
You can specify the name of a Java class to load and get the list of recipients from. For more information, see Siebel Email Marketing Stand-Alone
Administration Guide.
■ Maximum Message Size. Siebel Email Marketing Stand-Alone can reject any
incoming email if its size is larger than the specified value. An empty entry disables this feature. (This is the default.)
A sensible number (in bytes) would be 1,000,000, but it really depends on the speed of your network connection.
For the following fields, if you choose it may override the Global Definition of a Regular Expression.
■ Mailer Daemon.This is a list-specific version of the Global Mailer Daemon Regular Expression.
■ Sensed Requests. This is a list-specific version of the Global Sensed Requests Regular Expression.
■ Suspicious Subjects.This is a list-specific version of the Global Suspicious Subjects Regular Expression.
■ Suspicious Headers. This is a list-specific version of the Global Suspicious Headers Regular Expression.
■ Suspicious Bodies.This is a list-specific version of the Global Suspicious Bodies Regular Expression.
■ Preserved Headers.This is a list-specific version of the Global Preserved Headers Regular Expression.
■ Discarded Headers.This is a list-specific version of the Global Discarded Headers Regular Expression.
■ Visibility. This is a list-specific version of the Global Visibility Regular Expression.
■ Email Author Firewall. This is a list-specific version of the Global Firewall Regular Expression.
The Errors Screen
The Errors screen lets you configure what happens to errors related to this list. Errors may be email that has been returned to the system for various reasons, or errors caused by users trying to use the system in an erroneous way.
Bounces are classified in two ways:
■ Hard Bounces. These are bounces that have been returned because there has been a permanent error. For example, user does not exist.
■ Soft Bounces. These are usually caused by temporary errors. For example, cannot connect to host.
For more information regarding errors, see “Bounce Handling” on page 63.
The Subscriptions Screen
This screen allows you to specify the options for subscribers. The Subscriptions screen only subscribes and unsubscribes users to the internal database.
You can specify a value for the following settings:
■ List Subscriptions Are.This option specifies how list subscriptions are handled. The available settings are:
■ Closed. The list does not accept subscription requests unless issued by a Subscription Manager.
■ Open. The list accepts all subscription requests without moderation. ■ Moderated. Subscription requests have to be approved by a Subscription
Manager.
■ List Unsubscriptions Are. This option specifies how list unsubscriptions are handled. The available settings are:
■ Closed. The list does not accept unsubscription requests unless issued by a
■ Open. The list accepts all unsubscription requests without moderation. ■ Moderated. Unsubscription requests have to be approved by a Subscription
Manager.
■ What to Do with Subscriptions Requests. Siebel Email Marketing Stand-Alone allows you to specify the name of a Java class to load and call whenever subscription changes are being made. That way, you can sync up between two databases.
The String arguments passed to that class's main()differs between operations.
The possible operations are:
■ ADD (a new subscriber) ■ DEL (delete a subscriber) ■ Other
■ New Subscriber Default Options.You can select the default options assigned to every new subscriber (if they have not already selected their own default options).
■ Preferred language. Specify the default language for new subscribers.
NOTE:Currently, the only available option is English.
■ Preferred mail mode.Specify the mail mode that new subscriber will get by default. The options shown depend on the configuration of the supporting Web server. The option AUTO DETECT tries to identify whether a user's mail reader supports HTML and will subscribe them in that mode if possible. Otherwise, the subscriber will receive MAIL/TEXT.
■ Send the Following Number of Previous Mailings to New Subscribers. You can specify the number of most recent mailings to be sent to a newly-subscribed user.
The People Screen
List Owners can do everything that the other people on this screen can do. You can assign certain people to certain permissions; these people will only be able to see the screens that allow them to do their task. For example, Subscription Managers will not be able to see the list configuration pages; they will only be able to view the Subscription Manager screens to add or remove subscribers.
Enter email addresses one per line in the boxes provided. You can specify a value for the following settings:
■ Owners. Each list has at least one owner.
List Owners are responsible for the configuration of the options open to them by the Site Manager(s).
Some options, like whether the list is archived or not, may be controlled by the Site Manager.
■ Subscription Managers. A list may have no Subscription Manager, one Subscription Manager, or more than one Subscription Manager.
For internal lists only, in lieu of Subscription Managers, the List Owner assumes this responsibility, if subscription management is enabled.
Subscription Managers are responsible for approving who can join or leave a list, and who can subscribe to files.
Subscription Managers are also responsible for helping subscribers with their attributes (for both the discussion part and files).
To specify Subscription Managers, enter their email address(es) (one address per line).
■ Error Handlers. A list may have no Error Handler, one Error Handler, or more than one Error Handler.
NOTE:In lieu of an Error Handler, the List Owner assumes this responsibility. Error Handlers are responsible for analyzing error mail (either mail bounces or error messages generated by Siebel Email Marketing Stand-Alone), and have the power to remove users whose email addresses bounce too often.
To specify Error Handlers, enter their email address(es) (one address per line).
■ Authors. Privileged authors are people who can post to the list. A list may have no privileged author, one privileged author, or more than one privileged authors.
NOTE:In lieu of Privileged Authors, the List Owner assumes this responsibility (if posting is restricted to owners and privileged authors).
To specify privileged authors, enter their email addresses (one address per line). Privileged authors are moderated, except for site managers and scheduled mailings.
■ Moderators. A list may have no moderators, one moderator, or more than one moderator.
Moderators are responsible for approving postings to a list, or reviewing documents and clipboards (perhaps HTML) before they get posted.
Moderators have the power to review postings from regular subscribers, but not privileged authors. Privileged authors means that you can post to a list.
Scheduled mailings and site manager mailings should not be moderated. Privileged authors are moderated, except for site manager and scheduled emails. To specify a moderator, enter their email address(es), one address per line.
■ Report Viewers. A list may optionally have one or more report viewers. Report viewers have access to the Mailing Delivery Status and Reporting Statistics for mailings sent to the list, but can not create, alter, or stop a mailing. In other words, they are read-only users who can see mailing statistics, but cannot send mailings on their own.
To specify a report viewer, enter their email address(es) (one address per line).
The Digests Screen
Digests are collections of things that have been emailed to a list within a certain time frame.
Each message that is posted to a list before the Digest Collect Until Time is collected together in one big message, and after that time a new digest is started.
When it is digest delivery time, the digest that was last collected is sent.
It is very common to have the digest collection time and digest delivery time be very close together.
You can adjust the time delay between digests being created by adjusting the digest interval time. This way it is possible to send digests once a day, twice a day, every hour, or only every week.
People who have subscribed to a mail list with mail mode of DIGEST or
MIME_DIGEST will receive the digests. DIGESTs are easy to read with plaintext mail readers, such as Elm, Pine, Emacs, and Mail. MIME_DIGESTs consist of a MIME email message with each post to the list being a mime attachment.
You can specify a value for the following settings:
■ Create Digests. A digest is a collection of messages posted and is sent out as a whole (one large message) at regular intervals. If you want digests to be collected by your list, then you should select Yes and configure the parameters that follow.
■ Collect Digests Until. Digests can be collected until a date and time you specify. Specify the date and time to stop collection for a given digest. If you choose to have daily digests sent out, ignore the Day field; simply specify a time of day to stop collection for a given digest.
■ Digest Delivery Time. Specify the date and time each digest is to go out. If you choose to have daily digests sent out, ignore the Day field; simply specify a time of day each digest is sent out. This time should be after the stop-collection time (previously specified).
■ Digest Creation Interval. Specify whether you want the digest to be sent out on a monthly, daily, hourly, or on a per-minute basis. This interval is relative to the stop-collection time (previously specified).
■ Max Size of Digest. Specify a maximum size for a given digest. Siebel Email Marketing Stand-Alone can send partial digests during a regularly-scheduled interval. If the size of a given digest exceeds the specified maximum size, Siebel Email Marketing Stand-Alone will send a partial digest.
NOTE:An empty entry disables this feature.
The Appearance Screen
The Appearance screen configures how a list will look to people who receive posts to the list through email. It does little to configure how the Web archives will appear. You can configure how headers of incoming mail are modified before they are sent out, and if extra headers will be added as well.
You can specify a value for the following settings:
■ Description
Specify a name for this list.
Keep in mind that the owner-specified name for a given list may be viewable to recipients, depending on the mail client or browser.
■ To: Header Line
The outgoing To: header line can be configured so that:
■ It is internally rewritten to One Line Description<listname@domain>.
If the Message Recipient Limit option is set to 1 and you have selected Internally Rewritten for this option, then the To: line will contain the email address of the recipient.
You can change the Message Recipient Limit option from the List Owner, General screen.
■ From: Header Line
The outgoing From: header line can be configured to preserve the identity of the author, or it can be internally rewritten to a value that you specify.
The original author will be shown in the X-Sender: header line if you rewrite it.
■ Subject: Header Line
The outgoing Subject: line will be preserved as is from the original author's message.
You also have the option to tack on the list name (to the beginning), or the list name and the current message count, so that your users can identify the list's messages more easily.
■ Reply-to: Header Line
The outgoing Reply-To: line can be configured to behave as follows:
■ Omit: No Reply-To: is inserted.
■ Preserve: If a Reply-To: exists in the original message, it is preserved; otherwise no Reply-To: will be shown.
■ Sender: If a Reply-To: exists in the original message, it is preserved; otherwise the Reply-To: is rewritten to point to the author of the message.
■ Sender Always: The Reply-To: will always point to the author of the message, regardless of what the original was.
■ List: Similar to Sender, but Reply-To: may point to the list's email address.
■ List Always: Similar to Sender Always, but Reply-To: will always point to the list's email address.