EVault Software
Web CentralControl 7.2
Administrator Guide
© 2013 EVault Inc.
EVault, A Seagate Company, makes no representations or warranties with respect to the contents hereof and specifically disclaims any implied warranties of merchantability or fitness for any particular purpose. Furthermore, EVault reserves the right to revise this publication and to make changes from time to time in the content hereof without obligation of EVault to notify any person of such revision of changes. All companies, names and data used in examples herein are fictitious unless otherwise noted.
No part of this document may be reproduced, transmitted, transcribed, stored in a retrieval System or translated into any language including computer language, in any form or by any means electronic, mechanic, magnetic, optical, chemical or otherwise without prior written permission of:
EVault, A Seagate Company c/o Corporation Trust Center 1209 Orange Street Wilmington, New Castle Delaware 19801 www.evault.com
EVault, EVault Software, EVault SaaS, and EVault DeltaPro, are registered trademarks of EVault Inc. All other products or company names mentioned in this document are trademarks or registered trademarks of their respective owners.
Acknowledgements: Two encryption methods, DES and TripleDES, include cryptographic software written by Eric Young. The Windows versions of these algorithms also include software written by Tim Hudson. Bruce Schneier designed Blowfish encryption. “Part of the software embedded in this product is gSOAP software. Portions created by gSOAP are Copyright 2001-2006 Robert A. van Engelen, Genivia Inc. All Rights Reserved. THE SOFTWARE IN THIS PRODUCT WAS IN PART PROVIDED BY GENIVIA INC AND ANY EXPRESS OR IMPLIED WARRANTIES, INCLUDING, BUT NOT LIMITED TO, THE IMPLIED WARRANTIES OF MERCHANTABILITY AND FITNESS FOR A PARTICULAR PURPOSE ARE DISCLAIMED. IN NO EVENT SHALL THE AUTHOR BE LIABLE FOR ANY DIRECT, INDIRECT, INCIDENTAL, SPECIAL, EXEMPLARY, OR CONSEQUENTIAL DAMAGES (INCLUDING, BUT NOT LIMITED TO, PROCUREMENT OF SUBSTITUTE GOODS OR SERVICES; LOSS OF USE, DATA, OR PROFITS; OR BUSINESS INTERRUPTION) HOWEVER CAUSED AND ON ANY THEORY OF LIABILITY, WHETHER IN CONTRACT, STRICT LIABILITY, OR TORT (INCLUDING NEGLIGENCE OR OTHERWISE) ARISING IN ANY WAY OUT OF THE USE OF THIS SOFTWARE, EVEN IF ADVISED OF THE POSSIBILITY OF SUCH DAMAGE.”
The EVault Software Agent, EVault Software CentralControl, and EVault Software Director applications have the encryption option of AES (Advanced Encryption Standard). Advanced Encryption Standard algorithm (named Rijndael, pronounced “Rain Doll”) was developed by cryptographers Dr. Joan Daemen and Dr. Vincent Rijmen. This algorithm was chosen by the National Institute of Standards and Technology (NIST) of the U.S. Department of Commerce to be the new Federal Information Processing Standard (FIPS).
The EVault Software Agents and EVault Software Director applications also have the added security feature of an over the wire encryption method.
Contents Page 3
Contents
1 Administration Overview ... 6
1.1 Welcome to Web CentralControl Administration ... 6
1.2 Web CentralControl Features and Requirements ... 7
1.2.1 Browser Limitations ... 8
1.3 Terms Used in This Guide ... 9
2 Installation ... 10
2.1 Migrating to a 64-Bit Server ... 10
2.2 Installation Overview ... 11
2.2.1 Prerequisites ... 11
2.2.2 Recommended Setup ... 11
2.2.3 SQL Server Requirements ... 12
2.2.4 Web CentralControl Recovery ... 13
2.2.5 Encrypting View State for Web CentralControl ... 14
2.2.6 Securing Your Websites ... 15
2.2.7 Limit Language Choices ... 16
2.2.8 Agent Update Indicator... 17
2.2.9 URLs for the Agent Assistant ... 18
2.2.10 Default Installation Directories ... 18
2.2.11 Agent Custom Commands ... 18
2.2.12 Backup Log timeouts in the .config files ... 19
2.2.13 Installation log ... 20
2.3 Web CentralControl Typical Installation ... 21
2.3.1 Installation Steps - Typical ... 21
2.4 Web CentralControl Custom Installation ... 31
Contents Page 4
2.4.2 Installation Steps - Custom ... 33
2.4.3 Installing Web CentralControl for an Intranet/Internet mix ... 54
2.4.4 AMP Redirectors ... 54
2.4.5 Configuring Web CentralControl for a Web Farm ... 55
2.4.6 Configure Logging Level ... 58
2.5 Modify, Repair, Remove/Uninstall ... 59
2.5.1 Modify ... 60
2.5.2 Repair ... 60
2.5.3 Remove/Uninstall ... 61
2.6 Web CentralControl Upgrade ... 62
2.6.1 Rolling Back an Upgrade ... 63
2.7 Status Application ... 64
2.7.1 Usage ... 64
2.7.2 Installation ... 65
3 Web CentralControl Administration ... 66
3.1 Overview ... 66
3.1.1 ADMINISTRATION Company ... 67
3.2 Logging In for the First Time: Super user ... 68
3.2.1 Search for Company or User Name ... 70
3.3 Account Management ... 71
3.3.1 Create New Company ... 71
3.3.2 Edit Company ... 72
3.3.3 Remove a Company ... 74
3.3.4 Account Administrator ... 75
3.3.5 Create New User ... 78
3.3.6 Edit User ... 79
3.3.7 Remove User... 81
Contents Page 5
3.3.9 Support User Login ... 84
3.4 Message Management ... 86
3.4.1 Add Message ... 86
3.4.2 Edit Message ... 91
3.4.3 Remove Message ... 92
3.4.4 Your Messages ... 92
3.5 Preferences ... 93
3.5.1 User Lockout Reset ... 94
3.6 Quick Links ... 95
3.7 Settings for EVault Reports ... 96
3.8 Usage Metrics ... 97
3.9 Agent Installation Kit Management ... 98
3.9.1 Agent Installation Kit Add or Update ... 98
3.9.2 Agent Installation Kit Removal ... 99
3.9.3 Upgrading the vSphere Agent ... 99
Overview Page 6
1
Administration Overview
1.1 Welcome to Web CentralControl Administration
The Web CentralControl program provides a centralized point of control for remotely managing backups and restores of servers on large computer networks.
With Web CentralControl, you can configure, monitor and manage all of your remote backup and restore activities. Your backups are encrypted and transmitted via your network, or the Internet, to a remote and secure vault (i.e., EVault Software Director).
Through Microsoft Internet Explorer or Mozilla Firefox on a network, you can use Web CentralControl to access registered Agents for backup and recovery.
You cannot directly upgrade a Web CentralControl installation from a 32-bit server to a 64-bit server, but migration is possible. For information about this, see the Web CentralControl Migration Guide.
This manual describes the installation of the Web CentralControl application, as well as
administration functions to use initially (and others to use routinely). Backups and restores are not part of this administration. Web CentralControl provides online help for backups and restores, and all backup/restore users can access it.
Administration functions have separate online help. These functions are also described in Web CentralControl Administration in this guide. Web CentralControl installation is not documented in the online help. It is only documented in this guide.
Overview Page 7
1.2 Web CentralControl Features and Requirements
Note: It is easier than ever to give your users access to EVault Reports. To learn how to take advantage of this, see EVault Reports integration information in Web CentralControl Typical Installation, Web CentralControl Custom Installation, and Settings for EVault Reports. Features of Web CentralControl:
- Communication between Web CentralControl and the Agents is encrypted (SSL/TLS). - Installation can range from simple (typical) setups on one machine to custom setups
on multiple machines.
- Six levels of roles and permissions, from “Super user” (site administrator) to “view status only”.
- Users can propagate a job from one Agent to another. This allows configuration of multiple Agents, without the need to modify each Agent individually.
- The Administrator can post informational messages on user dashboards.
- The application can support up to 50 concurrent user connections per server. If you need more, you must use a web farm for multiple servers.
The Web CentralControl application requires:
- Microsoft Windows Server 2012, 2008, or 2003 - .NET Framework version 3.5 SP1, plus ASP.NET
- Internet Information Services (IIS) version 7.0 or later (already active), except for Windows Server 2003 installations, which require IIS 6.0
- For new installations, SQL Server/Server Express 2012 or 2008 R2 (mixed mode authentication). See SQL Server Requirements for details.
- Agent software version 5.6 or later
Note: Web CentralControl itself does not require a license. Agents and Plug-Ins receive their licenses through the vault.
Browser requirements:
- Internet Explorer 8 or later, or a recent version of Firefox
Note:Compatibility View in Internet Explorer is not supported.
Overview Page 8 - Minimum recommended screen resolution is 1024 x 768
1.2.1 Browser Limitations
You can use the Web CentralControl user interface through Microsoft Internet Explorer and Mozilla Firefox. Because Web CentralControl is a secure web application, some browser functions are not permitted, or they do not operate as they do on typical internet sites. Besides the conditions mentioned previously (regarding cookies, JavaScript, and pop-up blockers), you should also adhere to the following conditions. Failure to do so can cause unpredictable results.
• You cannot have more than one Web CentralControl window open in the same login session. That is, you should not use Ctrl+N (New Window) or Ctrl+T (New Tab) to open a browser window from within another browser window. You may, however, start a separate new browser.
• Do not use the Back or Forward buttons in your browser. This will cause unpredictable behavior. The Web CentralControl program may appear to work properly, but it may not produce correct results.
In Firefox, to avoid scrollbars on Administration pop-up windows, suppress the location bar: 1. Type
about:config
into the location bar.2. Press Enter to display the list of preferences.
3. Highlight the following setting, and set its value to false.
dom.disable_window_open_feature.location
Go to the Web CentralControl login screen to continue.Internet Explorer has a security feature where a pop-up or modal dialog window may have an address or status bar showing. This tends to reduce the size of usable data in the window. You can turn this feature off through these steps:
1. Open a browser window.
2. Open the Tools menu, and click Internet Options. 3. Go to the Security tab, and click Custom level.
4. Under Miscellaneous, find the Allow websites to open windows without address or status bars option, and set it to Enable.
Overview Page 9
1.3 Terms Used in This Guide
AMP Proxy: AMP is an Agent Management Protocol. This protocol is used to communicate between Web CentralControl and the BUAgent, through a proxy server. There can be multiple AMP Proxy servers, each of which can support up to 1,000 registered Agents.
AMP Redirector: The AMP Redirector service sits between Web CentralControl and multiple proxy servers. Its function is to balance the load to the proxy servers. An AMP Redirector service is always required to be running.
BUAgent: A Backup Agent (BUAgent) is an Agent for Web CentralControl. Web CentralControl can only control BUAgents.
BAMS/BANS protocol: BAMS (Backup Agent Management SOAP) is the interface that Web CentralControl uses to communicate with the BUAgent. BANS (Backup Agent Notification SOAP) is the interface the BUAgent uses to upload data and register with Web CentralControl. (“SOAP” means Simple Object Access Protocol.)
Registration Service: This Web service allows the Agent to register with Web CentralControl through the AMP proxy.
Propagation: Users can propagate a job from one Agent to another. This helps speed up the configuration of multiple Agents in the same company. The user can configure multiple Agents from one base job without having to modify each Agent independently. Users can also update particular settings after the initial job propagation. A “Propagation Service” runs any job propagation requests submitted by users.
Messaging: The Super user can create system-wide messages that users will see in the “Your Messages” sections of their Backup and Recovery dashboards. The messages can be language-specific, and filtered for companies and Agent types.
Installation Page 10
2 Installation
This chapter describes Web CentralControl installation. Web CentralControl can be a simple (Typical) installation with all the components on the same machine. Or it can be a Custom installation, with the components installed separately.
A Custom installation, using all of the default selections, offers the same functionality as a Typical installation.
The same kit automatically installs the Web CentralControl components for Typical installation and Custom installation:
Notification Service: Allows the Agent to upload information to Web CentralControl through the AMP Proxy
Registration Service: Allows the Agent to register with Web CentralControl through the AMP Proxy
SQL Server Database Setup: Used by all the Web services, Windows Services, AMP Proxy and AMP Redirector
AMP Proxy: Allows the Agents to connect to (and then be managed by) Web CentralControl and the BackupConsole
Propagation Service: Runs job propagation requests submitted by users
User Interface: Provides login capabilities, user management and the ability to manage remote Agents. It also contains the BackupConsole and Login applications.
AMP Redirector Service: Allows Agents to connect to the AMP Redirector to register and be redirected to the AMP Proxy, which allows them to be managed by Web CentralControl.
Optional component:
Status: Program that provides a page that checks the status of the Web CentralControl components, including Notification/Registration service, Proxy availability and Database availability. See 2.7 Status Application for details.
Note: You should perform regular backups of the Web CentralControl databases (using the SQL Server Agent Plug-In or database dumps).
2.1
Migrating to a 64-Bit Server
You cannot directly upgrade a Web CentralControl installation from a 32-bit server to a 64-bit server, but migration is possible. To migrate to the 64-bit version of Web CentralControl, you must upgrade to the 32-bit version of Web CentralControl 7.2x first. To see instructions for migration, refer to the Web CentralControl Migration Guide.
Installation Page 11
2.2
Installation Overview
This section describes the installation process that applies to both Typical and Custom
installations. The sections following this overview describe Typical and Custom installations in detail.
2.2.1 Prerequisites
1. For new installations, Microsoft SQL Server/Server Express 2012 or 2008 R2 (mixed mode authentication) needs to be installed and running. See SQL Server Requirements for details. Note that SQL Server is not part of the Web CentralControl installation. 2. Internet Information Services (IIS) 7.0 or later is required. This is not part of the Web
CentralControl installation.
3. .NET Framework version 3.5 SP1 is required, as well as ASP.NET. Web CentralControl registers these, but does not install them.
Note: If you install products such as Web CentralControl and EVault Reports on the same machine
2.2.2 Recommended Setup
, they should use different virtual directory names for the same application. For example, when “Login” is the default virtual directory name, Web CentralControl can use “Login” and EVault Reports can use “ERLogin”. If you don’t use different names, one will overwrite the other. This does not apply if they are on different machines.
The user interface (i.e., the BackupConsole and User Management applications), AMP Proxy, and AMP Redirector should reside on systems in a perimeter network, or they should be made available over the Internet. They are the connection points to the system.
The Notification Service, Registration Service, Propagation Service, and Database should reside on one or more internal systems that are not accessible from the Internet. These services do need to be internally accessible by the user interface, AMP Proxy, and AMP Redirector systems.
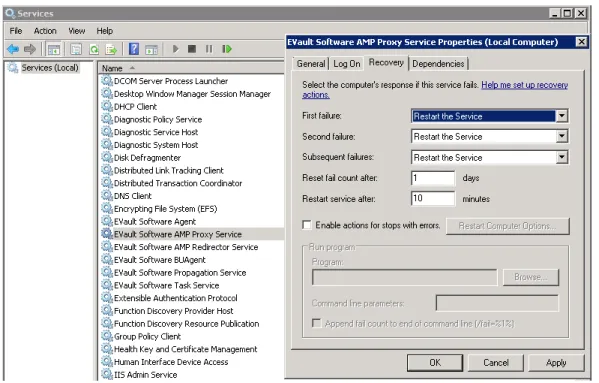
2.2.2.2 Recovery Options for Web CentralControl Service Properties
Windows Services (such as AMP Proxy, AMP Redirector, AMP Propagation, and BUAgent) typically use a default option to Take No Action for recovery. This means that if one of these services halts, it must be restarted manually.
But the Web CentralControl installation process changes the default responses for these services to restart after a 10-minute wait. The Administrator may want to change these recommended timeouts.
Installation Page 12 In Windows, under Administrative Tools > Services (Local), select one of the EVault services.
Under the Recovery tab, you will see menus for “response if this service fails” such as Restart service after <10> minutes. You can change the recommended times if you wish.
Figure 1. - Recovery Options for Services
2.2.3 SQL Server Requirements
For new Web CentralControl installations, Microsoft SQL Server/Server Express 2012 or 2008 R2 must be installed and running, with the following requirements:
SQL Server Option Requirement
Instance feature Database Engine Services
Authentication Mixed Mode (SQL Server and Windows authentication)
Collation Any case-insensitive collation
Instance name Any instance name; no restrictions
SQL Server should be installed on a system that is not externally visible, configured with default settings, and ready for use.
When SQL Server and Web CentralControl services are installed on different servers, TCP/IP must be enabled for the database instance. SQL credentials must also be specified for connecting to the database from remote servers.
Installation Page 13 Web CentralControl can use the same SQL Server instance as EVault Reports. However, for
scalability and environments with many Agents and vaults, it is preferable to use separate SQL Server instances for Web CentralControl and EVault Reports.
2.2.4 Web CentralControl Recovery
If your Web CentralControl installation is damaged or deleted, you might be able to recover. There are three databases associated with the Web CentralControl program. These contain all of the data that has been entered since the initial installation.
- WebCC
- UserManagement - SiteManagement
It is assumed that you have made backups of the databases with the SQL Server Agent Plug-In, or created database dump files with SQL Server Express. You can then restore the databases after you reinstall the Web CentralControl application.
Note: An open-file solution should not be used for backups here.
You must reinstall the software to the same locations as before, restore the databases, and then restart all of the services.
When you reinstall the Web CentralControl application, you will need to create new (empty) databases. Then you can restore the databases with the backup from the SQL Server Agent Plug-In.
2.2.4.1 Web CentralControl Backup / Restore
Here are recommendations for backing up Web CentralControl:
At a minimum, the three Web CentralControl databases (UserManagement, SiteManagement and WebCC) must be backed up.
To restore, you need to first reinstall the software at the same locations and IPs as before, restore the databases, and then restart all of the services.
Complete DR Backups
For a complete DR backup, the following must be backed up. Note that this will require multiple jobs to accomplish.
The three databases: UserManagement, SiteManagement and WebCC System State, including Windows System Files
Installation Page 14 The installation directories of these components:
• AMP Proxy (default location C:\Program Files\EVault Software\WebCC Services\AMP Proxy Service)
• AMP Redirector (default location C:\Program Files\EVault Software\WebCC Services\AMP Redirector Service)
• Propagation Service (default location C:\Program Files\EVault Software\WebCC Services\PropagationService)
• Task Service (default location C:\Program Files\EVault Software\WebCC Services\Task Service)
• BackupConsole (default location C:\inetpub\wwwroot\BackupConsole)
• Login (default location C:\inetpub\wwwroot\login)
• Notification (default location C:\inetpub\wwwroot\notification)
• Registration (default location C:\inetpub\wwwroot\registration)
• Status (default location C:\inetpub\wwwroot\WebCCStatus) (if installed)
• Language Files (default location C:\Program Files\EVault Software\WebCC Services\LanguageFiles)
To restore all of this, you must restore from all of the jobs that created the backups. The backup with System State and the files needs to be restored first, then the databases, and then all of the services need to be restored and restarted.
If a web farm was also being used, the “machine.cfg” file needs to be readjusted after the restore to enable the farm again.
Note: All of the Agents connected to the Proxy will go offline during a restore process and will need to be restarted. You can prevent the need to restart the Agents by making the AMP Proxy service unavailable while you restore the server.
2.2.5 Encrypting View State for Web CentralControl
ASP.NET view state is the technique used by an ASP.NET web page to preserve changes to the state of a Web Form across postbacks. That is, the view state represents the state of the page when it was last processed on the server. View state makes the use of the Web Forms model possible.
By default, with .NET the view state is verified but not encrypted. If Web CentralControl (using only one UI application) will run in a service environment, the view state should be encrypted.
Installation Page 15
There are some manual steps that must be taken to encrypt the view state.
If Web CentralControl is not running on a web farm, to turn on encryption for Web CentralControl, the user must modify the web.config file in this directory:
C:\Windows\Microsoft.NET\Framework\<version>\Config There is a line in the web.config file that resembles this:
<machineKey validationKey="AutoGenerate,IsolateApps" decryptionKey="AutoGenerate,IsolateApps"
validation="HMACSHA256"/>
To turn on encryption, only the “validation=” setting needs to change. Change it to 3DES. The resulting line should look similar to this:
<machineKey validationKey="AutoGenerate,IsolateApps"
decryptionKey="AutoGenerate,IsolateApps" validation="3DES"/> If you make this change, all .NET web applications that run under .NET will have their view states encrypted.
Note: If the Web CentralControl UI application is running on a web farm, there are different steps that are required to set up view state encryption on the web farm. See Configuring Web CentralControl for a Web Farm.
2.2.6 Securing Your Websites
If you choose to secure your websites after you have installed Web CentralControl, the following steps must be completed.
1. Assign your Certificate to the website where the UserManagement (Login) and BackupConsole web applications reside.
2. In IIS Manager, ensure that the SSL (Secure Sockets Layer) protocol is required for the Login and BackupConsole virtual directories.
3. Update the following fields in the web.config file in the BackupConsole web application's installation location to use https instead of http at the start of the URL:
StartupPage LoginSite Help.Base.Url
Installation Page 16 4. Update the following fields in the web.config file in the UserManagement (Login) web
application's installation location to have https instead of http at the start of the URL: FlorenceSite
LoginSite Help.Base.Url
Note: Do not modify the remainder of the line.
5. Restart IIS. You will need to connect to https://<yourwebaddress>/loginto use your application now. You should also install a default redirection page at the http://<yourwebaddress> location to redirect to the https://<yourwebaddress>/login page. This helps to prevent problems with users referencing the non-secure website.
Note: Attempts to log in with the http prefix rather than https will result in permission errors.
2.2.7 Limit Language Choices
During the installation you are asked for your choice of languages, in addition to the default English. You can choose from French, German, Spanish, and Portuguese.
If you do not install an additional language now, you can do it later by rerunning the installation with Modify. You can also remove a language this way.
The dialog for language selection only appears during a fresh Install, Upgrade or Modify process. Repair and Uninstall scenarios do not show the dialog.
Notes about languages
If Web CentralControl is used with multiple languages, messages (in “Your Messages”) need to be created for each language, in that language. If a message is not provided for a particular language, users who log in using that language will not see the message.
If Web CentralControl is used with multiple languages, quick links need to be created with text for each language, in that language. If a quick link does not have text for a particular language, users who log in using that language will not see the links.
Installation Page 17 2.2.8 Agent Update Indicator
Web CentralControl can place an icon next to an Agent version if it is not at the most recent version.
To accomplish this, the Super user has an “Agent Install Kit Management” screen that allows them to define which Agents can be upgraded, the versions, and where the upgrades come from. See 3.8 Agent Installation Kit Management for more information.
If an Agent that is registered to Web CentralControl has a version earlier than the one indicated in the file, that Agent will get an icon next to their Agent version number in the Agent grid. If the user pauses the mouse pointer over that icon, they will get a message indicating that there is a newer version of the Agent available for that system.
Figure 2. - A newer Agent version is available
If the Super user has added an Agent type to be upgraded, a URL is provided for the location of the Agent installation kit. The user will be able to click on the Agent Update indicator icon. This will download the new installation kit, and the user can run it to upgrade the Agent.
Installation Page 18 2.2.9 URLs for the Agent Assistant
During the Agent installation, if you chose to install the Agent Assistant, you were prompted for the URL of the Web CentralControl application, and the URL of the Web CentralControl Help. The installation process does not check the validity of the URL addresses. So if you cannot start Web CentralControl, or run the Help (or if you need to change the addresses), run the Agent installation kit in Modify mode.
Alternatively, you can change the settings through line commands. For example, you can use this command to install an Agent with the Agent Assistant, and then register the Agent with Web CentralControl:
setup.exe /s /v" FEATUREMAESTRO=on REGISTERWITHWEBCC=True AMPNWADDRESS=123.456.com [email protected]
AMPPASSWORD=LetMeIn3
BCKLOGINURL=http://123.456.com/login/login.aspx BCKHELPURL=http://123.456.com/help\help.htm /qn"
In this example, setup.exe represents the name of the installation package. For more information about these line commands, see the online help for Backup and Recovery.
2.2.10 Default Installation Directories
By default the installer places the files for fresh installations in a directory called: C:\Program Files\EVault Software\WebCC Services where “C:” may be another drive. You may still change the path, if required.
All the EVault Software applications are then located in a single directory, but have their own subdirectory to run in. Requirements (such as locking down for admin users only) won't affect the other applications.
The kit will not remove the top-level directory unless it is empty at the end of an uninstallation.
2.2.11 Agent Custom Commands
A folder called "ScheduleScripts" in the Agent installation folder is used to allow Web
CentralControl to use the custom commands that you create. If this folder does not exist, you should create it. The script file itself is a .bat file that must reside in this ScheduleScripts folder. See “Custom Commands” in the Web CentralControl help for more information.
Installation Page 19 2.2.12 Backup Log timeouts in the .config files
If you show "Errors Only" or "Errors and Warnings Only" for large files (see 3.3.9.2 Log File Viewer), Web CentralControl might time out and issue errors.
A Unix Agent can take a long time to parse the log file when filtering it, so you may want to increase the length of the timeout period. As a workaround, change the .config files. For log-viewer page timeouts, add the following lines to the BackupConsole application's
web.config file:
<location path="Pages/Job/logviewer.aspx"> <system.web>
<httpRuntime executionTimeout="1000"/> </system.web>
</location>
Add the lines to the Configuration section of the web.config file, directly after the </appSettings> line. In this example, the value is in seconds.
For the Proxy/Agent “keep alive” timeouts, in the AMP Proxy Service application directory, in the AmpService.exe.config file, there is a line that reads:
<add key="Proxy.KeepAlive.Interval" value="60000" /> This value is in milliseconds and (for example) may be increased to 300000. For SOAP call timeouts, in the AMP Proxy Service application directory, in the
AMPService.exe.config file, there is a line that reads:
<add key="Proxy.Soap.Timeout" value="100000" /> This value is in milliseconds and (for example) may be increased to 1000000.
Note: Increasing the “keep alive” interval to 5 or 10 minutes means that Web CentralControl will not receive information that an Agent is offline until 5 or 10 minutes after the Agent has gone offline. This means that the Agent will still show as online in the UI, even though it is offline. If you attempt to access this Agent that appears to be online, you will get errors because the Agent will not respond.
Installation Page 20 2.2.13 Installation log
Web CentralControl creates an installation log during a new Installation, Repair, Upgrade or Uninstall.
This log file can be used for troubleshooting and installation support. The log file is overwritten each time the installation runs.
Typically, the only place to write to a file during the installation is the temporary directory from where the installation is running. The behavior of the log file is as follows:
• While the installation is running, the log file will be in the installation’s “Temp” folder.
• At the end of the installation, the log file will be copied to one of two locations:
- If the AMP Proxy, AMP Redirector, Propagation Service or Support Files are selected for installation, the log file will be copied into the common parent directory (default is C:\Program Files\EVault Software\WebCC Services).
- If the above are not selected for installation, but User Interface, Notification, or Registration services are selected for installation, the log file will be copied into the common parent log location (default is C:\Logs).
- If none of the above is selected or the log file cannot be copied to one of those directories, the installation log remains in the Temp directory.
In the Installation log, you will see what the installation has used. This can include: Start date and time
Mode selected Database instance
Name of installation part (starting) Name of installation part (finishing)
Other steps, such as changing, replacing, cleaning up, and backing up Process completed
Note: If an uninstallation succeeds, the Installation log is removed. But if the uninstallation fails, or is cancelled, the Installation log will remain in its original location in the temporary folder.
Installation Page 21
2.3
Web CentralControl Typical Installation
A typical installation is the fastest and easiest installation. All the required components are installed on one server.
Before the installation starts, you should have:
• .NET installed
• IIS installed
• SQL Server/Server Express 2012 or 2008 R2 (mixed mode authentication) installed. See SQL Server Requirements for details.
2.3.1 Installation Steps - Typical
This section describes the steps involved in the installation.
1 – Run the installation kit,
WebCentralControl-7-2x-xxxx.exe
(where xxxx is the build version). The installation kit may have been renamed.2 – Welcome Dialog: States what product is being installed.
3 – View Notes: Information about Support and Release Notes appears.
4 – Software License Agreement: Ensures the user accepts the terms of the software license agreement (SLA) before installing the software.
5 – Install Type: Choose a Typical Installation. This will install all the necessary components on the same machine.
Installation Page 22
Figure 3. - Typical Installation
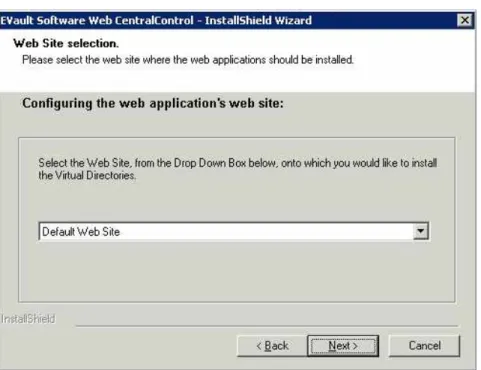
6 – Web Site selection.
If you have more than one web site in your IIS, you can select it here.
Note: If you have only one web site on this system, this dialog will not appear, and the single web site will be selected by default.
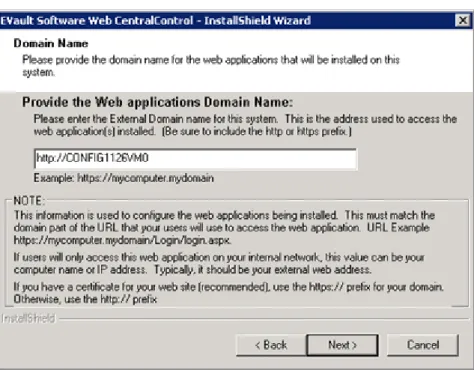
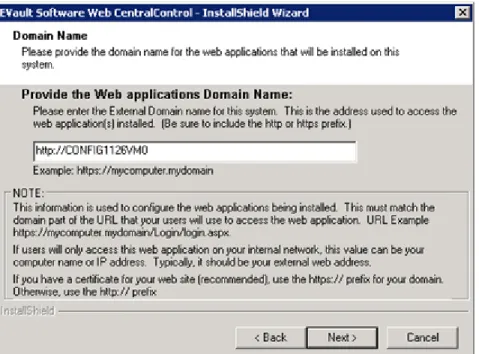
Installation Page 23 7 – Domain Name: Configure the Web application’s domain name.
Figure 5. - Domain Name - Typical Installation
The computer name or IP that you enter here must match the name or IP in the path that you use in the Web Browser to log in.
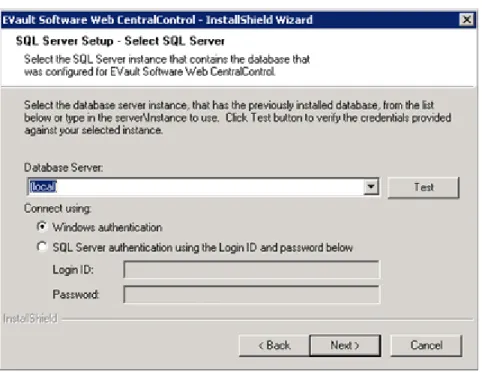
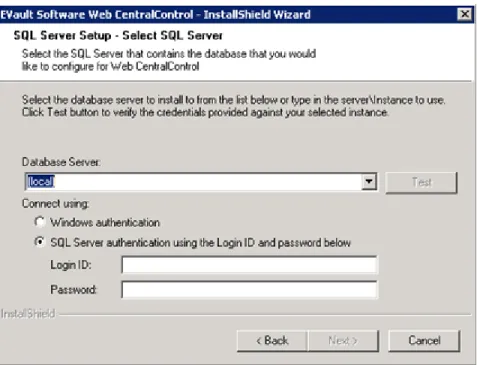
Installation Page 24 8 – SQL Server Setup - Select SQL Server
Figure 6. - SQL Server Setup
You can optionally click “Test” to validate your connection with the database server.
Note that SQL Server authentication requires the Login ID and password that the DBA used to create the database instance (which must be empty, or populated from a previous installation).
Installation Page 25 9 – Select the languages to install
You are asked for your choice of languages, in addition to the default English. You can choose from French, German, Spanish, and Portuguese.
If you do not install a language now, you can do it later by rerunning the installation with Modify. You can also remove a language this way.
The dialog for language selection only appears during a fresh Install, Upgrade or Modify process. Repair and Uninstall do not present the dialog.
10 – Services/Support files installation path
Installation Page 26 11 – AMP Proxy IP address configuration
Figure 8. - AMP Proxy IP addresses
Enter the domain name and the external IP address (for Agents) and internal IP address (for Web CentralControl) for the AMP Proxy.
Installation Page 27 12 – Integrate with EVault Reports
If you integrate Web CentralControl with EVault Reports, users can see the “Reporting” tab in Web CentralControl.
Note: Although this integration is optional, it is easier than ever to give your users access to EVault Reports. Web CentralControl authentication (login) information can now be used to allow EVault Reports access.
Figure 9. - EVault Reports integration
To fully integrate Web CentralControl with EVault Reports, you must also associate Customer short name values (from the vault) and Report Group Name values (from EVault Reports Manager) with Web CentralControl companies. For more information, see Settings for EVault Reports.
Installation Page 28 If you selected “Integrate Web CentralControl and EVault Reports” on the previous screen, you
are asked here for the EVault Report URLs. For integration to work, EVault Reports must already be installed, and you must provide correct URLs for the EVault Reports installation.
The Report Viewer URL is used for end users who have access to reports. When these users click the “Reporting” tab in Web CentralControl, they are redirected to the EVault Reports URL where they can run reports for their company.
The Subscription (Report Manager) URL is used for super users. When these users click the “Report Administration” tab in Web CentralControl, they are redirected to the EVault Reports Manager site where they can configure subscriptions and report groups.
The Token Manager Service URL is only required if you have selected the Web CentralControl Authentication login method for integrating Web CentralControl with EVault Reports.
Installation Page 29 If EVault Reports is not installed, or you provide incorrect EVault Reports URLs, end users will
see messages such as the following:
Figure 11. - Cannot find integrated sites
13 - Begin the installation:
Figure 12. - Begin the typical installation
Installation Page 30 14 - Installation complete
Figure 13. - Typical installation complete
You should see the "InstallShield Wizard Complete" screen. This screen provides information about which URL to use, as well as logging in for the first time as super.
You will also see a message: “Do you wish to open the start page in your browser now?” when you click Finish.
Figure 14. - Open the start page now
You can start it now or later, by pointing your browser to the address of the server, and logging in (for example, http://company.domain/login/login.aspx).
Installation Page 31
2.4
Web CentralControl Custom Installation
A custom installation is similar to a typical installation, but it allows you to install the
components separately (on different machines) if you want to. You can customize the location and name for User Interface, Login, BackupConsole, Notification Service, Registration Service, and Services/Support.
Before starting the installation, you should have:
• .NET installed
• IIS installed
• SQL Server/Server Express 2012 or 2008 R2 (mixed mode authentication) installed. See SQL Server Requirements for details.
2.4.1 Overview
The same kit installs the Web CentralControl components for the Typical Installation and the Custom Installation. These are automatically included in a Typical installation:
Notification Service Registration Service SQL Server Database Setup AMP Proxy
Propagation Service User Interface
AMP Redirector Service Optional:
Status component
For details about these components, see Installation in this chapter. Briefly, the steps for the installation are:
1. Run the installation kit WebCentralControl-7-2x-xxxx.exe (where xxxx is the build version). Note that the installation kit may have been renamed.
2. The Welcome screen is shown.
3. Information about support and release notes appears.
4. The SLA (Software License Agreement) is shown. You must accept this to be able to continue.
Installation Page 32 5. Choose a Custom installation.
6. Select the features to install.
7. Choose the web application’s website. (This only applies if there is more than one website installed on the system.)
8. Enter the web application’s Domain name when prompted.
9. Select an SQL server. (SQL Server authentication credentials need to be used.) 10. Choose the Login installation path and log locations.
11. Enter a Login Virtual Directory name.
12. Select the languages to install. The default is English, but you can also choose from French, German, Spanish, and Portuguese.
13. Choose the BackupConsole installation path. 14. Enter a BackupConsole Virtual Directory Name. 15. Enter a Propagation IP address.
16. Choose the Notification installation path. 17. Enter a Notification Virtual Directory Name. 18. Choose the Registration installation path. 19. Enter a Registration Virtual Directory Name. 20. Choose the Services/Support files installation path.
21. Configure AMP Proxy IP addresses. Enter the external IP address that the Agents will use to connect to the AMP Proxy, and the internal IP address that the User Interface will use to connect to the AMP Proxy.
22. Integrate Web CentralControl and EVault Reports (optional). 23. Configure the Status path if you are prompted.
24. Begin the installation. 25. Installation completes.
These steps are described in more detail after this section. (Note: Some of the options may not appear, depending on your other selections.)
Installation Page 33 2.4.2 Installation Steps - Custom
This section describes the steps involved in the installation.
1 – Run the installation kit, WebCentralControl-7-2x-xxxx.exe. This may have been renamed. 2 – Welcome screen: States what product is being installed.
3 – View Notes: Information about support and release notes appears.
4 – Software License Agreement: Ensures that the user accepts the terms of the Software License Agreement (SLA) before installing the software.
5 – Install Type: Choose Custom Installation. This allows you to install the necessary components separately.
(See also 2.3.1 Installation Steps - Typical.)
Installation Page 34 6 – Select Features
Figure 16. - Select features to install
All components that you choose must be installed and running for the Web CentralControl application to function properly. If you do not install one or more components now, you can continue the installation, but you will be prompted for the location of where that component has been or will be installed. (Components can be installed on different systems, but their locations need to be provided during the configuration of the applications that rely on them.) All components must be installed in the configured locations before the application will function.
For improved performance, it is recommended that the User Interface component be installed on a separate system from the Database, AMP Proxy and Propagation Service.
For example, the User Interface, Notification Service, and Registration could be on a different system (under IIS) than the other components, which do not run under IIS.
You may have more than one IIS server. The virtual directory name relates to the installation path of each component within the same IIS server. If you have more than one IIS server, the configuration prompts require the full web address of the remote IIS server for the local components that communicate with them.
Installation Page 35 7. Web Site selection
If you have more than one web site in your IIS, you can select it here.
Note: If you have only one web site on this system, this dialog will not appear, and the single web site will be selected by default.
Figure 17. - Web Site selection – Custom installation
If you select a web site that runs on a non-default port (http/https), the port number for that web site must be provided with the Domain name for this server at the Domain name prompt.
Installation Page 36 8. Domain Name: Configure the Web application’s domain name.
Figure 18. - Domain Name – Custom installation
The computer name or IP that you enter here must match the name or IP of the path that you use for the browser to log in.
Figure 19. - Failed to verify the provided Web Address
This error message is typical if you have not set up your local IIS server with your selected domain name. In this case, the application will only work when you have successfully configured your IIS server with the domain name that has been provided here. If the Domain name changes after installation, the installed components will need to be manually updated.
Installation Page 37 9 - SQL Server Setup - Select SQL Server
Figure 20. - SQL Server Setup
You can optionally click “Test” to validate your connection with the database server.
Note that SQL Server authentication requires the Login ID and password that the DBA used to create the database instance (which must be empty, or populated from a previous installation). If the SQL Server setup option was selected for installation, this instance must not already have databases called WebCC, UserManagement, or SiteManagement. If the SQL Server setup option was not selected for installation, the SQL instance that is selected here should be the location where the SQL Server setup option was previously installed (or where it will be installed). Make sure that SQL Server has been installed using mixed mode authentication.
Installation Page 38 10 – Login: Select Installation Path and Log File location
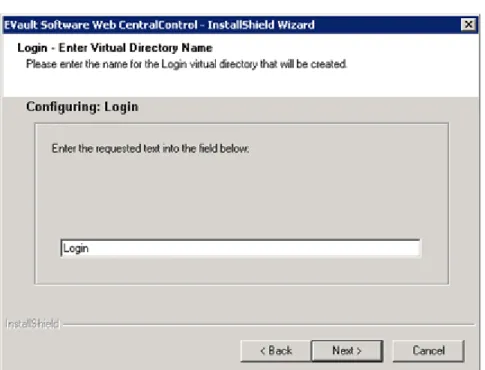
Installation Page 39 11 – Login: Virtual Directory Name
Figure 22. - Enter Virtual Directory Name
The installation path is where the application will be installed. The Log path is where this application will put its internal log files.
Note: Do not locate the log files under the application path. If you do, they will not available to users over the internet.
This component provides the login portal to Web CentralControl. This virtual directory will be part of the URL the users will see when they use your application. The breakdown of the URL to connect to this application is as follows:
http(s)://<DomainName>/<VirtualDirectory>/login.aspx.
Note that the default here, Login, is deliberately different from the default ERLogin directory name that EVault Reports uses. If you install both products on one server, and any Virtual Directory Names are the same, one will overwrite the other. You will not have this problem if they are on different machines.
Installation Page 40 12 – Select languages to install
You are asked for your choice of languages, in addition to the default English. You can choose from French, German, Spanish, and Portuguese.
If you do not install a language now, you can do it later by rerunning the installation in Modify mode. You can also remove a language this way.
The dialog for language selection only appears during a fresh Install, Upgrade or Modify process. Repair and Uninstall do not show the dialog.
13 – Backup Console: Select Installation Path
Installation Page 41 14 – Backup Console: Virtual Directory Name
Installation Page 42 15 - BackupConsole – Propagation IP address
Figure 25. - BackupConsole – Propagation IP address
By default, the Propagation Service will be installed using the loopback IP address (127.0.0.1). If your system does not allow the loopback, you can supply an alternate IP address for the local Propagation Service here.
Installation Page 43 16 – Notification Installation Path
Installation Page 44 17 – Notification Virtual Directory
Installation Page 45 18 – Registration Installation Path
Installation Page 46 19 – Registration Virtual Directory Name
Installation Page 47 20 – Services/Support files install path
Installation Page 48 21 - AMP Proxy IP address configuration
Figure 31. - AMP Proxy IP addresses
Enter the domain name and the external IP address (for Agents) and internal IP address (for Web CentralControl) for the AMP Proxy.
Installation Page 49
2.4.2.1 Integrating with EVault Reports
22 – Integrate with EVault Reports
If you integrate Web CentralControl with EVault Reports, users can see the “Reporting” tab in Web CentralControl.
Note: Although this integration is optional, it is easier than ever to give your users access to EVault Reports. Web CentralControl authentication (login) information can now be used to allow EVault Reports access.
Figure 32. - EVault Reports integration
To fully integrate Web CentralControl with EVault Reports, you must also associate Customer short name values (from the vault) and Report Group Name values (from EVault Reports Manager) with Web CentralControl companies. For more information, see Settings for EVault Reports.
Installation Page 50 If you selected “Integrate Web CentralControl and EVault Reports” on the previous screen, you
are asked here for EVault Reports URLs. For integration to work, EVault Reports must already be installed, and you must provide correct URLs for the EVault Reports installation.
The Report Viewer URL is used for end users who have access to reports. When these users click the “Reporting” tab in Web CentralControl, they are redirected to the EVault Reports URL where they can run reports for their company.
The Subscription (Report Manager) URL is used for super users. When these users click the “Report Administration” tab in Web CentralControl, they are redirected to the EVault Reports Manager site, where they can configure subscriptions and report groups.
The Token Manager Service URL is only required if you have selected the Web CentralControl Authentication login method for integrating Web CentralControl with EVault Reports.
Installation Page 51 If EVault Reports is not installed, or you provide incorrect EVault Reports URLs, end users will
see messages such as the following:
Figure 34. - Cannot find integrated sites
Note: EVault Reports is a separate installation. See the EVault Reports User Guide for detailed information.
After you successfully configure EVault Reports integration, you will see a Reporting tab in Web CentralControl. When you click the Reporting tab, you are taken to EVault Reports, which is a separate application.
Installation Page 52 23 – Optional: Select the path for the Status component, if you have chosen to install it.
See Status Application for details about this component.
Installation Page 53 24 - Begin the installation process
Figure 37. - Begin the installation process
The installation runs automatically from here. 25 - Installation complete
Figure 38. - Custom installation complete
You should see the "InstallShield Wizard Complete" screen. This screen provides information about which URL to use, as well as logging in for the first time as super.
Installation Page 54 You can start Web CentralControl after a complete installation by pointing your browser to the
address of the server, and then logging in.
For example (See Logging In for the First Time: Super User.)
Note: If you change the virtual directory of the Login component to something else, your URL will need to reflect this. The URL you should use is:
http or https (depending whether you are using certificates or not)
<http/https>://<domainname>/<virtualdirectory for Login component>/login.aspx. 2.4.3 Installing Web CentralControl for an Intranet/Internet mix
You may want to install Web CentralControl to use on both your Intranet and Internet, which might have different domain names.
If the domain names are the same, there is no conflict. If the domain names are different, the installation must be different.
You will need to install two instances of the User Interface component (one on each domain). The other components (AMP Proxy, Notification, Registration, SQL Server setup, and
Propagation) must only be installed in one location.
Both instances of the UI must point to the same installation of the other components. During the User Interface installation (if it was installed without the other components), you will be prompted for the location of the Database, Propagation Service and AMP Proxy Service. If you provide the locations to the single installation of those components, both User Interface installations will allow your users to manage the same Agents from either the Internet or Intranet.
2.4.4 AMP Redirectors
The AMP Redirector is a Web CentralControl service that sits between the Agent and proxy servers. It handles registration and initial connections of the Agents. The AMP Redirector must be set up for each Web CentralControl installation.
Its function is to balance the load to the proxy servers. When an Agent attempts to connect to Web CentralControl (and its database) through a proxy server, the Redirector will direct it to the next one available with the lowest number of connections.
During an upgrade from a previous Web CentralControl that did not use Redirector, the installer will add the Redirector if the AMP Proxy was previously installed. It will assume the port number of the AMP Proxy, and the proxy will be moved to port 8087.
Installation Page 55 Users should not notice any differences, and the Agent should reconnect when the services start
again. Users should be made aware after the upgrade that they will need to open port 8087 on their firewalls.
The Redirector service also handles the registration of Agents, so it will have the previously configured registration web service location in its configuration file.
An AMP Redirector is always included in a Typical installation, which is usually a single-machine Web CentralControl installation. For a Custom installation with many machines, you will need to add an AMP Redirector. There must be at least one AMP Redirector on the system.
- The AMP Redirector can be installed on a separate machine, which can be a virtual machine. Or it can be on the same system/systems as the UI, which would allow you to use the same address to access Web CentralControl and register the Agent.
Setting up AMP Redirector:
- You must have only one SQL database installation, one Propagation Service, one Notification Service, and one Registration Service installed. Each AMP Proxy/AMP Redirector must point to the single instances of these services.
- The AMP Redirector must have its own domain name. If it is running on the same address as an AMP Proxy, it must have its own port. This is the value that the Agent will use to make the initial connection, and register with Web CentralControl. By default the Agents attempt to connect to port 8086, so this should be the port for the AMP Redirector.
- You can have multiple AMP Proxies. Each AMP Proxy must be installed on its own system (or virtual machine) and have its own unique IP address that is available externally. The AMP Redirector will use that address to redirect the Agents to the appropriate Proxy.
- There is no need for extra configuration to set up an additional AMP Proxy. When the user chooses to install an AMP Proxy, the installation kit prompts for the location of the WebCC database and the external IP address. The AMP Proxy then uses these values to add itself to the Proxy list in the WebCC database, and the AMP Redirector uses the database to find the available AMP Proxies.
2.4.5 Configuring Web CentralControl for a Web Farm
A web farm uses multiple web servers to allow you to distribute your UI processing load across several servers.
If one of the servers in the farm fails, the others will continue to work. If you need more processing power, you can simply add another server without needing to change your Web CentralControl configuration or installation.
Installation Page 56 The web farm uses a virtual IP address (to which your UI application points) that is then resolved
into physical addresses for the servers.
The Agents must be registered to the IP of the computer hosting the AMP Redirector service. The Web CentralControl Administrator is responsible for installing and configuring the web farm. This includes setting the IP addresses, masks and gateways, and Network Load Balancing. These functions are not covered here.
The Web CentralControl installation is done in two parts. One server (which is not part of the farm) has all the components except the UI application installed. The servers in the farm are then each installed with their own copies of the UI application on each server.
There can be multiple AMP Proxy servers, each of which can support up to 1000 registered Agents. Each AMP Proxy should be installed on its own system (not the UI system).
All components of Web CentralControl on a web farm must be the same version. If you are upgrading Web CentralControl, you must upgrade all components on all servers to the same version.
Note: The UI Web application can support up to 50 concurrent user connections per server. If you need more, you must use a web farm for multiple servers.
Installation Page 57
Steps
1. Install the Notification Service, Registration Service, SQL Server, AMP Proxy, AMP Redirector
and Propagation Service, all on one machine (not a part of the farm). See Web CentralControl Custom Installation.2. Enable the Session State server on this machine. Using REGEDIT, change the
“AllowRemoteConnection” value to 1 to enable outside access. In the registry, see: HKEY_LOCAL_MACHINE\SYSTEM\CurrentControlSet\Services\aspnet_state\ParametersFigure 39. - Allow Remote Connections for Web CentralControl Services
3. Open Services in Computer Manager, and change the ASP.NET State Service “Startup Type” to
Automatic. Then start the service.
4. Install the Web CentralControl UI component on each of the farm servers. Run the installation
on each machine. Select Custom Installation, and choose only the User Interface feature to install (see Web CentralControl Custom Installation).5. To point to the session server, you must edit two
web.config files on each computer (with the UI installation) in the web farm. The files are typically in these folders:“C:\inetpub\wwwroot\BackupConsole” and “C:\inetpub\wwwroot\Login” In the “Session State Web.Config Settings” section of each file, change
“sessionState mode=InProc” to “sessionState mode=StateServer” Then change (in the next line)
stateConnectionString=”tcpip=xxx.xxx.xxx.xxx:42424”
to the IP of the session server (the one outside the web farm). This is the address that the Login page will point to. Save the web.config files.
Installation Page 58
6. Encrypt the View State next. All computers in the web farm with the UI application installed
must have the same machine key. The Web CentralControl Administrator is responsible for generating or obtaining the machine keys.
Modify the web.config file in the directory of each farm server machine: C:\Windows\Microsoft.NET\Framework\<version>\Config There is a line in the web.config file that resembles this:
<machineKey validationKey="AutoGenerate,IsolateApps"
decryptionKey="AutoGenerate,IsolateApps" validation="SHA1"/> Replace the settings for “validationKey=” and “decryptionKey=” with your generated keys, and change the “validation=” setting to “3DES”:
<machineKey validationKey="<your validation key here>"
decryptionKey="<your decryption key here>" validation="3DES"/>
Note: Use the same keys for all machines in the web farm that have the UI application installed. If you make this change, all .NET web applications that run under .NET will have their view states encrypted.
2.4.6 Configure Logging Level
Log files for BackupConsole and Login are automatically generated for clean installations of Web CentralControl. By default, the logging level is set to "Error".
To change the logging level, change the TraceLevelSwitch line in the system.diagnostics section of the web.config file. Do this for each web application (as well as AMP Proxy and Redirector). For example, use:
<add name="TraceLevelSwitch" value="4"/>
to enable verbose logging.Installation Page 59
2.5
Modify, Repair, Remove/Uninstall
This section describes the steps for modifying, repairing, or removing the Web CentralControl application.
1 – Run the installation kit WebCentralControl-7-2x-xxxx.exe. This may have been renamed. 2 – The Setup Wizard for Web CentralControl starts. Click Next to continue.
3 – Welcome screen: Modify, Repair, or Remove the program.
The installer detects that there is a version of Web CentralControl currently installed. Choose an option and click Next.
Figure 40. - Modify, Repair, or Uninstall
Modify: Use to add or remove features. If you are installing some components on different machines, you can use this option. Note that if you remove all the components, you will uninstall the entire application.
Repair: Reinstalls the files for the features that were already installed (in cases of corruption, for example). Note that this will not modify the settings in the configuration files of the
applications. If changes to the configuration files are required, make them manually. Remove: Uninstalls the application.
Installation Page 60 2.5.1 Modify
Modify allows you to select features to add or remove.
Figure 41. - Select Features to Modify/Install
For descriptions of the features, see Web CentralControl Custom Installation.
If you choose to integrate Web CentralControl and EVault Reports, you are asked for their websites. See Integrate with EVault Reports for more information.
You are then asked to confirm the Modify process, and it continues and finishes.
2.5.2 Repair
The Repair process will immediately start to reinstall all components. Click Finish when it completes.
Installation Page 61 2.5.3 Remove/Uninstall
1 – From the Welcome screen, choose “Remove” to remove all installed components. 2 – Removal will start, and first show the “Setup Type” screen. You are asked whether or not you want to remove the database used with this product. The default is Leave Database. Choose an option and click Next. (Note that you will only be asked about the database that was
specified through the installer. If you have pointed to another database, you will not be asked about it.)
This database contains all the configuration information for Agents and jobs. It also contains login information and other details about your Web CentralControl application.
Typically you would remove the database when you uninstall. But you may want to leave it for historical data, or if there is sensitive data involved. Removing it is recommended because leaving it could interfere with a new installation.
If you select to leave the database, this instance cannot be used to install the SQL Server setup component again. Leaving the database should not be done if you intend to install this
application to the same instance later. If the database is intended to be used again later, a modify should be used to remove the other applications but leave the database component installed, so it can be properly upgraded (if it is to be used again in the future).
3 – If you choose to remove the database, you see a “Select SQL Server” screen. The instance where the database was previously installed should be selected here so it can be properly uninstalled.
If you use the “Test” button, you can check the validity of the connection. You may get an error message (Test failed – connection not established) if you enter the wrong Login ID or Password for SQL Server authentication.
4 – Confirm uninstallation: You are asked to confirm that you want to proceed (i.e., continue with the removal of installed components).
Figure 42. - Confirm Software Uninstallation
5 – The uninstall proceeds. At the end, “Maintenance Operation Completed” appears. Click Finish.
Installation Page 62 You may be asked to restart your computer to properly finish the uninstallation.
2.6 Web CentralControl Upgrade
You cannot directly upgrade a Web CentralControl installation from a 32-bit server to a 64-bit server, but migration is possible. To migrate to the 64-bit version of Web CentralControl, you must upgrade to the 32-bit version of Web CentralControl 7.2 first. To see instructions for migration, refer to the Web CentralControl Migration Guide.
Before you start the upgrade process, make sure that each system has the correct versions of .NET and ASP.NET installed.
To upgrade an existing Web CentralControl installation, follow these steps:
1) Redirect the Login page to some sort of “Site under maintenance page” to ensure that no users log in during the upgrade.
2) Restart the IIS server on the front-end system (i.e., the system with the UI component installed) to make sure that any already logged in users will be logged out.
3) Shut down the AMP Proxy, Propagation Service, and Registration Service. 4) Back up the Web CentralControl databases (WebCC, UserManagement, and
SiteManagement).
5) First upgrade the back-end components to the new version. The system that has the database on it should always be upgraded first.
6) Upgrade the remaining systems that have Web CentralControl components, including other systems in the farm. All installations in the farm must be at the same version.
7) Modify the ASP.NET version that is configured for each website (Login, BackupConsole, Notification, and Registration). To do this, go to My Computer > Manage. Under the IIS and the website where the website is installed, select the website, right-click, and select Properties. Underneath, there should be a tab for ASP.NET. Go there and select the correct versions of .NET. Save the changes. This must be done for each website installed.
8) Verify that the application is working (note that this should be done using an alternate address so that Web CentralControl is still not available to the general public).
9) If upgrading the database, stop the AMP Proxy Services, Propagation Service, and
Registration Service again at this time. Ensure the Web CentralControl UI application is still unavailable to the general public.
Installation Page 63 10)Upgrade the database to the correct version of SQL. If you currently have MSDE installed,
and want to upgrade to SQL Express, follow the Microsoft instructions to perform an “In place” upgrade.
Note: By default, Setup uses the instance name of SQLEXPRESS to install, rather than the MSDE default of the host computer name. If you wish to change the instance name to the name of the host computer, click the Advanced button. This causes the setup program to detect all instances that have been installed using the MSI installation method. If you wish to upgrade a previously installed MSDE instance, click Installed Instance and select the MSDE instance that you wish to upgrade.
11)Restart the AMP Proxy Services, Propagation Service, and Registration Service. 12)Verify that the application is working.
13)If you like, you can install the Status application at this point by running an installation in Modify mode (or a fresh custom installation if you are installing the Status application to an independent server) from the installation kit, and selecting the Status application from the Features list. The Status application only needs to be installed on one system.
Note: After installation, the Status application can be found at http://localhost/Web CentralControlStatus/Status.aspx
14)Remove the redirection so that people can use the Login page again.
2.6.1 Rolling Back an Upgrade
During an upgrade, dump files are created. These can be used to manually roll back the databases in case the upgrade fails.
The three databases are backed up to the following files: WebCC_database.bak
UserManagement_database.bak SiteManagement_database.bak in the following location (typically):
C:\WebCCDBBackup\