A c c o u n t s P a y a b l e
User ’s Guide
Copyright Notification
At Cougar Mountain Software, Inc., we strive to produce high-quality software at reasonable prices. We can only do this, however, if our rights as developers are respected. Even though we provide excep-tional software at low prices, we do not consent to unlicensed use of our software or documentation included.
Information contained in this document represents the current view of Cougar Mountain Software on the issues discussed as of the date of publication. Because Cougar Mountain Software must respond to changing market conditions, it should not be interpreted to be a commitment on the part of Cougar Mountain Software, and Cougar Mountain Software cannot guarantee the accuracy of any information presented after the date of publication.
This documentation is for informational purposes only and is not a qualified accounting reference. COUGAR MOUNTAIN SOFTWARE MAKES NO WARRANTIES, EXPRESS OR IMPLIED, AS TO THE INFORMATION IN THIS DOCUMENT. It is the user’s responsibility to review the latest publication releases from Cougar Mountain Software. The example companies, organizations, products, people, and events depicted herein are fictitious. No association with any real company, organization, product, person, or event is intended or should be inferred.
Complying with all applicable copyright laws is the responsibility of the user. Without limiting the rights under copyright, no part of this document may be reproduced, stored in or introduced into a retrieval system, or transmitted in any form or by any means (electronic, mechanical, photocopying, recording, or otherwise), or for any purpose, without the express written permission of Cougar Mountain Software. Cougar Mountain Software may have patents, patent applications, trademarks, copyrights, or other intellectual property rights covering subject matter in this document. Except as expressly provided in any written license agreement from Cougar Mountain Software, the furnishing of this document does not give you any license to these patents, trademarks, copyrights, or other intellectual property. Recognized Trademarks. Microsoft, Windows, Windows Vista Business, Windows 7, Windows 8, and Windows 10 are registered trademarks of Microsoft Corporation. Other brands or products are the trademarks or registered trademarks of their respective holders and should be treated as such. © 2016 Cougar Mountain Software
All Rights Reserved
i
Table of Contents Accounts Payable User’s Guide
Learning About this Resource
1
How to Use This Guide ... 2
How This Guide Is Organized... 2
Denali Help... 3
Document Conventions... 3
In-Program and Web Help ... 4
Window-Specific Help ... 4
Procedural Help ... 4
Reference Help ... 4
Navigating the In-Program Help ... 5
Navigating the Web Help ... 6
Printing Help Topics ... 7
User Guides ... 7
Release Notes... 8
Customer Support... 8
Information to Gather before You Contact Customer Support... 8
Contacting Customer Support... 8
Training ... 9
Online Training... 9
Classroom Training in Boise ... 9
On-Site Training at Your Business... 9
Telephone Training ... 10
Training Videos ... 10
ii
Table of Contents Accounts Payable User’s Guide
Setting Up the Accounts Payable Module
11
Options and Preferences in Accounts Payable... 12
General Setup... 12
Customizing Options in the Enter Bills window ... 13
Accounts Payable Relationship with Other Modules ... 14
Setting Up Your Electronic Funds Transfer Option... 15
Tracking User-Defined Vendor Information... 15
Setting Up Your Credit Card Vendors ... 16
Setting Your Printing Preferences for Accounts Payable... 17
Working with Accounts Payable Codes... 18
Posting Transactions to General Ledger (AP Codes) ... 18
Establishing Aging Periods ... 19
Allocating Bills to Multiple Accounts (Allocation Codes) ... 20
Preparing for Recurring Bills (Frequency Codes) ... 21
Setting Up User-Defined Codes... 21
Changing or Deleting Codes... 22
Printing a Code Report in Accounts Payable... 23
Troubleshooting: Setting Up the Accounts Payable Module... 24
Managing Your Vendors
25
Planning Your Vendors... 26
Using Product Types to Filter and Sort Reports... 26
Creating Your Vendors ... 26
Enter Your Vendors' Opening Balances ... 28
Entering Balances as Balance Forward Amounts... 28
iii
Table of Contents Accounts Payable User’s Guide
Attaching Files to your Vendor Records ... 28
Using the User-Defined Fields After Setup... 29
Creating Vendor Templates... 30
Copy Vendors from Another Company... 30
Working with Vendors ... 31
Tracking Your Vendors... 31
Modify an Existing Vendor ... 31
Change or Merge Vendor Numbers... 32
Import and Export Vendor Information ... 33
Importing Vendor Information... 33
Exporting Vendor Information ... 34
Troubleshooting: Managing Your Vendors ... 36
Entering Bills in Accounts Payable
37
Working with Transaction Batches in Accounts Payable ... 38
Entering Bills ... 38
Setting Up Recurring Bills... 39
Generating Recurring Bills ... 40
Paid Out Transactions ... 41
Immediate Payment Processing ... 42
Immediate Payment by Check ... 42
Immediate Payment by Electronic Transfer ... 44
Generating the EFT Output File ... 44
Credit Card Transactions ... 45
Entering the Line Type Items for a Bill... 45
Applying a Discount to the Entire Bill... 46
Adding a Comment to a Payment... 47
iv
Table of Contents Accounts Payable User’s Guide
Tracking 1099 Information for This Vendor... 48
Printing Inventory Labels ... 49
Printing Inventory Labels According to Specific Quantities... 50
Entering Returns ... 51
Changing the Default Transaction Date ... 51
Importing Accounts Payable Transactions ... 52
Importing Vendor Payment Transactions... 52
Determine and Correct Errors in Imported Transactions Before Posting ... 53
Checking the Accuracy of Your Entries... 53
Printing the Enter Bills Edit Report ... 54
Correcting an Entered Bill... 55
Deleting Bills ... 55
Deleting Individual Bills ... 55
Deleting All the Bills in a Batch ... 55
Posting Bills... 55
Correcting Errors After Posting... 56
Printing the Posting Reports ... 56
Adjusting Posted Invoice Information ... 56
Viewing the Results of Posted Bill Transactions... 57
Troubleshooting: Entering Bills in Accounts Payable ... 60
Paying Bills in Accounts Payable
61
Paying Bills ... 62
Preparing Payments Automatically... 62
Preparing Payments Individually... 63
v
Table of Contents Accounts Payable User’s Guide
Adding or Viewing Notes About This Bill... 64
Setting Up Unapplied Payments... 65
Applying Unapplied Payments to an Invoice ... 65
Making Electronic Payments ... 66
Changing the Default Payment Date ... 67
Entering Adjustment Transactions... 67
Reversing a Liability (Decreasing the Vendor Balance)... 67
Adjusting a Vendor Balance (Increasing the Vendor Balance) ... 68
Applying a Previous Adjustment (Increase or Decrease) ... 68
Correcting or Deleting Unposted Payments... 69
Voiding Posted Payments ... 70
Voiding Checks and EFT Transactions... 70
Voiding Credit Card Transactions ... 71
Voiding a Paid Out Transaction ... 72
Applying Multiple Adjustments to an Invoice ... 73
Deleting Payment/Adjustment Transactions... 74
Deleting Individual Payments/Transactions ... 74
Deleting All Payments/Transactions in a Batch ... 74
Reviewing Paid Bills ... 75
Printing the Payment and Adjustment Edit Report... 75
Correcting Errors Found on the Edit Report ... 76
Printing Checks ... 77
Printing the Check Register ... 78
Generating a Positive Pay File ... 78
Posting Payments and Adjustments ... 79
vi
Table of Contents Accounts Payable User’s Guide
Viewing the Results of Posted Payments and Adjustments... 80
Troubleshooting: Paying Bills in Accounts Payable ... 82
Working with Reports in Accounts Payable
83
Reporting Overview ... 84
Denali Reports Available ... 84
Financial Statements... 84
History Reports ... 84
Control Reports ... 84
Reporting Options in Denali... 85
Options for Report Type... 85
Standard Report Sort Options... 85
Report Query Options ... 85
Using the Search Feature in Lookups... 86
Selecting Dates from the Online Calendar... 86
Working with Date Ranges... 86
Filter Ranges and Filter Methods ... 88
Accounts Payable Reports... 89
Vendor Reports ... 89
Quick Vendor List... 89
Vendor Labels ... 90
Master Vendor Report... 90
Transaction Reports ... 91
Aging Report ... 91
Cash Requirements Report... 92
Control Report... 93
Overdue Report... 94
History Report ... 95
Dated Invoice/Payment Report ... 95
Expense Reports... 96
Total Debt Report... 96
Prepaid Report ... 97
Future Liability Report ... 98
1099-MISC Report ... 99
Electronic File 1099-MISC Report... 100
GL Expense Distribution Report... 101
vii
Table of Contents Accounts Payable User’s Guide
Accounts Payable Period End and Maintenance
103
Accounts Payable Period End ... 104
Preparing for Period End... 104
Processing Prepaid Expenses and Future Liabilities... 104
Purging Open Items ... 105
Resetting YTD Vendor Totals... 106
Removing Temporary Vendors... 106
Accounts Payable Maintenance... 107
Recalculating Vendor Balances... 107
Viewing Table Information ... 107
Purging History ... 108
Troubleshooting: Accounts Payable Period End and
Maintenance... 109
Additional Resources
110
Formatting User-Defined Fields... 111
Format Requirements for Importing Transactions ... 112
File Formats Supported by Denali... 112
Importing Quotation Marks in CSV Files ... 113
Format Requirements for the Import/Export Feature ... 119
File Formats Supported by Denali for Importing Data... 120
Use the Export Feature to View File Formats... 121
Accounts Payable Format Requirements for Importing Data... 121
viii
Table of Contents Accounts Payable User’s Guide
Glossary 127
Index 136
1
Chapter
Learning About this
Resource
How to Use This Guide
How This Guide Is Organized
Denali Help
Customer Support
Training
Troubleshooting Options
2 Learning About this Resource
How to Use This Guide
Welcome to Denali by Cougar Mountain. This guide is designed to help you effectively
learn about Accounts Payable so you can use it the most effective way for your
business. This chapter gives you instructions on how to use this guide and tells you
where to find additional help. This chapter also includes introductions to each chapter
of the guide.
How to Use This Guide
We wrote this documentation to accommodate a system that has all available modules and enhancements installed and integrated. If this is not the case, some windows and options might be different. After you review this guide, if you would like to expand your software package to get the most out of Denali, refer to our website or contact our Sales Department at (800) 388-3038 for more information.
If you have not done so already, we highly recommend you review the information in the Getting Started guide before you continue. This guide provides valuable information on the commonalities between the Denali modules, customization options to ensure Denali meets your needs, and overviews of the different types of help and training available.
How This Guide Is Organized
Refer to this section for a summary of what is covered in this user’s guide and how to get the most out of it.
Chapter 1: Learning About this Resource
This chapter introduces you to the organization of this user’s guide. It provides an overall look at the information you can find and how it is designed.
Chapter 2: Setting Up the Accounts Payable Module
To get the most out of your software, it’s important to set up Accounts payable correctly. This chapter covers general setup, integration with other modules, printing preferences, and how to set up EFT and credit card vendor options. You will also find information about codes in Accounts Payable.
Chapter 3: Managing Your Vendors
In this chapter, we provide you with information about how to set up, modify, copy, and renumber your vendors, as well as how to set up a default vendor template that you can use to create vendors that contain large amounts of similar information.
Chapter 4: Entering Bills in Accounts Payable
This chapter provides information about transaction batches, as well as how to enter bills and returns, change the default transaction date, import transactions, manage immediate checks, print inventory labels, review and post bills, and adjust posted information.
3 Learning About this Resource
Denali Help
Chapter 5: Paying Bills in Accounts Payable
One of the purposes of Accounts Payable is to pay bills you receive from your vendors. There are a few different ways you can pay bills. You can make vendor payments via electronic funds transfer (EFT), make payment adjustments, work with credit (debit) memos, and make other payment transactions to vendor accounts. You can also view a list of checks that have not been printed before you post.
Chapter 6: Working with Reports in Accounts Payable
To make smart business decisions, you need to be able to track and view data. This chapter includes the types of reports available in Accounts Payable, and includes samples and instructions on how to customize reports to meet your business needs.
Chapter 7: Accounts Payable Period End and Maintenance
Most businesses need to perform year-end or periodic tasks. You might need to perform these tasks for tax, financial, or reporting reasons. There are also tasks you might want to perform periodically to keep your system functioning well. This chapter provides information about the tasks you might perform at period end or to maintain your system.
Chapter 8: Additional Resources
This chapter includes file format requirements for Universal Bridge and the import/export feature. It also contains error messages you might receive along with solutions to the errors.
Denali Help
Cougar Mountain Software is dedicated to providing as much help as you need to feel comfortable using our software. These topics describe the conventions we use in the documentation and the different types of help we offer.
Document Conventions
The following conventions are used throughout the documentation:
Convention Use
Bold Titles, names, and anything that appears on the screen will appear in bold, exactly as it appears.
•
Select Change Session Date from the Common Tasksmenu.
•
Click the New button.•
Enter a name in the Name box.Italic Italics are used for text that you should enter, or text that appears in a box or field within a window.
•
Enter Hardwood in the Description box.4 Learning About this Resource
Denali Help
In-Program and Web Help
Cougar Mountain offers in-program help, which is part of the software, accessible from any Help button, and does not require an Internet connection. We also offer web help that you can access from any Internet browser. The web help includes features not available in the in-program help, such as the ability to comment on topics and share information on social networking platforms. The content is the same in the in-program and web help. You can access the web help for Denali at
http://cougarmtnservice.com/help/index.html
.When you access the help, you will find we offer both procedural and window-specific help. If you want to know the steps you need to take to complete a task, you should access the procedural help. If you want to know what an option or field in a window is used for, you should access the window-specific help.
Window-Specific Help
Denali offers window-specific help that explains each field and option available in every window. When you work in the software, you can access help specific to an active window or tab when you click the
Help button or press F1 on the keyboard.
In many window-specific topics, you can access related task-based help topics when you select the See Also button at the bottom of the topic window. You can also access the task-based help from the Table of Contents in the left pane of the Help window.
Procedural Help
Procedural help gives you steps to complete a process from start to finish and general information about the software windows. You can access this help from the left navigation pane in the software when you click Resources and Tools > Access the Denali Help. You can also access the Help when you select the question mark on the right side of the toolbar. If you already have the Help window open, you can access all the help from the Table of Contents in the left pane of the window.
Reference Help
Denali includes topics that are designed to provide additional information for your reference. For example, format requirements to import transactions and purchase order calculations. Most of these topics can be found in the Appendix, which you can access from the Table of Contents in the in-program and web help.
Uppercase Uppercase characters will be used to denote keyboard keys or hot key combinations. Some examples are:
•
To delete an item in the detail grid, select the item and press the DELETE key.•
To open the Enter Transaction Comments window, simultaneously press SHIFT+C.> This character is used to separate menus, submenus, and commands. For example: Select Renumber / Merge Stock Items from the Inventory Items menu is written as: Select Inventory Items > Renumber / Merge Stock Items from the left navigation pane.
5 Learning About this Resource
Denali Help
Navigating the In-Program Help
When you access the Help in the software, you access the in-program help system. To help you find the information you’re looking for, we outline the different parts of the Help window.
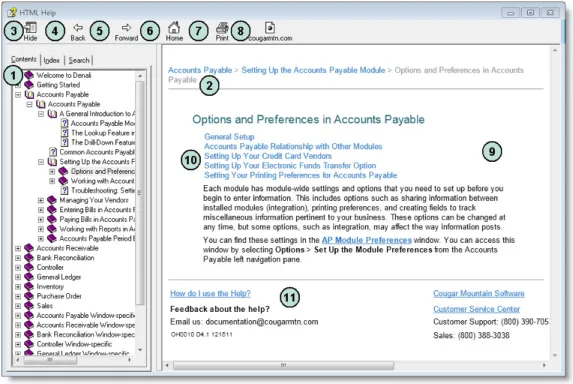
Figure 1: Navigational points and features available in the in-program help window.
The reference numbers in the table correspond with the previous figure and are used to highlight the main navigational points and features.
Reference Number
Option Name Description
1 Contents tab This is the Table of Contents for the Help. Click on the books to show the related subtopics.
2 Breadcrumbs These are links that show you where you are in the Help. The first link reflects the main topic and following links are subtopics. You can click these links to navigate backwards.
3 Hide button This hides the Table of Contents and changes to read Show, which you can then click to see the Table of Contents.
4 Back button Clicking this button takes you back through the previously viewed topics one at a time.
5 Forward button Clicking this button takes you forward through the topics you have moved back through using the Back button, one topic at a time. 6 Home button This button returns you to the main topic window in the Help. 7 Print button If you want to print the current help topic, click this button.
6 Learning About this Resource
Denali Help
Navigating the Web Help
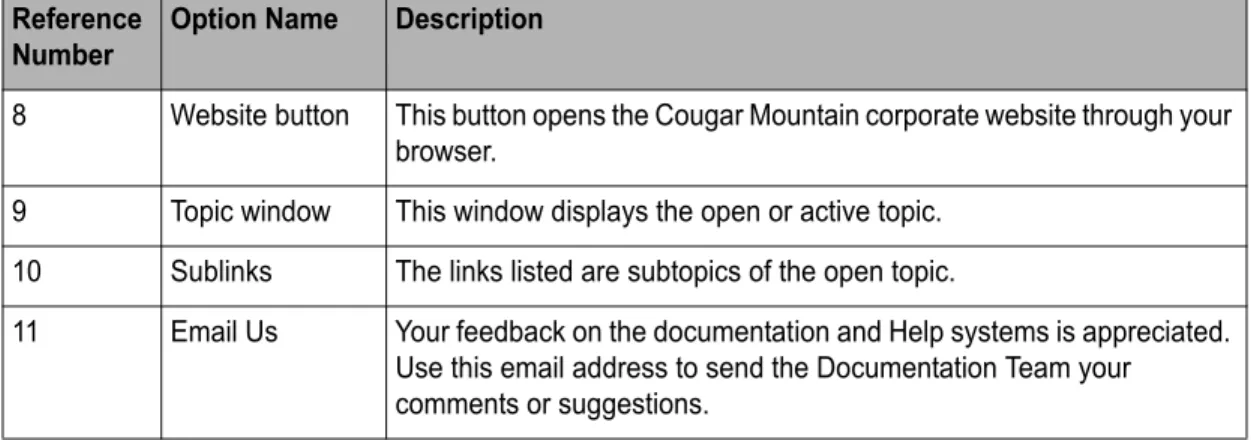
To help you find the information you’re looking for in the web help, we outline the different parts of the window.
Figure 2: Navigational points and features available in the web help window.
The reference numbers in the table correspond with the previous figure and are used to highlight the main navigational points and features.
8 Website button This button opens the Cougar Mountain corporate website through your browser.
9 Topic window This window displays the open or active topic. 10 Sublinks The links listed are subtopics of the open topic.
11 Email Us Your feedback on the documentation and Help systems is appreciated. Use this email address to send the Documentation Team your comments or suggestions.
Reference Number
Option Name Description
1 Contents This is the Table of Contents for the Help. Click on the folders to show the subtopics.
2 Index Click this to see the index entries for all the guides in the web help. 3 Search Use the search field to type the area of information you’re looking for. 4 Home Click this button to go to the home page of the web help.
Reference Number
7 Learning About this Resource
Denali Help
Printing Help Topics
You can print out any help topic to keep for future reference.
To print a single topic:
1
Select the Print button or right-click and select Print from the right-click menu.2
If the Print Topics window appears, select Print the selected topic and then select OK.3
When the Print window appears, make any desired adjustments and then select Print.To print multiple topics in the in-program help:
1
Verify the Contents tab is visible.2
Highlight the heading of the section you would like to print.3
Select the Print button.4
The Print Topics window will appear.5
Select Print the selected headings and all subtopics to print the entire section.User Guides
Denali includes access to PDF (portable document format) versions of the procedural help that you can open with Acrobat® Reader®. This is the same procedural help content that appears in the in-program and web help. To access these user guides, click Start > All Programs > Denali by Cougar Mountain
> Denali Documentation > Denali User Guides. When the Customer Service Center site opens, choose the guide you want to view.
5 Translate Click this button to translate the web help to another language. 6 Forward and
Back
Click these arrows to navigate forward and back through the help topics, one topic at a time.
7 Breadcrumbs These are links that show you where you are in the Help. The first link reflects the main topic and following links are subtopics. You can click these links to navigate backwards.
8 Social Media Use the social media buttons to share links to the help content. 9 CMS website,
Print, Email
Click these buttons to go to the CMS website, print the help topic, or email the CMS Documentation team.
10 Sublinks The links listed are subtopics of the open topic.
11 Comment Use this feature to share comments with other Denali users or the CMS Documentation team.
Reference Number
8 Learning About this Resource
Customer Support
Release Notes
The Release Notes include last-minute changes and technical issues not covered in other documentation. You can review the Release Notes on the installation screen at the start of the installation process, from the Start menu, or through the web help. You need to have Acrobat® Reader® to view the PDF.
To access them from the Start menu, click Start > All Programs > Denali by Cougar Mountain >
Denali Documentation. A submenu will appear from which you can select the Release Notes file. You can access them from the web help at
http://cougarmtnservice.com/help/index.html#page/ReleaseNotes/Release_Notes.htm.
Customer Support
If you come across a problem or an error message you cannot resolve, call our Customer Support Department. Cougar Mountain Software maintains a full-time Customer Support staff at our Boise, Idaho office specially trained to solve problems.
Our Customer Support staff has the expertise to answer your questions about installation and operation of the software. Call (800) 390-7053 to contact a Support Specialist. You can receive customer support over the phone from Cougar Mountain Software or you might be referred to a Cougar Mountain business partner in your area who can provide personalized, local support.
Cougar Mountain Software offers support contract plans that allow you to get help when you need it. You can request a Customer Support Specialist to contact you through our online form or you can send an email to Customer Support. Visit our Customer Support Center online at:
http://www.cougarmtn.com/support-request/
.You can also visit the customer service site at
http://www.cougarmtnservice.com/
to search for software updates you can download at your convenience.Information to Gather before You Contact Customer
Support
When you contact Cougar Mountain Customer Support, please have your support number ready. This is typically your telephone number with the area code first. It will also be helpful to know your operating system, the Cougar Mountain product(s) you purchased and installed, and the version of the product. If you are not sure how or where to find this information, Customer Support can help.
Contacting Customer Support
Refer to the following table for options available to contact a Customer Support Specialist for answers to your questions. You can also use one of these options to purchase a support contract, which will ensure you get the help you need.
Support Type: Contact via:
Contact a Customer Support Specialist. (800) 390-7053 Purchase a Software Assurance plan. (800) 388-3038 Email questions to a Customer Support
Specialist.
9 Learning About this Resource
Training
Training
While Denali is a comprehensive business accounting solution, the information you can get from the software will only be as good as the information you put in. The more you know about the software, the more you will be able to take advantage of its features. For this reason, we consider training to be a critical part of the learning process. We offer several different types of training—one or more are sure to meet your educational needs, time constraints, and budget. Contact Cougar Mountain at (800) 388-3038 about your training needs.
Online Training
To ensure you get the most out of your accounting software, it is important that you understand all its capabilities. For this reason, as part of our Software Assurance program, we include the opportunity for you to participate in e-learning. This educational resource is offered online through the Cougar Mountain Customer Service Center (CSC) website (
http://www.cougarmtnservice.com/
). Depending on the subscription you purchase, you can access a wealth of short presentations on the features of Denali. Because these presentations are online, you can view a topic whenever it is convenient for you and/or your employees. For more information on this resource, contact your account executive at (800) 388-3038.Classroom Training in Boise
We offer training classes on a regular basis at our corporate headquarters in beautiful Boise, Idaho. If you have a few people to train, this is a great way to learn about the software’s features and how you can use it to its full potential for your needs. One of the benefits of coming to our training classes is that you can hear from other users of the software, which can remind you of issues that are important to you. Another benefit is that it removes you from the day-to-day tasks at your own office and allows you to concentrate more fully on learning how to use the software. You can use this as a powerful tool to “train your trainer”—once the staff members who attended the training arrive back home, they can teach other staff members the aspects of the software they need to know.
On-Site Training at Your Business
If you have more than a few people to train, you might want to consider on-site training. In this scenario, one of our professional trainers travels to your site and works with your employees. One advantage to this type of training is that you can train as many people as necessary without incurring additional costs and you can have specific people participate for specific sessions depending on their job duties. For example, during the training for Purchase Order, only those associated with handling purchase orders need to be present. This will allow for less interruption in daily productivity. Another advantage of on-site training is that you can work with your own organization’s data and business practices while focusing on the specific needs of your business.
Complete the online Call Back Request form to
have a Customer Support Specialist contact you.
http://www.cougarmtn.com/support-
request/
10 Learning About this Resource
Troubleshooting Options
Telephone Training
Training can also be done over the telephone. Using network streaming technology via an internet connection between your computer and our trainer’s computer, you and your employees can work with one of our professional trainers to focus on the specific parts of the software you choose. The trainer will be able to see your computer screen and you can work with either your own data or the
demonstration data to learn how to best use the software for your business. This is a great solution if you have one or two modules that are new to you and you want thorough training without traveling to our training facility or having a trainer come to you.
Training Videos
Cougar Mountain Software also offers training videos which can help you in specific areas of the software. They serve as a great orientation for people new to your company and/or the software. They also can be a refresher for people who have already used the software, but need help in a few areas or are changing their job responsibilities to include things they haven’t done before.
Troubleshooting Options
At times, problems or errors can occur that are simple to fix without contacting Customer Support. Here, we indicate some common problems and ways to correct them. If you do not find what you are looking for in this section, refer to the help options under the “Denali Help” section of this guide and/or check the FAQ topics of our Customer Service Center at http://cougarmtnservice.com before you contact Customer Support. If you would like to offer suggestions for additions to our Troubleshooting sections, please email us at [email protected].
2
Chapter
Setting Up the Accounts
Payable Module
Options and Preferences in Accounts Payable
Working with Accounts Payable Codes
Troubleshooting: Setting Up the Accounts Payable Module
12 Setting Up the Accounts Payable Module Options and Preferences in Accounts Payable
Before you enter transactions in Accounts Payable, you must complete some basic
setup. This chapter describes how to set up the basics, along with some of the options
available to tailor the program to your specific needs. The information in this chapter
is designed with the assumption that all modules are installed and integrated. If this is
not the case, some options might not be available.
Options and Preferences in Accounts Payable
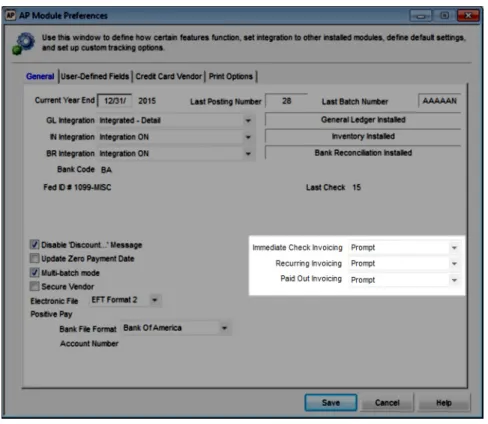
Each module has module-wide settings and options you need to define before you begin to enter information. This includes options such as sharing information between installed modules (integration), printing preferences, and creating fields to track miscellaneous information for your business (UDFs). You can change these options at any time, but some options, such as integration, might affect the way information posts.
You can find these settings in the AP Module Preferences window. You can access this window by selecting Options > Set Up theModule Preferences from the Accounts Payable left navigation pane.
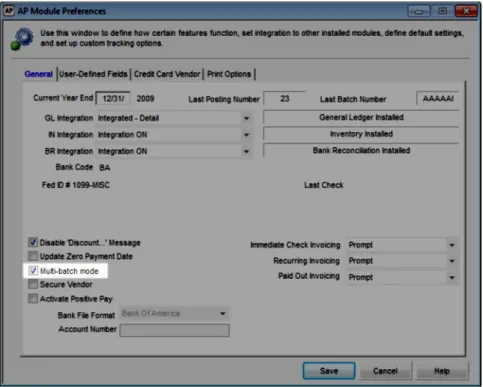
General Setup
Because module preferences are options that apply throughout Accounts Payable, be sure to review all the options available to you on each tab. On the General tab of the AP Module Preferences window, you will find options for setting the current year-end date, enabling transaction batches, integration, and more. You can click the Help button to get instant information about each available option.
13 Setting Up the Accounts Payable Module Options and Preferences in Accounts Payable Figure 3: AP Module Preferences window, General tab
Customizing Options in the Enter Bills window
Use the drop-downs on the General tab in Module Preferences to define how you want Immediate Check, Recurring, or Paid Out invoice options to work in the AP Enter Bills window.
14 Setting Up the Accounts Payable Module Options and Preferences in Accounts Payable
Figure 4: AP Module Preferences window, General tab: Invoicing options emphasis
You can choose if you want to display each option and, if you choose to display an option, you can select whether it will be part of the tabbing order. Click the Help button in the software window for more information about each option.
Accounts Payable Relationship with Other Modules
Integrate Accounts Payable to Inventory, Bank Reconciliation, and/or General Ledger to automatically update those modules with Accounts Payable information when you post transactions.
For example, if you integrate Accounts Payable to General Ledger, transactions will automatically post to General Ledger when you post them in Accounts Payable, and General Ledger accounts will be required when you set up AP Codes and AP Allocation Codes.
If you integrate, you can also look up certain information from these modules. See the Getting Started guide for more information.
Set integration on the General tab of the AP Module Preferences window. Choose from the available options to define how you want to share information from Accounts Payable. Click the Help button for more detailed information about each option in the window.
We recommend you review the Integration Guide for more information to help you get the most out of your integration options. You can access this guide from the Documentation area of the Cougar Mountain Customer Service Center.
NOTE: If you receive an error that indicates integration failed, print the generated report, make the corrections listed, open Module Preferences again, and select the Fix <Module> Integration button on the General tab.
15 Setting Up the Accounts Payable Module Options and Preferences in Accounts Payable Figure 5: Accounts Payable posting
Setting Up Your Electronic Funds Transfer Option
If you select EFT Format 1 from the Electronic File drop-down in Module Preferences, you need to set up EFT information so Denali’s electronic file will work with your EFT for Windows© software. If you select EFT Format 2, you can generate the file and send it directly to your bank; you do not need additional setup.
Before you can send electronic payments to your vendors, you need to gather bank account numbers for each vendor to whom you will make EFT payments.
You’ll need to enter a code of up to three characters for each bank account you will use for electronic transfers in your EFT software. The EFT account codes you set up in Denali need to correspond to the account codes you enter in your EFT software.For questions about this setup, refer to the
documentation that came with the EFT software.
If Accounts Payable is not integrated to Bank Reconciliation:
•
If you want to establish a default EFT Account Code to use for all vendors, enter a default account code on the General tab of the AP Module Preferences window.•
If you want to establish a default account code for each AP Code, leave the code in Module Preferences blank and enter the default EFT Account Code in the AP Codes window.•
If you want to use an EFT Code different from a default you established or you want to enter an EFT Account Code for each vendor, enter the account code on the Remit To tab of the AP Vendors window for each vendor you’ll pay electronically.If Accounts Payable is integrated to Bank Reconciliation, the bank account associated with the AP Code for each vendor will be automatically used, but you can change it on the Remit To tab in the AP Vendors window if necessary.
Once you set up your EFT software, establish EFT account codes in Denali, and process bills or payments, you can generate the EFT output file.
Tracking User-Defined Vendor Information
You might find it beneficial to track user-defined vendor information. The User-Defined tab in the AP Module Preferences window allows you to create up to ten fields to track any vendor information you choose. For example, you could set up a User-Defined Field (UDF) to show the county in which the vendor is located, which vendors give you a discount and how much, or if the vendor has a credit limit set for you. You can also use the UDFs to sort and filter certain Accounts Payable reports.
16 Setting Up the Accounts Payable Module Options and Preferences in Accounts Payable
To set up User-Defined Fields:
1
In Accounts Payable, select Options > Establish User-Defined Vendor Tracking from the left navigation pane.2
In the AP Module Preferences window, select the User-Defined Fields tab.Figure 6: AP Module Preferences window, User-Defined Fields tab
3
For each piece of information that you want to track, enter the heading text for the field into the correct type of UDF (Date, Amt, etc.).Use UDF Fields 1 or 2 if you want to set up a field that you can then attach Codes to. See “Setting Up User-Defined Codes” on page 21 for more information.
4
Once you enter all the User-Defined Fields you want to use, continue with your Module Preferences setup or click Save.For information on using these fields after you set them up, see “Using the User-Defined Fields After Setup” on page 29.
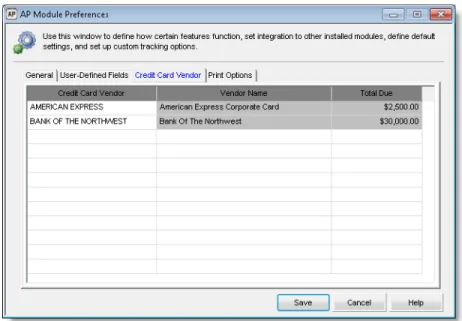
Setting Up Your Credit Card Vendors
After you set up credit card vendors in the AP Vendors window, you can use the Credit Card Vendor
tab of the Module Preferences window to identify the credit card vendors you want to use to pay vendors. For information on setting up vendors, see “Creating Your Vendors” on page 26.
Once you enter a credit card vendor, the Vendor Name and Total Due autofills with information from the AP Vendors window.
17 Setting Up the Accounts Payable Module Options and Preferences in Accounts Payable
Figure 7: AP Module Preferences window, Credit Card Vendor tab
Setting Your Printing Preferences for Accounts
Payable
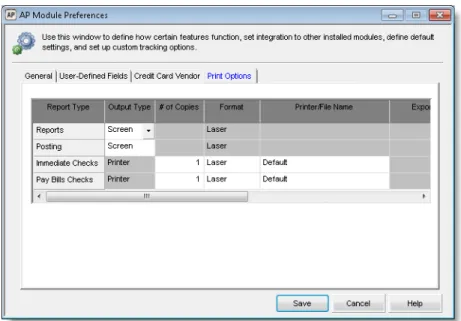
Use the Print Options tab of the APModule Preferences window to specify your printing preferences for Accounts Payable reports and checks. You can define default settings for all reports, including posting, and Immediate and Pay Bills check types. Select the check box in the Edit column to have the option to change these default settings every time you print. To learn more about printing reports, see “Accounts Payable Reports” on page 89.
18 Setting Up the Accounts Payable Module
Working with Accounts Payable Codes
Figure 8: AP Module Preferences window, Print Options tab
Working with Accounts Payable Codes
You can use Accounts Payable codes to track information, direct posting of Accounts Payable
transactions to General Ledger accounts, set aging period lengths, set up recurring bills, and sort and filter reports. You can access and edit each of these codes from the Options menu in Accounts Payable.
Posting Transactions to General Ledger (AP Codes)
AP Codes direct the posting of invoices, payments, and adjustments to the correct General Ledger accounts. Whenever you post a transaction to a vendor, the system uses the AP Code to determine which GL Liability Account is affected. The AP Code specifies which GL Cash Account to credit when a payment is disbursed and directs the posting of purchase discounts to a specified account.
You must enter one AP Code for each vendor you set up, therefore, before you set up any vendor accounts, we recommend you set up at least one AP Code. You can add or change these codes after you create vendors.
You can use AP Codes to group vendors into different categories for reporting purposes, to age your payables differently for different groups, or group your payment types. For example, you might use one AP Code for regular payments, a different one for tax payments, and a third for loan payments. If Accounts Payable is not integrated to General Ledger, or you do not want to group your vendors, you only need one AP Code. If Accounts Payable is integrated to General Ledger, you need one AP Code for each Accounts Payable liability account that you use.
If you delete a code after you post, you will no longer be able to use that code to sort. Refer to “Changing or Deleting Codes” on page 22 for more information.
19 Setting Up the Accounts Payable Module
Working with Accounts Payable Codes
To create new AP Codes:
1
In Accounts Payable, select Options > Define Aging Periods and Posting from the left navigation pane.Figure 9: AP Codes window
2
Enter an AP Code of up to six characters that you can easily identify. This is the code you will attach to your vendors. For example, APPAY.3
Enter a description for this code. For example, Bank of America Payroll.4
If Accounts Payable is integrated to Bank Reconciliation, enter the Bank Code for the bank account from which checks to vendors with this AP Code are drawn.If Accounts Payable is not integrated to Bank Reconciliation and you leave the default EFT Account Code blank in Module Preferences, enter the EFT Account Code you want to use for vendors with this AP Code.
5
Enter the aging periods and GL Accounts for this AP Code.6
Save the code and repeat this process until you enter all your AP Codes.Establishing Aging Periods
Aging periods determine when vendor payments are due and past due. You can use AP Codes to establish separate aging periods for different groups of vendors. You can then view these aging period balances on the Aging Report (see “Transaction Reports” on page 91).
You can also view the aging for individual vendors on the Aging tab in the AP Vendors window. Select the vendor for which you want to view aging and then sort the information by transaction date, due date, or forecast by due date.
20 Setting Up the Accounts Payable Module
Working with Accounts Payable Codes Figure 10: AP Vendors window, Aging tab
Allocating Bills to Multiple Accounts (Allocation
Codes)
For bills that you routinely expense to several different General Ledger accounts (for example, when you allocate overhead and administrative expenses between multiple departments) you can set up Allocation Codes to automatically distribute the expense.
To set up an Allocation Code:
1
Select Options > Define How Bills are Allocated from the left navigation pane.Figure 11: AP Allocation Codes window
2
Enter a unique code of up to six characters and a meaningful description for this allocation.3
Set the default amount that you want to allocate (if the amount varies, you can leave this field blank) and define the allocation breakdown in the grid. Select the Help button in the window for detailed information about the options in the window.4
When you finish entering the allocation information, select Save to keep this code.You can use this Allocation Code in the AP Enter Bills window with either an Allocation or Allocation Adjustment line type. The Allocation type will allocate the line items exactly as you saved them in the
APAllocation Codes window. The Allocation Adjustment line type will reverse the allocation by using a quantity of negative one (-1).
21 Setting Up the Accounts Payable Module
Working with Accounts Payable Codes
To enter a bill with an Allocation Code based on percent, for example, an electric bill that is a different amount each month, enter the Allocation Code on the Detail tab of the AP Enter Bills window and then enter the dollar amount due on the first line of the Cost Per Unit column.
To enter a bill with an Allocation Code based on dollar amount, for example, a rent payment, you only need to enter the Allocation Code. The correct amounts will be allocated to the GL accounts you selected when you set up the Allocation Code. If you change the dollar amount when you enter a bill, the additional amount is added to the last line of the allocation, but you can edit it.
Preparing for Recurring Bills (Frequency Codes)
Frequency Codes work in conjunction with Recurring Codes and define how often a bill should recur. For example, you might have bills that recur monthly, weekly, or quarterly and when you set up Frequency Codes, you can quickly set this time frame. If you choose to utilize the recurring bill feature in Denali, you need to establish at least one Frequency Code. You will then enter these codes as part of the recurring bill to indicate to the system when the bill should be processed (see “Setting Up Recurring Bills” on page 39).
To set up Frequency Codes, select Options > Set Up the Frequency for Recurring Bills from the left navigation pane in Accounts Payable and enter the code and description information. Continue to create additional codes until you have all the codes you need.
Figure 12: AP Frequency Codes window
If you want to print your Frequency Codes for reference, see “Printing a Code Report in Accounts Payable” on page 23.
Setting Up User-Defined Codes
Accounts Payable allows you to define up to two Defined Fields for which you can create User-Defined Codes to enter or select in those fields. This allows you to set up a category you want to track and define selections for it. For example, if you want to track the state in which your vendors reside, use one of the two code fields (User Field 1 or User Field 2) on the User-Defined Fields tab in the AP Module Preferences window, and type State (see “Tracking User-Defined Vendor Information” on page 15 for information about the User-Defined Fields tab). Then you could add the states as Codes to that field when you select Options > <Code Name> from the menu bar.
22 Setting Up the Accounts Payable Module
Working with Accounts Payable Codes
Figure 13: AP UDF Codes window, defining UDF Codes for State
After you define all the codes you want to use, you can select them on the User-Defined tab of the AP Vendors window to add information for individual vendors. You can add new Codes at any time.
Changing or Deleting Codes
You can open and change certain aspects of your codes after you create them, such as the description or General Ledger accounts. However, once a code is in use, it is important to understand how a change can affect the rest of the software. For instance, if you edit the accounts, keep in mind it will affect all the vendors the code is attached to.
To change or delete codes:
1
In Accounts Payable, select Options > <code you want to edit> from the left navigation pane.2
Type or use the Lookup to select the code you want to change or delete.3
Click the Edit button. This button label will then change to Del.4
If you are editing this code, make your changes and then click Save.If you want to delete this code, click the Del button. A message appears asking if you are sure you want to delete this code; select the appropriate option.
5
Repeat the previous steps until you are finished changing or deleting all the codes you want.NOTE: If you delete a code, you might need to add a new code to any transactions or records it was attached to before you can successfully post. If you try to delete a code that is attached to records or transactions, you will receive an error message. You can then print out a report that indicates what the code is attached to
.
Code type To delete it
AP Codes You must detach AP Codes from all vendors before you can delete the Codes.
AP Allocation You must detach Allocation Codes from all unposted records before you can delete the Codes.
23 Setting Up the Accounts Payable Module
Working with Accounts Payable Codes
Printing a Code Report in Accounts Payable
Once you create your codes, you might want to print out a complete list of them for record keeping or reference. You can print a code report for all codes.
To print a report of any of the codes in Accounts Payable:
1
In Accounts Payable, select Options and the code type you want to print from the left navigation pane.2
Select the Print button.Figure 14: AP Print Codes - Accounts Payable Codes window
3
Select the Print Current Code Only check box to print a report for a single code. If the check box is not checked, you can select a range of codes to print.4
Select OK.Figure 15: AP Accounts Payable Codes Report
Frequency You must detach Frequency Codes from all unposted records before you can delete the Codes.
24 Setting Up the Accounts Payable Module
Working with Accounts Payable Codes
Troubleshooting: Setting Up the Accounts Payable
Module
At times, problems or errors can occur that are simple to fix without contacting Customer Support. Here, we indicate some common problems and ways to correct them. If you do not find what you are looking for in this section, refer to the help options under the “Denali Help” section of this guide and/or check the FAQ topics of our Customer Service Center at http://cougarmtnservice.com before you contact Customer Support. If you would like to offer suggestions for additions to our Troubleshooting sections, please email us at [email protected].
To Fix This: Try This:
I pay bills to one vendor, but would like to expense the amount to different General Ledger accounts. How can I do this?
You can expense bills to different accounts by using Allocation Codes. Select Options >
Define How Bills are Allocated from the left navigation pane, or see “Entering the Line Type Items for a Bill” on page 45 for additional information.
I have vendor bills that recur every month and would like to set up the system so I do not need to enter the the recurring bills each month. How do I do this in Denali?
You can enter recurring bills and then choose to process them at any time. To begin this task, select Options > Set Up the Frequency for Recurring Bills from the left navigation pane.
3
Chapter
Managing Your Vendors
Planning Your Vendors
Creating Your Vendors
Creating Vendor Templates
Working with Vendors
Troubleshooting: Managing Your Vendors
26 Managing Your Vendors
Planning Your Vendors
One of the main features of Accounts Payable is comprehensive vendor tracking. After
you set up your vendors, the software automatically updates vendor accounts as you
pay bills. You can easily keep track of payments, history, balances, and early payment
discounts for each vendor.
Planning Your Vendors
When you plan your vendors, it’s important to determine which Accounts Payable liability account to use when you post invoices. The AP Code attached to the vendor identifies the Accounts Payable liability account that will be affected when you enter and pay invoices for the vendor. If you have more than one Accounts Payable liability account in your General Ledger, you’ll need one AP Code for each account. See “Working with Accounts Payable Codes” on page 18 for information on codes in Accounts Payable.
Using Product Types to Filter and Sort Reports
If you purchase different products from different vendors, you might want to create a list of product types. You can then assign a product type to each vendor and enter the type in the Prod Type field in the AP Vendors window. You can sort vendors based on the product type you enter in this field. See “Filter Ranges and Filter Methods” on page 88 for information on additional report sort and filter options.
Creating Your Vendors
You can add vendors at any time. After you establish vendors, you can use the vendor number to access vendors and sort reports.
You should plan ahead and set up a meaningful numbering system with any alphanumeric combination that works best for you. This will save you time later when you enter transactions and generate reports. You can establish meaningful vendor groups to group vendors together by certain criteria when you print reports. One way to do this is with AP Codes, which direct the posting of invoices, payments, and adjustments to the correct General Ledger accounts (see “Posting Transactions to General Ledger (AP
Tips & Tricks:
Why Would I Use Product Types?
Let’s say you own a bookstore, you sell several different types of products, and you purchase each type from a different vendor. You decide you want to sort vendors on reports by the type of products you receive from them.
If you plan your different product types ahead of time, you can include them in the Prod Type field of the AP Vendors window when you set up vendors. Keep in mind there is a 15 character limit for this field.
You should follow a consistent naming scheme to ensure your reports filter neatly and accurately.
Sample product types for a bookstore might be:
•
Electronics•
Food & Drink•
Gifts27 Managing Your Vendors
Creating Your Vendors
Codes)” on page 18). Before you create a vendor, you must establish at least one AP Code.
If you intend to enter a balance forward amount for your vendor, you must do so when you create the vendor; once you save the vendor, the option is locked and you can only change the vendor’s balance when you post transactions. See “Enter Your Vendors' Opening Balances” on page 28 for more information about entering a vendor balance.
To create a new vendor:
1
In Accounts Payable, select Vendor Accounts > Add / Change Accounts from the left navigation pane.Figure 16: AP Vendors window
2
Enter a unique vendor number in the Number field.3
Specify the AP Code for the vendor.Enter the remaining information. Select the Help button in the software window for more details about the fields in this window.
4
Select Save to add this vendor to the system.You can print a detailed list of all your vendors from the AP Vendors window by selecting the Print
button or by printing the Master Vendor Report; see “Master Vendor Report” on page 90 for more information on this report.
28 Managing Your Vendors
Creating Your Vendors
Enter Your Vendors' Opening Balances
When you first start using Denali, most of your vendors will probably have existing balances. You can enter opening balances in two ways: you can enter the balance in the Balance Forward box on the
Statistics tab of the AP Vendors window, or you can enter a transaction. You can enter these amounts either way, but the aging of the amounts differs depending on which method you use.
Entering Balances as Balance Forward Amounts
To enter balance forward amounts, select Vendor Accounts > Add / Change Accounts from the left navigation pane to access the AP Vendors window. When you first enter your vendor information, there is a Balance Forward box on the Statistics tab where you can enter the balance for this vendor. If you enter an amount in this box, the entire amount will be aged as of the date in the Created box located in the top portion of the window. If this balance originated from a single purchase transaction, you can enter the date of the transaction in the Created box and the balance will be properly aged from the transaction date.
Figure 17: AP Vendors window, Balance Forward field
However, if the total you owe a vendor is the result of multiple transactions on different dates, this method might not be suitable. This is because the combined balance for all the transactions will be aged from the same date. Refer to “Entering Balances as Accounts Payable Transactions” on page 28.
Entering Balances as Accounts Payable Transactions
If a vendor’s balance is the result of multiple transactions on different dates, you might want to enter the separate amounts as individual transactions. This allows the software to age the amounts properly and will more accurately reflect the vendor’s balance. For more information on entering opening balances using Accounts Payable transactions, see “Entering Bills” on page 38.
Attaching Files to your Vendor Records
Use the Attachments tab to attach files to your vendor records. For example, you can attach a W-9, a terms agreement, or any correspondence.
If you want to attach a file to multiple records or if you need to regularly update the file, you can create a custom menu instead of attaching the file to individual records.
To attach a file:
1
In Accounts Payable, select Vendor Accounts > Add / Change Accounts from the left navigation pane.29 Managing Your Vendors
Creating Your Vendors Figure 18: AP Vendors window, Attachments tab
2
Select a vendor and click the Edit button.3
On the Attachments tab, use the browse button in the Location field to select the file you want to attach.4
Enter a description of the attachment.5
If you want to publish this file to the SQL server, select the Published check box. This will allow everyone with access to the SQL server to access the file. If you want to allow access only to users on the local machine, leave the check box unchecked.You can double-click on any row to open the associated attachment. Use the right-click menu to delete a row, open the attachment, or unpublish the file.
When you back up your data through Denali or SQL, unpublished files will not be included.
Using the User-Defined Fields After Setup
If you defined any of the ten available User-Defined Fields on the User-Defined Fields tab of the AP Module Preferences window, those fields will appear on the User-Defined tab of the AP Vendors
window. Enter the values for this vendor, as applicable to your business.
Figure 19: AP Vendors window, User-Defined tab
For more information on creating User-Defined Fields, see “Tracking User-Defined Vendor Information” on page 15.
You can use custom fields to sort and/or filter many of the Accounts Payable reports to quickly get the information you need. See “Filter Ranges and Filter Methods” on page 88 for more information.
30 Managing Your Vendors Creating Vendor Templates
Creating Vendor Templates
You might use the same information for certain fields when you set up your vendors. You can use the Default Vendor Template to enter the information once rather than each time you create a new vendor. The AP Default Vendor window is similar to the AP Vendors window. Any changes or additions you make are used as the default setting in the AP Vendors window. To set up default vendor templates, select Vendor Accounts > Define the Default Template. Enter information on the template that is identical for many of your vendors.
In the future, when you open the AP Vendors window, certain information will already be filled in. You can change any information you enter in the AP Default Vendor window for individual vendors in the
AP Vendors window. For information on using the AP Vendor window, see “Creating Your Vendors” on page 26.
Figure 20: AP Default Vendor window
Copy Vendors from Another Company
You can copy all of your vendors from an existing organization to a new organization in Denali. Only the vendor master information, such as the name, address, and contact information is copied. No
transaction or balance information is copied.
To copy vendors to a new organization, first set up your new organization, then use this function to copy all of your vendors to it.
To copy vendors:
1
In Accounts Payable, select Vendor Accounts > Copy Vendors to Another Company from the left navigation pane.31 Managing Your Vendors
Working with Vendors Figure 21: AP Copy Vendors window
2
Select the Destination Company and the starting and ending vendor range to copy.3
Select the Copy Attached Files check box if you want to copy any files attached to your vendors.4
Select OK to copy the vendors and files, if applicable.The specified vendors copy to the Destination Company.
Working with Vendors
Vendors are any organization or person from which you purchase items or services. You might purchase some of the items for resale and others to run your business. As you manage your vendors, it is important to understand the options Denali offers. Review all the information in this section to ensure you get the most out of the available options.
Tracking Your Vendors
It might be helpful to track vendor performance so you can choose to do the most business with those vendors that give you the best service; this could mean the vendor with the lowest prices, the vendor with the quickest turnaround time, or the vendor with the most flexible purchasing requirements. Denali makes it easy to track all this information about your vendors so you can decide with whom you want to do more business.
You can track your vendor information through pre-defined reports included with Denali. You can also set up User-Defined Codes to track specific information about your vendors, such as the county they are located in for tax purposes, those vendors that offer you a discount, or the last date you purchased from them. See “Using the User-Defined Fields After Setup” on page 29 for more information on how you can use these fields and codes after you define them.
Modify an Existing Vendor
You can modify a vendor you already created at any time.
To modify a vendor:
1
In Accounts Payable, select Vendor Accounts > Add / Change Accounts from the left navigation pane.32 Managing Your Vendors
Working with Vendors Figure 22: AP Vendors window
2
In the Number field, type the vendor number or use the Lookup to select the vendor you want to edit.3
Select the Edit button and make any necessary changes.4
Select Save to save changes to the vendor.Change or Merge Vendor Numbers
You might find you need to change a vendor number or merge vendor records, for example, if you entered incorrect information or you have a duplicate vendor. You can use the Renumber Vendor option to update vendor numbers. If you stored data for a vendor under the old and new names, all information is merged into the new vendor record so you can retain all your data.
You can only merge vendors with identical AP Codes. See “Posting Transactions to General Ledger (AP Codes)” on page 18 for more information on these codes.
When you renumber vendors, the system merges any attached files into the new record and does not overwrite them, so you might have duplicate attachments.
To renumber vendors:
1
In Accounts Payable, select Vendor Accounts > Renumber / Merge Accounts from the left navigation pane.33 Managing Your Vendors
Working with Vendors Figure 23: AP Renumber Vendors window
2
Enter the old and new vendor numbers in the boxes.3
Select OK to renumber the vendor.All transactions with the old number will change to reflect the new number.
Import and Export Vendor Information
You can import or export certain data between Denali and an external file. For instance, if you have an external spreadsheet that contains new vendors, you can import this information directly into Denali rather than manually create each new vendor. Depending on the selections you make, this feature will add or update information directly in your Accounts Payable tables and you won’t need to use
adjustment transactions.
Importing Vendor Information
If you need to import adjustment transactions from an external file, see “Importing Vendor Payment Transactions” on page 52.
Make sure you have the proper file format before you import. To ensure your file formats are correct, see “Use the Export Feature to View File Formats” on page 121.
To import vendor information:
1
In Accounts Payable, select Vendor Accounts > Import / Export Vendor Information from the left navigation pane.34 Managing Your Vendors
Working with Vendors Figure 24: AP Import/Export window, Import selected
2
From the Import/Export drop-down menu, select Import.3
Select the type of file, transfer method, and format you will use for this import.4
Once you enter all the information for this import, select the Begin Import button.During the import process, data that is being imported to the fields will display in the Import Log text box. This box will also show any errors that occur during the process as well as a message that indicates the transfer was successful.
If an error occurs during the process, a print log is generated which you can use to correct the error. You can select the Print Log button to print the error log.
For information on how to correct errors in an external file, see “Determine and Correct Errors in Imported Transactions Before Posting” on page 53.
Exporting Vendor Information
If you need to copy vendor information from Denali to an external file, you can use the Import/Export feature. Exporting data from Denali increases what you can do with your accounting information and allows you to customize it. For example, if you have changes to make to multiple vendors, it might be quicker to export your vendors to a spreadsheet, make the necessary changes, and then import vendors back into Denali.
To export vendor information:
1
In the Accounts Payable module, select Vendor Accounts > Import / Export Vendor Informationfrom the left navigation pane.