User Guide
Copyright © 1993-2009 Quick Heal®
All Rights Reserved.
All rights are reserved by Quick Heal Technologies (P) Ltd.
No part of this software may be reproduced, duplicated or modified in any form or incorporated into any information retrieval system, electronic or any other or transmitted in any form without prior permission of Quick Heal Technologies (P) Ltd, 603 Mayfair Towers II, Wakdewadi, Shivajinagar, Pune-411005, India.
Marketing, distribution or use by anyone barring the people authorized by Quick Heal Technologies (P) Ltd. is liable to legal prosecution.
Trademarks
Quick Heal, Quick Heal Total Security and DNAScan are registered trademarks of Quick Heal Technologies (P) Ltd.
Microsoft, MSN, Windows and Windows Logo are trademarks of Microsoft Corporation. Vade Retro is registered trademark of Goto Software, France. All brand names and product names used in this manual may be trademarks, registered trademarks or trade names of their respective companies.
License Agreement IMPORTANT:
Read this License Agreement carefully before using this software.
BY USING THIS SOFTWARE IN ANY WAY YOU ACKNOWLEDGE THAT YOU HAVE READ, UNDERSTAND AND AGREE TO THE TERMS OF THIS USER LICENSE AGREEMENT. IF YOU DO NOT AGREE TO THE TERMS AND CONDITIONS BELOW, DO NOT USE THIS SOFTWARE IN ANY WAY AND PROMPTLY RETURN IT OR DELETE ALL THE COPIES OF THIS SOFTWARE IN YOUR POSSESSION. Quick Heal License Agreement
This License is a legal agreement between you, the licensee, and Quick Heal Technologies Pvt. Ltd. In consideration of payment of the License Fee, which is a part of the price evidenced by the Receipt, Quick Heal Technologies Pvt. Ltd. grants to the Licensee a nonexclusive right. Quick Heal Technologies Pvt. Ltd. reserves all rights not expressly granted, and retains title and ownership of the Software, including all subsequent copies in any media. This Software and the accompanying written materials are copyrighted. Copying of the Software or the written materials is expressly forbidden.
You can:
• use one copy of the software on a single computer. In case of multi-user copy which will be appropriately mentioned on the packaging and or the receipt, use the software only on the said number of systems as mentioned on the packaging. • make one copy of the software solely for backup purpose.
• install the software on a network, provided you have a licensed copy of the software for each computer that can access the software over that network.
You cannot:
• sublicense, rent or lease any portion of the software.
• debug, decompile, disassemble, modify, translate, reverse engineer the software. MANDATORY ACTIVATION
The license rights granted under this Agreement are limited to the first twenty (20) days after you first install the Product unless you supply registration information required to activate your licensed copy as described in Activation Wizard of the Product. You can activate the Product through the use of the Internet or telephone; toll charges may apply. You may also need to reactivate the Product if you happen to re-install the product due to reasons. There are technological measures in this Product that are designed to prevent unlicensed or illegal use of the Product. You agree that we may use those measures.
As the only warranty under this Agreement, and in the absence of accident, abuse or misapplication, Quick Heal Technologies Pvt. Ltd. warrants, to the original Licensee only, that the disk(s) on which the software is recorded is free from defects in the materials and workmanship under normal use and service for a period of thirty (30) days from the date of payment as evidenced by a copy of the Receipt. Quick Heal Technologies Pvt. Ltd.' only obligation under this Agreement is, at Quick Heal Technologies Pvt. Ltd.' option, to either (a) return payment as evidenced by a copy of the Receipt or (b) replace the disk that does not meet Quick Heal Technologies Pvt. Ltd.' limited warranty and which is returned to Quick Heal Technologies Pvt. Ltd. with the copy of the Receipt. THIRD PARTY WEBSITE LINKS
At some points the software product includes links to third party sites, you may link to such third party websites through the user of this software. The third party sites are not under the control of Quick Heal Technologies and Quick Heal Technologies is not responsible for the contents of any third party website, any links contained in the third party websites. Quick Heal Technologies is providing these links to third party websites to you only as a convenience
EMAIL/ELECTRONIC COMMUNICATION
Once you register the software by activating the software product, Quick Heal Technologies Pvt. Ltd. may communicate with you on the contact information submitted during the registration process through email or other electronic communication device like
QUICK HEAL STATUS UPDATE
Upon every update of licensed copy, Quick Heal Update module will send current product status information to Quick Heal Internet Center. The information that will be sent to the Internet Center includes the Quick Heal protection health status like which monitoring service is in what state in the system. The information collected does not contain any files or personal data. The information will be used to provide quick and better technical support for legitimate customers.
Disclaimers:
This software package is provided as such without warranty of any kind, either expressed or implied, including but not limited to the implied warranties of merchantability and fitness of the package. In no event will Quick Heal Technologies Pvt. Ltd. or its suppliers be liable to you or anyone else for any damages including loss of data, lost profits or any other damages arising out of the use or inability to use this software package ever.
The disclaimers and limitations set forth above will apply regardless of whether you accept the software. ALL MATTERS SUBJECTED TO PUNE (INDIA) JURISDICTION
About This Document
This user guide contains all the information you need to install and use Quick Heal Total Security on Windows. Once familiar you can also use it for future reference. Full care has been taken to incorporate all details with the latest developments in the shipping. The following are the list of conventions used in this document:
Convention Meaning
Bold Font Menu titles, commands, window titles, dialog elements, etc. Additional Information, Important Information, Notes etc.
To do this 1. Step 1 2. …….
Actions that must be performed
About Quick Heal Total Security
Quick Heal Total Security gives your desktop needed protection from various Internet threats. It gives Internet Security by automatically removing viruses and spyware, fighting spam, blocking access to hackers, preventing access to unwanted and malicious websites and blocking pop-up banner advertisements.
Complete Virus Protection
Quick Heal’s powerful virus detection engine provides protection from new and more complex virus threats that are appearing. It automatically protects you from viruses, worms, Trojans and backdoors. It continuously scans the system in background and prevents virus infection from files coming in through email attachments, instant messenger, Internet downloads and through vulnerability exploits. It also scans for certain non-virus threats like spyware, adware, riskware and other attack tools.
Quick Heal Total Security Anti-Virus Features
• Scans and cleans already infected PC before installation
• Cleans worms, backdoors and Trojans by cleaning registry and dropped files. • Cleans virus-infected files automatically.
• Scans email messages and attachments before they reach to your inbox • Downloads new updates automatically.
• Messenger service informs you about new Viruses, Hoaxes, general messages and Updates etc. • Quick Heal Anti Rootkit has been introduced. It detects and removes Rootkits from the system safely. Powerful email protection and AntiSpam filter
• Quick Heal’s unique on-line email protection scans email messages before they reach your inbox, no matter which email client you use.
• Powerful AntiSpam filter engine that identifies and filters junk emails by tagging them as spam. • Facility to provide black list and whit list for email filter in combination of spam filter.
• Prevents worms, Trojans and backdoors from sending infected emails. • Attachment control for better protection from new and unknown worms. • Remove email containing vulnerability e.g. IFRAME, MIME etc.
Complete Internet Protection
Quick Heal Personal Firewall protects your PC and valuable data when you are on-line. Firewall will block any application that will try to connect to Internet except those configured by you as trusted. This prevents Trojans, backdoors and spywares from using your Internet bandwidth to spread and or send personal data over the Internet.
Internet protection features
• Blocks spam mails including credit card phishing scams and email fraud. • Website filter that will block visits to unwanted websites.
• Blocks pop-up web advertisements that slows down your surfing or tracks your browsing habits. Data Protection
Data Theft Protection prevents unauthorized copy of confidential/sensitive data from your PC. Block access to pen drive/CD writer or other USB storage devices from your PC. Using this feature your system’s data cannot be copied to the removable drives. Neither can the data from outside (removable drives) be copied to your system. This way it protects your system and data. This helps to protect infection and data theft.
Anti-Phishing
Quick Heal Anti-Phishing toolbar has been introduced. This automatically scans all accessed web pages for fraudulent activity protecting you against any phishing attack as you surf the internet. It also prevents identity theft by blocking phishing websites. So you can do online shopping, banking and website surfing safely
PC2Mobile Scan
PC2Mobile Scan has been introduced under scan. Now scan and clean viruses and spywares from your cell phones, PDAs and smart
phones by just connecting it to your PC. Please refer
are supported. AntiMalware
A new advanced malware scanning engine scans registry, files and folders at lightning speed to thoroughly detect and clean Spywares, Adwares, Roguewares, Dialers, Riskwares and lots of other potential threats in your system.
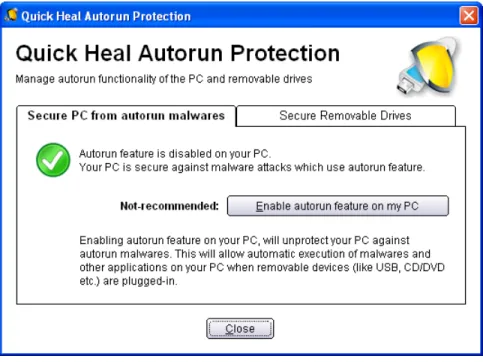
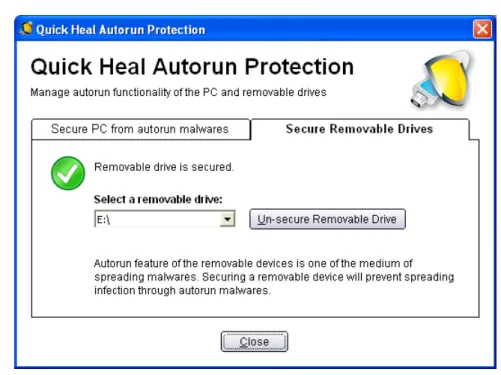
Autorun Protection
Autorun malwares gain access to your system using Autorun feature of the Operating system, and autorun feature of removable drives such as CDs, DVDs or USB drives. This tool secures your PC against such malwares by disabling the autorun feature of your PC or USB drives
AntiSpam Plugins
AntiSpam plugin feature in Quick Heal Total Security minimizes the effort for the user by providing options in MS Outlook or Eudora mail client. This plugin is user-friendly and will help the user to add email address to the Black List or White List just by a single click.
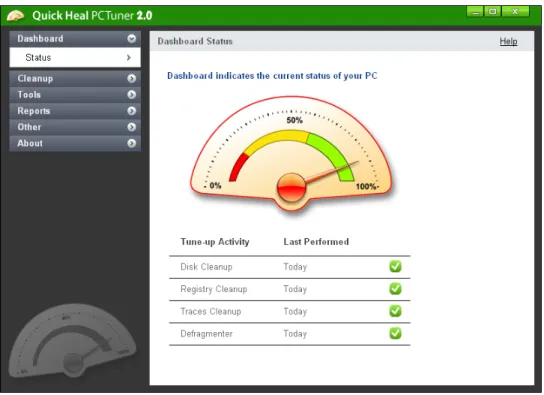
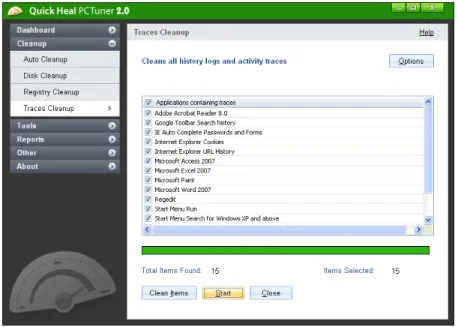
PCTuner
Quick Heal PCTuner improves the performance of your PC or Notebooks by cleaning out system clutter. It also protects your privacy by washing away online activities that are traced through your Internet browser history, cache and cookies. It removes traces from many popular applications like Adobe Acrobat Reader, Microsoft Office, and also cleans invalid registry entries of your operating system.
Table of Contents
INSTALLING QUICK HEAL TOTAL SECURITY ... 10
GETTING STARTED ... 10
SYSTEM REQUIREMENTS... 11
HOW TO INSTALL QUICK HEAL TOTAL SECURITY ... 16
UNINSTALLING QUICK HEAL TOTAL SECURITY... 17
REGISTERING QUICK HEAL TOTAL SECURITY ... 18
REGISTERING ONLINE WITH INTERNET CONNECTION ON THE SAME PC ... 18
REGISTERING OFFLINE WITH INTERNET CONNECTION ON SOME OTHER PC ... 19
IMPORTANT INFORMATION ABOUT MULTI-USER PACK REGISTRATION ... 20
REACTIVATION ... 20
RENEWAL ... 21
RENEWING ONLINE USING INTERNET ACCESS ON THE SAME PC ... 21
RENEWING OFFLINE USING INTERNET ACCESS ON SOME OTHER PC ... 22
CAN I INSTALL QUICK HEAL ON ANOTHER COMPUTER? ... 23
WHAT TO DO IF MY PRODUCT KEY IS LOST? ... 23
USING QUICK HEAL TOTAL SECURITY ... 24
ABOUT QUICK HEAL MAIN WINDOW ... 24
RIGHT SHELL MENU OPTIONS ... 26
USING HELP... 26
PERFORMING MANUAL SCANS ... 27
SCHEDULING QUICK HEAL TOTAL SECURITY SCANNER ... 31
USING ONLINE PROTECTION ... 32
USING EMAIL PROTECTION... 34
KNOWING ABOUT TRUSTED EMAIL CLIENTS ... 35
USING DATA PROTECTION ... 35
USING STARTUP SCAN ... 36
USING MESSENGER ... 37
VIEWING REPORTS ... 38
STATISTICS... 39
VIEWING VIRUS LIST ... 41
QUARANTINE ... 41
AUTORUN PROTECTION ... 42
SYSTEM INFORMATION ... 45
CREATING EMERGENCY CD OR COMMAND LINE SCANNER ... 46
OVERVIEW OF NATIVE BOOT SCAN ... 47
USING QUICK HEAL ANTIMALWARE ... 47
WHEN QUICK HEAL ANTIMALWARE SHOULD BE USED? ... 49
USING QUICK HEAL ANTI-PHISHING... 50
USING EXTRA TOOLS ... 51
HIJACK RESTORE ... 52
WINDOWS SPY ... 53
TRACK CLEANER ... 53
ADVANCED SYSTEM EXPLORER ... 53
ABOUT SECTION ... 54
CONFIGURING WINDOWS MOBILE PHONE BEFORE SCAN ... 57
SCANNING WINDOWS MOBILE ... 58
CONFIGURING OTHER MOBILE PHONE BEFORE SCAN ... 58
CONNECTION THROUGH BLUETOOTH ... 59
SCANNING OTHER MOBILE PHONE THROUGH BLUETOOTH ... 59
CONNECTION THROUGH USB CABLE ... 60
SCANNING OTHER MOBILE PHONE THROUGH CABLE ... 60
USING ANTI-ROOTKIT ... 61
SCANNING RESULTS AND CLEANING ROOTKITS ... 63
CLEANING ROOTKITS THROUGH QUICK HEAL EMERGENCY CD ... 64
USING QUICK HEAL PCTUNER... 65
ABOUT QUICK HEAL PCTUNER MAIN WINDOW ... 65
DASHBOARD ... 67
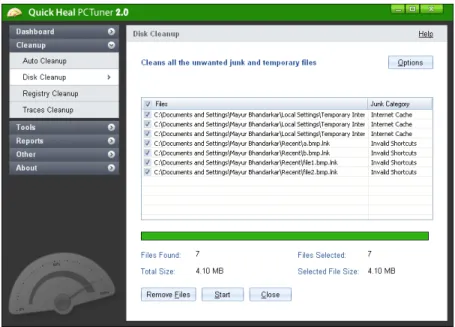
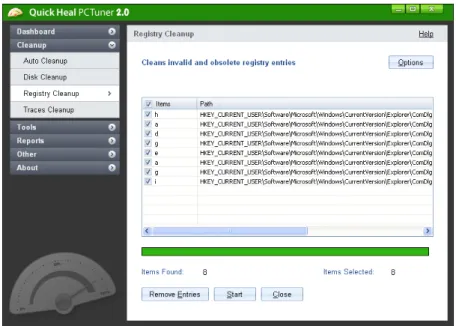
CLEANUP ... 68
TOOLS ... 73
USING PCTUNER REPORTS ... 78
OTHER FEATURES ... 81
CUSTOMIZING QUICK HEAL TOTAL SECURITY ... 83
SCANNER - SCAN OPTIONS ... 84
SCANNER – MEMORY SCAN ... 88
SCANNER – DNASCAN ... 88
SCANNER – REGISTRY RESTORE ... 89
SCANNER – PC2MOBILE SCAN ... 90
PROTECTION – ONLINE PROTECTION ... 90
PROTECTION - EMAIL PROTECTION ... 93
PROTECTION – ANTISPAM ... 95
ANTISPAM FILTER FOLDER ... 97
PROTECTION – INTERNET SECURITY ... 97
PROTECTION – DATA PROTECTION ... 99
PROTECTION – PACKER IDENTIFICATION ... 99
UPDATES - AUTOMATIC UPDATES ... 100
UPDATES - MESSENGER ... 101
GETTING MESSAGES FROM LOCAL FOLDER OR NETWORK PATH ... 102
UPDATES - INTERNET SETTINGS ... 102
MISCELLANEOUS - EXCLUSIONS ... 103
MISCELLANEOUS - GENERAL ... 104
CLEANING VIRUSES ... 106
CLEANING VIRUSES ENCOUNTERED DURING SCANS ... 106
CLEANING VIRUS ENCOUNTERED IN MEMORY ... 107
CLEANING BACKDOOR, TROJAN, WORM AND MALWARES ENCOUNTERED IN MEMORY ... 107
USING EMERGENCY CD AND COMMAND LINE SCANNER ... 108
USING EMERGENCY CD ... 108
USING COMMAND LINE SCANNER ... 108
Installing Quick Heal Total Security
Quick Heal has a simple installation procedure. During installation, read each installation screen, follow the instructions, and then click Next to continue.
Quick Heal should be installed on a virus-free machine. If you are sure that your computer is infected by a virus, use the Emergency CD to remove the viruses before installing Quick Heal. If you are not sure whether your computer is infected by viruses, continue with the installation. Quick Heal setup will scan your computer’s critical area for viruses as a part of its installation process.
Getting Started
Before installing Quick Heal remember the following guidelines:
• If you have any other anti-virus software/hardware loaded, uninstall it before proceeding with Quick Heal installation. Two anti-virus software’s co-existing on the same computer at the same time could be hazardous for your computer. • Quick Heal requires approximately 1 GB of free disk space.
• Close all open programs before proceeding with Quick Heal installation. • You must install with administrative rights.
Chapter
System Requirements
To use Quick Heal, your computer must meet the following minimum hardware requirements:
Operating System Minimum Requirements
Windows 2000 • 300 MHz Pentium Processor (or compatible) or higher • 256 MB of RAM
• 1 GB of free hard disk space • DVD or CD-ROM drive • Service Pack 3 or above • Internet Explorer 6 or higher
Windows XP • 300 MHz Pentium Processor (or compatible) or higher • 256 MB of RAM
• 1 GB of free hard disk space • DVD or CD-ROM drive • Service Pack 2 or above
Windows Vista • 1 GHz Processor (or compatible) or higher • 512 MB of RAM
• 1 GB of free hard disk space • DVD or CD-ROM drive
Windows 7 • 1 GHz Pentium Processor (or compatible) or higher
• For 32-bit 512 MB or higher RAM; for 64-bit 1 GB or higher RAM • 1 GB of free hard disk space
Clients supporting Email scan
Email scanning is supported for any of the following POP3 email clients: • Microsoft Outlook Express 5.5 and above
• Microsoft Outlook 2000 and above • Netscape Messenger 4 and above • Eudora 5 and above
• IncrediMail • Windows Mail
Clients not supporting Email scan
Email scanning is not supported for the following protocol and email clients: • IMAP
• AOL
• POP3s with Secure Sockets Layer (SSL)
• Web based email such as Hotmail and Yahoo! Mail • Lotus Notes
SSL connections not supported
Email Protection does not support encrypted email connections that use Secure Sockets Layer (SSL). If you are using SSL connections then your emails are not protected by Email Protection.
To send email through SSL connections, turn off Email Protection. Quick Heal Anti-Rootkit Requirements
• Quick Heal Anti-Rootkit is not supported 64-bit Operating Systems. • It requires minimum 256 MB RAM installed on system.
Quick Heal Browsing Protection
• This feature is only supported for Microsoft Internet Explorer 5.5 and above version. Quick Heal Self-Protection
• This feature is not supported for Microsoft Windows 2000 Operating System.
• For Microsoft Windows XP Operating System this feature is supported if Service Pack 2 or higher is installed.
Quick Heal Anti-Phishing
• This feature is supported for Internet Explorer 6 or above version. Quick Heal PC2Mobile Scan
• Quick Heal PC2Mobile feature is supported on Windows XP/Vista/Windows 7 having 32-bit operating systems. • For Windows Mobile, Microsoft Active Sync 4.0 or above software must be installed.
• For the list of Mobile phones supported please check
Quick Heal PCTuner
This table gives a comparison of the features available in
different flavors of Quick Heal: QUICK HEAL ANTIVIRUS QUICK HEAL INTERNET SECURITY
QUICK HEAL TOTAL SECURITY PROTECTION
Anti-Virus Protects your computer from all types of viruses.
AntiSpyware Detects and cleans Spywares, Trojans and keyloggers, and protects against identity theft. AntiMalware Scans system registry and folders
to detect and clean Adwares, Roguewares and other potentially harmful software.
AntiRootkit Performs deep scan of your computer and removes all hidden rootkits.
Autorun Protection Prevents execution of autorun from infected pen drive. Vaccinates pen drive to prevent from malware autorun infections.
Firewall Protects your computer from hacker attacks.
AntiSpam Blocks junk/spam mails from entering your mailbox.
INTERNET PROTECTION
Browsing Protection Protects against infected websites. Anti-Phishing Blocks access to phishing websites
and other online fraudulent websites.
PRIVACY PROTECTION
Track Cleaner Removes computer usage traces of various applications.
Data Theft Protection Blocks access to pen drive and other USB storage devices and prevents unauthorized copying of data.
Secure Delete Securely removes sensitive and confidential data from the hard disk permanently.
PC OPTIMIZATION
Registry Cleanup Cleans invalid and junk entries from system registry and optimizes system speed.
Disk Cleanup Cleans all the unwanted junk files and temporary files.
MOBILE PROTECTION
PC2Mobile Scan Scans and cleans your mobile phones, smart phones and PDA using your computer.
How to Install Quick Heal Total Security
To start with installation, insert the Quick Heal CD in the CD-Drive. CD being enabled with auto-run feature will automatically prompt you with a list of available options.
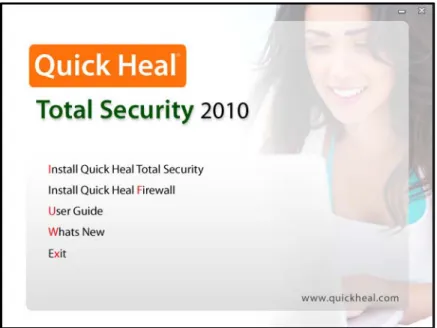
1. Click Install Quick Heal Total Security to initiate the installation process.
Figure 1-1: Install Quick Heal Total Security
2. Installation program will first perform Pre-install virus scan on your system to scan system memory, master boot record and system files for known viruses.
3. During Pre-install virus scan if a virus is found active in memory then follow below given procedures: a. The installer automatically sets native scanner to scan and disinfect the system on next boot.
b. After disinfection restart your system and continue with installation. For more details refer to Native Scan in User Guide.
4. During the Pre-install virus scan, if viruses are not found in the critical system areas then installation would proceed further.
5. Click Next.
6. Read the License Agreement carefully; if you agree then choose I Agree. If you disagree then you cannot continue with the installation.
7. Click Next.
8. Click Browse to change the installation path if you want to install Quick Heal in different folder. 9. Click Next.
10. You can configure additional protection related to Internet Security to ensure safe browsing. For a novice user, it is recommended to keep the default settings intact as it will provide optimum protection against malwares and various threats.
11. Click Next.
12. Read the important information relating to the product. 13. Click Next.
14. On Finish, Registration/Re-activation, Updating and Install Quick Heal Firewall activities will be performed. In case if you wish to perform these activities later on then unselect the above options and click Finish.
If the CD auto-run menu does not appear
In some systems, CD-ROM drive does not automatically start a CD when it is inserted. In such case, to start the installation, please perform the following steps:
1. Double click the My Computer icon on your Desktop. 2. Right click the CD-ROM drive and select Explore option. 3. Double click Autorun.exe to start the installation.
Uninstalling Quick Heal Total Security
If due to any reason you wish to uninstall Quick Heal, please perform the following steps:
1. Click Start -> Programs -> Quick Heal Total Security -> Uninstall Quick Heal Total Security to initiate the un-installation process.
2. Quick Heal Uninstaller will prompt for the deletion of Reports, Quarantine and Backup files. If you wish to reinstall Quick Heal after some time then you can uncheck Remove Report Files and Remove Quarantine/Backup Files. Otherwise proceed by clicking OK.
3. To uninstall Quick Heal Firewall Pro select Uninstall Quick Heal Firewall Pro and click OK. Quick Heal Firewall Pro un-installation will start. Please go through the screen wise instructions.
4. If you are a registered user, a dialog will be displayed showing Product key of your copy. Your are requested to note down your Product key as it will be needed in case you want to reinstall and reactivate Quick Heal.
5. Uninstaller will finally prompt you to restart your system for changes to take effect.
• Before proceeding with uninstallation, ensure that all other running programs are closed. • To uninstall Quick Heal Total Security, administrative privilege is required.
Registering Quick Heal Total Security
After installation of Quick Heal Total Security, you will need to register your copy to get it activated. It is strongly recommended that you register and activate your copy immediately after installation; otherwise without activation it cannot be further updated. Registered users can get other benefits like technical support and messenger service. If your copy of Quick Heal is not registered within 20 days time period from the date of installation, it will expire and its further use will be considered as void.
Registration can be done by any of the following options: • Online with Internet Connection on the same PC • Offline with Internet Connection on some other PC
Registering Online with Internet Connection on the same PC
If your PC has Internet connection then you can activate Quick Heal Total Security online. To register Quick Heal online, please perform the following steps:
1. Click Start -> Programs -> Quick Heal Total Security -> Activate Quick Heal Total Security to launch the registration wizard.
2. Click Next to continue.
3. Select Yes to I have Internet access on this computer and click Next to continue. 4. Select Activate the copy and click Next to continue.
5. The Activation Information screen appears. Provide the 20-digit Product key and click Next to continue. 6. Provide details for Purchased from and Register for fields. Click Next.
7. The Personal Information screen appears. Provide details as requested. The fields marked with * are mandatory fields. Click Next to continue.
8. The Submit the Information screen appears. Verify the information displayed. If any modifications are needed click Back and make the necessary modifications; else click Next to continue.
9. The screen indicating successful activation is displayed. The validity of Quick Heal Total Security is displayed. Click Finish to complete the Activation process.
1. You can find the Product key for your copy pasted on your User Guide and / or inside the box. If you have purchased the software online using credit card then you will find the product key in the e-mail confirming your order.
2. Kindly stay connected to the Internet during the Registration process.
Chapter
Registering Offline with Internet Connection on some other PC
In case if Internet connection is not available on your computer, you will need to register your copy by filling the registration form
on our website. You can visit off-line activation page on our web site at
system having Internet Connection. For example: Cyber cafe. This involves following important steps
• Getting details of your Quick Heal Total Security installation
• Visiting and filling off-line registration web form through some other PC having Internet access • Receiving license.key file through email.
• Activating the Quick Heal Total Security installation using newly obtained license.key file. Detail procedure
When filling the registration form on our website you would also need following information of your installed copy: • Product key
• Installation Number • A valid email address.
1. You can find Product key for your copy pasted on your User Guide and / or inside the box. If you have purchased the software online using credit card then you will find the Product key in the email confirming your order.
2. Installation Number is available in Off-line Registration section of Quick Heal Total Security Registration Wizard. Choose No to ‘I have Internet access on this computer’ and click Next. Choose Offline registration through web and click Next to get your Installation Number.
Obtaining License File
Once the Product key and Installation Number are verified, you will have access to the Personal Information page wherein you are required to fill the relevant contact details. Once the registration details are submitted successfully you will get your unique License.key file via email on the email address provided by you at the time of registration. You will also get an option to download your License.key file on successful registration/activation. Take this License.key file to the computer where activation needs to be done.
Activating Offline
Now proceed with the following process to activate your copy:
1. Click Start -> Programs -> Quick Heal Total Security -> Activate Quick Heal Total Security to launch the registration wizard.
2. Click Next.
3. Choose No to I have Internet access on this computer. 4. Click Next.
5. Select Offline Registration through web. 6. Click Next.
7. Click Browse and open the License.Key file.
8. On completion you will get successful activation message. The validity of Quick Heal Total Security is displayed. 9. Click Finish to complete the registration process.
Important Information about Multi-user Pack Registration
For Multi-user pack when the first Product key of Quick Heal is registered, registration information of the first Product key is automatically applied for all the other Product keys in the pack. As a result the Product keys that are registered after the registration of first Product key will have same user information and subscription expiry date.
Reactivation
If due to any reason you need to reinstall your operating system or Quick Heal Total Security, it is necessary to reactivate your copy after reinstallation.
Reactivation is very easy and similar to the registration process. The changes in case of Reactivation are:
• On a PC where you have Internet access, you are required to choose Re-activate the copy option and provide the Product key of your copy and click Next.
Renewal
To renew your copy of Quick Heal you need to buy renewal code. You can purchase a renewal code from Quick Heal, or from nearest distributor or reseller.
Renewing Online using Internet Access on the same PC
If your PC has Internet connection then you can renew Quick Heal online by performing the following steps: 1. Click Start -> Programs -> Quick Heal Total Security -> Quick Heal Total Security.
2. If your subscription to Quick Heal Total Security has expired then Information section of the Status window will show that the subscription to your copy of Quick Heal has expired. Click Renew Now button. If your subscription to Quick Heal has not expired, then click About menu and then click Renew Now button.
3. The Product key of the product will be displayed in the Product key field. Enter the renewal code in Renewal Code field. Enter the distributor name or reseller name in the Purchased from field.
4. Click Next to continue.
5. The subscription information such as Current Expiry Date and New Expiry Date will be displayed. 6. Click Renew to continue.
7. Your copy of Quick Heal will be renewed. Click OK to complete the renewal process.
If a user has purchased an additional renewal code, then the renewal can be performed only after 10 days of the current renewal.
Renewing Offline using Internet Access on some other PC
In case if Internet connection is not available on your computer, you will need to renew your copy by filling the renewal form on
our website. You can visit off-line renewal page on our web site at
having Internet Connection. For example: Cyber cafe. This involves following important steps
• Getting details of your Quick Heal Total Security installation
• Visiting and filling off-line renewal web form through some other PC having Internet access • Receiving license.key file through email.
• Renew the Quick Heal Total Security using newly obtained license.key file. Detail procedure
When filling the renewal form on our website you would also need following information of your installed copy: • Product key
• Installation Number
1. Installation Number and Product key are available in Off-line Renewal section of Quick Heal Total Security Renewal Wizard. Select ‘Renew Offline’ and click Next. You will find the Installation Number along with the Product key.
Obtaining License File
1. Once the Product key, Installation Number and Renewal code are verified, next page will be displayed with User Name and Email Address field. In case if your email address has been changed then please update the email address in this form.
2. Click the Submit button, to get unique License.key file via email on the email address provided by you. You will also get an option to download your License.key file on successful renewal. Take this License.key file to the computer where renewal needs to be done.
Renewing Offline
Now proceed with the following process to renew your copy:
1. Click Start -> Programs -> Quick Heal Total Security -> Quick Heal Total Security.
2. If your subscription to Quick Heal Total Security has expired then Information section of the Status window will show that the subscription to your copy of Quick Heal has expired. Click Renew Now button. If your subscription to Quick Heal Total Security has not expired, then click About menu and then click Renew Now button.
3. Select Renew Offline option on this window. 4. Click Next.
5. Click Browse and open the License.Key file.
6. On completion you will get successful renewal message. The new validity of Quick Heal Total Security is displayed. 7. Click OK to complete the renewal process.
Can I Install Quick Heal on another computer?
If you install Quick Heal Total Security on another computer, after installation it is necessary to register your software. You must perform the registration procedure by providing new Product key. Any previously obtained Product key and License Keys are invalid and will not work on another computer.
One Product key can only be used for one computer.
What to do if my Product key is lost?
Product key will serve as the users Identity. In case you lose the Product key, you can obtain your Product key by contacting Quick Heal Technical Support by paying nominal charges.
Using Quick Heal Total Security
All the features related to Quick Heal can be accessed from Quick Heal main window. In addition, you can also access Quick Heal main window or the features from Windows system tray. Proceeding by the default installation, Quick Heal protects your entire system. You do not have to manually start Quick Heal Total Security to protect your system in such cases.
You can manually start Quick Heal by any of the following ways:
• Click Start -> Programs -> Quick Heal Total Security -> Quick Heal Total Security.
• In Windows system tray, double click the Total Security Online Protection icon or right click Total Security Online Protection icon in system tray and select Open Total Security.
• At the prompt in DOS window, change the path to the directory where Total Security is located. Type Scanner and press Enter.
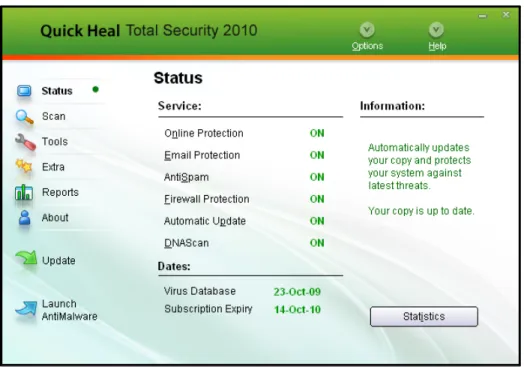
About Quick Heal Main Window
The main window lets you access features, configure the options and access online help.
Figure 3-1: Quick Heal Total Security Main Window
Chapter
On the left side of the main window select the option that you want. You have following options:
Status View the status of Quick Heal Total Security. This section provides status of important security scanning.
Scan Virus scanning is obviously the most important component of any Anti-Virus software. Quick Heal scanner detects viruses in boot records, partition tables, executable files, compressed files, compressed exes, mailboxes, OLE files, script files, scrap etc.
Tools Important tools can be accessed from this section such as Anti-Rootkit, Quarantine, Virus List, Scheduling Scan, System Information, Emergency CD, Autorun Protection and Messenger.
Extra This section provides extra tools for system diagnosis and repair. Advanced tools like Hijack Restore, Windows Spy, Track Cleaner and Advanced System Explorer can be accessed from here.
Reports View the activity reports of all the important modules.
About This section provides details about Version, Virus Database, Subscription details and Technical Support. You can also Register/Re-activate or renew your Quick Heal subscription from here.
Following are the other options available on the main screen:
Options Customize the general options for Quick Heal Total Security.
Update Update the virus definition files and Quick Heal Total Security components. Launch AntiMalware Scans for malicious softwares (Adwares, Dialers, Pornwares, Potentially
unwanted software, Rouge applications, Spyware) and provides cure against them.
Right Shell Menu Options
Open Total Security Launch Quick Heal Total Security.
Launch AntiMalware Launch Quick Heal AntiMalware.
Check New Messages Displays new messages received from Quick Heal.
Enable/Disable
Entertainment Mode Enables/Disables all Quick Heal prompts and notifications.
View Messages Displays the messages received from Quick Heal. Enable/Disable
Online Protection Enables/Disables Quick Heal Online Protection.
Option Check or configure various Quick Heal Total Security options.
Statistics Provides statistical information from Online Protection, Email Protection and AntiSpam Protection.
Update Now Update Quick Heal Total Security. Scan Memory Scan System Memory for viruses.
Using Help
Help system consists of extensive topics, index, commands and procedures with general FAQs. Quick Heal provides online help for most of the message windows. You can get help on all the topics by any of the following ways:
1. Launching Help by clicking Help button from Scanner or Scanner Options. 2. Pressing F1 when you need help.
3. Clicking the Help button in a dialog box.
Performing Manual Scans
If Online Protection is enabled with default setting, you normally would not need to scan manually. However, you can manually scan your entire computer, or individual floppy disks, drives, network drives (mapped drives), USB data storage drives, folders, or files if you wish to. Although the default settings for manual scanning are usually adequate, you can adjust the options for manual scanning in the Options of Quick Heal Total Security.
Performing a full system scan
A full system scan scans all boot records, drives, folders and files on your computer. To perform a full system scan: 1. Start Quick Heal Scanner.
2. In the Quick Heal Scanner main window, click Scan on the left pane. 3. In the Scan pane, click My Computer.
4. Click Scan.
5. When the scan is complete, scan statistics and report will be provided. 6. After reviewing the statistics and report click Close.
Performing My Documents scan
My Documents scan scans all the documents, spreadsheets, presentation and other files kept in My Documents folder. To perform My Document Scan:
1. Start Quick Heal Scanner.
2. In the Quick Heal Scanner main window, click Scan on the left pane. 3. In the Scan pane, click My Documents.
4. Click Scan.
5. When the scan is complete, scan statistics and report will be provided. 6. After reviewing the statistics and report click Close.
Performing a System Memory scan
Now you scan System Memory for viruses. To perform a System Memory scan: 1. Start Quick Heal Scanner.
2. In the Quick Heal Scanner main window, click Scan on the left pane. 3. In the Scan pane, click System Memory.
4. Click Scan.
5. When the scan is complete, scan statistics and report will be provided. 6. After reviewing the statistics and report click Close.
Performing a Windows folder scan
Windows folder is the primary folder of the Operating System. To perform a Windows folder scan: 1. Start Quick Heal Scanner.
Performing scan on folder
Occasionally you would also like to scan specific folders. To perform scan on desired folder: 1. Start Quick Heal Scanner.
2. In the Quick Heal Scanner main window, click Scan on the left pane. 3. In the Scan pane, double click the Scan Folder.
4. Select the folder you want to scan. You can also choose multiple folders for a single scan. Select Exclude Subfolder if you do not wish to scan subfolders.
5. Click OK to initiate the scan.
6. When the scan is complete, scan statistics and report will be provided. 7. After reviewing the statistics and report click Close.
Performing scan on specific files
Occasionally you would also like to scan specific file(s). To perform scan on desired file(s): 1. Start Quick Heal Scanner.
2. In the Quick Heal Scanner main window, click Scan on the left pane. 3. In the Scan pane, double click Scan File.
4. Select the file(s) you want to scan. 5. Click OK to initiate the scan.
6. When the scan is complete, scan statistics and report will be provided. 7. After reviewing the statistics and report click Close.
Performing Native Boot Scan
Native Boot Scan is very useful to disinfect the system. In case the system is badly infected by a virus and it cannot be cleaned because the virus is active, use Native Boot Scan. This scan will be performed on next boot using Windows NT Boot Shell.
1. Start Quick Heal Scanner.
2. In the Quick Heal Scanner main window, click Scan on the left pane. 3. In the Scan pane, click Native Boot Scan.
4. Click Scan.
5. A confirmation prompt will be displayed to set boot time scanner on next boot. Click Yes.
6. If you wish to scan your system immediately then click Yes to restart the system. If you wish to scan later when you boot the system next time then click No.
Performing Mailbox Scan
Mailbox scan scans inside Outlook Express and Windows Mail’s mailboxes for viruses. It deletes the infected mail ensuring your mailboxes remains clean and virus free.
1. Start Quick Heal Scanner.
2. In the Quick Heal Scanner main window, click Scan on the left pane. 3. In the Scan pane, click Mailbox Scan.
4. Click Scan. When the scan is complete, scan report will be generated. 5. After reviewing the statistics and report click Close.
Adding Item in My Profile for regular scan
You can add a custom scan if you regularly scan a particular area of your computer and don’t want to specify that area to be scanned every time. You can delete the scan when it is no longer necessary.
To create a custom scan
1. Start Quick Heal Total Security.
2. In the Quick Heal Total Security main window, click Scan on the left pane. 3. In the Scan pane, click Add Item.
4. If want to scan a folder or multiple folders then click Add Folders and select the desirable folder(s) and click OK. You can configure Exclude Subfolder while scanning of a specific folder. This will ignore scanning inside the subfolders while scanning. e.g. If you select C:\ drive for scan along with selecting Exclude Subfolder option, this will initiate scan for files available at the root of C:\ drive only.
5. You can add your desirable files to scan in a single custom scan. To add specific files, click on Add Files and browse for files and click OK.
6. Click Next.
7. Give a name to your custom scan. 8. Click Finish to save the custom scan. To scan a custom scan item
1. Start Quick Heal Total Security.
2. In the Quick Heal Total Security main window, click Scan on the left pane. 3. In the Scan pane, select the custom scan item and click Scan.
4. When the scan is complete, scan statistics and report will be provided. 5. When you are done reviewing the statistics and report, click Close. To edit a custom scan
You can edit your custom scan any time to add or remove the scan items. To edit a custom scan: 1. Start Quick Heal Total Security.
2. In the Quick Heal Total Security main window, click Scan on the left pane. 3. In the Scan pane, click on the custom scan which you created previously. 4. Click Edit Item.
5. Make the changes and click Finish to save the changes. To remove a custom scan
You can remove your custom scan any time. To remove a custom scan: 1. Start Quick Heal Total Security.
2. In the Quick Heal Total Security main window, click Scan on the left pane. 3. In the Scan pane, click on the custom scan item which you want to delete. 4. Click Remove Item.
To scan one or more drives
You can scan all or specific drive(s) available on your system. To scan the drive(s): 1. Start Quick Heal Total Security.
2. In the Quick Heal Total Security main window, click Scan on the left pane. 3. In the Scan pane, click the Drives section.
4. Select Drive dialog box appears. Herein check the drives you want to scan from the drives list box. You can check special selection for multiple drives by checking items in the Drive Types group.
5. Now click Scan button. Schedule Scan
You can schedule the scanner to scan automatically at predetermined time and intervals. For more details please see Scheduling Quick Heal Total Security.
Scan initiated by right click handler
You can easily initiate scan by using right click handler. To scan:
1. Right click on the object (Drive, Folder and File) you want to scan. 2. Select Total Security Scan from the right click menu.
Scanning through DOS command line
If you are working in a DOS window, you can easily initiate scan for a specific drive, file or folder, from DOS command line. To scan:
1. In the DOS window prompt, changed to the directory path where you have installed Quick Heal Total Security. 2. At the prompt, type SCANNER.EXE and give the path to scan. For example: Scanner.exe C:\Windows 3. Press Enter to start the scan.
Scan using DUMB mode
If you are working in a DOS window, you can easily initiate scan for a specific drive, file or folder, from DOS command line. To scan:
1. In the DOS window prompt, changed to the directory path where you have installed Quick Heal Total Security. 2. At the prompt, type SCANNER.EXE /DUMB. For example: Scanner.exe /DUMB
3. Press Enter. Quick Heal Total Security will start in dumb mode. 4. Now select the item you wish to scan.
Scanning through DOS command line using DUMB mode
Using DOS command line you can scan in dumb mode. To scan using dumb mode:
1. In the DOS window prompt, changed to the directory path where you have installed Quick Heal Total Security.
2. At the prompt, type SCANNER.EXE /DUMB and give the path to scan. For example: Scanner.exe /DUMB C:\Windows
Overview of DUMB mode scanning
Dumb mode scanning is recommended if no virus was detected during an ordinary scanning procedure but the system is still behaving strangely (for example, slow performance of applications, and so on). Otherwise, we do not recommend dumb scanning mode as it noticeably slows down the scanning speed of Quick Heal Total Security.
Scheduling Quick Heal Total Security Scanner
You can schedule the scanner to scan automatically at predetermined time and intervals. You can schedule the scan at first boot, one time, daily and weekly. This will supplement other automatic protection features to ensure that your computer remains virus-free.
You can easily schedule custom scan. Frequency can be set for daily and weekly scans, which additionally can refine your request to schedule it to occur every two days or every three days instead. Further you can also schedule the task to repeat at specific intervals.
To create a new schedule scan
1. On the left pane of the main window, under Quick Heal Total Security, click Tools. 2. In the Tools pane, click Schedule Scan. Total Security Scan Scheduler wizard will appear. 3. Select Create new Schedule Scan and click Next.
4. Name your custom schedule scan under Name of the Schedule Scan /Task. For example: My Scan.
5. Select First Boot to schedule the scanner to scan at first boot of the day. When you select First Boot in this case you don’t have to specify the time of the day to start the scan. Scan will take place only during the first boot no matter at what time you start the system. Otherwise set the frequency and time at which you want to scan the system. Most of the frequency options include additional options (Every day (s) and Repeat Task) that let you further refine your schedule scan. You can also configure the scanner to scan silently (without any user intervention) by selecting Silent Scan option. By default the Schedule AntiMalware option will be checked. This will perform a malware scan along with the virus scan. Select the schedule scan priority from High, Normal and Low. Set the additional options as necessary.
6. Provide User Name and Password.
7. Under Setting, you can specify specific items to be scanned, action required to be taken if a virus is found and use of advance options while scanning. By default, setting has been set for adequate options for scanning.
8. When you are done, press Next. 9. Click Add Folders.
10. Select the Drives, folder or multiple folders to be scanned and press OK. You can configure Exclude Subfolder while scanning of a specific folder. This will ignore scanning inside the subfolders while scanning. e.g. If you select C:\ drive for scan along with selecting Exclude Subfolder option, this will initiate scan for files available at the root of C:\ drive only. 11. Click Next.
12. Review the summary of your custom scheduled scan. 13. When you are done, click Finish.
To edit a scheduled scan
You can change the schedule of any scheduled scan. To edit a scheduled scan:
1. On the left pane of the main window, under Quick Heal Total Security, click Tools. 2. In the Tools pane, click Schedule Scan. Total Security Scan Scheduler wizard will appear. 3. Click Modify Schedule Scan and select schedule scan created previously.
4. Click Next.
5. Change the schedule as desired. 6. When you are done, click Next. 7. Change the scan area as desired. 8. Click Next.
9. Review the summary of your custom scheduled scan. 10. When you are done, click Finish.
To delete a scan schedule
You can delete any scan schedule. To delete a scan schedule:
1. On the left pane of the main window, under Quick Heal Total Security, click Tools. 2. In the Tools pane, click Schedule Scan. Total Security Scan Scheduler wizard will appear. 3. Click Delete Schedule Scan.
4. To delete a single schedule scan, select the schedule scan and click Remove. To delete all the scheduled scans click Remove All.
Using Online Protection
Online Protection prevents your system from virus attack by continuously monitoring the system and prevents virus infection from email attachments, Internet Downloads, network, ftp, floppy, Data storage devices, CD-DVD ROM file executables and during suspected file copying. All this is done in the background and you are notified only when a virus infected file is found or a virus like activity is detected.
Quick Heal Total Security Online protection is configured to load automatically whenever you start your computer. Online Protection icon appears on the Windows taskbar.
Disabling Online Protection
It is not recommended to disable Quick Heal Total Security Online Protection. It could be hazardous for your computer and data. But if you wish to do so, it can be done as follows:
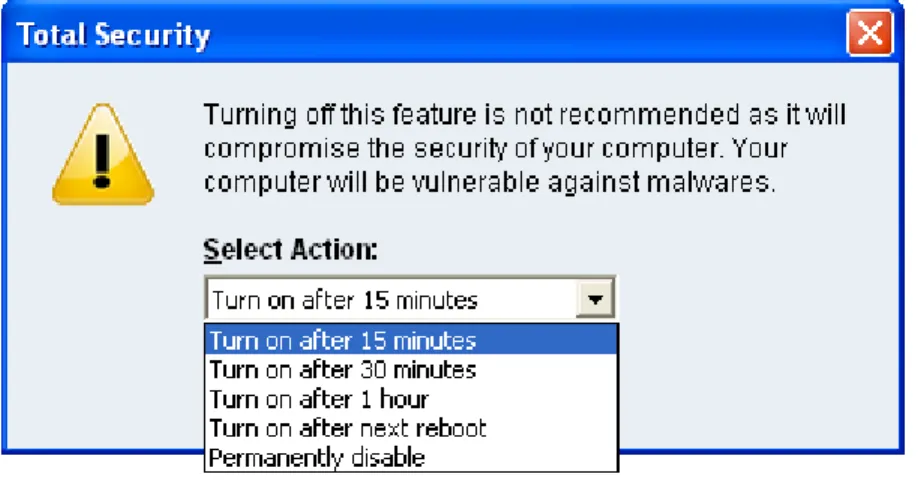
To disable Online Protection temporarily
1. Right-click Total Security Online Protection icon on the Windows task bar. 2. Click Disable Online Protection.
3. A prompt that recommends against turning off Online Protection appears. Select the time period for Online Protection to automatically enable itself or permanently disable using the Select Action drop-down box.
Figure 3-2: Disable Online Protection
4. Click OK to disable Online Protection.
You can now see that Online Protection icon’s color is changed from Green to Red in Windows System Tray. It means that Online Protection has been disabled temporarily or permanently based on your selection. If you have selected Turn on after 15 minutes / 30 minutes / 1 hour then the icon’s color will change back from Red to Green based on the time frame selected, to indicate that Online Protection has been enabled. If you have selected Turn on after next reboot, then the icon’s color will change back to Green at the next reboot. If you select Permanently disable then the icon’s color will remain Red until you enable Online Protection manually.
To disable Online Protection permanently 1. Start Quick Heal Total Security.
2. Click Options, under main windows menu of the Quick Heal Total Security. 3. Click Online Protection tab.
4. Uncheck the Load Online Protection at Windows Startup option. 5. Press OK to apply the changes.
Using Email Protection
Email is the most common medium for spreading viruses and other malicious programs. Since email is most widely used for communication, newer viruses are using email as a medium to spread. Virus authors are always looking for new methods to automatically execute their viral codes using some vulnerability amongst popular email clients. Hence, for every user it is very important to have robust mail protection, which will block viruses or malicious programs at transferring level itself. Total Security Mail Protection has been redesigned to provide utmost & best protection to its users. Total Security provides reliable and robust email protection. It supports all email programs that use POP3 communications protocol. Your email messages are scanned automatically for any malicious code content within, and hence you are assured of virus free safe emails.
Email protection protects you from following threats: • Viruses received in email and attachments. • Partial messages.
• Email containing vulnerability such as MIME, IFRAME etc. The following features are supported in email protection:
• Scanning of Incoming Mail.
• Silent mode (does not prompt) scanning. • Remove multiple extension attachment(s). • Remove Message/Partial type of mails.
• Actions if viruses are found are Delete automatically and Repair automatically, delete if unsuccessful. • Backup before cleaning action.
• Scanning of ZIP attachments. • Attachments Control.
• Trusted email clients allow only trusted email clients to send mails. This prevents new worms from further spreading to a greater extent.
• AntiSpam.
See Customizing Email Protection for further set-up options. Disabling Email Protection
It is not recommended that you disable Quick Heal Email Protection. Your email communication may not remain safe any further, and your system shall be open for vulnerable virus infection through email.
Email Protection can also be disabled as follows: 1. Start Quick Heal Total Security.
2. Click Options, under main windows menu of the Quick Heal Total Security. 3. Click Mail Protection tab.
4. Uncheck the Enable Email Protection option. 5. Click OK to apply the changes.
Knowing about Trusted Email Clients
Email is the most common medium for spreading viruses and other malicious programs. Since email is most widely used for communication, newer viruses are using email as a very easy medium to spread. Virus authors are always looking for new methods to automatically execute their viral codes using some vulnerability amongst popular email clients. Worms are also using their own SMTP engine routine to spread their infection.
Trusted email client is an advanced option which authenticates email-sending application on the system before they are sending emails. This option will prevent new ‘Worms’ from further spreading from your system. It contains a default email client list, which is allowed to send emails. Email client in the default list are Microsoft Outlook Express, Microsoft Outlook, Eudora and Netscape Navigator.
1. In case if the prompt comes for an application, which is known to you for sending email but not added in the Trusted email client list, click Yes to add the same.
2. In case if the prompt comes for an application, which is not known to you for sending email then select No as it could
be a new Worm. We also request you to send the same file to
same.
Using Data Protection
Data protection can be used to block access to removable drives (viz USB drives, Pen Drives, Memory cards, etc.). This will protect your confidential information in the system from being copied using these drives. Using this feature your system’s data cannot be copied to the removable drives. Neither can the data from outside (removable drives) be copied to your system. This way it protects your system and data. This helps to protect infection and data theft.
To enable Data Protection
1. Start Quick Heal Total Security.
2. Click Options, under main windows menu of the Quick Heal Total Security. 3. Click Data Protection tab.
4. Select Data Protection option. 5. Click OK to apply the changes.
Using Startup Scan
Total Security Startup Scan keeps a watch on the programs trying to get automatic execution control. It also keeps a watch on some of the system files, which are commonly patched (or replaced) by certain worms/backdoors/trojans.
By default it is configured to check these on every boot operation. When a program takes an automatic execution control it can be: • A program installed by you.
• A program installed without your knowledge, which in case might be a malicious program. Total Security Startup Scan warns you in both the cases.
It provides you three options:
Accept This registers the program or changes with Startup Scan and does not warn from the next boot. If you have installed a program or upgraded an existing program you shall get the warning, which should be registered, once with the Startup Scan. Press A to accept.
Delete / Repair If it discovers a new entry in the system, it gives the option to delete. If selected to Delete, it removes the entry of the particular program and sends the file to Quarantine.
If it discovers that some old entry or system file has been modified it gives the option to repair. If Repair is selected it restores the old settings and sends the new file to Quarantine.
Help It shows in detail what the alarm means. This will help you in deciding the course of action.
General guideline for choosing the response is:
If you have installed some program and you receive a Startup Scan warning for that program select Accept. If you have not installed any application knowingly and you get a Startup Scan warning choose Repair / Delete as this may be a new Trojan/Worm/Backdoor.
Using Messenger
Quick Heal Total Security Messenger provides the trusted link for message delivery between Quick Heal Team and you (the User). It automatically gathers information from our web site and informs you about New Viruses, Hoaxes, Upgrade availabilities and other information. It can be also used from Local Folder or Network path.
Quick Heal Total Security Messenger icon on the tray indicates that the messenger is running. By default Quick Heal Total Security Messenger is configured to load automatically.
The messenger starts blinking along with an Audio Alarm whenever there is a new message. Click the blinking ball to view the message. A detailed log of messages is also maintained.
Color Indicates
Red Virus Alert
Amber Hoax Information
Green Upgrade
Blue General
Viewing Messages
To view the messages, do the following steps:
1. Right click Quick Heal Total Security icon from windows system tray.
2. Click View Messages to open the Newsletter Viewer containing the list of all the messages with date, type and subject. 3. Select the message you want to view.
4. Click View to see the particular message. The message is displayed instantly. You can use Prev and Next buttons to browse through the other messages. Click Close to move back to the Newsletter Viewer.
5. Click Close Newsletter Viewer.
6. Click Minimize to minimize the Messenger. Disabling Messenger
If you turn off Quick Heal Total Security Messenger then you are going to miss the important information related to new threats, updates and other information about Quick Heal Total Security.
Quick Heal Messenger can also be disabled as follows: 1. Start Quick Heal Total Security.
2. Click Options, under main windows menu of the Quick Heal Total Security. 3. Click Messenger tab.
4. Uncheck the Enable Messenger option. 5. Press OK to apply the changes.
To check the Message Instantly:
By default the messenger is configured to check for the message automatically from Internet. See Customizing Quick Heal Total Security Messenger. You can also check the message any time instantly. To check the message instantly:
1. Right Click Quick Heal Total Security icon from windows system tray. 2. Select Check New Messages.
This checks the new message if available on Quick Heal website instantly (subject to the availability of internet). You can also see the status of the messenger, configure Messenger and view message log from here.
Viewing Reports
Quick Heal Total Security Reports provide detailed information about the different module's functioning & virus scans sessions. Activity Log generates log for the following module:
• Scanner • Online Protection • Email Protection • Startup Scan • Scheduler • Quick Update • Memory Scan • Anti-Phishing • Registry Restore • Native Scanner • AntiMalware Scan • Browsing Protection • PC2Mobile Scan To view reports
1. Start Quick Heal Total Security.
2. In the left pane of the Quick Heal Total Security main window, click Reports. 3. Now click the desirable report section which you want to see.
Reports contain a list of activity logs for each module with details such as scan date, scan time & report for different scan session. • Click Details to view details about the selected log entry. The Detail information consists of additional information
regarding viruses detected and action taken against those viruses. To see previous log, click Prev. To see Next log, click Next.
• Click Delete to delete selected scan log entry.
• Click Delete All to delete all scan log entries for that particular module.
Statistics
Quick Heal now provides statistics for Online Protection, Email Protection and AntiSpam Protection. Following are the statistics provided by Quick Heal:
Online Protection Statistics
Number of files scanned Provides information about total number of files scanned. Number of infected files Provides information about total number of infected files found. Number of suspicious
files Provides information about total number of suspicious files found. Number of packed files
identified Provides information about the number of packed files found. Last file scanned Provides information about the last scanned file.
Last file found infected Provides information about the last file which was found infected.
Last infection name Provides information about the Virus or Malware which was recently detected.
Last file found
suspicious Provides information about the file which was found suspicious recently. Last packed file
identified
Provides information about the last packed file that was identified.
Email Protection Statistics
Number of emails scanned Provides information about total number of emails scanned for infection.
Number of emails with
attachments Provides information about total number of email received along with attachments. Number of infected emails Provides information about total number of emails found infected. Number of attachments Provides information about total number of attachments received. Number of infected
attachments Provides information about total number of attachments found infected. Number of suspicious
attachments Provides information about total number of attachments found suspicious. Number of multiple
extensions attachments blocked
Provides information about total number of attachments blocked having multiple extensions. e.g. .doc.exe.
Number of vulnerable
emails blocked Provides information about total number of vulnerable emails blocked. Number of attachments
blocked by attachment control
Provides information about total number of attachments blocked as per the Attachment control policy.
Type of attachments
received by user mostly Provides information about attachments which is mostly received by the user. e.g. .doc (Office Document file). Type of attachments
blocked mostly Provides information about attachments which is being blocked mostly as per the Attachment control policy. Last application blocked
attempting to send mail Provides information about an un-trusted application which was blocked while sending mails as per Trusted Email Client policy. Number of attempts to
send mail blocked Provides information about total number of attempts of sending mails by un-trusted email clients that were blocked as per Trusted Email Client policy.
AntiSpam Protection Statistics Number of emails
scanned for spam Provides information about total number of emails scanned for spam. Number of spam emails Provides information about total number of spam emails detected by
AntiSpam protection.
Since System Start Under this category, Quick Heal provides statistics since system start. Statistics under this category are purged on every shutdown or restart. Since Installation Under this category, Quick Heal provides statistics since installation.
Viewing Virus List
Quick Heal Total Security Virus List provides an exhaustive database of respective virus names along with their category. Viewing Virus List
1. Start Quick Heal Total Security.
2. In the left pane of the Quick Heal Total Security main window, click Tools.
3. Click Virus List. For the first time Virus List will take considerable time to load the list. Virus List Overview
To find for a virus in the virus list: 1. Click Find.
2. Type the name of virus you want to find. 3. Click Find.
Click Print to take a print-out of the virus list.
Latest Latest section contains the threats, added in the daily updates.
Quarantine
Quarantine helps in safely isolating the infected or suspected files. When a file is added to Quarantine, Quick Heal Total Security encrypts the file and keeps it inside the Quarantine directory. Being kept in an encrypted form, these files cannot be executed and hence are safe. Quarantine also keeps a copy of infected file before repairing. Backup functionality is available by selecting Backup before repairing option under Scanner's settings.
To launch Quarantine
1. Start Quick Heal Total Security.
2. In the left pane of the Quick Heal Total Security main window, click Tools. 3. Click Quarantine.