Workforce Management 7
The information contained herein is proprietary and confidential and cannot be disclosed or duplicated without the prior written consent of Genesys Telecommunications Laboratories, Inc.
Copyright © 2004 Genesys Telecommunications Laboratories, Inc. All rights reserved. About Genesys
Genesys Telecommunications Laboratories, Inc., a subsidiary of Alcatel, is 100% focused on software for call centers. Genesys recognizes that better interactions drive better business and build company reputations. Customer service solutions from Genesys deliver on this promise for Global 2000 enterprises, government organizations, and
telecommunications service providers across 80 countries, directing more than 100 million customer interactions every day. Sophisticated routing and reporting across voice, e-mail, and Web channels ensure that customers are quickly connected to the best available resource—the first time. Genesys offers solutions for customer service, help desks, order desks, collections, outbound telesales and service, and workforce management. Visit www.genesyslab.com for more information.
Each product has its own documentation for online viewing at the Genesys Technical Support website or on the Documentation Library CD, which is available from Genesys upon request. For more information, contact your sales representative.
Notice
Although reasonable effort is made to ensure that the information in this document is complete and accurate at the time of release, Genesys Telecommunications Laboratories, Inc., cannot assume responsibility for any existing errors. Changes and/or corrections to the information contained in this document may be incorporated in future versions. Your Responsibility for Your System’s Security
You are responsible for the security of your system. Product administration to prevent unauthorized use is your responsibility. Your system administrator should read all documents provided with this product to fully understand the features available that reduce your risk of incurring charges for unlicensed use of Genesys products.
Trademarks
Genesys, T-Server, and the Genesys logo are registered trademarks of Genesys Telecommunications Laboratories, Inc. All other trademarks and trade names referred to in this document are the property of other companies. Technical Support from VARs
If you have purchased support from a value-added reseller (VAR), please contact the VAR for technical support. Technical Support from Genesys
If you have purchased support directly from Genesys, please contact Genesys Technical Support at the following regional numbers:
Prior to contacting technical support, please refer to the Genesys Technical Support Guide for complete contact information and procedures.
Ordering and Licensing Information
Complete information on ordering and licensing Genesys products can be found in the Genesys 7 Licensing Guide. Released by
Genesys Telecommunications Laboratories, Inc. http://www.genesyslab.com
Document Version: 70wm_ad_9-2004_v2.01
Region Telephone E-mail
North and Latin America +888-369-5555 or +506-674-6767 [email protected] Europe, Middle East, and Africa +44 (0) 118 974 7002 [email protected] Asia Pacific +61 7 3368 6868 [email protected]
Table of Contents
Chapter 1 About This Document ... 9
Intended Audience... 10
Chapter Summaries... 10
Document Conventions ... 11
Related Resources ... 12
Making Comments on This Document ... 13
Chapter 2 Overview ... 15
Workforce Management 7 Components... 15
Workforce Management User Interfaces ... 16
Integration with the Genesys Solution ... 18
Configuration Layer Integration ... 18
Management Layer Integration... 18
High Availability ... 18
Enterprise Routing Integration ... 19
Calendar Management... 19
Meeting Planner... 19
Vacation Planner... 20
Schedule Exceptions ... 20
Forecasting... 21
Using Historical Data ... 21
Using Forecasting Events... 21
Setting Service Objectives... 21
Flexible Forecasting... 22
Deferred-Work Forecasting ... 22
Scheduling... 22
Profile Scheduling... 23
Multi-Site Planning... 23
Agent Preferences ... 23
Flexible Shifts... 24
Contents
Reports ... 26
Chapter 3 Architecture ... 27
Component Overview ... 27
Workforce Management Data Flow ... 28
Component Connections ... 29
Chapter 4 Deployment Planning ... 31
Predeployment Overview ... 32
Using the WFM Configuration Utility ... 32
Using WFM Web... 32
About the WFM Configuration Objects ... 32
User Security ... 33
Organization ... 33
Activities and Statistics ... 33
Skills ... 35
Schedule-State Groups... 35
Events ... 36
Time Zones ... 36
Synchronization ... 36
About the WFM Policies Objects ... 36
Accrual Rules... 36
Activity Policies ... 37
Contracts... 37
Flexible Shifts... 38
Exception Types ... 38
Meetings ... 39
Vacation Limits... 39
Rotating Patterns ... 39
Forecasting Considerations... 39
Factors and Events ... 40
Scheduling Considerations... 40
Creating Blank Schedules ... 41
About Performance Monitoring... 41
About Adherence Monitoring ... 41
Chapter 5 Installing and Configuring Workforce Management ... 43
Preliminary Preparation ... 44
Software Requirements ... 44
Management Layer System Requirements... 46
Contents
Create Your WFM Database... 47
Create and Install DB Server ... 47
Create a Database Access Point ... 48
Import the WFM Templates ... 48
Import the WFM Solution Template ... 49
Install and Run the Configuration Wizards ... 49
Running the Configuration Wizards ... 50
Manually Create and Configure the Applications ... 58
Manually Create the WFM Solution Object... 59
Install and Run the Database Utility ... 60
Running the Database Utility ... 60
Install the Workforce Components... 61
Install WFM Server ... 61
Install WFM Builder... 62
Install WFM Data Aggregator... 63
Install WFM Reports Server... 63
Install WFM Configuration Utility... 64
Install WFM Web... 64
Install the Servers as Windows Services... 69
Remove a Windows NT Service ... 69
Uninstall Workforce Management 7... 69
Stopping Windows Services ... 70
Delete WFM Web from Tomcat... 70
Delete WFM Web from WebSphere... 71
Using Add/Remove Programs ... 71
Chapter 6 Configuring Application Options Tab Settings ... 73
Overview... 73
Options Tab Settings for WFM Server ... 74
Options Tab Settings for WFM Builder ... 80
Options Tab Settings for WFM Data Aggregator ... 85
Options Tab Settings for WFM Reports Server ... 91
Options Tab Settings for WFM Configuration Utility ... 95
Options Tab Settings for WFM Web ... 100
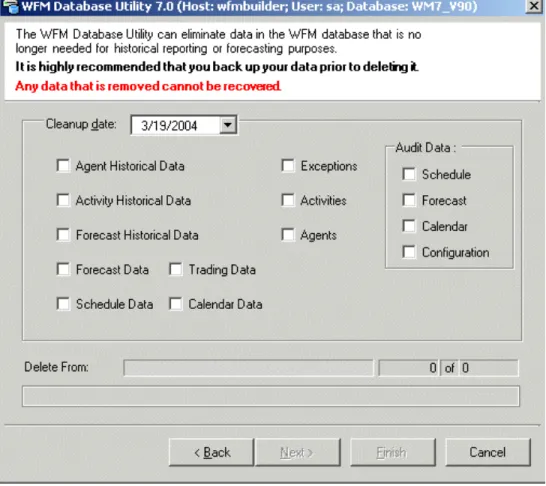
Chapter 7 Using the WFM Database Utility ... 107
Overview... 107
New Database Configuration... 108
Contents
Database Cleanup... 109
Back Up and Restore Your Database... 110
Chapter 8 Starting and Stopping ... 113
Start Workforce Management with SCI ... 113
Start the Workforce Management Servers ... 114
Configure the Windows Services... 114
Manually Start a Windows Service... 115
Start the Workforce Management Servers Manually ... 115
Start the WFM Configuration Utility ... 115
Start the WFM Database Utility ... 116
Start WFM Web ... 116
Stop Workforce Management with SCI... 117
Stop the WFM Configuration Utility... 117
Stop the WFM Database Utility... 117
Stop WFM Web ... 118
Stop the Workforce Management Servers... 118
Stop the Servers Manually... 118
Stop a Server’s Windows Service... 118
Chapter 9 Troubleshooting ... 121
Architectural Issues: Components and Connections... 121
Unable to Connect to Data Source ... 122
Determine the MDAC Version... 122
“DA Server Name Not Found” Error ... 122
WFM Data Aggregator Does Not Start... 122
Applets Do Not Load in WFM Web ... 123
WFM Web Does Not Open ... 123
The Schedule Weekly Preference View Does Not Display 24-Hour Graphical Data... 123
Synchronization with the Configuration Database Takes an Unreasonably Long Time... 123
Contents
Workforce Management Configuration Issues ... 124
Performance Shows No Intraday Statistics... 124
Real-Time Agent Adherence Is Not Working Correctly... 124
Agents Are Not Being Scheduled ... 125
Calculation of Average Handling Time Based on TotalTime Statistics.... 125 Cannot Find Agents or Sites ... 125
Errors or Warnings When Creating a Schedule... 126
Data on Active Interactions Disappears... 126
Forecast Appears Inaccurate... 126
Schedules Are Highly Over- or Understaffed... 127
WFM Configuration Utility Error Messages... 127
Log Files ... 128
Chapter 10 List of Terms ... 129
Chapter
1
About This Document
Welcome to the Workforce Management 7 Administrator’s Guide. This guide:
• Provides a high-level overview of Workforce Management 7.
• Describes Workforce Management 7 architecture.
• Explains how to use the WFM Database Utility.
• Drovides deployment instructions and troubleshooting suggestions.
• Contains a glossary of Workforce Management–specific terms. This guide is valid only for the 7.0.x release(s) of this product.
Note: For releases of this guide created for other releases of this product, please visit the Genesys Technical Support website, or request the Documentation Library CD, which you can order by e-mail from Genesys Order Management at [email protected].
The following sections provide an overview of this guide, identify the primary audience, introduce document conventions, and list related reference
information:
z Intended Audience, page 10 z Chapter Summaries, page 10 z Document Conventions, page 11 z Related Resources, page 12
z Making Comments on This Document, page 13
Workforce Management 7, a contact-center resource-planning application, consists of three user interfaces, WFM Web, which contains both supervisor and agent functionality, WFM Database Utility, and the WFM Configuration Utility. It is supported by a number of servers that provide forecasting,
Chapter 1: About This Document Intended Audience
Intended Audience
This guide primarily intended for contact center managers and system administrators. It assumes that you have a basic understanding of:
• Computer-telephony integration (CTI) concepts, processes, terminology, and applications.
• Network design and operation.
• Your own network configurations.
• Genesys Framework, especially Configuration Manager and, if applicable, Management Layer.
Chapter Summaries
In addition to this opening chapter, this guide contains these chapters:
• Chapter 2, “Overview” on page 15, contains a high-level introduction to Workforce Management 7 features and functionality.
• Chapter 3, “Architecture” on page 27, shows the Workforce Management 7 architecture and describes each component. It also contains some
information on architectural changes from previous releases.
• Chapter 4, “Deployment Planning” on page 31, contains a list of software prerequisites and presents considerations you should take into account during deployment planning to arrive at the most effective setup for your environment.
• Chapter 5, “Installing and Configuring Workforce Management” on page 43,
explains how to install and configure all Workforce Management 7 components.
• Chapter 6, “Configuring Application Options Tab Settings” on page 73,
contains a list of the Options tab options, with descriptions and recommended settings, for all Workforce Management 7 components.
• Chapter 8, “Starting and Stopping” on page 113, describes how to start and stop each WFM component. It includes all the various methods you might use, including the use of Management Layer.
• Chapter 7, “Using the WFM Database Utility” on page 107, explains how to use the WFM Database Utility for routine database maintenance and
cleanup. You will find instructions for using the WFM Database Utility to create your new database and to transfer your existing data into the new database in Chapter 5, “Installing and Configuring Workforce Management” on page 43, and the Workforce Management chapter in the Genesys
Chapter 1: About This Document Document Conventions
• Chapter 9, “Troubleshooting” on page 121, describes how to resolve a number of issues that end-users may encounter while using Workforce Management 7.
Document Conventions
This document uses some stylistic and typographical conventions with which you might want to familiarize yourself.
Document Version Number
A document version number appears at the bottom of the inside front cover of this guide. Version numbers change as new information is added to this guide. Here is a sample version number:
70fr_ref_09-2003_v1.00
You will need this number when you are talking with Genesys Technical Support about this product.
Type Styles
Italic
In this document italic is used:
• When a term is being defined. Example
A customary and usual practice is one that is widely accepted and used within a particular industry or profession.
• For emphasis. For example, “Do not use this value for this option.”
• For variables, for example, x +1 = 7 where x stands for . . .
Monospace
A monospace font, which is shown in the following examples, is used for:
• All programming identifiers and GUI elements. This convention includes the names of directories, files, folders, paths, scripts, dialog boxes, options, fields, text and list boxes, all buttons including radio buttons, check boxes, commands, tabs, CTI events, and error messages; the values of options; logical arguments and command syntax; and code samples.
Chapter 1: About This Document Related Resources
In the Operand text box, enter your formula. Click OK to exit the Properties dialog box.
The following table presents the complete set of error messages T-Server® distributes in EventError events.
If you select true for the inbound-bsns-calls option, all established inbound calls on a local agent are considered business calls.
• For any text the user must manually enter during a configuration or installation procedure:
Example
Enter exit at the command line.
Correction of Errors in Screen Captures
Screen captures taken from the product GUI (graphical user interface) and used in this document may sometimes contain a minor spelling, capitalization, or grammatical error. The text accompanying and explaining the screen captures corrects such errors.
Use of Square Brackets
In any logical arguments, commands, and programming syntax presented in this document, square brackets are used to indicate that a particular parametric value is optional. That is, the value is not required to resolve a command, argument, or programming syntax. The customer/user decides whether to supply a value and what that value is. Here is a sample:
smcp_server -host [/flags]
Use of Angle Brackets
Angle brackets are used to indicate that a value in a logical argument, command, or programming syntax is required, but that the user must supply the data for the value. Because the value is specific to an individual
enterprise—for example, DNs or port numbers—the program cannot predict (that is, program in) what the value is. Here is a sample:
smcp_server -host <confighost>
Related Resources
Consult these additional resources as necessary:
• Workforce Management 7 Configuration Utility Help, which explains how to use the WFM Configuration Utility to set up Workforce Management objects, such as sites, time zones, and agents, and constraints, such as security settings, working hours, and vacation accrual rules.
Chapter 1: About This Document Making Comments on This Document
• Workforce Management 7 Web for Supervisors Help, which explains how to use the Supervisors web interface to create forecasts and schedules, make schedule and staffing changes, and to track agent real-time adherence and contact center performance. WFM Web for Supervisors also contains the Workforce Management reporting functions.
• Workforce management 7 Web for Agents Help, which instructs agents on how to check their schedules; request vacations, working hours, and other preferences; and make schedule trades with other agents.
• The Genesys Technical Publications Glossary, which ships on the Genesys Documentation Library CD and which provides a comprehensive list of the Genesys and CTI terminology and acronyms used in this document.
• The Genesys 7 Migration Guide, also on the Genesys Documentation Library CD, which contains a documented migration strategy for Genesys product releases 5.x and later. Contact Genesys Technical Support for additional information.
• The Release Notes and Product Advisories for this product, which are available on the Genesys Technical Support website at http:// genesyslab.com/support.
Information on supported hardware and third-party software is available on the Genesys Technical Support website in the following documents:
• Genesys 7 Supported Operating Systems and Databases • Genesys 7 Supported Media Interfaces
Genesys product documentation is available on the:
• Genesys Technical Support website at http://genesyslab.com/support.
• Genesys Documentation Library CD, which you can order by e-mail from Genesys Order Management at [email protected].
Making Comments on This Document
If you especially like or dislike anything about this document, please feel free to e-mail your comments to [email protected].
You can comment on what you regard as specific errors or omissions, and on the accuracy, organization, subject matter, or completeness of this document. Please limit your comments to the information in this document only and to the way in which the information is presented. Speak to Genesys Technical Support if you have suggestions about the product itself.
When you send us comments, you grant Genesys a nonexclusive right to use or distribute your comments in any way it believes appropriate, without incurring any obligation to you.
Chapter
2
Overview
Genesys Workforce Management 7 unifies forecasting, employee scheduling and calendar management, monitoring of real-time agent-adherence and intra-day center performance, and historical reporting into a robust contact-center resource-planning application.
This chapter discusses these topics:
z Workforce Management 7 Components, page 15 z Integration with the Genesys Solution, page 18 z Calendar Management, page 19
z Forecasting, page 21 z Scheduling, page 22 z Performance, page 25 z Agent Adherence, page 25 z Reports, page 26
Workforce Management 7 Components
Genesys Workforce Management 7 consists of these components:
• WFM Database Utility
• WFM Configuration Utility
• WFM Web (with separate interfaces for Supervisors and Agents)
• WFM Server
• WFM Data Aggregator
• WFM Reports Server
Chapter 2: Overview Workforce Management 7 Components
Note: The database structure for Workforce Management 7 has changed from previous versions. If you are migrating from an earlier version, you must create a new database and migrate your existing data with the WFM Database Utility before starting to use Workforce
Management 7. See the “Workforce Management Migration Procedures” chapter in the Genesys 7 Migration Guide for details. Workforce Management 7 works in a single-site environment or across a multi-site enterprise.
Workforce Management User Interfaces
Workforce Management provides three client user interfaces: the WFM Configuration Utility, the WFM Database Utility, and WFM Web.
WFM Configuration Utility
Use this client application to configure security access and organizational structures for the Enterprise, such as site and agent properties. You also use it to configure various constraints, such as working hours, shifts, and contracts.
WFM Database Utility
Database and/or system administrators can use the WFM Database Utility to:
• Create the Workforce Management database.
• Migrate from Workforce Management version 6.5.100.04or higher to Workforce Management 7.
Note: See the procedures provided in the “Workforce Management Migration Procedures” chapter of the Genesys 7 Migration Guide for important advisories about the database migration process.
• Update from previous Workforce Management 7.x versions.
• Back up and restore the Workforce Management 7 database.
• Remove outdated data from the Workforce Management 7 database.
WFM Web for Supervisors
WFM Web for Supervisors includes calendar management, forecasting, scheduling, real-time agent adherence, contact-center performance statistics, and reporting. These functions are all entirely accessible through any computer with a supported browser and network access.
Chapter 2: Overview Workforce Management 7 Components
Calendar Management
Enables planners to enter known appointments, such as vacations, meetings, and training sessions, into agent calendars prior to scheduling.
The unique agent-based scheduling approach that WFM provides enables robust agent-calendar management prior to scheduling. You can use WFM to incorporate known obligations into agent schedules to ensure that agent appointments are kept while maximizing contact center efficiency. By enabling more accurately planning for known appointments, WFM enables you to take the guesswork out of forecasting for staffing overheads, leading to more-efficient resource utilization. See “Calendar Management” on page 19 for more information.
Forecasting
Enables contact-center managers to predict workload and staffing requirements based on historical data or user-defined templates. See “Forecasting” on page 21 for more information.
Scheduling
Uses the forecast to create agent schedules within user-defined business constraints or to create empty schedules to which you can assign agents. See “Scheduling” on page 22 for more information.
Adherence
When you use Genesys WFM scheduling to control the delivery of work to agents, you can monitor agents to see their current activity as well as what they are scheduled for. WFM will automatically identify agents who are not
adhering to their schedules for durations longer than is configured to be acceptable. See “Agent Adherence” on page 25for details.
Performance
Statistical views reveal how closely actual events match the forecast and schedule. See “Performance” on page 25 for more information.
Reporting
Enables you to create reports on contact center operations. See “Reports” on
page 26 for more information.
Chapter 2: Overview Integration with the Genesys Solution
Integration with the Genesys Solution
Workforce Management 7 is tightly integrated with the Genesys platform.
Configuration Layer Integration
WFM can automatically retrieve agent and skills information from the Genesys unified configuration environment, reducing the effort needed to maintain the WFM system and removing the chance of human errors caused by redundant data entry. You can also configure WFM to place agents within a site automatically based on their switch logins if the switch is used to represent a site in WFM. Also, you can easily configure WFM to retrieve statistics from Routing objects (queues, routing points, virtual queues, and so on) within the Genesys platform, reducing the effort needed to support changes in routing strategies.
Management Layer Integration
Management Layer delivers powerful solution-wide control of Genesys solutions from a single access point. Through Solution Control Interface (SCI), Management Layer provides control and monitoring functions that allow a user to start or shut down single applications, or an entire solution, in a single operation and to monitor current runtime status of applications and entire solutions.
Workforce Management 7 is integrated with the Genesys Management Layer, enabling easy solution-wide configuration, overview of Workforce
Management status, and automatic switching to backup servers if necessary. If you use Management Layer to control and monitor WFM, each computer on which a Workforce Management server is installed also runs a Local Control Agent that constantly checks that server’s status. If a server goes down, SCI signals the user, enabling a prompt response.
Problems are centrally logged for convenient access. For more information on Management Layer, see the Framework 7 Management Layer User’s Guide. Management Layer installation and configuration are described in Genesys Framework documentation.
High Availability
Data Aggregator supports Hot-Standby high availability. You can install a second Data Aggregator server as a backup and configure it to take over automatically in case the primary server goes down.
The backup reads the same information as the primary Data Aggregator, so if it is necessary to switch to the backup, there is no delay or loss of data. At the
Chapter 2: Overview Calendar Management
transition, the backup Data Aggregator simply starts writing to the database starting from the point when the primary Data Aggregator left off.
Because the failure of other WFM servers does not result in critical data loss, they do not support Hot- or Warm-Standby high availability. However, if you are using Management Layer, you can configure the Local Control Agents running on the server computers to restart and WFM processes and reestablish their connections.
Enterprise Routing Integration
You can configure Genesys Enterprise Routing (ER) to route calls based on Workforce Management schedules. Doing so can help ensure a more-balanced multiskill workload for agents and improved schedule adherence.
Routing strategies can route based on the anticipated availability of an agent. For example, interactions are not routed to agents immediately before they are scheduled for a break, improving agent adherence and leading to better customer service and worker efficiency. Schedules and activities are created within Workforce Manager and stored in the Workforce Management database. You configure WFM routing strategies in Interaction Routing Designer, a user interface provided with ER to create routing strategies.
Calendar Management
The unique agent-based scheduling approach that WFM provides enables robust agent-calendar management prior to scheduling. WFM can incorporate known obligations into agent schedules to ensure that appointments are kept while maximizing contact center efficiency. By more accurately planning for known appointments, WFM can take the guesswork out of forecasting for staffing overheads, leading to more efficient resource utilization.
Meeting Planner
The WFM Meeting Planner allows great flexibility when planning meetings. You select the meeting participants, define the range of time in which the meeting should occur, and set the duration of the meeting. The WFM
Scheduler builds the meeting into the work schedules of the participants during the scheduling process, finding the optimal times for the shift and the meeting at the same time.
The meeting is included as an exception in the schedules of the attendees, using the code associated with the selected exception in all schedule views for easy identification. If participating agents are unavailable, then the meeting is
Chapter 2: Overview Calendar Management
Vacation Planner
Vacation Planner enables you to create vacation-accrual rules to associate with agents. You can also set limits on the maximum number of agents or maximum percentage of total agents who may be on vacation on a particular day for activities, teams, and sites.
Requested vacation days may be manually approved by the supervisor or automatically approved by WFM Web, based on agent vacation balances and the limits set on the number of vacations per activity, team, or site.
Additionally, a long-term planning section in Vacation Planner enables you to set vacation limits for a certain date range.
When the Scheduler runs, all vacation days that have been granted are scheduled, and agents may no longer remove them using WFM Web for Agents.
Schedule Exceptions
Exceptions are additions to a schedule that are not work but which must be taken into account to allocate agent time correctly. Examples of exceptions include meetings, training, special projects, and personal days off.
Exception Types
You create exception types based on the needs of your contact center. These types can be extremely flexible and you can link them to other Workforce Management scheduling features. For example, you can specify that some exception types count as vacation time, that others are used in meeting planning, and that some can be converted to a day off if necessary. Exceptions can be full-day or part-day. You can assign multiple, part-day exceptions, assuming they do not overlap or otherwise violate internal Workforce Manager consistency checks.
Exception and Preference Hierarchy
Exceptions and preferences are ranked in a hierarchy. This means that, if multiple exceptions and preferences are assigned for an agent on a single day, Calendar Management analyzes the assignments and immediately selects the highest-priority exception for assignment, noting the others as declined. However, declined exceptions and preferences are stored in the Workforce Management database in case of later changes to calendar information. If, for example, a training session is canceled, an agent’s previously overridden day-off preference might then change status and be available for scheduling.
Chapter 2: Overview Forecasting
Forecasting
Use this tool to predict contact-center workload and staffing requirements based on historical data or user-defined templates. WFM provides multiple methods of forecasting the workload and staffing requirements for work activities. Optionally, you can derive workload forecasts from historical information that is either collected automatically by WFM from the Genesys system or imported from .csv files using the WFM Configuration Utility. You can also create workload and staffing forecasts as reusable templates. Once you have generated a workload prediction, WFM determines the staffing requirements needed to service the workload, taking into account any applicable service objectives.
Using Historical Data
Historical data is collected automatically from Stat Server for all work activities handled by the Genesys platform encompassing all media, contact segments, and service types. Using Genesys Stat Server, rather than automatic call distribution (ACD) reports, allows for far greater flexibility in defining and gathering statistics that provide an appropriate measure of contact center performance over time.
Interaction volumes and average handling time (AHT) are analyzed to predict future trends for each work activity. This data enables Workforce Manager to build accurate forecasts for the anticipated workload and calculate the workforce required to meet that workload.
Using Forecasting Events
Workforce Management can track events that may affect interaction volume. A sales promotion or marketing campaign, for example, may cause a predictable peak in interaction volume. Such events are entered in the WFM Configuration Utility and used by the advanced WFM algorithms. If an event recurs, the forecasting algorithms learn the impact of that event and account for its impact in future forecasts.
Setting Service Objectives
With Workforce Management forecasting, you can set desired service
objectives. You can also adjust these levels and rebuild the forecast, allowing detailed “what-if” analysis of the potential impact of staffing or service-objective changes. Workforce Management forecasting uses parameters such as interaction volumes, Average Handling Time (AHT), Average Speed of
Chapter 2: Overview Scheduling
Flexible Forecasting
Workforce Management allows for an unlimited number of forecasting scenarios, providing the user the ability to create multiple forecasts and evaluate changes in forecasting events and service objectives. Resource planners can easily create reliable forecasts, fine-tuning the results in tabular and graphical data views. You can also save forecast workforce data as templates for use in subsequent forecast building.
Workforce Management offers three different forecasting methods of varying complexity:
Template-Based—Good for work activities with little historical information or for activities with very predictable interaction traffic.
Expert Average Engine—Good for work activities that have a reasonable amount of historical data or those that fluctuate more dramatically because of unknown factors.
Universal Modeling Engine—Good for work activities with more than one year of historical data and accurate forecasting event information.
Deferred-Work Forecasting
Genesys Workforce Management is designed to consider deferrable work activities such as e-mail as inherently different from typical “immediate” work. Workforce Management uses a proprietary algorithm designed to distribute the backlog of deferrable interactions across the day, within a service goal
expressed in minutes, hours, or days. This allows the contact center to avoid spikes in workload forecasts when a contact center opens for the day or during brief periods of high volume.
Scheduling
WFM uses the forecast to create agent schedules within user-defined business constraints or to create empty schedules to which you can assign agents. Schedule constraints include available personnel with required skills, staffing requirements, employment contracts, business policies, and agent preferences. The staffing requirements act as a target for schedule generation. An optimized schedule ensures the least amount of over and understaffing while still meeting contractual obligations. The individual skills, contracted working rules, and calendar items for each employee are used as guides to help identify when employees can work and what they will work on.
You can schedule agents to work on multiple types of work at once, and/or you can be schedule them to work on specific types of work for periods of time within their day. Once you finalize schedules, you can publish them to the agents via a web server. Agents can optionally trade their schedules as needed, based on a system of working rules, autodecision, and supervisor review.
Chapter 2: Overview Scheduling
In addition, Workforce Management enables you to create schedules based on agent profiles. This allows the creation of schedules with empty schedule slots that are appropriate for the contract types or agent skill sets you currently have or anticipate hiring for.
Profile Scheduling
Although agent-based scheduling offers a multitude of advantages, in some cases you must build schedules without agents assigned to them. Workforce Management offers two methods for creating blank schedules to which you can assign agents:
Scheduling Using Profiles—Profiles are based on contracts and include a skill set. They are used to represent a typical kind of agent or a proposed new agent classification. For example, you can create a new flexible full-time profile to allow planners to evaluate the adoption of a 4-day, 10-hours-per-day work week. Each profile has a skill set with assigned skill levels. Scheduler uses either a user-specified number of each Profile type or a blend of profiles based on the current staff to create blank schedules to which you can assign qualified agents.
Mixed Scheduling—You can build schedules using a combination of Profiles and actual agents. This can allow planners to create additional optimized schedules for expected new hires or for outsourced agents to use.
Multi-Site Planning
Using a familiar tree structure, you can configure Workforce Management to correspond exactly to the Enterprise organization. For centralized, multi-site contact centers, Workforce Management enables you to forecast and build schedules for work activities spanning all sites.
For decentralized, multi-site contact centers, Workforce Management enables you to forecast interaction volumes centrally and distribute the workload to each site for further planning efforts. Each site can set parameters such as service objectives, staffing requirements, and can build schedules. The browser-based capabilities provided by WFM ensure that in any multi-site environment users across the enterprise can participate in the planning process.
Agent Preferences
Scheduler can optionally consider agent preferences when building schedules. You can enter agent preferences for shifts, days off, availability, and vacation time WFM Web for Supervisors. If a supervisor approves a preference, the calendar algorithm grants that agent’s preference when building the schedule.
Chapter 2: Overview Scheduling
Preference Fulfillment and Schedule Optimization
Contact center administrators can also specify whether preference fulfillment or schedule optimization is the more important goal. This adds another layer of control over preference scheduling.
Flexible Shifts
The method used in Workforce Management to create shifts allows for a flexible description of shift durations and of start and end times. Additionally, Workforce Management schedules use flexible break and meal parameters. In a sense a Workforce Management shift is an abstraction, representing countless possible working times even if the shift is configured to produce very regular, fixed, agent schedules. This is in contrast to the conventional notion of a shift with a mandatory fixed weekly start time, fixed duration, and set breaks. A single Workforce Management shift can incorporate hundreds of possible start times and durations as long as they fall within the parameters of the contract. However, through synchronicity constraints and more-rigid shift configuration, agent start times and workday durations can be fixed. This combination of flexibility and structure makes the Workforce Management shift a tremendously powerful scheduling mechanism. In fact, in some cases, you can configure an entire contact center using only a few Workforce Management shifts.
The Workforce Management Shift
For example, consider a contact center with a standard full-time shift of 8 hours a day, 5 days a week, and an alternative full-time shift of 10 hours a day, 4 days a week. Both types of agents can use a single shift with a flexible duration of 8 to 10 hours per day. In either case, the agents are contracted to receive 40 hours work each week and to work 4 or 5 days. You can configure Workforce Management to guarantee that specific agents work 4 or 5 days a week, or let the Workforce Management Scheduler to determine how many agents of each full-time type should be used to provide the most effective schedule.
Task Sequences
Genesys WFM task-based scheduling enables you to configure sequences to be used in shifts that guarantee that a specific period of time can accommodate a certain kind or set of work activities.
Multimedia contact centers can now generate agent-friendly schedules that build in extended periods of time set aside for handling specific tasks. Agents are able to focus on a single media or skill set, enabling them to complete their tasks more effectively, without the confusing effects of frequently switching
Chapter 2: Overview Performance
media. Contact center planners can ensure that task time is equitably distributed among all qualifying agents and can allow Genesys WFM to optimize the assignment of task times based on forecasted staffing requirements.
For example, contact center planners could guarantee that all appropriately skilled agents receive exactly 2 hours of outbound work for every shift or they can allow WFM to determine how much outbound work to distribute to each agent. You can configure Genesys Routing to use WFM schedule information as input for routing decisions. In this way, you can use task-based scheduling to provide a closed-loop routing system that complements an agent-based approach to contact center management.
Schedule Trading
Genesys WFM schedule trading enables agents to trade schedules among themselves, either in trades with a specified agent or trades open to any qualified agents within their community.
Contact center planners no longer need to spend an excessive amount of time managing and processing agent schedule-trade requests. Agents feel that they have flexibility when they need to change their usual schedule and that they have more proactive control over the times they work. In some cases, schedule trades can be approved without supervisor intervention, enabling managers to focus on trades that may affect service levels or violate company policies.
Performance
The Performance modules compare the forecast and schedule to what is actually happening in the contact center. Intraday statistics such as interaction volume, average handling time (AHT), agents logged in, service level, average speed of answer (ASA), and abandons are provided and compared to plans. Intraday contact-center and team-performance data is displayed in an informative and easy-to-read format, enabling efficient performance monitoring and quick response to unanticipated interaction flow or agent-staffing situations. Workforce Management also provides a “what-if” calculator for performance statistics as an aid in decision making.
Agent Adherence
Workforce Management provides real-time agent-adherence data, which compares the current agent status to the scheduled status.
Chapter 2: Overview Reports
that the agent’s current status has differed from the scheduled status. This running total is continually updated.
Using Reason Codes
Workforce Management enables you to enter reason (aux) codes during the configuration of agent-adherence rules. The reason codes are linked to
Genesys Agent States and add additional details to the state information. The Genesys state + reason code combination is mapped to Workforce
Management Scheduled State Groups and displayed in Adherence views. For example, an agent might signal that she is in a NotReady state. By adding a reason code, she can specify that she is doing after-call work or answering e-mail. This detailed information then appears in the WFM Web Adherence Details view and agent-adherence reports.
Reports
WFM Web for Supervisors provides access to a variety of reports designed to present key contact-center data in a flexible and accessible format. Report types include:
• Configuration Reports—Present information on work activity configuration.
• Policies Reports—Present information on agents, contracts, shifts, and rotating patterns.
• Calendar Reports—Present information on vacation days and agent calendar items.
• Forecast Reports—Display forecast interaction volumes, AHT, and staffing requirements in tabular and graph formats.
• Schedule Reports—Display schedule data for agents, activities, teams, sites, multi-site activities, and business units at various granularities. Also present budget information and schedule validation warnings and errors.
• Performance Reports—Present various types of contact-center performance statistics in detailed and summary formats.
• Adherence Reports—Present agent-adherence information for agents, teams, sites, business units, and the enterprise.
Chapter
3
Architecture
This chapter explains the interconnections among the various components of Genesys Workforce Management and how Workforce Management interacts with the Genesys Framework. This chapter has only two sections:
z Component Overview, page 27
z Workforce Management Data Flow, page 28
Component Overview
Genesys Workforce Management consists of a number of components. See Figure 1 on page 29 for a layout of all the components and their connections. The components can be clustered into the following categories:
• Presentation Layer—Browser-based user applications. These provide access to all Workforce Management functions.
WFM Web for Supervisors WFM Web for Agents
• Web Server—The container used for the WFM Web server. Genesys Workforce Management supports Tomcat and WebSphere. Workforce Management does not include these web servers in its CD package. You must obtain and install them separately.
Note: For supported versions, see Genesys 7 Supported Operating Systems and Databases, which you can find on the Genesys Technical Support website.
• Utilities—Applications that provide specific configuration and set-up functions.
Chapter 3: Architecture Workforce Management Data Flow
WFM Database Utility—Use this utility to create, update, and manage your database. If you are migrating from a previous version of Genesys Workforce Management, this utility also transfers your existing data into the new database.
WFM Configuration Utility—Enables you to perform essential configuration required before you can start using Workforce
Management. This includes settings for objects such as site time zones and site rules; working hours; shifts; rotating patterns; vacation rules; security access; and a number of other important parameters.
• Services Layer—The various servers that support WFM functionality. WFM Server—The central WFM server responsible for managing and
responding to client requests for data.
Reports Server—A process dedicated to report generation.
Data Aggregator—A WFM real-time reporting component that captures historical data and provides real-time agent-adherence information. WFM Builder—Builds the WFM schedules.
• Database—The WFM Database, which contains all Workforce-specific configuration settings and data.
Connections to the Genesys Framework
Genesys Workforce Management connects to:
• Stat Server—Provides statistical data to WFM Data Aggregator.
• Configuration Server—Provides Genesys’ centralized configuration information to the WFM Configuration Utility and authenticates all WFM users and components.
Workforce Management Data Flow
Figure 1 on page 29 shows the Workforce Management components and their interrelationships. It also shows how WFM draws on Configuration Layer data and statistical data that Stat Server provides.
Note: Tomcat and WebSphere, the supported web server containers, are not Workforce Management components. This graphic includes them to show how they fit into the total Workforce Management architecture.
Chapter 3: Architecture Workforce Management Data Flow
Figure 1: Workforce Management Architecture
Component Connections
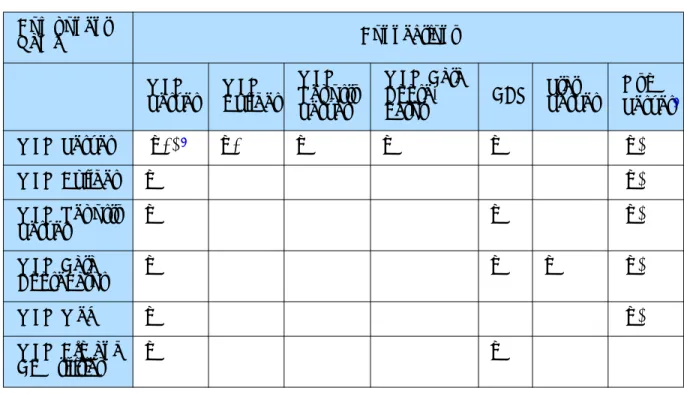
Table 1 on page 30 shows the connections that are configured on the
Connections tab of each component’s Application object. These connections offer an alternative, but complementary, way of understanding the Workforce Management architecture.
• As you can see, WFM Server acts as a hub, connecting to, and being connected to, every component.
• The WFM database (represented in the table by its DAP) forms a different sort of central hub, with many of the components connecting directly to it. Others connect indirectly, through WFM Server.
• Through its connection to Stat Server, WFM Data Aggregator provides one
Legend
Client-Server Communication: Configuration Synchronization:
Presentation Layer
WFM Web Client
Agents Supervisors
Web Server
(Tomcat, WebSphere) WFM Web WFM Server Layer
WFM Builder
WFM Reports WFM DA
WFM Server WFM Database
WFM Database WFM DAP
WFM Utilities
WFM Configuration
Utility WFM Database
Utility
Framework
Unified Media and Statistics (T-Server & Stat Server)
Centralized Configuration
Configuration Database
DAP
Chapter 3: Architecture Workforce Management Data Flow
Configuration Utility draws actively on this connection to import
configuration objects, such as agents, agent skills, and time zones, into the WFM database during synchronization.
• If you are using Management Layer, the Message Server connections and the WFM Solution object specification of the instance of SCI used to control the solution also connect Workforce Management with the Genesys Framework.
Legend:
X—single connection
X+—one or more connections (X)—optional connection Notes on Table 1
1. WFM Server may connect to other instances of WFM Server if you are using an environment with a number of WFM Servers and want to create schedules for all the sites they serve. See “Configure Multiple WFM Servers” on page 52
for how to create this configuration.
2. Configure the Message Server connections if you are using Management Layer to run Workforce Management.
Table 1: WFM Component Connections Component
Name Connections
WFM
Server WFM Builder
WFM Reports Server
WFM Data
Aggre-gator DAP
Stat Server
Msg Server2
WFM Server (X+) 1 X+ X X X (X)
WFM Builder X (X)
WFM Reports
Server X X (X)
WFM Data
Aggregator X X X (X)
WFM Web X (X)
WFM Cfg and
Chapter
4
Deployment Planning
A successful Workforce Management deployment requires more than
installing and setting up the software. You must design effective strategies for translating corporate business rules into Workforce Management objects and constraints. For this reason, it is important to understand key Workforce Management concepts before configuring and using the application.
This chapter introduces the key Workforce Management features and functions you must understand to effectively deploy this product in your enterprise. It includes the following sections:
z Predeployment Overview, page 32
z About the WFM Configuration Objects, page 32 z About the WFM Policies Objects, page 36 z Forecasting Considerations, page 39 z Scheduling Considerations, page 40 z About Performance Monitoring, page 41 z About Adherence Monitoring, page 41
Use the information in this chapter to achieve an efficient, precisely customized deployment.
Note: This chapter provides a conceptual overview of Workforce Management objects and settings. For software and hardware prerequisites, see Chapter 5, “Installing and Configuring Workforce Management” on page 43, Genesys Supported Operating Systems and Databases, and the Genesys Sizing Guide, both of which are available on the Genesys Technical Support website.
Chapter 4: Deployment Planning Predeployment Overview
Predeployment Overview
Plan a detailed, suitable combination of Configuration Manager objects and Workforce Management activities before configuring Workforce Management. This information is the basis for all subsequent workforce planning and should not be changed.Any changes to the Workforce Management activity
configuration may compromise the usefulness of historical data.
Agents, users, time zones, and skills are defined as objects in Configuration Manager. These objects are brought into the Workforce Management through synchronization with the Configuration Database performed by the WFM Configuration Utility. Carefully consider the relationships among these objects when using them for enterprise planning. The relationship between skills, configured in Configuration Manager, and activities, created in the WFM Configuration Utility, is especially important.
Using the WFM Configuration Utility
You configure Workforce Management object and working rules in the
Configuration and Policies sections of the application. Configuration objects include user security settings, organizations, activities, schedule-state groups, skills, time zones, and events. Organization rules, contracts, shifts, task sequences, vacation accrual rules, exception types, meetings, and rotating patterns are set up in Policies.
The WFM Configuration Utility also includes a module that enables you to import and export historical data.
Using WFM Web
WFM Web for Supervisors provides calendar management, forecasting, scheduling, performance monitoring, real-time agent-adherence monitoring, and reporting capabilities. The success of your forecasts and schedules
depends considerably on the accuracy and completeness of your configuration of Workforce Management objects and working rules.
About the WFM Configuration Objects
The Configuration module of the WFM Configuration Utility enables you to configure a number of object types. The following sections briefly describe each object type and offer some considerations to assist you in planning your configuration.
Note: The following sections provide only brief introductions to these objects and focus on aspects relevant to deployment planning. For a
Chapter 4: Deployment Planning About the WFM Configuration Objects
full description, refer to Workforce Management 7 Configuration Utility Help.
User Security
The User Security module enables you to configure security settings for all supervisors (that is, all nonagents who use Workforce Management). The user security settings allow for a great deal of flexibility. You can specify which sites and business units, teams, and so on, the user can access. You can configure no calendar, forecast, and schedule access; read-only access; or full access.
To configure user security settings efficiently, determine the access levels appropriate for all users. You can change settings at any time, as necessary.
Organization
Use this module to configure sites and business units (formerly called virtual PABXs), teams, and agents. To configure this module, determine the sites that belong to business units. Decide on the site properties, such as the associated switch, the maximum seats, the Data Aggregator and WFM Server the site uses, and so on. Collect information about agent team and site associations, as well as agent settings, such as rotating pattern (if any), contract, and vacation accrual settings.
Activities and Statistics
Activities are defined as different categories of work that comprise the total workload for a contact center. Workload and staffing forecasts are created for each activity. Each site configures its own activities, to take into account of local conditions. All agent work that is forecast and scheduled must be assigned to an activity.
Activities can take various forms. They might describe types of work, such as inbound calls or e-mail; groups of customers served, such as preferred
customer care; or work times, such as overnight. You can also use activities for non-CTI work. Each activity is then associated with one or more preconfigured skills. Because activities are a fundamental unit for forecasts and schedules, it is critical that you configure them accurately.
Maximum Simultaneous Users for Activities
Chapter 4: Deployment Planning About the WFM Configuration Objects
understaffed. This feature is best used when the contact center is understaffed as a whole. As the Maximum Simultaneous Users value is reached, agents are then assigned to other activities.
Note: Only use the Maximum Simultaneous Users feature in a multiskilled environment.
Configuring Statistics
Workforce Management uses Data Aggregator to track four statistical
categories: Interaction Volume, Abandonment Volume, Quality of Service, and Handle Time. These statistics are written to the Workforce Management database, providing the historical data necessary for Workforce Management Forecasting, Scheduling, Performance monitoring, and Adherence monitoring. For example, you can sum up values from any set of statistics you want, such as totalTalkTime + totalHoldTime + totalAfterCallWorkTime.This type of flexible configuration overcomes the limitations of ACD switch reports and integration, allowing you to choose the statistics that best represent the work associated with servicing each customer interaction.
Adding Reason Codes
When associating agent schedule states provided by Workforce Management with Genesys events, you can configure reason codes with Genesys events. This allows you to refine the Genesys agent-state information that Workforce Management uses to track agent compliance with their scheduled states. Data Aggregator can process reason codes that come from hard and/or soft phones. To receive reason codes from hard phones, or in a mixed hard/soft phone environment, set the Data Aggregator Application object
ReasonCodeKeyName option in Configuration Manager to ReasonCode. Note: You can use reason codes only if your CTI environment supports
them.
Using Hot-Standby Backup for Data Aggregator
You can configure a hot-standby backup Data Aggregator for each primary Data Aggregator server. The backup reads the same information as the primary Data Aggregator, so if it is necessary to switch to the backup, there is no delay or loss of data. At the transition, the backup Data Aggregator simply starts writing to the database starting from where the primary Data Aggregator left off.
If you do not use a backup, you can configure Data Aggregator to preserve information in the event of a disconnect from the database and subsequent
Chapter 4: Deployment Planning About the WFM Configuration Objects
Data Aggregator shutdown. To do so, specify a path and file name for the
DBDumpFile option on the Options tab of the Data Aggregator Application
object. Then, if Data Aggregator loses its connection to the database, before closing down it writes all current data to the local file (the so-called dump file). After restart and reconnection to the database, Data Aggregator reads the dump file, writes the data to the database, and deletes the dump file.
Note: The dump file does not prevent data loss during the period that Data Aggregator is shut down.
Skills
You can configure interactions to be routed to specific agents within a contact center based on skill definitions. For example, you may want to have incoming interactions go first to an agent at the highest level of a certain skill. If no agent with that skill level for that activity is available, then the interaction can be routed to an agent with the next highest level of that skill. If no agent is available at that level, then the interaction can be routed to the next available agent, regardless of the agent’s skill level for the activity. The contact center manager can decide whether to staff for the higher skill levels or staff to have any agent handle the interaction.
Matching Skills and Activities
Activities often correspond to skills but may also correspond to agent skill levels. Choosing an appropriate strategy for a contact center’s activities allows for improved staffing decisions.
For example, in a simple scenario, the relationship among the queue, skills, and activities is a 1-1-1 correspondence. As things get more complex, the relationships get more complex. Activities consist of multiple skills, and each switch has many activities associated with it. The goal is to find the best combination of relationships to meet staffing requirements.
Schedule-State Groups
A schedule-state group is a collection of schedule states that is linked to a site. These include breaks, meals, exceptions, activities, vacations, and so on. You can group these and associate the group with a specific Genesys event. To configure schedule-state groups, determine what schedule states you are using, what are the most logical groupings, and which Genesys event best corresponds to each group.
Chapter 4: Deployment Planning About the WFM Policies Objects
Events
Events are specific instances of occurrences that affect scheduling
requirements. For example, a catalog drop might increase demand for agents handling inbound interactions. By configuring an event, you can forecast and schedule to incorporate its effects, ensuring appropriate staffing levels throughout the period that the event affects.
Time Zones
Time zones are set up in Configuration Manager and imported into Workforce Management during synchronization. You can assign time zones to sites and business units. You can also configure a default time zone, for efficiency in configuring new objects, and a user time zone, which is used as the alternative time zone in WFM Web Performance views. All newly created sites and business units use the default time zone, unless specified otherwise.
Synchronization
Synchronization brings Configuration Database objects, such as agents, agent skills, time zones, and users into Workforce Management. You can configure security settings to determine the users who are able to perform
synchronizations.
About the WFM Policies Objects
Contractual obligations, legal requirements, and business practices comprise constraints under which a contact center operates. Workforce Management enables you to specify constraints in great detail, resulting in forecasts and schedules that comply with constraints while optimizing staffing levels.
Accrual Rules
This module enables you to set vacation accrual constraints, such as how many hours accumulate per working period and when the vacation carry-over date is. You also use this module to assign accrual rules to specific agents.
You may have a number of accrual rules, each of which is attached to a site. Because accrual rules are separate from contracts, agents with the same contract may accumulate vacation hours at different rates, providing more flexibility in managing contact center staff.
Chapter 4: Deployment Planning About the WFM Policies Objects
Activity Policies
This module enables you to set activity open hours and staffing constraints. You can also use it to create activity sets (previously called exclusivity sets). Activity sets provide a means to combine activities into groups for multiskilled scheduling. Activity sets are associated with sites and agents are assigned to the activity sets. When assigned, agents much perform only the activities included in the set for a specified period of time.
When planning your deployment, consider which activities could logically be grouped into activity sets.
Contracts
Contracts are sets of rules that describe the contact center’s contractual obligations to agents. The maximum working hours for a contract should include allowances for meetings, training, overtime, and other planned, paid activities. You can configure an unlimited number of contracts. In some cases a unique contract might be necessary for each agent.
Use Contracts to describe a single agent’s availability. For example, a student might prefer to work Monday, Wednesday, and Friday evenings, any time Tuesday and Thursday, and have weekends off for study and fun. You could configure this student’s contract to enable these availability parameters. A contract is not the same as a shift. A shift indicates the hours an agent will work, whereas a contract describes how many hours an agent should work. For further details on shifts, see “Flexible Shifts” on page 38.
Constraints for Working Days, Hours, and Time Off
You can set the numbers of working days and hours and time off for one of several scheduling periods, depending on which best suit your enterprise’s business practices and any applicable legal requirements. You can set these parameters per week, per month, or per any period of 2 to 6 weeks. For example, you can ensure that employees always receive 2 weekends off per month or work an exactly specified number of hours per 6-week period.
Configuring Profiles
A profile is an abstract or hypothetical agent constructed from user-defined contract data. You can create multiple profile types, which you can use to construct schedules containing empty schedule slots appropriate for the contracts you have or intend to hire for. You can insert actual agents into the schedule slots after you build the schedule.
Chapter 4: Deployment Planning About the WFM Policies Objects
Flexible Shifts
The method used to create Workforce Management shifts allows for a flexible description of shift durations and of start and end times. Additionally,
Workforce Management schedules use flexible break and meal parameters. In a sense, a Workforce Management shift is an abstraction, representing
countless possible working times, even though you can configure a shift to produce very regular, fixed, agent schedules.
A single Workforce Management shift can incorporate hundreds of possible start times and durations as long as they fall within the parameters of the contract. However, through more rigid shift configuration, agent start times and workday durations can be fixed. This combination of flexibility and structure makes the Workforce Management shift a tremendously powerful scheduling mechanism. In fact, in some cases, you can configure an entire contact center using only a few Workforce Management shifts.
Taking Advantage of the Workforce Management Shift
The Workforce Management shift contrasts sharply with the conventional notion of a shift, with fixed weekly start time, fixed duration, and set breaks. You can confiure shifts to work in tandem with contracts, which efficiently and effectively controls the placement of working times.
For example, consider a contact center with a standard full-time shift of 8 hours a day, 5 days a week, and an alternative full-time shift of 10 hours a day, 4 days a week. Both types of agents can use a single shift with a flexible duration of 8–10 hours per day. In either case, the agents are contracted to receive 40 hours work each week and to work 4 or 5 days. You can configure Workforce Management to guarantee that specific agents work 4 or 5 days a week, or you can leave it to the Workforce Management Scheduler to
determine how many agents of each full-time type should be used to provide the least costly schedule.
Such an efficient method of shift allocation allows you to take into account the effect of complex scheduling requirements and agent-centric considerations, while making the best possible use of multiskilled agents.
Exception Types
Exception types define periods of time when agents are engaged in nonwork activities, such as personal days off or meetings. Each site configures its own set of exception types based on its business
requirements. These might include meetings, holidays, jury duty, and training. You can configure exceptions to be considered during Meeting Planner use, to count as vacation time, to be convertible to a day off, and so on. You can assign agents to multiple partial-day exceptions if the exceptions do not overlap.
Chapter 4: Deployment Planning Forecasting Considerations
Because you can group agents into teams, you can assign exceptions to large groups of agents at one time.
Meetings
Use this module to create meetings and assign them to agents.
Vacation Limits
Use this module to set limits for the number or percentage of agents who can be on vacation. You can set limits at the activity, team, and site levels. If you have configured more than one limit, the lowest applicable limit applies.
Rotating Patterns
Rotating patterns increase scheduling flexibility and control. A rotating pattern is a series of weekly patterns arranged in a repeating sequence. You can construct each weekly pattern in a rotating pattern from a combination of shift assignments, agent availability times, days off, and so on, depending on what constraint is most important for any specific day.
Rotating patterns include availability times as options for weekly pattern days. If used, these availability settings override the availability settings that you configured in the Contract module for that day. Rotating pattern assignments are displayed in the Calendar along with all other schedule data.
Forecasting Considerations
You can create forecasts based on various kinds of data. Ideally, a substantial quantity of good-quality historical data on contact center interactions already exists and can be imported into the Workforce Management database. Two forecasting algorithms are available, depending on the amount of quality historical data available. The Expert Average Engine requires a full week of historical data with no missing timesteps. The Universal Modeling Engine must have at least a full year of historical data to create forecasts.
If historical data is unavailable or of poor quality, you can create forecasts based on templates. Templates reflect estimated interaction levels for different days and times and can be constructed for each activity. Or you can simply enter figures for interaction volumes into the New Forecast Scenario Wizard text boxes.
Creating optimal forecasts depends not only on whether historical data is available, but also on usual workflow. Contact centers with very regular