Cisco AnyConnect Secure Mobility Client Administrator Guide, Release
4.9
Americas Headquarters
Cisco Systems, Inc. 170 West Tasman Drive San Jose, CA 95134-1706 USA http://www.cisco.com Tel: 408 526-4000 800 553-NETS (6387) Fax: 408 527-0883
THE SPECIFICATIONS AND INFORMATION REGARDING THE PRODUCTS IN THIS MANUAL ARE SUBJECT TO CHANGE WITHOUT NOTICE. ALL STATEMENTS, INFORMATION, AND RECOMMENDATIONS IN THIS MANUAL ARE BELIEVED TO BE ACCURATE BUT ARE PRESENTED WITHOUT WARRANTY OF ANY KIND, EXPRESS OR IMPLIED. USERS MUST TAKE FULL RESPONSIBILITY FOR THEIR APPLICATION OF ANY PRODUCTS.
THE SOFTWARE LICENSE AND LIMITED WARRANTY FOR THE ACCOMPANYING PRODUCT ARE SET FORTH IN THE INFORMATION PACKET THAT SHIPPED WITH THE PRODUCT AND ARE INCORPORATED HEREIN BY THIS REFERENCE. IF YOU ARE UNABLE TO LOCATE THE SOFTWARE LICENSE OR LIMITED WARRANTY, CONTACT YOUR CISCO REPRESENTATIVE FOR A COPY.
The Cisco implementation of TCP header compression is an adaptation of a program developed by the University of California, Berkeley (UCB) as part of UCB's public domain version of the UNIX operating system. All rights reserved. Copyright©1981, Regents of the University of California.
NOTWITHSTANDING ANY OTHER WARRANTY HEREIN, ALL DOCUMENT FILES AND SOFTWARE OF THESE SUPPLIERS ARE PROVIDED “AS IS" WITH ALL FAULTS. CISCO AND THE ABOVE-NAMED SUPPLIERS DISCLAIM ALL WARRANTIES, EXPRESSED OR IMPLIED, INCLUDING, WITHOUT LIMITATION, THOSE OF
MERCHANTABILITY, FITNESS FOR A PARTICULAR PURPOSE AND NONINFRINGEMENT OR ARISING FROM A COURSE OF DEALING, USAGE, OR TRADE PRACTICE. IN NO EVENT SHALL CISCO OR ITS SUPPLIERS BE LIABLE FOR ANY INDIRECT, SPECIAL, CONSEQUENTIAL, OR INCIDENTAL DAMAGES, INCLUDING, WITHOUT LIMITATION, LOST PROFITS OR LOSS OR DAMAGE TO DATA ARISING OUT OF THE USE OR INABILITY TO USE THIS MANUAL, EVEN IF CISCO OR ITS SUPPLIERS HAVE BEEN ADVISED OF THE POSSIBILITY OF SUCH DAMAGES.
Any Internet Protocol (IP) addresses and phone numbers used in this document are not intended to be actual addresses and phone numbers. Any examples, command display output, network topology diagrams, and other figures included in the document are shown for illustrative purposes only. Any use of actual IP addresses or phone numbers in illustrative content is unintentional and coincidental.
All printed copies and duplicate soft copies of this document are considered uncontrolled. See the current online version for the latest version. Cisco has more than 200 offices worldwide. Addresses and phone numbers are listed on the Cisco website at www.cisco.com/go/offices.
Cisco and the Cisco logo are trademarks or registered trademarks of Cisco and/or its affiliates in the U.S. and other countries. To view a list of Cisco trademarks, go to this URL:
https://www.cisco.com/c/en/us/about/legal/trademarks.html. Third-party trademarks mentioned are the property of their respective owners. The use of the word partner does not imply a partnership relationship between Cisco and any other company. (1721R)
C O N T E N T S
Deploy AnyConnect 1
C H A P T E R 1
Before You Begin Deployment 1
AnyConnect Deployment Overview 1
Preparing the Endpoint for AnyConnect 4
Using Mobile Broadband Cards with AnyConnect 4
Add the ASA to the List of Internet Explorer Trusted Sites on Windows 4
Block Proxy Changes in Internet Explorer 5
Configure How AnyConnect Treats Windows RDP Sessions 5
Configure How AnyConnect Treats Linux SSH Sessions 6
DES-Only SSL Encryption on Windows 7
Using NVM on Linux 7
Prerequisites to Build the AnyConnect Kernel Module 7
Package NVM with Prebuilt AnyConnect Linux Kernel Module 8
Predeploying AnyConnect 8
AnyConnect Module Executables for Predeploy and Web Deploy 10
Locations to Predeploy the AnyConnect Profiles 10
Guidelines for Cloning VMs With AnyConnect (Windows Only) 12
Predeploying AnyConnect Modules as Standalone Applications 13
Deploying Stand-Alone Modules with an SMS on Windows 13
Deploying AnyConnect Modules as Standalone Applications 13
User Installation of Stand-Alone Modules 13
Predeploying to Windows 14
Distributing AnyConnect Using the zip File 14
Contents of the AnyConnect zip File 15
Distributing AnyConnect Using an SMS 15
AnyConnect Module Installation and Removal Order on Windows 17
Predeploying to macOS 18
Install and Uninstall AnyConnect on macOS 18
Installing AnyConnect Modules on macOS as a Standalone Application 19
Restrict Applications on macOS 20
Predeploying to Linux 20
Installing Modules for Linux 20
Uninstalling Modules for Linux 21
Manually Installing/Uninstalling NVM on a Linux Device 21
Initializing Server Certificate Verification with Firefox 21
Manually Installing DART on a Linux Device 22
Web Deploying AnyConnect 22
Configuring Web Deployment on the ASA 23
Download the AnyConnect Package 23
Load the AnyConnect Package on the ASA 24
Enable Additional AnyConnect Modules 24
Create a Client Profile in ASDM 24
Configuring Web Deployment on ISE 25
Prepare AnyConnect Files for ISE Upload 26
Configure ISE to Deploy AnyConnect 27
Configuring Web Deployment on FTD 28
Updating AnyConnect Software and Profiles 29
Disabling AnyConnect Auto Update 31
Prompting Users to Download AnyConnect During WebLaunch 31
Allowing Users to Defer Upgrade 32
Set the Update Policy 34
Update Policy Overview 34
Authorized Server Update Policy Behavior 34
Unauthorized Server Update Policy Behavior 35
Update Policy Guidelines 36
Update Policy Example 36
AnyConnect Reference Information 37
Locations of User Preferences Files on the Local Computer 37
Port Used by AnyConnect and the Legacy VPN Client 38
Customize and Localize the AnyConnect Client and Installer 39
C H A P T E R 2
Modify AnyConnect Installation Behavior 39
Disable Customer Experience Feedback 39
Modify Installation Behavior, Windows 40
Windows Installer Properties That Customize Client Installations 40
Windows Installer Properties for AnyConnect Modules 41
Import a Customized Installer Transform to the Adaptive Security Appliance 43
Localize the AnyConnect Installer Screens 44
Import a Localized Installer Transform to the Adaptive Security Applicance 44
Modify Installation Behavior, macOS 46
Customize Installer Behavior on macOS with ACTransforms.xml 46
Disable the Customer Experience Feedback Module 46
Modify Installation Behavior, Linux 47
Customizing Installer Behavior on Linux with ACTransform.xml 47
Enable DSCP Preservation 47
Set Public DHCP Server Route 48
Customize the AnyConnect GUI Text and Messages 48
Add or Edit the AnyConnect Text and Messages 50
Import Translation Tables to the Adaptive Security Appliance 52
Create Message Catalogs for Enterprise Deployment 53
Merge New Messages into a Customized Translation Table on the ASA 54
Select the Default Language for Windows on the Client 55
Create Custom Icons and Logos for the AnyConnect GUI 55
Replace AnyConnect GUI Components 56
AnyConnect Icons and Logos for Windows 57
AnyConnect Icons and Logos for Linux 60
AnyConnect Icons and Logos for macOS 62
Create and Upload an AnyConnect Client Help File 62
Write and Deploy Scripts 63
Write, Test, and Deploy Scripts 64
Configure the AnyConnect Profile for Scripting 65
Troubleshoot Scripts 65
Write and Deploy Custom Applications with the AnyConnect API 66
Use the AnyConnect CLI Commands 67
Launch the Client CLI Prompt 67
Use the Client CLI Commands 67
Prevent a Windows Popup Message When ASA Terminates a Session 69
Prepare AnyConnect Customizations and Localizations for ISE Deployment 70
Prepare an AnyConnect Localization Bundle 70
Prepare an AnyConnect Customization Bundle 71
The AnyConnect Profile Editor 73
C H A P T E R 3
About the Profile Editor 73
Add a New Profile from ASDM 73
The AnyConnect VPN Profile 74
AnyConnect Profile Editor, Preferences (Part 1) 74
AnyConnect Profile Editor, Preferences (Part 2) 78
AnyConnect Profile Editor, Backup Servers 83
AnyConnect Profile Editor, Certificate Matching 84
AnyConnect Profile Editor, Certificate Enrollment 87
AnyConnect Profile Editor, Certificate Pin 88
Certificate Pinning Wizard 88
AnyConnect Profile Editor, Mobile Policy 88
AnyConnect Profile Editor, Server List 89
AnyConnect Profile Editor, Add/Edit a Server List 89
AnyConnect Profile Editor, Mobile Settings 91
NVM Profile Editor 93
The AnyConnect Local Policy 97
Local Policy Parameters and Values 98
Change Local Policy Parameters Manually 101
Enable Local Policy Parameters in an MST File 102
Configure VPN Access 103
C H A P T E R 4
Connect and Disconnect to a VPN 103
AnyConnect VPN Connectivity Options 103
Configure VPN Connection Servers 105
Automatically Start Windows VPN Connections Before Logon 106
About Start Before Logon 106
Limitations on Start Before Logon 107
Configure Start Before Logon 107
Troubleshoot Start Before Logon 108
Automatically Start VPN Connections When AnyConnect Starts 109
Configure Start Before Logon (PLAP) on Windows Systems 109
Automatically Restart VPN Connections 109
Use Trusted Network Detection to Connect and Disconnect 110
About Trusted Network Detection 110
Guidelines for Trusted Network Detection 110
Configure Trusted Network Detection 111
Require VPN Connections Using Always-On 113
About Always-On VPN 113
Limitations of Always-On VPN 113
Guidelines for Always-On VPN 114
Configure Always-On VPN 114
Configure Always-On in the AnyConnect VPN Client Profile 114
Add Load-Balancing Backup Cluster Members to the Server List 115
Exempt Users from Always-On VPN 115
Set a Connect Failure Policy for Always-On 116
Use Captive Portal Hotspot Detection and Remediation 118
About Captive Portals 118
Configure Captive Portal Remediation 119
Enhanced Captive Portal Remediation (Windows Only) 119
Configure Captive Portal Remediation Browser Failover 120
Troubleshoot Captive Portal Detection and Remediation 120
Configure AnyConnect over L2TP or PPTP 121
Use Management VPN Tunnel 122
About the Management VPN Tunnel 122
Configure the Management VPN Tunnel 124
Configure the Tunnel Group for the Management VPN Tunnel 124
Create a Profile for Management VPN Tunnel 125
(Optional) Upload an Already Configured Management VPN Profile 125
Associate the Management VPN Profile to Group Policies 125
Configure a Custom Attribute to Support Tunnel-All Configuration 126
Restrict Management VPN Profile Updates 126
Troubleshoot Management VPN Tunnel Connectivity Issues 127
Configure AnyConnect Proxy Connections 128
About AnyConnect Proxy Connections 128
Requirements for AnyConnect Proxy Connections 129
Limitations on Proxy Connections 129
Allow a Local Proxy Connection 129
Public Proxy 130
Configure a Public Proxy Connection, Windows 130
Configure a Public Proxy Connection, macOS 130
Configure a Public Proxy Connection, Linux 130
Configure a Private Proxy Connection 131
Configure the Client to Ignore Browser Proxy Settings 131
Lock Down the Internet Explorer Connections Tab 131
Verify the Proxy Settings 132
Select and Exclude VPN Traffic 132
Configure IPv4 or IPv6 Traffic to Bypass the VPN 132
Configure a Client Firewall with Local Printer and Tethered Device Support 133
Configure Split Tunneling 133
Routing Network Traffic on Linux 133
About Dynamic Split Tunneling 134
Interoperability Between Static Split Tunneling and Dynamic Split Tunneling 135
Outcome of Overlapping Scenarios with Split Tunneling Configuration 135
Notifications of Dynamic Split Tunneling Usage 135
Split DNS 136
Requirements for Split DNS 136
Configure Split DNS 136
Verify Split DNS Using AnyConnect Logs 137
Check Which Domains Use Split DNS 137
Manage VPN Authentication 138
Important Security Considerations 138
Supported Security Types 138
Configure Server Certificate Handling 138
Server Certificate Verification 138
Invalid Server Certificate Handling 139
Configure Certificate-Only Authentication 142
Configure Certificate Enrollment 142
SCEP Proxy Enrollment and Operation 143
Certificate Authority Requirements 143
Guidelines for Certificate Enrollment 143
Configure SCEP Proxy Certificate Enrollment 144
Set Up a Windows 2008 Server Certificate Authority for SCEP 145
Configure a Certificate Expiration Notice 146
Configure Certificate Selection 147
Configure Which Certificate Stores to Use 147
Prompt Windows Users to Select Authentication Certificate 149
Create a PEM Certificate Store for macOS and Linux 150
Configure Certificate Matching 151
VPN Authentication Using SAML 153
VPN Authentication Using SDI Token (SoftID) Integration 155
Categories of SDI Authentication Exchanges 156
Compare Native SDI with RADIUS SDI 158
Configure the ASA to Support RADIUS/SDI Messages 158
About Certificate Pinning 160
Global and Per Host Pins 161
Configure Network Access Manager 163
C H A P T E R 5
About Network Access Manager 163
Suite B and FIPS 164
Single Sign On "Single User" Enforcement 165
Configure Single Sign-On Single User Enforcement 165
Network Access Manager Deployment 165
Disable DHCP Connectivity Testing 167
Network Access Manager Profile 167
Client Policy Window 167
Authentication Policy Window 169
Networks Window 170
Networks, Media Type Page 171
Networks, Security Level Page 172
Configure an Authenticating Network 173
Configure an Open Network 175
Configure a Shared Key Network 175
Networks, Network Connection Type Pane 176
Networks, User or Machine Authentication Page 177
EAP Overview 177 EAP-GTC 177 EAP-TLS 178 EAP-TTLS 179 PEAP Options 180 EAP-FAST Settings 182 LEAP Settings 183
Define Networks Credentials 184
Network Groups Window 189
Configure Posture 191
C H A P T E R 6
What ISE Posture Module Provides 192
Posture Checks 192
Any Necessary Remediation 192
Reassessment of Endpoint Compliance 193
Cisco Temporal Agent 194
Posture Policy Enhancements for Optional Mode 195
Visibility into Hardware Inventory 196
Stealth Mode 196
Posture Policy Enforcement 197
UDID Integration 197
Application Monitoring 197
USB Storage Device Detection 197
Automatic Compliance 198
VLAN Monitoring and Transitioning 198
Operations That Interrupt the AnyConnect ISE Flow 199
Status of ISE Posture 200
Posture and Multi Homing 201
Simultaneous Users on an Endpoint 201
Logging for Posture Modules 201
Posture Modules' Log Files and Locations 202
ISE Posture Profile Editor 202
Advanced Panel 204
What VPN Posture (HostScan) Module Provides 205
HostScan 205
Basic Functionality 205
Endpoint Assessment 206
Advanced Endpoint Assessment: AntiMalware and Firewall Remediation 206
Configure Antimalware Applications for HostScan 206
Integration with Dynamic Access Policies 207
BIOS Serial Number in a DAP 207
Specify the BIOS as a DAP Endpoint Attribute 207
How to Obtain BIOS Serial Numbers 207
Determine the HostScan Image Enabled on the ASA 208
Upgrade HostScan 208
OPSWAT Support 208
Configure Web Security 211
C H A P T E R 7
About the Web Security Module 211
Typical Web Security Configuration 212
Cisco Cloud Web Security Scanning Proxies in the Client Profile 212
How Users Choose Scanning Proxies 213
Update the Scanning Proxy List 213
Display or Hide Scanning Proxies from Users 214
Select a Default Scanning Proxy 215
Specify an HTTP(S) Traffic Listening Port 215
Configuring Windows Internet Options to Configure Public Proxy 216
Excluding or Including Endpoint Traffic from Web Scanning Service 216
Exclude or Include Host Exceptions 217
Exclude Proxy Exceptions 218
Exclude Static Exceptions 218
Configure User Controls and Calculate Fastest Scanning Proxy Response Time 220
Use Secure Trusted Network Detection 221
Not Using Secure Trusted Network Detection 222
Configure Authentication and Sending Group Memberships to the Cisco Cloud Web Security Proxy
222
Advanced Web Security Settings 224
Configure the KDF Listening Port 224
Configure How the Port Listens for Incoming Connections 225
Configure When Timeout/Retries Occur 226
DNS Lookup 226
Debug Settings 226
Block and Allow Traffic 226
Other Customizable Web Security Options 227
Export Options 227
Configure Split Tunnel Exclusions for Web Security 228
Use Cisco Cloud Web Security Hosted Profiles 229
Switch Off and Enable the Cisco AnyConnect Web Security Agent 230
Switch Off and Enable Filters Using Windows 230
Switch Off and Enable Filters Using Mac OS X 230
Web Security Logging 231
Configure AMP Enabler 233
C H A P T E R 8
About AMP Enabler 233
AMP Enabler Deployment 233
AMP Enabler Profile Editor 234
Status of AMP Enabler 234
Network Visibility Module 235
C H A P T E R 9
About Network Visibility Module 235
NVM on Desktop AnyConnect 236 Standalone NVM 236 Deployment Modes 236 NVM on Mobile AnyConnect 237 How to Use NVM 237 Contents
Collection Parameters for NVM 238
NVM Profile Editor 241
About Flow Filters 246
Customer Feedback Module Gives NVM Status 247
Umbrella Roaming Security 249
C H A P T E R 1 0
Umbrella Module for AnyConnect for Android OS 249
Prerequisites for Deploying the Umbrella Module for AnyConnect on Android OS 250
Umbrella Module for AnyConnect for Windows or macOS 250
Umbrella Roaming Client and Umbrella Roaming Security Module Incompatibility 250
Obtain Cisco Umbrella Account 251
Download the OrgInfo File From Dashboard 251
Get Umbrella Roaming Security Up and Running 251
Configure the OrgInfo.json File 251
Cloud Update 252
Configure Security Policies and Review the Reports 253
Decipher What UI Changes You See on the Endpoint 253
Interpret Diagnostics 257
AnyConnect Umbrella Secure Web Gateway Module 257
Limitations of SWG 258
Installation and Upgrade for Umbrella SWG 258
Umbrella SWG Log Files and Messages 258
Status in Roaming Security Tile 259
Troubleshooting Umbrella SWG 259
Enable FIPS in the Local Policy 261
C H A P T E R 1 1
About FIPS, NGE, and AnyConnect 261
FIPS Features in AnyConnect 262
AnyConnect FIPS Requirements 262
Limitations of AnyConnect FIPS 263
Guidelines for AnyConnect FIPS 263
Configure FIPS for the AnyConnect Core VPN Client 264
Enable FIPS for the AnyConnect Core VPN 264
Enable FIPS During Windows Installation 264
Configure FIPS for the Network Access Manager 264
Enable FIPS for the Network Access Manager 265
Enforce FIPS Mode for the Network Access Manager 265
AnyConnect on Mobile Devices 267
C H A P T E R 1 2
AnyConnect Operation and Options on Mobile Devices 267
About AnyConnect Mobile VPN Connections 267
AnyConnect VPN Connection Entries on Mobile Devices 268
Tunneling Modes 268
Multiple Tunnel for iOS 269
Secure Gateway Authentication on Mobile Devices 269
Client Authentication on Mobile Devices 271
VPN Authentication Using SAML 271
Localization on Mobile Devices 273
Import Translation Tables to the Adaptive Security Appliance 274
FIPS and Suite B Cryptography on Mobile Devices 274
AnyConnect on Android Devices 275
Guidelines and Limitations for AnyConnect on Android 275
Android Specific Considerations 276
Android Mobile Posture Device ID Generation 276
Android Device Permissions 276
Configure AnyConnect for Android on Chromebooks 277
AnyConnect on Apple iOS Devices 284
Guidelines and Limitations for AnyConnect on Apple iOS 284
Apple iOS Specific Considerations 285
MDM Configurable Settings for AnyConnect on iOS 288
Define AnyConnect Local Secure Settings 288
Block End Users from Adding VPN Connections 288
AnyConnect on Chrome OS Devices 289
Guidelines and Limitations for AnyConnect on Chrome OS 289
AnyConnect on Universal Windows Platform 289
Guidelines and Limitations for AnyConnect on Universal Windows Platform 289
Configure Mobile Device VPN Connectivity on the ASA Secure Gateway 290
Configure Per App VPN 291
Install the Cisco AnyConnect Enterprise Application Selector Tool 292
Determine Which Apps Should Be Allowed in the Tunnel 293
Determine the Application IDs for Mobile Apps 293
Define a Per-App VPN Policy for Android Devices 294
Define a Per App VPN Policy for Apple iOS Devices 295
Create Per App Custom Attributes 295
Assign a Custom Attribute to a Policy on the ASA 296
Configure Mobile Device Connections in the AnyConnect VPN Profile 297
Automate AnyConnect Actions Using the URI Handler 298
Generate a VPN Connection Entry 299
Establish a VPN Connection 302
Disconnect from a VPN 304
Import Certificates 304
Import a VPN Client Profile 305
Localize the AnyConnect UI and Messages 305
Troubleshoot AnyConnect on Mobile Devices 305
Cisco AnyConnect Customer Experience Feedback Module 307
C H A P T E R 1 3
Configure Customer Experience Feedback 307
Troubleshoot AnyConnect 309
C H A P T E R 1 4
Gather Information for Troubleshooting 309
View Statistical Details 309
Run DART to Gather Data for Troubleshooting 310
Expose UDID in DART 311
Collect Logs to Gather Data for Install or Uninstall Issues (for Windows) 311
Get Computer System Info 311
Get Systeminfo File Dump 312
Check Registry File 312
Location of AnyConnect Log Files 312
Run DART to Clear Troubleshooting Data 312
AnyConnect Connection or Disconnection Issues 313
AnyConnect Not Establishing Initial Connection or Not Disconnecting 313
AnyConnect Not Passing Traffic 314
VPN Service Failures 316
VPN Service Connection Fails 316
Determine What Conflicted With Service 316
VPN Client Driver Encounters Error (after a Microsoft Windows Update) 317
Repair VPN Client Driver Error 317
Driver Crashes 317
Fix Driver Crashes in VPNVA.sys 317
Fix Driver Crashes in vpnagent.exe 318
Link/Driver Issues with Network Access Manager 318
Other Crashes 318
AnyConnect Crashes 318
How to Back Up .log or .dmp Files 318
AnyConnect Crashes in vpndownloader (Layered Service Provider (LSP) Modules and NOD32 AV) 319
Blue Screen (AT & T Dialer) 319
Security Alerts 319
Microsoft Internet Explorer Security Alert 319
"Certified by an Unknown Authority" Alert 319
Install Trusted Root Certificates on a Client 320
Dropped Connections 320
Wireless Connection Drops When Wired Connection is Introduced (Juniper Odyssey Client) 320
Configure the Odyssey Client 321
Connections to the ASA Fail (Kaspersky AV Workstation 6.x) 321
No UDP DTLS Connection (McAfee Firewall 5) 321
Connection to the Host Device Fails (Microsoft Routing and Remote Access Server) 321
Failed Connection/Lack of Credentials (Load Balancers) 321
Installation Failures 322
AnyConnect Fails to Download (Wave EMBASSY Trust Suite) 322
Incompatability Issues 322
Failure to Update the Routing Table (Bonjour Printing Service) 322
Version of TUN is Incompatible (OpenVPN Client) 322
Winsock Catalog Conflict (LSP Symptom 2 Conflict) 322
Slow Data Throughput (LSP Symptom 3 Conflict) 322
Disable SSL Protocol Scanning 323
DPD Failure (EVDO Wireless Cards and Venturi Driver) 323
DTLS Traffic Failing (DSL Router) 323
NETINTERFACE_ERROR (CheckPoint and other Third-Party Software such as Kaspersky) 323
Performance Issues (Virtual Machine Network Service Drivers) 324
Known Third-Party Application Conflicts 324
Appendix: AnyConnect Changes Related to macOS 11 (Big Sur) 327
C H A P T E R 1 5
About the AnyConnect System Extension 327
Approving the AnyConnect System Extension 328
Approve the System Extension Loading/Activation 328
Approve the System Extension Using MDM 328
Confirm Activation of AnyConnect System Extension 329
Deactivate AnyConnect Extension 329
Failover to Kernel Extension 330
Revert Back to System Extension 330
Sample MDM Configuration Profile for AnyConnect System and Kernel Extension Approval 331
C H A P T E R
1
Deploy AnyConnect
•Before You Begin Deployment, on page 1 •AnyConnect Deployment Overview, on page 1 •Preparing the Endpoint for AnyConnect, on page 4 •Using NVM on Linux, on page 7•Predeploying AnyConnect, on page 8 •Web Deploying AnyConnect, on page 22
•Updating AnyConnect Software and Profiles, on page 29
Before You Begin Deployment
If you are deploying the Umbrella Roaming Security module, any existing installation of the Umbrella Roaming Client will be detected and removed automatically to prevent conflicts. If the existing installation of the Umbrella Roaming Client is associated with an Umbrella service subscription, it will automatically be migrated to the Umbrella Roaming Security moduleunlessan OrgInfo.json file is co-located with the AnyConnect installer, configured for web deployment or predeployed in the Umbrella module's directory. You may wish to manually uninstall the Umbrella Roaming Client prior to deploying the Umbrella Roaming Security module. You must additionally complete the following prerequisites if using the Umbrella Roaming Security module: •Obtain Umbrella Roaming Account.The Umbrella dashboardhttp://dashboard.umbrella.comis the
login page where you obtain necessary information for the operation of the AnyConnect Umbrella Roaming Security Module. You also use this site to manage reporting for the roaming client activity. •Download the OrgInfo File from the Dashboard.To prepare for deploying the AnyConnect Umbrella
Roaming Security Module, obtain the OrgInfo.json file from the Umbrella dashboard. Click onRoaming Computerin the Identities menu structure and then click the+sign in the upper-left corner of the page. Scroll down to AnyConnect Umbrella Roaming Security Module and clickModule Profile.
The OrgInfo.json file contains specific information about your Umbrella service subscription that lets the Roaming Security module know where to report and which policies to enforce.
AnyConnect Deployment Overview
Deploying AnyConnect refers to installing, configuring, and upgrading the AnyConnect client and its related files.
The Cisco AnyConnect Secure Mobility Client can be deployed to remote users by the following methods: • Predeploy—New installations and upgrades are done either by the end user, or by using an enterprise
software management system (SMS).
• Web Deploy—The AnyConnect package is loaded on the headend, which is either an ASA or FTD firewall, or an ISE server. When the user connects to a firewall or to ISE, AnyConnect is deployed to the client.
• For new installations, the user connects to a headend to download the AnyConnect client. The client is either installed manually or automatically (web-launch).
• Updates are done by AnyConnect running on a system where AnyConnect is already installed, or by directing the user to the ASA clientless portal.
• Cloud Update—After the Umbrella Roaming Security module is deployed, you can update any AnyConnect modules using one of the above methods, as well as Cloud Update. With Cloud Update, the software upgrades are obtained automatically from the Umbrella cloud infrastructure, and the update track is dependent upon that and not any action of the administrator. By default, automatic updates from Cloud Update are disabled.
Consider the following regarding Cloud Update:
• Only the software modules that are currently installed are updated. • Customizations, localizations, and any other deployment types are not
supported.
• The updates occur only when logged in to a desktop and will not happen if a VPN is established.
• With updates disabled, the latest software features and updates will not be available.
• Disabling Cloud Update has no effect on other update mechanisms or settings (such as web deploy, deferred updates, and so on).
• Cloud Update ignores having newer, unreleased versions of AnyConnect (such as interim releases and patched versions).
Note
When you deploy AnyConnect, you can include optional modules that enable extra features, and client profiles that configure the VPN and optional features.
Refer to theAnyConnect release notesfor system, management, and endpoint requirements for ASA, IOS, Microsoft Windows, Linux, and macOS.
Some third-party applications and operating systems may restrict the ISE posture agent and other processes from necessary file access and privilege elevation. Make sure the AnyConnect installation directory (C:\Program Files (x86)\Cisco for Windows or /opt/cisco for macOS) is trusted and/or in the allowed/exclusion/trusted lists for endpoint antivirus, antimalware, antispyware, data loss prevention, privilege manager, or group policy objects.
Note
Deploy AnyConnect AnyConnect Deployment Overview
Decide How to Install AnyConnect
AnyConnect can be web deployed by ISE 2.0 (or later) and ASA headends or predeployed. To install AnyConnect initially requires administrative privileges.
Web Deploy
To upgrade AnyConnect or install additional modules using web deploy (from ASA/ISE/Umbrella cloud with Downloader), you do not need administrative privileges.
• Web Deploying from an ASA or FTD device—User connects to the AnyConnect clientless portal on the headend device, and selects to download AnyConnect. The ASA downloads the AnyConnect Downloader. The AnyConnect Downloader downloads the client, installs the client, and starts a VPN connection. • Web Deploying from ISE—User connects to the Network Access Device (NAD), such as an ASA,
wireless controller, or switch. The NAD authorizes the user, and redirects the user to the ISE portal. The AnyConnect Downloader is installed on the client to manage the package extraction and installation, but does not start a VPN connection.
Predeploy
To upgrade AnyConnect or install additional modules using predeploy (out of band deployment, either manually or using SCCM and so on), you need administrative privileges.
• Using an Enterprise software management system (SMS).
• Manually distributing an AnyConnect file archive, with instructions for the user about how to install. File archive formats are zip for Windows, DMG for Mac OS X, and gzip for Linux.
For system requirements and licensing dependencies, refer to theAnyConnect Secure Mobility Client Features, License, and OS Guide.
If you are using AnyConnect Posture (HostScan) to perform root privilege activities on a Mac or Linux platform, we recommend that you predeploy AnyConnect Posture.
Note
Determine The Resources You Need to Install AnyConnect Several types of files make up an AnyConnect deployment:
• AnyConnect core client, which is included in the AnyConnect package.
• Modules that support extra features, which are included in the AnyConnect package. • Client profiles that configure AnyConnect and the extra features, which you create.
• Language files, images, scripts, and help files, if you wish to customize or localize your deployment. • AnyConnect ISE Posture, and the compliance module (OPSWAT).
Deploy AnyConnect
Preparing the Endpoint for AnyConnect
Using Mobile Broadband Cards with AnyConnect
Some 3G cards require configuration steps before using AnyConnect. For example, the VZAccess Manager has three settings:
• modem manually connects
• modem auto connect except when roaming • LAN adapter auto connect
If you chooseLAN adapter auto connect, set the preference to NDIS mode. NDIS is an always on connection where you can stay connected even when the VZAccess Manager is closed. The VZAccess Manager shows an autoconnect LAN adapter as the device connection preference when it is ready for AnyConnect installation. When an AnyConnect interface is detected, the 3G manager drops the interface and allows the AnyConnect connection.
When you move to a higher priority connection—wired networks are the highest priority, followed by WiFi, and then mobile broadband—AnyConnect makes the new connection before breaking the old one.
Add the ASA to the List of Internet Explorer Trusted Sites on Windows
An Active Directory administrator can use a group policy to add the ASA to the list of trusted sites in Internet Explorer. This procedure is different from the way a local user adds trusted sites in Internet Explorer. Procedure
Step 1 On the Windows Domain server, log in as a member of the Domain Administrators group. Step 2 Open the Active Directory Users and Computers MMC snap-in.
Step 3 Right-click the Domain or Organizational Unit where you want to create the Group Policy Object and click
Properties.
Step 4 Select theGroup Policytab and clickNew.
Step 5 Type a name for the new Group Policy Object and pressEnter.
Step 6 To prevent this new policy from being applied to some users or groups, clickProperties. Select theSecurity
tab. Add the user or group that you want topreventfrom having this policy, and then clear theReadand the
Apply Group Policycheck boxes in the Allow column. ClickOK.
Step 7 ClickEditand chooseUser Configuration > Windows Settings > Internet Explorer Maintenance >
Security.
Step 8 Right-clickSecurity Zones and Content Ratingsin the right pane, and then clickProperties. Step 9 SelectImport the current security zones and privacy settings. If prompted, clickContinue. Step 10 ClickModify Settings, selectTrusted Sites, and clickSites.
Step 11 Type the URL for the Security Appliance that you want to add to the list of trusted sites and clickAdd. The format can contain a hostname (https://vpn.mycompany.com) or IP address (https://192.168.1.100). It can be an exact match (https://vpn.mycompany.com) or a wildcard (https://*.mycompany.com).
Deploy AnyConnect Preparing the Endpoint for AnyConnect
Step 12 ClickCloseand clickOKcontinually until all dialog boxes close.
Step 13 Allow sufficient time for the policy to propagate throughout the domain or forest. Step 14 ClickOKin the Internet Options window.
Block Proxy Changes in Internet Explorer
Under certain conditions, AnyConnect hides (locks down) the Internet Explorer Tools > Internet Options > Connections tab. When exposed, this tab lets the user set proxy information. Hiding this tab prevents the user from intentionally or unintentionally circumventing the tunnel. The tab lockdown setting is reversed upon disconnect. Tab lockdown is overridden by any administrator-defined policies applied to that tab. The lockdown is applied when:
• The ASA configuration specifies Connections tab lockdown • The ASA configuration specifies a private-side proxy
• A Windows group policy previously locked down the Connections tab (overriding the no lockdown ASA group policy setting)
For Windows 10 version 1703 (or later), in addition to hiding the Connections Tab in Internet Explorer, AnyConnect hides (locks down) the system proxy tab in the Settings app to prevent the user from intentionally or unintentionally circumventing the tunnel. This lockdown is reversed upon disconnect.
Procedure
Step 1 In ASDM go toConfiguration > Remote Access VPN > Network (Client) Access > Group Policies. Step 2 Select a group policy and clickEditorAdda new group policy.
Step 3 In the navigation pane, go toAdvanced>Browser Proxy. The Proxy Server Policy pane displays. Step 4 ClickProxy Lockdownto display more proxy settings.
Step 5 UncheckInheritand select either:
•Yesto enable proxy lockdown and hide the Internet Explorer Connections tab during the AnyConnect session.
•Noto disable proxy lockdown and expose the Internet Explorer Connections tab during the AnyConnect session.
Step 6 ClickOKto save the Proxy Server Policy changes. Step 7 ClickApplyto save the Group Policy changes.
Configure How AnyConnect Treats Windows RDP Sessions
You can configure AnyConnect to allow VPN connections from Windows RDP sessions. By default, users connected to a computer by RDP are not able to start a VPN connection with the Cisco AnyConnect Secure Mobility Client. The following table shows the logon and logout options for a VPN connection from an RDP session. These preferences are configured in the VPN client profile:
Deploy AnyConnect
Windows Logon Enforcement—Available in SBL mode
• Single Local Logon (Default)—(Local: 1, Remote: no limit) Allows only one local user to be logged on during the entire VPN connection. Also, a local user can establish a VPN connection while one or more remote users are logged on to the client PC. This setting has no effect on remote user logons from the enterprise network over the VPN connection.
If the VPN connection is configured for all-or-nothing tunneling, then the remote logon is disconnected because of the resulting modifications of the client PC routing table for the VPN connection. If the VPN connection is configured for split-tunneling, the remote logon might or might not be disconnected, depending on the routing configuration for the VPN connection.
Note
• Single Logon—(Local + Remote: 1) Allows only one user to be logged on during the entire VPN connection. If more than one user is logged on, either locally or remotely, when the VPN connection is being established, the connection is not allowed. If a second user logs on, either locally or remotely, during the VPN connection, the VPN connection terminates. No additional logons are allowed during the VPN connection, so a remote logon over the VPN connection is not possible.
Multiple simultaneous logons are not supported. Note
• Single Logon No Remote—(Local: 1, Remote: 0) Allows only one local user to be logged on during the entire VPN connection. No remote users are allowed. If more than one local user or any remote user is logged on when the VPN connection is being established, the connection is not allowed. If a second local user or any remote user logs on during the VPN connection, the VPN connection terminates.
Windows VPN Establishment—Not Available in SBL Mode
• Local Users Only (Default)—Prevents a remotely logged-on user from establishing a VPN connection. This is the same functionality as in prior versions of AnyConnect.
• Allow Remote Users—Allows remote users to establish a VPN connection. However, if the configured VPN connection routing causes the remote user to become disconnected, the VPN connection terminates to allow the remote user to regain access to the client PC. Remote users must wait 90 seconds after VPN establishment if they want to disconnect their remote login session without causing the VPN connection to be terminated.
SeeAnyConnect VPN Connectivity Optionsfor additional VPN session connectivity options.
Configure How AnyConnect Treats Linux SSH Sessions
You can configure AnyConect to allow VPN connections from Linux SSH sessions. By default, users connected to a computer by SSH are not able to start a VPN connection with the Cisco AnyConnect Secure Mobility Client. The following table shows the logon and logout options for a VPN connection from an SSH session. These options are configured in the VPN client profile.
Linux Login Enforcement— Single Local Logon (Default): Allows only one local user to be logged on during the entire VPN connection. Also, a local user can establish a VPN connection while one or more remote
Deploy AnyConnect Configure How AnyConnect Treats Linux SSH Sessions
users are logged on to the client PC. This setting has no effect on remote user logons from the enterprise network over the VPN connection.
If the VPN connection is configured for all-or-nothing tunneling, then the remote logon is disconnected because of the resulting modifications of the client PC routing table for the VPN connection. If the VPN connection is configured for split-tunneling, the remote logon might or might not be disconnected, depending on the routing configuration for the VPN connection.
Note
Single Logon—Allows only one user to be logged on during the entire VPN connection. If more than one user is logged on (either locally or remotely) when the VPN connection is being established, the connection is not allowed. If a second user logs on (either locally or remotely) during the VPN connection, the VPN connection terminates. No additional logons are allowed during the VPN connection, so a remote logon over the VPN connection is not possible.
Linux VPN Establishment—
• Local Users Only (Default)—Prevents a remotely logged-on user from establishing a VPN connection. • Allow Remote Users—Allows remote users to establish a VPN connection.
SeeAnyConnect VPN Connectivity Optionsfor additional VPN session connectivity options.
DES-Only SSL Encryption on Windows
By default, Windows does not support DES SSL encryption. If you configure DES-only on the ASA, the AnyConnect connection fails. Because configuring these operating systems for DES is difficult, we do not recommend that you configure the ASA for DES-only SSL encryption.
Using NVM on Linux
Before using NVM on Linux, you must set up a kernel driver framework (KDF). You can choose to prebuild an AnyConnect Kernel Module or build the driver on target. If you choose to build on target, no action is required; the build is handled automatically during deployment or during reboot.
Prerequisites to Build the AnyConnect Kernel Module
Prepare the target device:
• Make sure that the GNU Make Utility is installed. • Install the kernel header package:
• For RHEL, install the packagekernel-devel-$(uname -r), such as kernel-devel-2.6.32-642.13.1.el6.x86_64.
• For Ubuntu, install the packagelinux-headers-$(uname -r), such as linux-headers-4.2.0-27-generic. • For Linux, install the required libelf devel packages.
Deploy AnyConnect
• Make sure that the GCC compiler is installed. Themajor.minorversion of the installed GCC compiler should match the GCC version with which the kernel was built. You can verify this in the /proc/version file.
Package NVM with Prebuilt AnyConnect Linux Kernel Module
Before you begin
Complete the prerequisites inPrerequisites to Build the AnyConnect Kernel Module, on page 7.
The AnyConnect NVM can be packaged with a pre-built AnyConnect Linux Kernel Module so that you do not need to build it on every target device, especially when the target devices have the same OS kernel version. If you decide to not use the pre-built option, you can use on target, which happens automatically during deployment or reboot without administrator input. Alternatively, if your deployment doesn't have the kernel prerequisites on all endpoints, you could use the pre-built option.
Web deployment is not supported with the pre-built AnyConnect Linux Kernel Module. Note
Procedure
Step 1 Extract the AnyConnect predeploy package: anyconnect-linux64-<version>-predeploy-k9.tar.gz. Step 2 Navigate to the nvm directory.
Step 3 Invoke the script$sudo ./build_and_package_ac_ko.sh.
After running the script, anyconnect-linux64-<version>-ac_kdf_ko-k9.tar.gzgets created, which includes the AnyConnect Linux Kernel Module build. On Secure Boot enabled systems, sign the module with a private key allowed by Secure Boot. This file can only be used for predeploy.
What to do next
When the target device's OS kernel is upgraded, you must re-deploy the AnyConnect NVM with the updated Linux Kernel Module.
Predeploying AnyConnect
AnyConnect can be predeployed by using an SMS, manually by distributing files for end users to install, or making an AnyConnect file archive available for users to connect to.
When you create a file archive to install AnyConnect, the directory structure of the archive must match the directory structure of the files installed on the client, as described inLocations to Predeploy the AnyConnect Profiles, on page 10
Deploy AnyConnect Package NVM with Prebuilt AnyConnect Linux Kernel Module
Before you begin
• If you manually deploy the VPN profile, you must also upload the profile to the headends. When the client system connects, AnyConnect verifies that the profile on the client matches the profile on the headend. If you have disabled profile updates, and the profile on the headend is different from the client, then the manually deployed profile will not work.
• If you manually deploy the AnyConnect ISE Posture profile, you must also upload that file to ISE. • If you are using a cloned VM, refer toGuidelines for Cloning VMs With AnyConnect (Windows Only),
on page 12.
Procedure
Step 1 Download the AnyConnect Predeployment Package.
The AnyConnect files for predeployment are available on cisco.com. AnyConnect Predeploy Package Name
OS
anyconnect-win-version-predeploy-k9.zip Windows
anyconnect-macos-version-predeploy-k9.dmg macOS
anyconnect-linux64-version-predeploy-k9.tar.gz Linux (64-bit)
The Umbrella Roaming Security Module is not available in the Linux operating system. Step 2 Create client profiles: some modules and features require a client profile.
The following modules require a client profile: • AnyConnect VPN
• AnyConnect Network Access Manager • AnyConnect Web Security
• AnyConnect ISE Posture • AnyConnect AMP Enabler • Network Visibility Module
• Umbrella Roaming Security Module
The following modules do not require an AnyConnect client profile: • AnyConnect VPN Start Before Logon
• AnyConnect Diagnostic and Reporting Tool • AnyConnect Posture
• AnyConnect Customer Experience Feedback
Deploy AnyConnect
You can create client profiles in ASDM, and copy those files to your PC. Or, you can use the stand-alone profile editor on a Windows PC.
Step 3 Optionally,Customize and Localize the AnyConnect Client and Installer, on page 39.
Step 4 Prepare the files for distribution. The directory structure of the files is described inLocations to Predeploy the AnyConnect Profiles.
Step 5 After you have created all the files for AnyConnect installation, you can distribute them in an archive file, or copy the files to the client. Make sure that the same AnyConnect files are also on the headends you plan to connect to, ASA and ISE.
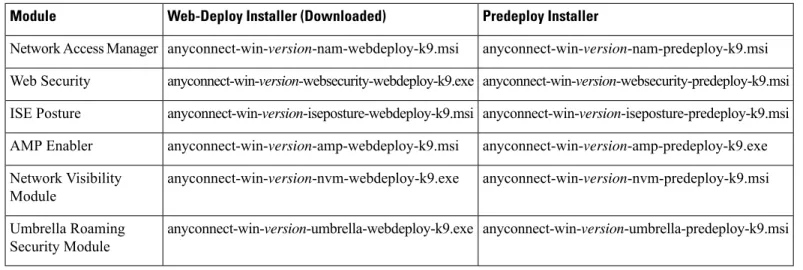
AnyConnect Module Executables for Predeploy and Web Deploy
The following table shows the filenames on the endpoint computer when you predeploy or web deploy the Umbrella Roaming Security Module, Network Access Manager, AMP Enabler, ISE Posture, Web Security, and Network Visibility Module clients to a Windows computer.
Table 1: Module Filenames for Web Deployment or Predeployment
Predeploy Installer Web-Deploy Installer (Downloaded)
Module
anyconnect-win-version-nam-predeploy-k9.msi anyconnect-win-version-nam-webdeploy-k9.msi
Network Access Manager
anyconnect-win-version-websecurity-predeploy-k9.msi anyconnect-win-version-websecurity-webdeploy-k9.exe
Web Security
anyconnect-win-version-iseposture-predeploy-k9.msi anyconnect-win-version-iseposture-webdeploy-k9.msi
ISE Posture
anyconnect-win-version-amp-predeploy-k9.exe anyconnect-win-version-amp-webdeploy-k9.msi
AMP Enabler
anyconnect-win-version-nvm-predeploy-k9.msi anyconnect-win-version-nvm-webdeploy-k9.exe
Network Visibility Module
anyconnect-win-version-umbrella-predeploy-k9.msi anyconnect-win-version-umbrella-webdeploy-k9.exe
Umbrella Roaming Security Module
AnyConnect 4.3 (and later) has moved to the Visual Studio 2015 build environment and requires VS redistributable files for its Network Access Manager Module functionality. These files are installed as part of the install package. You can use the .msi files to upgrade the Network Access Manager Module to 4.3 (or later), but the AnyConnect Secure Mobility Client must be upgraded first and running release 4.3 (or later).
If you have a Windows server OS, you may experience installation errors when attempting to install AnyConnect Network Access Manager. The WLAN service is not installed by default on the server operating system, so you must install it and reboot the PC. The WLANAutoconfig service is a requirement for the Network Access Manager to function on any Windows operating system.
Note
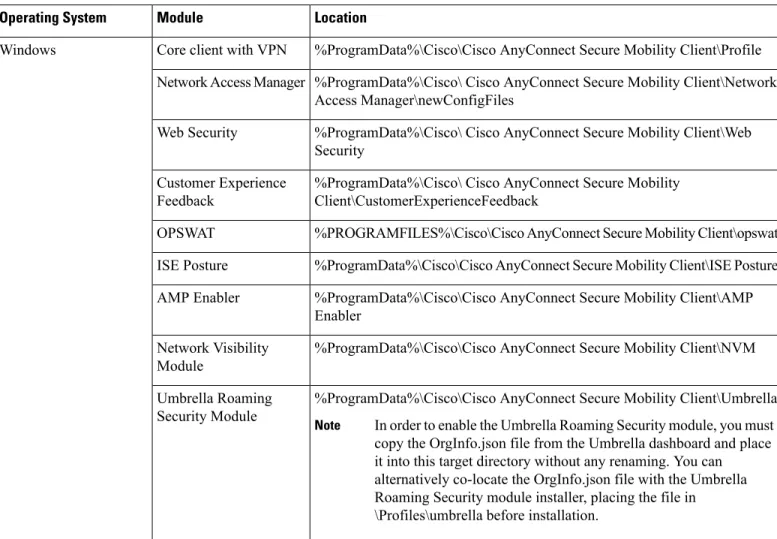
Locations to Predeploy the AnyConnect Profiles
If you are copying the files to the client system, the following tables show where you must place the files.
Deploy AnyConnect AnyConnect Module Executables for Predeploy and Web Deploy
Table 2: AnyConnect Core Files
Description File
AnyConnect profile. This file specifies the features and attribute values configured for a particular user type.
anyfilename.xml
Defines the XML schema format. AnyConnect uses this file to validate the profile.
AnyConnectProfile.xsd
Table 3: Profile Locations for all Operating Systems
Location Module
Operating System
%ProgramData%\Cisco\Cisco AnyConnect Secure Mobility Client\Profile Core client with VPN
Windows
%ProgramData%\Cisco\ Cisco AnyConnect Secure Mobility Client\Network Access Manager\newConfigFiles
Network Access Manager
%ProgramData%\Cisco\ Cisco AnyConnect Secure Mobility Client\Web Security
Web Security
%ProgramData%\Cisco\ Cisco AnyConnect Secure Mobility Client\CustomerExperienceFeedback
Customer Experience Feedback
%PROGRAMFILES%\Cisco\Cisco AnyConnect Secure Mobility Client\opswat OPSWAT
%ProgramData%\Cisco\Cisco AnyConnect Secure Mobility Client\ISE Posture ISE Posture
%ProgramData%\Cisco\Cisco AnyConnect Secure Mobility Client\AMP Enabler
AMP Enabler
%ProgramData%\Cisco\Cisco AnyConnect Secure Mobility Client\NVM Network Visibility
Module
%ProgramData%\Cisco\Cisco AnyConnect Secure Mobility Client\Umbrella In order to enable the Umbrella Roaming Security module, you must copy the OrgInfo.json file from the Umbrella dashboard and place it into this target directory without any renaming. You can alternatively co-locate the OrgInfo.json file with the Umbrella Roaming Security module installer, placing the file in
\Profiles\umbrella before installation. Note
Umbrella Roaming Security Module
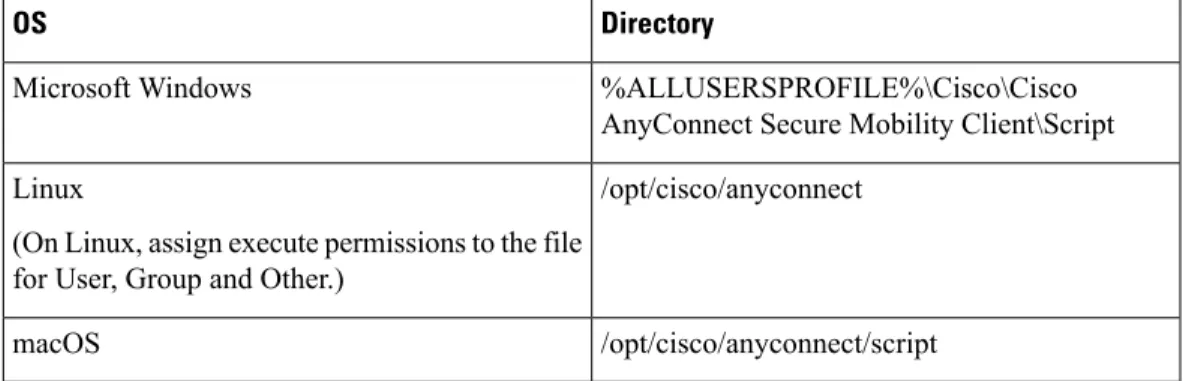
Deploy AnyConnect
Location Module
Operating System
/opt/cisco/anyconnect/profile All other modules
macOS /opt/cisco/anyconnect/CustomerExperienceFeedback Customer Experience Feedback /opt/cisco/anyconnect/bin Binaries /opt/cisco/anyconnect/lib/opswat OPSWAT /opt/cisco/anyconnect/lib Libraries
/Applications/Cisco/Cisco AnyConnect Secure Mobility Client.app/Contents/Resources/ UI Resources /opt/cisco/anyconnect/iseposture/ ISE Posture /opt/cisco/anyconnect/ampenabler/ AMP Enabler /opt/cisco/anyconnect/NVM/ Network Visibility Module /opt/cisco/anyconnect/umbrella
In order to enable the Umbrella Roaming Security module, you must copy the OrgInfo.json file from the Umbrella dashboard and place it into this target directory without any renaming. You can alternatively co-locate the OrgInfo.json file with the Umbrella Roaming Security module installer, placing the file in
\Profiles\umbrella before installation. Note Umbrella Roaming Security Module /opt/cisco/anyconnect/NVM NVM Linux /opt/cisco/anyconnect/profile All other modules
Guidelines for Cloning VMs With AnyConnect (Windows Only)
AnyConnect endpoints are uniquely identified by a Universal Device Identifier (UDID), which all modules of AnyConnect use. When a Windows VM is cloned, the UDID remains the same for all the clones from a source. To avoid any potential issues with cloned VMs, follow this action before using AnyConnect:
1. Navigate toC:\Program Files\Cisco\Cisco AnyConnect Secure Mobility Clientand run dartcli.exe with administrator privileges as:
dartcli.exe -nu
or
dartcli.exe -newudid
2. Print the UDID prior to and after this command to ensure that the UDID has changed with this comand:
dartcli.exe -u
or
Deploy AnyConnect Guidelines for Cloning VMs With AnyConnect (Windows Only)
dartcli.exe -udid
Predeploying AnyConnect Modules as Standalone Applications
The Network Access Manager, Web Security, and Umbrella Roaming Security modules can run as standalone applications. The AnyConnect core client is installed, but the VPN and AnyConnect UI are not used.
Deploying Stand-Alone Modules with an SMS on Windows
Procedure
Step 1 Disable VPN functionality by configuring your software management system (SMS) to set the MSI property PRE_DEPLOY_DISABLE_VPN=1. For example:
msiexec /package anyconnect-win-version-predeploy-k9.msi /norestart /passive PRE_DEPLOY_DISABLE_VPN=1 /lvx* <log_file_name>
The MSI copies the VPNDisable_ServiceProfile.xml file embedded in the MSI to the directory specified for profiles for VPN functionality.
Step 2 Install the module. For example, the following CLI command installs web security:
msiexec /package anyconnect-win-version-websecurity-predeploy-k9.msi /norestart /passive /lvx* c:\test.log
Step 3 (Optional) Install DART.
misexec /package annyconnect-win-version-dart-predeploy-k9.msi /norestart /passive /lvx* c:\test.log Step 4 Save a copy of the obfuscated client profile to the proper Windows folder.
Step 5 Restart the Cisco AnyConnect service.
Deploying AnyConnect Modules as Standalone Applications
You can deploy the AnyConnect Network Access Manager, Web Security, and Umbrella Roaming Security Modules as standalone applications on a user computer. DART is supported with these applications. Refer toStandalone NVM, on page 236for details about its advantages and method of deployment. Requirements
The VPNDisable_ServiceProfile.xml file must also be the only AnyConnect profile in the VPN client profile directory.
User Installation of Stand-Alone Modules
You can break out the individual installers and distribute them manually.
If you decide to make the zip image available to your users, and then ask to install it, be sure to instruct them to install only the stand-alone modules.
Deploy AnyConnect
If a previous installation of Network Access Manager did not exist on the computer, the user must reboot the computer to complete the Network Access Manager installation. Also, if the installation is an upgrade that required upgrading some of the system files, the user must reboot.
Note
Procedure
Step 1 Instruct users to check the AnyConnect Network Access Manager, AnyConnect Web Security Module, or Umbrella Roaming Security Module.
Step 2 Instruct users to uncheckCisco AnyConnect VPN Module.
Doing so disables the VPN functionality of the core client, and the Install Utility installs the Network Access Manager, Web Security, or Umbrella Roaming Security Module as stand-alone applications with no VPN functionality.
Step 3 (Optional) Check theLock Down Component Servicescheck box. The lockdown component service prevents users from switching off or stopping the Windows service.
Step 4 Instruct users to run the installers for the optional modules, which can use the AnyConnect GUI without the VPN service. When the user clicks the Install Selected button, the following happens:
a) A pop-up dialog box confirms the selection of the stand-alone Network Access Manager, the stand-alone Web Security Module, or the Umbrella Roaming Security Module.
b) When the user clicks OK, the Install Utility invokes the AnyConnect core installer with a setting of PRE_DEPLOY_DISABLE_VPN=1.
c) The Install Utility removes any existing VPN profiles and then installs VPNDisable_ServiceProfile.xml. d) The Install Utility invokes the Network Access Manager, Web Security, or Umbrella Roaming Security
installer.
e) The Network Access Manager, Web Security Module, or Umbrella Roaming Security Module is enabled without VPN service on the computer.
Predeploying to Windows
Distributing AnyConnect Using the zip File
The zip package file contains the Install Utility, a selector menu program to launch the individual component installers, and the MSIs for the core and optional AnyConnect modules. When you make the zip package file available to users, they run the setup program (setup.exe). The program displays the Install Utility menu, from which users choose which AnyConnect modules to install. You probably do not want your users to chose which modules to load. So if you decide to distribute using a zip file, edit the zip to remove the modules you do not want to use, and edit the HTA file.
One way to distribute an ISO is by using virtual CD mount software, such as SlySoft or PowerIS. Predeployment zip Modifications
• Update the zip file with any profiles that you created when you bundled the files, and to remove any installers for modules that you do not want to distribute.
Deploy AnyConnect Predeploying to Windows
• Edit the HTA file to personalize the installation menu, and to remove links to any module installers that you do not want to distribute.
Contents of the AnyConnect zip File
Purpose File
AnyConnect icon image. GUI.ico
Launches the Install Utility. Setup.exe
MSI installer file for the DART module. anyconnect-win-version-dart-predeploy-k9.msi
MSI installer file for the SBL module. anyconnect-win-version-gina-predeploy-k9.msi
MSI installer for the ISE Posture module. anyconnect-win-version-iseposture-predeploy-k9.msi
MSI installer file for the AMP Enabler. anyconnect-win-version-amp-predeploy-k9.exe
MSI installer file for the Network Visibility Module. anyconnect-win-version-nvm-predeploy-k9.msi
MSI installer file for the Umbrella Roaming Security Module. anyconnect-win-version-umbrella-predeploy-k9.msi
MSI installer file for the Network Access Manager module. anyconnect-win-version-nam-predeploy-k9.msi
MSI installer file for the posture module. anyconnect-win-version-posture-predeploy-k9.msi
MSI installer file for the Web Security module. anyconnect-win-version-websecurity-predeploy-k9.msi
MSI installer file for the AnyConnect core client. anyconnect-win-version-core-vpn-predeploy-k9.msi
Information file for setup.exe. autorun.inf
Acceptable Use Policy. eula.html
Install Utility HTML Application (HTA), which you can customize for your site.
setup.hta
Distributing AnyConnect Using an SMS
After extracting the installers (*.msi) for the modules you want to deploy from the zip image, you can distribute them manually.
Requirements
• When installing AnyConnect onto Windows, you must disable either the AlwaysInstallElevated or the Windows User Account Control (UAC) group policy setting. If you do not, the AnyConnect installers may not be able to access some directories required for installation.
• Microsoft Internet Explorer (MSIE) users should add the headend to the list of trusted sites or install Java. Adding to the list of trusted sites enables the ActiveX control to install with minimal interaction from the user.
Deploy AnyConnect
Profile Deployment Process
• If you are using the MSI installer, the MSI picks any profile that has been placed in the Profiles folder and places it in the appropriate folder during installation. The proper folder paths are available in the predeployment MSI file available on CCO.
• If you are predeploying the profile manually after the installation, copy the profile manually or use an SMS, such as Altiris, to deploy the profile to the appropriate folder.
• Make sure you put the same client profile on the headend that you predeploy to the client. This profile must also be tied to the group policy being used on the ASA. If the client profile does not match the one on the headend or if it is not tied to the group policy, you can get inconsistent behavior, including denied access.
Windows Predeployment MSI Examples
Command and Log File Module Installed
msiexec /package anyconnect-win-version-core-vpn-predeploy-k9.msi /norestart /passive PRE_DEPLOY_DISABLE_VPN=1 /lvx*
anyconnect-win-version-core-vpn-predeploy-k9-install-datetimestamp.log AnyConnect core client No VPN
capability.
Use when installing stand-alone Network Access Manager or Web Security modules.
msiexec /package anyconnect-win-version-core-vpn-predeploy-k9.msi /norestart /passive /lvx*
anyconnect-win-version-core-vpn-predeploy-k9-install-datetimestamp.log AnyConnect core client with VPN
capability.
msiexec /package anyconnect-win-version-core-vpn-predeploy-k9.msi /norestart /passive DISABLE_CUSTOMER_EXPERIENCE_FEEDBACK=1 /lvx*
anyconnect-win-version-core-vpn-predeploy-k9-install-datetimestamp.log Customer Experience Feedback
msiexec /package anyconnect-win-version-dart-predeploy-k9.msi /norestart /passive /lvx* anyconnect-win-version-dart-predeploy-k9-install-datetimestamp.log
Diagnostic and Reporting Tool (DART)
msiexec /package anyconnect-win-version-gina-predeploy-k9.msi /norestart /passive /lvx* anyconnect-win-version-gina-predeploy-k9-install-datetimestamp.log
SBL
msiexec /package anyconnect-win-version-nam-predeploy-k9.msi /norestart /passive /lvx* anyconnect-win-version-nam-predeploy-k9-install-datetimestamp.log
Network Access Manager
msiexec /package anyconnect-win-version-websecurity-predeploy-k9.msi /norestart/passive /lvx*
anyconnect-win-version-websecurity-predeploy-k9-install-datetimestamp.log Web Security
msiexec /package anyconnect-win-version-posture-predeploy-k9.msi /norestart/passive /lvx* anyconnect-win-version-posture-predeploy-k9-install-datetimestamp.log
VPN Posture (HostScan)
msiexec /package anyconnect-win-version-iseposture-predeploy-k9.msi /norestart/passive /lvx*
anyconnect-win-version-iseposture-predeploy-k9-install-datetimestamp.log ISE Posture
Deploy AnyConnect Windows Predeployment MSI Examples
Command and Log File Module Installed
msiexec /package anyconnect-win-version-amp-predeploy-k9.msi / norestart/passive /lvx* anyconnect-win-version-amp-predeploy-k9-install-datetimestamp.log
AMP Enabler
msiexec /package anyconnect-win-version-nvm-predeploy-k9.msi / norestart/passive /lvx* anyconnect-win-version-nvm-predeploy-k9-install-datetimestamp.log
Network Visibility Module
msiexec /package anyconnect-win-version-umbrella-predeploy-k9.msi / norestart/passive /lvx*
anyconnect-version-umbrella-predeploy-k9-install-datetimestamp.log Umbrella Roaming Security
AnyConnect Sample Windows Transform
Cisco provides example Windows transforms, along with documents that describe how to use the transforms. A transform that starts with an underscore character (_) is a general Windows transform which allows you to apply only certain transforms to certain module installers. Transforms that start with an alphabetic character are VPN transforms. Each transform has a document that explains how to use it. The transform download is sampleTransforms-x.x.x.zip.
Windows Predeployment Security Options
Cisco recommends that end users are given limited rights on the device that hosts the Cisco AnyConnect Secure Mobility Client. If an end user warrants additional rights, installers can provide a lockdown capability that prevents users and local administrators from switching off or stopping those Windows services established as locked down on the endpoint. In the Web Security module, you can use a service password to put the client in bypass mode. You can also prevent users from uninstalling AnyConnect.
Windows Lockdown Property
Each MSI installer supports a common property (LOCKDOWN) which, when set to a non-zero value, prevents the Windows service(s) associated with that installer from being controlled by users or local administrators on the endpoint device. We recommend that you use the sample transform
(anyconnect-vpn-transforms-X.X.xxxxx.zip) provided at the time of install to set this property and apply the transform to each MSI installer that you want to have locked down. The lockdown option is also a check box within the ISO Install Utility.
Hide AnyConnect from Add/Remove Programs List
You can hide the installed AnyConnect modules from users that view the Windows Add/Remove Programs list. If you launch any installer using ARPSYSTEMCOMPONENT=1, that module will not appear in the Windows Add/Remove Programs list.
We recommend that you use the sample transform (anyconnect-vpn-transforms-X.X.xxxxx.zip) that we provide to set this property. Apply the transform to each MSI installer for each module that you want to hide.
AnyConnect Module Installation and Removal Order on Windows
The module installers verify that they are the same version as the core client before starting to install. If the versions do not match, the module does not install, and the installer notifies the user of the mismatch. If you
Deploy AnyConnect
use the Install Utility, the modules in the package are built and packaged together, and the versions always match.
Procedure
Step 1 Install the AnyConnect modules in the following order:
a) Install the AnyConnect core client module, which installs the GUI and VPN capability (both SSL and IPsec).
In Windows and macOS, a restricted user account (ciscoacvpnuser) is created to enforce the principle of least privilege only when the management tunnel feature is detected as enabled. This account gets removed during AnyConnect uninstallation or during an installation upgrade.
b) Install the AnyConnect Diagnostic and Reporting Tool (DART) module, which provides useful diagnostic information about the AnyConnect core client installation.
c) Install the Umbrella Roaming Security Module,Network Visibility Module, AMP Enabler, SBL, Network Access Manager, Web Security, Posture modules, or ISE compliance modules in any order.
Step 2 Uninstall the AnyConnect modules in the following order:
a) Uninstall Umbrella Roaming Security Module,Network Visibility Module, AMP Enabler, Network Access Manager, Web Security, Posture, ISE Compliance module, or SBL, in any order.
b) Uninstall the AnyConnect core client. c) Uninstall DART last.
DART information is valuable should the uninstall processes fail.
By design, some XML files remain after uninstalling AnyConnect. Note
Predeploying to macOS
Install and Uninstall AnyConnect on macOS
AnyConnect for macOS is distributed in a DMG file, which includes all the AnyConnect modules. When users open the DMG file, and then run the AnyConnect.pkg file, an installation dialog starts, which guides the user through installation. On the Installation Type screen, the user is able to select which packages (modules) to install.
AnyConnect 4.9.04xxx is the minimum required version on macOS 11. For details on the AnyConnect changes pertaining to macOS 11, refer to