C A L I F O R N I A
Assessment of Student Performance and Progress
Secure Browser Installation
Manual
Winter/Spring 2015
Smarter Balanced Summative Assessments
Smarter Balanced Interim Assessments
© Smarter Balanced Assessment Consortium, 2014 Updated May 1, 2015
Prepared by the American Institutes for Research®
CAASPP Assessment System
Table of Contents
Introduction to the Secure Browser Manual ... 1
Manual Content ... 1
Other Resources ... 1
Section I. Supported Operating Systems ... 2
Section II. Overview of Secure Browsers ... 4
About the Secure Browser ... 4
Close External User Applications ... 4
No Testing on Computers with Dual Monitors ... 4
Forbidden Application Detection ... 4
Secure Browser Error Messages ... 5
Secure Browser Not Detected ... 5
Unable to Establish a Connection with the Test Delivery System ... 5
Section III. Desktop Secure Browser Installation... 6
Installation Options ... 6
One-by-One (Manual) Installation ... 6
Network Installation (Network Administrators) ... 6
Installation Without Administrator Rights (Windows) ... 6
Windows Secure Browser 7.2 ... 7
Windows Secure Browser: Individual Installation ... 7
Installing the .msi Package via the User Interface ... 7
Installing the .msi Package via a Script ... 8
Windows Secure Browser: Network Installation ... 9
Installing the Secure Browser to a Shared Drive ... 9
Pushing the Secure Browser Installation Directory from the Network to Client Computers ... 9
Windows Secure Browser: Thin Client Installation ... 10
NComputing Virtual Desktop Installation ... 10
Terminal Server Installation ... 11
Windows Secure Browser: Installation Without Administrator Rights ... 12
Windows Secure Browser: Uninstallation ... 13
Mac OS X Secure Browsers ... 13
Mac Secure Browser 5.6: Individual Installation ... 13
Mac Secure Browser 5.6: Installation... 14
Mac Secure Browser 6.5: Individual Installation ... 15
Mac Secure Browser 7.2: Individual Installation ... 16
Disabling Spaces in Mission Control on Mac 10.7−10.10 Computers ... 17
Mac Computers and Keyboard Options for Opening Applications ... 17
Mac OS X Secure Browser: Network Installation ... 18
Installing the Mac OS X Secure Browser Using Apple Remote Desktop ... 18
Mac OS X Secure Browser: Uninstallation ... 19
Linux Secure Browser 6.5 ... 19
Linux Secure Browser: 64-Bit Installation ... 19
Linux Secure Browser: Standard (32-Bit) Installation ... 20
Linux Secure Browser: Uninstallation ... 21
Section IV. Proxy Settings for Desktop Secure Browsers ... 22
Specify a Proxy Server to Use with the Secure Browser ... 22
Create a Corresponding Desktop Shortcut to Run the Browser Using Additional Parameters ... 23
Microsoft Windows ... 23
Mac OS X ... 24
Linux ... 26
Section V. Mobile Secure Browser Installation ... 27
Introduction to Testing on Tablets and Chromebooks ... 27
iOS AIRSecureTest Mobile Secure Browser ... 27
Downloading and Installing the iOS AIRSecureTest Mobile Secure Browser... 28
Opening the AIRSecureTest Browser and Selecting the Assessment Program ... 28
Activating the Volume ... 29
Closing the AIRSecureTest Mobile Secure Browser ... 31
iOS 6.0–6.1 ... 31
iOS 7.0–8.2 ... 32
Android AIRSecureTest Mobile Secure Browser ... 32
CAASPP Assessment System
Opening the AIRSecureTest Browser and Selecting the Assessment Program ... 35
Closing the AIRSecureTest Mobile Secure Browser ... 35
Chrome OS AIRSecureTest Kiosk App... 35
Adding the AIRSecureTest Kiosk App to Managed Chromebooks ... 36
Adding the AIRSecureTest Kiosk App to Non-Managed Chromebooks ... 37
Opening the AIRSecureTest Kiosk App and Selecting the Assessment Program ... 38
Configuring Mobile Devices ... 38
Configuring for Guided Access on iOS ... 38
Configuring Using Autonomous Single App Mode ... 40
Overview of Autonomous Single App Mode and the Secure Testing Environment ... 40
Section VI. Resetting Secure Browser Profiles ... 46
Resetting Secure Browser Profiles on Windows ... 46
Resetting profiles for 64-bit versions of Windows ... 46
Resetting profiles for 32-bit versions of Windows ... 46
Technical Support ... 47
California Technical Assistance Center ... 47
Change Log ... 48
List of Tables
Table 1. Key Symbols and Elements ... 1Table 2. Supported Operating Systems for 2014–2015 ... 2
Table 3. Operating System End-of-Support Information ... 3
Table 4. Proxy settings ... 22
Table 5. Profile Keys for Features in iOS 8.1.3 or Later... 41
List of Figures
Figure 1. Unable to Establish Connection alert message ... 5Figure 2. Identify your Mac processor type ... 14
Figure 3. Mac OS X—Change the desktop directory ... 24
Figure 4. Mac OS X—Create a .command file ... 24
Figure 5. Mac OS X after the creation of the .command file ... 24
Figure 6. Sample Mac 10.7.5 Command ... 25
Figure 7. Mac OS X—After exiting the editor ... 25
Figure 8. Mac OS X—Command line to execute permission to the shell script file ... 26
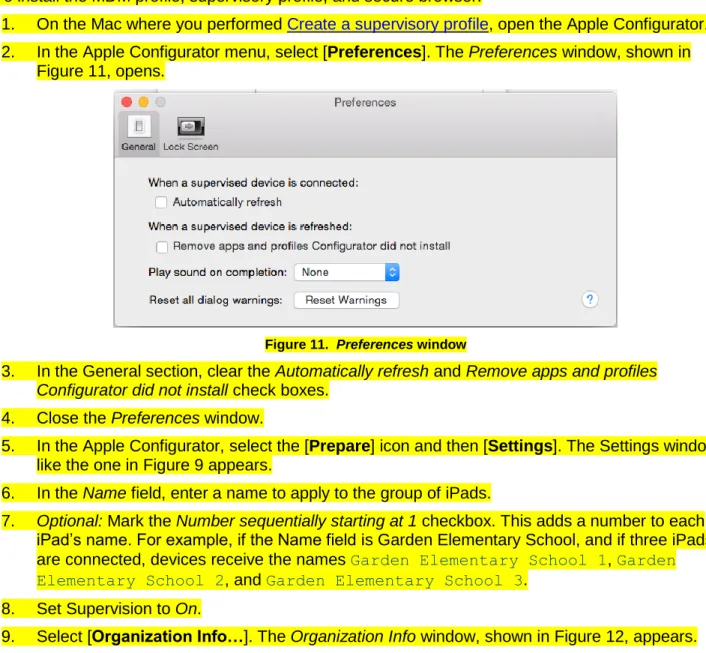
Figure 9. Settings Window in Apple Configurator ... 42
Figure 10. Configuration Web form ... 42
Figure 11. Preferences window ... 43
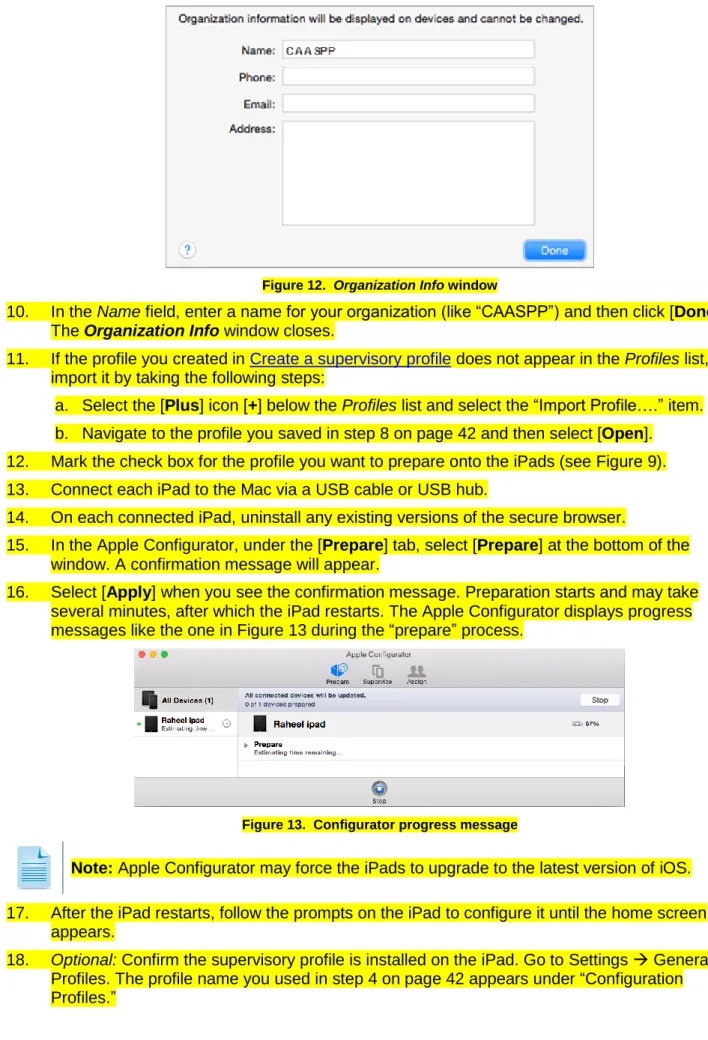
Figure 12. Organization Info window... 44
Introduction to the Secure Browser Manual | Manual Content
Introduction to the Secure Browser Manual
This manual provides instructions for installing secure browsers on computers and devices running a supported operating system.
Manual Content
Below is a brief description of each section in this manual, as well as a table of common symbols and elements used throughout the document.
Section I, Supported Operating Systems, provides information about which operating systems are supported.
Section II, Overview of Secure Browsers, provides information about the secure browsers that are used for online testing.
Section III, Desktop Secure Browser Installation, includes instructions for installing the secure browser onto supported Windows, Mac, and Linux platforms.
Section IV, Proxy Settings for Desktop Secure Browsers, provides commands for each Web proxy server type.
Section V, Mobile Secure Browser Installation, includes instructions for installing the mobile secure browser onto supported iOS, Android, and Chrome OS platforms.
Table 1. Key Symbols and Elements
Element Description
Important:This symbol accompanies important information regarding a task that may cause minor errors.
Note: This symbol accompanies additional information about the topic. [text] Bold text in brackets is used to indicate a link or button that is selectable.
Warning:This symbol accompanies important information regarding actions that may cause fatal errors.
This symbol accompanies user tips.
Other Resources
This manual does not contain information about technical specifications or braille requirements.
For information about technical specifications and related requirements, including hardware, software, and text-to-speech, refer to the Technical Specifications Manual for Online Testing.
For information about braille hardware and software requirements, as well as basic test administration processes, refer to the Braille Requirements and Testing Manual.
The above resources as well as test administration manuals and user guides for testing within the California Assessment of Student Performance and Progress (CAASPP) System are available on the CAASPP Portal (http://caaspp.org).
Section I. Supported Operating Systems | Other Resources
Section I. Supported Operating Systems
Table 2 contains basic information regarding supported operating systems. For detailed information, refer to the Technical Specifications Manual for Online Testing.
Table 2. Supported Operating Systems for 2014–2015
Supported
Operating Systems Supported Devices
Supported Secure Browser Related Requirements Windows XP (Service Pack 3), Vista, 7, 8.0, 8.1 Server 2003, 2008
Desktops/Laptops/Netbooks 7.2* Fast User Switching must be disabled.
Windows Servers are supported when using a thin client. Windows 8.0 Pro 8.0 RT 8.1 Surface Pro Asus Transformer Dell Venue N/A Mac OS X 10.4, 10.5 (PowerPC) Desktops/Laptops/Netbooks 5.6 N/A Mac OS X 10.5 (Intel) Desktops/Laptops/Netbooks 6.5 N/A Mac OS X 10.6, 10.7, 10.8, 10.9, 10.10
Desktops/Laptops/Netbooks 7.2 Mission Control/Spaces must be disabled (10.7–10.10).
Linux
Fedora 16–20 openSUSE 13.1 Red Hat Enterprise 6.5
Ubuntu (LTS) 10.04, 12.04, 14.04
Desktops/Laptops/Netbooks 6.5 Required libraries must be installed.
Festival and SoX software must be installed.
Verdana TrueType font must be installed. iOS (iPads) 6.0, 6.1 7.0, 7.1 8.0, 8.2 iPad 2 iPad 3
4th Generation (Retina Display)
iPad Air
AIRSecureTest Mobile Secure Browser
Guided Access must be enabled.
Note: Guided Access is not the same as Single App Mode.
Android
4.0.4–4.4
Google Nexus 10 Motorola Xoom
Samsung Galaxy Note (10.1) Samsung Galaxy Tab 2 (10.1) LearnPad Quarto
AIRSecureTest Mobile Secure Browser
The secure browser keyboard must be enabled after installing the mobile secure browser. Chrome OS 31–41 Chromebooks AIRSecureTest kiosk application Chromebooks must be in kiosk mode.
Note: While there are California-specific versions of the desktop secure browser for Windows, Mac OS X, and Linux, there are not California-specific versions of the mobile secure browsers for iOS, Android, and Chrome OS.
Section I. Supported Operating Systems | Other Resources
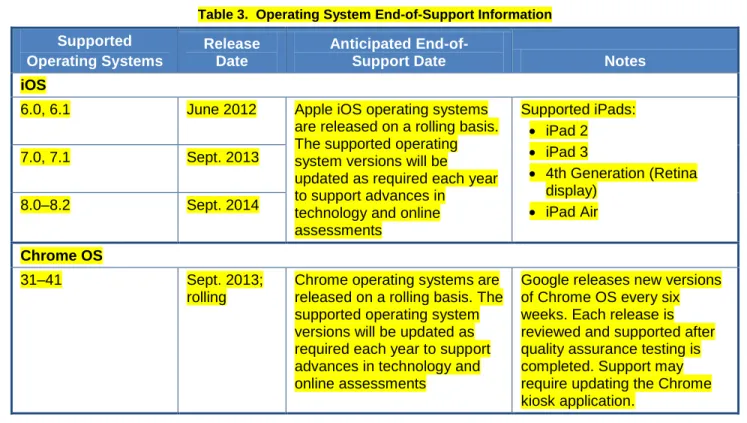
Table 3 contains information regarding end-of-support dates for supported operating systems. For more information regarding support for a specific operating system, see the manufacturer’s Web site.
Table 3. Operating System End-of-Support Information
Supported Operating Systems
Release Date
Anticipated
End-of-Support Date Notes
iOS
6.0, 6.1 June 2012 Apple iOS operating systems are released on a rolling basis. The supported operating system versions will be updated as required each year to support advances in
technology and online assessments Supported iPads: iPad 2 iPad 3 4th Generation (Retina display) iPad Air 7.0, 7.1 Sept. 2013 8.0–8.2 Sept. 2014 Chrome OS 31–41 Sept. 2013; rolling
Chrome operating systems are released on a rolling basis. The supported operating system versions will be updated as required each year to support advances in technology and online assessments
Google releases new versions of Chrome OS every six weeks. Each release is reviewed and supported after quality assurance testing is completed. Support may require updating the Chrome kiosk application.
Note: If Microsoft or Apple ends support for an operating system sooner than 10 years after its release, support for that operating system will stop after one full school year.
Section II. Overview of Secure Browsers | About the Secure Browser
Section II. Overview of Secure Browsers
The information in this section provides an overview of secure browsers and their use with online assessments. This section includes the following topics:
About the Secure Browser Forbidden Application Detection Secure Browser Error Messages
About the Secure Browser
All students must use a secure browser to access operational assessments. The secure browser prevents students from accessing other computer or Internet applications or copying test information.
All computers that will be used for testing must have the correct secure browser installed.
This manual contains instructions for downloading and installing the secure browsers. Your local educational agency (LEA) or school information technology (IT) staff should ensure that the secure browser has been installed correctly on all computers and devices that will be used for student testing. While the secure browser is an integral component of test security, Test Administrators (TAs) perform an equally important role in preserving test integrity. TAs should be aware of the following
requirements and employ the necessary precautions while administering online assessments:
Close External User Applications
Prior to administering the online assessments, all nonrequired applications on computers and devices should be closed. After closing these applications, the secure browser can be launched.
The secure browser will not work if the computer detects that a forbidden application is running. For more information, see the Forbidden Application Detection section.
No Testing on Computers with Dual Monitors
Students should not take online assessments on computers that are connected to more than one monitor. Systems that use a dual monitor setup typically display an application on one monitor screen while another application is accessible on the other screen.
Forbidden Application Detection
This feature automatically detects certain applications that are prohibited from running on a computer while the secure browser is open. The secure browser checks the applications currently running on a computer when it is launched. If a forbidden application is detected, the student is denied entry and receives a message indicating the open application. Similarly, if a forbidden application launches while the student is already in a test (e.g., scheduled tasks), the student is automatically logged out and a message is displayed.
Warning: Forbidden Applications and Testing
If a forbidden application is launched in the background while the student is testing, the student will be automatically logged out and a message displayed. This typically occurs when a process such as a Web browser (e.g., Internet Explorer) or an antivirus program is triggered in the background in order for a software autoupdate to occur. It is recommended to check all software autoupdates and ensure that they are scheduled to occur outside of planned testing hours.
Before administering tests, LEA Technology Coordinators and TAs should take proper measures to ensure that forbidden applications are not running on student computers.
Section II. Overview of Secure Browsers | Secure Browser Error Messages
Secure Browser Error Messages
Secure Browser Not Detected
The Test Delivery System automatically detects whether a computer is using the secure browser to access the online assessments. Under no conditions should a student access an operational assessment using a nonsecure browser.
Unable to Establish a Connection with the Test Delivery System
If a computer fails to establish a connection with the Test Delivery System, the message in Figure 1 will display. This is most likely to occur if there is a network-related problem. The cause can be anything from a network cable not being plugged in to the firewall not allowing access to the site.
Section III. Desktop Secure Browser Installation | Installation Options
Section III. Desktop Secure Browser Installation
The appropriate secure browser must be installed on each computer that will be used for student testing. All secure browsers can be downloaded from the Secure Browser Web page, which is linked on the CAASPP Portal (http://caaspp.org).Note: Uninstall a secure browser that is still loaded on any of your school’s computers. This section contains secure browser installation instructions for each supported desktop operating system platform.
Installation Options
Windows Secure Browser 7.2
Mac OS X Secure Browsers
– Mac Secure Browser 5.6
– Mac Secure Browser 6.5
– Mac Secure Browser 7.2 Linux Secure Browser 6.5
Installation Options
Installing the secure browser individually on each computer that will be used for student testing is strongly recommended. The secure browser can also be pushed out or installed onto a network; however, the installation instructions provided in this manual may not apply to your network configuration.
One-by-One (Manual) Installation
From each computer to be used for testing, access the Internet and download and install the browser; OR
Download and save the browser onto a media device (such as a flash drive), and then copy and install the files onto each computer; OR
Download and save the browser to a network folder and then copy it onto each computer. For any of these options, access the Secure Browser Web page linked on the CAASPP Portal at
http://caaspp.org and download and install the browser to your desired location (an individual computer, a media device, or a network folder).
Network Installation (Network Administrators)
You can push the browser out to all computers through a network by copying browser files from the network to individual computers or through third-party programs to run the installers, such as Apple Remote Desktop.
Installation Without Administrator Rights (Windows)
If you must install the secure browser on computers to which you do not have administrator or
installation rights, read the Windows Secure Browser: Installation Without Administrator Rights section in this document.
Section III. Desktop Secure Browser Installation | Windows Secure Browser 7.2
Windows Secure Browser 7.2
This section provides instructions for installing the Windows secure browser on desktop computers running a supported Windows operating system. The Windows secure browser will not run on nonsupported Windows platforms.
You must install Windows Secure Browser 7.2 on each computer that will be used for student testing.
About the Instructions in this Section
The instructions in this section assume machines are running a 64-bit version of Windows and that the secure browser will be installed to the default C:\Program Files (x86)\ location. If you are running a 32-bit version of Windows, then adjust the instructions accordingly to the C:\Program Files\ path.
Notes:
Installing Windows secure browser 7.2 will not uninstall the previous version automatically. While keeping the previous version will not affect online test
administration using the updated version, you should manually uninstall the previous version to avoid confusion.
The installation file for Windows computers is an .msi file, which requires administrator rights. For instructions on installing the secure browser without administrator rights, refer to the Windows Secure Browser: Installation Without Administrator Rights section.
The following instructions are included in this section:
Windows Secure Browser: Individual Installation Windows Secure Browser: Network Installation Windows Secure Browser: Thin Client Installation
Windows Secure Browser: Installation Without Administrator Rights Windows Secure Browser: Uninstallation
Windows Secure Browser: Individual Installation
This section contains instructions for installing the secure browser to individual machines. Two sets of instructions are included:
Installing the .msi Package via the User Interface Installing the .msi Package via a Script
Installing the .msi Package via the User Interface
1. Navigate to the Secure Browser Web page, which is linked on the CAASPP Portal at
http://caaspp.org.
2. Select the [Windows] tab and then select the [Download Browser] link. A dialog window will open.
Note: This step may vary slightly depending on the browser you are currently using.
If you are presented with a choice to either [Run] or [Save] the file, select [Run]. This will open the Secure Browser Setup Wizard.
If presented only with the option to [Save], save the file to a convenient location.
–
After saving the file, double-click the installation file (CASecureBrowser7.2-Win.msi) to open the Secure Browser Setup Wizard.Section III. Desktop Secure Browser Installation | Windows Secure Browser 7.2
3. Follow the instructions in the Secure Browser Setup Wizard to proceed with the installation. When prompted, select the Standard installation option. This will install the browser to its default location:
C:\Program Files (x86)\CASecureBrowser7.2
4. A shortcut icon will also be installed to the desktop. The text under the icon should say “CA Secure Browser 7.2.”
5. Select [Finish]. This will launch the secure browser directly from the Setup Wizard.
6. Upon launching the secure browser, you will see the student logon screen.
Note: The browser will fill the entire screen and hide the task bar.
7. To exit the browser, select the [Close Secure Browser] button in the upper-right corner of the screen.
Installing the .msi Package via a Script
Network administrators can install the Windows secure browser via an installation script to be
executed by an Administrator account. The script can be written to run without any human interaction (with the quiet switch) and to install in the default directory (C:\Program Files (x86\)) or any target directory of choice. Uninstallation can also be scripted.
Below are two generic scripts: one for installation and one for uninstallation. Both require the script to have visibility to the .msi installation file and can be executed only by an Administrator account on the machine. (This is a Windows-based restriction, not a secure browser restriction, because the msiexec service that installs .msi files is meant to be used by administrators only.)
Script Conventions
<Source> = Complete path to the .msi installation file including .msi installation file name: Example:
C:\MSI\CASecureBrowser7.2-win.msi
<Target> = Complete path to the location where the secure browser should be installed if the default location (C:\ProgramFiles (x86)) is not preferred. (The target install directory does not have to be created in advance.)
Example:
C:\MSI\Installation_Dir
Installation Script
msiexec /I <Source> /quiet INSTALLDIR=<Target>
Example:
msiexec /I C:\MSI\CASecureBrowser7.2-win.msi /quiet INSTALLDIR=C:\MSI\Browser_Install
Uninstallation Script
msiexec /X <Source> /quiet Example:
Section III. Desktop Secure Browser Installation | Windows Secure Browser 7.2
Windows Secure Browser: Network Installation
You can install the secure browser to all computers on a network by copying browser files from the network to individual computers or through third-party programs to run the installers. This section contains instructions for the following:
Installing the Secure Browser to a Shared Drive
Pushing the Secure Browser Installation Directory from the Network to Client Computers Installing the Secure Browser to a Shared Drive
1. Install the secure browser following the standard directions in the Windows Secure Browser: Individual Installation section.
2. On each client machine, map the network directory to the location where you installed the secure browser.
a. In the network location where you installed the secure browser, create a shortcut by selecting the [CASecureBrowser7.2.exe] icon with your right mouse button and selecting “Create Shortcut.”
b. Optional: You may want to rename the new shortcut to “CASecureBrowser7.2.” (This becomes the shortcut link name that you will use in step 3 below.)
c. In the shortcut properties section, change the path to CASecureBrowser7.2.exe to use the mapped path.
3. To each user (computer) profile, add the following command, which will execute upon logon through the user group logon script:
COPY “<X> \CASecureBrowser7.2.lnk” “%USERPROFILE%\Desktop”
Note: “<X>” refers to the shared directory from which the browser will be run. The script will need to reference the correct directory.
Pushing the Secure Browser Installation Directory from the Network to Client Computers 1. Install the browser onto your server following the standard directions available in this document. 2. Identify the sourcenetwork directory location where you saved the browser file. These
instructions refer to that network directory location as “<X>.”
3. Identify the targetnetwork directory on the local user computers to which you will copy the browser file. These instructions refer to that directory as “<Y>.” Make sure that you have write access to <Y> on the local computers.
Note: Restricted users will have access only to certain folders on the local computers. 4. Create a shortcut in the network directory by selecting the
[CASecureBrowser7.2.exe] icon with your right mouse button and selecting “Create Shortcut.” Rename the new shortcut, e.g., “CASecureBrowser7.2.”
Note: In the shortcut properties section, the “Target” and “Start In” attributes will
show the <X> network installation directory.
5. Change the shortcut properties (“Target” and “Start In” attributes) to the local computers’ <Y> directory instead of the default <X> network directory. That way, the secure browser shortcut will point to the designated installation directory.
6. Add the following lines to the logon script for each user, replacing your actual local and source network directories for <X> and <Y>:
Section III. Desktop Secure Browser Installation | Windows Secure Browser 7.2
IF EXIST <Y> GOTO DONE XCOPY “<X>” “<Y>” /E /I
COPY “<Y>\CASecureBrowser7.2.lnk” “%USERPROFILE%\Desktop” :DONE
EXIT
Windows Secure Browser: Thin Client Installation
You can install the secure browser to an NComputing virtual desktop or to a terminal server:
NComputing Virtual Desktop Installation Terminal Server Installation
About NComputing
Quality testing is conducted with L230 and L300 terminals using Windows 7 and vSpace Server 6.6.23. Other terminals should work provided the server host is a supported client Windows operating system. For more information, refer to the Technical Specifications Manual for Online Testing.
About Terminal Servers
Terminal servers used with a thin client can be used for online testing. Quality testing is conducted with Windows Server 2003 and 2008. For more information, refer to the Technical Specifications Manual for Online Testing.
Security Issues With Terminal Services or Remote Desktop Connections to Servers
Using a terminal services or remote desktop connection to access a Windows Server or workstation that has the secure browser installed is typically not a secure test
environment.
NComputing Virtual Desktop Installation
The following steps should be taken to install the secure browser on a network that uses NComputing virtual desktops.
Step 1. Create a batch file that runs the logon script for the secure browser.
This step creates a unique profile folder in “Application Data” with a unique session name. The batch file can be saved to the “Startup” folder in the “Start” menu (Start Programs Startup).
1. As the Administrator, open Notepad.
2. Copy and paste the line below into the Notepad file:
“C:\Program Files (x86)\CASecureBrowser7.2\
CASecureBrowser7.2.exe” –CreateProfile %SESSIONNAME%
3. Save the file as a batch file to the desktop (you may call it anything; e.g., “logon.bat”). 4. Navigate to “User Configuration,” which is in the “Remote Administration Console” window:
Start Menu All Programs NComputing vSpace vSpace Console Expand “Local Computer Policy”
5. Expand “User Configuration” and then expand the “Windows Settings” folder. 6. Select “Scripts (Logon/Logoff).”
Section III. Desktop Secure Browser Installation | Windows Secure Browser 7.2
7. Select “Logon” and open “Properties.” (To open Properties, select the [Properties] link on the left or select [Logon] with your right mouse button and select “Properties.”)
8. In the “Logon Properties” window, select the [Add] button. 9. Browse for the “Logon” batch file that you created in step 3. 10. Select the [OK] button to add the file.
11. Select the [Apply] button and then close the “Logon Properties” window. 12. Close the “Remote Administration Console” window.
Step 2. Create a shortcut on the desktop of each client machine.
Note: This will create shortcuts for the secure browser on the client machines. 1. On the NComputing terminal, locate the “Secure Browser” folder:
C:\Program Files (x86)\<SecureBrowserName> folder\
2. Select the CASecureBrowser7.2.exe file with your right mouse button and select “Send To Desktop (Create Shortcut).”
3. Select the shortcut icon on the desktop with your right mouse button and select “Properties.”
4. In the “Target” text box, type or copy/paste the correct command below as shown:
“C:\Program Files(X86)\CASecureBrowser7.2\CASecureBrowser7.2.exe” –P “%SESSIONNAME%”
5. Select [OK] to close the “Properties” window.
6. Optional: Rename the desktop shortcut to “CASecureBrowser7.2.” Step 3. Log on as an Administrator and run the application once.
Simply launching the secure browser and going to the diagnostics page is sufficient (you do not need to start a test).
Note: In order to launch the secure browser on the client machines, users will need to double-click the shortcut created on the desktop.
Terminal Server Installation
The following steps should be taken when computers on a terminal server network setup have a shared or generic logon account and multiple users need to use that same account when logging on to a terminal server.
Step 1. Create a batch file that runs the logon script for the secure browser.
This step creates a unique profile folder in “Application Data” with a unique session name. The batch file can be saved to the “Startup” folder in the “Start” menu (Start Programs Startup).
1. As the Administrator, open Notepad.
2. Copy and paste the line below into the Notepad file:
“C:\Program Files (x86)\CASecureBrowser7.2\
CASecureBrowser7.2.exe” –CreateProfile %SESSIONNAME%
Section III. Desktop Secure Browser Installation | Windows Secure Browser 7.2
4. Open “User Configuration” in the Group Policy Editor.
5. Start Menu Run; type GPEdit.msc and then select [OK] or press [Enter]. 6. Expand “User Configuration” and then expand the “Windows Settings” folder. 7. Select “Scripts (Logon/Logoff).”
8. Select “Logon” and then open “Properties.” (To open Properties, select the [Properties] link on the left or select “Logon” with your right mouse button and then select “Properties.”)
9. In the “Logon Properties” window, select the [Add] button. 10. Browse for the “Logon” batch file that you created.
11. Select the [OK] button to add the file.
12. Select the [Apply] button and then close the “Logon Properties” window. 13. Close the “Group Policy” window.
Step 2. Create a shortcut on the desktop of each client machine.
Note: This step will create shortcuts for the secure browser on the client machines. 1. On the terminal machine, locate the “Secure Browser” folder:
C:\Program Files (x86)\<SecureBrowserName> folder\
2. Select the CASecureBrowser7.2.exe file with your right mouse button and then select “Send To Desktop (Create Shortcut).”
3. Select the shortcut icon on the desktop with your right mouse button and then select “Properties.”
4. In the “Target” text box, type or copy/paste the correct path below as shown:
“C:\Program Files(X86)\CASecureBrowser7.2\CASecureBrowser7.2.exe” –P “%SESSIONNAME%”
5. Select [OK] to close the Properties window.
6. Optional: Rename the desktop shortcut to “CASecureBrowser7.2.”
Windows Secure Browser: Installation Without Administrator Rights
You are strongly recommended to install the secure browser on each individual computer.
However, if you do not have administrator rights, follow the instructions below to use either a shared network location or a removable drive to copy the secure browser program to the computer.
Once you have installed the browser on one machine, you can copy it to restricted accounts on other machines.
1. On a computer on which you have installation rights, download and install the browser, following the standard directions available in the Windows Secure Browser 7.22 section.
2. Copy the entire folder where the browser was installed (usually, “C:\Program Files (x86)\CASecureBrowser7.2”) to a removable drive or shared network location.
3. Copy the entire directory from the shared location or removable drive to any directory on the target computer.
Section III. Desktop Secure Browser Installation | Mac OS X Secure Browsers
Windows Secure Browser: Uninstallation
Follow these steps to uninstall the Windows secure browser. Please note that a previous version of the Windows secure browser must be uninstalled manually.
1. Open the Control Panel (from your taskbar, select Start Settings Control Panel). 2. Select [Add or Remove Programs].
3. Select the secure browser program (e.g., “CASecureBrowser7.2”) and select [Remove] to open the Uninstall Wizard.
4. Select [Next].
5. Select [Uninstall]. This will remove the secure browser. 6. Select [Finish] to complete the uninstallation process.
Note: Installing the new Windows secure browser will not uninstall previous versions automatically, you will need to manually remove the earlier version first.
Mac OS X Secure Browsers
This section provides instructions for installing the Mac secure browsers on desktop computers. Three secure browsers are available: one for computers running Mac OS 10.4 (Intel or PowerPC) and 10.5 (PowerPC), one for computers running Mac OS 10.5 (Intel), and one for computers running Mac OS 10.6, 10.7, 10.8, 10.9, and 10.10. The correct secure browser must be installed on Mac computers used for student testing.
The following instructions are included in this section:
Mac Secure Browser 5.6: Individual Installation
Note: This secure browser must be installed on computers running Mac OS 10.4 (Intel or PowerPC) and Mac OS 10.5 (PowerPC).
Mac Secure Browser 6.5: Individual Installation
Note: This secure browser must be installed on computers running Mac OS 10.5 (Leopard) with an Intel processor. Computers running Mac OS 10.5 with a PowerPC processor are not
supported.
Mac Secure Browser 7.2: Individual Installation
Note: This secure browser must be installed on computers running Mac OS 10.6–10.10. Mac OS X Secure Browser: Network Installation
Mac OS X Secure Browser: Uninstallation
Mac Secure Browser 5.6: Individual Installation
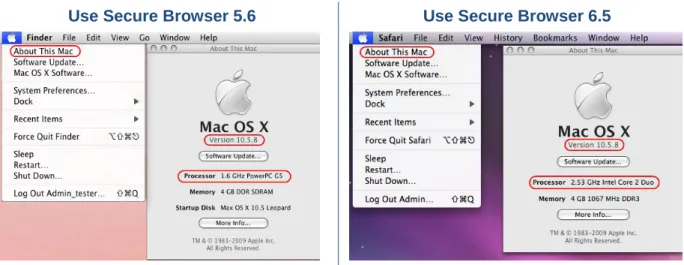
This section provides instructions for installing secure browser 5.6 on the following computers:
Mac 10.4 computers with either PowerPC or Intel-based processors
Mac 10.5 computers with PowerPC processors
How do I know if my Mac 10.5 computer is using a PowerPC or Intel-based processor?
From the Apple drop-down menu, select “About This Mac.” The screen will indicate the operating system version and processor your computer is using.
If you are using 10.4, download and install secure browser 5.6 using the instructions in this section. (The processor type does not matter.)
Section III. Desktop Secure Browser Installation | Mac OS X Secure Browsers
If you are using 10.5 and you see PowerPC, download and install secure browser 5.6 using the instructions in this section.
If you are using 10.5 and you see Intel, refer to the Mac Secure Browser 6.5: Individual Installation section for instructions.
Use Secure Browser 5.6 Use Secure Browser 6.5
Figure 2. Identify your Mac processor type
You must install version 5.6 of the secure browser on all Mac 10.4 and 10.5 computers with PowerPC processors that will be used for online testing. You are strongly recommended to install the secure browser on each individual computer. Please note: Students must have the correct secure browser in order to access the online assessments.
Mac Secure Browser 5.6: Installation
1. Navigate to the Secure Browser Web page, which is linked on the CAASPP Portal at
http://caaspp.org.
2. Select the [Download Browser] link. (If you are prompted for a download location, select the desktop.)
Note: This step may vary slightly depending on the browser version you are using.
If your browser automatically expands the Zip file, proceed to step 3.
If your computer opens the Software License Agreement page, proceed to step 4.
If you receive a warning message that the file contains an application, select [Continue] and proceed to step 4.
3. Open the file (CASecureBrowser5.6-OSX.dmg) to expand its contents. Double-click the file (CASecureBrowser5.6-OSX.dmg) to mount the “CASecureBrowser5.6” folder on the desktop. Note: Your computer may automatically expand the file upon download.
4. Double-click the mounted folder (“CASecureBrowser5.6”). 5. Select [Accept] on the Software License Agreement page.
Section III. Desktop Secure Browser Installation | Mac OS X Secure Browsers
Important:
The secure browser must be launched at this point to successfully complete the installation. The browser will disable Exposé (hot corner) settings if they are set and they will remain disabled after the browser is closed. The dock will appear the first time the Exposé settings are being disabled on browser launch. System security will not be affected as applications opened from the dock open in the background and cannot be accessed.
7. Double-click the [CASecureBrowser5.6] icon in the “Applications” folder to launch the secure browser. Upon launching the secure browser, you will see the student logon screen.
Note: The browser will fill the entire screen.
8. Select [Close] in the upper-right corner to exit the browser.
Note: You can also use the following keyboard command to close the Mac OS X secure
browser: [Ctrl] + [ALT] + [SHIFT] + [F10]. (If you are using a laptop, you may also need to press the [FN] key before you press [F10].)
Mac Secure Browser 6.5: Individual Installation
This section provides instructions for installing the Mac secure browser on desktop computers running Mac OS 10.5 with an Intel processor.
1. Navigate to the Secure Browser Web page, which is linked on the CAASPP Portal at
http://caaspp.org.
2. Select the [Mac OS X 10.5] tab, and then select the [Download Browser] link. A dialog window will open. If prompted for a download location, select the desktop.
Note: This step may vary slightly depending on the browser you are currently using.
If your browser automatically expands the Zip file, proceed to step 4.
If your computer opens the Software License Agreement page, proceed to step 5.
If you receive a warning message that the file contains an application, select [Continue] and proceed to step 4.
3. Open the file (CASecureBrowser6.5-OSX.dmg) to expand its contents. Double-click the [CASecureBrowser6.5-OSX.dmg] file icon to mount the “CASecureBrowser6.5” folder on the desktop.
Note: Your computer may automatically expand the file upon download.
4. Double-click the mounted folder (“CASecureBrowser6.5”). The Software License Agreement window will open.
5. Select [Accept].
6. Drag the [CA Secure Browser 6.5] icon to your “Applications” folder.
Important:
The secure browser must be launched to successfully complete the installation.
The secure browser will disable Exposé (hot corner) settings if they are set and they will remain disabled after the browser is closed.
Section III. Desktop Secure Browser Installation | Mac OS X Secure Browsers
7. Open the “Applications” folder and double-click the [CASecureBrowser6.5] icon to launch the secure browser. Upon launching the secure browser, you will see the student logon screen.
Note: The browser will fill the entire screen and hide the dock.
8. To exit the browser, select the [Close Secure Browser] button in the upper-right corner of the screen.
Mac Secure Browser 7.2: Individual Installation
This section provides instructions for installing the Mac secure browser on desktop computers running Mac OS 10.6, 10.7, 10.8, 10.9, and 10.10.
1. Navigate to the Secure Browser Web page, which is linked on the CAASPP Portal at
http://caaspp.org.
2. Select the [Mac OS X 10.6–10.10] tab, and then select the [Download Browser] link. A dialog window will open. If prompted for a download location, select the desktop.
Note: This step may vary slightly, depending on the browser you are currently using.
If your browser automatically expands the Zip file, proceed to step 4.
If your computer opens the Software License Agreement page, proceed to step 5.
If you receive a warning message that the file contains an application, select [Continue] and proceed to step 4.
3. Open the file (CASecureBrowser7.2-OSX.dmg) to expand its contents. Double-click the [CASecureBrowser7.2-OSX.dmg] file icon to mount the
“CASecureBrowser7.2” folder on the desktop.
Note: Your computer may automatically expand the file upon download.
4. Double-click the mounted folder (“CASecureBrowser7.2”). The Software License Agreement window will open.
5. Select [Accept].
6. Drag the [CA Secure Browser 7.2] icon to your “Applications” folder.
Important:
The secure browser must be launched to successfully complete the installation.
For Mac OS 10.6, Exposé settings will be disabled only when the secure browser is launched. The dock will appear the first time the Exposé settings are disabled upon browser launch. System security is not affected because
applications opened from the dock open in the background and cannot be accessed.
For Mac OS 10.7, 10.8, 10.9, and 10.10, Mission Control/Spaces must be manually disabled before students can use the secure browser. Instructions for disabling Spaces are in the next section.
7. Open the “Applications” folder and double-click the [CASecureBrowser7.2] icon to launch the secure browser. Upon launching the secure browser, you will see the student logon screen.
Note: The browser will fill the entire screen and hide the dock.
8. To exit the browser, select the [Close Secure Browser] button in the upper-right corner of the screen.
Section III. Desktop Secure Browser Installation | Mac OS X Secure Browsers Disabling Spaces in Mission Control on Mac 10.7−10.10 Computers
Follow these instructions to disable Spaces. Spaces should be disabled on computers that students will be using.
1. Navigate to Apple System Preferences.
2. In System Preferences, Select the [Keyboard] icon. The Keyboard window will be displayed.
3. Select the [Keyboard Shortcuts] tab. The Keyboard Shortcuts options will be displayed.
Note: Mac 10.9 and 10.10 use the label [Shortcuts].
4. In the left panel, select “Mission
Control.” The right panel will show all Mission Control options.
5. In the right panel, make sure the boxes for the following are not checked:
a. “Move left a space” b. “Move right a space”
c. “Switch to Desktop 1” (this may already be unchecked.)
To re-enable Spaces, follow steps 1–4 again, and check the boxes for spaces. Mac Computers and Keyboard Options for Opening Applications
When students use the secure browser for testing, the Test Delivery System conducts regular checks to ensure that other applications are not open. These checks help maintain the integrity of the secure test environment.
Some schools may have Mac computers with keyboards that are configured to launch iTunes and other applications by using direct function keys (e.g., F8). This section contains information on how to disable the function keys for launching applications, including iTunes.
Section III. Desktop Secure Browser Installation | Mac OS X Secure Browsers
These instructions are based on Mac 10.8 and should be similar for users with other supported Mac OS versions.
Modifying Keyboard Options in Mac 10.8
1. Navigate to Apple System Preferences.
2. In System Preferences, click the
[Keyboard] icon. The Keyboard window will be displayed.
3. On the Keyboard preferences window, you will see an option regarding using all function keys as standard function keys. Check this option.
4. Once this option is checked, you should no longer be able to access
applications by simply pressing the function keys.
5. If you need to launch iTunes or another application, press the [Fn] key and then press the desired function key. This combination will launch the application.
Mac OS X Secure Browser: Network Installation
This section provides network installation instructions for Mac OS X computers and the Apple Remote Desktop application.
Installing the Mac OS X Secure Browser Using Apple Remote Desktop
1. Log on to an administrator computer on your network. This computer should have Apple Remote Desktop installed and running.
2. Download the correct Mac OS X browser from Secure Browser Web page, which is linked on the CAASPP Portal at http://caaspp.org.
For Mac OS 10.4 and 10.5 (PowerPC), download Mac Secure Browser 5.6.
For Mac OS 10.5 (Intel), download Mac Secure Browser 6.5.
For Mac OS 10.6–10.10, download Mac Secure Browser 7.2.
3. Select the downloaded icon to unzip and save the .dmg file onto your administrator computer. 4. Open the .dmg file and select the .app file.
Section III. Desktop Secure Browser Installation | Linux Secure Browser 6.5
5. Open Apple Remote Desktop.
6. In the Apple Remote Desktop window, select a computer list.
7. Select one or more computers from the computer list onto which you would like to install the secure browser.
8. Select Manage Copy Items.
9. Select the browser .app file (from step 4).
10. Select copy options, including your preferred destination on the target machine. 11. Select [Copy].
Mac OS X Secure Browser: Uninstallation
Before installing a new Mac secure browser, you will need to uninstall the previous version, if you have one.
There may be a secure browser folder on the desktop. (The secure browser version number will vary depending on your operating system version.) Drag the folder and related files to the Trash. If the browser was installed to a different location, remove it accordingly.
Linux Secure Browser 6.5
This section provides instructions for installing the Linux secure browser on desktop computers running a supported Linux distribution. While the Linux secure browser can be installed on other Linux distributions, those distributions may not support the secure browser.
Notes:
In addition to installing the Linux secure browser, required and recommended libraries should be installed.
Festival and SoX software must be installed.
Verdana TrueType font must be installed.
For more information about the above Linux requirements, refer to the Technical Specifications Manual for Online Testing.
The following instructions are included in this section:
Linux Secure Browser: 64-Bit Installation
Linux Secure Browser: Standard (32-Bit) Installation Linux Secure Browser: Uninstallation
Linux Secure Browser: 64-Bit Installation
The secure browser is a 32-bit browser. If you have machines running a 64-bit Linux distribution, the secure browser will not launch properly. The reason is that 64-bit distributions typically do not have 32-bit compatibility libraries installed.
In order for the secure browser to run, the 32-bit compatibility libraries for your Linux distribution must be installed. As the commands for doing so vary between Linux distributions, you are encouraged to check the documentation for your specific Linux distribution or configuration. Once you have installed the 32-bit compatibility libraries, follow the instructions for the 32-bit installation.
Section III. Desktop Secure Browser Installation | Linux Secure Browser 6.5 Fedora 16–20
Note: You must run the following command as the root user.
yum install glibc.i686 nspr.i686 gtk2.i686 xulrunner-i686
openSUSE 13.1
zypper install glibc-32bit
Red Hat Enterprise Linux 6.5
sudo yum install xulrunner.i686 libgtk-x11-2.0.50.0 libxcom.so glibc.i686
Ubuntu (LTS) 10.04, 12.04, 14.04
sudo apt-get install libgtk2.0.0:i386 libstdc++6:i386 libasound2:i386 libasound2-plugins:i386 libdbus-glib-1-2:i386 libXt6:i386
Linux Secure Browser: Standard (32-Bit) Installation
The instructions in this section are for installing the Linux secure browser onto 32-bit versions of Linux systems.
1. Navigate to the Secure Browser Web page, which is linked on the CAASPP Portal at
http://caaspp.org.
2. Select the [Linux] tab, and then select the [Download Browser] link. Save the file to the desktop.
3. Select the downloaded file (CASecureBrowser6.5-Linux.tar.bz2) with your right mouse button, and then select “Extract Here” to expand the file. This creates the “CASecureBrowser6.5” folder on the desktop.
Note: To expand the compressed image using command line, use the following command:
tar -jxvf CASecureBrowser6.5-Linux.tar.bz2
4. Open the “CASecureBrowser6.5” folder.
5. Double-click the file icon [install-icon.sh] and select [Run] from the prompt.
Note: This will create the [CASecureBrowser6.5] icon on the desktop.
6. From the desktop, double-click the [CASecureBrowser6.5] icon to launch the browser.
7. Upon launching the secure browser, you will see the student logon screen.
Note: The browser will fill the entire screen and hide the task bar.
8. To exit the browser, select [Close Secure Browser] in the upper-right corner of the screen.
Note: If you do not want to run the installer, you can extract the files by opening the “CASecureBrowser6.5” file and selecting [Run] from the options in the message dialog box.
Section III. Desktop Secure Browser Installation | Linux Secure Browser 6.5
Linux Secure Browser: Uninstallation
Before installing a new Linux secure browser, you will need to uninstall the previous version, if you have one.
There may be a secure browser folder on the desktop. (The secure browser version number will vary depending on your operating system version.) Drag the folder and related files to the Trash. If the browser was installed to a different location, remove it accordingly.
Section IV. Proxy Settings for Desktop Secure Browsers | Specify a Proxy Server to Use with the Secure Browser
Section IV. Proxy Settings for Desktop Secure
Browsers
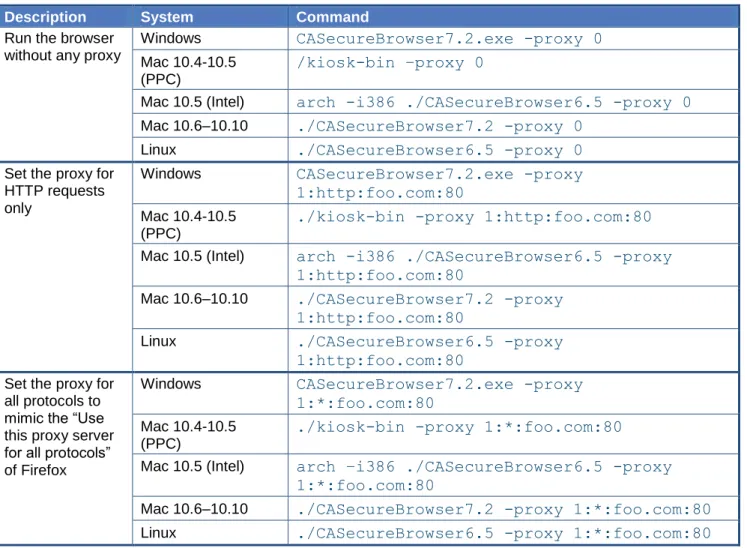
By default, the secure browsers for Windows, Mac, and Linux are packaged with the proxy setting set to “autodetect.” This setting can be overridden using the command line or by creating a shortcut.
Specify a Proxy Server to Use with the Secure Browser
These secure browsers attempt to autodetect the settings for your network’s Web proxy server. As an option, you can change the settings to use by passing parameters to the proxy executable.
The following proxy values are supported: 0 – Direct connection, no proxy
1 – Manual proxy configuration 2 – Proxy autoconfiguration (PAC) 4 – Autodetect proxy settings
5 – System proxy settings (this is the default)
Table 4. Proxy settings
Description System Command
Run the browser without any proxy
Windows CASecureBrowser7.2.exe -proxy 0 Mac 10.4-10.5
(PPC)
/kiosk-bin –proxy 0
Mac 10.5 (Intel) arch -i386 ./CASecureBrowser6.5 -proxy 0 Mac 10.6–10.10 ./CASecureBrowser7.2 -proxy 0
Linux ./CASecureBrowser6.5 -proxy 0
Set the proxy for HTTP requests only
Windows CASecureBrowser7.2.exe -proxy
1:http:foo.com:80
Mac 10.4-10.5 (PPC)
./kiosk-bin -proxy 1:http:foo.com:80
Mac 10.5 (Intel) arch -i386 ./CASecureBrowser6.5 -proxy
1:http:foo.com:80
Mac 10.6–10.10 ./CASecureBrowser7.2 -proxy 1:http:foo.com:80
Linux ./CASecureBrowser6.5 -proxy
1:http:foo.com:80
Set the proxy for all protocols to mimic the “Use this proxy server for all protocols” of Firefox
Windows CASecureBrowser7.2.exe -proxy
1:*:foo.com:80
Mac 10.4-10.5 (PPC)
./kiosk-bin -proxy 1:*:foo.com:80
Mac 10.5 (Intel) arch –i386 ./CASecureBrowser6.5 -proxy
1:*:foo.com:80
Mac 10.6–10.10 ./CASecureBrowser7.2 -proxy 1:*:foo.com:80
Section IV. Proxy Settings for Desktop Secure Browsers | Create a Corresponding Desktop Shortcut to Run the Browser Using Additional Parameters
Description System Command
Specify the URL of the PAC file
Windows CASecureBrowser7.2.exe -proxy 2:proxy.com Mac 10.4-10.5
(PPC)
./kiosk-bin -proxy 2:proxy.com
Mac 10.5 (Intel) arch -i386 ./CASecureBrowser6.5 -proxy
2:proxy.com
Mac 10.6–10.10 ./CASecureBrowser7.2 -proxy 2:proxy.com
Linux ./CASecureBrowser6.5 -proxy 2:proxy.com Autodetect proxy
settings
Windows CASecureBrowser7.2.exe -proxy 4 Mac 10.4-10.5
(PPC)
./kiosk-bin–proxy 4
Mac 10.5 (Intel) arch -i386 ./CASecureBrowser6.5 -proxy 4 Mac 10.6–10.10 ./CASecureBrowser7.2 -proxy 4
Linux ./CASecureBrowser6.5 -proxy 4 Use the system
proxy setting (default)
Windows CASecureBrowser7.2.exe -proxy 5 Mac 10.4-10.5
(PPC)
./kiosk-bin–proxy 5
Mac 10.5 (Intel) arch -i386 ./CASecureBrowser6.5 -proxy 5
Mac 10.6–10.10 ./CASecureBrowser7.2 -proxy 5
Linux ./CASecureBrowser6.5 -proxy 5
Create a Corresponding Desktop Shortcut to Run the Browser
Using Additional Parameters
This section provides guidelines for adding a nondefault proxy setting to the secure browser so that it will launch as desired. All commands in this section are examples only.
Microsoft Windows
1. Navigate to the location of the “Secure Browser” program folder.
2. Create a shortcut by selecting the “CASecureBrowser7.2.exe” executable file with your right mouse button.
3. Move the shortcut to a desired location, such as the desktop.
4. Select the shortcut icon with your right mouse button to edit its properties.
5. In the “Target:” input field, append the additional options after the command. For example:
“C:\Program Files (x86)\CASecureBrowser7.2\CASecureBrowser7.2.exe” –proxy 1:http:foo.com:80
Section IV. Proxy Settings for Desktop Secure Browsers | Create a Corresponding Desktop Shortcut to Run the Browser Using Additional Parameters
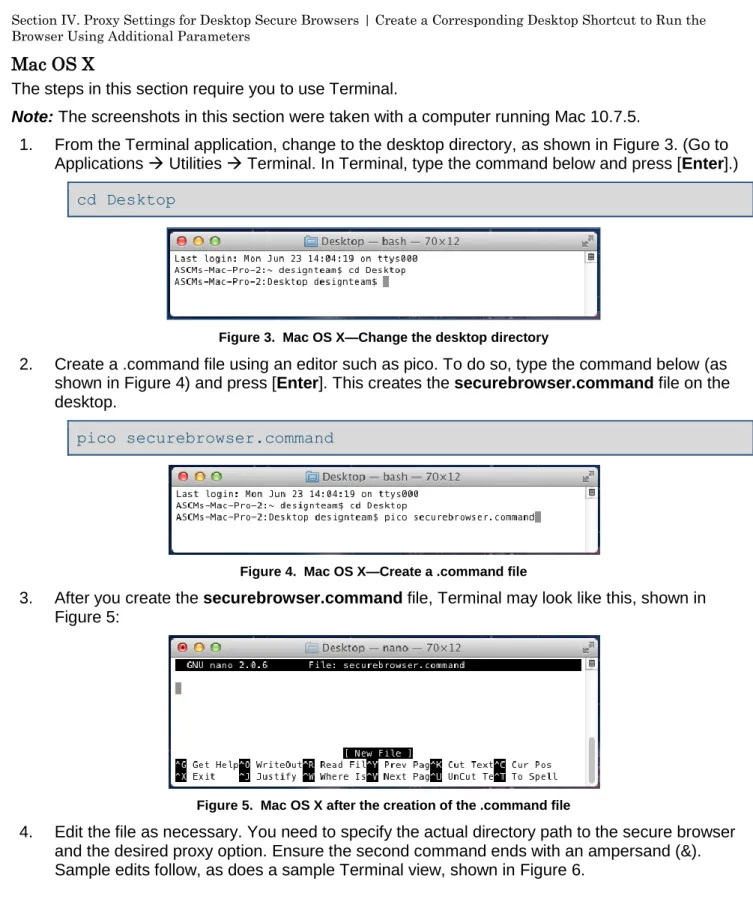
Mac OS X
The steps in this section require you to use Terminal.
Note: The screenshots in this section were taken with a computer running Mac 10.7.5.
1. From the Terminal application, change to the desktop directory, as shown in Figure 3. (Go to Applications Utilities Terminal. In Terminal, type the command below and press [Enter].)
cd Desktop
Figure 3. Mac OS X—Change the desktop directory
2. Create a .command file using an editor such as pico. To do so, type the command below (as shown in Figure 4) and press [Enter]. This creates the securebrowser.command file on the desktop.
pico securebrowser.command
Figure 4. Mac OS X—Create a .command file
3. After you create the securebrowser.command file, Terminal may look like this, shown in Figure 5:
Figure 5. Mac OS X after the creation of the .command file
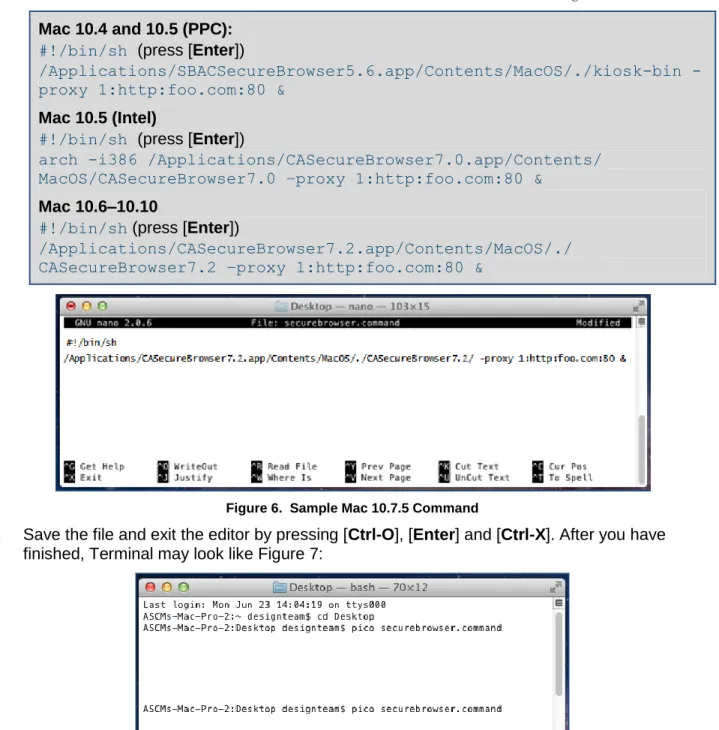
4. Edit the file as necessary. You need to specify the actual directory path to the secure browser and the desired proxy option. Ensure the second command ends with an ampersand (&). Sample edits follow, as does a sample Terminal view, shown in Figure 6.
Section IV. Proxy Settings for Desktop Secure Browsers | Create a Corresponding Desktop Shortcut to Run the Browser Using Additional Parameters Mac 10.4 and 10.5 (PPC):
#!/bin/sh (press [Enter])
/Applications/SBACSecureBrowser5.6.app/Contents/MacOS/./kioskbin -proxy 1:http:foo.com:80 &
Mac 10.5 (Intel)
#!/bin/sh (press [Enter])
arch -i386 /Applications/CASecureBrowser7.0.app/Contents/ MacOS/CASecureBrowser7.0 –proxy 1:http:foo.com:80 &
Mac 10.6–10.10
#!/bin/sh (press [Enter])
/Applications/CASecureBrowser7.2.app/Contents/MacOS/./ CASecureBrowser7.2 –proxy 1:http:foo.com:80 &
Figure 6. Sample Mac 10.7.5 Command
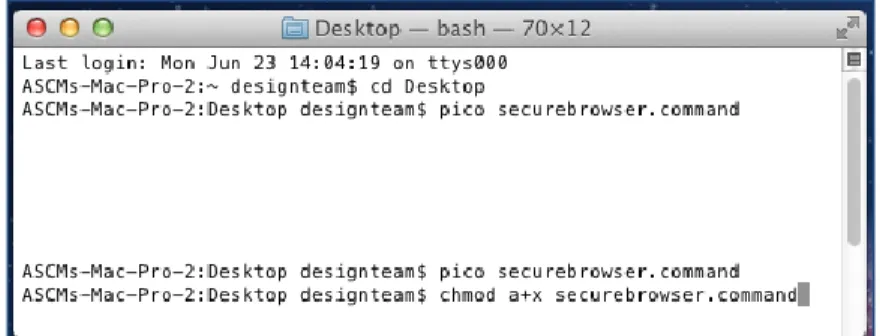
5. Save the file and exit the editor by pressing [Ctrl-O], [Enter] and [Ctrl-X]. After you have finished, Terminal may look like Figure 7:
Figure 7. Mac OS X—After exiting the editor
6. Execute permission to the shell script file. (In Terminal, type in the command line below and press [Enter]; this is shown in Figure 8.)
Section IV. Proxy Settings for Desktop Secure Browsers | Create a Corresponding Desktop Shortcut to Run the Browser Using Additional Parameters
Figure 8. Mac OS X—Command line to execute permission to the shell script file
7. Close Terminal.
8. Select the [securebrowser.command] icon on the desktop. This will open the secure browser with the proxy setting that you configured.
Linux
Information about creating a corresponding desktop shortcut for supported Linux distributions will be available soon.
Section V. Mobile Secure Browser Installation | Introduction to Testing on Tablets and Chromebooks
Section V. Mobile Secure Browser Installation
The appropriate AIRSecureTest mobile secure browser application must be installed on each
supported device that will be used for student testing. All mobile secure browsers can be accessed for download from the link to the Secure Browser Web page on the CAASPP Portal (http://caaspp.org). This section contains information about the installation of the AIRSecureTest app for iOS, Android, and Chrome OS. For information about configuring supported tablets and Chromebooks to work with the secure browser, refer to the Technical Specifications Manual for Online Testing.
This section includes the following:
Introduction to Testing on Tablets and Chromebooks iOS AIRSecureTest Mobile Secure Browser
Android AIRSecureTest Mobile Secure Browser Chrome OS AIRSecureTest Kiosk App
Introduction to Testing on Tablets and Chromebooks
The AIRSecureTest mobile secure browser application is designed to support a secure testing environment. This application may require changes to default device settings.
Student testing on iPads requires Guided Access to be enabled.
Student testing on Android tablets requires the secure browser keyboard to be enabled.
Student testing on Chromebooks requires the device to be in kiosk mode.
The first time a mobile secure browser is opened successfully, a Launchpad page will appear. This page will prompt you to select your state (California); the program name will display automatically. Once this step is completed, the student logon page will load.
iOS AIRSecureTest Mobile Secure Browser
The AIRSecureTest secure browser can be downloaded from the App store. The process for installing the secure browser is the same as for any other iOS application.
This section contains instructions for downloading and installing the AIRSecureTest browser,
selecting your state and assessment program, and activating the volume (and with it, Guided Access).
Downloading and Installing the iOS AIRSecureTest Mobile Secure Browser Opening the AIRSecureTest Browser and Selecting the Assessment Program Activating the Volume
Section V. Mobile Secure Browser Installation | iOS AIRSecureTest Mobile Secure Browser
Downloading and Installing the iOS AIRSecureTest Mobile Secure Browser
1. On your iPad, navigate to the Secure Browser page, which is linked on the CAASPP Portal at http://caaspp.org. 2. Select the [iOS] tab.
3. Select the [Download] button.
Note: You may also search for
“AIRSecureTest” in the App store to find the secure browser app.
4. The AIRSecureTest application download page will open.
5. Tap or select the [Free] button. The button will change to [Install App].
6. Tap or select [Install App]. 7. Enter your Apple ID password.
8. The AIRSecureTest mobile secure browser will download and install onto your iPad. Look for the [AIRSecureTest] icon.
Opening the AIRSecureTest Browser and Selecting the Assessment Program
The first time you open the AIRSecureTest mobile secure browser, you will see a Launchpad screen. This Launchpad establishes the test administration your students will log on to.
1. Under “Please Select Your State,” select California from the drop-down list.
Section V. Mobile Secure Browser Installation | iOS AIRSecureTest Mobile Secure Browser
2. Under “Choose Your Assessment Program,” the program name should already be selected.
3. Tap or select [OK]. The student logon page will load. The secure browser is now ready for students to use.
4. The Launchpad screen is designed to display only one time. The student logon page will display automatically the next time the secure browser is launched.
Activating the Volume
Step 1. Enable guided access before a test session begins.
Guided Access must already be enabled via iOS Settings prior to completing the steps to enable the volume. However, if students are using iPads with iOS 7, proceed to Step 2; the volume buttons can be enabled prior to starting Guided Access.
1. Tap the [Settings] icon to open the Settings application.
2. Navigate to General Accessibility Learning and tap [Guided Access].
Section V. Mobile Secure Browser Installation | iOS AIRSecureTest Mobile Secure Browser
3. Tap [Off] to change it to [On] (enabled). 4. Set the passcode for Guided Access. This
passcode is required to deactivate Guided Access after students have finished testing. (If you do not set the passcode now, you will be prompted to set it later.) To set the passcode:
a. Tap [Set Passcode]. b. Enter a 4-digit passcode.
c. Confirm the 4-digit passcode. (You may want to write down or save this number in a safe place. There is no ability to “retrieve” a forgotten passcode.)
Step 2. Enable the volume.
1. Open the AIRSecureTest secure browser app. The student logon page should display.
2. Triple-tap (press) the [Home] button on the iPad.
3. The Guided Access options will appear in a border around the secure browser app.
a. Tap the [Options] button under “Hardware Buttons.” A popup menu will appear with options. b. Tap the toggle for “Volume
Buttons” so that it is enabled. (This will allow students to adjust the volume during the test.) c. Tap the [Start] button in the
upper-right corner. A popup message will appear saying, “Guided Access has started.”
Section V. Mobile Secure Browser Installation | iOS AIRSecureTest Mobile Secure Browser Notes:
Guided Access is not the same as Single App Mode. It cannot be enabled or activated via a Mobile Device Management program.
When Guided Access is activated, students cannot switch to other applications or take screenshots.
If you are using iOS 6, the hardware buttons are completely disabled and cannot be enabled.
Step 3. Deactivate Guided Access After a Test Session Ends 1. Triple-tap (press) the [Home] button
on the iPad.
2. Enter the Guided Access passcode. This must be the same passcode used when Guided Access was enabled.
3. Tap the [End] button in the upper-left corner. A popup message will appear saying “Guided Access ended.”
Closing the AIRSecureTest Mobile Secure Browser
Closing the AIRSecureTest browser is the same as closing any other iOS application. iOS 6.0–6.1
1. Double-tap (press) the [Home] button. This will open the multitasking bar. 2. Press the [AIRSecureTest] icon until it wiggles and the red minus sign appears. 3. Tap the red minus sign and then press the [Home] button.
Section V. Mobile Secure Browser Installation | Android AIRSecureTest Mobile Secure Browser iOS 7.0–8.2
1. Double-tap (press) the [Home] button. This will open the multitasking screen. 2. Locate the [AIRSecureTest] app preview and slide it upward.
Android AIRSecureTest Mobile Secure Browser
The AIRSecureTest secure browser can be downloaded from the Google Play store. The process for installing the secure browser is the same as for any other Android application.
This section contains instructions for downloading and installing the AIRSecureTest browser and selecting your state and assessment program.
Downloading and Installing the Android AIRSecureTest Mobile Secure Browser Opening the AIRSecureTest Browser and Changing the Keyboard
Opening the AIRSecureTest Browser and Selecting the Assessment Program Closing the AIRSecureTest Mobile Secure Browser
Downloading and Installing the Android AIRSecureTest Mobile Secure Browser
1. On your Android tablet, navigate to the Secure Browser Web page, which is linked on the CAASPP Portal at http://caaspp.org, and select the [Android] tab.
2. Select [Download Browser].
Note: You may also search for
“AIRSecureTest” in the Google Play store to find the secure browser app.
The AIRSecureTest application download page will open.
3. Tap or select the [Install] button.
4. The AIRSecureTest mobile secure browser will download and install onto your tablet. Look for the [AIRSecureTest] icon. (The name may be truncated.)
Notes about the Android Secure Browser Keyboard
If the secure browser keyboard has not been selected via device settings on Android tablets, it will need to be selected upon opening the AIRSecureTest app.
The Android mobile secure browser requires the secure browser keyboard to be used because the default tablet keyboard includes a predictive text section. Therefore, any external keyboard that has a shortcut button to open the tablet’s default keyboard should not be permitted, as this default keyboard will override the mobile secure browser keyboard.
Testing has determined that the EZOWare Slim Full Size Keyboard external keyboard should not be used with Android tablets.
Section V. Mobile Secure Browser Installation | Android AIRSecureTest Mobile Secure Browser
Opening the AIRSecureTest Browser and Changing the Keyboard
The first time you open the AIRSecureTest secure browser on an Android device, you will be prompted to select the secure browser keyboard.
Notes:
Once the secure browser keyboard is set, that becomes the default keyboard for all Android tablet applications, not just the secure browser. If you want to return to the default Android keyboard after using the secure browser, you will have to navigate to Settings > Language & Input and uncheck the secure browser keyboard.
If you change back to the default Android keyboard, you will be prompted to select the secure browser keyboard the next time you open the secure browser. The secure browser will not allow you to access the student login page until the secure browser keyboard has been selected.
All screenshots in this section were taken with a Samsung Galaxy Tab 2. 1. Select the [Secure Browser] icon on the
home screen.
2. You will be prompted to change the keyboard. Select [Close].
3. Select [Set up input methods]. The Language & Input settings screen will automatically open.
4. Select the checkbox next to
“AIRSecureTest” so that a check mark appears.
5. You will be prompted to acknowledge your selection. Select [OK] to continue.
Note: This action allows the secure browser keyboard to be used by the secure browser application.