Reference Documentation
Ben Alex
Luke Taylor
Spring Security: Reference Documentation
by Ben Alex and Luke TaylorTable of Contents
Preface ... x
I. Getting Started ... 1
1. Introduction ... 2
1.1. What is Spring Security? ... 2
1.2. History ... 4
1.3. Release Numbering ... 4
1.4. Getting Spring Security ... 5
Project Modules ... 5 Core - spring-security-core.jar ... 5 Web - spring-security-web.jar ... 5 Config - spring-security-config.jar ... 5 LDAP - spring-security-ldap.jar ... 5 ACL - spring-security-acl.jar ... 6 CAS - spring-security-cas-client.jar ... 6 OpenID - spring-security-openid.jar ... 6
Checking out the Source ... 6
2. Security Namespace Configuration ... 7
2.1. Introduction ... 7
Design of the Namespace ... 8
2.2. Getting Started with Security Namespace Configuration ... 8
web.xml Configuration ... 8
A Minimal <http> Configuration ... 9
What does auto-config Include? ... 10
Form and Basic Login Options ... 11
Using other Authentication Providers ... 12
Adding a Password Encoder ... 13
2.3. Advanced Web Features ... 14
Remember-Me Authentication ... 14
Adding HTTP/HTTPS Channel Security ... 14
Session Management ... 15
Detecting Timeouts ... 15
Concurrent Session Control ... 15
Session Fixation Attack Protection ... 16
OpenID Support ... 16
Attribute Exchange ... 17
Adding in Your Own Filters ... 17
Setting a Custom AuthenticationEntryPoint ... 19
2.4. Method Security ... 19
The <global-method-security> Element ... 19
Adding Security Pointcuts using protect-pointcut ... 20
2.5. The Default AccessDecisionManager ... 21
Spring Security 3.0.7.RELEASE iv 3. Sample Applications ... 23 3.1. Tutorial Sample ... 23 3.2. Contacts ... 23 3.3. LDAP Sample ... 24 3.4. CAS Sample ... 24 3.5. Pre-Authentication Sample ... 25
4. Spring Security Community ... 26
4.1. Issue Tracking ... 26
4.2. Becoming Involved ... 26
4.3. Further Information ... 26
II. Architecture and Implementation ... 27
5. Technical Overview ... 28
5.1. Runtime Environment ... 28
5.2. Core Components ... 28
SecurityContextHolder, SecurityContext and Authentication Objects ... 28
Obtaining information about the current user ... 29
The UserDetailsService ... 29
GrantedAuthority ... 30
Summary ... 30
5.3. Authentication ... 30
What is authentication in Spring Security? ... 30
Setting the SecurityContextHolder Contents Directly ... 32
5.4. Authentication in a Web Application ... 33
ExceptionTranslationFilter ... 33
AuthenticationEntryPoint ... 34
Authentication Mechanism ... 34
Storing the SecurityContext between requests ... 34
5.5. Access-Control (Authorization) in Spring Security ... 35
Security and AOP Advice ... 35
Secure Objects and the AbstractSecurityInterceptor ... 36
What are Configuration Attributes? ... 36
RunAsManager ... 36
AfterInvocationManager ... 37
Extending the Secure Object Model ... 37
5.6. Localization ... 37
6. Core Services ... 39
6.1. The AuthenticationManager, ProviderManager and AuthenticationProviders ... 39
DaoAuthenticationProvider ... 40
Erasing Credentials on Successful Authentication ... 40
6.2. UserDetailsService Implementations ... 41
In-Memory Authentication ... 41
JdbcDaoImpl ... 42
Authority Groups ... 42
What is a hash? ... 42
Adding Salt to a Hash ... 43
Hashing and Authentication ... 43
III. Web Application Security ... 44
7. The Security Filter Chain ... 45
7.1. DelegatingFilterProxy ... 45
7.2. FilterChainProxy ... 45
Bypassing the Filter Chain ... 47
7.3. Filter Ordering ... 47
7.4. Request Matching and HttpFirewall ... 48
7.5. Use with other Filter-Based Frameworks ... 49
8. Core Security Filters ... 50
8.1. FilterSecurityInterceptor ... 50 8.2. ExceptionTranslationFilter ... 51 AuthenticationEntryPoint ... 52 AccessDeniedHandler ... 52 8.3. SecurityContextPersistenceFilter ... 52 SecurityContextRepository ... 53 8.4. UsernamePasswordAuthenticationFilter ... 53
Application Flow on Authentication Success and Failure ... 54
9. Basic and Digest Authentication ... 56
9.1. BasicAuthenticationFilter ... 56 Configuration ... 56 9.2. DigestAuthenticationFilter ... 57 Configuration ... 58 10. Remember-Me Authentication ... 59 10.1. Overview ... 59
10.2. Simple Hash-Based Token Approach ... 59
10.3. Persistent Token Approach ... 60
10.4. Remember-Me Interfaces and Implementations ... 60
TokenBasedRememberMeServices ... 61 PersistentTokenBasedRememberMeServices ... 61 11. Session Management ... 62 11.1. SessionManagementFilter ... 62 11.2. SessionAuthenticationStrategy ... 62 11.3. Concurrency Control ... 63 12. Anonymous Authentication ... 65 12.1. Overview ... 65 12.2. Configuration ... 65 12.3. AuthenticationTrustResolver ... 66 IV. Authorization ... 68 13. Authorization Architecture ... 69 13.1. Authorities ... 69 13.2. Pre-Invocation Handling ... 69
Spring Security
3.0.7.RELEASE vi
Voting-Based AccessDecisionManager Implementations ... 70
RoleVoter ... 71
AuthenticatedVoter ... 71
Custom Voters ... 71
13.3. After Invocation Handling ... 71
14. Secure Object Implementations ... 73
14.1. AOP Alliance (MethodInvocation) Security Interceptor ... 73
Explicit MethodSecurityInterceptor Configuration ... 73
14.2. AspectJ (JoinPoint) Security Interceptor ... 73
15. Expression-Based Access Control ... 76
15.1. Overview ... 76
Common Built-In Expressions ... 76
15.2. Web Security Expressions ... 76
15.3. Method Security Expressions ... 77
@Pre and @Post Annotations ... 77
Access Control using @PreAuthorize and @PostAuthorize ... 77
Filtering using @PreFilter and @PostFilter ... 78
Built-In Expressions ... 78
The PermissionEvaluator interface ... 78
V. Additional Topics ... 80
16. Domain Object Security (ACLs) ... 81
16.1. Overview ... 81
16.2. Key Concepts ... 82
16.3. Getting Started ... 84
17. Pre-Authentication Scenarios ... 86
17.1. Pre-Authentication Framework Classes ... 86
AbstractPreAuthenticatedProcessingFilter ... 86 AbstractPreAuthenticatedAuthenticationDetailsSource ... 86 J2eeBasedPreAuthenticatedWebAuthenticationDetailsSource ... 87 PreAuthenticatedAuthenticationProvider ... 87 Http403ForbiddenEntryPoint ... 87 17.2. Concrete Implementations ... 88
Request-Header Authentication (Siteminder) ... 88
Siteminder Example Configuration ... 88
J2EE Container Authentication ... 89
18. LDAP Authentication ... 90
18.1. Overview ... 90
18.2. Using LDAP with Spring Security ... 90
18.3. Configuring an LDAP Server ... 90
Using an Embedded Test Server ... 91
Using Bind Authentication ... 91
Loading Authorities ... 91
18.4. Implementation Classes ... 92
LdapAuthenticator Implementations ... 92
BindAuthenticator ... 93
PasswordComparisonAuthenticator ... 93
Active Directory Authentication ... 93
Connecting to the LDAP Server ... 93
LDAP Search Objects ... 93
FilterBasedLdapUserSearch ... 94
LdapAuthoritiesPopulator ... 94
Spring Bean Configuration ... 94
LDAP Attributes and Customized UserDetails ... 95
19. JSP Tag Libraries ... 97
19.1. Declaring the Taglib ... 97
19.2. The authorize Tag ... 97
19.3. The authenticationTag ... 98
19.4. The accesscontrollist Tag ... 98
20. Java Authentication and Authorization Service (JAAS) Provider ... 99
20.1. Overview ... 99 20.2. Configuration ... 99 JAAS CallbackHandler ... 99 JAAS AuthorityGranter ... 100 21. CAS Authentication ... 101 21.1. Overview ... 101
21.2. How CAS Works ... 101
21.3. Configuration of CAS Client ... 101
22. X.509 Authentication ... 104
22.1. Overview ... 104
22.2. Adding X.509 Authentication to Your Web Application ... 104
22.3. Setting up SSL in Tomcat ... 105
23. Run-As Authentication Replacement ... 106
23.1. Overview ... 106
23.2. Configuration ... 106
A. Security Database Schema ... 108
A.1. User Schema ... 108
Group Authorities ... 108
A.2. Persistent Login (Remember-Me) Schema ... 109
A.3. ACL Schema ... 109
Hypersonic SQL ... 109
PostgreSQL ... 110
B. The Security Namespace ... 112
B.1. Web Application Security - the <http> Element ... 112
<http> Attributes ... 112
servlet-api-provision ... 112
path-type ... 113
lowercase-comparisons ... 113
Spring Security 3.0.7.RELEASE viii access-decision-manager-ref ... 113 access-denied-page ... 113 once-per-request ... 113 create-session ... 113 use-expressions ... 113 disable-url-rewriting ... 114 <access-denied-handler> ... 114
The <intercept-url> Element ... 114
pattern ... 114
method ... 114
access ... 114
requires-channel ... 114
filters ... 115
The <port-mappings> Element ... 115
The <form-login> Element ... 115
login-page ... 115 login-processing-url ... 115 default-target-url ... 115 always-use-default-target ... 116 authentication-failure-url ... 116 authentication-success-handler-ref ... 116 authentication-failure-handler-ref ... 116
The <http-basic> Element ... 116
The <remember-me> Element ... 116
data-source-ref ... 116
token-repository-ref ... 116
services-ref ... 117
token-repository-ref ... 117
The key Attribute ... 117
token-validity-seconds ... 117
user-service-ref ... 117
The <session-management> Element ... 117
session-fixation-protection ... 117
The <concurrency-control> Element ... 117
The max-sessions attribute ... 118
The expired-url attribute ... 118
The error-if-maximum-exceeded attribute ... 118
The session-registry-alias and session-registry-ref attributes ... 118
The <anonymous> Element ... 118
The <x509> Element ... 118
The subject-principal-regex attribute ... 118
The user-service-ref attribute ... 119
The <openid-login> Element ... 119
The logout-url attribute ... 119
The logout-success-url attribute ... 119
The invalidate-session attribute ... 119
The <custom-filter> Element ... 119
The request-cache Element ... 119
The <http-firewall> Element ... 119
B.2. Authentication Services ... 120
The <authentication-manager> Element ... 120
The <authentication-provider> Element ... 120
Using <authentication-provider> to refer to an AuthenticationProvider Bean ... 120
B.3. Method Security ... 121
The <global-method-security> Element ... 121
The secured-annotations and jsr250-annotations Attributes ... 121
Securing Methods using <protect-pointcut> ... 121
The <after-invocation-provider> Element ... 121
LDAP Namespace Options ... 121
Defining the LDAP Server using the <ldap-server> Element ... 121
The <ldap-provider> Element ... 122
Spring Security
3.0.7.RELEASE x
Preface
Spring Security provides a comprehensive security solution for J2EE-based enterprise software applications. As you will discover as you venture through this reference guide, we have tried to provide you a useful and highly configurable security system.
Security is an ever-moving target, and it's important to pursue a comprehensive, system-wide approach. In security circles we encourage you to adopt "layers of security", so that each layer tries to be as secure as possible in its own right, with successive layers providing additional security. The "tighter" the security of each layer, the more robust and safe your application will be. At the bottom level you'll need to deal with issues such as transport security and system identification, in order to mitigate man-in-the-middle attacks. Next you'll generally utilise firewalls, perhaps with VPNs or IP security to ensure only authorised systems can attempt to connect. In corporate environments you may deploy a DMZ to separate public-facing servers from backend database and application servers. Your operating system will also play a critical part, addressing issues such as running processes as non-privileged users and maximising file system security. An operating system will usually also be configured with its own firewall. Hopefully somewhere along the way you'll be trying to prevent denial of service and brute force attacks against the system. An intrusion detection system will also be especially useful for monitoring and responding to attacks, with such systems able to take protective action such as blocking offending TCP/IP addresses in real-time. Moving to the higher layers, your Java Virtual Machine will hopefully be configured to minimize the permissions granted to different Java types, and then your application will add its own problem domain-specific security configuration. Spring Security makes this latter area - application security - much easier.
Of course, you will need to properly address all security layers mentioned above, together with managerial factors that encompass every layer. A non-exhaustive list of such managerial factors would include security bulletin monitoring, patching, personnel vetting, audits, change control, engineering management systems, data backup, disaster recovery, performance benchmarking, load monitoring, centralised logging, incident response procedures etc.
With Spring Security being focused on helping you with the enterprise application security layer, you will find that there are as many different requirements as there are business problem domains. A banking application has different needs from an ecommerce application. An ecommerce application has different needs from a corporate sales force automation tool. These custom requirements make application security interesting, challenging and rewarding.
Please read Part I, “Getting Started”, in its entirety to begin with. This will introduce you to the framework and the namespace-based configuration system with which you can get up and running quite quickly. To get more of an understanding of how Spring Security works, and some of the classes you might need to use, you should then read Part II, “Architecture and Implementation”. The remaining parts of this guide are structured in a more traditional reference style, designed to be read on an as-required basis. We'd also recommend that you read up as much as possible on application security issues in general. Spring Security is not a panacea which will solve all security issues. It is important that the application is designed with security in mind from the start. Attempting to retrofit it is not a good idea. In particular, if you are building a web application, you should be aware of the many potential vulnerabilities such as cross-site scripting, request-forgery and session-hijacking which you should be
taking into account from the start. The OWASP web site (http://www.owasp.org/) maintains a top ten list of web application vulnerabilities as well as a lot of useful reference information.
We hope that you find this reference guide useful, and we welcome your feedback and suggestions. Finally, welcome to the Spring Security community.
Part I. Getting Started
The later parts of this guide provide an in-depth discussion of the framework architecture and implementation classes, which you need to understand if you want to do any serious customization. In this part, we'll introduce Spring Security 3.0, give a brief overview of the project's history and take a slightly gentler look at how to get started using the framework. In particular, we'll look at namespace configuration which provides a much simpler way of securing your application compared to the traditional Spring bean approach where you have to wire up all the implementation classes individually.
We'll also take a look at the sample applications that are available. It's worth trying to run these and experimenting with them a bit even before you read the later sections - you can dip back into them as your understanding of the framework increases. Please also check out the project website [http://static.springsource.org/spring-security/site/index.html] as it has useful information on building the project, plus links to articles, videos and tutorials.
1.1 What is Spring Security?
Spring Security provides comprehensive security services for J2EE-based enterprise software applications. There is a particular emphasis on supporting projects built using The Spring Framework, which is the leading J2EE solution for enterprise software development. If you're not using Spring for developing enterprise applications, we warmly encourage you to take a closer look at it. Some familiarity with Spring - and in particular dependency injection principles - will help you get up to speed with Spring Security more easily.
People use Spring Security for many reasons, but most are drawn to the project after finding the security features of J2EE's Servlet Specification or EJB Specification lack the depth required for typical enterprise application scenarios. Whilst mentioning these standards, it's important to recognise that they are not portable at a WAR or EAR level. Therefore, if you switch server environments, it is typically a lot of work to reconfigure your application's security in the new target environment. Using Spring Security overcomes these problems, and also brings you dozens of other useful, customisable security features. As you probably know two major areas of application security are “authentication” and “authorization” (or “access-control”). These are the two main areas that Spring Security targets. “Authentication” is the process of establishing a principal is who they claim to be (a “principal” generally means a user, device or some other system which can perform an action in your application). “Authorization” refers to the process of deciding whether a principal is allowed to perform an action within your application. To arrive at the point where an authorization decision is needed, the identity of the principal has already been established by the authentication process. These concepts are common, and not at all specific to Spring Security.
At an authentication level, Spring Security supports a wide range of authentication models. Most of these authentication models are either provided by third parties, or are developed by relevant standards bodies such as the Internet Engineering Task Force. In addition, Spring Security provides its own set of authentication features. Specifically, Spring Security currently supports authentication integration with all of these technologies:
• HTTP BASIC authentication headers (an IEFT RFC-based standard) • HTTP Digest authentication headers (an IEFT RFC-based standard) • HTTP X.509 client certificate exchange (an IEFT RFC-based standard)
• LDAP (a very common approach to cross-platform authentication needs, especially in large environments)
• Form-based authentication (for simple user interface needs) • OpenID authentication
• Authentication based on pre-established request headers (such as Computer Associates Siteminder) • JA-SIG Central Authentication Service (otherwise known as CAS, which is a popular open source
single sign on system)
• Transparent authentication context propagation for Remote Method Invocation (RMI) and HttpInvoker (a Spring remoting protocol)
Spring Security
3.0.7.RELEASE 3
• Run-as authentication (which is useful if one call should proceed with a different security identity) • Java Authentication and Authorization Service (JAAS)
• JEE container autentication (so you can still use Container Managed Authentication if desired) • Kerberos
• Java Open Source Single Sign On (JOSSO) * • OpenNMS Network Management Platform * • AppFuse *
• AndroMDA * • Mule ESB *
• Direct Web Request (DWR) * • Grails * • Tapestry * • JTrac * • Jasypt * • Roller * • Elastic Path * • Atlassian Crowd *
• Your own authentication systems (see below)
(* Denotes provided by a third party; check our integration page [http://acegisecurity.org/ powering.html] for links to the latest details)
Many independent software vendors (ISVs) adopt Spring Security because of this significant choice of flexible authentication models. Doing so allows them to quickly integrate their solutions with whatever their end clients need, without undertaking a lot of engineering or requiring the client to change their environment. If none of the above authentication mechanisms suit your needs, Spring Security is an open platform and it is quite simple to write your own authentication mechanism. Many corporate users of Spring Security need to integrate with "legacy" systems that don't follow any particular security standards, and Spring Security is happy to "play nicely" with such systems.
Sometimes the mere process of authentication isn't enough. Sometimes you need to also differentiate security based on the way a principal is interacting with your application. For example, you might want to ensure requests only arrive over HTTPS, in order to protect passwords from eavesdropping or end users from man-in-the-middle attacks. This is especially helpful to protect password recovery processes from brute force attacks, or simply to make it harder for people to duplicate your application's key content. To help you achieve these goals, Spring Security fully supports automatic "channel security", together with JCaptcha integration for human user detection.
Irrespective of how authentication was undertaken, Spring Security provides a deep set of authorization capabilities. There are three main areas of interest in respect of authorization, these being authorizing web requests, authorizing whether methods can be invoked, and authorizing access to individual domain object instances. To help you understand the differences, consider the authorization capabilities found in the Servlet Specification web pattern security, EJB Container Managed Security and file system security respectively. Spring Security provides deep capabilities in all of these important areas, which we'll explore later in this reference guide.
1.2 History
Spring Security began in late 2003 as “The Acegi Security System for Spring”. A question was posed on the Spring Developers' mailing list asking whether there had been any consideration given to a Spring-based security implementation. At the time the Spring community was relatively small (especially compared with the size today!), and indeed Spring itself had only existed as a SourceForge project from early 2003. The response to the question was that it was a worthwhile area, although a lack of time currently prevented its exploration.
With that in mind, a simple security implementation was built and not released. A few weeks later another member of the Spring community inquired about security, and at the time this code was offered to them. Several other requests followed, and by January 2004 around twenty people were using the code. These pioneering users were joined by others who suggested a SourceForge project was in order, which was duly established in March 2004.
In those early days, the project didn't have any of its own authentication modules. Container Managed Security was relied upon for the authentication process, with Acegi Security instead focusing on authorization. This was suitable at first, but as more and more users requested additional container support, the fundamental limitation of container-specific authentication realm interfaces became clear. There was also a related issue of adding new JARs to the container's classpath, which was a common source of end user confusion and misconfiguration.
Acegi Security-specific authentication services were subsequently introduced. Around a year later, Acegi Security became an official Spring Framework subproject. The 1.0.0 final release was published in May 2006 - after more than two and a half years of active use in numerous production software projects and many hundreds of improvements and community contributions.
Acegi Security became an official Spring Portfolio project towards the end of 2007 and was rebranded as “Spring Security”.
Today Spring Security enjoys a strong and active open source community. There are thousands of messages about Spring Security on the support forums. There is an active core of developers who work on the code itself and an active community which also regularly share patches and support their peers.
1.3 Release Numbering
It is useful to understand how Spring Security release numbers work, as it will help you identify the effort (or lack thereof) involved in migrating to future releases of the project. Officially, we use the Apache Portable Runtime Project versioning guidelines, which can be viewed at http:// apr.apache.org/versioning.html. We quote the introduction contained on that page for your convenience:
“Versions are denoted using a standard triplet of integers: MAJOR.MINOR.PATCH. The basic intent is that MAJOR versions are incompatible, large-scale upgrades of the API. MINOR versions retain source
Spring Security
3.0.7.RELEASE 5
1.4 Getting Spring Security
You can get hold of Spring Security in several ways. You can download a packaged distribution from the main Spring download page [http://www.springsource.com/download/community?project=Spring %20Security], download individual jars (and sample WAR files) from the Maven Central repository (or a SpringSource Maven repository for snapshot and milestone releases) or, alternatively, you can build the project from source yourself. See the project web site for more details.
Project Modules
In Spring Security 3.0, the codebase has been sub-divided into separate jars which more clearly separate different functionaltiy areas and third-party dependencies. If you are using Maven to build your project, then these are the modules you will add to your pom.xml. Even if you're not using Maven, we'd recommend that you consult the pom.xml files to get an idea of third-party dependencies and versions. Alternatively, a good idea is to examine the libraries that are included in the sample applications.
Core - spring-security-core.jar
Contains core authentication and access-contol classes and interfaces, remoting support and basic provisioning APIs. Required by any application which uses Spring Security. Supports standalone applications, remote clients, method (service layer) security and JDBC user provisioning. Contains the top-level packages: • org.springframework.security.core • org.springframework.security.access • org.springframework.security.authentication • org.springframework.security.provisioning • org.springframework.security.remoting Web - spring-security-web.jar
Contains filters and related web-security infrastructure code. Anything with a servlet API dependency. You'll need it if you require Spring Security web authentication services and URL-based access-control. The main package is org.springframework.security.web.
Config - spring-security-config.jar
Contains the security namespace parsing code (and hence nothing that you are likely yo use directly in your application). You need it if you are using the Spring Security XML namespace for configuration. The main package is org.springframework.security.config.
LDAP - spring-security-ldap.jar
LDAP authentication and provisioning code. Required if you need to use LDAP authentication or manage LDAP user entries. The top-level package is org.springframework.security.ldap.
ACL - spring-security-acl.jar
Specialized domain object ACL implementation. Used to apply security to specific domain object instances within your application. The top-level package is
org.springframework.security.acls.
CAS - spring-security-cas-client.jar
Spring Security's CAS client integration. If you want to use Spring Security web authentication with a CAS single sign-on server. The top-level package is org.springframework.security.cas.
OpenID - spring-security-openid.jar
OpenID web authentication support. Used to authenticate users against an external OpenID server.
org.springframework.security.openid. Requires OpenID4Java.
Checking out the Source
Since Spring Security is an Open Source project, we'd strongly encourage you to check out the source code using git. This will give you full access to all the sample applications and you can build the most up to date version of the project easily. Having the source for a project is also a huge help in debugging. Exception stack traces are no longer obscure black-box issues but you can get straight to the line that's causing the problem and work out what's happening. The source is the ultimate documentation for a project and often the simplest place to find out how something actually works.
To obtain the source for the project trunk, use the following git command:
git clone git://git.springsource.org/spring-security/spring-security.git
You can checkout specific versions from https://src.springframework.org/svn/ spring-security/tags/.
Spring Security
3.0.7.RELEASE 7
2.1 Introduction
Namespace configuration has been available since version 2.0 of the Spring framework. It allows you to supplement the traditional Spring beans application context syntax with elements from additional XML schema. You can find more information in the Spring Reference Documentation [http://static.springsource.org/spring/docs/3.0.x/spring-framework-reference/htmlsingle/spring-framework-reference.htm]. A namespace element can be used simply to allow a more concise way of configuring an individual bean or, more powerfully, to define an alternative configuration syntax which more closely matches the problem domain and hides the underlying complexity from the user. A simple element may conceal the fact that multiple beans and processing steps are being added to the application context. For example, adding the following element from the security namespace to an application context will start up an embedded LDAP server for testing use within the application:
<security:ldap-server />
This is much simpler than wiring up the equivalent Apache Directory Server beans. The most common alternative configuration requirements are supported by attributes on the ldap-server element and the user is isolated from worrying about which beans they need to create and what the bean property names are. 1. Use of a good XML editor while editing the application context file should provide information on the attributes and elements that are available. We would recommend that you try out the SpringSource Tool Suite [http://www.springsource.com/products/sts] as it has special features for working with standard Spring namespaces.
To start using the security namespace in your application context, you first need to make sure that the
spring-security-config jar is on your classpath. Then all you need to do is add the schema declaration to your application context file:
<beans xmlns="http://www.springframework.org/schema/beans" xmlns:security="http://www.springframework.org/schema/security" xmlns:xsi="http://www.w3.org/2001/XMLSchema-instance" xsi:schemaLocation="http://www.springframework.org/schema/beans http://www.springframework.org/schema/beans/spring-beans-3.0.xsd http://www.springframework.org/schema/security http://www.springframework.org/schema/security/spring-security-3.0.3.xsd"> ... </beans>
In many of the examples you will see (and in the sample) applications, we will often use "security" as the default namespace rather than "beans", which means we can omit the prefix on all the security namespace elements, making the content easier to read. You may also want to do this if you have your application context divided up into separate files and have most of your security configuration in one of them. Your security application context file would then start like this
1
<beans:beans xmlns="http://www.springframework.org/schema/security" xmlns:beans="http://www.springframework.org/schema/beans" xmlns:xsi="http://www.w3.org/2001/XMLSchema-instance" xsi:schemaLocation="http://www.springframework.org/schema/beans http://www.springframework.org/schema/beans/spring-beans-3.0.xsd http://www.springframework.org/schema/security http://www.springframework.org/schema/security/spring-security-3.0.3.xsd"> ... </beans:beans>
We'll assume this syntax is being used from now on in this chapter.
Design of the Namespace
The namespace is designed to capture the most common uses of the framework and provide a simplified and concise syntax for enabling them within an application. The design is based around the large-scale dependencies within the framework, and can be divided up into the following areas:
• Web/HTTP Security - the most complex part. Sets up the filters and related service beans used to apply the framework authentication mechanisms, to secure URLs, render login and error pages and much more.
• Business Object (Method) Security - options for securing the service layer.
• AuthenticationManager - handles authentication requests from other parts of the framework. • AccessDecisionManager - provides access decisions for web and method security. A default one will
be registered, but you can also choose to use a custom one, declared using normal Spring bean syntax. • AuthenticationProviders - mechanisms against which the authentication manager authenticates users. The namespace provides supports for several standard options and also a means of adding custom beans declared using a traditional syntax.
• UserDetailsService - closely related to authentication providers, but often also required by other beans.
We'll see how to configure these in the following sections.
2.2 Getting Started with Security Namespace
Configuration
In this section, we'll look at how you can build up a namespace configuration to use some of the main features of the framework. Let's assume you initially want to get up and running as quickly as possible and add authentication support and access control to an existing web application, with a few test logins. Then we'll look at how to change over to authenticating against a database or other security repository. In later sections we'll introduce more advanced namespace configuration options.
web.xml
Configuration
Spring Security 3.0.7.RELEASE 9 <filter-name>springSecurityFilterChain</filter-name> <filter-class>org.springframework.web.filter.DelegatingFilterProxy</filter-class> </filter> <filter-mapping> <filter-name>springSecurityFilterChain</filter-name> <url-pattern>/*</url-pattern> </filter-mapping>
This provides a hook into the Spring Security web infrastructure. DelegatingFilterProxy is a Spring Framework class which delegates to a filter implementation which is defined as a Spring bean in your application context. In this case, the bean is named “springSecurityFilterChain”, which is an internal infrastructure bean created by the namespace to handle web security. Note that you should not use this bean name yourself. Once you've added this to your web.xml, you're ready to start editing your application context file. Web security services are configured using the <http> element.
A Minimal
<http>
Configuration
All you need to enable web security to begin with is
<http auto-config='true'>
<intercept-url pattern="/**" access="ROLE_USER" /> </http>
Which says that we want all URLs within our application to be secured, requiring the role ROLE_USER
to access them. The <http> element is the parent for all web-related namespace functionality. The
<intercept-url> element defines a pattern which is matched against the URLs of incoming requests using an ant path style syntax2. The access attribute defines the access requirements for requests matching the given pattern. With the default configuration, this is typically a comma-separated list of roles, one of which a user must have to be allowed to make the request. The prefix “ROLE_” is a marker which indicates that a simple comparison with the user's authorities should be made. In other words, a normal role-based check should be used. Access-control in Spring Security is not limited to the use of simple roles (hence the use of the prefix to differentiate between different types of security attributes). We'll see later how the interpretation can vary3.
Note
You can use multiple <intercept-url> elements to define different access requirements for different sets of URLs, but they will be evaluated in the order listed and the first match will be used. So you must put the most specific matches at the top. You can also add a method attribute to limit the match to a particular HTTP method (GET,
POST, PUT etc.). If a request matches multiple patterns, the method-specific match will take precedence regardless of ordering.
To add some users, you can define a set of test data directly in the namespace:
2
See the section on Request Matching in the Web Application Infrastructure chapter for more details on how matches are actually performed.
3
The interpretation of the comma-separated values in the access attribute depends on the implementation of the AccessDecisionManager which is used. In Spring Security 3.0, the attribute can also be populated with an EL expression.
<authentication-manager> <authentication-provider> <user-service>
<user name="jimi" password="jimispassword" authorities="ROLE_USER, ROLE_ADMIN" /> <user name="bob" password="bobspassword" authorities="ROLE_USER" />
</user-service>
</authentication-provider> </authentication-manager>
If you are familiar with pre-namespace versions of the framework, you can probably already guess roughly what's going on here. The <http> element is responsible for creating a
FilterChainProxy and the filter beans which it uses. Common problems like incorrect filter ordering are no longer an issue as the filter positions are predefined.
The <authentication-provider> element creates a
DaoAuthenticationProvider bean and the <user-service> element creates an
InMemoryDaoImpl. All authentication-provider elements must be children of the
<authentication-manager> element, which creates a ProviderManager and registers the authentication providers with it. You can find more detailed information on the beans that are created in the namespace appendix. It's worth cross-checking this if you want to start understanding what the important classes in the framework are and how they are used, particularly if you want to customise things later.
The configuration above defines two users, their passwords and their roles within the application (which will be used for access control). It is also possible to load user information from a standard properties file using the properties attribute on user-service. See the section on in-memory authentication for more details on the file format. Using the <authentication-provider> element means that the user information will be used by the authentication manager to process authentication requests. You can have multiple <authentication-provider> elements to define different authentication sources and each will be consulted in turn.
At this point you should be able to start up your application and you will be required to log in to proceed. Try it out, or try experimenting with the “tutorial” sample application that comes with the project. The above configuration actually adds quite a few services to the application because we have used the
auto-config attribute. For example, form-based login processing is automatically enabled.
What does auto-config Include?
The auto-config attribute, as we have used it above, is just a shorthand syntax for:
<http>
<form-login /> <http-basic />
Spring Security
3.0.7.RELEASE 11
These other elements are responsible for setting up form-login, basic authentication and logout handling services respectively 4 . They each have attributes which can be used to alter their behaviour.
Form and Basic Login Options
You might be wondering where the login form came from when you were prompted to log in, since we made no mention of any HTML files or JSPs. In fact, since we didn't explicitly set a URL for the login page, Spring Security generates one automatically, based on the features that are enabled and using standard values for the URL which processes the submitted login, the default target URL the user will be sent to after loggin in and so on. However, the namespace offers plenty of support to allow you to customize these options. For example, if you want to supply your own login page, you could use:
<http auto-config='true'>
<intercept-url pattern="/login.jsp*" access="IS_AUTHENTICATED_ANONYMOUSLY"/> <intercept-url pattern="/**" access="ROLE_USER" />
<form-login login-page='/login.jsp'/> </http>
Note that you can still use auto-config. The form-login element just overrides the default settings. Also note that we've added an extra intercept-url element to say that any requests for the login page should be available to anonymous users 5. Otherwise the request would be matched by the pattern /** and it wouldn't be possible to access the login page itself! This is a common configuration error and will result in an infinite loop in the application. Spring Security will emit a warning in the log if your login page appears to be secured. It is also possible to have all requests matching a particular pattern bypass the security filter chain completely:
<http auto-config='true'>
<intercept-url pattern="/css/**" filters="none"/> <intercept-url pattern="/login.jsp*" filters="none"/> <intercept-url pattern="/**" access="ROLE_USER" /> <form-login login-page='/login.jsp'/>
</http>
It's important to realise that these requests will be completely oblivious to any further Spring Security web-related configuration or additional attributes such as requires-channel, so you will not be able to access information on the current user or call secured methods during the request. Use
access='IS_AUTHENTICATED_ANONYMOUSLY' as an alternative if you still want the security filter chain to be applied.
4
In versions prior to 3.0, this list also included remember-me functionality. This could cause some confusing errors with some configurations and was removed in 3.0. In 3.0, the addition of an AnonymousAuthenticationFilter is part of the default
<http> configuration, so the <anonymous /> element is added regardless of whether auto-config is enabled. 5
See the chapter on anonymous authentication and also the AuthenticatedVoter class for more details on how the value
Note
Using filters="none" operates by creating an empty filter chain in Spring Security's FilterChainProxy, whereas the access attributes are used to configure the FilterSecurityInterceptor in the single filter chain which is created by the namespace configuration. The two are applied independently, so if you have an access contraint for a sub-pattern of a pattern which has a filters="none" attribute, the access constraint will be ignored, even if it is listed first. It isn't possible to apply a
filters="none" attribute to the pattern /** since this is used by the namespace filter chain. In version 3.1 things are more flexible. You can define multiple filter chains and the
filters attribute is no longer supported.
If you want to use basic authentication instead of form login, then change the configuration to
<http auto-config='true'>
<intercept-url pattern="/**" access="ROLE_USER" /> <http-basic />
</http>
Basic authentication will then take precedence and will be used to prompt for a login when a user attempts to access a protected resource. Form login is still available in this configuration if you wish to use it, for example through a login form embedded in another web page.
Setting a Default Post-Login Destination
If a form login isn't prompted by an attempt to access a protected resource, the default-target-url option comes into play. This is the URL the user will be taken to after logging in, and defaults to "/". You can also configure things so that they user always ends up at this page (regardless of whether the login was "on-demand" or they explicitly chose to log in) by setting the always-use-default-target attribute to "true". This is useful if your application always requires that the user starts at a "home" page, for example:
<http>
<intercept-url pattern='/login.htm*' filters='none'/> <intercept-url pattern='/**' access='ROLE_USER' />
<form-login login-page='/login.htm' default-target-url='/home.htm' always-use-default-target='true' />
</http>
Using other Authentication Providers
In practice you will need a more scalable source of user information than a few names added to the application context file. Most likely you will want to store your user information in something
Spring Security
3.0.7.RELEASE 13
UserDetailsService, called "myUserDetailsService" in your application context, then you can authenticate against this using
<authentication-manager>
<authentication-provider user-service-ref='myUserDetailsService'/> </authentication-manager>
If you want to use a database, then you can use
<authentication-manager> <authentication-provider> <jdbc-user-service data-source-ref="securityDataSource"/> </authentication-provider> </authentication-manager>
Where “securityDataSource” is the name of a DataSource bean in the application context, pointing at a database containing the standard Spring Security user data tables. Alternatively, you could configure a Spring Security JdbcDaoImpl bean and point at that using the user-service-ref attribute:
<authentication-manager>
<authentication-provider user-service-ref='myUserDetailsService'/> </authentication-manager>
<beans:bean id="myUserDetailsService"
class="org.springframework.security.core.userdetails.jdbc.JdbcDaoImpl"> <beans:property name="dataSource" ref="dataSource"/>
</beans:bean>
You can also use standard AuthenticationProvider beans as follows
<authentication-manager>
<authentication-provider ref='myAuthenticationProvider'/> </authentication-manager>
where myAuthenticationProvider is the name of a bean in your application context which implements AuthenticationProvider. You can use multiple authentication-provider
elements, in which case they will be checked in the order they are declared when attempting to authenticated a user. See Section 2.6, “The Authentication Manager and the Namespace” for more on information on how the Spring Security AuthenticationManager is configured using the namespace.
Adding a Password Encoder
Often your password data will be encoded using a hashing algorithm. This is supported by the
<password-encoder> element. With SHA encoded passwords, the original authentication provider configuration would look like this:
<authentication-manager>
<authentication-provider>
<password-encoder hash="sha"/> <user-service>
<user name="jimi" password="d7e6351eaa13189a5a3641bab846c8e8c69ba39f" authorities="ROLE_USER, ROLE_ADMIN" />
<user name="bob" password="4e7421b1b8765d8f9406d87e7cc6aa784c4ab97f" authorities="ROLE_USER" /> </user-service> </authentication-provider> </authentication-manager>
When using hashed passwords, it's also a good idea to use a salt value to protect against dictionary attacks and Spring Security supports this too. Ideally you would want to use a randomly generated salt value for each user, but you can use any property of the UserDetails object which is loaded by your
UserDetailsService. For example, to use the username property, you would use
<password-encoder hash="sha">
<salt-source user-property="username"/> </password-encoder>
You can use a custom password encoder bean by using the ref attribute of password-encoder. This should contain the name of a bean in the application context which is an instance of Spring Security's PasswordEncoder interface.
2.3 Advanced Web Features
Remember-Me Authentication
See the separate Remember-Me chapter for information on remember-me namespace configuration.
Adding HTTP/HTTPS Channel Security
If your application supports both HTTP and HTTPS, and you require that particular URLs can only be accessed over HTTPS, then this is directly supported using the requires-channel attribute on
<intercept-url>:
<http>
<intercept-url pattern="/secure/**" access="ROLE_USER" requires-channel="https"/> <intercept-url pattern="/**" access="ROLE_USER" requires-channel="any"/>
... </http>
With this configuration in place, if a user attempts to access anything matching the "/secure/**" pattern using HTTP, they will first be redirected to an HTTPS URL. The available options are "http", "https"
Spring Security
3.0.7.RELEASE 15
If your application uses non-standard ports for HTTP and/or HTTPS, you can specify a list of port mappings as follows: <http> ... <port-mappings> <port-mapping http="9080" https="9443"/> </port-mappings> </http>
Session Management
Detecting TimeoutsYou can configure Spring Security to detect the submission of an invalid session ID and redirect the user to an appropriate URL. This is achieved through the session-management element:
<http> ...
<session-management invalid-session-url="/sessionTimeout.htm" /> </http>
Concurrent Session Control
If you wish to place constraints on a single user's ability to log in to your application, Spring Security supports this out of the box with the following simple additions. First you need to add the following listener to your web.xml file to keep Spring Security updated about session lifecycle events:
<listener>
<listener-class>
org.springframework.security.web.session.HttpSessionEventPublisher </listener-class>
</listener>
Then add the following lines to your application context:
<http> ... <session-management> <concurrency-control max-sessions="1" /> </session-management> </http>
This will prevent a user from logging in multiple times - a second login will cause the first to be invalidated. Often you would prefer to prevent a second login, in which case you can use
<http> ...
<session-management>
</session-management> </http>
The second login will then be rejected. By “rejected”, we mean that the user will be sent to the
authentication-failure-url if form-based login is being used. If the second authentication takes place through another non-interactive mechanism, such as “remember-me”, an “unauthorized” (402) error will be sent to the client. If instead you want to use an error page, you can add the attribute
session-authentication-error-url to the session-management element.
If you are using a customized authentication filter for form-based login, then you have to configure concurrent session control support explicitly. More details can be found in the Session Management chapter.
Session Fixation Attack Protection
Session fixation [http://en.wikipedia.org/wiki/Session_fixation] attacks are a potential risk where it is possible for a malicious attacker to create a session by accessing a site, then persuade another user to log in with the same session (by sending them a link containing the session identifier as a parameter, for example). Spring Security protects against this automatically by creating a new session when a user logs in. If you don't require this protection, or it conflicts with some other requirement, you can control the behaviour using the session-fixation-protection attribute on <session-management>, which has three options
• migrateSession - creates a new session and copies the existing session attributes to the new session. This is the default.
• none - Don't do anything. The original session will be retained.
• newSession - Create a new "clean" session, without copying the existing session data.
OpenID Support
The namespace supports OpenID [http://openid.net/] login either instead of, or in addition to normal form-based login, with a simple change:
<http>
<intercept-url pattern="/**" access="ROLE_USER" /> <openid-login />
</http>
You should then register yourself with an OpenID provider (such as myopenid.com), and add the user information to your in-memory <user-service> :
<user name="http://jimi.hendrix.myopenid.com/" authorities="ROLE_USER" />
You should be able to login using the myopenid.com site to authenticate. It is also possible to select a specific UserDetailsService bean for use OpenID by setting the user-service-ref
Spring Security
3.0.7.RELEASE 17
will be generate internally, preventing you from accidentally using this user data as an authentication source elsewhere in your configuration.
Attribute Exchange
Support for OpenID attribute exchange [http://openid.net/specs/openid-attribute-exchange-1_0.html]. As an example, the following configuration would attempt to retrieve the email and full name from the OpenID provider, for use by the application:
<openid-login>
<attribute-exchange>
<openid-attribute name="email" type="http://axschema.org/contact/email" required="true" /> <openid-attribute name="name" type="http://axschema.org/namePerson" />
</attribute-exchange> </openid-login>
The “type” of each OpenID attribute is a URI, determined by a particular schema, in this case http:// axschema.org/. If an attribute must be retrieved for successful authentication, the required attribute can be set. The exact schema and attributes supported will depend on your OpenID provider. The attribute values are returned as part of the authentication process and can be accessed afterwards using the following code:
OpenIDAuthenticationToken token = (OpenIDAuthenticationToken)SecurityContextHolder.getContext().getAuthentication(); List<OpenIDAttribute> attributes = token.getAttributes();
The OpenIDAttribute contains the attribute type and the retrieved value (or values in the case of multi-valued attributes). We'll see more about how the SecurityContextHolder class is used when we look at core Spring Security components in the technical overview chapter.
Adding in Your Own Filters
If you've used Spring Security before, you'll know that the framework maintains a chain of filters in order to apply its services. You may want to add your own filters to the stack at particular locations or use a Spring Security filter for which there isn't currently a namespace configuration option (CAS, for example). Or you might want to use a customized version of a standard namespace filter, such as the UsernamePasswordAuthenticationFilter which is created by the <form-login>
element, taking advantage of some of the extra configuration options which are available by using the bean explicitly. How can you do this with namespace configuration, since the filter chain is not directly exposed?
The order of the filters is always strictly enforced when using the namespace. When the application context is being created, the filter beans are sorted by the namespace handling code and the standard Spring Security filters each have an alias in the namespace and a well-known position.
Note
In previous versions, the sorting took place after the filter instances had been created, during post-processing of the application context. In version 3.0+ the sorting is now done at the bean metadata level, before the classes have been instantiated. This has implications for how you add your own filters to the stack as the entire filter list must be known during the parsing of the <http> element, so the syntax has changed slightly in 3.0.
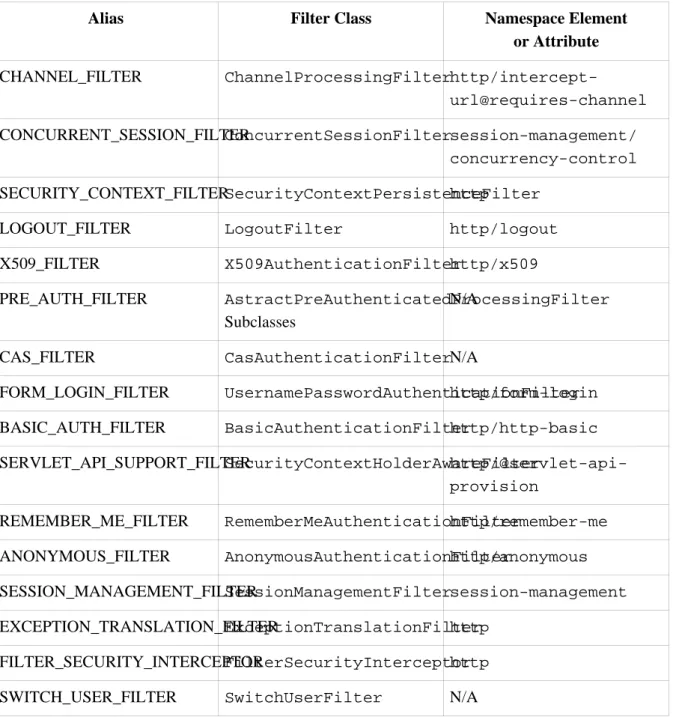
The filters, aliases and namespace elements/attributes which create the filters are shown in Table 2.1, “Standard Filter Aliases and Ordering”. The filters are listed in the order in which they occur in the filter chain.
Table 2.1. Standard Filter Aliases and Ordering
Alias Filter Class Namespace Element
or Attribute CHANNEL_FILTER ChannelProcessingFilterhttp/intercept-url@requires-channel CONCURRENT_SESSION_FILTERConcurrentSessionFiltersession-management/ concurrency-control SECURITY_CONTEXT_FILTERSecurityContextPersistenceFilterhttp
LOGOUT_FILTER LogoutFilter http/logout
X509_FILTER X509AuthenticationFilterhttp/x509
PRE_AUTH_FILTER AstractPreAuthenticatedProcessingFilter
Subclasses
N/A
CAS_FILTER CasAuthenticationFilterN/A
FORM_LOGIN_FILTER UsernamePasswordAuthenticationFilterhttp/form-login
BASIC_AUTH_FILTER BasicAuthenticationFilterhttp/http-basic
SERVLET_API_SUPPORT_FILTERSecurityContextHolderAwareFilter http/@servlet-api-provision
REMEMBER_ME_FILTER RememberMeAuthenticationFilterhttp/remember-me
ANONYMOUS_FILTER AnonymousAuthenticationFilterhttp/anonymous
SESSION_MANAGEMENT_FILTERSessionManagementFiltersession-management
EXCEPTION_TRANSLATION_FILTERExceptionTranslationFilterhttp
FILTER_SECURITY_INTERCEPTORFilterSecurityInterceptorhttp
SWITCH_USER_FILTER SwitchUserFilter N/A
You can add your own filter to the stack, using the custom-filter element and one of these names to specify the position your filter should appear at:
<http>
<custom-filter position="FORM_LOGIN_FILTER" ref="myFilter" /> </http>
Spring Security
3.0.7.RELEASE 19
You can also use the after or before attributes if you want your filter to be inserted before or after another filter in the stack. The names "FIRST" and "LAST" can be used with the position attribute to indicate that you want your filter to appear before or after the entire stack, respectively.
Avoiding filter position conflicts
If you are inserting a custom filter which may occupy the same position as one of the standard filters created by the namespace then it's important that you don't include the namespace versions by mistake. Avoid using the auto-config attribute and remove any elements which create filters whose functionality you want to replace.
Note that you can't replace filters which are created by the use of the <http> element itself - SecurityContextPersistenceFilter, ExceptionTranslationFilter
or FilterSecurityInterceptor.
If you're replacing a namespace filter which requires an authentication entry point (i.e. where the authentication process is triggered by an attempt by an unauthenticated user to access to a secured resource), you will need to add a custom entry point bean too.
Setting a Custom AuthenticationEntryPoint
If you aren't using form login, OpenID or basic authentication through the namespace, you may want to define an authentication filter and entry point using a traditional bean syntax and link them into the namespace, as we've just seen. The corresponding AuthenticationEntryPoint can be set using the entry-point-ref attribute on the <http> element.
The CAS sample application is a good example of the use of custom beans with the namespace, including this syntax. If you aren't familiar with authentication entry points, they are discussed in the technical overview chapter.
2.4 Method Security
From version 2.0 onwards Spring Security has improved support substantially for adding security to your service layer methods. It provides support for JSR-250 annotation security as well as the framework's original @Secured annotation. From 3.0 you can also make use of new expression-based annotations. You can apply security to a single bean, using the intercept-methods element to decorate the bean declaration, or you can secure multiple beans across the entire service layer using the AspectJ style pointcuts.
The
<global-method-security>
Element
This element is used to enable annotation-based security in your application (by setting the appropriate attributes on the element), and also to group together security pointcut declarations which will be applied across your entire application context. You should only declare one <global-method-security>
element. The following declaration would enable support for Spring Security's @Secured:
<global-method-security secured-annotations="enabled" />
Adding an annotation to a method (on an class or interface) would then limit the access to that method accordingly. Spring Security's native annotation support defines a set of attributes for the method. These will be passed to the AccessDecisionManager for it to make the actual decision:
public interface BankService {
@Secured("IS_AUTHENTICATED_ANONYMOUSLY") public Account readAccount(Long id);
@Secured("IS_AUTHENTICATED_ANONYMOUSLY") public Account[] findAccounts();
@Secured("ROLE_TELLER")
public Account post(Account account, double amount); }
Support for JSR-250 annotations can be enabled using
<global-method-security jsr250-annotations="enabled" />
These are standards-based and allow simple role-based constraints to be applied but do not have the power Spring Security's native annotations. To use the new expression-based syntax, you would use
<global-method-security pre-post-annotations="enabled" />
and the equivalent Java code would be
public interface BankService {
@PreAuthorize("isAnonymous()") public Account readAccount(Long id);
@PreAuthorize("isAnonymous()") public Account[] findAccounts();
@PreAuthorize("hasAuthority('ROLE_TELLER')")
public Account post(Account account, double amount); }
Expression-based annotations are a good choice if you need to define simple rules that go beyond checking the role names against the user's list of authorities. You can enable more than one type of annotation in the same application, but you should avoid mixing annotations types in the same interface or class to avoid confusion.
Adding Security Pointcuts using protect-pointcut
The use of protect-pointcut is particularly powerful, as it allows you to apply security to many beans with only a simple declaration. Consider the following example:
Spring Security
3.0.7.RELEASE 21
<protect-pointcut expression="execution(* com.mycompany.*Service.*(..))" access="ROLE_USER"/>
</global-method-security>
This will protect all methods on beans declared in the application context whose classes are in the
com.mycompany package and whose class names end in "Service". Only users with the ROLE_USER
role will be able to invoke these methods. As with URL matching, the most specific matches must come first in the list of pointcuts, as the first matching expression will be used.
2.5 The Default AccessDecisionManager
This section assumes you have some knowledge of the underlying architecture for access-control within Spring Security. If you don't you can skip it and come back to it later, as this section is only really relevant for people who need to do some customization in order to use more than simple role-based security.
When you use a namespace configuration, a default instance of AccessDecisionManager is automatically registered for you and will be used for making access decisions for method invocations and web URL access, based on the access attributes you specify in your intercept-url and protect-pointcut declarations (and in annotations if you are using annotation secured methods).
The default strategy is to use an AffirmativeBased AccessDecisionManager with a
RoleVoter and an AuthenticatedVoter. You can find out more about these in the chapter on authorization.
Customizing the AccessDecisionManager
If you need to use a more complicated access control strategy then it is easy to set an alternative for both method and web security.
For method security, you do this by setting the access-decision-manager-ref attribute on
global-method-security to the Id of the appropriate AccessDecisionManager bean in the application context:
<global-method-security access-decision-manager-ref="myAccessDecisionManagerBean"> ...
</global-method-security>
The syntax for web security is the same, but on the http element:
<http access-decision-manager-ref="myAccessDecisionManagerBean"> ...
</http>
2.6 The Authentication Manager and the Namespace
The main interface which provides authentication services in Spring Security is the
AuthenticationManager. This is usually an instance of Spring Security's ProviderManager
class, which you may already be familiar with if you've used the framework before. If not, it will be covered later, in the technical overview chapter. The bean instance is registered using the authentication-manager namespace element. You can't use a custom
AuthenticationManager if you are using either HTTP or method security through the namespace, but this should not be a problem as you have full control over the AuthenticationProviders that are used.
You may want to register additional AuthenticationProvider beans with the
ProviderManager and you can do this using the <authentication-provider> element with the ref attribute, where the value of the attribute is the name of the provider bean you want to add. For example: <authentication-manager> <authentication-provider ref="casAuthenticationProvider"/> </authentication-manager> <bean id="casAuthenticationProvider" class="org.springframework.security.cas.authentication.CasAuthenticationProvider"> ... </bean>
Another common requirement is that another bean in the context may require a reference to the
AuthenticationManager. You can easily register an alias for the AuthenticationManager
and use this name elsewhere in your application context.
<security:authentication-manager alias="authenticationManager"> ...
</security:authentication-manager>
<bean id="customizedFormLoginFilter"
class="com.somecompany.security.web.CustomFormLoginFilter"> <property name="authenticationManager" ref="authenticationManager"/> ...
</bean>