reproduction of this document or any part of this document is strictly prohibited, except as AB SCIEX may authorize in writing.
Software that may be described in this document is furnished under a license agreement. It is against the law to copy, modify, or distribute the software on any medium, except as specifically allowed in the license agreement. Furthermore, the license agreement may prohibit the software from being disassembled, reverse engineered, or decompiled for any purpose. Warranties are as stated therein.
Portions of this document may make reference to other manufacturers and/or their products, which may contain parts whose names are registered as trademarks and/or function as trademarks of their respective owners. Any such use is intended only to designate those manufacturers' products as supplied by AB SCIEX for incorporation into its equipment and does not imply any right and/or license to use or permit others to use such manufacturers' and/or their product names as trademarks.
AB SCIEX warranties are limited to those express warranties provided at the time of sale or license of its products and are AB SCIEX’s sole and exclusive representations, warranties, and obligations. AB SCIEX makes no other warranty of any kind whatsoever, expressed or implied, including without limitation, warranties of merchantability or fitness for a particular purpose, whether arising from a statute or otherwise in law or from a course of dealing or usage of trade, all of which are expressly disclaimed, and assumes no responsibility or contingent liability, including indirect or consequential damages, for any use by the purchaser or for any adverse circumstances arising therefrom.
For research use only. Not for use in diagnostic procedures.
The trademarks mentioned herein are the property of AB Sciex Pte. Ltd. or their respective owners.
AB SCIEX™ is being used under license. © 2013 AB Sciex Pte. Ltd.
Printed in Canada.
AB Sciex Pte. Ltd. Blk 33, #04-06
Marsiling Ind Estate Road 3 Woodlands Central Indus. Estate SINGAPORE 739256
Chapter 1 Introduction . . . 5
Important Information to Know Before Installing . . . .5
Support . . . .6
Chapter 2 Software Installation Requirements. . . 7
Operating System Requirements . . . .7
Network Environment Requirements . . . .7
Acquisition Workstation Requirements . . . .7
Processing Workstation Requirements . . . .8
Current Shipping Configuration for the Dell Optiplex 9010 for Acquisition Workstations . . . .8
Supported Interface Cards and Driver Versions . . . .9
Reporter 3.2 Requirements . . . .9
PDF Reporting Capabilities . . . .9
User Account Control Requirements for Windows 7 . . . .9
Compatibility with Other Software . . . .9
Compatible Software . . . .10
Non-Compatible Software . . . .10
Supported Mass Spectrometers . . . .11
Key Content of the Analyst 1.6.2 Software DVD . . . .11
Key Contents of the Analyst 1.6.2 Software Web Download Package . . . .12
Chapter 3 Installation Instructions . . . 13
How to Use These Installation Instructions for Acquisition Workstations Versus Processing Workstations . . . .14
Task List for Installation . . . .15
Prepare to Install . . . .16
Assemble the Software DVDs . . . .16
Prepare the Instrument and Workstation for Installation . . . .16
Back up the Analyst Data Folder to a Safe Location . . . .16
Install the Analyst 1.6.2 Software . . . .17
Using the Analyst 1.6.2 Software DVD . . . .17
Using the Analyst 1.6.2 Software Web Download Package . . . .17
Update the Firmware and Configuration Tables . . . .18
(Optional) Install Scripts . . . .18
Run the Analyst Software for the First Time . . . .18
Register the Analyst Software Online . . . .19
Chapter 4 Network Installation for Windows XP . . . 21
Important Information to Know Before Installing . . . .21
Create the Network Image . . . .21
Create Images for the Prerequisite Applications . . . .21
Create a Distribution Point for the Analyst 1.6.2 Software . . . .22
Installing the Prerequisite Applications . . . .23
Install the Analyst 1.6.2 Software . . . .24
Add User Accounts . . . .25
Chapter 5 Troubleshoot Installation . . . 27
Appendix A Firmware and Configuration Tables Files . . . .29
Appendix B Peripheral Devices and Firmware . . . .31
Peripheral Devices Controlled via AAO Software Interface . . . .37
Appendix C Change the User Account Control Settings in Windows 7 . . . .39
Appendix D Configure the Intel Dual Port Card . . . .41
Configure the Card in Windows XP . . . .41
Configure the Card in Windows 7 . . . .42
Check the DAD Settings . . . .44
Appendix E Upgrade the ADC Card Driver for Windows XP . . . .47
Upgrade the Driver Software for the ADC Card . . . .47
Determine Whether the ADC Card is Installed . . . .47
Update the Driver . . . .48
Appendix F Upgrade the GPIB Card Driver in Windows XP . . . .55
Upgrade the Driver Software . . . .55
1
This guide provides information about, and procedures for, installing the Analyst® 1.6.2 software. This guide also includes information on supported peripheral devices and firmware. Information about troubleshooting installation is also included.
For information about new software features, enhancements, and known issues, refer to the release notes for the Analyst 1.6.2 software included with the Analyst 1.6.2 software package.
Important Information to Know Before Installing
Read the following points carefully before installing the software:
• All versions of the Analyst software require a valid software license. These licenses are provided with new instrument purchases and can also be purchased separately from AB SCIEX. If you have any questions regarding the validity of your current license or to enquire about purchasing additional licenses, please contact your AB SCIEX sales representative or Technical Support via [email protected].
• Do not attempt to install the software without following the installation instructions provided in this guide.
• The Analyst 1.6.2 software data files are not compatible with all previous versions of the Analyst software. However, you can open data acquired in the previous versions of the Analyst software in the Analyst 1.6.2 software. • Results tables created with the Analyst 1.6.2 software cannot be opened in
Analyst 1.5.x software.
• Use the task list provided at the beginning of the installation procedure in this guide to check off each task as you complete it. The order in which you perform the installation steps is important.
• All peripheral devices supported in the Analyst 1.4.2 software and later continue to be supported in the Analyst 1.6.2 software. For more information, refer to Peripheral Devices and Firmware on page 31. • The Analyst 1.6.2 software is available as either a software DVD or web
download package for customers upgrading from supported previous versions of the Analyst software. Refer to Chapter 3: Installation Instructions for more information.
• Deactivate the hardware profile and close the Analyst software before installing the Analyst 1.6.2 software.
• For more information about compatibility, refer to Compatibility with Other Software on page 9.
Note: Back up the Analyst Data folder to a safe location before upgrading. For more information, see Back up the Analyst Data Folder to a Safe Location on page 16. Do not rename the existing folder. This folder contains the API Instrument folder, which contains the basic instrument calibration and parameter settings.
Note: If you upgrade to the Analyst 1.6.2 software from a previous version of the Analyst software, the previous version will be removed during the upgrade process.
Support
We are committed to providing the highest level of support. To obtain answers to questions about any of our products, report issues, or suggest improvements, visit our Web site at www.absciex.com or write to [email protected].
2
This section explains the operating system, hardware, and software requirements that acquisition and processing workstations must meet for the Analyst® software to operate.
Operating System Requirements
The Analyst 1.6.2 software requires one of these operating systems on a Dell Optiplex 9010 computer:
• Microsoft Windows XP SP3 (32-bit) • Microsoft Windows 7 SP1 (32-bit)
• Microsoft Windows 7 SP1 (64-bit) (supported only for fresh installation of the Analyst 1.6.2 software)
The Analyst 1.6.2 software requires one of these operating systems on a Dell Optiplex 990 computer:
• Microsoft Windows XP SP3 (32-bit) • Microsoft Windows 7 SP1 (32-bit)
• Microsoft Windows 7 SP1 (64-bit) (supported only for fresh installation of the Analyst 1.6.2 software)
Network Environment Requirements
The Analyst 1.6.2 software supports these network environments:• Microsoft Windows Server 2003 • Microsoft Windows Server 2008
Acquisition Workstation Requirements
It is highly recommended that you purchase an acquisition workstation, including the communication interface cards, from AB SCIEX. These configured systems meet all requirements and undergo extensive testing and verification with the Analyst software. Detailed specifications for these systems are shipped with the workstation. For more information, contact your AB SCIEX sales representative.
The Dell Optiplex 9010 computer model is recommended for use with Windows XP and Windows 7. For acquisition workstations, AB SCIEX recommends the following minimum computer configuration:
• Intel Core I5-3550s
• 4 Gb DDR3 1600 Mhz SDRAM • 2 × 2 Tb HDD (RAID1) • DVD ± RW
• One DP-DVI adapter
• Two single-port Broadcom Ethernet cards
The Analyst 1.6.2 software has been qualified for acquisition on the current PC configuration. Refer to Current Shipping Configuration for the Dell Optiplex 9010 for Acquisition Workstations. The Dell Optiplex 990 computer model is supported for use with Windows XP (32-bit), Windows 7 (32-bit) and Windows 7 (64-bit). The Windows 7 (64-bit) image for Dell Optiplex 990 computer is available from AB SCIEX. Please contact your AB SCIEX sales representative for details.
The Analyst 1.6.2 software has been tested and verified on the Dell Optiplex 990 and 9010 computers.
Processing Workstation Requirements
For processing workstations, AB SCIEX recommends the following minimum computer configuration:
• Intel Core I5-3550s
• 4 Gb DDR3 1600 Mhz SDRAM • 2 × 2 Tb HDD (RAID1) • DVD ± RW
• One DP-DVI adapter
• Two single-port Broadcom Ethernet cards
Some AB SCIEX add-on software requires additional memory, disk space, and processing speed. For more information, refer to the documentation included with the add-on software.
Current Shipping Configuration for the Dell Optiplex
9010 for Acquisition Workstations
The computer comes installed with the following:
• A embedded Windows XP Professional SP3 (32-bit) OS license. • A embedded Windows 7 Professional (32-bit or 64-bit) OS license so that
the OS can be upgraded to Windows 7 if required.
This computer is RoHS compliant and can be used as an acquisition workstation or stand-alone processing computer. Windows XP and Windows 7 come with Internet Explorer 8.0. All driver software required for the cards is also installed.
The acquisition workstation comes with the following:
• Two Broadcom network card PCIe Ethernet, 1 port The acquisition workstation supports the following external interfaces and card:
• GPIB (not included) • Serial (not included)
• NI DAQ ADC PCIe card (not included)
Caution: Do not change the power management settings in the BIOS. Changing the Note: Newer systems might be available. For more information, contact your AB SCIEX sales representative.
Note: National Instruments USB to GPIB may be required for data acquisition but is not included.
Note: Edgeport USB may be required for peripheral device control but is not included.
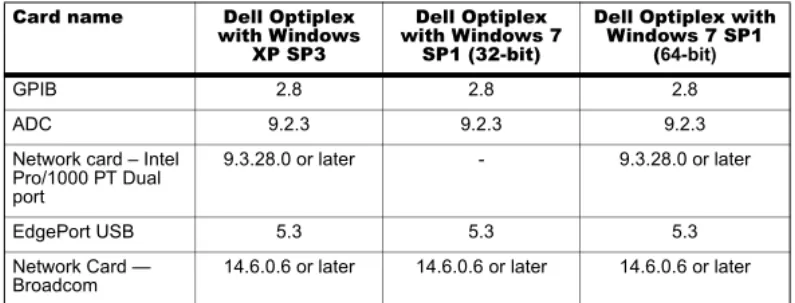
Supported Interface Cards and Driver Versions
Table 2-1 shows the driver versions installed on the currently shipping acquisition workstation. It also lists the supported driver versions.
Reporter 3.2 Requirements
To use Reporter 3.2, you must have Microsoft Office 2007, 2010, 2013. Reporter 3.2 is not compatible with Microsoft Office 2003.
PDF Reporting Capabilities
Select the option to allow reporting in either all formats (Word, Text, Excel, HTML, PDF) or only the PDF format during the software installation.
User Account Control Requirements for Windows 7
If you are using the Analyst 1.6.2 software with the Windows 7 operating system, we recommend that you use the Windows default settings for User Account Control. For the Administrator, the default setting is Default – Notify me only when programs try to make changes to my computer; for standard users, it is Default – Always notify me.The acquisition computer comes configured with the default User Account Control settings.
Compatibility with Other Software
The Analyst 1.6.2 software requires the following additional software:
• Microsoft Update for Digital Signature (on Windows XP only) • .NET 3.5 SP1 (on Windows XP only; it is included in the Windows 7
operating system) • .NET 4.0
• Microsoft Visual C++ 2008 SP1 Runtime
• Microsoft Visual C++ 2008 SP1 ATL Security Update • Microsoft Visual C++ 2010 Runtime Libraries
• Visual Studio 2010 Tools for Office Runtime (different for Windows 7 (32-bit) and Windows 7 (64-bit))
Table 2-1 Cards and Drivers
Card name Dell Optiplex with Windows
XP SP3
Dell Optiplex with Windows 7
SP1 (32-bit)
Dell Optiplex with Windows 7 SP1
(64-bit)
GPIB 2.8 2.8 2.8
ADC 9.2.3 9.2.3 9.2.3
Network card – Intel Pro/1000 PT Dual port
9.3.28.0 or later - 9.3.28.0 or later
EdgePort USB 5.3 5.3 5.3
Network Card —
• SaveAsPdf
• Microsoft Office 2007 Primary Interop Assemblies (installed if the workstation has Microsoft Office 2007)
• Microsoft Office 2010 Primary Interop Assemblies (installed if the workstation has Microsoft Office 2010 or 2013)
• AB SCIEX Reporter Template Suite 3.2 (different for Windows 7 (32-bit) and Windows 7 (64-bit))
The additional software is installed automatically when the Analyst 1.6.2 software is installed. The Analyst 1.6.2 software does not require any additional prerequisites.
Compatible Software
As of this release, these applications are compatible with the Analyst 1.6.2 software on both the Windows XP and Windows 7 operating systems.
• Cliquid® 3.2.1 software
• ChemoView™ 2.0.2 software (Not compatible on Windows 7 OS) • MarkerView™ 1.2.1 software
• LightSight® 2.3 software (Not compatible on Windows 7 64-bit OS)
• LipidView™ 1.2 software
For information about the compatibility of AAO applications, refer to Peripheral Devices Controlled via AAO Software Interface on page 37.
Non-Compatible Software
At the time of this release, these applications are not compatible with the Analyst 1.6.2 software:
• MultiQuant™ 2.1.1 software • ProteinPilot™ 4.5 software • MPX™ driver software • DiscoveryQuant™ software • Smart Monitor 4.3.2.1 software • BioAnalyst™ software
• Metabolite ID software (for the API series instruments) • Metabolite ID software (for the QSTAR® series instruments)
• MRMPilot™ software • Pro ID software
Note: If MS Office 2007 or 2010 was not installed on your system before the Analyst 1.6.1 software installation, then Primary Interop Assemblies will not be installed during Analyst 1.6.2 software installation. You will need to install them from the
ISSetupPrerequisites folder after installing Microsoft Office, or run setup again.
Note: Earlier versions of all of these applications are not supported on the Analyst 1.6.2 software.
• Pro BLAST software • oMALDI™ software • oMALDI Xpert software • PrepExpress software • FlashQuant® software
• Automaton software
To inquire about the compatibility of software not included in either of these lists, contact AB SCIEX support or your sales representative.
Supported Mass Spectrometers
The Analyst 1.6.2 software can control and analyze data from each of the following AB SCIEX mass spectrometers:
• QTRAP® 4500 LC/MS/MS system
• AB SCIEX Triple Quad™ 4500 LC/MS/MS system • QTRAP® 5500 LC/MS/MS system
• AB SCIEX Triple Quad™ 5500 LC/MS/MS system • QTRAP® 6500 LC/MS/MS system
• Triple Quad™ 6500 LC/MS/MS system • 4000 QTRAP® LC/MS/MS system • 3200 QTRAP® LC/MS/MS system • QTRAP® LC/MS/MS system • API 5000™ LC/MS/MS system • API 4000™ LC/MS/MS system • API 3200™ LC/MS/MS system • API 3000™ LC/MS/MS system • API 2000™ LC/MS/MS system
Key Content of the Analyst 1.6.2 Software DVD
The following software applications, files, folders, and documents are included on the Analyst 1.6.2 software DVD:
• Analyst 1.6.2 software.
• Drivers folder: Contains driver software for all supported cards. • Extras folder: Contains the following subfolders:
• AAO: Contains the Analyst Access Object release notes and user guide.
• ACROREAD: Contains the Adobe Acrobat Reader 10.0.1. • Agilent BOOTP Package: Contains a utility that controls the
Agilent LC devices using Ethernet (in most cases, an additional Ethernet adapter is required). The folder contains two subfolders, containing the Windows XP- and Windows 7-compatible versions of the utility.
Note: Other models of mass spectrometers supported in the Analyst1.4.2 software may be compatible with the Analyst 1.6.2 software but have not been specifically verified.
• Examples: Contains sample methods, data, and results files. • Instrument Update: Contains the Firmware/Configuration Table
Update Program (ConfigUpdater.exe).
• Peak Finder: Contains a registry file for setting the peak finder version used on older data files.
• Scripting Cookbook: Contains a guide that provides information for writing applications to control the Analyst software. • The Analyst 1.6.2 Software Release Notes.
• The Analyst 1.6.2 Software Installation Guide (this document).
• An Install folder containing safety guides as well as hardware and software guides and tutorials for all instruments.
Key Contents of the Analyst 1.6.2 Software Web
Download Package
The following software application and documents are included in the Analyst 1.6.2 software web download package:
• Analyst 1.6.2 software launcher.
• Bin folder: Contains the files required to run the software. • Extras folder: Contains the following subfolders:
• Instrument Update: Contains the Firmware/Configuration Table Update Program (ConfigUpdater.exe).
• Scripting Cookbook: Contains a guide that provides information for writing applications to control the Analyst software. • The Analyst 1.6.2 Software Release Notes.
• The Analyst 1.6.2 Software Installation Guide (this document).
• An Install folder containing the hardware, qualified maintenance, safety, site planning, and software guides as well as tutorials for all instruments. It also contains all the scripts.
Note: For a complete list of documents and their location, see Analyst® Software Documentation on page 55.
Note: For a complete list of documents and their location, refer to Analyst®
3
This section provides procedures for installing or upgrading to the Analyst® 1.6.2 software. It can be done using one of the following:
• The Analyst 1.6.2 software DVD: Use the DVD for fresh installation of the Analyst 1.6.2 software without any previous version of the Analyst software as a prerequisite. Also, use the DVD to upgrade to the Analyst 1.6.2 software from a supported previous version of this software.
• The Analyst 1.6.2 software web download package: Use the web download package to upgrade to the Analyst 1.6.2 software from a supported previous version of this software.
Using the Analyst 1.6.2 software DVD, you can upgrade to the Analyst 1.6.2 software from the following previous versions of this software:
• Analyst 1.5.2 Software with Components for SelexION Technology.
• Analyst 1.6 Software.
• Analyst 1.6 Software with Components for 6500 Series Instruments. • Analyst 1.6.1 Software.
Using the Analyst 1.6.2 software web download package, you can upgrade to the Analyst 1.6.2 software from the following previous versions of the Analyst software:
• Analyst 1.6 Software.
• Analyst 1.6 Software with Components for 6500 Series Instruments. • Analyst 1.6.1 Software.
Note: The Analyst 1.6.2 software cannot be installed as a fresh installation from the Analyst 1.6.2 software web download package.
Note: If you are upgrading from the Analyst 1.5.2 Software with Components for SelexION Technology, contact your local sales representative to get a license for the Analyst 1.6 software.
Note: Upgrading to the Analyst 1.6.2 software from any previous version of the Analyst software is not supported on the Windows 7 (64-bit) operating system.
Note: If you have the Analyst 1.5.2 software with HotFixes to February 2011 or an earlier version installed, then you can choose between a fresh installation or upgrade path to install the Analyst 1.6.2 Software. If using the upgrade path, before installing the Analyst 1.6.2 software, you must first upgrade to the Analyst 1.6 software.
Note: Your security database will be removed if the Analyst software is uninstalled. If you have the Analyst 1.5.2 software with HotFixes to February 2011 or an earlier version and would like to maintain your current security database, then you must follow the upgrade path to the Analyst 1.6 software before installing the Analyst 1.6.2 software.
How to Use These Installation Instructions for
Acquisition Workstations Versus Processing
Workstations
The upgrade instructions in this section can be used for both acquisition workstations (workstations that are connected to an instrument) and processing workstations (workstations that are not connected to an instrument).
Use the following table to understand which upgrade procedures to complete for each workstation.
Note: The Convert Methods script has been updated for defect fixes and to allow conversion to and from all supported instruments. The script is not automatically replaced during the installation of the Analyst 1.6.2 software. Uninstall the Convert Methods script before upgrading to the Analyst 1.6.2 software. After the upgrade is complete, you can re-install this script. It is available in the Install > Scripts folder in the Analyst 1.6.2 software DVD or web download package.
Note: The order of the upgrade procedures is important. Use the Task List for Installation on page 15 to make sure that you complete each procedure.
Note: You must be logged in as a user with Administrator privileges to install the Analyst 1.6.2 software.
Note: Removing the Analyst 1.6.2 software from the system will uninstall the Analyst software completely rather than reverting to the previously installed configuration. The Analyst Data folder will not be removed, but it is still recommended that you archive this folder. Instrument settings are retained but application settings are not.
Note: If you upgrade the acquisition workstation to the Analyst 1.6.2 software, AB SCIEX recommends that you upgrade the processing workstation as well.
Table 3-1 Procedures for Acquisition and Processing Workstations
Workstation Procedure
Acquisition workstations Complete all procedures in this section (note that some procedures are optional, or are required only if you have certain interface cards installed in the workstation).
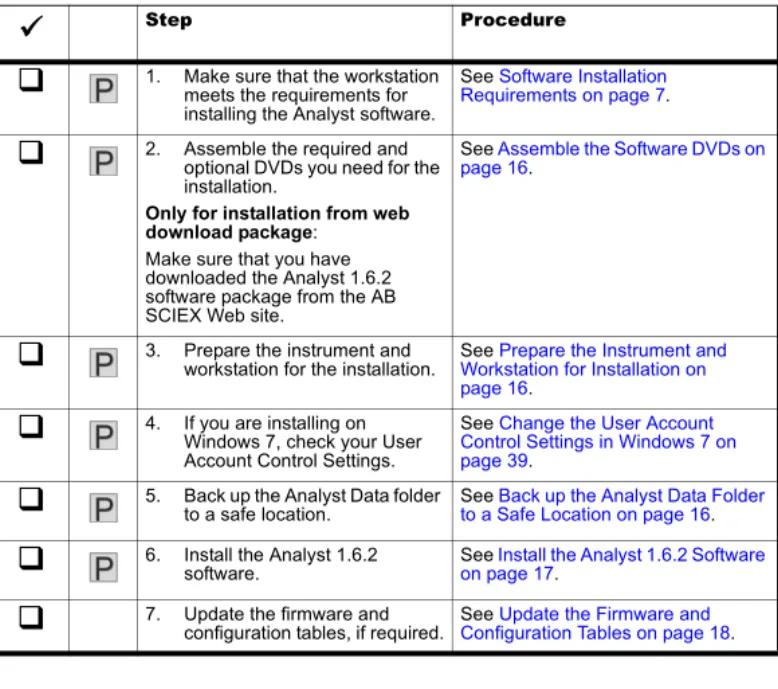
Task List for Installation
Use the following checklist to make sure that you complete all the required steps.
Processing workstations Complete only those procedures marked with the following icon:
You can omit any upgrade procedures related to: • Cards and driver software
• Upgrading firmware and configuration tables
Tip! Photocopy this checklist so you can check off each step as you proceed through the installation instructions.
Table 3-2 Checklist
Step Procedure
1. Make sure that the workstation meets the requirements for installing the Analyst software.See Software Installation Requirements on page 7.
2. Assemble the required andoptional DVDs you need for the installation.
Only for installation from web download package:
Make sure that you have downloaded the Analyst 1.6.2 software package from the AB SCIEX Web site.
See Assemble the Software DVDs on page 16.
3. Prepare the instrument andworkstation for the installation. See Workstation for Installation on Prepare the Instrument and page 16.
4. If you are installing on Windows 7, check your User Account Control Settings.See Change the User Account Control Settings in Windows 7 on page 39.
5. Back up the Analyst Data folderto a safe location. See to a Safe Location on page 16Back up the Analyst Data Folder .
6. Install the Analyst 1.6.2software. See on page 17Install the Analyst 1.6.2 Software .
7. Update the firmware andconfiguration tables, if required. See Configuration Tables on page 18Update the Firmware and . Table 3-1 Procedures for Acquisition and Processing Workstations (Continued)
Workstation Procedure
P
P
P
P
P
P
P
P
P
P
P
P
P
P
Prepare to Install
Assemble the Software DVDs
1. Locate the Analyst 1.6.2 software DVD.2. If required, locate any DVDs containing optional add-on software.
Prepare the Instrument and Workstation for Installation
1. Log on to the computer as a user with Administrator privileges.
2. For acquisition workstations, if your workstation has a GPIB connector, make sure the instrument is powered on and connected to the GPIB connector at the back of the workstation.
3. If you are upgrading from a previous version of the Analyst software, deactivate any active hardware profiles before installing the Analyst 1.6.2 software and then exit the Analyst software.
Back up the Analyst Data Folder to a Safe Location
Do not rename the existing Analyst Data folder. When you upgrade, AB SCIEX recommends that you use the same Analyst Data folder from your previous installation. This gives you access to your existing data, such as hardware profiles, methods, and data files. It also retains your InstrumentData.ins and ParameterSettings.psf files.• Make a backup copy of the files and subfolders in the Analyst Data folder (do not rename the folder). The default location is D:\Analyst Data. Create the backup in a safe location, such as a network drive or a DVD. You are not required to restore these files as part of a normal upgrade; however, it is good practice to make sure that a backup exists.
The content of the Analyst Data folder includes the API Instrument folder, which contains the basic instrument calibration and parameter settings.
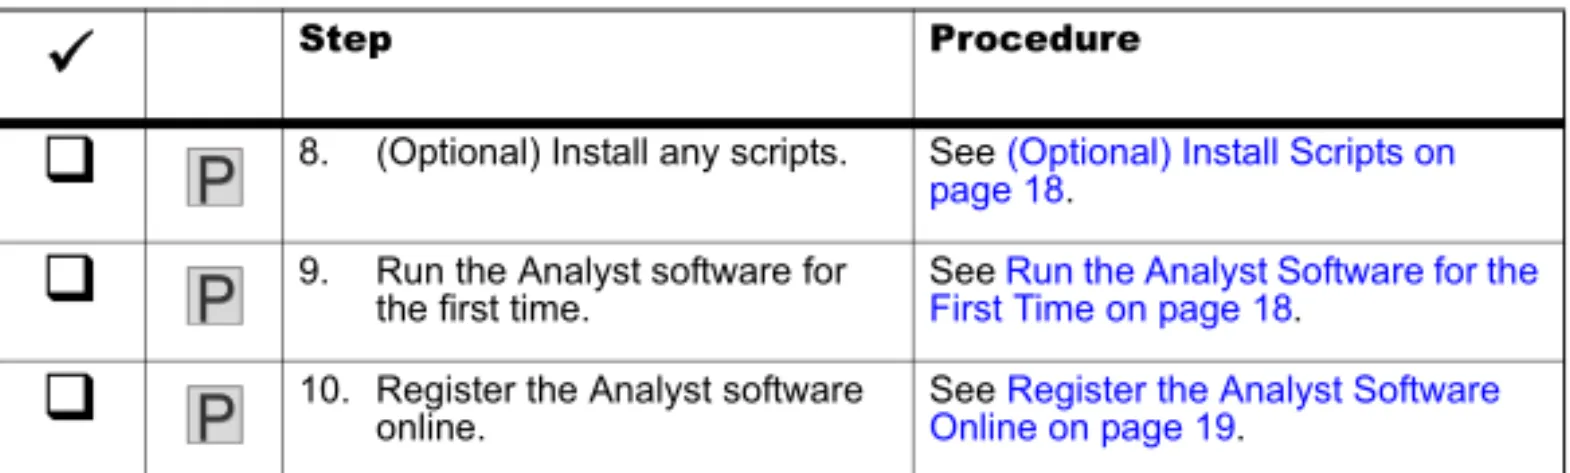
8. (Optional) Install any scripts. See (Optional) Install Scripts on page 18.
9. Run the Analystsoftware forthe first time. See First Time on page 18Run the Analyst Software for the .
10. Register the Analyst softwareonline. See Online on page 19Register the Analyst Software .
Note: Do not remove any of the cards from the workstation. Table 3-2 Checklist (Continued)
Step ProcedureP
P
P
P
P
P
Install the Analyst 1.6.2 Software
Complete the following procedures to upgrade the workstation to the Analyst 1.6.2 software release.
Using the Analyst 1.6.2 Software DVD
1. If upgrading from a previous version of the Analyst software, make sure that there is no active hardware profile and close the Analyst software before installing the Analyst 1.6.2 software.
2. Insert the Analyst 1.6.2 software DVD.
3. Click Install Analyst 1.6.2 Software.
4. Follow the instructions in the installation wizard to install the software.
Using the Analyst 1.6.2 Software Web Download Package
1. Make sure that there is no active hardware profile and close the Analyst software before installing the Analyst 1.6.2 software.
2. Extract the files from the compressed Analyst 1.6.2 software web package. 3. Click Launch.exe.
4. Follow the instructions in the installation wizard to install the software. Note: As part of normal installation, the API Instrument folder and the
CompoundLib.db is automatically backed up to the TEMP folder on your system. This folder is normally stored in <drive>:\Documents and Settings\<name>\Local Settings\Temp\Analyst_Data_Backup_[Date]. Do not rely on this backup. Always back up the Analyst Data folder and only use this folder if absolutely necessary.
Note: Microsoft Word 2007, 2010, or 2013 is required to generate reports. If you do not have either MS Word 2007, 2010, or 2013 installed on the system, during the installation process a warning will be displayed informing you that Word 2007, 2010, or 2013 is required for the Reporter to function properly. You can either cancel the installation or continue with it. After the Analyst 1.6.2 software is installed, you can install Word 2007, 2010, or 2013 if required.
Note: If the installation browser does not appear, then browse to the Install folder on the DVD and then double-click setup.exe.
Note: In Windows 7, several User Account Control warnings appear during installation. Click Yes to continue.
Note: In Windows 7, several User Account Control warnings appear during installation. Click Yes to continue.
Update the Firmware and Configuration Tables
Use the Firmware and Configuration Table Update program to automatically determine if firmware or configuration tables must be updated on the system. The utility performs only the required updates. The utility may also reset the mass spectrometer system controller. This is normal and is required by the update process.
If the system has a GPIB connection, then, before running this utility, make sure that the mass spectrometer is turned on and connected to the GPIB card and that the GPIB driver software is properly installed.
1. If the Analyst 1.6.2 software DVD is not already in the DVD drive, insert it. 2. If the installation browser appears, click Exit.
3. On the DVD drive, navigate to the \Extras\Instrument Update folder and then double-click ConfigUpdater.exe.
Only for installation from web download package
• In the extracted package, navigate to the \Extras\Instrument Update folder and then double-click ConfigUpdater.exe.
The Firmware/Configuration Table Update Program page opens, identifying the new firmware version it will install.
4. Click Next.
5. Follow the on-screen instructions.
6. Click Finish.
(Optional) Install Scripts
• A number of research-grade scripts are available to extend the functionality of the Analyst software. For more information on installing scripts, refer to the Scripts User Guide found in the Start Menu: All Programs > AB SCIEX > Analyst > Software Guides.
Run the Analyst Software for the First Time
1. Start the Analyst software by double-clicking the icon on the desktop. 2. For acquisition workstations, activate a hardware profile.
3. Make sure that you can acquire or process data.
Note: For information on the firmware and configuration table versions supported in the Analyst 1.6.2 software, refer to Firmware and Configuration Tables Files on page 29.
Note: If the utility presents you with more than one choice for the configuration file name, choose the version listed in Firmware and Configuration Tables Files on page 29.
Note: If you are upgrading the firmware on the 4500, 5500, or 6500 systems, you will be prompted to manually restart the mass spectrometer.
Register the Analyst Software Online
Register your installation online at:www.absciex.com/AnalystReg or contact [email protected].
Ten days from the date of installation, the software prompts you to register the Analyst software online.
Registration of the software helps AB SCIEX offer better support. AB SCIEX will also notify you about the availability of upgrades and patches, as well as other software-related information. You can register from any computer with internet access; it does not have to be the computer on which the software is installed. Your name and email address, and the name, address, and telephone number of the company licensing the software are required. Optional information includes some brief questions on how the Analyst software is used at the site, plus a section for comments. You can choose whether to be contacted for software updates, product information, or electronic surveys. Review the privacy statement and contact information on the web site for details about the information collected and its usage.
4
This section describes the procedure for installing the Analyst® 1.6.2 software over a network. For more information, refer to the Analyst software Administrator Console section of the
Laboratory Director’s Guide for the Analyst software, found in the Start menu: All Programs > AB SCIEX > Analyst > Hardware and Software Guides.
Important Information to Know Before Installing
For a successful installation, make sure that all workstations are connected to the Active Directory.Create the Network Image
Network installation of the Analyst 1.6.2 software requires some prerequisite applications to be already installed on the system. If they are not already installed or have been removed, install these applications before installing the Analyst 1.6.2 software.
Create Images for the Prerequisite Applications
1. Create a network image for Microsoft .NET Framework 3.5 SP1. Examples are provided for two different methods of creating the image:
• Install Microsoft .NET Framework 3.5 SP1 Using the Administrator Mode Setup on page 22.
• Install Microsoft .NET Framework 3.5 SP1 using Active Directory on page 22.
2. Create a network image for Microsoft .NET Framework 4.0 SP1. You can use a similar method to that used for Microsoft .NET Framework 4.0, using the executable file dotNetFx40_Full_x86_x64.exe.
3. Create network images for these applications by creating a shared folder and then copying the executable file into it:
• Microsoft Visual C++ 2008 SP1 Runtime Redistributable • Microsoft Visual C++ 2008 SP1 ATL Security Update
• SaveAsPDF
• Visual Studio 2010 Tools for Office Runtime
• Microsoft Office 2007 Primary Interop Assemblies (required if you will be using Reporter 3.2 with Microsoft Office 2007)
• Microsoft Office 2010 Primary Interop Assemblies (required if you will be using Reporter 3.2 with Microsoft Office 2010 or 2013)
• AB SCIEX Reporter Template Suite 3.2 • Document Fix For Converter
Note: Network installation is not supported with Windows 7.
Note: These procedures should be performed by someone with the prerequisite knowledge and the support of the IT department.
Install Microsoft .NET Framework 3.5 SP1 Using the Administrator Mode Setup
1. Create a network image by following these steps:
i. Create a shared folder on the server (for example, NetFX35). ii. Copy the dotnetfx35.exe file into the shared folder from the DVD. 2. Run the Setup by following these steps:
i. Verify that the Microsoft .NET Framework 3.5 SP1 redistributable package is available on the network server.
ii. Click Start > Run.
iii. Type the following command and then click OK: \\<server>\<share>\dotnetfx35.exe /q /norestart
where <server> is the server name and <share> is the name of the shared folder you created. For example,
\\server1\NetFX35\dotnetfx35.exe /q /norestart.
Install Microsoft .NET Framework 3.5 SP1 using Active Directory
1. Create a folder to hold the Microsoft .NET Framework 3.5 SP1 redistributable package, for example, C:\deploy.
2. Copy the dotnetfx35.exe file into this folder from the DVD.
3. Create the installation points for all the components of the .NET Framework by following these steps:
i. Create a .bat file that contains the script provided on the
http://msdn.microsoft.com/en-us/library/cc160717(VS.90).aspx#appendix web page, and save the .bat file in the folder you created in step 1; for example, C:\deploy. (If you used a different folder name, change the first line of the script accordingly.)
ii. Open the Command Prompt window, and execute the .bat file to create the installation points.
The script creates the installation points for all the components in the AIP subfolder, and places each installation point in its own subfolder. iii. Close the Command Prompt window.
4. In Windows Explorer, navigate to the extraction destination folder (AIP) to verify that the files were extracted.
5. Move the folder and its contents to the network share to be used for deployment.
Create a Distribution Point for the Analyst 1.6.2 Software
1. On a server, create a distribution point for the software. 2. When the installation browser opens, click Exit.
3. To create an administrative image, in a command line, type Msiexec.exe /a <PathToAnalyst.msi> SHORTFILENAMES=1
TARGETDIR=<PathToDistributionPoint> NAMESOFPROPERTIES=value /qr. The SHORTFILENAMES parameter is a Windows Installer property that uses short file names for the names of target files, rather than long file names. If the target volume does not support long names, this property has to be set to 1.
The NAMESOFPROPERTIES parameter is the list of the following properties of the Analyst software that can be changed:
• ANALYSTDATAPATH: Destination location of Analyst Data (default is the NTFS disk with the most free space\Analyst Data).
• SECURITYDATA: Overwrite or not overwrite security database if it is found. “1“ — overwrite
“0” — not overwrite (default)
• LIBSEARCHDATA: Overwrite or not overwrite Library Search database if it is found
“1“ — overwrite
“0” — not overwrite (default)
• COMPOUNDDATA: Overwrite or not overwrite Compound database if it is found.
“1“ — overwrite
“0” — not overwrite (default)
Example: Msiexec /a “d:\install\analyst.msi” SHORTFILENAMES=1 TARGETDIR=”C:\Managed Applications\Analyst16” LIBSEARCHDATA=”1” /qr. 4. After creating the distribution point, copy the Scripts folder, all the documentation
(tutorials and guides) folders, the release notes, and the software installation guide to this location.
Installing the Prerequisite Applications
1. For Windows XP SP2, install Windows Installer 3.1 by following these steps:. i. ClickStart >Run
.
ii. Type the following command and then click OK:
\\<server>\<share>\WindowsInstaller-KB893803-v2-x86.exe /quiet /norestart
where <server> is the server name and <share> is the name of the shared folder you created. For example,
\\server1\WinInst31\WindowsInstaller-KB893803-v2-x86.exe /quiet /norestart
2. Install Microsoft .NET Framework 3.5 SP1 by following these steps:
i. Verify that the Microsoft .NET Framework 3.5 SP1 Runtime package is available on the network server.
ii. Click Start > Run.
iii. Type the following command and then click OK: \\<server>\<share>\dotnetfx35.exe /q /norestart
where <server> is the server name and <share> is the name of the shared folder you created. For example,
\\server1\NetFX35\dotnetfx35.exe /q /norestart. 3. Install Microsoft .NET Framework 4.0 by following the instructions at:
http://msdn.microsoft.com/en-us/library/ee390831.aspx
4. Install the Microsoft Visual C++ 2008 SP1 Runtime Redistributable by typing the following command in the Command Prompt window:
\\<server>\<share>\Vcredist_x86.exe /q:a
where <server> is the server name and <share> is the name of the shared folder you created.
5. Install Microsoft Visual C++ 2008 SP1 ATL Security Update by typing the following command in the Command Prompt window:
\\<server>\<share>\Vcredist_x86.exe /q:a
where <server> is the server name and <share> is the name of the shared folder you created.
6. Install Visual Studio 2010 Tools for Office Runtime by typing the following command in the Command Prompt window:
\\<server>\<share>\vstor40_x86.exe/q:a /c:"install /q /l"
where <server> is the server name and <share> is the name of the shared folder you created.
7. Install SaveAsPDF by typing the following command in the Command Prompt window:
\\<server>\<share>\SaveAsPDF.exe /quiet
where <server> is the server name and <share> is the name of the shared folder you created.
8. Install Microsoft Office 2007 Primary Interop Assemblies by typing the following command in the Command Prompt window:
\\<server>\<share>\o2007pia.msi /quiet
where <server> is the server name and <share> is the name of the shared folder you created.
9. Install Microsoft Office 2010 Primary Interop Assemblies by typing the following command in the Command Prompt window:
\\<server>\<share>\o2010pia.msi /quiet
where <server> is the server name and <share> is the name of the shared folder you created.
10. Install AB SCIEX Reporter Template Suite 3.2 by typing the following command in the Command Prompt window:
\\<server>\<share>\ContentControlManager.msi /quiet
where <server> is the server name and <share> is the name of the shared folder you created.
11. Install DocumentFixForConverter by typing the following command in the Command Prompt window:
\\<server>\<share>\DocFixForConverter.msi /quiet
where <server> is the server name and <share> is the name of the shared folder you created.
Install the Analyst 1.6.2 Software
1. Make sure that the Analyst 1.6.2 software DVD is in the DVD drive. Only for installation from web download package
• Make sure that you have downloaded the Analyst 1.6.2 software web download package from the AB SCIEX Web site.
• Extract all the files in a folder on your system.
Note: This application will not be installed if Microsoft Office 2007 is not installed on the workstation.
Note: This application will not be installed if Microsoft Office 2010 or 2013 is not installed on the workstation.
2. Create an Organizational Unit containing all the workstations where the Analyst 1.6.2 software will be installed.
3. Create a Group Policy for the unit.
4. In the Group Policy dialog, expand the Computer Configuration and Software Settings nodes.
5. Right-click Software Installation, point to New, and then click Package. 6. Navigate to the .msi package in the distribution point.
7. Restart each workstation.
Add User Accounts
Use this procedure to create user accounts.
If you are upgrading from a previous version of the Analyst software and you choose to keep your existing user security database when installing the Analyst 1.6.2 software, your user accounts are preserved and you do not need to perform this procedure.
1. After installing the Analyst 1.6.2 software over the network, start the Analyst software and log on as a local user named administrator.
2. In the Security Configuration window, click the People tab. 3. Add new user accounts and then assign roles.
4. Close the Analyst software.
5. Restart the Analyst software and then log on using one of the accounts that you added in step 3.
Note: If you want to upgrade from the Analyst 1.4.x or 1.5.x software and want to preserve your security database, then first follow theupgrade pathto the Analyst 1.6 software or the Analyst 1.6 software before upgrading to the Analyst 1.6.2 software.
Tip! If you are using Integrated Mode, log off from Windows to log in as another user.
5
This section describes some issues that may be encountered while installing or upgrading to the Analyst® 1.6.2 software. It suggests possible causes and offers solutions.
AB SCIEX is committed to providing the highest level of support for the Analyst software users. To obtain answers to questions about any of our products, report problems, or suggest improvements, visit the Web site at www.absciex.com.
Table 5-1 Troubleshooting
Issue Possible Cause/Solution
After installing, I cannot log on to the
Analyst software. Your user name might not have been successfully added to the security database during the upgrade. Log on to the computer as the local administrator and then add your user name to the Analyst software through the Security Configuration dialog. I see the error message “Failed to load
the parameter settings file” when I try to start a profile in the Analyst software.
If you restored any files or folders from a DVD, or copied over files shipped with your instrument, these files might be set as read only. To use these files, remove the read- only setting from the files through Windows.
A
The following instrument firmware and configuration table versions must be used with the Analyst®1.6.2 software. Instructions for making sure you have the latest versions of these files
are included in the Update the Firmware and Configuration Tables on page 18. These tables are for reference purposes only.
Table A-1 Firmware Files for the 4500, 5500, and 6500 Series of Instruments
Firmware Version
All systems PIL1400
Table A-2 Firmware Files for Other Mass Spectrometers
Firmware Version
340 Main M401402
332 Main M3L1417
425 Main MIL3002
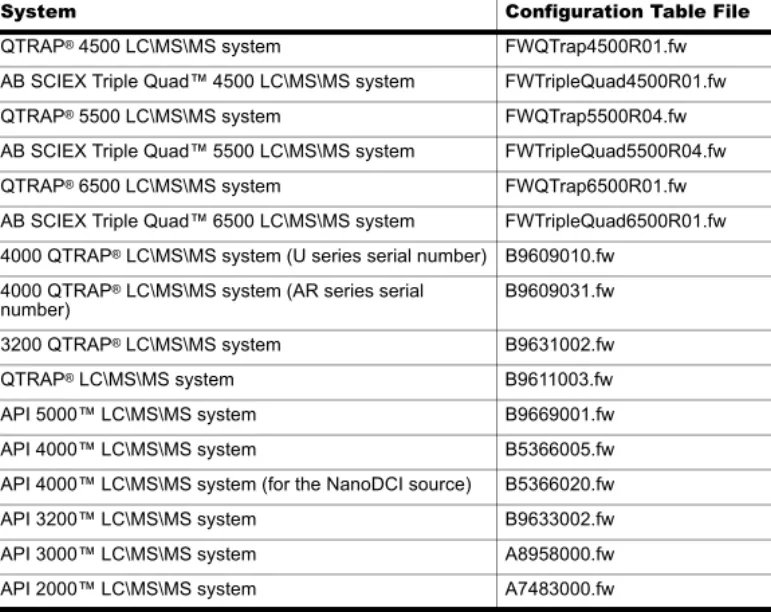
Table A-3 Configuration Table Files for the Analyst 1.6.2 Software
System Configuration Table File
QTRAP®4500 LC\MS\MS system FWQTrap4500R01.fw
AB SCIEX Triple Quad™4500 LC\MS\MS system FWTripleQuad4500R01.fw
QTRAP®5500 LC\MS\MS system FWQTrap5500R04.fw
AB SCIEX Triple Quad™5500 LC\MS\MS system FWTripleQuad5500R04.fw
QTRAP®6500 LC\MS\MS system FWQTrap6500R01.fw
AB SCIEX Triple Quad™6500 LC\MS\MS system FWTripleQuad6500R01.fw 4000 QTRAP® LC\MS\MS system (U series serial number) B9609010.fw
4000 QTRAP® LC\MS\MS system (AR series serial
number) B9609031.fw
3200 QTRAP®LC\MS\MS system B9631002.fw
QTRAP® LC\MS\MS system B9611003.fw
API 5000™LC\MS\MS system B9669001.fw
API 4000™LC\MS\MS system B5366005.fw
API 4000™LC\MS\MS system (for the NanoDCI source) B5366020.fw
API 3200™LC\MS\MS system B9633002.fw
API 3000™LC\MS\MS system A8958000.fw
B
The Analyst® software supports the peripheral devices listed in the following table. Firmware versions that have been fully qualified with the Analyst 1.6.2 software are listed without parentheses. Versions shown in parentheses have functioned acceptably in more limited testing.
In most cases, more recent firmware versions from the device manufacturer will work with the Analyst 1.6.2 software. If you encounter difficulties, change the device firmware to the version listed in this table. For information on checking and upgrading firmware, refer to the documentation provided by the peripheral device manufacturer. For information on installation and configuration of peripheral devices, refer to the Peripheral Devices Setup Guide.
Recommended Firmware Versions for Peripheral Devices
It is the responsibility of the user to validate the suitability of the device prior to use. Contact the manufacturer to determine the supported firmware version.Table B-1 Eksigent
Peripheral device Tested firmware (and other firmware)
Communication cable required
ekspert™ ultraLC 100
Autosampler (1.29 or higher) WC024736 (RS-232 cable)
ekspert ultraLC 100-XL
Autosampler (1.02 or higher) WC024736 (RS-232 cable)
ekspert ultraLC 100 Pump (1.2 or higher) —
ekspert ultraLC 100 Column
Oven (2.04 or higher) —
Table B-2 Agilent 1290 Series
Peripheral device Tested firmware (and other firmware)
Communication cable required
Binary Pump B.06.30, (B.06.32) WC024736 (RS-232 cable) or
Ethernet Standard Autosampler A.06.31 (A.06.32,
A.06.30) WC024736 or Ethernet
TCC—Thermostatted Column
Compartment (A.06.32, A.06.30) WC024736
DAD—Diode Array Detector B.02.11, (B.06.32,
Table B-3 Agilent 1260 Series
Peripheral device Tested firmware (and other firmware)
Communication cable required
Isocratic Pump A.06.33, (A.06.32) WC024736 or Ethernet
Quaternary Pump (A.06.32) WC024736 or Ethernet
Binary Pump (A.06.32) WC024736 or Ethernet
High Performance Autosampler A.06.32 WC024736 or Ethernet TCC—Thermostatted Column
Compartment (A.06.32) WC024736
DAD—Diode Array Detector (B.06.32) Ethernet
Table B-4 Agilent 1200 Series
Peripheral device Tested firmware (and other firmware)
Communication cable required
Isocratic Pump (A.06.32, A.06.02) WC024736 (RS-232 cable) or Ethernet
Quaternary Pump (A.06.32, A.06.02) WC024736 or Ethernet
Binary Pump A.06.32 (A.06.04,
A.06.02) WC024736 or Ethernet
Binary SL Pump (A.06.32, A.06.04,
A.06.02) WC024736 or Ethernet
Capillary Pump (A.06.32, A.06.02) WC024736 or Ethernet
Nanoflow Pump (A.06.32, A.06.02) WC024736 or Ethernet
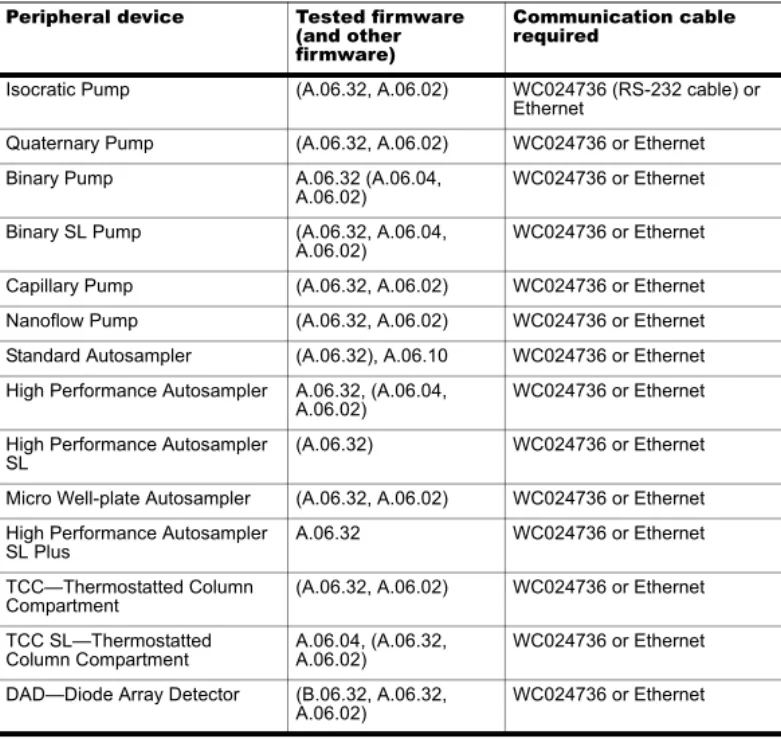
Standard Autosampler (A.06.32), A.06.10 WC024736 or Ethernet High Performance Autosampler A.06.32, (A.06.04,
A.06.02) WC024736 or Ethernet
High Performance Autosampler
SL (A.06.32) WC024736 or Ethernet
Micro Well-plate Autosampler (A.06.32, A.06.02) WC024736 or Ethernet High Performance Autosampler
SL Plus A.06.32 WC024736 or Ethernet
TCC—Thermostatted Column
Compartment (A.06.32, A.06.02) WC024736 or Ethernet
TCC SL—Thermostatted
Column Compartment A.06.04, (A.06.32, A.06.02) WC024736 or Ethernet DAD—Diode Array Detector (B.06.32, A.06.32, WC024736 or Ethernet
DAD SL—Diode Array Detector
SL (B.06.32, B.01.02) Ethernet
Table B-5 Agilent 1100 Series
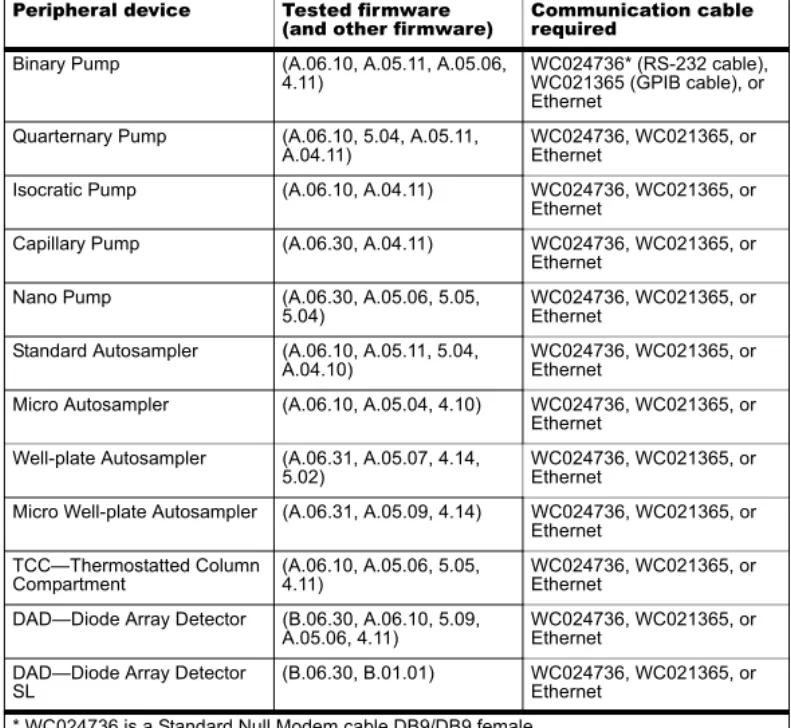
Peripheral device Tested firmware
(and other firmware) Communication cable required
Binary Pump (A.06.10, A.05.11, A.05.06,
4.11) WC024736* (RS-232 cable), WC021365 (GPIB cable), or Ethernet
Quarternary Pump (A.06.10, 5.04, A.05.11,
A.04.11) WC024736, WC021365, or Ethernet
Isocratic Pump (A.06.10, A.04.11) WC024736, WC021365, or
Ethernet
Capillary Pump (A.06.30, A.04.11) WC024736, WC021365, or
Ethernet
Nano Pump (A.06.30, A.05.06, 5.05,
5.04) WC024736, WC021365, or Ethernet Standard Autosampler (A.06.10, A.05.11, 5.04,
A.04.10) WC024736, WC021365, or Ethernet Micro Autosampler (A.06.10, A.05.04, 4.10) WC024736, WC021365, or
Ethernet Well-plate Autosampler (A.06.31, A.05.07, 4.14,
5.02) WC024736, WC021365, or Ethernet Micro Well-plate Autosampler (A.06.31, A.05.09, 4.14) WC024736, WC021365, or
Ethernet TCC—Thermostatted Column
Compartment (A.06.10, A.05.06, 5.05, 4.11) WC024736, WC021365, or Ethernet DAD—Diode Array Detector (B.06.30, A.06.10, 5.09,
A.05.06, 4.11) WC024736, WC021365, or Ethernet DAD—Diode Array Detector
SL (B.06.30, B.01.01) WC024736, WC021365, or Ethernet
* WC024736 is a Standard Null Modem cable DB9/DB9 female Table B-4 Agilent 1200 Series (Continued)
Peripheral device Tested firmware (and other firmware)
Communication cable required
Table B-6 CTC
Peripheral device Tested firmware
(and other firmware) Communication cable required
HTS PAL Autosampler (4.2, 4.1.x, 2.4.0) WC024736 (RS-232 cable) HTC PAL Autosampler 4.1.3, (4.2, 4.1.x, 2.4.0) WC024736
LC PAL Autosampler (4.2, 4.1.x, 2.4.0, 2.3.1) WC024736 DLW (HTC-XT) (4.2.0, 4.1.x and Rev 5
cycle files) WC024736 or Ethernet
Table B-7 Gilson
Peripheral device Tested firmware
(and other firmware) Communication cable required
215 Autosampler (2.20) WC024735**
215 Autosampler with 819
Valve (1.00) Gilson GSIOC
233 Autosampler (BV1.11) WC024735
233 Autosampler with 402
Syringe (SV2.3, SV1.10) Gilson GSIOC
** WC024735 is a standard modem cable DB25 male/DB9 female. Table B-8 Harvard
Peripheral device Tested firmware
(and other firmware) Communication cable required
Harvard (22 Syringe Pump) 22.90
Table B-9 LC Packings
Peripheral device Tested firmware (and
other firmware) Communication cable required
UltiMate Integrated System (6.00, 5.06) Cables available from LC Packings
Famos Autosampler
(Well-plate) (2.02) Cables available from LC Packings
Famos Autosampler (Carousel) (1.14) Cables from LC Packings Table B-10 PE Series 200
Peripheral device Tested firmware
Column Oven (1134) WC024736
Micro Pump (2.43) WC024736
Quaternary Pumps (2.43) WC024736
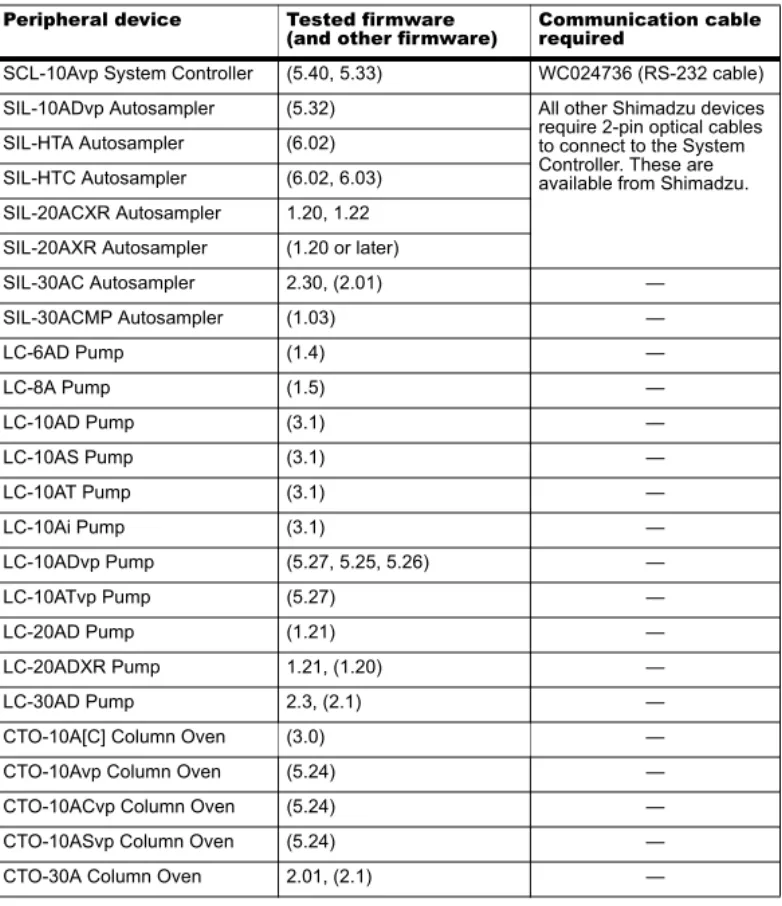
Table B-11 Shimadzu
Peripheral device Tested firmware
(and other firmware) Communication cable required
SCL-10Avp System Controller (5.40, 5.33) WC024736 (RS-232 cable)
SIL-10ADvp Autosampler (5.32) All other Shimadzu devices
require 2-pin optical cables to connect to the System Controller. These are available from Shimadzu. SIL-HTA Autosampler (6.02)
SIL-HTC Autosampler (6.02, 6.03) SIL-20ACXR Autosampler 1.20, 1.22 SIL-20AXR Autosampler (1.20 or later)
SIL-30AC Autosampler 2.30, (2.01) — SIL-30ACMP Autosampler (1.03) — LC-6AD Pump (1.4) — LC-8A Pump (1.5) — LC-10AD Pump (3.1) — LC-10AS Pump (3.1) — LC-10AT Pump (3.1) — LC-10Ai Pump (3.1) — LC-10ADvp Pump (5.27, 5.25, 5.26) — LC-10ATvp Pump (5.27) — LC-20AD Pump (1.21) — LC-20ADXR Pump 1.21, (1.20) — LC-30AD Pump 2.3, (2.1) —
CTO-10A[C] Column Oven (3.0) —
CTO-10Avp Column Oven (5.24) —
CTO-10ACvp Column Oven (5.24) —
CTO-10ASvp Column Oven (5.24) —
CTO-30A Column Oven 2.01, (2.1) —
Table B-10 PE Series 200 (Continued)
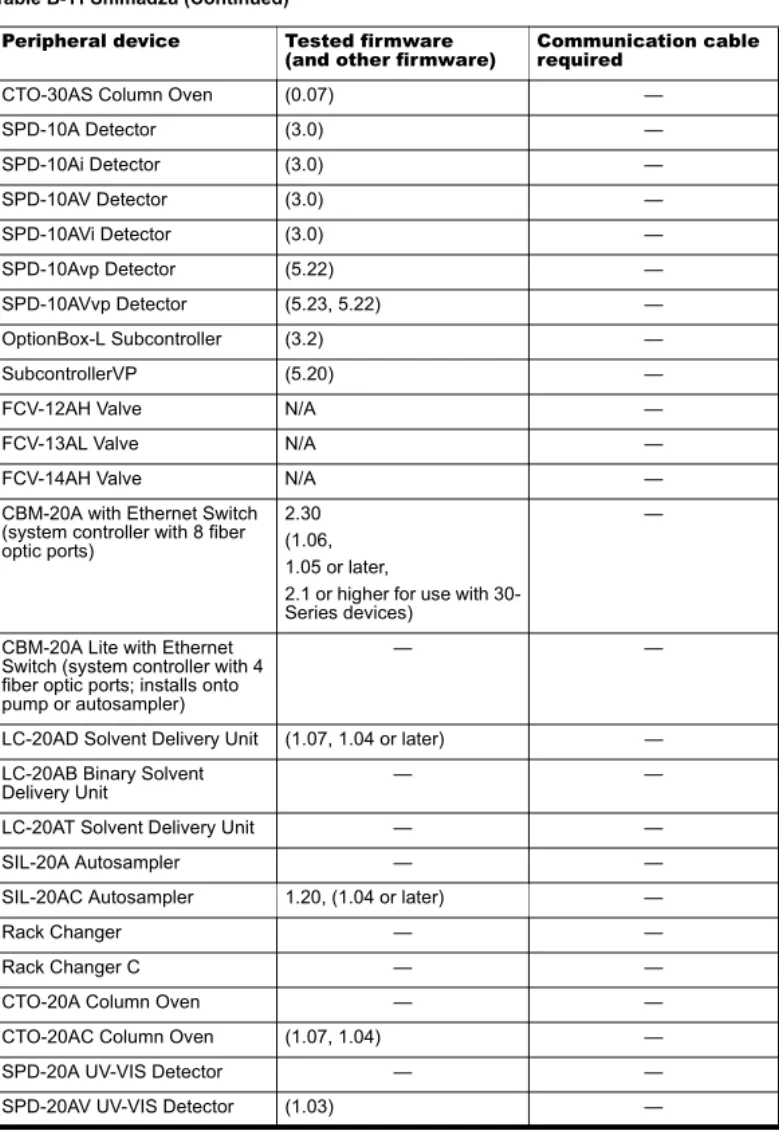
Peripheral device Tested firmware
CTO-30AS Column Oven (0.07) — SPD-10A Detector (3.0) — SPD-10Ai Detector (3.0) — SPD-10AV Detector (3.0) — SPD-10AVi Detector (3.0) — SPD-10Avp Detector (5.22) — SPD-10AVvp Detector (5.23, 5.22) — OptionBox-L Subcontroller (3.2) — SubcontrollerVP (5.20) —
FCV-12AH Valve N/A —
FCV-13AL Valve N/A —
FCV-14AH Valve N/A —
CBM-20A with Ethernet Switch (system controller with 8 fiber optic ports)
2.30 (1.06, 1.05 or later,
2.1 or higher for use with 30-Series devices)
—
CBM-20A Lite with Ethernet Switch (system controller with 4 fiber optic ports; installs onto pump or autosampler)
— —
LC-20AD Solvent Delivery Unit (1.07, 1.04 or later) — LC-20AB Binary Solvent
Delivery Unit — —
LC-20AT Solvent Delivery Unit — —
SIL-20A Autosampler — —
SIL-20AC Autosampler 1.20, (1.04 or later) —
Rack Changer — —
Rack Changer C — —
CTO-20A Column Oven — —
CTO-20AC Column Oven (1.07, 1.04) —
SPD-20A UV-VIS Detector — —
Table B-11 Shimadzu (Continued)
Peripheral device Tested firmware
Peripheral Devices Controlled via AAO Software
Interface
The Analyst Access Object (AAO) is an interface to the Analyst software that allows peripheral device vendors to develop device control software that can be plugged into the Analyst software to enable integrated LC/MS control.
Vendors that have released AAO software are listed below. For additional information, contact vendors directly. • Alcott Chromatography • Cohesive Technologies • Dionex Corp. • Eksigent Technologies • ESA Inc. • Flux Instruments AG • Jasco Inc. • Leap Technologies
• Maylab Analytical Instruments • PerkinElmer Inc.
• Shimadzu Corporation • Shiseido Co. Ltd. • Spark Holland • Waters Corp.
AAO applications that are compatible with the Analyst 1.6 and Analyst 1.5.x software versions will be compatible with the Analyst 1.6.2 software on the Windows XP and Windows 7(32-bit) operating systems (OS).
AAO applications that are compatible with the Analyst 1.6 and Analyst 1.5.x software versions will be compatible with the Analyst 1.6.2 software on the Windows 7 (64-bit) OS only if they run as 32-bit applications in the WOW64 mode.
Contact the AAO vendor to confirm application compatibility for the Windows 7 (32-bit and 64-bit) OS.
Table B-12 Spark-Holland
Peripheral device Tested firmware
(and other firmware) Communication cable required
Endurance Autosampler (2.05) Requires the Analyst®
Software Driver Kit p/n 0920-768 from Spark ([email protected]) Table B-13 Valco
Peripheral device Tested firmware
(and other firmware) Communication cable required
C
Windows 7
If you are using the Analyst® 1.6.2 software with the Windows 7 operating system, AB SCIEX recommends that you use the Windows default settings for User Account Control. For the Administrator, the default setting is Default (Notify me only when programs try to make changes to my computer); for standard users, it is Always notify me.
1. Open Windows Control Panel.
2. Click System and Security > Change User Account Control settings. 3. On the User Account Control Settings dialog, move the slider bar to the desired
level.
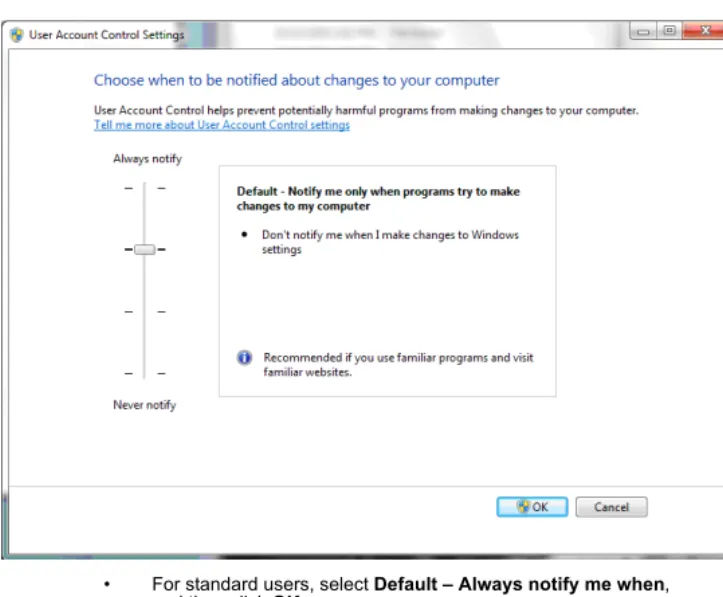
• For the Administrator, select Default – Notify me only when programs try to make changes to my computer, and then click OK.
Figure C-1 User Account Control setting for the Administrator
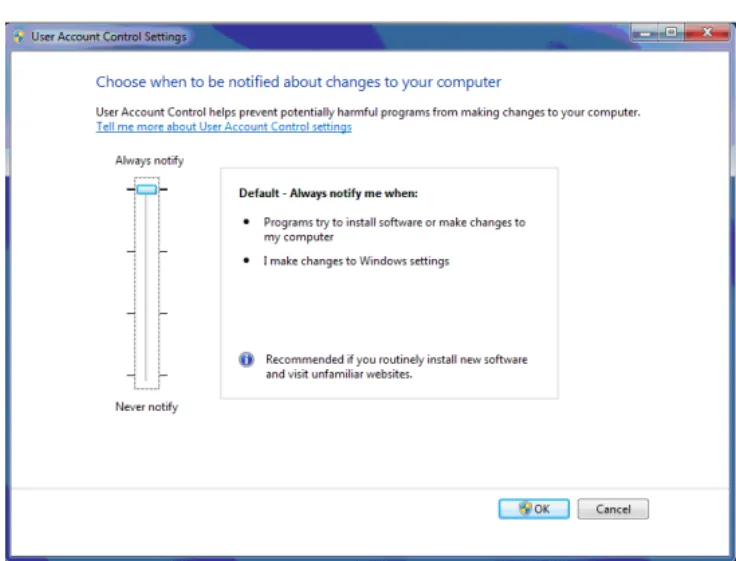
• For standard users, select Default – Always notify me when, and then click OK.
D
If your computer is equipped with the Intel Pro 1000/PT Dual Port Ethernet card, you can configure it using the procedures covered in this appendix.
Configure the Card in Windows XP
1. Open Windows Control Panel.
2. Open the Network Connections control panel.
3. Right-click Local Area Connection 2 or 3 and then click Properties. Figure D-1 Local Area Connection 2 Properties dialog
4. Click Internet Protocol. 5. Click Properties.
Figure D-2 Internet Protocol (TCP/IP) Properties dialog
Note: This procedure assumes that you are using a T3400 or Optiplex 960 workstation. For other computer systems, screens and steps might vary slightly.
Tip! If the View is by Category, select Network and Internet Connections > Network Connections.
6. Select Use the following IP address.
7. In the IP address field, type the default IP address. 8. Press Tab.
The Subnet mask field is automatically filled.
9. Click OK and then close the Local Area Connection 2 (or 3) Properties dialog.
Configure the Card in Windows 7
1. Open Windows Control Panel.
2. Open the Network and Sharing Center.
3. Click Change Adapter Settings (in the top left corner). 4. Click Network Connections.
The Network Connections window opens.
5. Right-click Local Area Connection 2 or 3 and then click Properties. Figure D-3 Local Area Connection Properties dialog
Tip! If the View is by Category, select Network and Internet Connections > Network Sharing Center.
6. Click Internet Protocol Version 4 (TCP/IPv4).
7. Click Properties.
Figure D-4 Internet Protocol (TCP/IP) Properties dialog
Note: The Analyst 1.6.1 software has not been tested with Internet Protocol Version 6 (TCP/IPv6).
8. Select Use the following IP address.
9. In the IP address field, type the default IP address. 10. Press Tab.
The Subnet mask field is automatically filled.
11. Click OK and then close the Local Area Connection 2 (or 3) Properties dialog.
Check the DAD Settings
1. Make sure that the DAD unit is connected to the Ethernet Port A (if using Local Area Connection 2) or Port B (if using Local Area Connection 3).
2. On the back of the DAD unit, check the Initializing Mode switches. The switches should be set as listed in Table D-1.
For more information, refer to the Agilent 1200 Series Diode Array and Multiple Wavelength Detector SL User Manual.
3. Make sure that the DAD is using the default LAN settings (IP address Table D-1 Initializing Mode switches and their settings
Switch name Setting
SW 6 OFF
SW 7 ON
4. In Windows XP, to confirm the connection between the workstation and the DAD, from Windows, follow these steps:
i. Click Start > Run.
ii. In the Open box, type ping 192.168.254.11-t and then click OK. 5. In Windows 7, to confirm the connection between the workstation and the DAD, from
Windows, follow these steps: i. Click Start.
ii. In the Search box type ping 192.168.254.11-t and then click OK. 6. When the message “Reply from 192.168.254.11” appears, indicating that the
communication is successful, continue to step 7.
7. Using the Analyst software, add the DAD to a hardware profile. For more information, refer to the operator’s guide that comes with the instrument.
Note: If the message “Request Timed Out” appears, then the
communication has failed. Check your connections, IP settings, and cables, and then repeat step 1 to step 5.
E
This section provides procedures for upgrading the driver software for the optional National Instruments ADC card.
Upgrade the Driver Software for the ADC Card
If the workstation is not running a supported version of the ADC driver software, you can upgrade to version 9.2.3. NI-DAQmx 9.2.3 is available on the Analyst® 1.6.2 software DVD.
Determine Whether the ADC Card is Installed
1. Open Windows Control Panel.2. Open the Administrative Tools control panel.
Figure E-1 Administrative Tools window
3. Click Computer Management. 4. Expand System Tools. 5. Click Device Manager.
6. If present, expand Data Acquisition Devices.
Note: This procedure is not required for Windows 7. The Windows 7 workstation comes with the correct driver version installed.
Tip! If the View is by Category, select Performance and Maintenance > Administrative Tools.
7. In the list of installed software, look for PCI-6032, PCI-6259, or PCIe-6259 and then do one of the following:
• If the entries are present, complete the steps in the following procedure.
• If the entries are not present, you do not have the ADC card installed and do not need to update the driver.
Update the Driver
1. Right-click PCI-6032, PCI-6259, or PCIe-6259 and then click Uninstall. A confirmation message is shown.
2. Click OK.
3. Close the Computer Management window to return to Control Panel. 4. Open the Add or Remove Programs control panel.
5. Click National Instruments Software. 6. Click Change/Remove.
7. On the National Instruments Software panel, click NI-DAQ old version. 8. Click Remove.
A confirmation message appears. 9. Click Yes.
A message is shown prompting you to restart the computer. 10. Click No.
11. Navigate to the folder where the new NI-DAQmx 9.2.3 software has been extracted. 12. Double-click Setup.exe.
The Product Information window opens. 13. Click Next.
Tip! If the View is by Category, select Add or Remove Programs > Add or Remove Programs.
Figure E-2 Destination Directory dialog
14. Click Next.
Figure E-3 Select Installation Option dialog
15. Click Custom. 16. Click Next.
Figure E-4 Features Dialog
Figure E-5 License Agreement dialog
18. Click I accept the license agreement. 19. Click Next.
Figure E-6 Supplemental License Terms Dialog
20. Click I accept the license agreement. 21. Click Next.
Figure E-7 Start Installation Dialog
22. Click Next.
When the installation is complete, the Completion window opens. 23. Click Next.
You are prompted to restart your computer. 24. Click Restart.
When the computer restarts, an NI Product Registration window appears. Registration is optional and is not required to continue.
The Found New Hardware Wizard appears prompting you to connect to Windows Update to search for a new driver.
25. Select No, not this time.
26. When prompted for the location of the new software, select Install the software automatically (Recommended).
27. Click Next.
After the installation is complete, the Completion window appears. 28. Click Finish.
F
This section provides procedures for upgrading the driver software for the optional National Instruments GPIB card.
Upgrade the Driver Software
1. Make sure the hardware profile is deactivated. 2. Open Windows Control Panel.3. Open the Add/Remove Programs control panel.
4. Double-click Add/Remove Programs.
5. From the list of installed software, click National Instruments Software. 6. Click Change/Remove.
Figure F-1 National Instruments Software dialog
7. Select all the items in the NI Products list, and then click Remove. 8. Follow the instructions to remove the software.
9. Click Finish.
10. When prompted, click Yes to restart the computer.
11. Make sure the Analyst® 1.6.2 software DVD is in the DVD drive.
12. Browse to the Drivers folder. 13. In the GPIB 2.8 folder, click Setup.exe. 14. Follow the instructions in the installation wizard. 15. Register the software.
Note: This procedure is not required for Windows 7. The Windows 7 workstation comes with the correct driver version installed.
Tip! If the View is by Category, select Add or Remove Programs > Add or Remove Programs.
16. Click Finish.