Job Scheduling with Spring
M
ost application logic happens in response to some form of user action, such as a button clickor a form submission. However, in many applications certain processes must be invoked without user interaction, usually at a given interval. For example, you might have a process that cleans out temporary files once an hour or a process that creates a data export from a database and sends it to an external system once a day at midnight. Most nontrivial applications require some kind of scheduling support—if not directly related to business logic of the application then to support sys-tem housekeeping.
When you are building scheduled tasks for your application, creating a task that runs once an hour or once a day is fairly simple. But what about a task that runs at 3:00 p.m. every Monday, Wednesday, and Friday? This is a little more difficult to code, and it makes sense to use prebuilt scheduling solutions rather than attempt to create your own scheduling framework.
When talking about scheduling from a programming perspective, we tend to talk about three distinct concepts. A job is a unit of work that needs to be scheduled to run at a specific interval. A trigger is a condition, perhaps a fixed interval or a given piece of data, that causes a job to run. A schedule is a collection of triggers that govern the complete timeline of a job. Typically, you encapsulate a job by implementing an interface or extending a given base class. You define your triggers in whatever terms your scheduling framework supports. Some frame-works may support only basic interval-based triggers, whereas others, such as Quartz, provide much more flexible trigger schemes. In general, a job has only a single trigger in its schedule, and the terms “schedule” and “trigger” are often used interchangeably.
Scheduling support in Spring comes in two distinct forms: JDK Timer-based and Quartz-based. The JDK Timer-based approach provides scheduling capabilities on any version 1.3 or later JVM, and it does not need external dependencies beyond Spring. Timer-based scheduling is quite primitive
and provides limited flexibility when defining job schedules. However, Timersupport is included
with Java and requires no external libraries, which might be beneficial if you are restricted by appli-cation size or corporate policy. Quartz-based scheduling is much more flexible and allows triggers to be defined in a much more real-world way, such as the earlier example of 3:00 p.m. every Monday, Wednesday, and Friday.
In this chapter, we explore both of the scheduling solutions included with Spring. In particular, this chapter discusses three core topics: scheduling with the JDK Timer, Quartz-based scheduling, and job scheduling considerations.
We’ll start our discussion by exploring Spring’s support for JDK Timer-based scheduling. This section introduces the different trigger types available with Timer-based scheduling and looks at how you can schedule any arbitrary logic without needing to create additional Java code.
After that, we’ll look at the comprehensive Quartz scheduling engine and how it is integrated into Spring. In particular, we examine Quartz support for cron expressions allowing highly complex schedules to be configured using a concise format. As with the JDK Timer, you’ll see how to schedule any logic without needing to encapsulate it.
445
Finally, we’ll discuss the various points to consider when choosing a scheduling implementa-tion and patterns to use when creating logic for scheduled execuimplementa-tion.
Scheduling Jobs Using JDK Timer
The most basic scheduling support with Spring is based on the JDK java.util.Timerclass. When
scheduling using Timer, you are limited to simple interval-based trigger definitions, which makes Timer-based scheduling suitable only for jobs that you need to execute just once at some given future time or that you need to execute at some fixed frequency.
Trigger Types with Timer
Timer-based scheduling offers you three types of triggers:
• One-off: When you use a one-off trigger, job execution is scheduled for some given point in the future, defined as the number of milliseconds from a given date. After the job executes, it is not rescheduled for further execution. We have found that one-off triggers are great for scheduling jobs that need to be done once that you might forget to do yourself. For instance, if a web application has scheduled maintenance coming up in a week, we can schedule a task to switch on the In Maintenance page when the maintenance is due to begin.
• Repeating and fixed-delay: When you use a fixed-delay trigger, you schedule the first execu-tion of the job just like for a one-off trigger, but after that, the job is rescheduled to execute after a given interval. When you are using fixed-delay, the interval is relative to the actual execution time of the previous job. This means that the interval between successive execu-tions is always approximately the same, even if execuexecu-tions occur “late” when compared to the original schedule. With this type of trigger, the interval you specify is the actual interval between subsequent executions. Use this approach when the interval between executions must be kept as constant as possible.
• Repeating and fixed-rate: Fixed-rate triggers function in a similar way to fixed-delay triggers, but the next execution time is always calculated based on the initial scheduled execution time. This means that if a single execution is delayed, subsequent executions are not delayed as a result. With this type of trigger, the interval you specify is not necessarily the actual interval between subsequent executions. Use this approach when the actual execution time is important, rather than the interval between executions.
You may find it difficult to visualize the differences between fixed-delay and fixed-rate triggers, and unfortunately, creating an example that causes enough of a delay in execution to fully clarify the differences reliably is difficult. That said, here is a simple example that should help highlight the differences.
Consider a task that starts executing at 1:00 p.m. and has a specified interval of 30 minutes. The task runs fine until 4:30 p.m., when the system experiences a heavy load and a particularly nasty garbage collection; these cause the actual execution time to be a minute late—4:31 p.m. Now, with fixed-delay scheduling it is the actual interval that is important, that is to say, we want 30 minutes between each actual execution, so the next execution is scheduled for 5:01 p.m. rather than 5:00 p.m. With fixed-rate scheduling, the interval defines the intended interval—that is to say, we intend the job to execute every 30 minutes based on the start time, not on the time of the last job—so the job is scheduled for execution at 5:00 p.m.
Both of these trigger types are useful in different ways. In general, you use fixed-delay triggers for situations where you want the time between each execution to be as regular as possible or when you want to avoid the possibility of two executions happening too close together, which can happen
with fixed-rate execution if a particular execution is delayed long enough. You use fixed-rate triggers for real-time–sensitive operations such as those that must execute every hour on the hour.
Creating a Simple Job
To create a job to use with the Timerclass, you simply extend the TimerTaskclass and implement the
run()method to execute your job’s logic. Listing 12-1 shows a simple TimerTaskimplementation that writes “Hello, World” to stdout.
Listing 12-1. Creating a Basic TimerTask package com.apress.prospring2.ch12.timer; import java.util.TimerTask;
public class HelloWorldTask extends TimerTask { public void run() {
System.out.println("Hello World!"); }
}
Here, you can see that in the run()method, we simply write the “Hello, World” message to stdout.
Each time a job is executed, Timerinvokes the TimerTask’s run()method. The simplest possible
trig-ger we can create for this job is a one-off trigtrig-ger to start the job in 1 second; Listing 12-2 shows this. Listing 12-2. Using a One-Off Trigger with the HelloWorldTask
package com.apress.prospring2.ch12.timer; import java.util.Timer;
public class OneOffScheduling {
public static void main(String[] args) { Timer t = new Timer();
t.schedule(new HelloWorldTask(), 1000); }
}
To schedule a job using a given trigger when you are using the JDK Timerclass, you must first
create an instance of the Timerclass and then create the trigger using one of the schedule()or
scheduleAtFixedRate()methods. In Listing 12-2, we used the schedule()method to schedule an
instance of HelloWorldTaskto run after a delay of 1,000 milliseconds. If you run this example, after
the initial delay of 1 second, you get the following message: Hello World!
This kind of off trigger is fairly useless—how often are you going to need to schedule a one-off task to run an arbitrary period of time after application start-up? For this reason, you can also specify an absolute date when you create a one-off trigger. So if we want to create a job to remind us
seven days before an important birthday, we can replace our call to Timer.schedule()with
some-thing like this:
Calendar cal = Calendar.getInstance(); cal.set(2008, Calendar.NOVEMBER, 30);
In this example, you can see that we created an instance of Calendarfor the date November 30,
2008. Then, using the Calendarinstance, we scheduled the HelloWorldTaskto run. This is clearly
more useful than the first example, because no matter what time the application starts, the job is always scheduled to run at the same time. The only drawback with this approach is that we will not be reminded about the birthday in 2009 or 2010 unless we explicitly add more triggers. By using a repeating trigger, we can get around this.
Both types of repeating trigger, fixed-delay and fixed-rate, are configured in the same way: you
specify a starting point, using either a number of milliseconds relative to the call to schedule()or
an absolute date, and you specify an interval in milliseconds to control when subsequent executions occur. Remember that “interval” is interpreted differently depending on whether you are using a fixed-delay or fixed-rate trigger.
We can schedule the HelloWorldTaskjob to run every 3 seconds with a 1-second delay using
the code shown in Listing 12-3.
Listing 12-3. Scheduling a Repeating Task package com.apress.prospring2.ch12.timer; import java.util.Timer;
public class FixedDelayScheduling {
public static void main(String[] args) throws Exception{ Timer t = new Timer();
t.schedule(new HelloWorldTask(), 1000, 3000); }
}
If you run this application, you will see the first “Hello, World” message displayed after about 1 sec-ond, followed by further “Hello, World” messages every 3 seconds. To schedule this job using a fixed-rate
trigger, simply replace the call to Timer.schedule()with a call to Timer.scheduleAtFixedRate(), as
shown in Listing 12-4.
Listing 12-4. Scheduling a Job Using a Fixed-Rate Trigger package com.apress.prospring2.ch12.timer;
import java.util.Timer;
public class FixedRateScheduling {
public static void main(String[] args) throws Exception { Timer t = new Timer();
t.scheduleAtFixedRate(new HelloWorldTask(), 1000, 1000); }
}
As with the one-off trigger, you can start both fixed-delay and fixed-rate triggers using an absolute date. Using this approach, we can create a trigger for our birthday reminder example that runs on a given date and then repeats each year. This is shown in Listing 12-5.
Listing 12-5. Scheduling Birthday Reminders package com.apress.prospring2.ch12.timer; import java.util.Calendar;
import java.util.Timer;
public class SimpleBirthdayReminderScheduling {
private static final long MILLIS_IN_YEAR = 1000 * 60 * 60 * 24 * 365; public static void main(String[] args) {
Timer t = new Timer();
Calendar cal = Calendar.getInstance(); cal.set(2008, Calendar.NOVEMBER, 30);
t.schedule(new HelloWorldTask(), cal.getTime());
t.scheduleAtFixedRate(new HelloWorldTask(), cal.getTime(), MILLIS_IN_YEAR);
} }
In this example, you can see that we calculate the number of milliseconds in a year, and using aCalendarinstance, we define a starting point of November 30 and define the interval to be one year. Now, every year on November 30, provided that this application is running and conveniently ignoring the existence of leap years, the “Hello, World” message is written to stdout. Clearly, this is not a fully functional example, because there is no real notification mechanism, and each time we want to add a new birthday reminder, we need to change the code. In the next section, we create
a more robust birthday reminder application using Spring’s JDK Timersupport classes.
Spring Support for JDK Timer Scheduling
As you saw in the previous section, you can easily create and schedule jobs using the JDK Timerand
TimerTaskclasses. That said, the approach we took in the previous examples has some problems.
First, we created the TimerTaskinstances within the application rather than using Spring. For the
HelloWorldTask, this is acceptable, because we did not need to configure the job at all. However, many jobs require some configuration data, so we should manage these using Spring to allow for easy configuration. Second, the trigger information is hard-coded into the application, meaning that any changes to the time a job is triggered require a change to the application code and a recom-pilation. Finally, scheduling new jobs or removing a job requires changes to the application code;
ideally, we should be able to configure this externally. By using Spring’s Timersupport classes, we
can externalize all job and trigger configuration as well as hand over control of Timercreation to
Spring, thus allowing jobs and their triggers to be defined externally.
The core of Spring’s Timersupport comes in the form of the ScheduledTimerTaskand
TimerFactoryBeanclasses. The ScheduledTimerTaskclass acts as a wrapper around your TimerTask implementations and allows you to define trigger information for the job. Using the TimerFactoryBean,
you can have Spring automatically create Timerinstances for a given list of ScheduledTimerTaskbeans
using the trigger configuration data when creating the trigger.
Using ScheduledTimerTask and TimerFactoryBean
Before we dive in and look at our new and improved birthday reminder application, we should
first look at the basics of how ScheduledTimerTaskand TimerFactoryBeanwork. For each
sched-uled job you want to create, you need to configure an instance of the job class and an instance of ScheduledTimerTaskcontaining the trigger details. You can share the same TimerTaskinstance
across many ScheduledTimerTaskinstances if you want to create many triggers for the same job.
the list of ScheduledTimerTaskbeans. Spring then creates an instance of Timerand schedules all
the jobs defined by the ScheduledTimerTaskbeans using that Timerclass.
This might sound complex at first, but in reality, it is not. Listing 12-6 shows a simple
configu-ration for scheduling the HelloWorldTaskto run every 3 seconds with a delay of 1 second before the
first execution.
Listing 12-6. Configuring Job Scheduling Using TimerFactoryBean <?xml version="1.0" encoding="UTF-8"?>
<beans xmlns=http://www.springframework.org/schema/beans xmlns:xsi=http://www.w3.org/2001/XMLSchema-instance
xsi:schemaLocation="http://www.springframework.org/schema/beans http://www.springframework.org/schema/beans/spring-beans-2.0.xsd"> <bean id="job" class="com.apress.prospring2.ch12.timer.HelloWorldTask"/> <bean id="timerTask"
class="org.springframework.scheduling.timer.ScheduledTimerTask"> <property name="delay" value="1000" />
<property name="period" value="3000" /> <property name="timerTask" ref="job" /> </bean> <bean id="timerFactory" class="org.springframework.scheduling.timer.TimerFactoryBean"> <property name="scheduledTimerTasks"> <list> <ref local="timerTask"/> </list> </property> </bean> </beans>
Here, you can see that we have configured a bean, job, of type HelloWorldTask, and using this bean, we have configured a bean of type ScheduledTimerTask, setting the delay to 1,000 milliseconds
and the period to 3,000 milliseconds. The final part of the configuration is the timerFactorybean,
which is passed a list of beans of type ScheduledTimerTask. In this case, we have only one task to
schedule, represented by the timerTaskbean. Be aware that when specifying trigger information
using ScheduledTimerTask, you can supply a delay only in milliseconds, not an initial date for start-up. We’ll show you a way around this when we build the birthday reminder application in the next section.
With all of the scheduling and job definition information contained in the configuration, our sample application has very little to do. In fact, all we need to do is load the ApplicationContext,
and Spring creates the Timerclass and schedules the HelloWorldTaskas per the configuration file.
This code is shown in Listing 12-7.
Listing 12-7. The TimerFactoryBeanExample Class package com.apress.prospring2.ch12.timer;
import org.springframework.context.ApplicationContext;
import org.springframework.context.support.FileSystemXmlApplicationContext; public class TimerFactoryBeanExample {
public static void main(String[] args) throws Exception {
ApplicationContext ctx = new FileSystemXmlApplicationContext( "./ch12/src/conf/timer-context.xml");
System.in.read(); }
}
If you run this application, you will see that the message “Hello, World” is written to stdout every 3 seconds after an initial delay of 1 second. As you can see from this example, it is very simple to configure job scheduling external to your application’s code. Using this approach, it is much sim-pler to make changes to a job’s schedules or to add new scheduled jobs and remove existing ones.
A More Comprehensive Birthday Reminder Application
In this section, we create a more complex birthday reminder application using Spring’s Timer
sup-port. With this example, we want to be able to schedule multiple reminder jobs, each with a specific configuration, to identify whose birthday the reminder indicates. We also want to be able to add and remove reminders without having to modify the application code.
To get started, we need to create a job to perform the actual reminder. Because we are going to create these jobs using Spring, we can allow all configuration data to be provided using DI. Listing 12-8 shows the BirthdayReminderTask.
Listing 12-8. The BirthdayReminderTask
package com.apress.prospring2.ch12.timer.bday; import java.util.TimerTask;
public class BirthdayReminderTask extends TimerTask { private String who;
public void setWho(String who) { this.who = who;
}
public void run() {
System.out.println("Don't forget it is " + who + "'s birthday is 7 days");
} }
Notice here that we defined a property on the task, who, that allows us to specify of whose birth-day we’re being reminded. In a real birthbirth-day reminder application, the reminder would no doubt be sent to e-mail or some similar medium. For now, however, you’ll have to be content with reminder messages written to stdout!
With this task complete, we are almost ready to move on to the configuration stage. However, as we pointed out earlier, you cannot specify the start time of a scheduled job using a date when you are using ScheduledTimerTask. This is problematic for our sample application, because we do not want to have to specify reminder dates as a relative offset to the start-up time of the application.
Thankfully, we can overcome this problem quite easily by extending the ScheduledTimerTaskclass
and overriding the getDelay()method used by TimerFactoryBeanto determine what delay it should
assign to a trigger. At the same time, we can also override the getPeriod()method to return the
number of milliseconds in a year so that you do not have to add that literal into configuration files. Listing 12-9 shows the code for our custom ScheduledTimerTask, BirthdayScheduledTask.
Listing 12-9. Customizing ScheduledTimerTask package com.apress.prospring2.ch12.timer.bday; import java.text.DateFormat; import java.text.ParseException; import java.text.SimpleDateFormat; import java.util.Calendar; import java.util.Date; import org.springframework.scheduling.timer.ScheduledTimerTask; public class BirthdayScheduledTask extends ScheduledTimerTask {
private static final long MILLIS_IN_YEAR = 1000 * 60 * 60 * 24 * 365; private DateFormat dateFormat = new SimpleDateFormat("yyyy-MM-dd"); private Date startDate;
public void setDate(String date) throws ParseException { startDate = dateFormat.parse(date);
}
public long getDelay() {
Calendar now = Calendar.getInstance(); Calendar then = Calendar.getInstance(); then.setTime(startDate);
return (then.getTimeInMillis() - now.getTimeInMillis()); }
public long getPeriod() { return MILLIS_IN_YEAR; }
}
In this example, you can see that we define a new property for the BirthdayScheduledTaskclass,
date, which allows us to specify the start date as a date rather than a delay period. This property is of
type String, because we use an instance of SimpleDateFormatconfigured with the pattern yyyy-MM-dd
to parse dates such as 2008-11-30. We override the getPeriod()method, which TimerFactoryBean
uses when it configures the interval for the trigger, to return the number of milliseconds in a year.
Also notice that we override getDelay(), and using the Calendarclass, we calculate the number of
milliseconds between the current time and the specified start date. This value is then returned as the delay. With this complete, we can now complete the configuration for our sample application, as shown in Listing 12-10.
Listing 12-10. Configuring the Birthday Reminder Application <?xml version="1.0" encoding="UTF-8"?>
<beans xmlns="http://www.springframework.org/schema/beans" xmlns:xsi="http://www.w3.org/2001/XMLSchema-instance"
xsi:schemaLocation="http://www.springframework.org/schema/beans http://www.springframework.org/schema/beans/spring-beans-2.0.xsd">
<bean id="mum"
class="com.apress.prospring2.ch12.timer.bday.BirthdayScheduledTask"> <property name="date" value="2008-11-30" />
<property name="fixedRate" value="true" /> <property name="timerTask">
<bean class="com.apress.prospring2.ch12.timer.bday.BirthdayReminderTask"> <property name="who" value="Mum">
</bean> </property> </bean> <bean id="timerFactory" class="org.springframework.scheduling.timer.TimerFactoryBean"> <property name="scheduledTimerTasks"> <list> <ref local="mum"/> </list> </property> </bean> </beans>
This code should look familiar to you by now. Notice that we used our BirthdayScheduledTask
class in place of the ScheduledTimerTaskclass, and instead of specifying a delay and a period, we
have simply specified the date. Also, we rely on the overridden getDelay()and getPeriod()
meth-ods to provide the TimerFactoryBeanwith the delay and period values. In addition, notice that we
set the fixedRateproperty of the BirthdayScheduledTaskbean to true. This property is inherited
from ScheduledTimerTask; TimerFactoryBeanuses it to decide whether or not it should create a
fixed-rate or fixed-delay trigger.
Scheduling Arbitrary Jobs
When scheduling jobs, you often need to schedule the execution of logic that already exists. If this is
the case, you might not want to go through the trouble of creating aTimerTaskclass just to wrap
your logic. Thankfully, you don’t have to. Using the MethodInvokingTimerTaskFactoryBean, you can schedule the execution of any method on any given bean or a static method on a specific class; you can even provide method arguments if your logic method requires them.
As an example of this, consider the FooBeanshown in Listing 12-11.
Listing 12-11. The FooBean Class
package com.apress.prospring2.ch12.timer; public class FooBean {
public void someJob(String message) { System.out.println(message); }
}
If we want to schedule the someJob()method to run every 3 seconds with a given argument rather
than create aTimerTaskjust to do that, we can simply use the MethodInvokingTimerTaskFactoryBeanto
Listing 12-12. Using MethodInvokingTimerTaskFactoryBean <?xml version="1.0" encoding="UTF-8"?> <beans xmlns=http://www.springframework.org/schema/beans xmlns:xsi=http://www.w3.org/2001/XMLSchema-instance xsi:schemaLocation="http://www.springframework.org/schema/beans http://www.springframework.org/schema/beans/spring-beans-2.0.xsd"> <bean id="target" class="com.apress.prospring2.ch12.timer.FooBean"/> <bean id="task" class="org.springframework.scheduling.timer.➥
MethodInvokingTimerTaskFactoryBean"> <property name="targetObject" ref="target" />
<property name="targetMethod" value="someJob" /> <property name="arguments" value="Hello World!" /> </bean>
<bean id="timerTask"
class="org.springframework.scheduling.timer.ScheduledTimerTask"> <property name="delay" value="1000" />
<property name="period" value="3000" /> <property name="timerTask" ref="task" /> </bean> <bean id="timerFactory" class="org.springframework.scheduling.timer.TimerFactoryBean"> <property name="scheduledTimerTasks"> <list> <ref local="timerTask"/> </list> </property> </bean> </beans>
We can replace the definition of our own custom TimerTaskbean with a definition using the
MethodInvokingTimerTaskFactoryBean. To configure MethodInvokingTimerTaskFactoryBean, we specify the target of the invocation as a reference to another bean, the method to execute, and the argument
to use when executing. The TimerTasksupplied by MethodInvokingTimerTaskFactoryBeanis used in
the normal way, wrapped in aScheduledTimerTask, and passed to the TimerFactoryBean.
Listing 12-13 shows a simple driver program to test this out. Listing 12-13. Testing the MethodInvokingTimerTaskFactoryBean package com.apress.prospring2.ch12.timer;
import org.springframework.context.ApplicationContext;
import org.springframework.context.support.FileSystemXmlApplicationContext; public class MethodInvokerScheduling {
public static void main(String[] args) throws Exception {
ApplicationContext ctx = new FileSystemXmlApplicationContext( "./ch12/src/conf/timerMethodInvoker.xml");
System.in.read(); }
Running this example gives you the now familiar timed appearance of “Hello, World” messages
on your console. Clearly, using MethodInvokingTimerTaskFactoryBeanremoves the need to create
custom TimerTaskimplementations that simply wrap the execution of a business method.
JDK Timer-based scheduling provides support for an application’s basic scheduling needs using
a simple and easy-to-understand architecture. Although the trigger system for JDK Timeris not
extremely flexible, it does provide basic schemes that allow you to control simple scheduling. Using Spring’s support classes for Timer, you externalize a task scheduling configuration and make it easier to add and remove tasks from the scheduler without having to change any application code. Using MethodInvokingTimerTaskFactoryBean, you avoid having to create TimerTaskimplementations that do nothing more than invoke a business method, thus reducing the amount of code you need to write and maintain.
The main drawback of JDK Timerscheduling comes when you need to support complex
trig-gers such as a trigger to execute a job every Monday, Wednesday, and Friday at 3:00 p.m. In the next part of this chapter, we look at the Quartz scheduling engine, which provides much more compre-hensive support for scheduling and, just like Timer, is fully integrated into Spring.
Scheduling Jobs Using OpenSymphony Quartz
The open source Quartz project is a dedicated job scheduling engine designed to be used in both Java EE and Java SE settings. Quartz provides a huge range of features such as persistent jobs, clus-tering, and distributed transactions, though we do not look at the clustering or distributed transaction features in this book—you can find out more about these online at www.opensymphony.com/quartz. Spring’s Quartz integration is similar to its Timerintegration in that it provides for declarative con-figuration of jobs, triggers, and schedules. In addition to this, Spring provides additional job persistence features that allow the scheduling of a Quartz job to take part in a Spring-managed transaction.Introducing Quartz
Quartz is an extremely powerful job scheduling engine, and we cannot hope to explain everything about it in this chapter. However, we do cover the main aspects of Quartz that are related to Spring,
and we discuss how you can use Quartz from a Spring application. As with our Timerdiscussion, we
start by looking at Quartz separately from Spring, and then we look at integrating Quartz and Spring.
The core of Quartz is made up of two interfaces, Joband Scheduler, and two classes, JobDetail
and Trigger. From their names, it should be apparent what Job, Scheduler, and Triggerdo, but the
role of the JobDetailclass is not so clear. Unlike Timer-based scheduling, tasks are not executed
using a single instance of your job class; instead, Quartz creates instances as it needs them. You can
use the JobDetailclass to encapsulate the job state and to pass information to a job between
subse-quent executions of a job. Timer-based scheduling has no notion of aTriggerclass; Triggerlogic is
encapsulated by the Timerclass itself. Quartz supports a pluggable architecture for triggers, which
allows you to create your own implementations as you see fit. That said, you rarely create your own Triggerimplementations because Quartz provides the superpowerful CronTriggerclass out of the box, which allows you to use cron expressions (more on that shortly) to have fine-grained control over job execution.
Simple Job Scheduling
To create a job for use in Quartz, simply create a class that implements the Jobinterface. The Job
interface defines a single method, execute(), from which you call your business logic. Quartz passes
an instance of JobExecutionContextto the execute()method, allowing you to access context data
about the current execution. We’ll look at this in more detail in the next section.
Listing 12-14. Creating a Simple Job
package com.apress.prospring2.ch12.quartz; import org.quartz.Job;
import org.quartz.JobExecutionContext; import org.quartz.JobExecutionException; public class HelloWorldJob implements Job {
public void execute(JobExecutionContext context) throws JobExecutionException {
System.out.println("Hello World!"); }
}
To schedule this job to run, we first need to obtain aSchedulerinstance, then create aJobDetail
bean that contains information about the job, and finally create aTriggerto govern job execution.
The code for this is shown in Listing 12-15. Listing 12-15. Scheduling Jobs in Quartz package com.apress.prospring2.ch12.quartz; import java.util.Date; import org.quartz.JobDetail; import org.quartz.Scheduler; import org.quartz.SimpleTrigger; import org.quartz.Trigger; import org.quartz.impl.StdSchedulerFactory; public class HelloWorldScheduling {
public static void main(String[] args) throws Exception {
Scheduler scheduler = new StdSchedulerFactory().getScheduler(); scheduler.start();
JobDetail jobDetail = new JobDetail("helloWorldJob", Scheduler.DEFAULT_GROUP, HelloWorldJob.class); Trigger trigger = new SimpleTrigger("simpleTrigger",
Scheduler.DEFAULT_GROUP, new Date(), null, SimpleTrigger.REPEAT_INDEFINITELY, 3000); scheduler.scheduleJob(jobDetail, trigger); }
}
This code starts by obtaining an instance of Schedulerusing the StdSchedulerFactoryclass. We
are not going to look at this class in any detail here, but you can find out more information in the Quartz tutorial, which is available on the OpenSymphony web site. For now, it is enough to know
that the StdSchedulerFactory.getScheduler()class returns aSchedulerinstance that is ready to
run. In Quartz, aSchedulercan be started, stopped, and paused. If aSchedulerhas not been started
Next, we create the JobDetailinstance of the job we are scheduling, passing in three argu-ments to the constructor. The first argument is the job name and refers to this job when using one
of the Schedulerinterface’s administration methods, such as pauseJob(), which allows a particular
job to be paused. The second argument is the group name, for which we are using the default. Group names can be used to refer to a group of jobs together, perhaps to pause them all using Scheduler.pauseJobGroup(). You should note that job names are unique within a group. The third
and final argument is the Classthat implements this particular job.
With the JobDetailinstance created, we now move on to create aTrigger. In this example, we
use the SimpleTriggerclass, which provides JDK Timer-style trigger behavior. The first and second
arguments passed to the SimpleTriggerconstructor are the trigger name and group name,
respec-tively. Both of these arguments perform similar functions for aTriggeras they do for aJobDetail.
Also note that trigger names must be unique within a group, as otherwise, an exception is raised. The third and fourth arguments, both of type Date, are the start and end dates for this Trigger. By
specifying nullfor the end date, we are saying there is no end date. The ability to specify an end
date for a trigger is not available when you are using Timer. The next argument is the repeat count,
which allows you to specify the maximum number of times the Triggercan fire. We use the constant
REPEAT_INDEFINITELYto allow the Triggerto fire without a limit. The final argument is the interval
between Triggerfirings and is defined in milliseconds. We have defined an interval of 3 seconds.
The final step in this example is to schedule the job with a call to Scheduler.schedule()that
passes in the JobDetailinstance and the Trigger. If you run this application, you will see the
famil-iar stream of “Hello, World” messages appearing gradually in your console.
Using JobDataMaps
In the previous example, all information for the job execution was contained in the job itself. However,
you can pass state into the job using the JobDetailor Triggerclass. Each instance of JobDetailand
Triggerhas an associated JobDataMapinstance, which implements Map, and allows you to pass in job
data in key/value pairs. Your jobs can modify data in the JobDataMapto allow for the passing of data
between subsequent executions of the job. However, there are some considerations related to job persistence when using this approach. We discuss these later in the “About Job Persistence” section.
Storing data about aTriggeris useful when you have the same job scheduled with multiple
Triggerimplementations and want to provide the job with different data on each independent
trig-gering. Entries of this map are made available via the JobDataMapon the JobExecutionContextthat can
be retrieved via the getMergedJobDataMap()method. As the method name suggests, the JobDataMap
on the JobExecutionContextis a merge of the JobDataMapfound on the JobDetailand the JobDataMap
found on the Trigger, whereas data stored in the Triggeroverrides data stored on the JobDetail.
In Listing 12-16, you can see an example of aJobthat uses data contained in the merged
JobDataMapto perform its processing. Listing 12-16. Using the JobDataMap
package com.apress.prospring2.ch12.quartz; import java.util.Map;
import org.quartz.Job;
import org.quartz.JobExecutionContext; import org.quartz.JobExecutionException; public class MessageJob implements Job {
Map properties = context.getMergedJobDataMap(); System.out.println("Previous Fire Time: "
+ context.getPreviousFireTime());
System.out.println("Current Fire Time: " + context.getFireTime()); System.out.println("Next Fire Time: " + context.getNextFireTime()); System.out.println(properties.get("message")); System.out.println(properties.get("jobDetailMessage")); System.out.println(properties.get("triggerMessage")); System.out.println(""); } }
From the merged JobDataMap, we are able to extract the Objects that are keyed as message, jobDetailMessage, and triggerMessageand write them to stdout. Also notice that we are able to get information about the previous, current, and next execution of this job from the JobExecutionContext.
In Listing 12-17, you can see an example of how you populate the JobDataMapon JobDetailwith
data when scheduling the Job.
Listing 12-17. Adding Data to the JobDetail JobDataMap package com.apress.prospring2.ch12.quartz; import org.quartz.Scheduler; import org.quartz.SimpleTrigger; import org.quartz.JobDetail; import org.quartz.Trigger; import org.quartz.impl.StdSchedulerFactory; import java.util.Map; import java.util.Date;
public class JobDetailMessageScheduling {
public static void main(String[] args) throws Exception {
Scheduler scheduler = new StdSchedulerFactory().getScheduler(); scheduler.start();
JobDetail jobDetail = new JobDetail("messageJob", Scheduler.DEFAULT_GROUP, MessageJob.class); Map map = jobDetail.getJobDataMap();
map.put("message", "This is a message from Quartz"); map.put("jobDetailMessage", "A jobDetail message"); Trigger trigger = new SimpleTrigger("simpleTrigger",
Scheduler.DEFAULT_GROUP, new Date(), null, SimpleTrigger.REPEAT_INDEFINITELY, 3000); scheduler.scheduleJob(jobDetail, trigger); }
}
You will recognize much of this code from the example in Listing 12-15, but notice that once
the JobDetailinstance has been created here, we access the JobDataMapand add two messages to it,
keyed as messageand jobDetailMessage. If you run this example and leave it running for a few
Previous Fire Time: null
Current Fire Time: Tue Oct 23 11:02:19 BST 2007 Next Fire Time: Tue Oct 23 11:02:22 BST 2007 This is a message from Quartz
A jobDetail message null
Previous Fire Time: Tue Oct 23 11:02:19 BST 2007 Current Fire Time: Tue Oct 23 11:02:22 BST 2007 Next Fire Time: Tue Oct 23 11:02:25 BST 2007 This is a message from Quartz
A jobDetail message null
Previous Fire Time: Tue Oct 23 11:02:22 BST 2007 Current Fire Time: Tue Oct 23 11:02:25 BST 2007 Next Fire Time: Tue Oct 23 11:02:28 BST 2007 This is a message from Quartz
A jobDetail message null
You can see that both messages contained in the JobDataMapare written to stdoutafter the
information about the execution times of the previous, current, and next execution is displayed.
Listing 12-18 gives you an example of also providing data on the Triggerand the effect that
merging the two JobDataMapinstances has on the values.
Listing 12-18. Using the JobDataMap on the Trigger package com.apress.prospring2.ch12.quartz; import org.quartz.JobDetail; import org.quartz.Scheduler; import org.quartz.SimpleTrigger; import org.quartz.Trigger; import org.quartz.impl.StdSchedulerFactory; import java.util.Date;
public class TriggerMessageScheduling {
public static void main(String[] args) throws Exception {
Scheduler scheduler = new StdSchedulerFactory().getScheduler(); scheduler.start();
JobDetail jobDetail = new JobDetail("triggerMessageJob", Scheduler.DEFAULT_GROUP, MessageJob.class);
jobDetail.getJobDataMap().put("message", "This is a message from Quartz"); jobDetail.getJobDataMap().put("jobDetailMessage", "My job details data."); Trigger trigger = new SimpleTrigger("simpleTrigger",
Scheduler.DEFAULT_GROUP, new Date(), null, SimpleTrigger.REPEAT_INDEFINITELY, 3000);
trigger.getJobDataMap().put("message", "Message from Trigger");
scheduler.scheduleJob(jobDetail, trigger); }
}
As you can see, the JobDetailis configured exactly as before. We simply add two messages to
the Trigger: a keyed message and a trigger message. Running this example produces output similar to the following:
Previous Fire Time: null
Current Fire Time: Tue Oct 23 11:14:22 BST 2007 Next Fire Time: Tue Oct 23 11:14:25 BST 2007 Message from Trigger
My job details data. Another trigger message.
Previous Fire Time: Tue Oct 23 11:14:22 BST 2007 Current Fire Time: Tue Oct 23 11:14:25 BST 2007 Next Fire Time: Tue Oct 23 11:14:28 BST 2007 Message from Trigger
My job details data. Another trigger message.
Previous Fire Time: Tue Oct 23 11:14:25 BST 2007 Current Fire Time: Tue Oct 23 11:14:28 BST 2007 Next Fire Time: Tue Oct 23 11:14:31 BST 2007 Message from Trigger
My job details data. Another trigger message.
Note that the value of the key messageis what we added to the Trigger JobDataMap, not what we
defined in the JobDetail.
As you will see shortly, when using Spring to configure Quartz scheduling, you can create the JobDataMapin your Spring configuration file, allowing you to externalize all Jobconfiguration completely.
Using the CronTrigger
In the previous examples, we used the SimpleTriggerclass, which provides trigger functionality
very similar to that of the JDK Timerclass. However, Quartz excels in its support for complex trigger
expressions using the CronTrigger. CronTriggeris based on the Unix cron daemon, a scheduling
application that supports a simple, yet extremely powerful, trigger syntax. Using CronTrigger, you can quickly and accurately define trigger expressions that would be extremely difficult or
impossi-ble to do with the SimpleTriggerclass. For instance, you can create a trigger that says, “Fire every
5 seconds of every minute, starting at the third second of the minute, but only between the hours of 2:00 and 5:00 p.m.” Or it could say, “Fire on the last Friday of every month.”
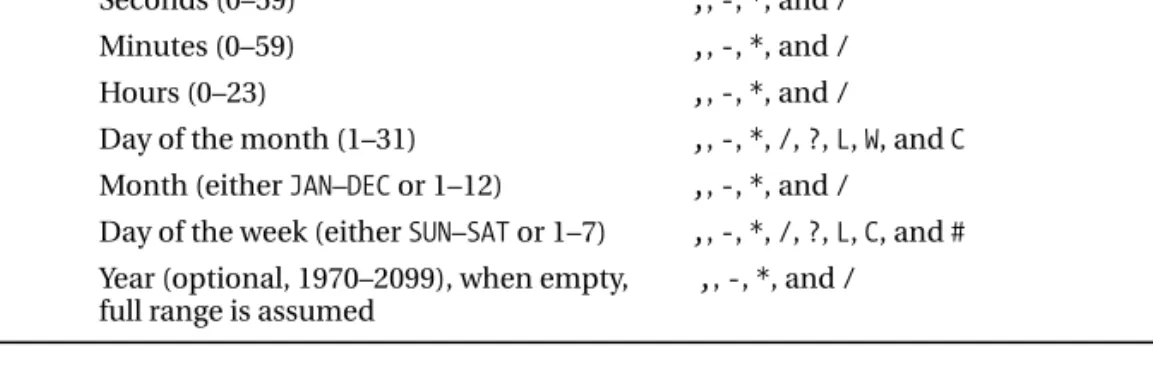
A CronTriggersyntax expression, referred to as a cron expression, contains six required
compo-nents and one optional component. A cron expression is written on a single line, and each component is separated from the next by a space. Only the last, or rightmost, component is optional. Table 12-1 describes the cron components in detail.
Table 12-1. Components of a cron Expression
Position Meaning Allowed Special Characters
1 Seconds (0–59) ,, -, *, and /
2 Minutes (0–59) ,, -, *, and /
3 Hours (0–23) ,, -, *, and /
4 Day of the month (1–31) ,, -, *, /, ?, L, W, and C
5 Month (either JAN–DECor 1–12) ,, -, *, and /
6 Day of the week (either SUN–SATor 1–7) ,, -, *, /, ?, L, C, and #
7 Year (optional, 1970–2099), when empty, ,, -, *, and /
full range is assumed
Each component accepts the typical range of values that you would expect, such as 0–59 for seconds and minutes and 1–31 for the day of the month. For the month and day of the week com-ponents, you can use numbers, such as 1–7 for day of the week, or text such as SUN–SAT.
Each field also accepts a given set of special symbols, so placing an asterisk (*) in the hours
component means “every hour,” and using an expression such as 6Lin the day of the week
compo-nent means “last Friday of the month.” Table 12-2 describes cron wildcards and special characters in detail.
Table 12-2. cron Expression Wildcards and Special Characters Special Character Description
* Any value. This special character can be used in any field to indicate that the
value should not be checked. Therefore, our example cron expression will be fired on every day of the month, every month, and every day of the week between 1970 and 2099.
? No specific value. This special character is usually used with other specific
values to indicate that a value must be present but will not be checked.
- Range. For example, 10–12in the hours field means hours 10:00, 11:00, and
12:00 a.m.
, List separator. Allows you to specify a list of values, such as MON, TUE, WEDin
the day of the week field.
/ Increments. This character specifies increments of a value. For example, 0/1
in the minute field means the job should run on every 1-minute increment of the minute field, starting from 0.
L An abbreviation for “last.” The meaning of Lis a bit different in the day of the
month field than for the day of the week. When used in the day of the month field, it means the last day of the month (March 31, February 28 or 29, and so on). When used in the day of the week field, it has the same value as 7—Saturday. The Lspecial character is most useful when you use it with a specific day of the week value. For example, 6Lin the day of the week field means the last Friday of each month.
W Wis only allowed for the day of the month field and specifies the nearest
weekday (Monday–Friday) to the given day of the same month. Set the value to 7W, and the trigger will be fired on the sixth day if the seventh happens to be a Saturday. If the seventh day is a Sunday, the trigger fires on Monday, the eighth day. Note that a trigger due on Saturday the first will actually fire on the third.
Table 12-2. Continued
Special Character Description
# This value is allowed only for the day of the week field, and it specifies the nth
day in a month. For example 1#2means the first Monday of each month.
C The calendar value. This is allowed for the day of the month and day of the
week fields. The values of days are calculated against a specified calendar.
Specifying 20Cin the day of the month field fires the trigger on the first day
included in the calendar on or after the twentieth day. Specifying 6Cin the
day of the week field is interpreted as the first day included in the calendar on or after Friday.
The last thing to bear in mind when writing cron expressions is daylight saving time. Changes because of daylight saving time may cause a trigger to fire twice in spring or to never fire in autumn.
There are many more permutations for cron expressions than we can discuss here; you can find
a detailed description of cron syntax in the Javadoc for the CronTriggerclass.
Listing 12-19 shows an example of the CronTriggerclass in action.
Listing 12-19. Using the CronTrigger Class package com.apress.prospring2.ch12.quartz; import java.util.Map; import org.quartz.CronTrigger; import org.quartz.JobDetail; import org.quartz.Scheduler; import org.quartz.Trigger; import org.quartz.impl.StdSchedulerFactory; public class CronTriggerExample {
public static void main(String[] args) throws Exception {
Scheduler scheduler = new StdSchedulerFactory().getScheduler(); scheduler.start();
JobDetail jobDetail = new JobDetail("messageJob", Scheduler.DEFAULT_GROUP, MessageJob.class); Map map = jobDetail.getJobDataMap();
map.put("message", "This is a message from Quartz"); String cronExpression = "3/5 * 14,15,16,17 * * ?"; Trigger trigger = new CronTrigger("cronTrigger",
Scheduler.DEFAULT_GROUP, cronExpression); scheduler.scheduleJob(jobDetail, trigger); }
}
Much of this code should look familiar to you; the only major difference here is that we use the
cron expression. The actual creation of the CronTriggerclass is very similar to the creation of the
SimpleTriggerclass in that you have a name and a group name. To help you understand the cron expression in the example, we’ll break it down into components.
The first component, 3/5, means every 5 seconds starting at the third second of the minute. The second component, *, simply says every minute. The third component, 14, 15, 16, 17, restricts this trigger to running between 2:00 and 5:59 p.m.—that is, when the time begins with 14, 15, 16, or 17. The next two components are both wildcards saying that this trigger can run in any month or any year. The final component uses the queston mark wildcard, ?, to indicate that this trigger can run on any day of the week. This expression has the net effect of firing every 5 seconds, starting on the third second of the minute, but only between 2:00 and 5:59 p.m.
If you run this example, depending on the time of day, you see either a blank screen or the ever increasing list of “Hello, World” printouts. Try modifying the first component in the expression to change the frequency of the trigger or at which second in the minute the trigger starts. You should also try modifying other components to see what effects you get.
The CronTriggerclass is great for almost all trigger requirements. However, expressions can
quickly become convoluted when you need to program exceptions to the rule. For instance, con-sider a process that checks a task list for a user every Monday, Wednesday, and Friday at 11:00 a.m. and 3:00 p.m. Now, consider what happens when you want to prevent this trigger from firing when
the user is on vacation. Thankfully, Quartz provides support for this via the Calendarinterface. Using
the Calendarinterface, you can accurately define a period that should either be explicitly included
or explicitly excluded from a trigger’s normal schedule. Quartz comes with six implementations of Calendar, one of which is the HolidayCalendarthat stores a list of days to be excluded from a trigger’s
schedule. Listing 12-20 shows a modification of the previous example that uses aHolidayCalendar
to exclude December 25, 2007.
Listing 12-20. Explicitly Excluding Dates with HolidayCalendar package com.apress.prospring2.ch12.quartz; import java.util.Calendar; import java.util.Map; import org.quartz.CronTrigger; import org.quartz.JobDetail; import org.quartz.Scheduler; import org.quartz.Trigger; import org.quartz.impl.StdSchedulerFactory; import org.quartz.impl.calendar.HolidayCalendar; public class CronWithCalendarExample {
public static void main(String[] args) throws Exception {
Scheduler scheduler = new StdSchedulerFactory().getScheduler(); scheduler.start();
// create a calendar to exclude a particular date Calendar cal = Calendar.getInstance();
cal.set(2007, Calendar.DECEMBER, 25);
HolidayCalendar calendar = new HolidayCalendar(); calendar.addExcludedDate(cal.getTime());
// add to scheduler
scheduler.addCalendar("xmasCalendar", calendar, true, false); JobDetail jobDetail = new JobDetail("messageJob",
Map map = jobDetail.getJobDataMap();
map.put("message", "This is a message from Quartz"); String cronExpression = "3/5 * 14,15,16,17 * * ?"; Trigger trigger = new CronTrigger("cronTrigger",
Scheduler.DEFAULT_GROUP, cronExpression); trigger.setCalendarName("xmasCalendar");
scheduler.scheduleJob(jobDetail, trigger); }
}
Here, you can see that we create an instance of HolidayCalendar, and using the addExcludedDate()
method, we exclude December 25. With the Calendarinstance created, we add the Calendarto the
Schedulerusing the addCalendar()method, giving it a name of xmasCalendar. Later, before adding the CronTrigger, we associate it with xmasCalendar. Using this approach saves you from having to create complex cron expressions just to exclude a few arbitrary dates.
About Job Persistence
Quartz provides support for Jobpersistence, allowing you to add jobs at runtime or make changes
to existing jobs and persist these changes and additions for subsequent executions of the Job.
Cen-tral to this concept is the JobStoreinterface, implementations of which are used by Quartz when it
is performing persistence. By default, Quartz uses the RAMJobStoreimplementation, which simply
stores Jobinstances in memory. Other available implementations are JobStoreCMTand JobStoreTX.
Both of these classes persist job details using a configured DataSourceand support the creation and
modification of jobs as part of a transaction. The JobStoreCMTimplementation is intended to be
used in an application server environment and takes part in container-managed transactions. For
stand-alone applications, you should use the JobStoreTXimplementation. Spring provides its own
LocalDataSourceJobStoreimplementation of JobStore, which can take part in Spring-managed transactions. We will take a look at this implementation when we discuss Spring support for Quartz.
Earlier on, you saw how you can modify the contents of the JobDataMapto pass information
between different executions of the same Job. However, if you try to run that example using aJobStoreimplementation other than RAMJobStore, you will be surprised to see that it doesn’t work. The reason for this is that Quartz supports the notion of stateless and stateful jobs. When
using the RAMJobStoreand modifying the JobDataMap, you are actually modifying the store directly,
so the type of Jobis unimportant, but this is not the case when you are using implementations
other than RAMJobStore. A stateless Jobonly has the data in the JobDataMappersisted when it is added to
the Scheduler, whereas stateful Jobs have their JobDataMappersisted after every execution. To mark
aJobas stateful, implement the StatefulJobinterface instead of the Jobinterface. StatefulJobis
a subinterface of Job, so you do not need to implement Jobas well. You should also be aware that
any data you place in the JobDataMapwhen using Jobpersistence must be serializable, because
Quartz writes the JobDataMapas a serialized blob to the database.
Quartz Support in Spring
Spring’s Quartz integration follows a similar pattern to the integration with Timerin that it allows
you to configure your job scheduling fully within the Spring configuration file. In addition to this, Spring provides further classes to integrate with the Quartz JobStore, thus allowing you to configure
Jobpersistence in your configuration and for Jobmodification to take part in Spring-managed
Scheduling a Job with Spring
As you would expect, much of the code you need to schedule a Quartz Jobusing Spring goes into
the Spring configuration file. Indeed, you only need to load the ApplicationContextin your
applica-tion for the configuraapplica-tion to take effect and for Spring to start the Schedulerautomatically.
In Listing 12-21, you can see the configuration code required to configure the MessageJobclass
you saw in Listing 12-16 to run once every 3 seconds. Listing 12-21. Configuring Scheduling Declaratively <?xml version="1.0" encoding="UTF-8"?>
<beans xmlns="http://www.springframework.org/schema/beans" xmlns:xsi="http://www.w3.org/2001/XMLSchema-instance"
xsi:schemaLocation="http://www.springframework.org/schema/beans http://www.springframework.org/schema/beans/spring-beans-2.0.xsd">
<bean id="job" class="org.springframework.scheduling.quartz.JobDetailBean"> <property name="jobClass"
value="com.apress.prospring2.ch12.quartz.MessageJob"/> <property name="jobDataAsMap">
<map>
<entry key="message"
value="This is a message from the Spring config file!"/> </map>
</property> </bean>
<bean id="trigger"
class="org.springframework.scheduling.quartz.SimpleTriggerBean"> <property name="jobDetail" ref="job"/>
<property name="startDelay" value="1000"/> <property name="repeatInterval" value="3000"/> <property name="jobDataAsMap">
<map>
<entry key="triggerMessage"
value="Trigger message from the Spring config file!"/> </map> </property> </bean> <bean id="schedulerFactory" class="org.springframework.scheduling.quartz.SchedulerFactoryBean"> <property name="triggers"> <list> <ref local="trigger"/> </list> </property> </bean> </beans>
Here, you can see that we use the JobDetailBeanclass, which extends the JobDetailclass, to
configure the job data in a declarative manner. The JobDetailBeanprovides more JavaBean-style
properties that are accessible by Spring, and it also provides sensible defaults for properties that you usually have to specify yourself. For instance, notice that we did not specify a job name or a group
name. By default, the JobDetailBeanuses the ID of the <bean>tag as the job name and the default
group of the Scheduleras the group name. Notice that we are able to add data to the JobDataMap
you can’t add directly to the jobDataMapproperty. It is of type JobDataMap, and this type is not supported in Spring configuration files.
With the JobDetailBeanconfigured, the next step is to create a trigger. Spring offers two classes,
SimpleTriggerBeanand CronTriggerBean, that wrap the SimpleTriggerand CronTriggerclasses,
allowing you to configure them declaratively and to associate them with aJobDetailBean—all
within your configuration file. Notice that in Listing 12-21, we defined a starting delay of 1 second
and a repeat interval of 3 seconds. By default, the SimpleTriggerBeansets the repeat count to infinity.
The final piece of configuration you need is the SchedulerFactoryBean. By default, the SchedulerFactoryBeancreates an instance of StdSchedulerFactory, which, in turn, creates the Schedulerimplementation. You can override this behavior by setting the schedulerFactoryClass property to the name of a class that implements SchedulerFactory, which you wish to use in place of StdSchedulerFactory. The only property that you need to configure scheduling is the triggers
property, which accepts aListof TriggerBeanelements.
Because all of the job scheduling configuration is contained in the configuration, you need
very little code to actually start the Schedulerand execute the Jobinstances. In fact, all you need to
do is create the ApplicationContext, as shown in Listing 12-22. Listing 12-22. Testing Declarative Quartz Configuration package com.apress.prospring2.ch12.quartz.spring; import org.springframework.context.ApplicationContext;
import org.springframework.context.support.FileSystemXmlApplicationContext; public class SimpleSpringQuartzIntegrationExample {
public static void main(String[] args) {
ApplicationContext ctx = new FileSystemXmlApplicationContext( "./ch12/src/conf/quartz-simple.xml ");
} }
As you can see, this class does nothing more than create an instance of ApplicationContext using the configuration shown in Listing 12-21. If you run this application and leave it running for a few iterations, you end up with something like this:
Previous Fire Time: null
Current Fire Time: Tue Oct 23 11:24:31 BST 2007 Next Fire Time: Tue Oct 23 11:24:34 BST 2007
This is a message from the Spring configuration file! null
Trigger message from the Spring configuration file! Previous Fire Time: Tue Oct 23 11:24:31 BST 2007 Current Fire Time: Tue Oct 23 11:24:34 BST 2007 Next Fire Time: Tue Oct 23 11:24:37 BST 2007
This is a message from the Spring configuration file! null
Trigger message from the Spring configuration file! Previous Fire Time: Tue Oct 23 11:24:34 BST 2007 Current Fire Time: Tue Oct 23 11:24:37 BST 2007 Next Fire Time: Tue Oct 23 11:24:40 BST 2007
This is a message from the Spring configuration file! null
Notice that it is running just like it was for the previous MessageJobexample, but the messages displayed are the messages configured in the Spring configuration file.
Using Persistent Jobs
One of the great features of Quartz is its ability to create stateful, persistent jobs. This opens up some great functionality that is not available when you are using Timer-based scheduling. With per-sistent jobs, when you can add jobs to Quartz at runtime, they will still be in your application after
a restart. Plus, you can modify the JobDataMappassed between executions of aJob, and the changes
will still be in effect after a restart.
In this example, we are going to schedule two jobs, one using Spring configuration mechanisms and one at runtime. We’ll see how the Quartz persistence mechanism copes with changes to the JobDataMapfor these jobs and what happens in subsequent executions of the application.
To start with, you need to create a database in which Quartz can store the Jobinformation.
In the Quartz distribution—we used version 1.6.0—you will find a selection of database scripts for a variety of different RDBMS flavors. For the example here, we use Oracle, but you should not encounter problems using a different database as long as Quartz has a database script for it. For
version 1.6.0, try the docs/dbTablessubfolder of the Quartz distribution. Once you have located
the script for your database, execute it against your database and verify that 12 tables, each with the prefix qrtz, have been created.
Next, create your test Job. Because we want to make changes to JobDataMapduring Job
execu-tion, we need to flag to Quartz that it should treat this as a stateful Job. We do this by implementing
the StatefulJobinterface rather than the Jobinterface. This is shown in Listing 12-23.
Listing 12-23. Creating a Stateful Job
package com.apress.prospring2.ch12.quartz.spring; import java.util.Map;
import org.quartz.JobExecutionContext; import org.quartz.JobExecutionException; import org.quartz.StatefulJob;
public class PersistentJob implements StatefulJob { public void execute(JobExecutionContext context)
throws JobExecutionException {
Map map = context.getJobDetail().getJobDataMap();
System.out.println("[" + context.getJobDetail().getName() + "]" + map.get("message"));
map.put("message", "Updated Message"); }
}
The StatefulJobinterface does not declare additional methods for your class to implement;
it is simply a marker telling Quartz that it should persist the JobDetailafter every execution.
Here, you can see that we display the message that is stored in the JobDataMapalong with the
name of the Job.
The next steps are to configure the Jobin Spring and configure the Schedulerwith aDataSource
Listing 12-24. Configuring Quartz Persistence in Spring <?xml version="1.0" encoding="UTF-8"?> <beans xmlns="http://www.springframework.org/schema/beans" xmlns:xsi="http://www.w3.org/2001/XMLSchema-instance" xsi:schemaLocation="http://www.springframework.org/schema/beans http://www.springframework.org/schema/beans/spring-beans-2.0.xsd"> <bean id="job" class="org.springframework.scheduling.quartz.JobDetailBean">
<property name="jobClass"
value="com.apress.prospring2.ch12.quartz.spring.PersistentJob"/> <property name="jobDataAsMap">
<map>
<entry key="message" value="Original Message"/> </map>
</property> </bean>
<bean id="dataSource"
class="org.springframework.jdbc.datasource.SingleConnectionDataSource"> <property name="driverClassName" value="oracle.jdbc.driver.OracleDriver"/> <property name="url"
value="jdbc:oracle:thin:@oracle.devcake.co.uk:1521:INTL"/> <property name="username" value="PROSPRING"/>
<property name="password" value="x******6"/> </bean>
<bean id="trigger"
class="org.springframework.scheduling.quartz.SimpleTriggerBean"> <property name="jobDetail" ref="job"/>
<property name="startDelay" value="1000"/> <property name="repeatInterval" value="3000"/> </bean> <bean id="schedulerFactory" class="org.springframework.scheduling.quartz.SchedulerFactoryBean"> <property name="triggers"> <list> <ref local="trigger"/> </list> </property>
<property name="dataSource" ref="dataSource"/> </bean>
</beans>
You will recognize much of this configuration code from Listing 12-21; the important part here
is the dataSourcebean. In this code, we use the Spring class SingleConnectionDataSource; this
DataSourceimplementation is handy for testing, but never use it in production (check the Javadoc for this class if you are unsure why). Also, remember, you need to modify the connection details in the configuration as appropriate for your environment. For more details on configuring other DataSources with Spring, see Chapter 8.
Using the configured dataSourcebean, we set the dataSourceproperty of the SchedulerFactoryBean.
By doing this, we instruct Spring to create aSchedulerthat is configured to persist Jobdata using
the given DataSource. Internally, this is achieved using Spring’s own JobStoreimplementation,
With the configuration complete, all that remains is to load it in an application and add another
Jobto the Schedulerat runtime. Listing 12-25 shows the code for this.
Listing 12-25. Testing Job Persistence
package com.apress.prospring2.ch12.quartz.spring; import java.util.Date; import org.quartz.JobDetail; import org.quartz.Scheduler; import org.quartz.SimpleTrigger; import org.quartz.Trigger; import org.springframework.context.ApplicationContext; import org.springframework.context.support.FileSystemXmlApplicationContext; public class SpringWithJobPersistence {
public static void main(String[] args) throws Exception {
ApplicationContext ctx = new FileSystemXmlApplicationContext( "./ch12/src/conf/quartzPersistent.xml");
// get the scheduler
Scheduler scheduler = (Scheduler) ctx.getBean("schedulerFactory"); JobDetail job = scheduler.getJobDetail("otherJob",
Scheduler.DEFAULT_GROUP); if (job == null) {
// the job has not yet been created job = (JobDetail) ctx.getBean("job"); job.setName("otherJob");
job.getJobDataMap().put("message", "This is another message"); Trigger trigger = new SimpleTrigger("simpleTrigger",
Scheduler.DEFAULT_GROUP, new Date(), null, SimpleTrigger.REPEAT_INDEFINITELY, 3000); scheduler.scheduleJob(job, trigger);
} } }
This code requires little explanation. However, note that before we schedule the second job, we
check to see if it already exists using the Scheduler.getJobDetail()method. This prevents us from
overwriting the Jobon subsequent runs of the application.
The first time you run this example, you get output something like this: [otherJob]This is another message
[job]Original Message [otherJob]Updated Message [job]Updated Message [otherJob]Updated Message [job]Updated Message
As you can see, the first time each Jobexecutes, the message displayed is the original message
configured in the JobDataMapwhen the Jobwas scheduled. On subsequent executions, each Job
dis-plays the updated message that was set during the previous execution. If you stop the application and restart it, you see something slightly different:
[otherJob]Updated Message [job]Updated Message [otherJob]Updated Message [job]Updated Message [otherJob]Updated Message [job]Updated Message
This time, you can see that, because the Jobdata was persisted, you do not need to re-create
the second Job, and the JobDataMapaccurately reflects changes that were made during the last run
of the application.
Scheduling Arbitrary Jobs with Quartz
Like the Timer-based scheduling classes, Spring provides the ability to schedule the execution of arbitrary methods using Quartz. We won’t go into detail on this, because it works in an almost
iden-tical manner to the Timerapproach. Instead of using MethodInvokingTimerTaskFactoryBean, you use
MethodInvokingJobDetailFactoryBean, and instead of automatically creating TimerTask
implemen-tations, you automatically create JobDetailones.
Job Scheduling Considerations
If you are going to be adding job scheduling to your application, you should bear in mind a few con-siderations when you choose a scheduler and a scheduling approach.
Choosing a Scheduler
The first decision you have to make when adding scheduling to your application is which scheduler to use. This choice is actually quite easy. If you have only very simple scheduling requirements or are restricted in the external libraries that you can package with your application, you should use Timer-based scheduling. Otherwise, use Quartz.
Even if you find that your requirements are simple, you might want to go with Quartz, especially
if you have to create an explicit Jobimplementation. If you use Quartz from the outset, if your
require-ments become more advanced, you can easily add persistence, transactions, or more complex triggers
without having to change aTimerTaskto aJob. In general, we have found that using Quartz for all of
our scheduling allows us to become familiar with a single scheduling approach and saves our devel-opers from having to worry about two different approaches when one provides everything they need.
Packaging Job Logic Separately from the Job Class
A common approach that we see many developers take when adding scheduling to an application
is to place business logic inside aJobor TimerTask. Generally, this is a bad idea. In many cases, you
need to have scheduled tasks available for execution on demand, which requires the logic to be sep-arate from the scheduling framework.
Also, you should not unnecessarily couple your business logic to a particular scheduler. We have found that a better approach is to keep business logic in separate classes and either create