Development of a Web GIS Application using Web
AppBuilder for ArcGIS (Developer Edition)
1
Taranjot Singh Bhatia,
2Harpinder Singh,
3P.K Litoria,
4Brijendra Pateriya
1,2,3,4Punjab Remote Sensing Centre, Ludhiana, Punjab, India
Abstract
Development of a web GIS (Geographic Information Systems) is a complex job and it requires specialized software. There are many software both commercial and FOSS (Free and open source software) available on the internet to develop a web GIS application. In this study an attempt has been made to review the process of development of a mobile friendly web GIS application using the ESRI Web AppBuilder for ArcGIS (Developer Edition). Web AppBuilder for ArcGIS (Developer Edition) is a part of the ESRI ArcGIS Enterprise collection of software. A basic application is developed using Web AppBuilder and then it is customized and extended. The various customizations described in this paper are, the creation of a new widget (tool), addition of a widget
downloaded from the internet and modifications in the branding,
headed, footer and sidebar of the application.
Keywords
Web-GIS, Web AppBuilder for ArcGIS (Developer Edition)
I. Introduction
Development of a web GIS (Geographic Information Systems) is a complex job and it requires specialized software. In this study an attempt has been made to review the process of development of a mobile friendly web GIS application using the Web AppBuilder for ArcGIS (Developer Edition). The application has a three layer architecture where the backend is the PostgreSQL database, middleware is the ArcGIS Server and the frontend has been developed using the Web AppBuilder for ArcGIS (Developer Edition).
The details about the database and various important components of the ArcGIS Enterprise and their use have been provided in [1]. [1] also includes the process of the map service creation using the ArcMap and ArcGIS Server. It includes the process of the GUI creation using the template based Web AppBuilder [2] tool present in the Portal for ArcGIS.
In this paper an attempt has been made to explain the process of customizing the basic GIS application using the Web AppBuilder for ArcGIS (Developer Edition) [3]. Customization can be done by the creation of own widgets, panels and themes. Developers need
sufficient knowledge and experience using HTML and JavaScript (JS) to customize the application.
The knowledge of ArcGIS API for JavaScript [4] is essential for the customization work. The ArcGIS API for JavaScript is a
lightweight way to embed maps and tasks in web applications. The maps may be extracted from the ArcGIS Online platform or from the users own ArcGIS server or other GIS Server’s. ArcGIS
API for JavaScript is built on top of Dojo [5]. Dojo is an open source toolkit which helps to write efficient and robust JavaScript
code, simplify the development process and also ensures that the application works the same in different browsers. Sample code at [6] demonstrates the use of various features in the ArcGIS API
for JavaScript.
II. Objectives
The objective of this study is to review the process of creating a custom web GIS application using ESRI Web AppBuilder for ArcGIS (Developer Edition). A basic application is developed using Web AppBuilder and then it is customized and extended. The various customizations described in this paper are: creation of a new widget (tool), addition of a widget downloaded from
the internet, modifications in the branding, headed, footer and
sidebar of the application.
III. Tools & Methodology
Tools Used: Visual Studio Code Editor 1.34, ArcGIS API for JavaScript 3.24, PostgreSQL 9.4, ArcGIS Server 10.6, Portal for ArcGIS 10.6 and Web AppBuilder for ArcGIS (Developer
Edition) 2.12.
A. Setup the Web AppBuilder for ArcGIS (Developer Edition)
Download and install the Web AppBuilder for ArcGIS
•
(Developer Edition) SDK [7].
Double-click the startup.bat file in the unzipped folder •
to start the Web AppBuilder [8].
Web AppBuilder will start in the browser with the following
•
URL http://[yourmachinename]:3344/webappbuilder. In the next window, specify the URL of the ArcGIS Portal
•
account that will be accessed.
Register the Web AppBuilder by providing an app ID.
Log in to the ArcGIS Portal.
•
Click the “Content” tab.
•
Click “Add Item” to create a new application.
•
Enter the URL http://[yourmachinename]:3344/ •
webappbuilder, application title and tags. The new application will be created.
Click the “Settings” tab and scroll down to the App
•
Registration section and click Register. In the redirect URL
type http://[yourmachinename]:3344 and add. Also add https://[yourmachinename]:3344. Click “Register”.
After the registration the App ID will be displayed. Copy
•
it.
Start the Web AppBuilder for ArcGIS (Developer Edition)
•
with startup.bat.
Add the ArcGIS for Portal Link and paste the copied App
•
ID. Login in the portal and approve.
If you get an Error 400 with “Invalid redirect URL” than go •
to the following path (webappbuilderforArcGIS> server) and
delete the “signininfo.json” file and try again.
B. Build a basic application
Start the Web AppBuilder for ArcGIS (Developer Edition)
•
with startup.bat.
Open the Web AppBuilder home page, Click “Create New”
• [9].
Choose the Default (2D) theme (if 2D application has to be
developed).
Provide the application name and description.
•
Select the map and widgets required in the application.
•
Click the “Attribute” tab and change the title, subtitle, and
•
logo of the application.
Click “Preview” to view the application in different platforms
•
and devices.
Click “Launch”to view the app in your browser.
•
Path containing the software code of the created application
•
[10] is (webappbuilderforArcGIS> server> apps> application
folder)
Some important folders and files in the application folder are:
Widget folder:
• It contains the code (js) and associated
files (images, CSS, manifest.json etc) of each widget in the
application. Themes folder:
• It contains the code and associated files for
the theme applied to the application ( e.g. header, footer, sidebar etc)
Images folder:
• It will contain the images e.g. logo etc used in the application.
jimu.js/css/jimu.css file:
• is used to style the theme and widgets. It is used to change the placement of the widgets. config.json file:
• It contains the whole structure of the application i.e. themes, widgets etc.
C. Customization of the Basic Application
Customization can be done by the creation of own widgets, panels and themes. The application folder can be opened in Visual Code
Editor for editing the JS, HTML, CSS files etc. In this paper an
attempt has been made to review the process of adding a widget downloaded from the internet and also to create a new custom
widget. In addition to above, the details regarding the modifications
in the application header, footer, sidebar and branding etc. is also provided.
I. Addition of a widget downloaded from the internet:
Widgets developed by other developers can be downloaded from Github, [11] or other sources. Process to add such widget is as given below:
Find and download a suitable custom widget. It may be in
•
the form of a zipped file.
Unzip it and extract it into the Web AppBuilder for ArcGIS
•
(Developer Edition) (i.e. webappbuilderforArcGIS> client> stemapp> widgets). A new folder will be created for the widget. Modify the widget according to the project requirement. Also, add the entry of the widget in the config.json so that the new widget is added to the existing list of widgets.
If an application is already created then copy the
•
widget folder and place it in the application folder i.e. (webappbuilderforArcGIS> server> apps> application folder> widgets).
If a new application is developed then the widget can be
•
added to the application and the widget folder need not be explicitly copied to its folder.
II. Creation of a New Custom Widget
Make a copy of the MyWidget in the (webappbuilderforArcGIS>
•
client> stemapp> widgets) widgets folder.
Rename the widget folder to a suitable name. Edit the “name”
•
attribute in the manifest.json file to the name of the widget.
Similarly other attributes in the file can also be changed.
Create the GUI of the widget by editing the
• widget.html e.g.
addition of a text box, button etc. Styling of the widget can be done by editing the style.css (/css folder)
The main logic and functionality of the widget is present in
•
the widget.js file. It will contain various variables, functions
and queries.
Add the entry of the widget in the
• config.json so that the new
widget is added to the existing list of widgets.
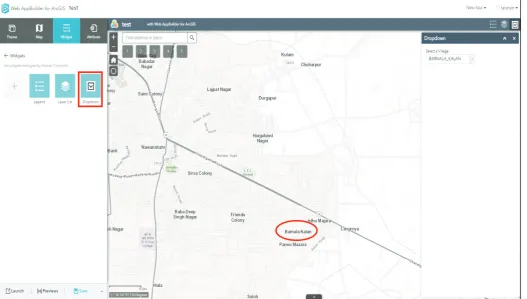
Below given is an example of a custom widget (Dropdown) which helps the user to select a village name from a dropdown (populated from a REST mapservice) and zoom to its geographic extent. The
populated dropdown widget is as shown in fig. 1.
Widget window design and styling:
Widget.html (webappbuilderforArcGIS> server> apps> application folder> widgets> Dropdown)
<div><div><table>
<tr><td> Select Village Name</td></tr> <tr><td>
<select data-dojo-type=”dijit/form/FilteringSelect” id=”villName” name=”villName” data-dojo-attach point=”villName” data-dojo-props=”value: ‘’, placeHolder: ‘Type Here...’, required: true, fetchProperties:{sort:[{attribute :’name’,descending:false}]}”></select>
</td></tr></table></div>
<div data-dojo-attach-point=”shelter” data-dojo-type=”jimu/ dijit/LoadingShelter” data-dojo-props=’hidden:true’></div></ div>
style.css (webappbuilderforArcGIS> server> apps> application folder> widgets> Dropdown >css)
.jimu-widget-Dropdown div:first-child{
width: 300px; }
Functionality of the widget:
manifest.json: To change the widget and author name. (webappbuilderforArcGIS> server> apps> application folder> widgets> Dropdown) { “name”: “Dropdown”, “platform”: “HTML”, “version”: “2.11”, “wabVersion”: “2.11”, “author”: “Singh”,
“description”: “This is the widget used in developer guide”, “copyright”: “”,
“license”:”http://www.apache.org/licenses/LICENSE-2.0” } strings.js: To define the label of the widget in the GUI. (webappbuilderforArcGIS> server> apps> application folder>widgets> Dropdown > nls)
define({
root: ({ _widgetLabel: “Dropdown”
}) });
Widget.js: The complete functionality and logic of the widget.
(webappbuilderforArcGIS> server> apps> application folder>widgets> Dropdown)
define([
‘dojo/_base/declare’,
‘dijit/_WidgetsInTemplateMixin’, ‘jimu/BaseWidget’,
‘esri/tasks/query’, ‘esri/tasks/QueryTask’, ‘dojo/store/Memory’,
‘dojo/_base/lang’,
‘dojo/on’ ],
function (
declare, _WidgetsInTemplateMixin, BaseWidget, Query, QueryTask,
Memory, lang, on ) {
Return declare([BaseWidget, _WidgetsInTemplateMixin], {
baseClass: ‘jimu-widget-Dropdown’, villageUrl: null,
postCreate: function () { this.inherited(arguments);
this.villageUrl = ‘https://abc.com/arcgisserver/rest/services/
puda/MASTER_PLAN/MapServer/5’; }, startup: function () {
this.inherited(arguments);
on(this.villName, ‘change’, lang.hitch); }, onOpen: function () {
this.getVillage(); },
// Get Village Details
getVillage: function () { this.shelter.show(); var query = new Query();
query.returGeometry = false; query.where = ‘1=1’; query.outFields = [‘*’];
varqueryTask = new QueryTask(this.villageUrl);
queryTask.execute(query, lang.hitch(this, this.populateVillage));
},
// Populate Village Combo
populateVillage: function (featureSet) { var data = { identifier: ‘id’, items: [],
label: ‘name’ };
for (var i = 0; i <featureSet.features.length; i++) { data.items.push(lang.mixin({“name”:featureSet. features[i].attributes[‘village_na’] }, {
“id”: featureSet.features[i].attributes [‘village_na’]
})); } //create store
varvillageStore = new Memory({
data: data });
dijit.byId(‘villName’).attr(‘store’,villageStore); this.shelter.hide();
},
this.shelter.show();
//call function: get geometry of the village zoom this.
getVillageGeom(); var query = new Query();
query.returGeometry = false;
query.where=”village_na=’”+ this.villName.displayedValue + “’”;
query.outFields = [‘*’]; },
getVillageGeom: function ()
{
this.shelter.show(); var query = new Query();
query.returnGeometry = true;
query.where=”village_na=’”+ this.villName.displayedValue + “’”;
query.outFields=[‘*’]; query.outSpatialReference= this.map.spatialReference;
varqueryTask=new QueryTask(this.villageUrl);
queryTask.execute(query,lang.hitch(this,this.zoomToVillage));
},
zoomToVillage: function (featureSet) { this.map.setExtent(featureSet.features[0]. geometry.getExtent());
this.shelter.hide();
},
onClose: function () {
} }); });
Widget icon Positioning/styling:
Setting.html (webappbuilderforArcGIS> server> apps> application folder> widgets> Dropdown >setting)
<a class=”link” href=”http://abc.pdf”>
<imgsrc=”images/icon.png” width=”40px” height=”42px”></ a>
style.css (webappbuilderforArcGIS> server> apps> application
folder> widgets> Dropdown >setting>css)
.jimu-widget-Dropdown-setting input{ margin-left: 100px;
}
III. Customizations in the Header, Footer and Sidebar
a). Header
The Header of the application can be customized to contain a
website link, widget icons etc. The size and colour of the header
can also be modified. The following HTML and CSS code example
helps to add a text (ABC) in the header which hyperlinks to www. abc.com website.
widget.html (webappbuilderforArcGIS> server> apps>
application folder> themes>FoldableTheme>widgets>HeaderC
ontroller)
<aclass=”link” href=”http://www.abc.com/”
data-dojo-attach-point=”aboutNode” data-dojo-attach-event=”onclick:_
onAboutClick” style=”line-height: 44px;”>ABC</a>
style.css (webappbuilderforArcGIS> server> apps> application
folder> themes>FoldableTheme>widgets>HeaderController>c
ss)
.link{
Height: 300px;
Width: auto;
b). Footer
The Footer of the application can be customized to contain company information, copyright content, text/icons hyperlinks
etc. The size and colour of the footer can also be modified. The following HTML and CSS code example helps to add a text
(copyright) in the footer.
widget.html (webappbuilderforArcGIS> server> apps> application folder> themes>TabTheme>widgets>Footer)
<div class=”footer-widget-copyright”>All rights reserved. Copyright @ 2019. Name of the Company</div>
style.css (webappbuilderforArcGIS> server> apps>application folder> themes> TabTheme> widgets> Footer>css)
.jimu-widget-footer{ height: 100%;
overflow: hidden;
margin-left: 0px; margin-top: 0; width: 100%; }
.jimu-widget-footer .footer-widget-copyright{ max-width: 800px;
color:white; font-size: 12px; text-align: center; line-height: 32px; margin-left: auto; margin-right: auto; }
c). Sidebar
The Sidebar of the application can be customized to add various widgets. The location, size and colour of the sidebar can also be
changed. The following code helps to add more than five widgets (default is five and the style is foldable) in sidebar:
widget.js (webappbuilderforArcGIS> server> apps> application folder> themes> TabTheme> widgets> SidebarController)
createTabs: function() {
varallIconConfigs = this.getAllConfigs(), iconConfigs = [], openAtStartId = ‘’; if (allIconConfigs.length<= 9) { iconConfigs = allIconConfigs;
this.moreTab = false; }
IV. Change company branding logo on the map window:
Copy the logo image to the application folder image directory
and do the following modification in the CSS file.
jimu.css (webappbuilderforArcGIS> server> apps> application folder> css)
.map .logo-med { z-index: 0;
background-image: url(./images/logo.jpg) !important;
height: 110px;
background-repeat: no-repeat; background-position: bottom;}
D. Download and host the customized application
Start the Web AppBuilder for ArcGIS (Developer Edition)
•
with Startup.bat.
Open Web AppBuilder home page (
• http://<systemname>:3344/
webappbuilder)
Download the application using the download link.
•
Unzip it and place the folder in a web server e.g. IIS or
•
Apache
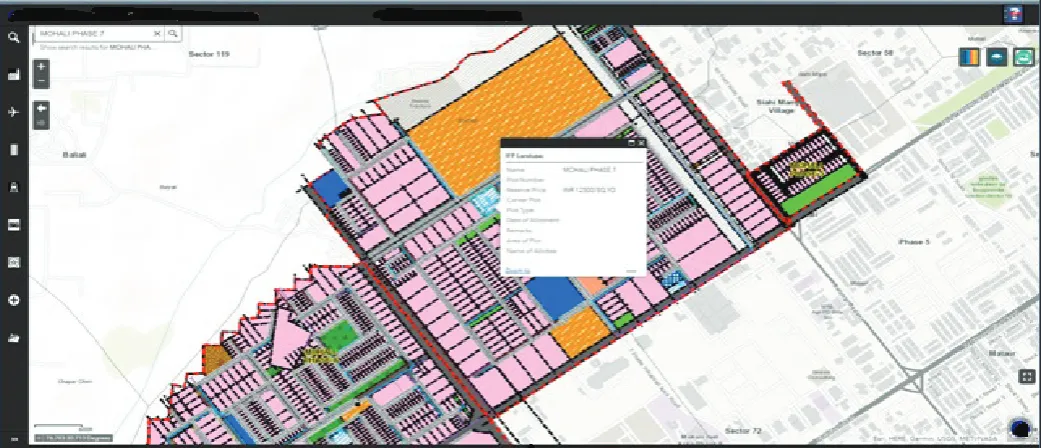
View the final customized application in any browser. Fig. 3. •
IV. Conclusion
This paper provides a complete overview of the development of a mobile friendly customized web GIS application using the Web AppBuilder for ArcGIS (Developer Edition).
References
[1] Bhatia Taranjot, Singh Harpinder, Litoria PK, Pateriya
Brijendra,"Web GIS Development using Portal for ArcGIS, ArcGIS Server and Web AppBuilder for ArcGIS." In
International Journal of Computer Science and Technology, Vol. 10, No. 1, pp. 43-47, 2019.
[2] Anonymous,"Introduction to WebApp Builder". [Online]. Available: https://doc.arcgis.com/en/web-appbuilder/ create-apps/widget-overview.htm.
[3] Anonymous,"Introduction to Web App Builder For Developer Edition". [Online]. Available: https://developers.arcgis.com/ web-appbuilder/guide/developer-s-guide-overview.htm
[4] Anonymous,"ArcGIS API forJavascript". [Online]. Available:
https:// developers.arcgis.com/ javascript/3/
[5] Anonymous,"Working with Dojo". [Online]. Available:
https://developers.arcgis.com/ javascript/3/jshelp/inside_ dojo.html
[6] Anonymous," ArcGIS API for JavaScript: Sample Codes".
[Online]. Available: https://developers.arcgis.com/ javascript/3/jssamples/
[7] Anonymous,"Download SDK for Web App Builder for Developers". [Online]. Available: https://developers.arcgis. com/web-appbuilder/
[8] Anonymous,"Web App Builder for Developers – Get Started", [Online]. Available: https://developers.arcgis.com/ web-appbuilder/ guide/ getstarted.htm
[9] Anonymous,"Web App Builder for Developers – Build your
First app". [Online]. Available: https://developers.arcgis.
com/web-appbuilder/guide/build-your-first-app.htm [10] Anonymous,"Development Overview". [Online]. Available:
https:// developers.arcgis.com/ web-appbuilder/ guide/ developer-s-guide-overview.htm
[11] Anonymous,"Roberts Custom WAB Widgets". [Online].
Available:
Fig. 1: Dropdown Widget Which has Been Populated by the Names of Villages