IOT Based Smart Irrigation System
P.Roopa Ranjani & Gvnsk Sravya
1Assistant Professor, G.Narayanamma Institute of Technology and Science, Hyderabad 2Assistant Professor, G.Narayanamma Institute of Technology and Science, Hyderabad
Email: [email protected], [email protected]
ABSTRACT: In the present era one of the greatest problems faced by the world is water scarcity and agriculture being a demanding occupation consumes plenty of water. Therefore a system is required that uses water judiciously. Smart irrigation systems estimate and measure diminution of existing plant moisture in order to operate an irrigation system, restoring water as needed while minimizing excess water use.
With the water requirements in irrigation being large, there is a need for a smart irrigation system that can save about 80% of the water. This prototype aims at saving time and avoiding problems like constant vigilance. As technology is advancing, there is always a chance of reducing risks and making work simpler. Embedded and micro controller systems provide solutions for many problems. This application precisely controls water system for gardens by using a sensor micro controller system. It is achieved by installing sensors in the field to monitor the soil temperature and soil moisture which transmits the data to the microcontroller for estimation of water demands of plants.
INTRODUCTION
In the present era one of the greatest problems faced by the world is water scarcity and agriculture being a demanding occupation consumes plenty of water. Therefore a system is required that uses water judiciously. Smart sprinkler systems estimate and measure diminution of existing plant moisture in order to operate an sprinkler system, restoring water as needed while minimizing excess water use.
A real-time wireless smart sensor array for scheduling irrigation prototyped a real-time, smart sensor array for measuring soil moisture and soil temperature that uses off-the-shelf components was developed and evaluated for scheduling irrigation in cotton.
This system is specific for a crop and hence its usage is limited. Proper scheduling of irrigation is critical for efficient water management in crop production, particularly under conditions of water scarcity. The effects of the applied amount of irrigation water, irrigation frequency and water use are particularly important. To improve water efficiency there must be a proper irrigation scheduling strategy. So our project devices a simple system, using a microcontroller to automate the
irrigation and watering of small potted plants or crops with minimal manual interventions.
I. Block Diagram
Moisture Sensor:It is an analog sensor used to measure the moisture content in the soil. DHT11 Sensor:It is a digital sensor used to measure the temperature and humidity level of surroundings.
NODEMCU:It acts as a gateway which is used to convert the analog signals to digital signals and to communicate with the cloud
SERVO MOTOR:It is used to turn ON and OFF the sprinkler in the soil by rotating the motor from 0° to 180°.
CLOUD:It is used to receive the signals send by the nodemcu and to retrieve back the signals.
The following are the main features that are included in system
o It displays the temperature and humidity values on the website.
o It automatically controls the water sprinkler pump.
o The sprinkler can also be manually controlled through website.
o It automatically controls the water flow based on the soil type.
o It also displays the moisture values on the website.
II. OPERATING ENVIRONMENT
ARDUINO IDE
Environment - or Arduino Software (IDE) - contains a text editor for writing code, a message area, a text console, a toolbar with buttons for common functions and a series of menus. It connects to the Arduino and Genuino hardware to upload programs and communicate with them.
Programs written using Arduino Software (IDE) are called sketches. These sketches are written in the text editor and are saved with the file extension ino. The editor has features for cutting/pasting and for searching/replacing text. The message area gives feedback while saving and exporting and also displays errors. The console displays text output by the Arduino Software (IDE), including complete error messages and other information. The bottom right-hand corner of
the window displays the configured board and serial port. The toolbar buttons allow you to verify and upload programs, create, open, and save sketches, and open the serial monitor.
Verify
Checks your code for errors compiling it. Upload
Compiles your code and uploads it to the configured board. See uploading below for details.
Note: If you are using an external programmer with your board,you can hold down the "shift" key on your computer when using this icon. The text will change to "Upload using Programmer"
New
Creates a new sketch. 4
Open
Presents a menu of all the sketches in your sketchbook. Clicking one will open it within the current window overwriting its content.
Note: due to a bug in Java, this menu doesn't scroll; if you need to open a sketch late in the list,
use the File | Sketchbook menu instead. Save
Saves your sketch.
Serial Monitor
Opens the serial monitor.
Additional commands are found within the five menu File, Edit, Sketch, Tools and Help
Thingspeak
ThingSpeak is a platform providing various services exclusively targeted for building IoT applications. It
offers the capabilities of real-time data collection, visualizing the collected data in the form of charts, ability to create plugins and apps for collaborating with web services, social network and other APIs. The core element of ThingSpeak is a ‘ThingSpeak Channel’. A channel stores the data that we send to ThingSpeak and comprises of the below elements:
8 fields for storing data of any type - These can be used to store the data from a sensor or from an embedded device.
3 location fields - Can be used to store the latitude, longitude and the elevation. These are very useful for tracking a moving device.
1 status field - A short message to describe the data stored in the channel.To use ThingSpeak, we need to signup and create a channel. Once we have a channel, we can send the data, allow ThingSpeak to process it and also retrieve the same. Let us start exploring ThingSpeak by signing up and setting up a channel. Getting Started: Open https://thingspeak.com/ and click on the ‘Get Started Now’ button on the center of the page and you will be redirected to the sign-up page(you will reach thesame page when you click the ‘Sign Up’ button on the extreme right). Fill out the required details and click on the ‘Create Account’ button.
Figure 1 sign up for Thinkspeak
Figure 2 Channel Creation in Thinkspeak Go ahead and click on ‘New Channel’. You should see a page like the below
You can change the name to fit your need and you can add a description corresponding to the channel.
You can add any other useful description into the metadata field. In the same page, you should see the fields for Latitude, Longitude and Elevation. Also, when you scroll down you should see a check box that says ‘Make Public?’. Let us consider the significance of the various fields and the tabs:
Latitude, longitude and elevation - These fields correspond to the location of a ‘thing’ and are especially significant for moving things.
Make Public? - If the channel is made public, anyone can view the channel's data feed and the corresponding charts. If this check box is not checked, the channel is private, which means for every read or write operation, the user has to pass a corresponding API key.
URL - This can be the URL of your blog or website and if specified, will appear on the public view of the channel.
Video ID - This is the ID corresponding to your YouTube or Vimeo ID. If specified, the video appears on the public view of the channel.
Fields 1 to 8 - These are the fields which correspond to the data sent by a sensor or a ‘thing’.
A field has to be added before it can be used to store data. By default, Field 1 is added. In case you try posting to fields that you have not added, your request will still be successful, but you will not be able to see the field in the charts and the corresponding data. You can click on the small box before the ‘add field’ text corresponding to each field to add it. Once you click the ‘add field’ box, a default label name appears in the text box corresponding to each field and the ‘add field’ text changes to ‘remove field’. You can edit the field text that appears by default when a field is added to make more sense. For example, in the below screen, I have modified the text for Field 2 to ‘SensorInput’. To remove a field which is added, just check on the ‘remove field’ box. Once you click this, the text ‘remove field’ changes back to ‘add field’ and the corresponding field text is cleared.
Once you have edited the fields, click on ‘Save Channel’ button. You should now see a page like the below in which the ‘Private View’ tab is defaulted
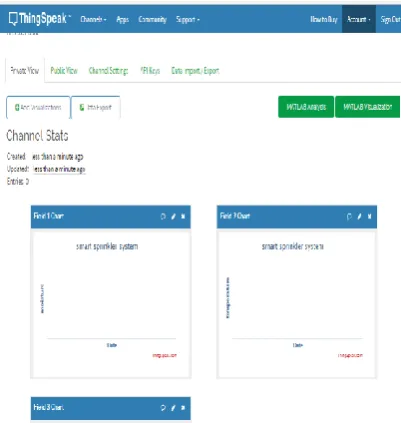
Figure 3 Output in private view
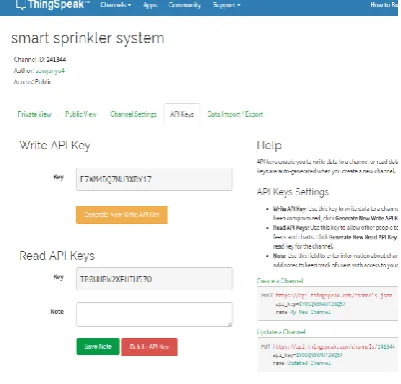
similar to the below. The write API key is used for sending data to the channel and the read API key(s) is used to read the channel data. When we create a channel, by default, a write API key is generated. We generate read API keys by clicking the ‘Generate New Read API Key’ button under this tab. You can also add a note corresponding to each of the read API keys.
Now click on the ‘Data Import/Export’ tab and you should see a screen similar to the below. This tab is used to import the ‘Comma Separated Values(CSV)’ data from a file into the channel. You can also download the channel’s feed from here in CSV format. This tab also outlines how to send and view data by providing the URIs to the send and view APIs.
Figure 4 Channel API keys
III. Specific Requirements
Hardware interface
Soil Moisture Sensor- soil moisture sensors estimates the soil volumetric water content based on the dielectric constant (soil bulk permittivity) of the soil. The dielectric constant can be thought of as the soil's ability to transmit electricity. The dielectric constant of soil increases as the water content of the soil increases. This response is due to the fact that the dielectric constant of water is much larger than the other soil components, including air. Thus, measurement of the dielectric constant gives a predictable estimation of water content. It consists of a pair of electrodes to measure the resistance of the soil. Greater the resistance, lower the moisture content of the soil
Temperature Sensor- A Resistance Temperature Detector(RTD) is used to measure temperature as a function of resistance. As the temperature of the soil increases, the resistance of the soil also increases. RTDs readings are more accurate and more repeatable.
Servo Motor and Rotating Platform- to take the water pipe to water the target plot. In order to control the spray distance and angle, we use a servo motor Software Interface
Software requirements of the system are very nominal and no other special requirement is used, hence it is economically feasible. Also Arduino IDE is open source and thus easily available free of cost.
Communication Interface
A web browser is a computer program application found on all modern computers. They are also now a common feature of mobile phones or other mobile devices and tablet computers like the iPad or Android tablets.
Web browsers are used by people to find and look at web sites on the Internet. The first web browser was created in 1990. Many different web browsers are available for free. All web browsers can go to websites but each browser has good things and bad things about it.
IV. Functional requirements
Temperature And Humidity
This module describes about the humidity and temperature levels in the atmosphere
It is controlled by the microprocessor (node mcu) and is given 3.3v power supply
The area range covered by the sensor is 10 meter's
The range of the temperature is 0'c to 50'c
The range of the humidity is 20-90%
The values of the temperature and humidity are send to the micro controller and the micro controller sends the values to the cloud for the storage of the data and it analyzes the data for the control of the sprinkler.
Moisture
This module describes about the moisture levels in the soil.
The area range covered by the sensor is 10 meter's
The range of the moisture is 0 to 100% VMC
The value of the moisture is send to the micro controller and the micro controller sends the values to the cloud for the storage of the data and it analyzes the data for the control of the sprinkler.
Display
This helps in displaying the information periodically.
The real world data is processed in the cloud, by graphs.
The data is sent to the cloud from the sensors directly.
A wireless connectivity is established in between the sensor and the cloud.
NOD MCU will send the entire data to the Cloud, Thingspeak.
Overall data is displayed onto the webpage for assistance
Notification Service
For the notification services we are using IFTTT (If Then This That) in which we have to create account to get notifications
This module is useful for triggering the notifications whenever required.
Mainly works on the boolean type considering the spinkler, i.e if the sprinkler is
ON it will send an alert to the defined mobile number about the status and vice versa.
This is the ultimate security we have as everything is notfied to the user.
It uses one of the apps from the Thingspeak Cloud Services.
It works by forwarding a SMS to the user mobile either the sprinkler is operated manually or automatically.
Figure 4 Notification app
Controller
The overall control of the system is maintained by this module.
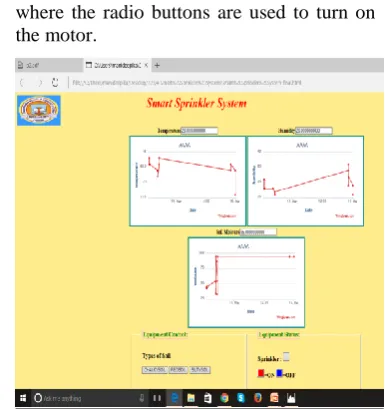
Webpage is maintained for monitoring and controlling the motor.
User is allowed to use the webpage and the webpage is linked with the motor implicates the controller to turn ON and OFF the sprinkler based upon user interaction.
A manual controlling is adapted in this, where the radio buttons are used to turn on the motor.
Figure 5 Output of web application
V. Results
45
90
Dry Soil
Wet Soil
VII. CONCLUSION
Internet of Things is the concept in which the virtual world of information technology connected to the real world of things. The technologies of Internet of things such as RFID and Sensor make our life become better and more comfortable.
integration with web services, other APIs and social networks and provides the capability to create the applications as plugins. It is a great platform with extensive possibilities to explore the integration of the Internet of Things
REFERENCES
[1] Rafael Muñoz-Carpena and Michael D. Dukes, Automatic Irrigation Based on Soil Moisture for Vegetable Crops, IFAS Extension, 2005.