Digital Business Telephone Systems
Publication Information
Toshiba America Information Systems, Inc., Telecommunication Systems Division, reserves the right, without prior notice, to revise this information publication for any reason, including, but not limited to, utilization of new advances in the state of technical arts or to simply change the design of this document.
Further, Toshiba America Information Systems, Inc.,
Telecommunication Systems Division, also reserves the right, without prior notice, to make such changes in equipment design or components as engineering or manufacturing methods may warrant.
DKA-UG-DKSLT-VB
Toshiba America Information Systems, Inc. Telecommunication Systems Division
All rights reserved. No part of this manual, covered by the copyrights hereon, may be reproduced in any form or by any means—graphic, electronic, or mechanical, including recording, taping, photocopying, or information retrieval systems—without express written permission of the publisher of this material.
Contents
Introduction
Organization ...v
Conventions ...vi
Chapter 1 – The Grand Tour
Buttons ...2LED Indicators ...3
Volume Controls ...4
On-hook/Off-hook ...4
Chapter 2 – Features
Before You Begin ... .5Automatic Line Selection ...5
Ringing Line Preference ...5
Incoming Call Ringing Patterns ...6
Feature Codes ...6
Quick Reference ...7
Making an Internal Call ...7
Making an Outside Call ...7
Making an Outside Call Using ISDN ...8
Chapter 2 - Features
Verified Account Codes ...10
Voluntary Account Codes ...10
Automatic Busy Redial (ABR) ...11
Automatic Call Distribution (ACD) ...12
Automatic Callback (ACB) ...13
Attendant Console Calling ...14
Background Music (BGM) Over Telephone Speakers ...15
Call Forward (CF) ...15
Call Forward—External ...17
Call Park Orbits ...20
Call Pickup ...22
Pick up Calls to a Group ...23
Conference Calls ...24
CO Line Queuing ...26
Direct Inward System Access (DISA) ...27
Door Phones ...30
DTMF Tone Dialing with * and # ...31
Hold ...31
Retrieve a Call on Hold ...32
Retrieve a Call on Exclusive Hold ...32
Message Waiting ...32
Set Message Waiting on Other Telephones ...34
Override Calls ...35
Busy Override or Off-hook Call Announce ...35
Do Not Disturb (DND) Override ...35
Executive Override ...35
Toll Restriction Override ...36
Paging Announcements ...36
Repeat Last Number Dialed ...37
Speed Dial ...38
Chapter 3 - Toshiba Voice Mail Systems
Chapter 3 – Toshiba Voice Mail Systems
Setting Call Forward ...41
Voice Mail Identification Code ...41
Call Forward To Toshiba Voice Systems ...43
Voice Mail Message Retrieval ...43
Appendix A – Access Codes
CO Line Access Codes ...45Paging Access Codes ...47
Speed Dial Access Codes ...48
Appendix B – Centrex Application
Flexible Directory Numbering ...49Centrex Feature Buttons ...49
Ringing Repeat ...50
Delayed Ringing ...50
Introduction
This guide provides instructions for operating the DKT2001 Digital Single Line Telephone (SLT) for Strata DK Systems. These systems include:
♦ DK14
♦ DK16e/DK16
♦ DK40i/DK40
♦ DK424/DK280 (Release 3.0 or higher)
Organization
This guide is divided as follows:
♦ Chapter 1 – The Grand Tour describes the buttons, LEDs and volume controls
of the DKT2001 telephone.
♦ Chapter 2 – Feature Operation provides descriptions and operating procedures
Conventions
♦ Appendix A – Access Codes provides CO Line Access Codes, Paging Group
Codes, Feature Access Codes, and Speed Dial Access Codes.
♦ Appendix B – Centrex Application describes the Centrex features which may be
available with your Strata DK system.
Conventions
➤ Denotes a procedure
Elaborates specific items or references other information.
Important! Calls attention to important instructions or information.
Letters in [brackets] represent buttons on your telephone which have Directory Numbers on them:
[PDN] Primary Directory Number button (the Extension or Intercom Number). On the DKT2001, the /LQH button is used as the [PDN].
([WUDEROG letters represent telephone buttons. For example: .
‰ denotes the step in a one-step procedure.
~ means “through”. For example: 5~10.
+ is used for multiple key entries. For example: Enter your security code +
means enter your security code, then press.
see Figure 9 Grey words within the text denote cross-references. In the electronic version of this manual (Strata Library CD-ROM or FYI Internet download), cross-references appear in blue hypertext.
The left column gives you the single or
numbered steps you need to perform a procedure.
The Grand Tour
1
This chapter familiarizes you with the controls and indicators located on your Strata DKT2001 Digital SLT.
Buttons
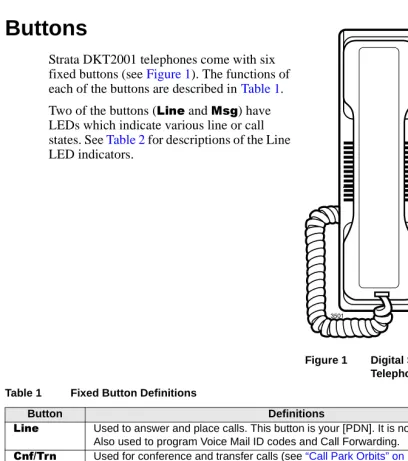
Buttons
Strata DKT2001 telephones come with six fixed buttons (see Figure 1). The functions of each of the buttons are described in Table 1. Two of the buttons (/LQH and 0VJ) have LEDs which indicate various line or call states. See Table 2 for descriptions of the Line LED indicators.
Table 1 Fixed Button Definitions
Button Definitions
/LQH Used to answer and place calls. This button is your [PDN]. It is not a CO line button. Also used to program Voice Mail ID codes and Call Forwarding.
&QI7UQ Used for conference and transfer calls (see “Call Park Orbits” on Page 20 and
“Conference Calls” on Page 24).
+ROG Used to hold internal or outside calls. Also used for Exclusive hold. See “Hold” on Page 31.
0VJ The message button is used to call back the station or voice mail device that activated the LED (see “Message Waiting” on Page 32). 9RO▲
9RO▼ Adjusts volume levels (“Volume Controls” on Page 4).
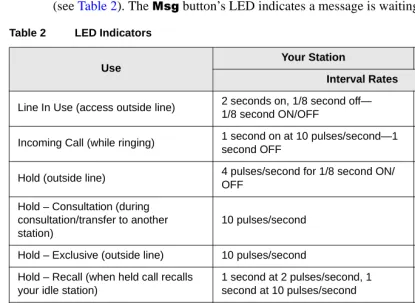
LED Indicators
LED Indicators
The /LQH button has an LED that flashes at varying rates to indicate line or call status (see Table 2). The 0VJ button’s LED indicates a message is waiting.
Table 2 LED Indicators
Use
Your Station Other Station
Interval Rates Line In Use (access outside line) 2 seconds on, 1/8 second off—
1/8 second ON/OFF steady
Incoming Call (while ringing) 1 second on at 10 pulses/second—1 second OFF
one second ON/ OFF
Hold (outside line) 4 pulses/second for 1/8 second ON/ OFF
1/2 second ON/OFF
Hold – Consultation (during consultation/transfer to another station)
10 pulses/second steady
Hold – Exclusive (outside line) 10 pulses/second steady
Hold – Recall (when held call recalls your idle station)
1 second at 2 pulses/second, 1
second at 10 pulses/second flashes
Hold – Exclusive Recall 1 second at 2 pulses/second, 1
second at 10 pulses/second steady
Internal Call (while station ringing) The Line LED flashes 10 pulses/ second—1 second OFF
Red flashing or ringing
Volume Controls
Volume Controls
Your telephone has 9RO▲/9RO▼ buttons to increase and decrease ring tone and handset volume levels.
You must hold down either button for at least 1/8 second for any volume change to occur. If you continually hold down either button, the volume continually changes about every half second until the level limit is reached. You hear ring tone as long as you press a Volume button when your telephone is idle.
The method for changing feature volume varies. Some features can be adjusted using only the 9RO▲/9RO▼and others require additional buttons (see Table 3).
On-hook/Off-hook
Some procedures in this user guide instruct you to perform a step while “on-hook” or “off-hook.” These terms refer to the position of the handset. “Off-hook” indicates that the handset should be lifted off of the telephone cradle. “On-hook” indicates that the handset should remain in the cradle and should not be lifted.
Table 3 Using only Vol ▲/Vol ▼
Feature Phone Status Comments
Ring Tone
Volume On-hook, Idle Use to adjust the volume of your incoming calls.
Handset
Receiver Off-hook
Features
2
This chapter explains how to use the features on your DKT2001 telephone. There is a Quick Reference section for basic telephone use, followed by the features in
alphabetical order.
Before You Begin
If you are a new user of the Strata DKT2001 telephone, you need to find out if your telephone has been set up for Automatic Line Selection and Ringing Line Preference.
Automatic Line Selection
You have Automatic Line Selection, if you hear dial tone and the Line LED lights steady.
➤ Lift the handset.
You do not have Automatic Line Selection, if you hear silence.
Before You Begin
/LQH to answer the ringing call. Ringing Line Preference is enabled in system programming.
Incoming Call Ringing Patterns
Your telephone ringing pattern is set in system programming.
Some systems may use the internal call ring pattern—one second ON, three seconds OFF—for incoming outside calls.
A distinct outside call ring pattern—0.4 seconds ON, 0.2 seconds OFF, 0.4 seconds ON, three seconds OFF—is available.
Feature Codes
Your telephone may not have all of the features mentioned in this guide. The Appendix lists all of the feature codes that can be programmed for your telephone system. See your System Administrator to find out which features and codes apply to your telephone.
Some CO line features, such as conferencing, Centrex, or behind PBX operation require “flashing the CO line,” to dial Centrex/PBX feature access code or extension numbers.
➤ To flash a CO line
1. Access a CO line. 2. Press&QI7UQ +
.
You hear Centrex or PBX dial tone.
Quick Reference
Quick Reference
Making an Internal Call
Making an Outside Call
1. Lift the handset ...or lift the handset and press /LQH.
You hear internal dial tone.
2. Dial the desired station number.
1. Lift the handset ...or lift the handset and press /LQH.
You hear internal dial tone.
2. Enter a CO line number access code.
See Table 4 on Page 46.
You hear dial tone after entering the access code.
Quick Reference
Making an Outside Call Using ISDN
If your Strata DK telephone system has Integrated Services Digital Networking (ISDN) features, you can make calls using this advanced service. See your System Administrator regarding your system’s capabilities.
Answering Calls
1. Lift the handset ...or lift the handset and press /LQH.
You hear internal dial tone.
2. Enter a CO line number access code.
See Table 4 on Page 46. You hear dial tone after entering the access code.
3. Enter the desired telephone number. 4. If you need to dial a
subaddress (usually required for calling station equipment at a location requiring extra dialed digits), then, proceed to Step
5.
Your call rings through to the destination.
5. Wait for the system to connect you.
The default waiting period is four seconds; however, your system may be set differently.
➤ When your telephone rings, lift the handset and speak
...or lift the handset and press /LQH.
The internal ring pattern is one second ON, three seconds OFF— for incoming outside calls.
Account Code Calls
Account Code Calls
Account Codes are used for a variety of reasons, including billing, call tracking, and line restriction applications. The system records the Account Codes and can print the codes and other call details on a Station Message Detail Recording (SMDR) report.
Forced Account Codes
Some applications may require that you enter an Account Code, called a Forced Account Code, before dialing a telephone number. Forced Account Codes can be recorded for outgoing calls only.
Emergency Override of Forced Account Code Dialing
Requirements
Forced Account Code requirements can be bypassed by up to three emergency numbers, including 911. See your system administrator for these numbers:
1. Lift the handset ...or lift the handset and press /LQH.
You hear dial tone.
2. Dial a CO line number access code.
See Table 4 on Page 46. The CO line accessed must be set to require a Forced Account Code in system programming.
3. Enter the Forced Account Code.
You hear dial tone after you press the last digit of a valid account code or busy tone after you press the last digit of an invalid code (if your system verifies account codes.)
4. Dial the telephone number.
Account Code Calls
Verified Account Codes
Some Strata DK systems verify the numbers entered when you enter Forced or Voluntary Account Codes. These are called Verified Account Codes.
Voluntary Account Codes
Voluntary Account Codes are optional and can be entered anytime after accessing a CO line or during a call.
An exception is a Voluntary Account Code which is required to change the Toll Restriction classification of your station. The code gives you access to telephone numbers outside your usual dialing area and must be entered prior to dialing the telephone number. As an example, if your station is restricted to local area calls, you can make out-of-state calls by using a Voluntary Account Code set in system
programming.
If the system is set for Verified Account Codes, you must enter specific codes when entering the Voluntary Account Code(s) or the code is not validated for the SMDR call report.
➤ To record a voluntary account code
1. After accessing a CO line or talking on a line, press &QI7UQ.
You hear dial tone and the CO line is on Hold.
2. Dial.
3. Enter the Voluntary Account Code.
Voluntary Account Codes must be entered during the call. Dial tone stops after the first telephone number digit is dialed.
4. Dial a telephone number if you entered the code after
Automatic Busy Redial (ABR)
Automatic Busy Redial (ABR)
After reaching a busy outside number, you can activate ABR so that the Strata DK system automatically redials the number at regular intervals. If the system redials an outside number that is still busy, ABR resets and tries again. This feature may not be enabled on some (or all) lines in your system—depending on the telephone line type connected. It also may not be enabled for your station.
ABR is not attempted while your station is busy, but continues to time-out.
➤ To cancel ABR
1. When you reach a busy number, press
&QI7UQ + .
You hear confirmation tone.
2. Hang up.
3. The system redials, up to 15 times, every 30 or 60 seconds (depending on system programming). 4. Your telephone
receives ring tone, when ABR dials the number and it is available.
The Line LED flashes.
5. Lift the handset and wait for the party to answer.
If you do not pick up the handset within 30 seconds after a connection is made, you hear a muted ring for another 30 seconds, then the call disconnects.
1. Lift the handset ...or lift the handset
/LQH
Automatic Call Distribution (ACD)
Automatic Call Distribution (ACD)
Your DKT2001 telephone must be programmed for ACD in order for ACD features to work. If you are an ACD agent or supervisor, please refer to the Strata DK ACD Agent and ACD Supervisor’s Guide(s) for detailed feature instruction.
➤ To receive ACD calls
➤ To access other ACD features
➤ Lift the handset ...or lift the handset and press /LQH.
You are connected to your ACD call.
1. Lift the handset ...or lift the handset and press /LQH.
You hear internal dial tone.
2. Enter the appropriate access code sequence:
ACD Call Pickup &QI7UQ ACD Help
;;;; Log In/Out (XXXX = Agent ID code)
&QI7UQ<< Transfer to ACD Group (YY = ACD Group 01~16 on large systems, 01~08 on small systems)
Unavailable &QI7UQ Work Unit
Automatic Callback (ACB)
Automatic Callback (ACB)
After reaching a busy or the Do Not Disturb (
DND) mode, you can set ACB to have the system call you back when the called station is no longer busy or in the DND mode. ACB does not apply to outside calls.
➤ To cancel ACB (to busy or DND station)
1. After reaching a busy station, press .
You hear busy tone, followed by dial tone (two secs.), then busy tone.
2. Hang up. You can make other calls while waiting for the called station to become available.
3. /LQH rings at a fast rate when the called station becomes idle. 4. Answer within three rings to prevent the callback from being cancelled.
You hear a single tone, as if making a regular internal call. If you used Tone Signaling instead of Voice First Signaling, you hear repetitive ringing.
If you hear busy tone after answering, it means the called party has already received or originated another call. Your request is not cancelled. You will be called again when the station becomes idle.
5. If you were
attempting to make an outside call and did not use LCR, redial the telephone number.
If the original call was made using LCR, the telephone number is automatically dialed.
1. Lift the handset ...or lift the handset and press /LQH.
Attendant Console Calling
Attendant Console Calling
Up to four attendant consoles can be installed per system. There can be up to three ways to call the attendant console, depending upon system programming.
➤ To call any attendant console
➤ To call a particular console
➤ To make an emergency call to a console
1. Lift the handset ...or lift the handset and press /LQH.
You hear internal dial tone.
2. Press. The call rings the Attendant Console’s button. These calls rotate between the consoles if more than one console is installed.
1. Lift the handset ...or lift the handset and press /LQH.
You hear internal dial tone.
2. Enter the console’s Directory Number [DN] ______.
The call rings the console’s [PDN] button. Your System Administrator can provide the Attendant Console(s) internal number(s).
1. Lift the handset ...or lift the handset and press /LQH.
You hear internal dial tone.
Background Music (BGM) Over Telephone Speakers
Background Music (BGM) Over Telephone
Speakers
BGM over external speakers is controlled by the System Administrator. If BGM is enabled, you can turn it ON/OFF for your individual station speaker.
➤ To enable/cancel BGM on your telephone speaker
Call Forward (CF)
You can set your station to CF to another station or voice mail for a variety of conditions, described in Step 2.
1. Lift the handset ...or lift the handset and press /LQH.
You hear internal dial tone.
2. Press(ON) ...or (OFF).
Confirmation tone is heard. BGM stops playing if the telephone rings or is paged.
1. Lift the handset ...or lift the handset and press /LQH.
You hear internal dial tone.
2. Enter a CF access code:
You hear confirmation tone.
-All Calls Forwards all calls immediately; your telephone does not ring. -Busy Forwards calls immediately when your telephone is busy or in
Call Forward (CF)
-Busy/No Answer
Forwards calls immediately to another station whenever you are busy on another call. Calls also forward if you do not answer within a certain time (that you designate). Not available from a rotary telephone.
3. Enter the Call Forward destination number.
Confirmation tone is heard.
4. If setting CF-No Answer or CF-Busy/ No Answer, press
, enter the time in seconds, then press.
You can enter the amount of time that your telephone rings before it forwards (08~60 seconds). Always enter two digits. If you do not wish to change the ring time, press
then to make the ring time the same as the last setting.If you are unable to dial DTMF tones by pressing
and, see your System Administrator.You hear a confirmation tone after pressing
and again after pressing.5. Hang up. Notes
● You can continue using your phone in the usual
manner while Call Forward is in effect.
● If Call Forward is set:
● CO lines that ring your station exclusively will
forward—CO lines that ring more than one station will not forward. (Release 3.2 or higher will allow more than one station to ring and follow the call forwarding.)
● CO line calls transferred to your station will
forward.
● Internal calls will forward.
● Call Forward has priority over the hunt feature
Call Forward (CF)
➤ To cancel Call Forward
Call Forward—External
This feature enables you to forward new, incoming calls to a number outside of the system.
Call Forward-External does not forward internal calls or calls transferred to your telephone. The only calls that it forwards are incoming Direct-In-Dial (DID) calls and calls over CO lines dedicated to ring your station.
However, any of the other Call Forward modes can be set simultaneously with Call Forward-External. Other Call Forward modes will be active for internal and transferred calls.
1. Lift the handset ...or lift the handset and press /LQH.
You hear internal dial tone.
2. Press.
3. Hang up. You hear confirmation tone again.
1. Store the number that calls will be
forwarded to at Station Speed Dial location 49 (RCTUA, B, C/D processors), or location 139
(RCTUE/F processor).
Important! Only perform Step 1 the first time Call Forward-External is set or when you change the destination. It is not necessary to store the destination each time; it remains in system memory.
The Call Forward destination can be a telephone number over a CO line, a station over a Tie line, or a station within your Strata DK system.
Call Forward (CF)
➤ To cancel Call Forward-External
Remote Call Forward—External Destination Change
If Call Forward-External mode is set at your station, you can change the forwarding destination from a telephone outside of the system.
The destination is normally an external Public Telephone Network Number, but it can also be an internal Directory Number.
Use the Speed Dial storage codes detailed on See Page 48. When forwarding to an outside destination include the CO Line (or CO Line group) access code before the telephone number.
Example: 8015833700, where 801 = CO Line access code 5833700 = Telephone number
Important! See Table 4 on Page 46 for CO Line/ Line Group access codes. The LCR access code “9” cannot be used. 2. Lift the handset
...or lift the handset and press /LQH. 3. Press.
4. Hang up. Incoming calls will forward to the destination stored at Station Speed Dial Location 49.
Call Forward (CF)
➤ To change the destination number
1. Call into the Strata DK system over a CO line programmed for the DISA feature.
You hear ring back tone signal, then internal dial tone for 10 seconds. Try again if you hear busy tone.
Note See the System Administrator for DISA telephone numbers.
2. After you hear dial tone, press, then enter a [PDN].
You hear a confirmation tone.
If a number is not dialed, the system automatically causes the DISA CO line to ring at telephones as a normal incoming call. Then, if the call is not answered within 15 seconds after the ringing starts, it disconnects.
3. Enter the Remote Call Forward-External security code.
You hear a confirmation tone. See the System Administrator for the access code.
4. Enter the new destination number. You can enter an internal [PDN], or a CO or Tie line access code + an external telephone number. With some systems, you can dial a line group code instead of a CO line number access code (see
Call Park Orbits
Call Park Orbits
The Call Park feature enables you to hold a call temporarily in an orbit (the area where the call is held). Anyone can retrieve the call from the orbit using the same or a different station. There are 20 General Park Orbits for the system and 1 Personal Park Orbit for each station.
Once you have parked a call in an orbit, you can:
♦ Hang up and retrieve the parked call at a later time ♦ Originate another call
♦ Access a voice paging device to announce the parked call for pickup from another
station
➤ To park a call
Important! Do not press , since that ends the procedure (see Step 5). Instead, use when entering a CO line access code.
5. Press. You hear a confirmation tone.
1. While on a call, press
&QI7UQ.
You hear dial tone.
2. Press.
3. Enter a General Orbit Number (a) or [PDN].
Call Park Orbits
➤ To retrieve a parked call from any station
➤ To park a call and page another station
4. Hang up. Once the call is parked, you can make or receive other calls.
Notes
● If the parked call is not retrieved within a specified
time, the call rings back to your phone.
● If your phone is busy when the parked call recalls,
you hear two tones of two short beeps, three seconds apart. You can place the new call on hold and answer the parked recall or end the second call and answer the parked recall by hanging up. The parked call remains camped onto your phone until you respond.
1. Lift the handset ...or lift the handset and press /LQH.
You hear dial tone.
2. Press and enter the Orbit Number that you used to park the call.
You are reconnected to the parked call.
1. While on a call, press
&RQI7UQ + . 2. Enter the General
Orbit Number (a) or [PDN].
Call Pickup
Call Pickup
You can pick up a call that is ringing another station, a call placed on hold at another station, and other types of calls with the Call Pickup feature.
3. Enter a Page Group or Zone access code (see
Tables 5 and 6 on Page 47).
4. Make your
announcement and include the Orbit Number.
5. Hang up to free the paging device.
If the parked call is not retrieved within a specified time, the call rings back to your phone.
1. Lift the handset ...or lift the handset and press /LQH.
2. Press . This begins the call pickup sequence.
3. Press a Call Pickup code:
You are connected to the caller.
+ ;;; (XXX=[PDN]/ [PhDN]
Pick up a call ringing or on hold at a specific Primary or Phantom Directory Number [PDN] or [PhDN] (Release 3.1 and above).
Pick up a telephone group page, internal call, or door phone call ringing a station.
~ Pick up an external page. Pick up a ringing CO line.
Call Pickup
Pick up Calls to a Group
Stations may be assigned in system programming to Pickup Groups. As many as 20 groups can be created to enable you to easily pick up incoming (new or transferred) or internal calls that are ringing stations in your group or in other groups. You can belong to more than one group. See the System Administrator for group assignments.
➤ To pick up a call that is ringing in your pickup group(s)
➤ To pick up a call that is ringing in another group
1. Lift the handset ...or lift the handset and press /LQH.
2. Press . You are connected to the caller.
1. Lift the handset ...or lift the handset and press /LQH.
You hear dial tone.
2. Enter + the group pickup access code (~).
You are connected to the call after dialing the group access code. If the called station belongs to more than one group, any of the Group Pickup codes associated with those groups will pick up the call.
Conference Calls
Conference Calls
Strata DK enables you to participate in a variety of conference calls:
♦ Up to four stations (including your own) may be conferenced on internal lines.
♦ Up to three stations (including your own) may be conferenced with one CO line.
♦ Up to two stations (including your own) may be conferenced with two CO lines.
Step 1: Make a Conference Call or Tandem Two CO Lines
1. While on either an external call or internal call, press
&QI7UQ.
You hear internal dial tone and the call is placed on hold. You will not hear the held party again until Step 4.
2. If you want to add an outside line, dial the CO line access code.
See Table 4 on Page 46 for CO line access codes. You hear dial tone when the line is accessed. (Up to two CO lines can be conferenced.)
3. Dial the telephone number that you want to add to the call ...or dial the internal station number. 4. If you hear a single
tone, voice announce the call and ask the party to pick up
On internal calls, the new party must pick up the handset or press a [PDN] to participate in a conference call.
Conference Calls
Step 2: (Optional) Add More Callers to a Conference or Tandem
Call
...or, if the called station is busy, you can press the /LQH button to return to the existing call.
Note If a called external number is busy, you must hang up and re-initiate the call.
5. If you are ringing an internal party, press
&RQI7UQ after the party answers
...or if you are ringing an outside line, you can press &RQI7UQ before or after the party answers.
All parties are conferenced.
6. If only your telephone is connected with two parties on external CO lines, you can exit the conference by pressing &RQI7UQ again before you hang up.
If you exit the conference call, your Line LED continues to flash. Your station appears busy to other callers. The external lines remain connected.
➤ For Conference calls: repeat Substeps 1~3 of Step 1: “Make a Conference Call or
CO Line Queuing
CO Line Queuing
If all outgoing CO lines are busy, the CO Line Queuing feature will ring your telephone when one is available.
...or for Tandem calls: press &QI7UQ and hang up.
If only your telephone is connected with two parties on external CO lines, you can exit the call to allow the two external parties to continue talking.
If you exit the conference call, the Line LED continues to flash. Your station appears busy to other callers.
1. If you hear busy tone after dialing a CO line access code, press .
Busy tone stops, followed by dial tone (two secs.), then busy tone resumes.
2. Hang up. (You can make other calls while waiting for a line to become available.)
3. Your telephone rings at a fast rate when a CO line becomes idle. 4. Answer within three
rings to prevent the callback from being cancelled.
You hear CO dial tone. (If you hear busy tone, it means the line has already been seized or has received an incoming call. Your request is not cancelled. You will be called again the next time a line becomes idle.)
5. Dial the desired telephone number.
Direct Inward System Access (DISA)
➤ To cancel CO Line Queuing
Direct Inward System Access (DISA)
Outside callers with telephones that send Dual-tone Multi-frequency (DTMF) tones (push-button dialing) can call in on CO lines programmed for DISA and dial stations or outgoing CO lines without going through an attendant or operator.
➤ Lift the handset and press
...or press /LQH +
.
Confirmation tone is heard.
1. From outside the system, call the DISA CO line phone number:___-______. See the System Administrator for this number.
2. Listen for the repetitive ringback tone signal, followed by dial tone.
Try again if you hear busy tone.
3. During the 10 secs. of dial tone, make your call.
Direct Inward System Access (DISA)
➤ To make an outgoing call with DISA
4. If you hear busy tone, press
.
If the call is not answered after 6 rings or 24 seconds, whichever occurs first, you hear busy tone.
5. When you hear dial tone, call again.
1. From outside the system, call the DISA CO line telephone number:___-_____. See the System Administrator for this number.
2. Listen for repetitive ringback tone, then listen for dial tone. Try again if you hear busy tone.
The dial tone is present for 10 seconds to allow direct dialing of a station internal number or CO line access code. If a number is not dialed, the system automatically causes the DISA CO line to ring at telephones as a normal incoming call. Then, if the call is not answered within 15 seconds after the ringing starts, it disconnects.
3. Dial a CO line number or line group access code. See
Table 4 on Page 46. 4. If a DISA security
code is required (see the System
Administrator), dial the code and listen for CO dial tone.
If the correct code is not entered, the call is disconnected.
...or if a DISA security code is not required, you hear CO dial tone.
Direct Inward System Access (DISA)
5. Press to reset the timer four more minutes; otherwise, the call disconnects approximately one min. after the tone. 6. Dial a telephone
Door Phones
Door Phones
You can call a door phone and monitor the immediate area surrounding the door phone.
➤ To call/monitor a door phone
➤ To pick up a door phone call that is ringing another station
1. Lift the handset ...or lift the handset and press /LQH.
You hear dial tone.
2. Dial the door number:
Door Phone ID Location
1A
1B
1C
2A
2B
2C
3A
3B
3C
4A
4B
4C
1. When you hear a door phone call, lift the handset
...or lift the handset and press /LQH.
Door phone calls ring from one to five times, depending on system programming.
DTMF Tone Dialing with * and #
DTMF Tone Dialing with * and #
You may have to send
*
and DTMF tones to some devices or services, such as a voice mail device or computer output service. See your System Administrator to find out whether the*
button on your telephone has been programmed for DTMF tones or as a Speed Dial button.Hold
With the /LQH button, you can place a call on hold or exclusive hold for retrieval at a later time.
Note The &RQI7UQ button also places calls on hold (see “Conference Calls” on Page 24) and the feature
“Call Park Orbits” on Page 20
).➤ While on an outside call, press
*
, then .You can now output
*
and , DTMF tones, and digits ~ for the duration of the call. This procedure must be repeated on each call where you require such output.➤ While on a call, press
+ROGonce to hold internal or outside calls
The Line LED flashes at the internal hold rate.
...or press twice to enable Exclusive Hold. The Line LED flashes at the
exclusive hold rate.
Message Waiting
Retrieve a Call on Hold
Retrieve a Call on Exclusive Hold
Message Waiting
If your station is idle or busy on a call while another station tries to contact you, the calling station can turn on the message waiting LED on your telephone. Your Message Waiting lamp flashes when there is a message.
When you respond by pressing 0VJ, you will either hear a voice message or your phone will dial the telephone which set a callback message. Voice mail devices and stations can leave message waiting indications.
Up to four Message Waiting indications can be left at a station at one time. One of the indications is for the Message Center.
➤ To answer a Message Waiting light
➤ Press /LQH again. If a call is not retrieved by a certain time (set in system programming), it recalls back to your phone. You hear repeated recall tone (or if you are on the phone, you hear recall tone twice).
If the held party hangs up, the call is released and the CO provides a hold-release signal.
1. Lift the handset and press 0VJ.
You hear dial tone after lifting the handset.
Your phone rings the device that set the indication. If there is no answer, hang up and try later. (The LED continues to flash.)
...or lift the handset and press /LQH +
Message Waiting
➤ To cancel the Message Waiting light
2. If your telephone calls a busy station or there is no answer, hang up and try later.
The LED continues to flash.
...or you can bypass this message and listen to the next message by going on-hook and repeating Steps 1 and 2.
This feature is available for DK14, DK16e, DK16, DK40i, DK40, DK424 Release 1 and DK280, Release 3.1 and higher.
3. After receiving the message, hang up.
If the Message Waiting lamp continues to flash, you have more messages.
➤ Repeat Steps 1~3 to retrieve them.
1. Lift the handset ...or lift the handset and press /LQH.
You hear dial tone.
Message Waiting
Set Message Waiting on Other Telephones
After reaching a busy or unanswered telephone equipped with a Message Waiting indicator, you can set a Message Waiting indication on the called telephone. A flashing lamp or LED at the called telephone indicates a call is waiting. The station user can press the button with the flashing LED or enter to call you back.
➤ To cancel the Message Waiting indication on another telephone
1. If a called telephone station is busy or does not answer, press
0VJ
...or press .
A Message Waiting light is set at the station. If you are calling a standard telephone, the telephone must have a message waiting light. All Toshiba digital or electronic telephones, as well as the DKT2001 telephones, have Message Waiting lights.
2. Hang up.
1. Lift the handset ...or lift the handset and press /LQH.
You hear dial tone.
2. Dial the station. 3. Press 0VJ twice
...or press +
;;;.
(;;; = station number with the message light.)
You hear busy tone if the called station is busy, or you hear repetitive ringing or a single tone if the called station is idle.
Override Calls
Override Calls
Busy Override enables you to send a tone to a busy station to indicate that a call is waiting. Any station can initiate Busy Override. Off-hook Call Announce is another way to contact a busy station; it lets you speak to a digital telephone user who is off-hook.
Do Not Disturb (DND) Override lets you send a tone to an idle station in the DND mode to indicate that a call is coming in. Executive Override enables you to enter a conversation. Executive Override and DND Override must be enabled in system programming to function.
Busy Override or Off-hook Call Announce
Do Not Disturb (DND) Override
Executive Override
➤ After reaching a busy station, press ...or to OCA, dial or .
The busy station receives a tone signal, indicating a waiting call.
If the busy station has the Off-hook Call Announce (OCA) feature, then you can immediately talk to the called party.
➤ After reaching a station in DND mode, press .
The DND station receives a fast, busy tone signal, indicating that a call is coming in.
Note Your station must be programmed for this feature.
➤ After reaching a busy station, press .
Paging Announcements
Toll Restriction Override
Stations can be individually restricted from making toll calls. Each station can be allowed or denied specific area and office codes, long distance information calls, international calls and/or operator-assisted calls.
You can completely override Toll Restriction at selected stations or you can change the station’s Toll Restriction class. The station resumes its normal class at the conclusion of the call.
Paging Announcements
You can make page announcements to digital and electronic telephone speakers and external speakers. Telephones are assigned to specific page groups in system
programming. A page can be sent to external speakers (all zones), if enabled in system programming.
1. Access a CO line. You hear dial tone and the LED flashes at the in-use rate.
2. Press &QI7UQ +. You no longer hear dial tone.
3. Enter the Toll Restriction Override Code (four digits).
You hear dial tone. For security reasons, the override codes are only available on a selected basis. See your System Administrator.
4. Dial a telephone number.
1. Lift the handset ...or lift the handset and press /LQH.
You hear dial tone.
2. Enter a page access code.
Repeat Last Number Dialed
Repeat Last Number Dialed
This feature enables you to easily redial the last number called.
See your System Administrator if this feature doesn’t work. The button on your telephone may have been programmed for DTMF tones, rather than Speed Dial.
3. Make your
announcement in a normal voice level and then repeat the announcement. 4. Hang up when you
have completed your announcement.
1. Lift the handset ...or lift the handset and press /LQH.
You hear dial tone.
Speed Dial
Speed Dial
Speed Dial enables you to call a telephone number by dialing a brief access code, instead of having to dial the entire telephone number. There are two types of Speed Dial numbers: Station Speed Dial numbers, which you can assign to Speed Dial locations and System Speed Dial numbers, which are assigned from the System Administrator’s station or an attendant console, but they can be used by other stations. See your System Administrator if this feature doesn’t work. The
button on your telephone may have been programmed for DTMF tones, rather than Speed Dial.
➤ To store a station speed dial number
1. Lift the handset ...or lift the handset and press /LQH.
You hear dial tone.
2. Press. You hear a short tone.
3. Press
.
4. Enter the access code where you wish to store the telephone number.
See Table 7 on Page 48.
5. Dial the CO line number access code to be stored.
See Table 4 on Page 46.
6. Enter the telephone number.
The number can be up to 20 digits, including the CO line access code.
7. Press. You hear confirmation tone once the CO line access code and the telephone number are stored. They will be automatically dialed when you enter the Speed Dial access code.
Timed Reminders
➤ To speed dial call
Timed Reminders
You can set five separate reminders at your station. At the time (hour and minute) set by you, your telephone beeps. You can set the reminder to occur once or on a daily basis.
1. Lift the handset ...or lift the handset and press /LQH.
You hear dial tone.
2. Press
. Dial tone continues.
3. Dial a Speed Dial access code.
Dial tone continues while you enter the access code. See Table 7 on Page 48. The system automatically dials the telephone number assigned to this code.
1. Lift the handset ...or lift the handset and press /LQH.
You hear dial tone.
2. Dial a timed reminder number
(~). 3. Enter the time you
want to be reminded.
Use a 24-hour clock format (HHMM).
4. Press for the reminder to be repeated every day, or
Timed Reminders
➤ To cancel a Timed Reminder
7. To cancel the beeping/message prior to 30 seconds, take the phone off-hook.
1. Press [DN], then the number of the timed reminder
(~) you want to cancel.
You can only cancel one reminder at a time.
Toshiba Voice Mail Systems
3
This chapter explains how to program your telephone for Call Forward and message retrieval when using a Toshiba Voice Mail System with your Strata DK system. Refer to the appropriate Toshiba Voice Mail user guide for more information:
♦ Stratagy Voice Processing User Guide
♦ Toshiba VP User Guide
Setting Call Forward
You can program your telephone to forward to the Toshiba Voice Mail System to answer your calls when you are busy or not available.
Voice Mail Identification Code
Setting Call Forward
➤ To store the voice mail ID code
➤ To cancel the voice mail ID code
1. Lift the handset ...or lift the handset and press /LQH.
You hear dial tone.
2. Press. You hear confirmation tone. is the access code for setting the Voice Mail Call Forward digit sequence. This code does not forward calls to the Voice Mail system.
3. Press .
4. Enter your mailbox number.
This could be the mailbox number for your Directory Number.
5. Press. You hear confirmation tone. The VM ID code is automatically sent to the Voice Mail system whenever calls to your telephone are forwarded to it.
Note Steps 1~5 are required for the initial storage of VM ID code to the Toshiba Voice Mail system. Once programmed, these digits remain in memory until changed. Repeat Steps 1~5 to change the code.
1. Lift the handset ...or lift the handset and press /LQH.
You hear dial tone.
2. Press. You hear confirmation tone.
Voice Mail Message Retrieval
Call Forward To Toshiba Voice Systems
By setting Call Forward to the Toshiba Voice Mail System on your telephone, information about the call will automatically be sent to the Voice Mail system, so that the callers who call your telephone and call forward to voice mail will be
automatically connected to your voice mail box.
Voice Mail Message Retrieval
You can program your telephone to automatically retrieve your voice mail messages.
➤ To cancel the voice mail retrieval codes
1. Lift the handset ...or lift the handset and press /LQH.
You hear dial tone.
2. Press. You hear confirmation tone. is the access code for setting the Voice Mail message retrieval digit sequence. This code does not forward calls to the Toshiba Voice Mail system.
3. Press.
4. Enter your mailbox number plus your security code.
By storing your security code, you avoid having to enter your code every time you access your mailbox; however, this will also enable anyone to retrieve your messages from your phone. If a security code is not desired, do not include it.
5. Press. You hear confirmation tone.
1. Lift the handset ...or lift the handset and press /LQH.
You hear dial tone.
2. Press . You hear confirmation tone.
Voice Mail Message Retrieval
➤ To retrieve messages
1. When the Msg Lamp flashes, lift the handset. 2. Press0VJ
...or press /LQH, then
0VJ
...or press ...or press /LQH +
.
The Voice Mail System is called and you are automatically connected to your Voice Mail box.
If you have multiple messages from other telephones, go on-hook and then repeat this step to skip the next message.
Access Codes
A
This appendix contains access codes for outside Speed Dial numbers, CO lines, Paging Group and Paging Zone Codes.
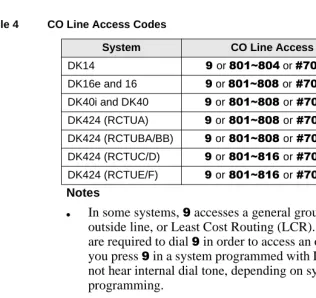
CO Line Access Codes
Your system may require that you enter a CO line code when you make an outside call. The codes are listed in Table 4. See your System Administrator for the code that applies to your telephone.
➤ To access a line
1. Lift the handset ...or lift the handset and press /LQH. 2. Enter a CO Line
CO Line Access Codes
Table 4 CO Line Access Codes
System CO Line Access Codes
DK14 or a or a
DK16e and 16 or aora
DK40i and DK40 oraora
DK424 (RCTUA) oraora
DK424 (RCTUBA/BB) oraora
DK424 (RCTUC/D) oraora
DK424 (RCTUE/F) oraora
Notes
● In some systems, accesses a general group code, an
outside line, or Least Cost Routing (LCR). System users are required to dial in order to access an outside line. If you press in a system programmed with LCR, you may not hear internal dial tone, depending on system
programming.
● a accesses line groups 1~16, respectively. ● a accesses individual lines 1~200,
Paging Access Codes
Paging Access Codes
Your telephone can be assigned to page group(s). Telephones can be a member of more than one group and each group can have as many as 120 stations. Station users can access each group separately by dialing an access code (Tables 5~6).
➤ To enter a paging group access code
➤ Access a line, then enter an Access Code.
Table 5 Paging Groups
Paging Group Access Code Paging Group Access Code
Station Group A Station Group E
Station Group B Station Group F
Station Group C Station Group G
Station Group D Station Group H
Note If you are storing onto a Speed Dial code, enter in place of .
Table 6 External Paging Zones
External Paging Zone Access Code External Paging Zone Access Code DK14/DK40i/DK40/DK424 (all processors)
Paging
All Call Page Zone
Paging
All Call, External Page Zone
DK40i/DK40/DK424 (RCTUA, RCTUBA/BB, RCTUC/D)
Zone A Zone C
Zone B Zone D
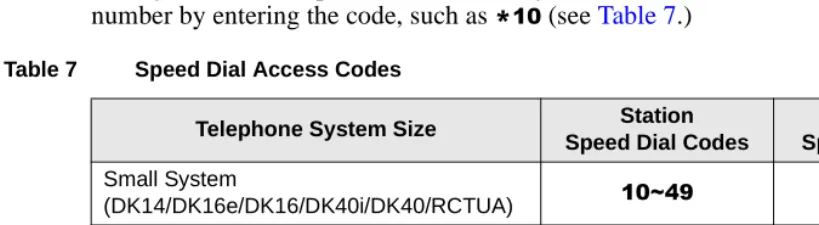
Speed Dial Access Codes
Speed Dial Access Codes
The number of station and system speed dial numbers available to you depends on the size of your company’s telephone system. Check with your System Administrator to find out which codes apply to your system.
Once you store a telephone number on any of the codes listed below, you can dial the number by entering the code, such as
(see Table 7.)
Table 7 Speed Dial Access Codes
Telephone System Size Station
Speed Dial Codes
System Speed Dial Codes Small System
(DK14/DK16e/DK16/DK40i/DK40/RCTUA) a a
Medium System
(RCTUBA/BB and RCTUC/D) a a
Large System
Centrex Application
B
Your system may be equipped with the Centrex Application, which enhances its feature capability when installed behind a Centrex or PBX system. Your telephone may have access to one or more of the enhanced Centrex features listed below.
Flexible Directory Numbering
A station’s [PDN] can be three or four digits. It is, therefore, possible to match a station’s [PDN] and Centrex line extension number. Dial the entire station number when indicated.
Note Some access code numbers may have been changed to avoid system numbering plan conflicts.
Centrex Feature Buttons
Ringing Repeat
Ringing Repeat
The distinctive ring patterns available in your Centrex system are automatically repeated with your digital telephone, enabling you to answer appropriately for either outside, inside or callback calls.
Delayed Ringing
Index
A
ABR,
11
ACB,
13
access codes,
45
speed dial,
48
account code calls,
9
ACD,
12
answering,
7
,8
attendant console calling,
12
automatic busy redial,
11
automatic call distribution (see ACD) automatic callback,
12
automatic callback (see ACB),
13
B
background music (see BGM) before you begin,
5
BGM over telephone speakers,
15
busy override,
35
buttons,
2
&QI7UQ,2
+ROG,2
/LQH,2
C
call
hold,
2
,20
,31
park orbits,
20
pickup,
22
call forward,
15
external,
17
to voice mail,
41
calling
internally,
7
outside,
7
centrex
application,
49
feature buttons,
49
&QI7UQ,2
CO line
access codes,
45
queuing,
26
conference calls,
27
D
delayed ringing,
50
E ~ V
E
emergency
call to a console,
14
override of forced account code,
9
exclusive hold,
31
,32
executive override,
35
external paging zones,
47
F
flash a CO line,
6
flexible directory numbering,
49
forced account codes,
9
H
+ROG,
2
hold,
20
,31
,32
I
integrated services digital networking (ISDN),
8
L
LED indicators,
3
/LQH,2
M
message waiting,
32
other telephones,
34
0VJ,2
O
OCA,
35
off-hook,
4
off-hook call announce (see OCA)
on-hook,
4
override,
35
busy, DND, executive,
35
toll restriction,
36
P
paging group codes,
47
Park,
20
park and page,
21
park orbits,
20
pickup,
22
R
repeat last number dialed,
37
ringing
patterns,
6
repeat,
50
S
SLT,
v
speed dial,
38
,48
T
timed reminders,
39
toll restriction override,
36
tone/voice first signaling,
41
transfer calls,
2
,20
,21
V
verified account codes,
10
voice mail,
41
message retrieval,
43
volume,